
QUICK START GUIDE
GUÍA DE INICIO RÁPIDO
GUIA DE INICIAÇÃO RÁPIDA
KURZANLEITUNG
PŘÍRUČKA PRO RYCHLÝ START
PRÍRUČKA PRE RÝCHLY ŠTART
GYORS ÜZEMBE HELYEZÉSI ÚTMUTATÓ
UDHËZUESİ İ FİLLİMİT TË SHPEJTË
КРАТКО РЪКОВОДСТВО ЗА ЕКСПЛОАТАЦИЯ
KRATKO UPUTSTVO
GUIDE DE MISE EN MARCHE RAPIDE
GUIDA RAPIDA ALL’AVVIO


English
Dear Customer
This apparatus is in conformance with the valid
European directives and standards regarding
electromagnetic compatibility and electrical safety.
European representative of the manufacturer is:
Parkring 6, 85748 Garching
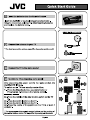
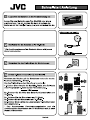
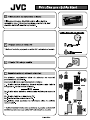
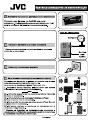
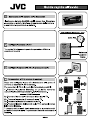
Accessories Included
Remote Control
Batteries: 2 x AAA
Quick Start Guide
Depends on model
WLAN USB Dongle and USB Extension Cable
Wall Mount Kit
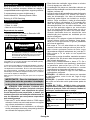
Safety Information
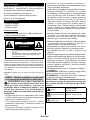
CAUTION
RISK OF ELECTRIC SHOCK
DO NOT OPEN
CAUTION: TO REDUCE THE RISK OF ELECTRIC SHOCK DO
NOT REMOVE COVER (OR BACK).
NO USER-SERVICEABLE PARTS INSIDE. REFER
SERVICING TO QUALIFIED SERVICE PERSONNEL.
Note: Follow the on screen instructions for operating the related
features.
In extreme weather (storms, lightning) and long inactivity
periods (going on holiday) disconnect the TV set from the
mains.
The mains plug is used to disconnect TV set from the mains
and therefore it must remain readily operable. If the TV set is
not disconnected electrically from the mains, the device will
still draw power for all situations even if the TV is in standby
IMPORTANT - Please read these instructions
fully before installing or operating
WARNING: This device is intended to be used
by persons (including children) who are
capable / experienced of operating such a device
unsupervised, unless they have been given
supervision or instruction concerning the use of
the device by a person responsible for their safety.
Use this TV set at an altitude of less than 5000 meters
above the sea level, in dry locations and in regions
with moderate or tropical climates.
The TV set is intended for household and similar
indoor use but may also be used in public places.
For ventilation purposes, leave at least 5cm of free
space around the TV.
The ventilation should not be impeded by covering
or blocking the ventilation openings with items, such
as newspapers, table-cloths, curtains, etc.
The power cord plug should be easily accessible. Do
not place the TV, furniture, etc. on the power cord.
you an electric shock. Handle the power cord by the
plug, do not unplug the TV by pulling the power cord.
Never touch the power cord/plug with wet hands as
this could cause a short circuit or electric shock.
Never make a knot in the power cord or tie it with
other cords. When damaged it must be replaced, this
Do not expose the TV to dripping or splashing of
such as vases, cups, etc. on or over the TV (e.g.,
on shelves above the unit).
Do not expose the TV to direct sunlight or do not
or near the TV.
Do not place any heat sources such as electric
heaters, radiators, etc. near the TV set.
Do not place the TV on the floor and inclined
surfaces.
out of the reach of the babies, children and domestic
animals.
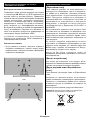
Carefully attach the stand to the TV. If the stand is
prevent the TV from tilting. Do not over-tighten the
screws and mount the stand rubbers properly.
Do not dispose of the batteries in fire or with
WARNING - Batteries must not be exposed to
WARNING - Excessive sound pressure from earphones
or headphones can cause hearing loss.
ABOVE ALL - NEVER let anyone, especially
children, push or hit the screen, push anything
into holes, slots or any other openings in the case.
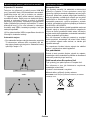
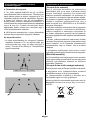
Caution Serious injury or death risk
Risk of electric shock Dangerous voltage risk
Maintenance
Important maintenance
component

English
Markings on the Product
The following symbols are used on the product as
a marker for restrictions and precautions and safety
instructions. Each explanation shall be considered
where the product bears related marking only. Note
such information for security reasons.
Class II Equipment: This appliance is
designed in such a way that it does not require
a safety connection to electrical earth.
Hazardous Live Terminal: The marked
terminal(s) is/are hazardous live under normal
operating conditions.
iCaution, See Operating Instructions: The
marked area(s) contain(s) user replaceable
coin or button cell batteries.
CLASS 1
LASER PRODUCT
Class 1 Laser Product: This
product contains Class 1
laser source that is safe under
reasonably foreseeable
conditions of operation.
WARNING
Do not ingest the battery, Chemical Burn Hazard
This product or the accessories supplied with the
product may contain a coin/button cell battery. If the
coin/button cell battery is swallowed, it can cause
severe internal burns in just 2 hours and can lead
to death.
Keep new and used batteries away from children.
If the battery compartment does not close secure-
ly, stop using the product and keep it away from
children.
If you think batteries might have been swallowed or
placed inside any part of the body, seek immediate
medical attention.
– – – – – – – – – – – –
A television may fall, causing serious personal injury
or death. Many injuries, particularly to children, can
be avoided by taking simple precautions such as:
ALWAYS use cabinets or stands or mounting
methods recommended by the manufacturer of
the television set.
ALWAYS use furniture that can safely support the
television set.
ALWAYS ensure the television set is not overhang-
ing the edge of the supporting furniture.
ALWAYS educate children about the dangers of
climbing on furniture to reach the television set
or its controls.
ALWAYS route cords and cables connected to
your television so they cannot be tripped over,
pulled or grabbed.
NEVER place a television set in an unstable
location.
NEVER place the television set on tall furniture
(for example, cupboards or bookcases) without
anchoring both the furniture and the television set
to a suitable support.
NEVER place the television set on cloth or other
materials that may be located between the televi-
sion set and supporting furniture.
NEVER place items that might tempt children
to climb, such as toys and remote controls, on
the top of the television or furniture on which the
television is placed.
The equipment is only suitable for mounting at
If the existing television set is going to be retained
and relocated, the same considerations as above
should be applied.
– – – – – – – – – – – –
Apparatus connected to the protective earthing of the
building installation through the MAINS connection or
through other apparatus with a connection to protec-
tive earthing – and to a television distribution system
using coaxial cable, may in some circumstances
-
tribution system has therefore to be provided through
a device providing electrical isolation below a certain
frequency range (galvanic isolator)

English
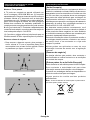
WALL MOUNTING WARNINGS
Read the instructions before mounting your TV
on the wall.
The wall mount kit is optional. You can obtain from
your local dealer, if not supplied with your TV.
Do not install the TV on a ceiling or on an inclined
wall.
accessories.
the TV from fall. Do not over-tighten the screws.
Figures and illustrations in this user manual are
actual product appearance. Product design and
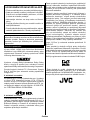
License Notication
Interface, HDMI trade dress and the HDMI Logos are
trademarks or registered trademarks of HDMI Licens-
ing Administrator, Inc.
Manufactured under licence from Dolby Laboratories.
Dolby, Dolby Audio, and the double-D symbol
are trademarks of Dolby Laboratories Licensing
Corporation.
Google, Android, Android TV, Chromecast, Google
Play and YouTube are trademarks of Google LLC.
Depends on model
For DTS patents, see http://patents.dts.com.
Manufactured under licence from DTS Licensing
Limited. DTS, DTS-HD, Virtual:X, and the DTS-HD
logo are registered trademarks or trademarks of DTS,
Inc. in the United States and other countries. © 2022
DTS, Inc. ALL RIGHTS RESERVED.
Depends on model
The Bluetooth® word mark and logos are registered
trademarks owned by the Bluetooth SIG, Inc. and
any use of such marks by Vestel Elektronik Sanayi ve
Ticaret A.S. is under license. Other trademarks and
trade names are those of their respective owners.
This product contains technology subject to certain
intellectual property rights of Microsoft. Use or
distribution of this technology outside of this product
is prohibited without the appropriate license(s) from
Microsoft.
Content owners use Microsoft PlayReady™ content
access technology to protect their intellectual property,
including copyrighted content. This device uses
PlayReady technology to access PlayReady-protected
content and/or WMDRM-protected content. If the
device fails to properly enforce restrictions on content
usage, content owners may require Microsoft to revoke
the device’s ability to consume PlayReady-protected
content or content protected by other content access
technologies. Content owners may require you to
upgrade PlayReady to access their content. If you
decline an upgrade, you will not be able to access
content that requires the upgrade.
The “CI Plus” Logo is a trademark of CI Plus LLP.
This product is protected by certain intellectual property
rights of Microsoft Corporation. Use or distribution of
such technology outside of this product is prohibited
without a license from Microsoft or an authorized
Microsoft subsidiary.
DVB is a registered trademark of the DVB Project.
manufactured-
-

English
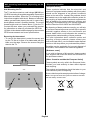
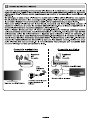
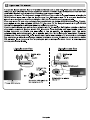
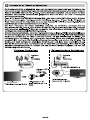
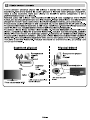
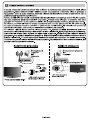
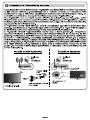
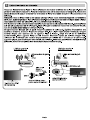
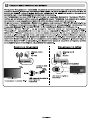
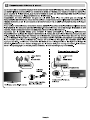
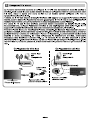
Wall mounting instructions (depending on the
model)
Wall Mounting the TV
The TV can be mounted on a wall using a MX X*X mm
(*) VESA mounting kit supplied separately. Remove the
base stand as shown. Mount the TV according to the
instructions supplied with the kit. Beware of electrical
cables, gas and water pipes in the wall. In case of any
thread length must not exceed X mm (*) into the TV.
Contact the store where you purchased the product
for information on where to purchase the VESA kit.
(*) Refer to the related additional page for the accurate
VESA measurements and screw specications.
Removing the base stand
To remove the base stand, protect the screen and
stand to the TV.
-or-
Disposal Information
[European Union]
These symbols indicate that the electrical and
electronic equipment and the battery with this symbol
should not be disposed of as general household
waste at its end-of-life. Instead, the products should
be handed over to the applicable collection points for
the recycling of electrical and electronic equipment as
well as batteries for proper treatment, recovery and
recycling in accordance with your national legislation
and the Directive 2012/19/EU and 2013/56/EU.
By disposing of these products correctly, you will help
to conserve natural resources and will help to prevent
human health which could otherwise be caused by
inappropriate waste handling of these products.
For more information about collection points and
recycling of these products, please contact your
service or the shop where you purchased the product.
Penalties may be applicable for incorrect disposal of
this waste, in accordance with national legislation.
[Business users]
If you wish to dispose of this product, please contact
your supplier and check the terms and conditions of
the purchase contract.
[Other Countries outside the European Union]
These symbols are only valid in the European Union.
Contact your local authority to learn about disposal
and recycling.
The product and packaging should be taken to your
local collection point for recycling.
Some collection points accept products free of charge.
Note: The sign Pb below the symbol for batteries indicates
that this battery contains lead.
Products
Battery

English
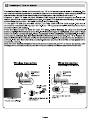
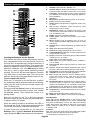
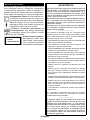
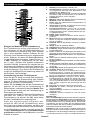
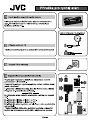
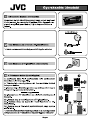
Remote Control 45160BT
Inserting the Batteries into the Remote
The remote may have a screw that secures the bat-
tery compartment cover onto the remote control (or
this may be in a separate bag). Remove the screw, if
the cover is screwed on previously. Then remove the
battery compartment cover to reveal the battery com-
partment. Insert two 1.5V - size AAA batteries. Make
sure the (+) and (-) signs match (observing correct
polarity). Do not mix old and new batteries. Replace
only with same or equivalent type. Place the cover
back on. Secure the cover again with the screw, if any.
To pair remote with the TV
for accessories will be performed after the initial setup
starts. You will need to pair your remote control with
your TV at this point.
Press and hold the Source button on the remote until
the LED on the remote starts to blink, then release
the Source button. That means the remote is in
pairing mode.
Select the name of your remote and press OK when
it appears on the TV screen.
When the pairing process is successful, the LED on
remote will enter sleep mode after 30 seconds.
In order to pair your remote later on, you can go to
Settings menu, highlight Remotes & Accessories
option and press OK to start a search for accessories.
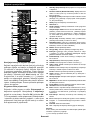
1. Standby: Quick Standby / Standby / On
2. Numeric buttons: Switches the channel in Live TV mode,
enters a number or a letter in the text box on the screen
3. Language: Switches among sound modes (analogue
TV), displays and changes audio language (digital TV,
where available)
4. Volume +/-
5. Microphone: Activates the microphone on the remote
6. Home: Opens the Home Screen
7. Guide: Displays the electronic programme guide in Live
TV mode
8. OK: Confirms selections, enters sub-menus, views
channel list (in Live TV mode)
9. Back/Return: Returns to previous menu screen, goes
one step back, closes open windows, closes teletext (in
Live TV-Teletext mode)
10. Netix:
11. Prime Video: Launches the Amazon Prime Video
application
12. Menu: Displays Live TV Settings menu (in Live TV
mode), displays available setting options such as sound
and picture
13. Rewind: Moves frames backwards in media such as
movies
14. Stop: Stops the media being played
15. Record: Records programmes in Live TV mode**
16. Coloured Buttons: Follow the on-screen instructions for
coloured button functions
17. Pause: Pauses the media being played, starts timeshift
recording in Live TV mode**
Play: Starts to play selected media
18. Text: Opens and closes teletext (where available in
Live TV mode)
19. Fast forward: Moves frames forward in media such
as movies
20. Source: Shows all available broadcast and content
sources, is also used in pairing process of the remote.
21. Google Play: Launches the Google Play Store application
22. YouTube: Launches the YouTube application
23. Exit: Closes and exits from Live TV Settings menus,
closes the Home Screen, exits from any running
application or menu or OSD banner, switches to last
set source
24. Directional buttons: Navigates menus, setting options,
moves the focus or cursor, etc. sets record time and
displays the subpages in Live TV-Teletext mode when
pressed Right or Left. Follow the on-screen instructions.
25. Info: Displays information about on-screen content
26. Programme +/-: Increases/Decreases channel number
in Live TV mode
27. Mute:
28. Subtitles:e)
Standby Button
Press and hold the Standby button on the remote control.
Power o dialogue will appear on the screen. Highlight OK
and press the OK button. The TV will switch into standby
standby mode or to switch on the TV when in quick standby
or standby mode.
Footnote:
Red, green, blue and yellow buttons are multifunction; please
follow on-screen prompts and section instructions.
(**) If this feature is supported by your TV.

English
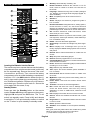
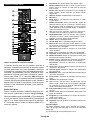
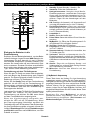
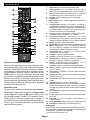
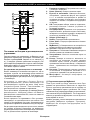
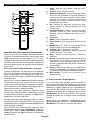
Remote Control 2055BT (depending on the model)
5
1
2
4
8
7
15
14
11
9
3
6
10
13
12
RM-C3606
Inserting the Batteries into the Remote
Remove the battery compartment cover to reveal the
battery compartment. Insert two size AAA batteries.
Make sure the (+) and (-) signs match (observing
correct polarity). Do not mix old and new batteries.
Replace only with same or equivalent type. Place the
cover back on.
To pair remote with the TV
When the
for accessories will be performed after the initial setup
starts. You will need to pair your remote control with
your TV at this point.
Press and hold the Source button on the remote until
the LED on the remote starts to blink, then release
the Source button. That means the remote is in
pairing mode.
Select the name of your remote and press OK when
it appears on the TV screen.
When the pairing process is successful, the LED on
remote will enter sleep mode after 30 seconds.
In order to pair your remote later on, you can go to
Settings menu, highlight Remotes & Accessories
option and press OK to start a search for accessories.
1. Standby: Quick Standby / Standby / On
2. Home: Opens the Home Screen
3. Directional buttons: Navigates menus, setting
options, moves the focus or cursor etc. and
displays the subpages in Live TV-Teletext mode
when pressed Right or Left. Follow the on-screen
instructions.
4. OK:
channel list (in Live TV mode)
5. Back/Return: Returns to previous menu screen,
goes one step back, closes open windows, closes
teletext (in Live TV-Teletext mode)
6. Volume +/-
7. Netix:
8. Prime Video: Launches the Amazon Prime Video
application
9. MyButton1 (*): Opens the picture mode setting
menu on available sources
10. YouTube: Launches the YouTube application
11. Programme +/-: Increases/Decreases channel
number in Live TV mode
12. Mute:
13. Exit: Closes and exits from Live TV Settings
menus, closes the Home Screen, exits from any
running application or menu or OSD banner,
switches to last set source
14. Source: Shows all available broadcast and
content sources, is also used in pairing process
of the remote.
15. Microphone: Activates the microphone on the
remote
(*) MyButton1 Customisation
This button can be assigned as a hotkey for an
application. Press and hold the button, available
applications will be displayed on the screen. Highlight
one and press OK. After that, you can launch the
selected application by pressing the MyButton1
button. In the same way, you can change the function
of this button any time later.
Note that if you perform initial setup (Factory reset /
Reset), MyButton1 will return to its default function.

English
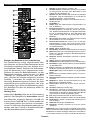
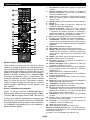
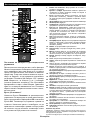
Remote Control 45157
Inserting the Batteries into the Remote
The remote may have a screw that secures the battery
compartment cover onto the remote control (or this may
be in a separate bag). Remove the screw, if the cover
is screwed on previously. Then remove the battery
compartment cover to reveal the battery compartment.
Insert two 1.5V - size AAA batteries. Make sure the (+)
and (-) signs match (observing correct polarity). Do not
mix old and new batteries. Replace only with same or
equivalent type. Place the cover back on. Secure the
cover again with the screw, if any.
Standby Button
Press and hold the Standby button on the remote
control. Power o dialogue will appear on the screen.
Highlight OK and press the OK button. The TV will
to switch the TV into quick standby mode or to switch
on the TV when in quick standby or standby mode.
1. Standby: Quick Standby / Standby / On
2. Numeric buttons: Switches the channel in Live TV
mode, enters a number or a letter in the text box on
the screen
3. Language: Switches among sound modes (analogue
TV), displays and changes audio language (digital TV,
where available)
4. Mute:
5. Volume +/-
6. Guide: Displays the electronic programme guide in
Live TV mode
7. Directional buttons: Navigates menus, setting options,
moves the focus or cursor, etc. sets record time and
displays the subpages in Live TV-Teletext mode when
pressed Right or Left. Follow the on-screen instructions.
8. OK: Confirms selections, enters sub-menus, views
channel list (in Live TV mode)
9. Back/Return: Returns to previous menu screen, goes
one step back, closes open windows, closes teletext (in
Live TV-Teletext mode)
10. Netix:
11. Google Play: Launches the Google Play Store appli-
cation
12. Menu: Displays Live TV Settings menu (in Live TV
mode), displays available setting options such as sound
and picture
13. Rewind: Moves frames backwards in media such as
movies
14. Stop: Stops the media being played
15. Record: Records programmes in Live TV mode**
16. Coloured Buttons: Follow the on-screen instructions for
coloured button functions
17. Pause: Pauses the media being played, starts timeshift
recording in Live TV mode**
Play: Starts to play selected media
18. Text: Opens and closes teletext (where available in
Live TV mode)
19. Fast forward: Moves frames forward in media such
as movies
20. MyButton1: Opens the picture mode setting menu on
available sources
21. Prime Video: Launches the Amazon Prime Video
application
22. YouTube: Launches the YouTube application
23. Exit: Closes and exits from Live TV Settings menus,
closes the Home Screen, exits from any running
application or menu or OSD banner, switches to last
set source
24. Info: Displays information about on-screen content
25. Source: Shows all available broadcast and content
sources
26. Programme +/-: Increases/Decreases channel number
in Live TV mode
27. Home: Opens the Home Screen
28. Subtitles:
Footnote:
Red, green, blue and yellow buttons are multifunction; please
follow on-screen prompts and section instructions.
(**) If this feature is supported by your TV.


Español
Estimado(a) Cliente:
Este aparato cumple con las directivas y las normas
europeas relativas a la compatibilidad electromagnética
y a la seguridad eléctrica.
El representante del fabricante en Europa es:
Parkring 6, 85748 Garching
Accesorios Incluidos
Mando a Distancia
Pilas: 2 X AAA
Guía Rápida de Inicio
En función del modelo
Llave WLAN USB y cable de extensión de USB
Kit de montaje en la pared
Información De Seguridad
PRECAUCIÓN
RIESGO DE DESCARGA
ELÉCTRICA
NO ABRIR
PRECAUCIÓN: PARA REDUCIR EL RIESGO DE DESCARGA
ELÉCTRICA NO RETIRE LA TAPA (O EL PANEL
TRASERO).NO CONTIENE PIEZAS QUE PUEDAN
SER CAMBIADAS POR EL USUARIO. PÓNGASE
EN CONTACTO CON PERSONAL TÉCNICO
CUALIFICADO.
Nota: Siga las instrucciones en pantalla para la operación de las
funciones relacionadas.
En climas extremos (tormentas, relámpagos) y largos periodos
de inactividad (irse de vacaciones) desconecte el televisor
de la red eléctrica.
El enchufe de corriente sirve para desconectar el televisor de
la electricidad y, por lo tanto, siempre debe estar accesible. Si
el televisor no se desconecta de la red eléctrica, el dispositivo
aún consumirá energía para todas las situaciones, incluso si
el televisor está en modo de espera o apagado.
IMPORTANTE - Por favor, lea estas
instrucciones detenidamente antes de
instalar o encender el televisor.
ADVERTENCIA: Este dispositivo está
diseñado para ser utilizado por personas
(incluidos los niños) con capacidad / experiencia
en el funcionamiento de un dispositivo de este tipo
sin supervisión, a menos que hayan recibido
supervisión o instrucciones relativas al uso del
aparato por una persona responsable de su
seguridad.
Utilice este aparato de TV a una altura de menos de
5000 metros sobre el nivel del mar, en lugares secos
y en regiones con climas templados o tropicales.
El televisor está diseñado para uso doméstico y uso
general similar, pero también puede ser utilizado en
lugares públicos.
Para facilitar la ventilación, deje al menos 5 cm de
espacio libre alrededor de la TV.
La ventilación no debe impedirse al cubrir o bloquear
las aberturas de ventilación con objetos como
periódicos, manteles, cortinas, etc.
Se debe poder acceder fácilmente al cable de
corriente. No coloque el televisor, ni ningún mueble,
etc., sobre el cable de corriente, ni lo pise. Un cable
deteriorado puede causar un incendio o provocarle
una descarga eléctrica. Agarre el cable de corriente
por la clavija de enchufe; no desenchufe el televisor
tirando del cable de corriente. No toque nunca el
cable con las manos mojadas, pues podría causar
un cortocircuito o sufrir una descarga eléctrica. No
haga nunca un nudo en el cable ni lo empalme
con otros cables. Deberá sustituirlo cuando esté
dañado, siendo únicamente un profesional quien
puede hacerlo.
No exponga el televisor a goteos y salpicaduras
de líquidos y no coloque objetos que contengan
el televisor (por ej., en los estantes por encima de
la unidad).
No exponga el televisor a la luz solar directa ni llamas
abiertas, tales como velas encendidas en la parte
superior o cerca del televisor.
No coloque ninguna fuente de calor como
calentadores eléctricos, radiadores, etc. cerca del
televisor.
inclinadas.
de plástico fuera del alcance de los bebés, los niños
y los animales domésticos.
Ponga cuidadosamente el soporte al televisor. Si el
soporte está provisto de tornillos, apriete los tornillos
apriete demasiado los tornillos y monte los cauchos
del soporte adecuadamente.
No deseche las pilas en el fuego o con materiales
ADVERTENCIA - Las pilas no deben exponerse a un
calor excesivo como la luz del sol, fuego o similares.
ADVERTENCIA - La presión de sonido excesiva de
auriculares o auriculares puede causar pérdida de
audición.
MUY IMPORTANTE: NO DEBE dejar que nadie,
especialmente los niños, introduzcan ningún
objeto por los agujeros, las ranuras o por cualquier
apertura de la carcasa.
Precaución Riesgo de lesiones
graves o muerte
Riesgo de
descarga eléctrica
Riesgo de tensión
peligrosa
Mantenimiento Importante componente
de mantenimiento

Español
Marcas en el producto
Los siguientes símbolos se utilizan como marcadores
sobre las restricciones, precauciones e instrucciones
de seguridad del producto. Cada explicación se deberá
tomar en cuenta dependiendo de la ubicación de
tales marcas. Tenga en cuenta dicha información por
motivos de seguridad.
Equipo de Clase II: Este aparato está
diseñado de una manera tal que no requiere
una conexión de seguridad a tierra eléctrica.
Terminal viva peligrosa: La(s) terminal(es)
marcada(s) live (viva) es/son peligrosa(s) bajo
condiciones normales de operación.
iPrecaución, consulte las instrucciones de
funcionamiento: El área marcada contiene
baterías de celda de moneda o de botón
reemplazable por el usuario.
CLASS 1
LASER PRODUCT
Producto Láser Clase 1
Este producto contiene una
fuente láser Clase 1 que es
segura en condiciones
razonablemente previsibles
de funcionamiento.
ADVERTENCIA:
No ingiera pilas, hay riesgo de quemaduras químicas.
Este producto o los accesorios suministrados con
el producto pueden contener una pila tipo moneda /
botón. Si la pila de botón es ingerida, puede causar
quemaduras internas graves en solo 2 horas y puede
llevar a la muerte.
Mantenga las pilas nuevas y usadas lejos de los niños.
Si el compartimiento de las pilas no se cierra de forma
segura, deje de usar el producto y manténgalo alejado
de los niños.
Si usted piensa que las pilas podrían haber sido
ingeridas o estar dentro de cualquier parte del cuerpo,
busque atención médica inmediata.
– – – – – – – – – – – –
Un televisor puede caerse y causar lesiones personales
graves o la muerte. Podrá evitar lesiones o heridas,
especialmente a los niños, tomando precauciones tan
sencillas como:
SIEMPRE utilice soportes o métodos recomendados
de instalación por el fabricante del televisor.
SIEMPRE utilice mobiliario que pueda soportar
SIEMPRE asegurarse de que el televisor no
sobresalga del borde del mueble.
SIEMPRE enseñe a los niños los peligros de subirse
al mueble para tocar el televisor y sus controles.
SIEMPRE pase los cables conectados a su televisor
de manera que no se puedan tropezar, tirar o
agarrarlos.
NUNCA coloque un aparato de televisión en un
lugar inestable.
NUNCA coloque el televisor en un mueble alto (por
como el televisor a un soporte adecuado.
NUNCA coloque el conjunto de televisión sobre
tela u otros materiales que estén colocados entre el
conjunto de televisión y muebles de apoyo.
NUNCA ponga artículos que puedan tentar a los
niños a trepar en la parte superior del televisor o
los muebles en los que se coloca el televisor, tales
como juguetes y controles remotos.
El equipo es adecuado únicamente para el montaje
Si el televisor existente está siendo retenido y
trasladado, se deben aplicar las mismas
consideraciones mencionadas aquí arriba.
– – – – – – – – – – – –
El aparato conectado a la tierra de protección de la
red o a través de otros aparatos con una conexión
a tierra de protección, y a un sistema de distribución
de televisión mediante un cable coaxial, en algunas
circunstancias puede crear un peligro de incendio. La
conexión a un sistema de distribución de televisión
por lo tanto, ha de ser proporcionado a través de
un dispositivo que proporciona aislamiento eléctrico
por debajo de un determinado rango de frecuencias
(aislador galvanizado)
ADVERTENCIAS DE MONTAJE EN
PARED
Lea las instrucciones antes de montar el televisor
en la pared.
El kit de montaje de pared es opcional. Usted lo
puede obtener de su distribuidor local, si no se
suministra con el televisor.
No instale el televisor en un techo o en una pared
inclinada.
Utilice los tornillos de montaje en la pared
Apriete los tornillos de montaje de pared con
demasiado los tornillos.
proporcionan solo para referencia y pueden diferir
del aspecto real del producto. Las características

Español
Aviso sobre la licencia
-
timedia Interface, y el Logotipo HDMI son marcas
comerciales o marcas registradas de HDMI Licensing
Administrator Inc.
Fabricado bajo licencia de Dolby Laboratories.
Dolby, Dolby sonido, y el logotipo de la doble D son
marcas registradas de Dolby Laboratories Licensing
Corporation.
Google, Android, Android TV, Chromecast, Google
Play y YouTube son marcas registradas de Google
LLC.
En función del modelo
Para patentes DTS, consulte http://patents.dts.com.
Fabricado bajo la licencia de DTS Licensing Limited.
DTS, DTS X,- HD y el logotipo de DTS Virtual- HD son
marcas comerciales registradas o marcas comerciales
de DTS, Inc. en los Estados Unidos y/u otros
países. © 2022 DTS Inc TODOS LOS DERECHOS
RESERVADOS.
En función del modelo
La palabra y los logotipos de Bluetooth® son marcas
registradas propiedad de Bluetooth SIG, Inc. y
cualquier uso de tales marcas por parte de Vestel
Elektronik Sanayi ve Ticaret A.S. está bajo licencia.
Otras marcas y nombres comerciales pertenecen a
sus respectivos propietarios.
Este producto contiene tecnología sujeta a ciertos
derechos de propiedad intelectual de Microsoft. El uso
o distribución de esta tecnología fuera de este producto
está prohibido sin la(s) licencia(s) apropiada(s) de
Microsoft.
Los propietarios de contenido utilizan la tecnología
de acceso de contenido Microsoft PlayReady ™
para proteger su propiedad intelectual, incluyendo
el contenido protegido por derechos de autor. Este
dispositivo utiliza la tecnología PlayReady para
acceder a contenido protegido por PlayReady y / o
contenido protegido por WMDRM. Si el dispositivo
no cumple correctamente las restricciones sobre
el uso del contenido, los propietarios de contenido
pueden requerir que Microsoft revogue la capacidad
del dispositivo para consumir contenido protegido
por PlayReady. La revocación no debe afectar
a contenido desprotegido o contenido protegido
por otras tecnologías de acceso a contenido. Los
propietarios de contenido pueden requerir que
actualice PlayReady para acceder a su contenido.
Si rechaza una actualización, no podrá acceder al
contenido que requiera la actualización.
El logotipo “CI Plus” es una marca registrada de CI
Plus LLP.
Este producto está protegido por ciertos derechos
de propiedad intelectual de Microsoft Corporation. El
uso o la distribución de dicha tecnología fuera de este
producto está prohibido sin una licencia de Microsoft
o una subsidiaria autorizada de Microsoft.
DVB es una marca registrada del proyecto DVB.
“Este producto es fabricado, -

Español
Instrucciones para el montaje en la pared (En
función del modelo)
Instalación del televisor en la pared
El televisor puede ser montado en la pared utilizando
un kit de montaje VESA MX X*X mm (*) que se
suministra por separado. Extraiga la base tal y como
se muestra. Instale el televisor de acuerdo con las
instrucciones suministradas con el kit. Esté al tanto de
los cables eléctricos, las tuberías de gas y agua que
estén en la pared. Si tiene dudas por favor contacte
del tornillo no deberá exceder X mm (*) dentro del
televisor. Póngase en contacto con el establecimiento
donde adquirió el aparato para saber dónde comprar
el kit VESA.
(*) Consulte la página adicional relacionada con
VESA para las medidas precisas y especicaciones
de los tornillos.
Para quitar la base
Para quitar la base, proteja la pantalla y coloque
estable con la base saliente por la orilla. Saque los
-o-
Información sobre su desecho
[Unión Europea]
Estos símbolos indican que aquellos equipos
eléctricos y electrónicos, así como las pilas que
lo tengan grabado, no se deben desechar como
tales aparatos deberán llevarse a puntos de recogida
destinados al reciclaje tanto de equipos eléctricos
y electrónicos, como de pilas o baterías para su
tratamiento, recuperación y reciclaje adecuados,
de acuerdo con la normativa nacional y la directiva
2012/19/EU y 2013/56/EU.
Al desechar este producto de forma correcta ayudará a
conservar los recursos naturales y evitará las posibles
consecuencias nocivas para el medio ambiente y la
salud de las personas que podrían derivarse del mal
manejo del producto como residuo.
Para obtener más información sobre puntos de
recogida y reciclaje de estos aparatos, póngase en
contacto con su ayuntamiento, servicio de recogida
de desechos, o bien con el establecimiento donde
lo adquirió.
En caso de no incumplir la normativa vigente en
materia de desecho de materiales, se le podría
sancionar.
[Empresas Usuarias]
Si desea desechar este aparato, contacte con el
distribuidor y compruebe los términos y condiciones
del contrato de adquisición.
[Otros países fuera de la Unión Europea]
Estos símbolos son válidos solo en la Unión Europea.
Contacte con la autoridad local para obtener la
información relativa al desecho y reciclado.
El aparato y las pilas deben llevarse al punto local de
recogida para su reciclado.
Algunos de estos puntos recogen aparatos de forma
gratuita.
Nota: El símbolo Pb de abajo para la pilas indica que dicha
batería contiene plomo.
Productos
Pila
1.

Español
Mando a Distancia 45160BT
Colocación de las pilas en el mando a distancia
El control remoto tal vez t
la tapa del compartimiento de la batería al control
remoto (o esto puede estar en una bolsa separada).
Si la cubierta está atornillada previamente, retire el
tornillo. Luego quite la cubierta del compartimiento
batería. Coloque dos pilas de tamaño AAA -1.5 V.
Asegúrese de que (+) y (-) coincidan con los signos
(observe la polaridad correcta). No utilice pilas de
distinto tipo (nuevas y viejas, alcalinas y salinas, etc.)
a la vez. Cámbielas por pilas del mismo tipo o de un
tipo equivalente. Coloque la tapa otra vez en su sitio.
Fije la cubierta de nuevo con el tornillo, si existe.
Para emparejar el control remoto con TV
Cuando se enciende TV por primera vez, después de
búsqueda de accesorio. En este momento necesitará
emparejar su control remoto con su TV.
Pulse y mantenga pulsado el botón Fuente del mando
a distancia hasta que el LED del mando empiece a
parpadear, a continuación, suelte el botón Fuente..
emparejamiento.
Ahora tendrá que esperar para que TV encuentre su
control remoto. Seleccione el nombre de su control
remoto y pulse OK cuando aparezca en la pantalla
de TV.
Cuando el proceso de emparejamiento fue exitoso, se
apagará el LED de control remoto. Si el proceso de
emparejamiento falla, el control remoto ingresará al
modo de reposo después de 30 segundos.
al menú de Conguración, resaltar la opción Mandos
y Accesorios y pulse OK para iniciar una búsqueda
de accesorios.
1. En espera: En Espera Rápido/ En Espera/Activo
2. Botones Numéricos: Cambia el canal en modo Live
TV, entra en un número o una letra en el cuadro de
texto en la pantalla.
3. Idioma: Alterna entre las opciones de audio en
televisión analógica, o muestra y cambia el idioma del
audio (TV digital, cuando la opción esté disponible)
4. Volumen +/-
5. Micrófono: Activa Micrófono en remoto
6. Inicio: Abre la Pantalla Principal.
7. Guía: Muestra guía de programa electrónica en modo
Live TV.
8. OK: Confirma selecciones, ingresa a submenús,
visualiza la lista de canales (en modo Live TV)
9. Volver /Atrás: Vuelve a la pantalla del menú anterior,
retrocede un paso, cierra las ventanas abiertas, cierra
el teletexto (en modoLive TV-Teletexto)
10. Netix:
11. Prime Video: Inicia la aplicación Amazon Prime vídeo
12. Menú: Muestra el menú de Ajustes de Live TV
(en el modo de Live TV), muestra las opciones de
13. Retroceder: Retrocede fotogramas en ficheros
multimedia tales como películas
14. Stop (Detener):
multimedia
15. Grabación: Graba programas en modo Live TV(**)
16. Teclas de Colores: Siga las instrucciones en pantalla
para las funciones de las teclas de colores
17. Pausa: Pausa el medio que se está reproduciendo,
inicia grabación con desplazamiento de tiempo en
modo Live TV(**)
Reproducir:
seleccionados
18. Texto: Abre y cierra teletexto (si está disponible en
modo de Live TV)
19. Avance rápido: Avanza fotogramas en ficheros
multimedia tales como películas
20. Source (Fuente): Muestra todas las fuentes de
emisión y contenido disponibles, también se utiliza en
el proceso de emparejamiento del mando.
21. Google Play: Inicia la aplicación Google Play
22. YouTube: Inicia la aplicación de YouTube
23. Salir: Cierre y sale de los menús de Ajustes de TV en
directo, cierra la Pantalla de Inicio, sale de cualquier
aplicación o menú en ejecución o del banner OSD,
cambia a la última fuente establecida
24. Botones de navegación: Navega entre los menús,
ajuste las opciones, mueve el foco o el cursor, etc.,
ajuste el tiempo de grabación y muestra las subpáginas
en modo Live TV-Teletexto cuando se pulsa Derecha o
Izquierda. Siga las instrucciones en línea
25. Info: Muestra la información sobre el contenido en
pantalla
26. Programa +/-: Aumenta/Disminuye el número de canal
en modo Live TV
27. Silencio: Silencia totalmente el volumen del televisor
28. Subtítulos: Muestra u oculta los subtítulos (si la opción
estuviera disponible)
Botón de Modo en Espera
Pulse y mantenga pulsado el botón En Espera en su mando
a distancia. En la pantalla se visualizará dialogo de Apagar.
Resalte OK y pulse el botón OK. Tele entrará en el modo
al modo de espera rápida o para cambiar a TV cuando esté
en modo de espera rápido o en espera.
Nota al pie:
Los botones de color rojo, verde, azul y amarillo son mul-
ti-función, siga las instrucciones en pantalla y de sección.
(**) Si esta función es compatible con el televisor
A página está carregando...
A página está carregando...
A página está carregando...
A página está carregando...
A página está carregando...
A página está carregando...
A página está carregando...
A página está carregando...
A página está carregando...
A página está carregando...
A página está carregando...
A página está carregando...
A página está carregando...
A página está carregando...
A página está carregando...
A página está carregando...
A página está carregando...
A página está carregando...
A página está carregando...
A página está carregando...
A página está carregando...
A página está carregando...
A página está carregando...
A página está carregando...
A página está carregando...
A página está carregando...
A página está carregando...
A página está carregando...
A página está carregando...
A página está carregando...
A página está carregando...
A página está carregando...
A página está carregando...
A página está carregando...
A página está carregando...
A página está carregando...
A página está carregando...
A página está carregando...
A página está carregando...
A página está carregando...
A página está carregando...
A página está carregando...
A página está carregando...
A página está carregando...
A página está carregando...
A página está carregando...
A página está carregando...
A página está carregando...
A página está carregando...
A página está carregando...
A página está carregando...
A página está carregando...
A página está carregando...
A página está carregando...
A página está carregando...
A página está carregando...
A página está carregando...
A página está carregando...
A página está carregando...
A página está carregando...
A página está carregando...
A página está carregando...
A página está carregando...
A página está carregando...
A página está carregando...
A página está carregando...
A página está carregando...
A página está carregando...
A página está carregando...
A página está carregando...
A página está carregando...
A página está carregando...
A página está carregando...
A página está carregando...
A página está carregando...
A página está carregando...
A página está carregando...
A página está carregando...
A página está carregando...
A página está carregando...
A página está carregando...
A página está carregando...
A página está carregando...
A página está carregando...
A página está carregando...
A página está carregando...
A página está carregando...
A página está carregando...
A página está carregando...
A página está carregando...
A página está carregando...
A página está carregando...
A página está carregando...
A página está carregando...
A página está carregando...
A página está carregando...
A página está carregando...
A página está carregando...
A página está carregando...
A página está carregando...
A página está carregando...
A página está carregando...
A página está carregando...
A página está carregando...
A página está carregando...
A página está carregando...
A página está carregando...
A página está carregando...
-
 1
1
-
 2
2
-
 3
3
-
 4
4
-
 5
5
-
 6
6
-
 7
7
-
 8
8
-
 9
9
-
 10
10
-
 11
11
-
 12
12
-
 13
13
-
 14
14
-
 15
15
-
 16
16
-
 17
17
-
 18
18
-
 19
19
-
 20
20
-
 21
21
-
 22
22
-
 23
23
-
 24
24
-
 25
25
-
 26
26
-
 27
27
-
 28
28
-
 29
29
-
 30
30
-
 31
31
-
 32
32
-
 33
33
-
 34
34
-
 35
35
-
 36
36
-
 37
37
-
 38
38
-
 39
39
-
 40
40
-
 41
41
-
 42
42
-
 43
43
-
 44
44
-
 45
45
-
 46
46
-
 47
47
-
 48
48
-
 49
49
-
 50
50
-
 51
51
-
 52
52
-
 53
53
-
 54
54
-
 55
55
-
 56
56
-
 57
57
-
 58
58
-
 59
59
-
 60
60
-
 61
61
-
 62
62
-
 63
63
-
 64
64
-
 65
65
-
 66
66
-
 67
67
-
 68
68
-
 69
69
-
 70
70
-
 71
71
-
 72
72
-
 73
73
-
 74
74
-
 75
75
-
 76
76
-
 77
77
-
 78
78
-
 79
79
-
 80
80
-
 81
81
-
 82
82
-
 83
83
-
 84
84
-
 85
85
-
 86
86
-
 87
87
-
 88
88
-
 89
89
-
 90
90
-
 91
91
-
 92
92
-
 93
93
-
 94
94
-
 95
95
-
 96
96
-
 97
97
-
 98
98
-
 99
99
-
 100
100
-
 101
101
-
 102
102
-
 103
103
-
 104
104
-
 105
105
-
 106
106
-
 107
107
-
 108
108
-
 109
109
-
 110
110
-
 111
111
-
 112
112
-
 113
113
-
 114
114
-
 115
115
-
 116
116
-
 117
117
-
 118
118
-
 119
119
-
 120
120
-
 121
121
-
 122
122
-
 123
123
-
 124
124
-
 125
125
-
 126
126
-
 127
127
-
 128
128


em outras línguas
- español: JVC Vestel Guía del usuario
- français: JVC Vestel Mode d'emploi
- italiano: JVC Vestel Guida utente
- slovenčina: JVC Vestel Užívateľská príručka