
YT-150
YT-150
u
u
r
o
i
o y
u
q
q
r
e
q
y
q w
w
GUITAR/BASS AUTO TUNER
MIC
u
r
y
w
q
r
u
t
q
YT-150
YT-150
OWNER’S MANUAL
Thank you for purchasing the YAMAHA YT-150 Guitar/Bass
Auto Tuner.
Please read this manual thoroughly and keep it in a safe place for
future reference.
6F22 or 006P
9V dry cell battery
■ BATTERY REPLACEMENT
GUITAR/BASS AUTO TUNER
■ PRECAUTIONS
◆ To prevent damage, do not use the tuner in the following locations:
• places where the unit will be in direct sunlight;
• places subject to temperature and humidity extremes;
• places that are sandy or dusty.
◆ To power the tuner, use only a 6F22 or 006P 9V dry cell battery.
◆ For maximum battery life, always be sure the tuner is turned OFF when not in
use.
◆ If an exhausted battery is left in the unit for an extended period of time, it may
leak and cause malfunctioning of the unit. When the battery becomes
exhausted, always remove it and replace it as soon as possible.
◆ Do not subject the tuner to strong physical shock or vibration. Do not use
excessive force on any of the controls.
◆ Never use solvents such as benzene or thinner to clean the tuner. Wipe clean
with a soft, dry cloth.
◆ After reading the owner's manual, keep it in a safe place for future reference.
Never dispose of used batteries by burning them.
Also make sure to keep batteries away from children.
FCC INFORMATION (U.S.A.)
1.IMPORTANT NOTICE: DO NOT MODIFY THIS UNIT!
This product, when installed as indicated in the instructions contained in this manual,
meets FCC requirements. Modifications not expressly approved by Yamaha may void
your authority, granted by the FCC, to use the product.
2.IMPORTANT: When connecting this product to accessories and/or another product
use only high quality shielded cables. Cable/s supplied with this product MUST be used.
Follow all installation instructions. Failure to follow instructions could void your FCC
authorization to use this product in the USA.
3.NOTE: This product has been tested and found to comply with the requirements listed
in FCC Regulations, Part 15 for Class ”B” digital devices. Compliance with these re-
quirements provides a reasonable level of assurance that your use of this product in a
residential environment will not result in harmful interference with other electronic de-
vices. This equipment generates/uses radio frequencies and, if not installed and used
according to the instructions found in the users manual, may cause interference harmful
to the operation of other electronic devices. Compliance with FCC regulations does not
guarantee that interference will not occur in all installations. If this product is found to
be the source of interference, which can be determined by turning the unit ”OFF” and
”ON”, please try to eliminate the problem by using one of the following measures:
Relocate either this product or the device that is being affected by the interference.
Utilize power outlets that are on different branch (circuit breaker or fuse) circuits or
install AC line filter/s.
In the case of radio or TV interference, relocate/reorient the antenna. If the antenna
lead-in is 300 ohm ribbon lead, change the lead-in to co-axial type cable.
If these corrective measures do not produce satisfactory results, please contact the
local retailer authorized to distribute this type of product. If you can not locate the
appropriate, please contact Yamaha Corporation of America, Electronic Service Divi-
sion, 6600 Orangethorpe Ave, Buena Park, CA 90620
The above statements apply ONLY to those products distributed by Yamaha
Corporations of America or its subsidiaries.
THIS DIGITAL APPARATUS DOES NOT EXCEED THE “CLASS B” LIMITS FOR RADIO
NOISE EMISSIONS FROM DIGITAL APPARATUS SET OUT IN THE RADIO INTERFER-
ENCE REGULATION OF THE CANADIAN DEPARTMENT OF COMMUNICATIONS.
■ TILT SLIT
The tuner can be tilted back by using the slit in the rear panel. Insert a coin or
similar flat object into the slit and tilt back as shown in the diagram below.
When battery power runs down, the
LCD indicator will grow dim.
Continued use of the tuner may result in
inaccurate operation. Replace the
battery with a new one (6F22 or 006P
9V dry cell battery) as soon as possible.
The battery compartment is in the rear
of the tuner. Remove the old battery
and replace it with a new one of the
same type. Be careful to connect the
battery in the correct polarity.
Bottom
side
Battery cover
■ SPECIFICATIONS
Indicators : Liquid crystal display, Tuning guides
Tuning Notes : GUITAR E, A, D, G, B, E
BASS B, E, A, D, G, C
Note Setting Range : A0 (27Hz) – C8 (4186Hz)
Accuracy : ±1 cent
In Pitch Accuracy : ±3 cent
Standard Pitch Setting Range : A4=435 – 446Hz (1Hz steps)
Input : INPUT (6
monaural), microphone
Output : OUTPUT (6
monaural)
Power Source : 9V dry cell battery (006P or 6F22)
Battery Life : Approximately 50 hrs. (AUTO mode)
Dimensions (W x H x D) : 118 x 63 x 24.5 mm (4.6" x 2.5" x 1.0")
Weight (including battery) : 130 g (4.6 oz)
Accessory : 9V dry cell battery (6F22) x 1
* Specifications and external appearance are subject to change without notice.
i
o
t
e
■ SETTING THE STANDARD PITCH
1. Turn the POWER switch u ON. The pitch is set to 440 Hz (flashing
display).
2. Continuously press the PITCH switch r until the desired standard pitch
(435 – 446Hz) is selected.
435→436→437→438→439→440→441→442→443→444→445→446
■ TUNING PROCEDURES
● Auto Tuning : AUTO
The tuner will automatically select the closest note name (string name) to the
plucked string’s pitch.
1. For electric guitars/basses, connect the guitar cable to the INPUT jack o.
(The OUTPUT jack i can also be connected to an amplifier. The guitar’s
signal will be sent to the amp whether the tuner’s power is switched ON or
OFF. However, it might result in added noise to the line so you should
switch the tuner’s power OFF during performance.)
* The built-in microphone y will not operate when a cable is plugged into the
INPUT jack o.
2. Turn the POWER switch u ON.
The standard pitch (factory preset A=440Hz) will flash on LCD indicator q
for about 2 seconds. After that, the tuner will enter the auto tuning mode
(GUITAR and AUTO will appear on the LCD indicator q).
3. Use the PITCH switch r to change the standard pitch. (Refer to the
“Setting the Standard Pitch” section below.)
4. Press the MODE switch e to select the instrument to be tuned. GUITAR or
BASS will appear on the LCD indicator q.
5. To tune an acoustic guitar, place the tuner’s internal microphone y as
close as possible to the guitar’s sound hole.
6. Pluck the string to be tuned. (Do not pluck more than one string at a time.)
The appropriate string name will appear on the LCD indicator q. Use the
needle and the tuning guide w as a reference while tuning the instrument.
6-1. First, adjust the string so that the appropriate string name indicator
flashes.
6-2. Next, tune the string until the needle rests in the middle and the green
LED of the tuning guide w lights.
Tune until needle comes to
rest in the center.
■ COMPONENTS
MIC
u POWER
switch
r PITCH switch
y Built-in microphone
w Tuning guide
q LCD indicator
3. When the PITCH switch r has not been pressed for about 2 seconds, the
tuner will automatically return to the tuning mode.
* When the POWER switch u is turned OFF, the standard pitch setting will be
reset to A=440Hz.
● Manual Tuning : MANL.
Each note must be selected individually as needed.
1. Carry out the same settings as described in steps 1 through 5 of the Auto
Tuning section.
2. Continue to press the NOTE switch t until the desired note name (string
name) flashes. The tuner is now in the manual mode, MANL. appears in
the bottom left hand corner of the LCD display q.
3. As in step 5 of the Auto Tuning section, pluck the string to be tuned and
proceed to tune the string.
4. Repeat steps 2 and 3 to tune other strings.
When this LED lights,
the string is tuned.
example) To tune the “E” string on a six string guitar.
The string name of the
plucked string flashes.
Select GUITAR on
the LCD indicator.
Select the AUTO
mode.
Standard Pitch is
displayed.
i OUTPUT
jack
o INPUT
jack
t NOTE switch
e MODE switch
* Always turn the POWER switch u to “OFF” before changing the battery.
YT-150
YT-150
BEDIENUNGSANLEITUNG
Vielen Dank für den Kauf des elektronischen Gitarren/Baß-
Stimmgeräts YT-150 von YAMAHA.
Lesen Sie diese Anleitung bitte aufmerksam durch, und bewahren
Sie sie dann zur späteren Bezugnahme gut auf.
ELEKTRONISCHES GITARREN/BASS- STIMMGERÄT
YT-150
YT-150
MODE D’EMPLOI
Nous vous remercions d’avoir porté votre choix sur l’accordeur
automatique de guitare/basse YAMAHA YT-150.
Nous vous prions de lire attentivement ce mode d’emploi et de le
conserver en lieu sûr pour vous y reporter ultérieurement.
ACCORDEUR AUTOMATIQUE DE GUITARE/BASSE
■ VORSICHTSMASSREGELN
◆ Verwenden Sie das Stimmgerät nicht an Orten, wo es den folgenden
schädlichen Einflüssen ausgesetzt ist:
• Direktes Sonnenlicht
• Extreme Temperatur- und Luftfeuchtigkeitswerte
• Sand und Staub
◆ Verwenden Sie als Stromquelle ausschließlich 9V-Trockenbatteriezellen vom
Typ 6F22 oder 006P.
◆ Schalten Sie das Stimmgerät nach Gebrauch stets aus, um die Batterien zu
schonen.
◆ Wenn verbrauchte Batterien längere Zeit im Gerät verbleiben, können sie
auslaufen und Schäden verursachen. Wenn die Batterien schwächer
werden, sollten Sie sie daher entnehmen und so bald wie möglich durch neue
ersetzen.
◆ Schützen Sie das Stimmgerät vor starken Schlägen und Erschütterungen.
Wenden Sie beim Betätigen der Bedienelemente nicht zu viel Kraft auf.
◆ Verwenden Sie zum Säubern des Stimmgeräts keine Lösungsmittel wie
Benzin oder Verdünner. Entfernen Sie Staub und Schmutz mit einem
weichen, trockenen Tuch.
◆ Bewahren Sie diese Anleitung nach dem Durchlesen gut auf.
Achten Sie bitte auf korrekte Entsorgung verbrauchter
Batterien. Batterien dürfen nicht verbrannt werden!
Achten Sie bitte auch darauf, daß Batterien nicht in
Kinderhände geraten.
■ PRECAUTIONS
◆ Afin de ne pas endommager l’accordeur, évitez de l’utiliser dans des endroits
répondant aux conditions suivantes :
• plein soleil
• humidité ou températures excessives.
• sable ou poussière
◆ Pour alimenter l’accordeur, utilisez exclusivement une pile sèche 6F22 ou
006P de 9 Volts.
◆ Pour garantir une longévité maximale des piles, mettez toujours l’accordeur
hors tension lorsque vous ne l’utilisez pas.
◆ Les piles épuisées qui restent dans l’accordeur pendant une longue période,
peuvent fuir et provoquer des anomalies de fonctionnement. Lorsque les
piles présentent des signes de décharge, remplacez-les dans le délai le plus
bref.
◆ L’accordeur ne doit pas subir de chocs ni de vibrations importants. Ne le
manipulez jamais avec une force excessive.
◆ N’utilisez jamais de solvants tels que de la benzine ou du diluant pour
nettoyer l’accordeur. Essuyez-le avec un chiffon doux et sec.
◆ Après avoir lu ce mode d’emploi, conservez-le en lieu sûr pour vous y reporter
ultérieurement.
Ne jetez jamais les piles au feu et conservez-les
toujours hors de portée des enfants.
Bescheinigung des Importeurs
Hiermit wird bescheinigt, daß der / die / das
GUITAR/BASS AUTO TUNER Typ : YT-150
(Gerät, Typ, Bezeichnung)
in Übereinstimmung mit den Bestimmungen der
VERFÜGUNG 1046/84
(Amtsblattverfügung)
funkentstört ist.
Der Deutschen Bundespost wurde das Inverkehrbringen dieses Gerätes
angezeigt und die Berechtigung zur Überprüfung der Serie auf
Einhaltung der Bestimmungen eingeräumt.
YAMAHA Europa GmbH
Name des Importeurs
■ KIPPSCHLITZ
Das YT-150 weist einen Schlitz auf der Rückseite auf, wodurch es nach hinten
gekippt werden kann. Eine Münze o.ä. in den Schlitz einführen und das Gerät
nach hinten kippen, wie gezeigt.
■ FENTE D’INCLINAISON
L’accordeur peut être maintenu incliné en utilisant la fente du panneau arrière.
Introduire une pièce de monnaie, ou autre objet plat similaire, dans la fente et
incliner l’accordeur de la manière illustrée.
Pile 6F22 ou 006P
de 9 Volts
■ REMPLACEMENT DE LA PILE
Lorsque la puissance de la pile devient
insuffisante, l’afficheur à cristaux
liquides s’assombrit.
Le fait de continuer à utiliser l’accordeur
dans ces conditions risque de ne pas
permettre de fournir une indication
précise. Remplacer la pile par une pile
sèche neuve (6F22 ou 006P 9 V) dans
les meilleurs délais.
Le logement de la pile est situé au dos
de l’accordeur. Retirer la pile usée et
la remplacer par une pile neuve du
même type. Faire très attention de pla-
cer la pile en respectant les polarités.
Dos de
l’accordeur
Couvercle du
logement des piles
Unterseite
Batteriefachdeckel
Batterie 6F22
oder 006P, 9V
■ BATTERIEWECHSEL
Wenn die Batterie erschöpft ist, sind die
Anzeigen des Flüssigkristall-Displays
schwächer als gewöhnlich.
Falls das Stimmgerät in diesem
Zustand weiterbenutzt wird, kann es
ungenau arbeiten. Ersetzen Sie die
Batterie (9-V-Trockenbatterie vom Typ
6F22 oder 006P) daher so bald wie
möglich durch eine neue.
Das Batteriefach befindet sich auf der
Rückseite. Die alte Batterie durch eine
neue des gleichen Typs austauschen.
Beim Anschließen der Batterie auf kor-
rekte Polung achten.
■ FICHE TECHNIQUE
Indicateurs et témoins : Afficheur à cristaux liquides, guide d’accord (à 3
diodes électroluminescentes)
Notes d’accord : guitare E, A, D, G, B, E
basse B, E, A, D, G, C
Plage de réglage de note : A0 (27Hz) - C8 (4186Hz)
Précision : ± 1 centième
Précision de hauteur : ± 3 centièmes
Plage de réglage de hauteur standard
: A4=435 - 446Hz (par incréments d’1 Hz)
Entrée : INPUT (6
monaurale), microphone
Sortie : OUTPUT (6
monaurale)
Source d’alimentation : Pile sèche de 9V (006P ou 6F22)
Autonomie des piles : 50 heures environ. (Mode AUTO)
Dimensions (L x H x P) : 118 x 63 x 24,5 mm
Poids (piles incluses) : 130 g
Accessoires : Pile sèche de 9V (6F22) x 1
* Les spécifications et l’aspect externe peuvent être modifiés sans aucun avis.
■ TECHNISCHE DATEN
Anzeigen :Flüssigkristall-Display, Stimmanzeigen (3 LEDs)
Stimmnoten : E-Gitarre E, A, D, G, B, E
Baß B, E, A, D, G, C
Noteneinstellbereich : A0 (27Hz) bis C8 (4186Hz)
Präzision : ±1 cent
Tonhöhengenauigkeit : ±3 cent
Standardtonhöhen-Einstellbereich
: A4=435 bis 446Hz (in Schritten zu 1 Hz)
Eingänge : INPUT-Buchse (6 mm, mono), Mikrofon
Ausgang : OUTPUT-Buchse (6 mm, mono)
Power Source : 9V dry cell battery (006P or 6F22)
Batterie-Lebensdauer : ca. 50 Studen (AUTO-Betrieb)
Abmessungen (B x H x T) : 118 x 63 x 24.5 mm
Gewicht
(einschließlich Batterien)
: 130 g
Zubehör : 9V Batterie (6F22) x 1
* Änderungen an Daten und Design vorbehalten.
■ EINSTELLEN DER BEZUGSTONHÖHE
1. Stellen Sie den POWER-Schalter u auf ON. Die Tonhöhe ist auf 440 Hz
voreingestellt (Blinkanzeige).
2. Drücken Sie den PITCH-Schalter r, bis die gewünschte Bezugstonhöhe
(435 bis 446 Hz) angezeigt wird.
■ STIMMVORGANG
● Automatisches Stimmen: AUTO
Das Stimmgerät wählt automatisch den Ton, der dem Ton der gezupften Saite
am nächsten kommt.
1. Eine elektrische Gitarre/Baßgitarre wird mit dem Gitarrenkabel an die
INPUT-Buchse o angeschlossen. (An der OUTPUT-Buchse o kann ein
Verstärker angeschlossen werden. Das Gitarrensignal wird bei ein- und
ausgeschaltetem Stimmgerät an den Verstärker weitergeleitet. Bei
eingeschaltetem Stimmgerät können jedoch Rauscheinstreuungen
auftreten, weshalb dieses beim Spielen stets ausgeschaltet sein sollte.)
* Wenn die INPUT-Buchse o beschaltet ist, arbeitet das eingebaute Mikrofon y
nicht.
2. Stellen Sie den POWER-Schalter u auf ON.
Die Bezugstonhöhe (werkseitig auf A = 440 Hz voreingestellt) blinkt etwa 2
Sekunden lang auf dem Display q. Danach schaltet das Stimmgerät auf
automatischen Stimmbetrieb (GUITAR und AUTO erscheinen dabei auf
dem Display q).
3. Drücken Sie nun, falls erforderlich, den PITCH-Schalter r, um die
Bezugstonhöhe zu ändern. (Einzelheiten siehe EINSTELLEN DER
BEZUGSTONHÖHE an späterer Stelle.)
4. Geben Sie nun mit dem MODE-Schalter e den Typ der zu stimmenden
Gitarre vor. Der Gitarrentyp (GUITAR oder BASS) wird auf dem Display q
angezeigt.
5. Wenn es sich um eine akustische Gitarre handelt, halten Sie das
Stimmgerät so, daß das eingebaute Mikrofon y sich so dicht wie möglich
am Schalloch der Gitarre befindet.
6. Zupfen Sie die zu stimmende Saite an. (Vermeiden Sie ein gleichzeitiges
Zupfen mehrerer Saiten.) Der Name des erkannten Tons erscheint dabei
auf dem Display q. Stimmen Sie nun die Saite mit Hilfe des Zeigers und
der Stimmanzeige w.
6-1. Stimmen Sie die Saite zunächst, bis ihr Tonname auf dem Display
blinkt.
6-2. Stimmen Sie die Saite nun fein ein, bis der Zeiger in der Mitte steht und
die grüne LED der Stimmanzeigew leuchtet.
Die Saite stimmen, bis der
Zeite in der Mitte steht.
■ BAUTEILE
MIC
u Ein/Aus-
Schalter
(POWER)
r Tonhöhenschalter (PITCH)
y Eingebautes Mikrofon
w Stimmanzeige
q Display
3. Wenn der PITCH-Schalter r etwa 2 Sekunden lang nicht betätigt wird,
schaltet das Gerät automatisch auf Stimmbetrieb.
* Wenn Sie den POWER-Schalter u zum Ausschalten des Geräts auf OFF
stellen, wird die Bezugstonhöhe wieder auf A = 440 Hz rückgesetzt.
● Manuelles Stimmen: MANL.
Beim manuellen Stimmbetrieb müssen Sie die Note der zu stimmenden Saite
wählen.
1. Zunächst die in Schritten 1 bis 5 unter "Automatisches Stimmen"
beschriebenen Vorbereitungen treffen.
2. Den NOTE-Schalter t drücken, bis der Tonname der zu stimmenden
Saite blinkt. Das Stimmgerät ist nun auf manuellen Betrieb gestellt, und
MANL. wird zur Bestätigung unten links auf dem Display q angezeigt.
3. Nun die Saite anzupfen und stimmen, wie in Schritt 5 unter "Automatisches
Stimmen" beschrieben.
4. Schritte 2 und 3 wiederholt ausführen, um andere Saiten zu stimmen.
Wenn diese LED leuchtet,
ist die Saite gut gestimmt.
Beispiel: Stimmen der E-Saite einer 6saitigen Gitarre
Der Tonname der gezupften
Saite muß blinken.
GUITAR auf dem
Display wählen.
AUTO-Betrieb
wählen.
Die Bezugstonhöhe
wird hier angezeigt.
i Ausgangsbuchse
(OUTPUT)
o Eingangsbuchse
(INPUT)
t Tonwahlschalter (NOTE)
e Modusschalter (MODE)
■ RÉGLAGE DE LA HAUTEUR STANDARD
1. Mettre l’accordeur sous tension avec l’interrupteur d’alimentation POWER
u. La hauteur est calée sur 440 Hz (l’afficheur clignote).
2. Maintenir le commutateur PITCH r enfoncé jusqu’à ce que la hauteur
standard désirée soit otenue (435 – 446 Hz).
■ MÉTHODES D’ACCORD
● Accord automatique : AUTO
L’accordeur sélectionnera automatiquement le nom de la note (le nom de la
corde) le plus proche de la tonalité de la corde pincée.
1. Avec les guitares électriques ou basses, raccorder le câble de guitare à la
mini-prise INPUT o.
(Il est également possible de raccorder la mini-prise OUTPUT i à un
amplificateur. Que l’alimentation de l’accordeur soit appliquée ou non avec
l’interrupteur d’alimentation, le signal de la guitare sera envoyé à
l’amplificateur. Cependant, cela risque de perturber la ligne en la parasitant
quelque peu de sorte qu’il est préférable de couper l’alimentation de
l’accordeur pendant que cette opération se déroule.)
* Le microphone incorporé y est automatiquement asservi dès que la prise d’un
câble est raccordée à la mini-prise INPUT o.
2.
Mettre l’accordeur sous tension avec l’interrupteur d’alimentation POWER u.
La hauteur standard du son (dont le préréglage a été fait sur A = 440 Hz en
usine) apparaîtra en clignotant dans l’afficheur à cristaux liquides q
pendant 2 secondes environ. Ensuite, l’accordeur se commutera en mode
d’accord automatique (GUITAR et AUTO apparaîtront dans l’afficheur à
cristaux liquides q).
3. Se servir du commutateur PITCH r pour changer la hauteur standard.
(Reportez-vous à la description intitulée “Réglage de la hauteur de
standard” ci-après.)
4. Appuyer sur le commutateur MODE e pour choisir l’instrument à accorder.
GUITAR ou BASS apparaîtront dans l’afficheur à cristaux liquides q.
5. Pour accorder une guitare acoustique, placer le microphone interne de
l’accordeur y le plus près possible de la bouche de la guitare.
6. Pincer la corde qui doit être accordée. (Ne pas pincer plus d’une corde à la
fois.) La corde appropriée apparaîtra dans l’afficheur à cristaux liquides q.
Utiliser en même temps l’aiguille et le guide d’accord w comme moyen de
référence tout en accordant l’instrument.
6-1. Régler tout d’abord la corde pour faire en sorte que l’indicateur du nom
de la corde appropriée clignote.
6-2. Ensuite, accorder la corde jusqu’à ce que l’aiguille se stabilise en position
centrale et que la diode électroluminescente verte du guide d’accord w
s’allume.
Accorder jusqu’à ce que l’aiguille se
stabilise en position centrale.
■ ORGANES
MIC
u Interrupteur
d’alimentation
POWER
r Commutateur de hauteur PITCH
y Microphone incorporé
w Guide d’accord
q Afficheur à cristaux
liquides
3. Si le commutateur PITCH r est laissé ainsi sans être enfoncé pendant 2
secondes environ, l’accordeur reviendra automatiquement en mode
d’accord.
* Lorsque l’alimentation de l’accordeur est coupée avec l’interrupteur
d’alimentation POWER u, la hauteur standard est ramenée sur A = 440 Hz.
● Accord manuel : MANL.
Chaque note doit être choisie individuellement à chaque fois que c’est
nécessaire.
1. Effectuer les mêmes réglages que ceux qui sont mentionnés aux étapes 1
à 5 ci-dessus du passage consacré au procédé d’accord automatique.
2. Maintenir le commutateur NOTE t enfoncé jusqu’à ce que le nom de la note
que l’on veut obtenir (nom de la corde) clignote. L’accordeur se trouve
maintenant en mode d’accord manuel et MANL. apparaît dans le coin
inférieur gauche de l’afficheur à cristaux liquides t.
3. Comme au cours de l’étape 5 du passage consacré au procédé d’accord
automatique, pincer la corde qui doit être accordée et faire en sorte que la
corde soit accordée.
4. Refaire les étapes 2 et 3 pour accorder les autres cordes.
La corde est accordée dès que la
diode électroluminescente s’allume.
Exemple) Comment accorder la corde de mi d’une guitare à six cordes.
Le nom de la corde
pincée clignote.
Choisir l’indication
GUITAR dans
l’afficheur à
cristaux liquides.
Choisir le mode
AUTO.
La hauteur
standard est
affichée.
i Mini-prise de
sortie OUTPUT
o Mini-prise
d’entrée INPUT
t Commutateur de note NOTE
e Commutateur de mode MODE
* Toujours mettre l’interrupteur POWER u sur la position “OFF” avant de
remplacer la pile.
LE PRESENT APPAREIL NUMERIQUE N'EMET PAS DE BRUITS
RADIOELECTRIQUES DEPASSANT LES LIMITES APPLICABLES AUX
APPAREILS NUMERIQUES DE LA "CLASSE B" PRESCRITES DANS LE
REGLEMENT SUR LE BROUILLAGE RADIOELECTRIQUE EDICTE PAR LE
MINISTERE DES COMMUNICATIONS DU CANADA.
* Vor dem Wechseln der Batterie den Betriebs-schalter u unbedingt auf OFF
stellen.
435→436→437→438→439→440→441→442→443→444→445→446
435→436→437→438→439→440→441→442→443→444→445→446

YT-150
YT-150
u
u
r
o
i
o y
u
q
q
r
e
q
y
q w
w
GUITAR/BASS AUTO TUNER
MIC
u
r
y
w
q
r
u
t
q
YT-150
YT-150
OWNER’S MANUAL
Thank you for purchasing the YAMAHA YT-150 Guitar/Bass
Auto Tuner.
Please read this manual thoroughly and keep it in a safe place for
future reference.
6F22 or 006P
9V dry cell battery
■ BATTERY REPLACEMENT
GUITAR/BASS AUTO TUNER
■ PRECAUTIONS
◆ To prevent damage, do not use the tuner in the following locations:
• places where the unit will be in direct sunlight;
• places subject to temperature and humidity extremes;
• places that are sandy or dusty.
◆ To power the tuner, use only a 6F22 or 006P 9V dry cell battery.
◆ For maximum battery life, always be sure the tuner is turned OFF when not in
use.
◆ If an exhausted battery is left in the unit for an extended period of time, it may
leak and cause malfunctioning of the unit. When the battery becomes
exhausted, always remove it and replace it as soon as possible.
◆ Do not subject the tuner to strong physical shock or vibration. Do not use
excessive force on any of the controls.
◆ Never use solvents such as benzene or thinner to clean the tuner. Wipe clean
with a soft, dry cloth.
◆ After reading the owner's manual, keep it in a safe place for future reference.
Never dispose of used batteries by burning them.
Also make sure to keep batteries away from children.
FCC INFORMATION (U.S.A.)
1.IMPORTANT NOTICE: DO NOT MODIFY THIS UNIT!
This product, when installed as indicated in the instructions contained in this manual,
meets FCC requirements. Modifications not expressly approved by Yamaha may void
your authority, granted by the FCC, to use the product.
2.IMPORTANT: When connecting this product to accessories and/or another product
use only high quality shielded cables. Cable/s supplied with this product MUST be used.
Follow all installation instructions. Failure to follow instructions could void your FCC
authorization to use this product in the USA.
3.NOTE: This product has been tested and found to comply with the requirements listed
in FCC Regulations, Part 15 for Class ”B” digital devices. Compliance with these re-
quirements provides a reasonable level of assurance that your use of this product in a
residential environment will not result in harmful interference with other electronic de-
vices. This equipment generates/uses radio frequencies and, if not installed and used
according to the instructions found in the users manual, may cause interference harmful
to the operation of other electronic devices. Compliance with FCC regulations does not
guarantee that interference will not occur in all installations. If this product is found to
be the source of interference, which can be determined by turning the unit ”OFF” and
”ON”, please try to eliminate the problem by using one of the following measures:
Relocate either this product or the device that is being affected by the interference.
Utilize power outlets that are on different branch (circuit breaker or fuse) circuits or
install AC line filter/s.
In the case of radio or TV interference, relocate/reorient the antenna. If the antenna
lead-in is 300 ohm ribbon lead, change the lead-in to co-axial type cable.
If these corrective measures do not produce satisfactory results, please contact the
local retailer authorized to distribute this type of product. If you can not locate the
appropriate, please contact Yamaha Corporation of America, Electronic Service Divi-
sion, 6600 Orangethorpe Ave, Buena Park, CA 90620
The above statements apply ONLY to those products distributed by Yamaha
Corporations of America or its subsidiaries.
THIS DIGITAL APPARATUS DOES NOT EXCEED THE “CLASS B” LIMITS FOR RADIO
NOISE EMISSIONS FROM DIGITAL APPARATUS SET OUT IN THE RADIO INTERFER-
ENCE REGULATION OF THE CANADIAN DEPARTMENT OF COMMUNICATIONS.
■ TILT SLIT
The tuner can be tilted back by using the slit in the rear panel. Insert a coin or
similar flat object into the slit and tilt back as shown in the diagram below.
When battery power runs down, the
LCD indicator will grow dim.
Continued use of the tuner may result in
inaccurate operation. Replace the
battery with a new one (6F22 or 006P
9V dry cell battery) as soon as possible.
The battery compartment is in the rear
of the tuner. Remove the old battery
and replace it with a new one of the
same type. Be careful to connect the
battery in the correct polarity.
Bottom
side
Battery cover
■ SPECIFICATIONS
Indicators : Liquid crystal display, Tuning guides
Tuning Notes : GUITAR E, A, D, G, B, E
BASS B, E, A, D, G, C
Note Setting Range : A0 (27Hz) – C8 (4186Hz)
Accuracy : ±1 cent
In Pitch Accuracy : ±3 cent
Standard Pitch Setting Range : A4=435 – 446Hz (1Hz steps)
Input : INPUT (6
monaural), microphone
Output : OUTPUT (6
monaural)
Power Source : 9V dry cell battery (006P or 6F22)
Battery Life : Approximately 50 hrs. (AUTO mode)
Dimensions (W x H x D) : 118 x 63 x 24.5 mm (4.6" x 2.5" x 1.0")
Weight (including battery) : 130 g (4.6 oz)
Accessory : 9V dry cell battery (6F22) x 1
* Specifications and external appearance are subject to change without notice.
i
o
t
e
■ SETTING THE STANDARD PITCH
1. Turn the POWER switch u ON. The pitch is set to 440 Hz (flashing
display).
2. Continuously press the PITCH switch r until the desired standard pitch
(435 – 446Hz) is selected.
435→436→437→438→439→440→441→442→443→444→445→446
■ TUNING PROCEDURES
● Auto Tuning : AUTO
The tuner will automatically select the closest note name (string name) to the
plucked string’s pitch.
1. For electric guitars/basses, connect the guitar cable to the INPUT jack o.
(The OUTPUT jack i can also be connected to an amplifier. The guitar’s
signal will be sent to the amp whether the tuner’s power is switched ON or
OFF. However, it might result in added noise to the line so you should
switch the tuner’s power OFF during performance.)
* The built-in microphone y will not operate when a cable is plugged into the
INPUT jack o.
2. Turn the POWER switch u ON.
The standard pitch (factory preset A=440Hz) will flash on LCD indicator q
for about 2 seconds. After that, the tuner will enter the auto tuning mode
(GUITAR and AUTO will appear on the LCD indicator q).
3. Use the PITCH switch r to change the standard pitch. (Refer to the
“Setting the Standard Pitch” section below.)
4. Press the MODE switch e to select the instrument to be tuned. GUITAR or
BASS will appear on the LCD indicator q.
5. To tune an acoustic guitar, place the tuner’s internal microphone y as
close as possible to the guitar’s sound hole.
6. Pluck the string to be tuned. (Do not pluck more than one string at a time.)
The appropriate string name will appear on the LCD indicator q. Use the
needle and the tuning guide w as a reference while tuning the instrument.
6-1. First, adjust the string so that the appropriate string name indicator
flashes.
6-2. Next, tune the string until the needle rests in the middle and the green
LED of the tuning guide w lights.
Tune until needle comes to
rest in the center.
■ COMPONENTS
MIC
u POWER
switch
r PITCH switch
y Built-in microphone
w Tuning guide
q LCD indicator
3. When the PITCH switch r has not been pressed for about 2 seconds, the
tuner will automatically return to the tuning mode.
* When the POWER switch u is turned OFF, the standard pitch setting will be
reset to A=440Hz.
● Manual Tuning : MANL.
Each note must be selected individually as needed.
1. Carry out the same settings as described in steps 1 through 5 of the Auto
Tuning section.
2. Continue to press the NOTE switch t until the desired note name (string
name) flashes. The tuner is now in the manual mode, MANL. appears in
the bottom left hand corner of the LCD display q.
3. As in step 5 of the Auto Tuning section, pluck the string to be tuned and
proceed to tune the string.
4. Repeat steps 2 and 3 to tune other strings.
When this LED lights,
the string is tuned.
example) To tune the “E” string on a six string guitar.
The string name of the
plucked string flashes.
Select GUITAR on
the LCD indicator.
Select the AUTO
mode.
Standard Pitch is
displayed.
i OUTPUT
jack
o INPUT
jack
t NOTE switch
e MODE switch
* Always turn the POWER switch u to “OFF” before changing the battery.
YT-150
YT-150
BEDIENUNGSANLEITUNG
Vielen Dank für den Kauf des elektronischen Gitarren/Baß-
Stimmgeräts YT-150 von YAMAHA.
Lesen Sie diese Anleitung bitte aufmerksam durch, und bewahren
Sie sie dann zur späteren Bezugnahme gut auf.
ELEKTRONISCHES GITARREN/BASS- STIMMGERÄT
YT-150
YT-150
MODE D’EMPLOI
Nous vous remercions d’avoir porté votre choix sur l’accordeur
automatique de guitare/basse YAMAHA YT-150.
Nous vous prions de lire attentivement ce mode d’emploi et de le
conserver en lieu sûr pour vous y reporter ultérieurement.
ACCORDEUR AUTOMATIQUE DE GUITARE/BASSE
■ VORSICHTSMASSREGELN
◆ Verwenden Sie das Stimmgerät nicht an Orten, wo es den folgenden
schädlichen Einflüssen ausgesetzt ist:
• Direktes Sonnenlicht
• Extreme Temperatur- und Luftfeuchtigkeitswerte
• Sand und Staub
◆ Verwenden Sie als Stromquelle ausschließlich 9V-Trockenbatteriezellen vom
Typ 6F22 oder 006P.
◆ Schalten Sie das Stimmgerät nach Gebrauch stets aus, um die Batterien zu
schonen.
◆ Wenn verbrauchte Batterien längere Zeit im Gerät verbleiben, können sie
auslaufen und Schäden verursachen. Wenn die Batterien schwächer
werden, sollten Sie sie daher entnehmen und so bald wie möglich durch neue
ersetzen.
◆ Schützen Sie das Stimmgerät vor starken Schlägen und Erschütterungen.
Wenden Sie beim Betätigen der Bedienelemente nicht zu viel Kraft auf.
◆ Verwenden Sie zum Säubern des Stimmgeräts keine Lösungsmittel wie
Benzin oder Verdünner. Entfernen Sie Staub und Schmutz mit einem
weichen, trockenen Tuch.
◆ Bewahren Sie diese Anleitung nach dem Durchlesen gut auf.
Achten Sie bitte auf korrekte Entsorgung verbrauchter
Batterien. Batterien dürfen nicht verbrannt werden!
Achten Sie bitte auch darauf, daß Batterien nicht in
Kinderhände geraten.
■ PRECAUTIONS
◆ Afin de ne pas endommager l’accordeur, évitez de l’utiliser dans des endroits
répondant aux conditions suivantes :
• plein soleil
• humidité ou températures excessives.
• sable ou poussière
◆ Pour alimenter l’accordeur, utilisez exclusivement une pile sèche 6F22 ou
006P de 9 Volts.
◆ Pour garantir une longévité maximale des piles, mettez toujours l’accordeur
hors tension lorsque vous ne l’utilisez pas.
◆ Les piles épuisées qui restent dans l’accordeur pendant une longue période,
peuvent fuir et provoquer des anomalies de fonctionnement. Lorsque les
piles présentent des signes de décharge, remplacez-les dans le délai le plus
bref.
◆ L’accordeur ne doit pas subir de chocs ni de vibrations importants. Ne le
manipulez jamais avec une force excessive.
◆ N’utilisez jamais de solvants tels que de la benzine ou du diluant pour
nettoyer l’accordeur. Essuyez-le avec un chiffon doux et sec.
◆ Après avoir lu ce mode d’emploi, conservez-le en lieu sûr pour vous y reporter
ultérieurement.
Ne jetez jamais les piles au feu et conservez-les
toujours hors de portée des enfants.
Bescheinigung des Importeurs
Hiermit wird bescheinigt, daß der / die / das
GUITAR/BASS AUTO TUNER Typ : YT-150
(Gerät, Typ, Bezeichnung)
in Übereinstimmung mit den Bestimmungen der
VERFÜGUNG 1046/84
(Amtsblattverfügung)
funkentstört ist.
Der Deutschen Bundespost wurde das Inverkehrbringen dieses Gerätes
angezeigt und die Berechtigung zur Überprüfung der Serie auf
Einhaltung der Bestimmungen eingeräumt.
YAMAHA Europa GmbH
Name des Importeurs
■ KIPPSCHLITZ
Das YT-150 weist einen Schlitz auf der Rückseite auf, wodurch es nach hinten
gekippt werden kann. Eine Münze o.ä. in den Schlitz einführen und das Gerät
nach hinten kippen, wie gezeigt.
■ FENTE D’INCLINAISON
L’accordeur peut être maintenu incliné en utilisant la fente du panneau arrière.
Introduire une pièce de monnaie, ou autre objet plat similaire, dans la fente et
incliner l’accordeur de la manière illustrée.
Pile 6F22 ou 006P
de 9 Volts
■ REMPLACEMENT DE LA PILE
Lorsque la puissance de la pile devient
insuffisante, l’afficheur à cristaux
liquides s’assombrit.
Le fait de continuer à utiliser l’accordeur
dans ces conditions risque de ne pas
permettre de fournir une indication
précise. Remplacer la pile par une pile
sèche neuve (6F22 ou 006P 9 V) dans
les meilleurs délais.
Le logement de la pile est situé au dos
de l’accordeur. Retirer la pile usée et
la remplacer par une pile neuve du
même type. Faire très attention de pla-
cer la pile en respectant les polarités.
Dos de
l’accordeur
Couvercle du
logement des piles
Unterseite
Batteriefachdeckel
Batterie 6F22
oder 006P, 9V
■ BATTERIEWECHSEL
Wenn die Batterie erschöpft ist, sind die
Anzeigen des Flüssigkristall-Displays
schwächer als gewöhnlich.
Falls das Stimmgerät in diesem
Zustand weiterbenutzt wird, kann es
ungenau arbeiten. Ersetzen Sie die
Batterie (9-V-Trockenbatterie vom Typ
6F22 oder 006P) daher so bald wie
möglich durch eine neue.
Das Batteriefach befindet sich auf der
Rückseite. Die alte Batterie durch eine
neue des gleichen Typs austauschen.
Beim Anschließen der Batterie auf kor-
rekte Polung achten.
■ FICHE TECHNIQUE
Indicateurs et témoins : Afficheur à cristaux liquides, guide d’accord (à 3
diodes électroluminescentes)
Notes d’accord : guitare E, A, D, G, B, E
basse B, E, A, D, G, C
Plage de réglage de note : A0 (27Hz) - C8 (4186Hz)
Précision : ± 1 centième
Précision de hauteur : ± 3 centièmes
Plage de réglage de hauteur standard
: A4=435 - 446Hz (par incréments d’1 Hz)
Entrée : INPUT (6
monaurale), microphone
Sortie : OUTPUT (6
monaurale)
Source d’alimentation : Pile sèche de 9V (006P ou 6F22)
Autonomie des piles : 50 heures environ. (Mode AUTO)
Dimensions (L x H x P) : 118 x 63 x 24,5 mm
Poids (piles incluses) : 130 g
Accessoires : Pile sèche de 9V (6F22) x 1
* Les spécifications et l’aspect externe peuvent être modifiés sans aucun avis.
■ TECHNISCHE DATEN
Anzeigen :Flüssigkristall-Display, Stimmanzeigen (3 LEDs)
Stimmnoten : E-Gitarre E, A, D, G, B, E
Baß B, E, A, D, G, C
Noteneinstellbereich : A0 (27Hz) bis C8 (4186Hz)
Präzision : ±1 cent
Tonhöhengenauigkeit : ±3 cent
Standardtonhöhen-Einstellbereich
: A4=435 bis 446Hz (in Schritten zu 1 Hz)
Eingänge : INPUT-Buchse (6 mm, mono), Mikrofon
Ausgang : OUTPUT-Buchse (6 mm, mono)
Power Source : 9V dry cell battery (006P or 6F22)
Batterie-Lebensdauer : ca. 50 Studen (AUTO-Betrieb)
Abmessungen (B x H x T) : 118 x 63 x 24.5 mm
Gewicht
(einschließlich Batterien)
: 130 g
Zubehör : 9V Batterie (6F22) x 1
* Änderungen an Daten und Design vorbehalten.
■ EINSTELLEN DER BEZUGSTONHÖHE
1. Stellen Sie den POWER-Schalter u auf ON. Die Tonhöhe ist auf 440 Hz
voreingestellt (Blinkanzeige).
2. Drücken Sie den PITCH-Schalter r, bis die gewünschte Bezugstonhöhe
(435 bis 446 Hz) angezeigt wird.
■ STIMMVORGANG
● Automatisches Stimmen: AUTO
Das Stimmgerät wählt automatisch den Ton, der dem Ton der gezupften Saite
am nächsten kommt.
1. Eine elektrische Gitarre/Baßgitarre wird mit dem Gitarrenkabel an die
INPUT-Buchse o angeschlossen. (An der OUTPUT-Buchse o kann ein
Verstärker angeschlossen werden. Das Gitarrensignal wird bei ein- und
ausgeschaltetem Stimmgerät an den Verstärker weitergeleitet. Bei
eingeschaltetem Stimmgerät können jedoch Rauscheinstreuungen
auftreten, weshalb dieses beim Spielen stets ausgeschaltet sein sollte.)
* Wenn die INPUT-Buchse o beschaltet ist, arbeitet das eingebaute Mikrofon y
nicht.
2. Stellen Sie den POWER-Schalter u auf ON.
Die Bezugstonhöhe (werkseitig auf A = 440 Hz voreingestellt) blinkt etwa 2
Sekunden lang auf dem Display q. Danach schaltet das Stimmgerät auf
automatischen Stimmbetrieb (GUITAR und AUTO erscheinen dabei auf
dem Display q).
3. Drücken Sie nun, falls erforderlich, den PITCH-Schalter r, um die
Bezugstonhöhe zu ändern. (Einzelheiten siehe EINSTELLEN DER
BEZUGSTONHÖHE an späterer Stelle.)
4. Geben Sie nun mit dem MODE-Schalter e den Typ der zu stimmenden
Gitarre vor. Der Gitarrentyp (GUITAR oder BASS) wird auf dem Display q
angezeigt.
5. Wenn es sich um eine akustische Gitarre handelt, halten Sie das
Stimmgerät so, daß das eingebaute Mikrofon y sich so dicht wie möglich
am Schalloch der Gitarre befindet.
6. Zupfen Sie die zu stimmende Saite an. (Vermeiden Sie ein gleichzeitiges
Zupfen mehrerer Saiten.) Der Name des erkannten Tons erscheint dabei
auf dem Display q. Stimmen Sie nun die Saite mit Hilfe des Zeigers und
der Stimmanzeige w.
6-1. Stimmen Sie die Saite zunächst, bis ihr Tonname auf dem Display
blinkt.
6-2. Stimmen Sie die Saite nun fein ein, bis der Zeiger in der Mitte steht und
die grüne LED der Stimmanzeigew leuchtet.
Die Saite stimmen, bis der
Zeite in der Mitte steht.
■ BAUTEILE
MIC
u Ein/Aus-
Schalter
(POWER)
r Tonhöhenschalter (PITCH)
y Eingebautes Mikrofon
w Stimmanzeige
q Display
3. Wenn der PITCH-Schalter r etwa 2 Sekunden lang nicht betätigt wird,
schaltet das Gerät automatisch auf Stimmbetrieb.
* Wenn Sie den POWER-Schalter u zum Ausschalten des Geräts auf OFF
stellen, wird die Bezugstonhöhe wieder auf A = 440 Hz rückgesetzt.
● Manuelles Stimmen: MANL.
Beim manuellen Stimmbetrieb müssen Sie die Note der zu stimmenden Saite
wählen.
1. Zunächst die in Schritten 1 bis 5 unter "Automatisches Stimmen"
beschriebenen Vorbereitungen treffen.
2. Den NOTE-Schalter t drücken, bis der Tonname der zu stimmenden
Saite blinkt. Das Stimmgerät ist nun auf manuellen Betrieb gestellt, und
MANL. wird zur Bestätigung unten links auf dem Display q angezeigt.
3. Nun die Saite anzupfen und stimmen, wie in Schritt 5 unter "Automatisches
Stimmen" beschrieben.
4. Schritte 2 und 3 wiederholt ausführen, um andere Saiten zu stimmen.
Wenn diese LED leuchtet,
ist die Saite gut gestimmt.
Beispiel: Stimmen der E-Saite einer 6saitigen Gitarre
Der Tonname der gezupften
Saite muß blinken.
GUITAR auf dem
Display wählen.
AUTO-Betrieb
wählen.
Die Bezugstonhöhe
wird hier angezeigt.
i Ausgangsbuchse
(OUTPUT)
o Eingangsbuchse
(INPUT)
t Tonwahlschalter (NOTE)
e Modusschalter (MODE)
■ RÉGLAGE DE LA HAUTEUR STANDARD
1. Mettre l’accordeur sous tension avec l’interrupteur d’alimentation POWER
u. La hauteur est calée sur 440 Hz (l’afficheur clignote).
2. Maintenir le commutateur PITCH r enfoncé jusqu’à ce que la hauteur
standard désirée soit otenue (435 – 446 Hz).
■ MÉTHODES D’ACCORD
● Accord automatique : AUTO
L’accordeur sélectionnera automatiquement le nom de la note (le nom de la
corde) le plus proche de la tonalité de la corde pincée.
1. Avec les guitares électriques ou basses, raccorder le câble de guitare à la
mini-prise INPUT o.
(Il est également possible de raccorder la mini-prise OUTPUT i à un
amplificateur. Que l’alimentation de l’accordeur soit appliquée ou non avec
l’interrupteur d’alimentation, le signal de la guitare sera envoyé à
l’amplificateur. Cependant, cela risque de perturber la ligne en la parasitant
quelque peu de sorte qu’il est préférable de couper l’alimentation de
l’accordeur pendant que cette opération se déroule.)
* Le microphone incorporé y est automatiquement asservi dès que la prise d’un
câble est raccordée à la mini-prise INPUT o.
2.
Mettre l’accordeur sous tension avec l’interrupteur d’alimentation POWER u.
La hauteur standard du son (dont le préréglage a été fait sur A = 440 Hz en
usine) apparaîtra en clignotant dans l’afficheur à cristaux liquides q
pendant 2 secondes environ. Ensuite, l’accordeur se commutera en mode
d’accord automatique (GUITAR et AUTO apparaîtront dans l’afficheur à
cristaux liquides q).
3. Se servir du commutateur PITCH r pour changer la hauteur standard.
(Reportez-vous à la description intitulée “Réglage de la hauteur de
standard” ci-après.)
4. Appuyer sur le commutateur MODE e pour choisir l’instrument à accorder.
GUITAR ou BASS apparaîtront dans l’afficheur à cristaux liquides q.
5. Pour accorder une guitare acoustique, placer le microphone interne de
l’accordeur y le plus près possible de la bouche de la guitare.
6. Pincer la corde qui doit être accordée. (Ne pas pincer plus d’une corde à la
fois.) La corde appropriée apparaîtra dans l’afficheur à cristaux liquides q.
Utiliser en même temps l’aiguille et le guide d’accord w comme moyen de
référence tout en accordant l’instrument.
6-1. Régler tout d’abord la corde pour faire en sorte que l’indicateur du nom
de la corde appropriée clignote.
6-2. Ensuite, accorder la corde jusqu’à ce que l’aiguille se stabilise en position
centrale et que la diode électroluminescente verte du guide d’accord w
s’allume.
Accorder jusqu’à ce que l’aiguille se
stabilise en position centrale.
■ ORGANES
MIC
u Interrupteur
d’alimentation
POWER
r Commutateur de hauteur PITCH
y Microphone incorporé
w Guide d’accord
q Afficheur à cristaux
liquides
3. Si le commutateur PITCH r est laissé ainsi sans être enfoncé pendant 2
secondes environ, l’accordeur reviendra automatiquement en mode
d’accord.
* Lorsque l’alimentation de l’accordeur est coupée avec l’interrupteur
d’alimentation POWER u, la hauteur standard est ramenée sur A = 440 Hz.
● Accord manuel : MANL.
Chaque note doit être choisie individuellement à chaque fois que c’est
nécessaire.
1. Effectuer les mêmes réglages que ceux qui sont mentionnés aux étapes 1
à 5 ci-dessus du passage consacré au procédé d’accord automatique.
2. Maintenir le commutateur NOTE t enfoncé jusqu’à ce que le nom de la note
que l’on veut obtenir (nom de la corde) clignote. L’accordeur se trouve
maintenant en mode d’accord manuel et MANL. apparaît dans le coin
inférieur gauche de l’afficheur à cristaux liquides t.
3. Comme au cours de l’étape 5 du passage consacré au procédé d’accord
automatique, pincer la corde qui doit être accordée et faire en sorte que la
corde soit accordée.
4. Refaire les étapes 2 et 3 pour accorder les autres cordes.
La corde est accordée dès que la
diode électroluminescente s’allume.
Exemple) Comment accorder la corde de mi d’une guitare à six cordes.
Le nom de la corde
pincée clignote.
Choisir l’indication
GUITAR dans
l’afficheur à
cristaux liquides.
Choisir le mode
AUTO.
La hauteur
standard est
affichée.
i Mini-prise de
sortie OUTPUT
o Mini-prise
d’entrée INPUT
t Commutateur de note NOTE
e Commutateur de mode MODE
* Toujours mettre l’interrupteur POWER u sur la position “OFF” avant de
remplacer la pile.
LE PRESENT APPAREIL NUMERIQUE N'EMET PAS DE BRUITS
RADIOELECTRIQUES DEPASSANT LES LIMITES APPLICABLES AUX
APPAREILS NUMERIQUES DE LA "CLASSE B" PRESCRITES DANS LE
REGLEMENT SUR LE BROUILLAGE RADIOELECTRIQUE EDICTE PAR LE
MINISTERE DES COMMUNICATIONS DU CANADA.
* Vor dem Wechseln der Batterie den Betriebs-schalter u unbedingt auf OFF
stellen.
435→436→437→438→439→440→441→442→443→444→445→446
435→436→437→438→439→440→441→442→443→444→445→446

435→436→437→438→439→440→441→442→443→444→445→446
YT-150
YT-150
MANUALE UTENTE
Grazie per avere scelto l’accordatore YAMAHA YT-150.
Vi preghiamo di leggere attentamente questo manuale e di
conservarlo per eventuali necessità.
batteria 9V
(6F22 o 006P)
■ SOSTITUZIONE DELLA BATTERIA
Accordatore per chitarra / basso
■ AVVERTENZE
◆ Per prevenire guasti, non utilizzare l’accordatore nelle seguenti locazioni:
• luoghi direttamente esposti al sole;
• luoghi soggetti a livelli estremi di temperatura e umidità;
• luoghi sabbiosi o polverosi.
◆ Per alimentare l’accordatore utilizzare esclusivamente batterie 9V dry cell
(6F22 o 006P).
◆ Per ottenere la massima durata della batteria, assicurarsi sempre che
l’accordatore sia spento quando inutilizzato.
◆ Se una batteria scarica è lasciata all’interno dell’apparecchio per un periodo
di tempo prolungato, può rilasciare perdite e causare danni all’unità.
Quando la batteria è scarica è necessario rimuoverla e sostituirla appena
possibile.
◆ Non sottoporre l’accordatore a forti urti o vibrazioni. Non usare eccessiva
forza sui controlli.
◆ Non utilizzare mai solventi come benzene o diluente per pulire
l’accordatore. Usare un panno soffice e asciutto.
◆ Dopo aver letto il manuale, conservarlo in un posto sicuro per eventuali
necessità future.
Non tentare di bruciare le batterie usate.
Tenere le batterie fuori dalla portata dei bambini.
■ INCLINAZIONE DELL’ACCORDATORE
L’accordatore può essere inclinato all’indietro utilizzando la fessura posta nel
pannello posteriore. Inserire una moneta o un oggetto piatto simile e
posizionare come nel disegno.
Quando la batteria è scarica,
l’indicatore LCD si affievolisce.
L’utilizzo continuato dell’accordatore
può determinare un funzionamento
non corretto. Sostituire la batteria con
una nuova (6F22 o 006P) appena
possibile.
Il compartimento della batteria si trova
sul retro dell’accordatore. Rimuovere
la vecchia batteria e sostituirla con una
nuova dello stesso tipo. Fare
attenzione a collegare la batteria con
la corretta polarità.
parte
posteriore
coperchio portapilà
■ SPECIFICHE TECNICHE
Indicatori : Indicatore LCD, LED guida per l’accordatura
Note selezionabili : CHITARRA E, A, D, G, B, E
BASSO B, E, A, D, G, C
Gamma di accordatura : A0 (27 Hz) – C8 (4186 Hz)
Accuratezza :+/– 1 cent
Accuratezza “In Pitch” :+/– 3 cent
Gamma di intonazione : A4= 435 – 446 Hz (in incrementi di 1 Hz)
Ingresso : INPUT (jack mono, microfono)
Uscita : OUTPUT (jack mono)
Alimentazione : batteria 9V (6F22 o 006P)
Durata della batteria : 50 ore circa (modalità di Accordatura automatica)
Dimensioni : 118 x 63 x 24,5 mm
Peso (batteria inclusa) : 130 g
Accessori : batteria 9V (6F22) x 1
* Specifiche soggette a cambio senza preavviso.
■ IMPOSTARE L‘INTONAZIONE (Standard pitch)
1. Impostare l’interruttore POWER u su ON.
2. Premere ripetutamente il selettore PITCH r fino a selezionare (con
incrementi di 1 Hz) l’intonazione desiderata.
■ PROCEDURA DI ACCORDATURA
● Accordatura automatica : AUTO
L’accordatore selezionerà automaticamente la nota più vicina (indicata con il
nome della corda) all’accordatura della corda suonata.
1. Con chitarre/bassi elettrici, collegare il cavo proveniente dallo strumento al
jack INPUT o. Il jack OUTPUT i può essere collegato all’amplificatore. Il
segnale della chitarra sarà inviato all’amplificatore con l’interruttore
impostato sia in ON che in OFF. Si consiglia comunque di impostare
l’interruttore su OFF durante l’esecuzione per evitare l’introduzione di
rumori indesiderati.
* Il microfono incorporato y non funziona se un cavo è collegato al jack INPUT o.
2. Impostare l’interruttore POWER u su ON.
L’intonazione (standard pitch) sarà indicata in modo lampeggiante
sull’indicatore LCD q per circa 2 secondi. Dopo, l’accordatore si
posizionerà in modalità di Accordatura automatica (le indicazioni GUITAR
e AUTO appariranno sull’indicatore LCD q.)
3. Utilizzare il selettore PITCH r per cambiare l’intonazione di riferimento
(vedere la sezione “Impostare l’intonazione” più avanti).
4. Premere il selettore MODE e per selezionare il tipo di strumento da
accordare. La scritta GUITAR o BASS apparirà nell’indicatore LCD q.
5. Per accordare una chitarra acustica, posizionare il microfono incorporato
y il più vicino possibile alla buca della chitarra.
6. Suonare la corda da accordare (non suonare più di una corda alla volta).
Il nome della corda apparirà nell’indicatore LCD q. Utilizzare l’ago e gli
indicatori LED guida per l’accordatura w come riferimento.
6-1. Innanzitutto, regolare la corda in modo che si illumini il corretto
indicatore.
6-2. In seguito, perfezionare l’accordatura in modo che l’ago si posizioni in
mezzo e il LED verde (fra gli indicatori LED guida per l’accordatura w)
si illumini.
L’ago deve trovarsi in
centro.
■ COMPONENTI
MIC
u interruttore
POWER
r selettore PITCH
y microfono incorporato
w LED guida per l’accordatura
q indicatore LCD
3. Quando il selettore PITCH r non è premuto per almeno 2 secondi,
l’accordatore ritorna automaticamente in modalità di accordatura.
* Quando l’interruttore POWER u è impostato su OFF, l’impostazione di
intonazione viene riportata a A = 440 Hz.
● Accordatura manuale : MANL.
Ognuna delle note deve essere selezionata individualmente secondo
necessità.
1. Seguire le stesse regolazioni descritte nei punti da 1 a 5 nella sezione
“Accordatura automatica”.
2. Premere ripetutamente il selettore NOTE t fino a far apparire il nome
della nota (e della corda) desiderata. L’accordatore si trova ora in modalità
di Accordatura manuale.
3. L’indicazione MANL appare nell’angolo in basso a sinistra dell’indicatore a
LED q.
4. Come descritto nel punto 5 della sezione Accordatura automatica, suonare
la corda e procedere all’accordatura.
5. Ripetere i punti 2 a 4 per accordare le altre corde.
Quando si accende il LED
verde, la corda è accordata.
Esempio) per accordare la corda MI (E) su una chitarra a sei corde :
La lettera corrispondente al
nome della corda si illumina.
Selezionare GUITAR
sull’indicatore LCD
Selezionare il
modo AUTO
L’intonazione
selezionata è
indicata a 440 Hz.
i jack
OUTPUT
(uscita)
o jack
INPUT
(ingresso)
t selettore NOTE
e selettore MODE
* Impostare sempre l’interruttore POWER u su “OFF” prima di sostituire la
batteria.
YT-150
YT-150
HANDLEIDING
Dank u voor de aanschaf van de YAMAHA YT-150 Gitaar/Bas Auto
Tuner.
Lees deze handleiding alstublieft aandachtig door, en bewaar deze
op een veilige plek zodat u er later nog eens iets in op kan zoeken.
6F22 of 006P
9V dry cell batterij
■ BATTERIJ VERVANGEN
GITAAR/BAS AUTO TUNER
■ VOORZORGSMAATREGELEN
◆ Gebruik de tuner niet op de volgende lokaties om schade te voorkomen:
• plaatsen waar het apparaat in direct zonlicht staat;
• plaatsen die worden blootgesteld aan extreme temperaturen en
vochtigheid;
• plaatsen waar veel zand ligt of waar het stoffig is.
◆ Voorzie de tuner alleen van stroom middels een 6F22 of 006P 9V dry cell
batterij.
◆ Doe de tuner altijd uit (OFF) als u hem niet gebruikt om de batterijen te
sparen.
◆ Als u een bijna lege batterij voor langere tijd in het apparaat laat zitten, kan
deze gaan lekken en schade veroorzaken aan het apparaat. Als de batterij
leeg raakt, moet u deze altijd verwijderen en deze zo snel mogelijk
vervangen.
◆ Stel het instrument niet bloot aan overdreven schokken of sterke vibraties. Ga
niet te ruw om met de knoppen.
◆ Gebruik nooit oplosmiddelen zoals benzine of verdunner om de tuner schoon
te maken. Maak het instrument schoon met een zachte, droge doek.
◆ Bewaar de handleiding na het lezen op een goede plek, zodat u er in een later
stadium ook nog eens wat in op kunt zoeken.
Verbrand gebruikte batterijen nooit.
Houdt batterijen buiten het bereik van kinderen.
Bij dit produkt zijn batterijen geleverd.
Wanneer deze leeg zijn, moet u ze niet weggooien
maar inleveren als KCA.
■ UITKLAP UITSPARING
De tuner kan worden uitgeklapt met behulp van de uitsparing op de achterkant.
Steek een munt of soortgelijk voorwerp in de uitsparing en klap de tuner uit zoals
getoond wordt in het onderstaande diagram.
Zodra de batterij leegraakt, wordt de
LCD indicator minder goed leesbaar.
Als u desondanks doorgaat met het
gebruiken van de tuner kan het zijn dat
deze niet goed meer werkt. Vervang
derhalve de batterij zo snel mogelijk
met nieuwe batterijen (6F22 of 006P 9V
dry cell batterij).
De batterijhouder bevindt zich op de
achterkant van de tuner. Verwijder de
oude batterijen en vervang deze door
nieuwe batterijen van hetzelfde type.
Let hierbij erop dat de polariteit van de
batterij juist wordt aangesloten.
Onderkant
Batterij deksel
■ SPECIFICATIES
Indicators : Liquid crystal display, Stemmingsindicators
Stem Noten : GUITAR E, A, D, G, B, E
BASS B, E, A, D, G, C
Nootbereik : A0 (27Hz) – C8 (4186Hz)
Nauwkeurigheid :+/– 1 cent
Nauwkeurigheid In Toonhoogte :+/– 3 cent
Standaard Toonhoogte Instelling Bereik
: A4=435 – 446Hz (1Hz stappen)
Input : INPUT (6 mono), microfoon
Output : OUTPUT (6 mono)
Voedingsbron : 9V dry cell batterij (006P of 6F22)
Batterijduur : Ongeveer 50 uur (AUTO mode)
Afmetingen (B x H x D) : 118 x 63 x 24.5 mm
Gewicht (inclusief batterij) : 130 g
Los verkrijgbaar : 9V dry cell batterij (6F22) x 1
* Specificaties en uiterlijk kunnen zich wijzigen zonder dat hier vantevoren over
bericht wordt.
■ STANDAARD TOONHOOGTE INSTELLEN
1. Zet het instrument aan met de aan/uit schakelaar (POWER schakelaar u
ON). De toonhoogte wordt op 440 Hz gezet (knipperende display).
2. Druk nu herhaaldelijk op de PITCH schakelaar r tot de gewenste standaard
toonhoogte is geselecteerd (435 – 446Hz).
■ HANDELINGEN BIJ HET STEMMEN
● Automatisch Stemmen : AUTO
De tuner selecteert automatisch de dichtstbijzijnde nootnaam (snaarnaam) van
de aangeslagen snaartoonhoogte.
1. Sluit de gitaarkabel bij elektrische gitaren/bassen aan op de INPUT jack o.
(De OUTPUT jack i kan bovendien worden aangesloten op een versterker.
Het gitaarsignaal wordt vervolgens naar de versterker gestuurd mits de tuner
aanstaat (aan/uit schakelaar op ON). Dit kan echter leiden tot extra
bijgeluiden in het lijnniveau als u de tuner tijdens het spelen uitzet.
* De ingebouwde microfoon y werkt niet als er een kabel is aangesloten op INPUT
jack o.
2. Doe de tuner aan met de POWER schakelaar u (ON).
De standaard toonhoogte (fabriekspreset A=440Hz) knippert ongeveer q of
2 seconden in de LCD indicator. Hierna gaat de tuner naar de automatische
stemmode (GUITAR en AUTO verschijnen in de LCD indicator q).
3. Wijzig de standaard toonhoogte met de PITCH schakelaar r. (Zie het “Het
instellen van de Standaard Toonhoogte” gedeelte hieronder.)
4. Druk op de MODE schakelaar e om het instrument te selecteren dat
gestemd moet worden. GUITAR of BASS verschijnt in de LCD indicator q.
5. Om een akoestische gitaar te stemmen moet u de ingebouwde microfoon y
van de tuner zo dicht mogelijk bij het klankgat van de gitaar houden.
6. Sla de snaar aan die u wilt stemmen. (Sla niet meer dan één snaar tegelijk
aan.)
De betreffende snaarnaam verschijnt in de LCD indicator q. Let op de naald
en de stemmingsindicator als een referentie tijdens het stemmen van het
instrument.
6-1. Sla eerst de snaar aan zodat de juiste snaarnaam indicator gaat
knipperen.
6-2. Stem vervolgens de snaar tot dat de naald netjes in het midden staat en
de groene LED van de stemmingsgids oplicht.
Stem tot de naald netjes
in het midden staat.
■ COMPONENTEN
MIC
u POWER
(aan/uit)
schakelaar
r PITCH (toonhoogte) schakelaar
y Ingebouwde microfoon
w Stemming indicator
q LCD indicator
3. Als de PITCH schakelaar r twee seconden lang niet wordt ingedrukt keert
de tuner automatisch terug naar de stem mode.
* Als u tuner uitzet (POWER schakelaar u op OFF), wordt de standaard
toonhoogte instelling gereset op A=440Hz.
● Handmatig stemmen: MANL.
Iedere noot moet naar wens individueel geselecteerd worden.
1. Voer dezelfde handelingen uit de omschreven handelingen in stappen 1 t/m
5 van het Automatisch Stemmen gedeelte.
2. Ga door met het indrukken van de NOTE schakelaar t tot de gewenste
nootnaam (snaarnaam knippert.) De tuner is nu in manual (handmatige)
mode, MANL. verschijnt onderin de linkerhoek van de LCD display q.
3. Sla, net als in stap 5 van het Automatische stemmen gedeelte, de snaar aan
die u wilt stemmen en begin met het stemmen van de snaar.
4. Herhaal stappen 2 en 3 om de andere snaren te stemmen.
Als deze LED oplicht, is
de snaar gestemd.
voorbeeld) Om de “E” snaar te stemmen van een gitaar met zes snaren.
De snaarnaam van de
aangeslagen snaar knippert.
Selecteer GUITAR
in de LCD indicator.
Selecteer de
AUTO mode.
De standaard
toonhoogte wordt
weergegeven.
i OUTPUT
jack
o INPUT
jack
t NOTE (noot) schakelaar
e MODE schakelaar
* Doe altijd het instrument uit (AAN/UIT schakelaar u uit (=“OFF”) ) alvorens
de batterij te verwisselen.
YT-150
YT-150
MANUAL DEL PROPIETARIO
Gracias por comprar el YAMAHA YT-150 Afinador Automático
de Guitarra y Bajo.
Por favor lea este manual completamente y manténgalo en un
lugar seguro para futuras consultas.
6F22 o 006P 9V
■ REEMPLAZO de la PILA
AFINADOR AUTOMATICO DE GUITARRA Y BAJO
■ PRECAUCIONES
◆ Para prevenir daños, no usar el afinador en las situaciones siguientes:
• los lugares donde la unidad estará expuesto a la luz del sol directa de
forma continuada;
• los lugares sujetos a temperaturas y humedad extremas;
• lugares que son arenosos o polvorientos.
◆ Para alimentar el afinador, use sólo una pila 6F22 o 006P 9V.
◆ Para la máxima vida de la pila, asegúrese que el afinador se apaga cuando
no se usa.
◆ Sí una pila gastada queda en la unidad por un periodo extendido de tiempo,
puede dañar la unidad. Cuando las pilas se agotan, quítelas y reemplácelas
lo más pronto posible.
◆ No someta el afinador a golpe físico fuerte o vibración. No use fuerza
excesiva en cualquiera de los mandos.
◆ Nunca use disolventes como gasolina o aguarrás para limpiar el afinador.
Límpielo con un paño suave y seco.
◆ Después de leer el manual, manténgalo en un lugar seguro para futuras
consultas.
Nunca tire las pilas usadas al fuego.
También asegúrese de mantener las pilas lejos de los niños.
■ ABERTURA de INCLINACION
El afinador puede ser inclinado atrás usando la abertura en la parte trasera.
Inserte una moneda u objeto similar en la abertura y incline atrás como se
muestra en el diagrama debajo.
Cuando la pila está baja, el indicador de
LCD perderá fuerza.
El uso continuado del afinador así
puede producir funcionamiento
inexacto. Reemplace la pila con una
nueva (6F22 o 006P 9V) lo mas pronto
posible.
El compartimento de la pila esta situado
en la parte trasera del afinador. Quite la
pila vieja y reemplácela con una nueva
del mismo tipo. Tenga cuidado de
conectar la pila en la polaridad correcta.
Lado del
fondo
Tapa de la pila
■ ESPECIFICACIONES
Indicadores : Pantalla de cristal líquido, guías de afinación,
Notas de afinación : GUITARRA: E, A, D, G, B, E
BAJO: B, E, A, D, G, C
Rango de Ajuste : A0 (27Hz) – C8 (4186Hz)
Exactitud :+ / – 1 cont
Exactitud del Diapasón :+ / – 3 cont
Rango de Ajuste Diapasón normal
: A4=435 – 446Hz (1Hz pasos)
Entradas : ENTRADA (6 monofónico), micrófono
Salida : SALIDA (6 monofónico)
Alimentación : 9V pila (006P o 6F22)
Vida de la pila : Aproximadamente 50 hrs. (Modo AUTO)
Dimensiones (W x H x D) : 118 x 63 x 24.5 mm
Peso (incluida la pila) : 130 g
Accesorio : 9V pila (6F22) x 1
* Las especificaciones y la apariencia externa están sujetas a cambio sin previo aviso.
■ PONIENDO EL DIAPASON NORMAL
1. Encienda el interruptor de encendido. El diapasón se pone a 440 Hz
(pantalla parpadeante).
2. Continuamente apriete el interruptor de PITCH hasta que el diapasón
deseado (435 – 446Hz) sea seleccionad.
■ PROCEDIMIENTOS DE AFINADO
● Afinación automática: AUTO
El afinador seleccionará el nombre de la nota más cercana de la cuerda tocada.
1. Para la guitarra ó bajo eléctrico, conecte el cable de la guitarra al jack de
ENTRADA o. (El jack de salida también puede conectarse a un
amplificador. La señal de la guitarra se enviará al amplificador esté el
afinador encendido ó no. Sin embargo, podría producir ruido en la línea,
así que usted debe apagar el afinador durante la actuación).
* El micrófono no operará cuando un cable se conecte en el jack de ENTRADA.
2. Encienda el interruptor POWER.
El diapasón normal (la fábrica prefijó A=440Hz) encenderá el indicador
LCD durante aproximadamente 2 segundos. Después de eso, el afinador
entrará en el modo auto(GUITAR y AUTO aparecerá en el indicador LCD).
3. Use el interruptor de PITCH para cambiar el diapasón normal. (Refiérase a
al sección "Poniendo el Diapasón Normal" más abajo)
4. Apriete el interruptor MODO para seleccionar el instrumento a afinar.
BASS ó GUITAR aparecerán en el indicador LCD.
5. Para afinar una guitarra acústica, ponga el micrófono del afinador lo más
cerca posible de la boca de la guitarra.
6. Pulse la cuerda a afinar. (No pulse más de una cuerda a la vez). El nombre
de la cuerda apropiada aparecerá en el indicador LCD. Use la aguja y la
guía de afinación como referencia mientras afina el instrumento.
6-1. Primero, ajuste la cuerda para que el indicador el nombre de la cuerda
apropiada parpadee.
6-2. Luego, afine la cuerda hasta que la aguja pare en el medio y en el LED
verde de las luces de la guía de afinación.
Afine hasta que la aguja
pare en el centro.
■ Los COMPONENTES
MIC
u Interruptor
de POWER
(ENCENDIDO)
r Interruptor de PITCH (DIAPASON)
y micrófono
w Guía de afinado
q Indicador de LCD
3. Cuando el interruptor de PITCH no se ha mantenido apretado durante
aproximadamente 2 segundos, el afinador volverá automáticamente al
modo de afinación.
* Cuando el interruptor de ENCENDIDO se apaga, los ajustes de diapasón se
pondrán a A=440Hz.
● La Afinación manual: MANL.
Cada nota debe seleccionarse individualmente como se necesite.
1. Haga los mismos ajuste como se describió en los pasos 1 a 5 de la sección
de Afinación automática.
2. Continúe apretando el interruptor de NOTA hasta que el nombre de la nota
deseado (nombre de la cuerda) parpadee. El afinador está ahora en el
modo manual, MANL. aparece la esquina inferior izquierda del LCD.
3. Como en el paso 5 de la sección de Afinación automática, pulse la cuerda
a afinar y proceda a afinarla.
4. Repita los pasos 2 y 3 para afinar las otras cuerdas.
Cuando se enciende esta
luz, la cuerda esta afinada.
ejemplo) para poner a punto la cuerda "E" en una guitarra de seis cuerdas.
El nombre de la cuerda
pulsada parpadea.
Seleccione GUITAR
en el indicador de LCD.
Seleccione el
modo de AUTO.
El Diapasón se
muestra normal.
i JACK de
SALIDA
o JACK de
ENTRADA
t Interruptor de NOTA
e Interruptor de MODO
* Apague siempre el afinador (interruptor en OFF) antes de cambiar la pila.
9802 R1
435→436→437→438→439→440→441→442→443→444→445→446
435→436→437→438→439→440→441→442→443→444→445→446

435→436→437→438→439→440→441→442→443→444→445→446
YT-150
YT-150
MANUALE UTENTE
Grazie per avere scelto l’accordatore YAMAHA YT-150.
Vi preghiamo di leggere attentamente questo manuale e di
conservarlo per eventuali necessità.
batteria 9V
(6F22 o 006P)
■ SOSTITUZIONE DELLA BATTERIA
Accordatore per chitarra / basso
■ AVVERTENZE
◆ Per prevenire guasti, non utilizzare l’accordatore nelle seguenti locazioni:
• luoghi direttamente esposti al sole;
• luoghi soggetti a livelli estremi di temperatura e umidità;
• luoghi sabbiosi o polverosi.
◆ Per alimentare l’accordatore utilizzare esclusivamente batterie 9V dry cell
(6F22 o 006P).
◆ Per ottenere la massima durata della batteria, assicurarsi sempre che
l’accordatore sia spento quando inutilizzato.
◆ Se una batteria scarica è lasciata all’interno dell’apparecchio per un periodo
di tempo prolungato, può rilasciare perdite e causare danni all’unità.
Quando la batteria è scarica è necessario rimuoverla e sostituirla appena
possibile.
◆ Non sottoporre l’accordatore a forti urti o vibrazioni. Non usare eccessiva
forza sui controlli.
◆ Non utilizzare mai solventi come benzene o diluente per pulire
l’accordatore. Usare un panno soffice e asciutto.
◆ Dopo aver letto il manuale, conservarlo in un posto sicuro per eventuali
necessità future.
Non tentare di bruciare le batterie usate.
Tenere le batterie fuori dalla portata dei bambini.
■ INCLINAZIONE DELL’ACCORDATORE
L’accordatore può essere inclinato all’indietro utilizzando la fessura posta nel
pannello posteriore. Inserire una moneta o un oggetto piatto simile e
posizionare come nel disegno.
Quando la batteria è scarica,
l’indicatore LCD si affievolisce.
L’utilizzo continuato dell’accordatore
può determinare un funzionamento
non corretto. Sostituire la batteria con
una nuova (6F22 o 006P) appena
possibile.
Il compartimento della batteria si trova
sul retro dell’accordatore. Rimuovere
la vecchia batteria e sostituirla con una
nuova dello stesso tipo. Fare
attenzione a collegare la batteria con
la corretta polarità.
parte
posteriore
coperchio portapilà
■ SPECIFICHE TECNICHE
Indicatori : Indicatore LCD, LED guida per l’accordatura
Note selezionabili : CHITARRA E, A, D, G, B, E
BASSO B, E, A, D, G, C
Gamma di accordatura : A0 (27 Hz) – C8 (4186 Hz)
Accuratezza :+/– 1 cent
Accuratezza “In Pitch” :+/– 3 cent
Gamma di intonazione : A4= 435 – 446 Hz (in incrementi di 1 Hz)
Ingresso : INPUT (jack mono, microfono)
Uscita : OUTPUT (jack mono)
Alimentazione : batteria 9V (6F22 o 006P)
Durata della batteria : 50 ore circa (modalità di Accordatura automatica)
Dimensioni : 118 x 63 x 24,5 mm
Peso (batteria inclusa) : 130 g
Accessori : batteria 9V (6F22) x 1
* Specifiche soggette a cambio senza preavviso.
■ IMPOSTARE L‘INTONAZIONE (Standard pitch)
1. Impostare l’interruttore POWER u su ON.
2. Premere ripetutamente il selettore PITCH r fino a selezionare (con
incrementi di 1 Hz) l’intonazione desiderata.
■ PROCEDURA DI ACCORDATURA
● Accordatura automatica : AUTO
L’accordatore selezionerà automaticamente la nota più vicina (indicata con il
nome della corda) all’accordatura della corda suonata.
1. Con chitarre/bassi elettrici, collegare il cavo proveniente dallo strumento al
jack INPUT o. Il jack OUTPUT i può essere collegato all’amplificatore. Il
segnale della chitarra sarà inviato all’amplificatore con l’interruttore
impostato sia in ON che in OFF. Si consiglia comunque di impostare
l’interruttore su OFF durante l’esecuzione per evitare l’introduzione di
rumori indesiderati.
* Il microfono incorporato y non funziona se un cavo è collegato al jack INPUT o.
2. Impostare l’interruttore POWER u su ON.
L’intonazione (standard pitch) sarà indicata in modo lampeggiante
sull’indicatore LCD q per circa 2 secondi. Dopo, l’accordatore si
posizionerà in modalità di Accordatura automatica (le indicazioni GUITAR
e AUTO appariranno sull’indicatore LCD q.)
3. Utilizzare il selettore PITCH r per cambiare l’intonazione di riferimento
(vedere la sezione “Impostare l’intonazione” più avanti).
4. Premere il selettore MODE e per selezionare il tipo di strumento da
accordare. La scritta GUITAR o BASS apparirà nell’indicatore LCD q.
5. Per accordare una chitarra acustica, posizionare il microfono incorporato
y il più vicino possibile alla buca della chitarra.
6. Suonare la corda da accordare (non suonare più di una corda alla volta).
Il nome della corda apparirà nell’indicatore LCD q. Utilizzare l’ago e gli
indicatori LED guida per l’accordatura w come riferimento.
6-1. Innanzitutto, regolare la corda in modo che si illumini il corretto
indicatore.
6-2. In seguito, perfezionare l’accordatura in modo che l’ago si posizioni in
mezzo e il LED verde (fra gli indicatori LED guida per l’accordatura w)
si illumini.
L’ago deve trovarsi in
centro.
■ COMPONENTI
MIC
u interruttore
POWER
r selettore PITCH
y microfono incorporato
w LED guida per l’accordatura
q indicatore LCD
3. Quando il selettore PITCH r non è premuto per almeno 2 secondi,
l’accordatore ritorna automaticamente in modalità di accordatura.
* Quando l’interruttore POWER u è impostato su OFF, l’impostazione di
intonazione viene riportata a A = 440 Hz.
● Accordatura manuale : MANL.
Ognuna delle note deve essere selezionata individualmente secondo
necessità.
1. Seguire le stesse regolazioni descritte nei punti da 1 a 5 nella sezione
“Accordatura automatica”.
2. Premere ripetutamente il selettore NOTE t fino a far apparire il nome
della nota (e della corda) desiderata. L’accordatore si trova ora in modalità
di Accordatura manuale.
3. L’indicazione MANL appare nell’angolo in basso a sinistra dell’indicatore a
LED q.
4. Come descritto nel punto 5 della sezione Accordatura automatica, suonare
la corda e procedere all’accordatura.
5. Ripetere i punti 2 a 4 per accordare le altre corde.
Quando si accende il LED
verde, la corda è accordata.
Esempio) per accordare la corda MI (E) su una chitarra a sei corde :
La lettera corrispondente al
nome della corda si illumina.
Selezionare GUITAR
sull’indicatore LCD
Selezionare il
modo AUTO
L’intonazione
selezionata è
indicata a 440 Hz.
i jack
OUTPUT
(uscita)
o jack
INPUT
(ingresso)
t selettore NOTE
e selettore MODE
* Impostare sempre l’interruttore POWER u su “OFF” prima di sostituire la
batteria.
YT-150
YT-150
HANDLEIDING
Dank u voor de aanschaf van de YAMAHA YT-150 Gitaar/Bas Auto
Tuner.
Lees deze handleiding alstublieft aandachtig door, en bewaar deze
op een veilige plek zodat u er later nog eens iets in op kan zoeken.
6F22 of 006P
9V dry cell batterij
■ BATTERIJ VERVANGEN
GITAAR/BAS AUTO TUNER
■ VOORZORGSMAATREGELEN
◆ Gebruik de tuner niet op de volgende lokaties om schade te voorkomen:
• plaatsen waar het apparaat in direct zonlicht staat;
• plaatsen die worden blootgesteld aan extreme temperaturen en
vochtigheid;
• plaatsen waar veel zand ligt of waar het stoffig is.
◆ Voorzie de tuner alleen van stroom middels een 6F22 of 006P 9V dry cell
batterij.
◆ Doe de tuner altijd uit (OFF) als u hem niet gebruikt om de batterijen te
sparen.
◆ Als u een bijna lege batterij voor langere tijd in het apparaat laat zitten, kan
deze gaan lekken en schade veroorzaken aan het apparaat. Als de batterij
leeg raakt, moet u deze altijd verwijderen en deze zo snel mogelijk
vervangen.
◆ Stel het instrument niet bloot aan overdreven schokken of sterke vibraties. Ga
niet te ruw om met de knoppen.
◆ Gebruik nooit oplosmiddelen zoals benzine of verdunner om de tuner schoon
te maken. Maak het instrument schoon met een zachte, droge doek.
◆ Bewaar de handleiding na het lezen op een goede plek, zodat u er in een later
stadium ook nog eens wat in op kunt zoeken.
Verbrand gebruikte batterijen nooit.
Houdt batterijen buiten het bereik van kinderen.
Bij dit produkt zijn batterijen geleverd.
Wanneer deze leeg zijn, moet u ze niet weggooien
maar inleveren als KCA.
■ UITKLAP UITSPARING
De tuner kan worden uitgeklapt met behulp van de uitsparing op de achterkant.
Steek een munt of soortgelijk voorwerp in de uitsparing en klap de tuner uit zoals
getoond wordt in het onderstaande diagram.
Zodra de batterij leegraakt, wordt de
LCD indicator minder goed leesbaar.
Als u desondanks doorgaat met het
gebruiken van de tuner kan het zijn dat
deze niet goed meer werkt. Vervang
derhalve de batterij zo snel mogelijk
met nieuwe batterijen (6F22 of 006P 9V
dry cell batterij).
De batterijhouder bevindt zich op de
achterkant van de tuner. Verwijder de
oude batterijen en vervang deze door
nieuwe batterijen van hetzelfde type.
Let hierbij erop dat de polariteit van de
batterij juist wordt aangesloten.
Onderkant
Batterij deksel
■ SPECIFICATIES
Indicators : Liquid crystal display, Stemmingsindicators
Stem Noten : GUITAR E, A, D, G, B, E
BASS B, E, A, D, G, C
Nootbereik : A0 (27Hz) – C8 (4186Hz)
Nauwkeurigheid :+/– 1 cent
Nauwkeurigheid In Toonhoogte :+/– 3 cent
Standaard Toonhoogte Instelling Bereik
: A4=435 – 446Hz (1Hz stappen)
Input : INPUT (6 mono), microfoon
Output : OUTPUT (6 mono)
Voedingsbron : 9V dry cell batterij (006P of 6F22)
Batterijduur : Ongeveer 50 uur (AUTO mode)
Afmetingen (B x H x D) : 118 x 63 x 24.5 mm
Gewicht (inclusief batterij) : 130 g
Los verkrijgbaar : 9V dry cell batterij (6F22) x 1
* Specificaties en uiterlijk kunnen zich wijzigen zonder dat hier vantevoren over
bericht wordt.
■ STANDAARD TOONHOOGTE INSTELLEN
1. Zet het instrument aan met de aan/uit schakelaar (POWER schakelaar u
ON). De toonhoogte wordt op 440 Hz gezet (knipperende display).
2. Druk nu herhaaldelijk op de PITCH schakelaar r tot de gewenste standaard
toonhoogte is geselecteerd (435 – 446Hz).
■ HANDELINGEN BIJ HET STEMMEN
● Automatisch Stemmen : AUTO
De tuner selecteert automatisch de dichtstbijzijnde nootnaam (snaarnaam) van
de aangeslagen snaartoonhoogte.
1. Sluit de gitaarkabel bij elektrische gitaren/bassen aan op de INPUT jack o.
(De OUTPUT jack i kan bovendien worden aangesloten op een versterker.
Het gitaarsignaal wordt vervolgens naar de versterker gestuurd mits de tuner
aanstaat (aan/uit schakelaar op ON). Dit kan echter leiden tot extra
bijgeluiden in het lijnniveau als u de tuner tijdens het spelen uitzet.
* De ingebouwde microfoon y werkt niet als er een kabel is aangesloten op INPUT
jack o.
2. Doe de tuner aan met de POWER schakelaar u (ON).
De standaard toonhoogte (fabriekspreset A=440Hz) knippert ongeveer q of
2 seconden in de LCD indicator. Hierna gaat de tuner naar de automatische
stemmode (GUITAR en AUTO verschijnen in de LCD indicator q).
3. Wijzig de standaard toonhoogte met de PITCH schakelaar r. (Zie het “Het
instellen van de Standaard Toonhoogte” gedeelte hieronder.)
4. Druk op de MODE schakelaar e om het instrument te selecteren dat
gestemd moet worden. GUITAR of BASS verschijnt in de LCD indicator q.
5. Om een akoestische gitaar te stemmen moet u de ingebouwde microfoon y
van de tuner zo dicht mogelijk bij het klankgat van de gitaar houden.
6. Sla de snaar aan die u wilt stemmen. (Sla niet meer dan één snaar tegelijk
aan.)
De betreffende snaarnaam verschijnt in de LCD indicator q. Let op de naald
en de stemmingsindicator als een referentie tijdens het stemmen van het
instrument.
6-1. Sla eerst de snaar aan zodat de juiste snaarnaam indicator gaat
knipperen.
6-2. Stem vervolgens de snaar tot dat de naald netjes in het midden staat en
de groene LED van de stemmingsgids oplicht.
Stem tot de naald netjes
in het midden staat.
■ COMPONENTEN
MIC
u POWER
(aan/uit)
schakelaar
r PITCH (toonhoogte) schakelaar
y Ingebouwde microfoon
w Stemming indicator
q LCD indicator
3. Als de PITCH schakelaar r twee seconden lang niet wordt ingedrukt keert
de tuner automatisch terug naar de stem mode.
* Als u tuner uitzet (POWER schakelaar u op OFF), wordt de standaard
toonhoogte instelling gereset op A=440Hz.
● Handmatig stemmen: MANL.
Iedere noot moet naar wens individueel geselecteerd worden.
1. Voer dezelfde handelingen uit de omschreven handelingen in stappen 1 t/m
5 van het Automatisch Stemmen gedeelte.
2. Ga door met het indrukken van de NOTE schakelaar t tot de gewenste
nootnaam (snaarnaam knippert.) De tuner is nu in manual (handmatige)
mode, MANL. verschijnt onderin de linkerhoek van de LCD display q.
3. Sla, net als in stap 5 van het Automatische stemmen gedeelte, de snaar aan
die u wilt stemmen en begin met het stemmen van de snaar.
4. Herhaal stappen 2 en 3 om de andere snaren te stemmen.
Als deze LED oplicht, is
de snaar gestemd.
voorbeeld) Om de “E” snaar te stemmen van een gitaar met zes snaren.
De snaarnaam van de
aangeslagen snaar knippert.
Selecteer GUITAR
in de LCD indicator.
Selecteer de
AUTO mode.
De standaard
toonhoogte wordt
weergegeven.
i OUTPUT
jack
o INPUT
jack
t NOTE (noot) schakelaar
e MODE schakelaar
* Doe altijd het instrument uit (AAN/UIT schakelaar u uit (=“OFF”) ) alvorens
de batterij te verwisselen.
YT-150
YT-150
MANUAL DEL PROPIETARIO
Gracias por comprar el YAMAHA YT-150 Afinador Automático
de Guitarra y Bajo.
Por favor lea este manual completamente y manténgalo en un
lugar seguro para futuras consultas.
6F22 o 006P 9V
■ REEMPLAZO de la PILA
AFINADOR AUTOMATICO DE GUITARRA Y BAJO
■ PRECAUCIONES
◆ Para prevenir daños, no usar el afinador en las situaciones siguientes:
• los lugares donde la unidad estará expuesto a la luz del sol directa de
forma continuada;
• los lugares sujetos a temperaturas y humedad extremas;
• lugares que son arenosos o polvorientos.
◆ Para alimentar el afinador, use sólo una pila 6F22 o 006P 9V.
◆ Para la máxima vida de la pila, asegúrese que el afinador se apaga cuando
no se usa.
◆ Sí una pila gastada queda en la unidad por un periodo extendido de tiempo,
puede dañar la unidad. Cuando las pilas se agotan, quítelas y reemplácelas
lo más pronto posible.
◆ No someta el afinador a golpe físico fuerte o vibración. No use fuerza
excesiva en cualquiera de los mandos.
◆ Nunca use disolventes como gasolina o aguarrás para limpiar el afinador.
Límpielo con un paño suave y seco.
◆ Después de leer el manual, manténgalo en un lugar seguro para futuras
consultas.
Nunca tire las pilas usadas al fuego.
También asegúrese de mantener las pilas lejos de los niños.
■ ABERTURA de INCLINACION
El afinador puede ser inclinado atrás usando la abertura en la parte trasera.
Inserte una moneda u objeto similar en la abertura y incline atrás como se
muestra en el diagrama debajo.
Cuando la pila está baja, el indicador de
LCD perderá fuerza.
El uso continuado del afinador así
puede producir funcionamiento
inexacto. Reemplace la pila con una
nueva (6F22 o 006P 9V) lo mas pronto
posible.
El compartimento de la pila esta situado
en la parte trasera del afinador. Quite la
pila vieja y reemplácela con una nueva
del mismo tipo. Tenga cuidado de
conectar la pila en la polaridad correcta.
Lado del
fondo
Tapa de la pila
■ ESPECIFICACIONES
Indicadores : Pantalla de cristal líquido, guías de afinación,
Notas de afinación : GUITARRA: E, A, D, G, B, E
BAJO: B, E, A, D, G, C
Rango de Ajuste : A0 (27Hz) – C8 (4186Hz)
Exactitud :+ / – 1 cont
Exactitud del Diapasón :+ / – 3 cont
Rango de Ajuste Diapasón normal
: A4=435 – 446Hz (1Hz pasos)
Entradas : ENTRADA (6 monofónico), micrófono
Salida : SALIDA (6 monofónico)
Alimentación : 9V pila (006P o 6F22)
Vida de la pila : Aproximadamente 50 hrs. (Modo AUTO)
Dimensiones (W x H x D) : 118 x 63 x 24.5 mm
Peso (incluida la pila) : 130 g
Accesorio : 9V pila (6F22) x 1
* Las especificaciones y la apariencia externa están sujetas a cambio sin previo aviso.
■ PONIENDO EL DIAPASON NORMAL
1. Encienda el interruptor de encendido. El diapasón se pone a 440 Hz
(pantalla parpadeante).
2. Continuamente apriete el interruptor de PITCH hasta que el diapasón
deseado (435 – 446Hz) sea seleccionad.
■ PROCEDIMIENTOS DE AFINADO
● Afinación automática: AUTO
El afinador seleccionará el nombre de la nota más cercana de la cuerda tocada.
1. Para la guitarra ó bajo eléctrico, conecte el cable de la guitarra al jack de
ENTRADA o. (El jack de salida también puede conectarse a un
amplificador. La señal de la guitarra se enviará al amplificador esté el
afinador encendido ó no. Sin embargo, podría producir ruido en la línea,
así que usted debe apagar el afinador durante la actuación).
* El micrófono no operará cuando un cable se conecte en el jack de ENTRADA.
2. Encienda el interruptor POWER.
El diapasón normal (la fábrica prefijó A=440Hz) encenderá el indicador
LCD durante aproximadamente 2 segundos. Después de eso, el afinador
entrará en el modo auto(GUITAR y AUTO aparecerá en el indicador LCD).
3. Use el interruptor de PITCH para cambiar el diapasón normal. (Refiérase a
al sección "Poniendo el Diapasón Normal" más abajo)
4. Apriete el interruptor MODO para seleccionar el instrumento a afinar.
BASS ó GUITAR aparecerán en el indicador LCD.
5. Para afinar una guitarra acústica, ponga el micrófono del afinador lo más
cerca posible de la boca de la guitarra.
6. Pulse la cuerda a afinar. (No pulse más de una cuerda a la vez). El nombre
de la cuerda apropiada aparecerá en el indicador LCD. Use la aguja y la
guía de afinación como referencia mientras afina el instrumento.
6-1. Primero, ajuste la cuerda para que el indicador el nombre de la cuerda
apropiada parpadee.
6-2. Luego, afine la cuerda hasta que la aguja pare en el medio y en el LED
verde de las luces de la guía de afinación.
Afine hasta que la aguja
pare en el centro.
■ Los COMPONENTES
MIC
u Interruptor
de POWER
(ENCENDIDO)
r Interruptor de PITCH (DIAPASON)
y micrófono
w Guía de afinado
q Indicador de LCD
3. Cuando el interruptor de PITCH no se ha mantenido apretado durante
aproximadamente 2 segundos, el afinador volverá automáticamente al
modo de afinación.
* Cuando el interruptor de ENCENDIDO se apaga, los ajustes de diapasón se
pondrán a A=440Hz.
● La Afinación manual: MANL.
Cada nota debe seleccionarse individualmente como se necesite.
1. Haga los mismos ajuste como se describió en los pasos 1 a 5 de la sección
de Afinación automática.
2. Continúe apretando el interruptor de NOTA hasta que el nombre de la nota
deseado (nombre de la cuerda) parpadee. El afinador está ahora en el
modo manual, MANL. aparece la esquina inferior izquierda del LCD.
3. Como en el paso 5 de la sección de Afinación automática, pulse la cuerda
a afinar y proceda a afinarla.
4. Repita los pasos 2 y 3 para afinar las otras cuerdas.
Cuando se enciende esta
luz, la cuerda esta afinada.
ejemplo) para poner a punto la cuerda "E" en una guitarra de seis cuerdas.
El nombre de la cuerda
pulsada parpadea.
Seleccione GUITAR
en el indicador de LCD.
Seleccione el
modo de AUTO.
El Diapasón se
muestra normal.
i JACK de
SALIDA
o JACK de
ENTRADA
t Interruptor de NOTA
e Interruptor de MODO
* Apague siempre el afinador (interruptor en OFF) antes de cambiar la pila.
9802 R1
435→436→437→438→439→440→441→442→443→444→445→446
435→436→437→438→439→440→441→442→443→444→445→446
-
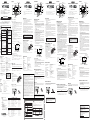 1
1
-
 2
2
-
 3
3
-
 4
4
-
 5
5
-
 6
6
-
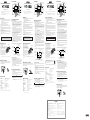 7
7
-
 8
8


em outros idiomas
- español: Yamaha YT-150 El manual del propietario
- français: Yamaha YT-150 Le manuel du propriétaire
- italiano: Yamaha YT-150 Manuale del proprietario
- English: Yamaha YT-150 Owner's manual
- русский: Yamaha YT-150 Инструкция по применению
- Nederlands: Yamaha YT-150 de handleiding
- Deutsch: Yamaha YT-150 Bedienungsanleitung
- dansk: Yamaha YT-150 Brugervejledning
- čeština: Yamaha YT-150 Návod k obsluze
- svenska: Yamaha YT-150 Bruksanvisning
- polski: Yamaha YT-150 Instrukcja obsługi
- 日本語: Yamaha YT-150 取扱説明書
- Türkçe: Yamaha YT-150 El kitabı
- română: Yamaha YT-150 Manualul proprietarului
Artigos relacionados
-
Yamaha YT-250 Manual do usuário
-
-
-
-
-
-
-
-
-
Outros documentos
-
Boss TU-88 Manual do proprietário
-
Boss TU-3 Manual do proprietário
-
-
Roland TU-12EX Manual do proprietário
-
Lexibook K200 SERIES Manual do usuário
-
-
-
-
-
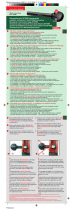 Wittner Cello Tuning Pegs 1/2 10,8 Manual do usuário
