
Aastra Business Communication
Solution
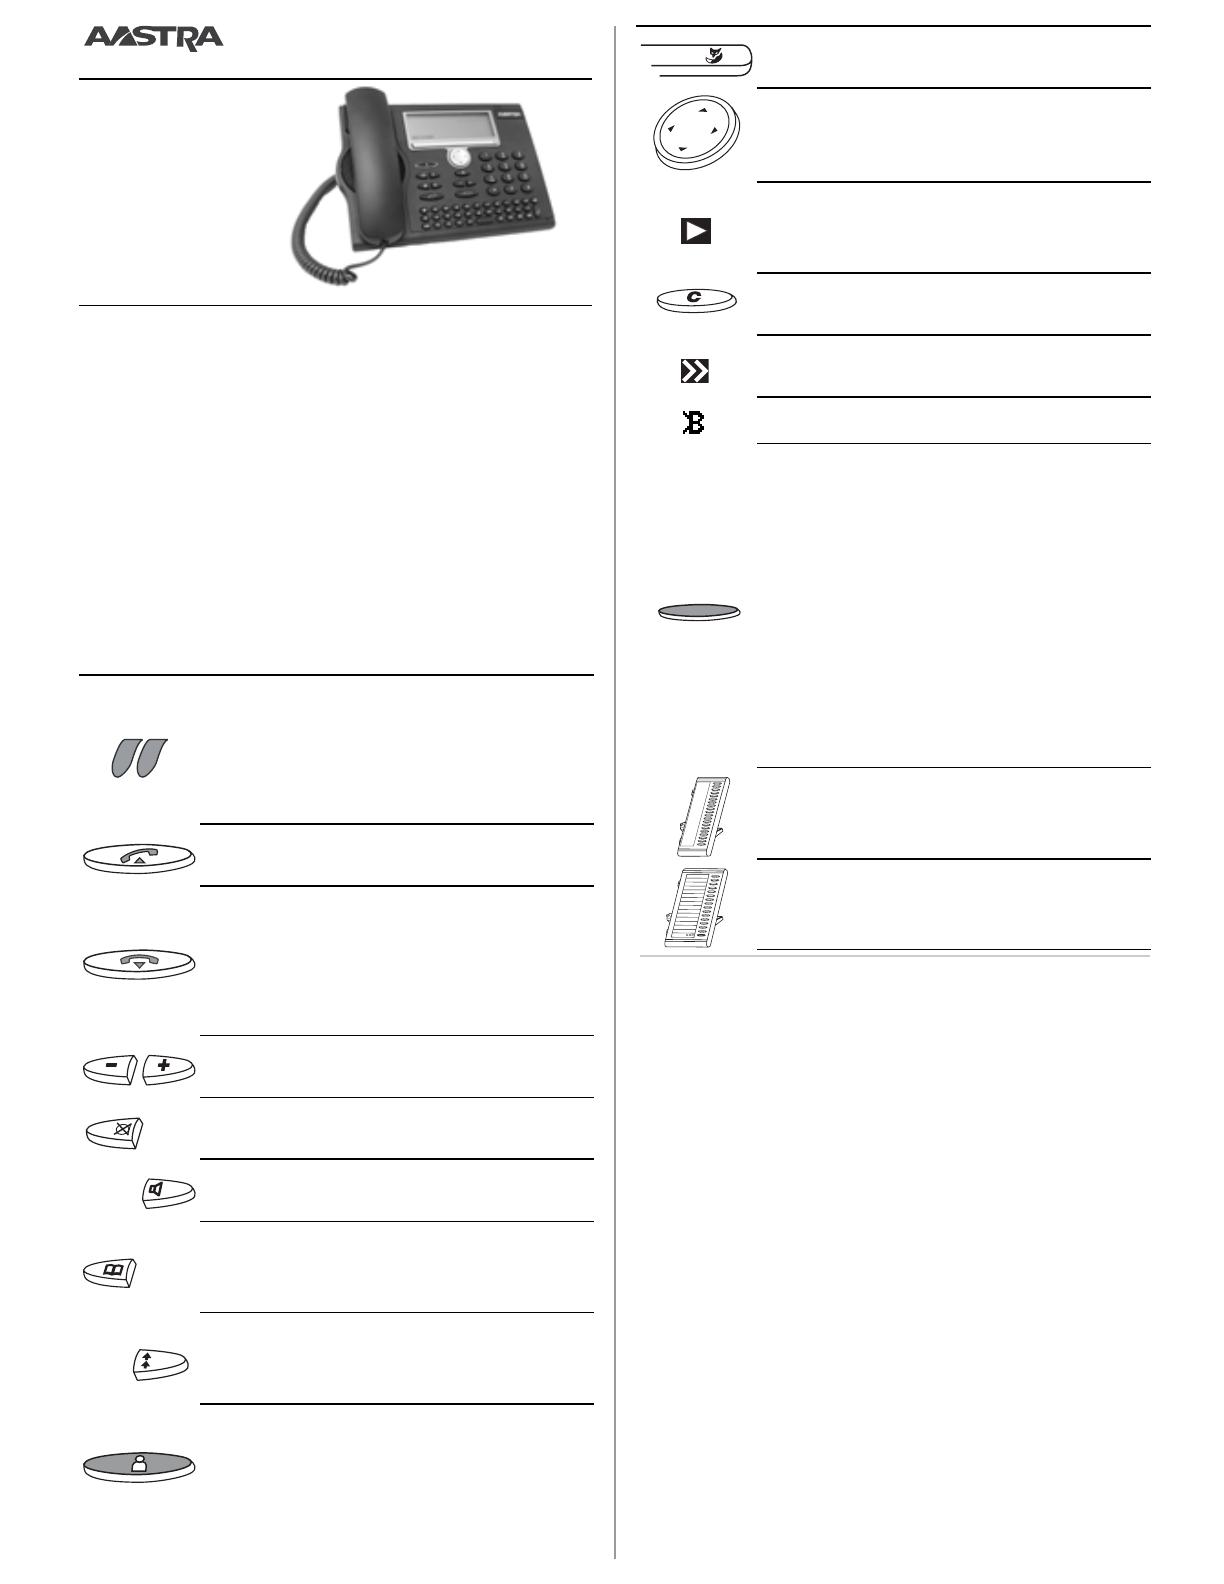
Aastra 5380 / Aastra 5380ip
Quick User’s Guide
Supported platforms:
Aastra 5000
Aastra 400 series
Aastra IntelliGate® series
eud-0989_xx/1.2 – – 09.2010

Aastra 5380 / Aastra 5380ip
Damit Sie wissen, an welchem System Ihr Telefon
angeschlossen ist, drücken Sie
M
ENÜ
>
E
INSTEL
-
LUNGEN
>
A
LLGEMEIN
>
E
IGENE
ID
. Name, Rufnum-
mer und Kommunikationssystem werden ange-
zeigt.
Wählen mit Namen
Wahl aus allen in der Telefonanlage gespeicher-
ten Namen.
In Aastra 400 / Aastra IntelliGate® Systemen
(Quickdial)
2
:
In Aastra 400 / Aastra IntelliGate® Systemen
2
:
1. Anfangsbuchstaben des gesuchten Namens
eingeben bis entsprechende Auswahl erscheint.
2.Gesuchten Benutzer auswählen.
3.Gesprächstaste drücken, um hinterlegte Ruf-
nummer zu wählen.
In Aastra 5000 Systemen
3
:
1.Anfangsbuchstaben des gesuchten Namens
eingeben.
2.
A
BFRAGE
, dann
N
ÄCHSTE
auswählen bis die ge-
wünschte Auswahl erscheint.
3.
A
NRUFEN
auswählen.
Zugriff auf verfügbare externe Telefonbücher
1
:
Telefonbuchtaste drücken,
E
RWEITERTE
S
UCHE
auswählen und Anfangsbuchstaben des ge-
wünschten Namens eingeben bis entsprechende
Auswahl erscheint.
Deutsch
1 Die Implementierung und Verfügbarkeit von
Funktionen, Merkmalen und Produkten ist vom
angeschlossenen System abhängig.
2 unterstützt von Aastra 400 / Aastra IntelliGate®
Systemen
3 unterstützt von Aastra 5000 Systemen
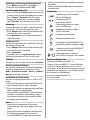
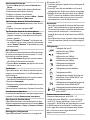
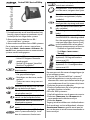
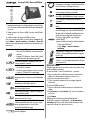
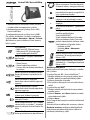
Aufmerksamkeits-LED:
• Linke LED blinkt: Ankommender
Anruf.
• Rechte LED leuchtet: Voice-Mail,
Meldung oder Rückruf
2
.
Gesprächstaste: Gespräch aufbauen
oder entgegennehmen.
Beendentaste:
• Gespräch beenden.
• Eingabe ohne Speichern beenden.
• Im Menü: zurück in Ruhezustand.
Einstelltasten: Ruf- und Hörlautstärke
einstellen.
Mikrofontaste: Freisprech- oder Hö-
rermikrofon ein/aus.
Lautsprechertaste: Freisprechen/
Lauthören ein/aus.
Telefonbuchtaste: Verfügbare Tele-
fonbücher öffnen.
Wahlwiederholungstaste: Zuletzt ge-
wählte Rufnummer(n).
Abwesenheitstaste mit LED. Vorkon-
figuration abhängig von System
1
.
Kann auch als Nummern-/Funktions-
taste konfiguriert werden.
Foxtaste: Angezeigte Funktion über
der Taste ausführen.
Navigationstaste: Im Menü vor- und
zurückblättern, in Listen navigieren.
Detailinfo mit rechter Navigations-
taste abrufbar (Anzeigesymbol).
Korrekturtaste: Letztes Zeichen lö-
schen oder im Menü zurückblättern.
Weitere Foxtasten verfügbar (Anzei-
gesymbol).
Bluetooth aktiviert
2
(Anzeigesym-
bol).
Konfigurierbare Tasten auf Erweite-
rungstastenmodul Aastra M530/
M535
2
mit LED.
Gespeicherte Rufnummer wählen
oder gespeicherte Funktion aktivie-
ren: ein- oder zweimal kurz drücken
1
.
Rufnummer oder Funktion speichern:
•Lang drücken
2
.
•
M
ENÜ
>
E
INSTELLUNGEN
>
T
ASTEN
3
drücken.
Erweiterungstastenmodul
Aastra M530 (Option): 20 konfigurier-
bare Tasten mit LED.
Erweiterungstastenmodul
Aastra M535
2
(Option): 3 x 15 konfi-
gurierbare Tasten mit LED.

Anrufe umleiten
1.
M
ENÜ
, dann
U
MLEITEN
>
A
USWÄHLEN
drücken.
2.Gewünschten Umleitungstyp
1
auswählen.
3.Ziel auswählen (Benutzer
2
/Teilnehmer
3
).
4.Rufnummer eingeben und bestätigen.
Umleitung über
M
ENÜ
>
A
KTIVIERTE
M
ERKMALE
>
D
EAKTIVIEREN
/
L
ÖSCHEN
wieder löschen.
Anruf während der Rufphase weiterleiten
1.
W
EITERLEITEN
während der Rufphase drücken.
2.Rufnummer eingeben und
OK
2
drücken.
Weitervermitteln während eines Gesprächs
1.Gesprächstaste oder
R
ÜCKFRAGE
drücken, Ruf-
nummer eingeben und warten bis der Ge-
sprächspartner antwortet.
2.
V
ERBINDEN
drücken, das Gespräch wird vermit-
telt. Falls niemand antwortet, mit
B
EENDEN
2
/
Z-
HOLEN
3
abbrechen und erstes Gespräch zu-
rücknehmen.
Makeln
Zwischen zwei Gesprächspartnern wechseln
ohne die Gesprächsverbindungen abzubrechen.
Sie sind in einem Gespräch:
1.
R
ÜCKFRAGE
drücken, Rufnummer eingeben und
warten bis der Gesprächspartner antwortet.
2.
M
AKELN
drücken, um zwischen den Gesprächs-
partnern hin- und her zu schalten.
Konferenzgespräch
Mehrere Gesprächspartner zu einem Konferenz-
gespräch zusammenschalten. Sie sind in einem
Gespräch:
1.
R
ÜCKFRAGE
drücken, Rufnummer eingeben und
warten bis der Gesprächspartner antwortet.
2.
K
ONFERENZ
drücken.
3.Weitere Gesprächspartner durch erneute
R
ÜCKFRAGE
1
dazuschalten.
Konferenz verlassen: Beendentaste drücken.
Rückruf
Der gewünschte Gesprächspartner ist besetzt
oder antwortet nicht:
R
ÜCKRUF
drücken.
Aktivierte Merkmale zurücksetzen
Alle Umleitungen und andere temporär aktive
Funktionen können Sie wieder ausschalten:
M
ENÜ
>
A
KTIVIERTE
M
ERKMALE
>
A
USWÄHLEN
drücken
und gewünschte Funktion
D
EAKTIVIEREN
/
L
ÖSCHEN
.
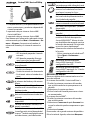
Montage und Anschluss
Sie können das Telefon wahlweise in einem 40°-
oder 25°-Winkel aufstellen:
1.Standfuss gemäss Montageskizze einfahren
und einrasten.
2.Hörer- und Anschlusskabel einstecken und
durch Kabelhalterungen führen.
3.Erweiterungstastenmodul Aastra M530/M535
2
gemäss Zeichnung rechts am Telefon einrasten
sowie Verbindungskabel und Netzkabel ein-
stecken.
Hinweise
• Einige Funktionsbefehle der
Sprachbedienerführung
3
können mit diesem
Endgerät nicht bedient werden.
• Trennen Sie immer zuerst das Telefon von der
Stromversorgung, bevor Sie ein Erweiterungs-
tastenmodul Aastra M530/M535
2
montieren/
demontieren.
• Montieren Sie immer zuerst den Standfuss, be-
vor Sie die Kabel stecken.
• Entfernen Sie immer zuerst die Kabel, bevor Sie
den Standfuss demontieren.
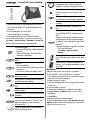
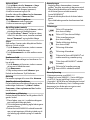
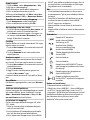
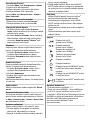
Anschlüsse
Dokumentbezeichnung
• Dokumentnummer: eud-0989 / 1.2
• Gültig ab: Aastra 5000 R5.1 / Aastra 400 series as
of R1.0 / Aastra IntelliGate® series as of I7.7
• Copyright © 09.2010 Aastra Technologies Limited
Konformitätserklärung, Bedienungsanleitung
und weitere Dokumente finden Sie unter
www.aastra.com/docfinder
2
oder
www.aastra.com
3
.
Anschluss ans IP-Netzwerk
(nur Aastra 5380ip)
PC-Anschluss
(nur Aastra 5380ip)
Anschluss Stromversorgung
(nur Aastra 5380ip)
Telefonanschluss
(nur Aastra 5380)
Höreranschluss
Headset-Anschluss
Anschluss Erweiterungstastenmodul
Aastra M530/M535
2
oder Stromver-
sorgung
Anschluss am Erweiterungstasten-
modul Aastra M530/M535
2
Anschluss Stromversorgung oder Er-
weiterungstastenmodul
Aastra M535
2
or

Aastra 5380 / Aastra 5380ip
To find out which system you are connected to,
press
M
ENU
>
S
ETTINGS
>
G
ENERAL
>
O
WN
ID
.
Name, call number and communication system
are displayed.
Dialling by Name
Dials a name from all the names stored in the tel-
ephone system.
On Aastra 400 / Aastra IntelliGate® systems
2
:
1.Enter the first few letters of the name you want
until the corresponding selection appears.
2.Select the user you want.
3.Press the call key to dial stored numbers.
On Aastra 5000 systems
3
:
1.Enter the first few letters of the name you
want.
2.Select
C
ONSULT
, then
N
EXT
until the corre-
sponding selection appears.
3.Select
C
ALL
.
To access any available external phone books
1
:
Press the phone book key, select
A
DVANCED
S
EARCH
and enter the first few letters of the name
you want until the corresponding selection ap-
pears.
Forwarding Calls
1.Press
M
ENU
, then
F
ORWARDING
>
S
ELECT
.
2.Select the type of forwarding
1
.
3.Select the destination (user
2
/subscriber
3
).
4.Enter the call number and validate.
Reset call forwarding with
M
ENU
then
A
CTIVATED
F
EATURES
>
S
ELECT
>
R
ESET
/
D
ELETE
.
English
1 The implementation and availability of func-
tions, features and products depend on the
system connected.
2 only supported by Aastra 400 /
Aastra IntelliGate® systems
3 only supported by Aastra 5000 systems
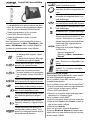
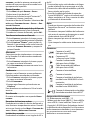
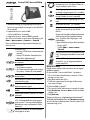
Indicator LED:
• Left LED flashes: Incoming call.
• Right LED flashes: Voice Mail, mes-
sage, or callback
2
.
Call key: Sets up or answers a call.
End key:
• Ends a call.
• Ends the input without saving.
• In a menu: back to the idle state.
Volume/cursor keys: Sets the ringing
and handset volume.
Microphone key: Hands-free or hand-
set microphone on/off.
Loudspeaker key: Hands-free opera-
tion/open listening mode on/off.
Phone book key: Opens available
phone books.
Redial key: Phone number(s) last di-
alled.
Absence key with LED. Preconfigura-
tion depending on system
1
. Can also
be configured as number key/func-
tion key.
Foxkey: Executes displayed function
using the key.
Navigation key: Scrolls forwards/
backwards in the menu, navigates
lists.
More information available using the
right navigation key (display symbol).
Correction key: Deletes the last char-
acter or goes back one step in the
menu.
More Foxkeys available (display sym-
bol).
Bluetooth activated
2
(display sym-
bol).
Configurable keys with LED on the
Aastra M530/M535
2
expansion key
module.
Dials the stored phone numbers or
activates the stored function: Press
once or twice in quick succession
1
.
Stores call number or function:
• Press and hold down
2
.
• Press
M
ENU
>
S
ETTINGS
>
K
EYS
3
.
Aastra M530 expansion key module
(optional): 20 configurable keys with
LED.
Aastra M535
2
expansion key module
(optional): 3 x 15 configurable keys
with LED.

Deflecting a Call During the Ringing Phase
1.Press
D
EFLECT
during the ringing phase.
2.Enter the call number and press
OK
2
.
Transferring During a Call
1. Press the Call key or
E
NQUIRY
CALL
, enter the call
number and wait until the called party answers.
2.Press
C
ONNECT
2
/
T
RANSFER
3
; the call is trans-
ferred. If no-one answers, cancel with
E
ND
CALL
2
/
R
ECOVER
3
and take back the first call.
Brokering
Switches between two callers without interrupt-
ing the calls. You are making/taking a call:
1.Press
E
NQUIRY
CALL
, enter the call number and
wait until the call is answered.
2.Press
B
ROKERING
to switch back and forth be-
tween the callers.
Conference Call
Connects several callers for a conference call. You
are making/taking a call:
1.Press
E
NQUIRY
CALL
, enter the call number and
wait until the call is answered.
2.Press
C
ONFERENCE
.
3.Add other callers using
E
NQUIRY
CALL
1
again.
Leaving a conference call: Press the End key.
Callback
The person is busy or does not answer:
C
ALLBACK
.
Resetting activated features
You can deactivate again all the call forwardings
and other temporarily active functions: Press
M
ENU
>
A
CTIVATED
F
EATURES
>
S
ELECT
and
R
ESET
/
D
ELETE
the function you want.
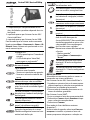
Installation and Connection
You can set up the phone either at a 40° or a 25°
angle:
1.Insert the footstand as indicated on the instal-
lation diagram until it snaps into place.
2.Plug in the handset and phone cords and feed
them through the cable holders.
3.Insert the Aastra M530/M535
2
expansion key
module as indicated in the drawing, snap it
into place and plug in the connection cable
and power cord if required.
Notes
• Some function commands of the vocal
announcements
3
are not to apply on this ter-
minal.
• Always disconnect the phone from the mains
first before you connect/disconnect an
Aastra M530/M535
2
expansion key module.
• Always install the footstand before you plug in
the cables.
• Always remove the cables before you detach
the footstand.
Connections
Document Designation
• Document number: eud-0989 / 1.2
• Valid as of: Aastra 5000 R5.1 / Aastra 400 series
as of R1.0 / Aastra IntelliGate® series as of I7.7
• Copyright © 09.2010 Aastra Technologies Limited
Declaration of Conformity, User’s Guide and oth-
er documents can be found at
www.aastra.com/docfinder
2
or
www.aastra.com
3
.
Connecting to the IP network
(Aastra 5380ip only)
Connecting the PC
(only Aastra 5380ip)
Connecting the power supply
(Aastra 5380ip only)
Telephone connection cable
(Aastra 5380 only)
Connecting the handset
Connecting the headset
Connection Aastra M530/M535
2
ex-
pansion key module or power supply
Connecting the Aastra M530/M535
2
expansion key module
Connection power supply or
Aastra M535
2
expansion key module
or
Aastra 5380 / Aastra 5380ip
Pour connaître le système auquel le poste est
raccordé, appuyez sur
M
ENU
>
P
ARAMÈTRES
>
G
É
-
NÉRAL
>
M
ON
N
UMÉRO
. Nom, numéro d’appel et
système de communication seront affichés.
Numérotation par le nom
Numérotation à partir de tous les noms enregis-
trés dans l’équipement téléphonique.
Sur les systèmes Aastra 400 / Aastra IntelliGate®
(numérotation rapide)
2
:
Sur les systèmes Aastra 400 / Aastra IntelliGate®
2
:
1.Entrer les premières lettres du nom recherché
jusqu’à ce que le choix voulu s’affiche.
2.Choisir l'utilisateur désiré.
3.Appuyer sur la touche de prise de ligne pour
composer le n° d'appel associé.
Sur les systèmes Aastra 5000
3
:
1.Entrer les premières lettres du nom recherché.
2.Sélectionner
C
ONSULT
, puis
S
UIVANT
jusqu’à ce
que le choix voulu s’affiche.
3.Sélectionner
A
PPELER
.
Accès aux annuaires externes disponibles
1
:
Actionner
R
ECHERCHE
A
VANCÉE
et entrer les pre-
mières lettres du nom recherché jusqu'à ce que
le choix voulu s’affiche.
Français
1
La disponibilité et la mise en oeuvre des fonc-
tions, des facilités et des équipements dépen-
dent de votre système de communication.
2
Proposé uniquement sur les systèmes
Aastra 400 / Aastra IntelliGate®
3
Proposé uniquement sur les systèmes
Aastra 5000
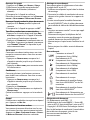
Diode d’avertissement :
• La diode gauche clignote : Appel
entrant.
• La diode droite clignote : Message-
rie vocale, message ou rappel
2
.
Touche de prise de ligne : Etablir ou
prendre une communication.
Touche de Fin :
• Mettre fin à la communication.
• Terminer l'entrée sans la sauvegarder.
• Dans le menu : retour à l'état de re-
pos.
Touches de réglage : Régler le volume
de la sonnerie et le volume d’écoute.
Touche microphone : Microphone
mains libres ou du combiné en/hors.
Touche de haut-parleur : Mains li-
bres/ Ecoute amplifiée en/hors.
Touche d’annuaire personnel : Ouvrir
des annuaires personnels disponi-
bles.
Touche de répétition d'un numéro :
Dernier(s) numéro(s) d'appel compo-
sé(s).
Touche d'absence avec diode. Pré-
configuration selon système
1
. Peut
être aussi configurée comme touche
de numéro ou de fonction.
Touche Fox : Exécuter la fonction affi-
chée à l'aide de la touche.
Touche de navigation : Avancer et re-
culer dans le menu, naviguer dans les
listes.
Information de détail disponible avec
la touche de navigation droite (sym-
bole d'affichage).
Touche de correction : Effacer le der-
nier caractère ou reculer dans le menu.
Autres touches Fox disponibles (sym-
bole d’affichage).
Bluetooth activé
2
(symbole d’affichage).
Touches configurables sur le module
d’extension Aastra M530/M535
2
avec
voyants. Sélectionner les numéros
d'appel enregistrés ou activer la fonc-
tion enregistrée : appuyer briève-
ment 1x ou 2x
1
.
Enregistrer un numéro d’appel ou
une fonction :
• Appuyer longuement
2
.
• Appuyer sur
M
ENU
>
P
ARAMÈTRES
>
T
OUCHES
3
.
Module d’extension Aastra M530 (op-
tion) : 20 touches configurables avec
diode.
Module d’extension Aastra M535
2
(option) : 3 x 15 touches configura-
bles avec diode.

Renvoyer les appels
1.Appuyer sur le
M
ENU
, puis
R
ENVOI
>
S
ÉLECT
.
2.Sélectionner le type de renvoi recherché
1
.
3. Sélectionner la destination (utilisateur
2
/
abonné
3
).
4.Composer le n° d'appel et confirmer.
Désactiver le renvoi en appuyant sur le
F
ONCTIONS
ACTIVES
>
S
ÉLECTIONNER
>
D
ÉSACTIVER
/
E
FFACER
.
Renvoyer l'appel pendant la phase de sonnerie
1.Appuyer sur le
D
EVIER
pendant la phase de
sonnerie.
2.Composer le n° d'appel et appuyer sur
OK
2
.
Transférer pendant une communication
1.Appuyer sur la touche de prise de ligne
D
OU
-
BLE
-
APPEL
, composer le n° d'appel et attendre
jusqu'à ce que l'interlocuteur réponde.
2.Appuyer sur
C
ONNECTER
, la communication est
transférée. Si personne ne répond, interrompre
avec
T
ERMINER
2
/
R
EPRISE
3
et reprendre la pre-
mière communication.
Va-et-vient
Commuter entre deux interlocuteurs sans inter-
rompre les communications. Vous êtes en com-
munication :
1.Appuyer sur
D
OUBLE
-
APPEL
, composer le n°
d'appel et attendre jusqu'à ce que l'interlocu-
teur réponde.
2.Appuyer sur
V
A
-
ET
-
VIENT
, pour commuter entre
les interlocuteurs.
Conférence
Connecter plusieurs interlocuteurs entre eux
pour établir une conférence. Vous êtes en com-
munication :
1.Appuyer sur
D
OUBLE
-
APPEL
, composer le n°
d'appel et attendre jusqu'à ce que l'interlocu-
teur réponde.
2.Appuyer sur
C
ONFÉRENCE
.
3.Ajouter d'autres interlocuteurs en répétant le
D
OUBLE
-
APPEL
1
.
Quitter la conférence : appuyer sur la touche de
Fin.
Rappel
L'interlocuteur souhaité est occupé ou ne répond
pas : Appuyer sur
D
BL
.-A
P
.
Désactiver les Fonctions actives
Vous pouvez à nouveau désactiver tous les ren-
vois et autres fonctions provisoirement activées :
Appuyez sur
M
ENU
>
F
ONCTIONS
A
CTIVES
>
S
ÉLECT
.
et
D
ÉSACTIV
.
/
E
FFACER
la function souhaitée.
Montage et raccordement
Vous pouvez placer le téléphone au choix dans
un angle de 40° ou de 25° :
1.Enfoncer et encliqueter le pied selon le schéma
de montage.
2.Connecter les câbles du combiné et de raccor-
dement et les guider à travers les supports de
câble.
3. Insérer et encliqueter le module d’extension
Aastra M530/M535
2
selon le schéma de monta-
ge et enficher le câble et le câble d'alimentation.
Notes
• Certaines annonces vocales
3
ne sont pas appli-
cables à ce poste.
• Déconnectez toujours le téléphone de l'ali-
mentation avant de monter ou démonter le
module d’extension Aastra M530/M535
2
.
• Montez toujours le pied avant d'enficher les câ-
bles.
• Retirez toujours les câbles avant de démonter
le pied.
Raccordements
Désignation du document
• N° de document: eud-0989 / 1.2
• Valable à partir de: Aastra 5000 R5.1 / Aastra 400
series as of R1.0 / Aastra IntelliGate® series as of I7.7
• Copyright © 09.2010 Aastra Technologies Limited
Pour la déclaration de conformité, le mode d’em-
ploi et d’autres documents visitez le site
www.aastra.com/docfinder
2
ou
www.aastra.com
3
.
Connexion au réseau IP
(uniquement Aastra 5380ip)
Raccordement du PC
(uniquement Aastra 5380ip)
Raccordement de l’alimentation
(uniquement Aastra 5380ip)
Raccordement du téléphone
(uniquement Aastra 5380)
Raccordement du combiné
Raccordement du casque
Raccordement du module d’exten-
sion Aastra M530/M535
2
ou de l’ali-
mentation
Raccordement du module d’exten-
sion Aastra M530/M535
2
Raccordement de l’alimentation ou
du module d’extension Aastra M535
2
or

Aastra 5380 / Aastra 5380ip
Per conoscere a quale sistema è collegago il vo-
stro telefono, premere
M
ENU
>
I
MPOSTAZIONI
>
G
E
-
NERALE
>
P
ROPRIO
ID
. Compaiono il nome, il nu-
mero e il sistema di comunicazione.
Selezione nominativa
Selezione di tutti i nomi memorizzati nell'impian-
to telefonico.
Su sistemi Aastra 400 / Aastra IntelliGate® (Sele-
zione rapida)
2
:
Su sistemi Aastra 400 / Aastra IntelliGate®
2
:
1. Digitare le lettere iniziali del cognome desidera-
to finché non compare la voce corrispondente.
2.Selezionare l’utente desiderato.
3.Premere il tasto Gancio per selezionare i nume-
ri di chiamata memorizzati.
Su sistemi Aastra 5000
3
:
1. Digitare le lettere iniziali del cognome desiderato.
2.
C
ONSULTARE
, dopo selezionare
S
UCCESSIVO
fin-
ché non compare la voce corrispondente.
3.Selezionare
C
HIAMARE
.
Accesso agli elenchi esterni disponibili
1
:
Premere il tasto Agenda, selezionare
R
ICERCA
AVANZATA
e inserire le iniziali del nome cercato
finché compare la voce corrispondente.
Italiano
1 L’implementazione e la disponibilità delle fun-
zioni, caratteristiche e dei prodotti dipendono
dal sistema collegato.
2 supportato da sistemi Aastra 400 /
Aastra IntelliGate®
3 supportato da sistemi Aastra 5000
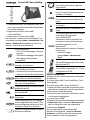
LED di Attenzione:
• Il LED sinistro lampeggia: Chiamata
in arrivo.
• Il LED destro lampeggia: Voice Mail,
Messaggio o Prenotazione
automatica
2
.
Tasto Conversazione: Eseguire o ri-
spondere alla chiamata.
Tasto Fine:
• Concludere la chiamata.
• Terminare l’immissione senza salvare.
• Nel menu: ritorno allo stato di riposo.
Tasti Regolazione: Regolare il volume
della suoneria e del microtelefono.
Tasto Microfono: Microfono on/off di
Viva-voce o microtelefono.
Tasto Altoparlante: Viva-voce/Ascolto
amplificato on/off.
Tasto Agenda: Aprire gli elenchi tele-
fonici disponibili.
Tasto Ripetizione: Ultimo numero(i)
chiamato(i).
Tasto Assenza con LED. Pre-configu-
razione dipendente dal sistema
1
. Può
essere configurato anche come Tasto
Funzione o come Tasto Numero.
Tasto Fox: Eseguire tramite il tasto la
funzione visualizzata.
Tasto di spostamento: Tornare indie-
tro o avanzare nel menu, spostarsi
negli elenchi.
Informazione dettagliata richiamabi-
le con il tasto di navigazione destro
(simbolo sul display).
Tasto di correzione: Cancellare l’ulti-
mo carattere o tornare indietro nel
menu.
Ulteriori tasti Fox disponibili (simbolo
sul display).
Bluetooth attivato
2
(simbolo sul di-
splay).
Tasti configurabili con LED sul modu-
lo di tastiera di espansione
Aastra M530/M535
2
.
Selezionare i numeri telefonici me-
morizzati o attivare la funzione me-
morizzata: premere 1x o 2x
brevemente
1
.
Memorizzare la funzione o il numero
di chiamata:
•Premere a lungo
2
.
•Premere
M
ENU
>
I
MPOSTAZIONI
>
T
ASTI
3
.
Modulo di tastiera di estensione
Aastra M530 (opzionale): 20 tasti con-
figurabili con LED.
Modulo di tastiera di estensione
Aastra M535
2
(opzionale): 3 x 15 tasti
configurabili con LED.

Deviazione di chiamata
1.Premere
M
ENU
, quindi premere
D
EVIARE
SU
>
S
ELEZ
.
2.Selezionare il tipo di deviazione desiderato
1
.
3.Selezionare destinazione (utente).
4.Digitare il numero e confermare.
Cancellare la deviazione: premere
M
ENU
>
F
UNZIO
-
NI
ATTIVATE
>
C
ANCELLA
/
C
ANCELLARE
.
Trasferimento durante la fase di chiamata
1.Premere
T
RASFERIMENTO
durante la fase di chia-
mata.
2.Digitare il numero e premere
OK
2
.
Trasferimento durante la conversazione
1.Premere il tasto Conversazione o
R
ICHIAMATA
,
digitare il numero e attendere finché l'interlo-
cutore risponde.
2.Premere
C
ONNETTI
2
/
C
OLLEGA
3
, la chiamata vie-
ne trasferita. Se nessuno risponde, interrompe-
re con
T
ERMINA
2
/
R
IPRESA
3
e riprendere la prima
conversazione.
Rich. alternata
Per parlare con due interlocutori alternativamen-
te senza interrompere le conversazioni. Si sta ef-
fettuando una conversazione:
1. Premere
R
ICHIAMATA
, digitare il numero e atten-
dere finché l'interlocutore risponde.
2.Premere
R
ICH
.
ALTERNATA
, per passare fra le due
chiamate in corso.
Conferenza
È possibile tenere attivi diversi interlocutori per
eseguire una conferenza. Si sta effettuando una
conversazione:
1. Premere
R
ICHIAMATA
, digitare il numero e atten-
dere finché l'interlocutore risponde.
2.Premere
C
ONFERENZA
.
3.Attivare nuovi interlocutori mediante una nuo-
va
R
ICHIAMATA
1
.
Per concludere la conferenza: Premere il tasto Fine.
Prenotazione automatica
L'interlocutore desiderato è occupato oppure non
risponde: Premere
P
RENOTAZIONE
AUTOMATICA
.
Ripristinare le funzioni attive
È possibile disattivare tutte le deviazioni e altre
funzioni temporaneamente attive: Premere
M
ENU
>
F
UNZIONI
A
TTIVATE
>
S
ELEZ
.
e
C
ANCELLA
/
C
ANCEL
-
LARE
.
Montaggio e collegamento
È possibile collocare il telefono in un angolo di
40° oppure di 25°:
1.Inserire e spingere il piede in base al disegno di
montaggio.
2.Inserire il cavo del microtelefono e il cavo di
collegamento e far passare attraverso le guide.
3.Modulo di tastiera di estensione Aastra M530/
M535
2
inserire nel telefono come indicato nel-
la illustrazione a destra e passare il cavo di al-
lacciamento e il cavo di alimentazione.
Avvertenza
• Forse alcuni comandi di funzione dell’istruzioni
vocali
3
non funzionano con questo terminale.
• Disconnettare sempre il telefono dall’alimenta-
zione prima di connettare / sconnettare un
modulo di tastiera di estensione Aastra M530/
M535
2
.
• Prima di inserire il cavo, montare sempre il piede.
• Prima di smontare il piede, rimuovere sempre il
cavo.
Collegamenti
Denominazione documento
• Numero di documento: eud-0989 / 1.2
• Valido da: Aastra 5000 R5.1 / Aastra 400 Series
as of R1.0 / Aastra IntelliGate® Series as of I7.7
• Copyright © 09.2010 Aastra Technologies Limited
La dichiarazione di conformità, l’istruzioni per
l'uso e ogni altra documentazione sono disponi-
bili sul sito www.aastra.com/docfinder
2
oppure www.aastra.com
3
.
Collegare alla rete IP
(soltanto Aastra 5380ip)
Collegamento PC
(soltanto Aastra 5380ip)
Collegamento alimentazione
(soltanto Aastra 5380ip)
Collegamento telefonico
(soltanto Aastra 5380)
Collegamento microtelefono
Collegamento cuffia
Collegamento modulo di tastiera di
estensione Aastra M530/M535
2
op-
pure alimentazione
Collegamento al modulo di tastiera di
estensione Aastra M530/M535
2
Collegamento alimentazione oppure
al modulo di tastiera di estensione
Aastra M535
2
or

Aastra 5380 / Aastra 5380ip
Para obtener más información sobre qué sistema
está conectado, pulsar
M
ENÚ
>
P
ARÁMETROS
>
G
E
-
NERAL
>
ID
PROPIO
. Se muestran el nombre, el
número de llamada y el sistema de comunica-
ción.
Marcación por nombre
Marca un nombre de los memorizados en el sis-
tema de telefonía.
En sistemas Aastra 400 / Aastra IntelliGate®
2
:
1.Escribir los primeros caracteres del nombre
que está buscando hasta que aparezca en la
pantalla.
2.Seleccionar el usuario que desea.
3.Pulsar la tecla de Llamada para marcar núme-
ros memorizados.
En sistemas Aastra 5000
3
:
1.Escribir los primeros caracteres del nombre
que está buscando.
2.Seleccionar
C
ONSULTAR
después
S
IGUIENTE
has-
ta que la selección que busca aparezca en pan-
talla.
3.Seleccionar
L
LAMAR
.
Para acceder a las agendas externas disponibles
1
:
Pulsar la tecla de Agenda, seleccione
B
ÚSQUEDA
Español
1 La implementación y la disponibilidad de fun-
ciones, prestaciones y productos depende del
sistema conectado.
2 soportado solo por sistemas Aastra 400 /
Aastra IntelliGate®
3 soportado solo por sistemas Aastra 5000
Indicador LED:
• LED izquierdo parpadea: Llamada
entrante.
• LED derecho parpadea: Mensaje
vocal, mensaje o retrollamada
2
.
Tecla de Llamada: Establece o contes-
ta una llamada.
Tecla Terminar:
• Finaliza una llamada.
• Finaliza la entrada sin almacenarla.
• En el menú: volver al estado de re-
poso.
Teclas de volumen/cursor: Configura
el volumen del timbre y del microte-
léfono.
Tecla de micrófono: Manos libres o
micrófono del microteléfono activa-
do/desactivado.
Tecla de altavoz: Manos libres/modo
de escucha en abierto activado/des-
activado.
Tecla de agenda: Abre las agendas
disponibles.
Tecla de remarcación: Último(s) nú-
mero(s) marcado(s).
Tecla de Ausencia con indicador LED.
La configuración inicial depende del
sistema
1
. También configurable como
tecla de número y tecla de función.
Tecla Fox: Permite ejecutar la función
mostrada en pantalla utilizando la tecla.
Tecla de desplazamiento: Desplaza-
mientos hacia adelante/hacia atrás
en el menú, recorrer las listas.
Más información disponible utilizan-
do la tecla de desplazamiento dere-
cha (símbolo de pantalla).
Tecla de corrección: Borra el último ca-
rácter o retrocede un nivel en el menú.
Más teclas Fox disponibles (símbolo
de pantalla).
Bluetooth activado
2
(símbolo de
pantalla).
Teclas configurables con LED en el
módulo de teclado de expansión
Aastra M530/M535
2
. Marcar el núm-
ero de teléfono almacenado o activar
la función almacenada: Pulsar la tecla
una o dos veces rápidamente
1
.
Almacena los números de llamada o
la función:
• Pulsar y mantener pulsada la tecla
2
.
•Pulsar
M
ENÚ
>
P
ARÁMETROS
>
T
ECLAS
3
.
Módulo de teclado extendido
Aastra M530 (opcional): 20 teclas
configurables con LED.
Módulo de teclado extendido
Aastra M535
2
(opcional): 3 x 15 teclas
configurables con LED.

AVANZADA
y escriba los primeros caracteres del
nombre de la persona que está buscando hasta
que aparezca en la pantalla.
Desviar llamadas
1.Pulsar
M
ENÚ
, después
D
ESVIAR
>
S
ELECC
.
2.Seleccionar el tipo de desvío
1
.
3.Seleccionar el destino (usuario
2
/extensión
3
).
4.Introducir el número y confirmar.
Desactivar el desvío de llamadas: Seleccionar
M
E
-
NÚ
despues
F
UNCIONES
A
CTIVAS
>
S
ELECC
.
>
D
ES
-
ACTIVAR
/
C
ANCELAR
.
Reenvío de llamada durante la fase de llamada
1.Pulsar
R
EENVÍO
durante la fase de llamada.
2.Introducir el número de llamada y pulsar
OK
2
.
Transferencia durante una llamada
1.Pulsar
C
ONSULTA
, introducir el número y espe-
rar a que la parte llamada conteste la llamada.
2.Pulsar
C
ONECTAR
2
/
T
RANSF
.
3
; para transferir la
llamada. Si no contesta nadie, anule la transfe-
rencia con
T
ERMINAR
2
/
R
ECUPER
.
3
y recupere la
primera llamada.
Alternancia
Conmuta entre dos interlocutores sin interrum-
pir las llamadas. Está efectuando o atendiendo
una llamada:
1.Pulsar
C
ONSULTA
, introducir el número y espe-
rar a que se conteste la llamada.
2.Pulsar
A
LTERNANCIA
para conmutar entre los in-
terlocutores.
Conferencia
Conecta a varios llamantes en una conferencia.
Está efectuando o atendiendo una llamada:
1.Pulsar
C
ONSULTA
, introducir el número y espe-
rar a que se conteste la llamada.
2.Pulsar
C
ONFERENCIA
.
3.Agregar otros llamantes pulsando otra vez
CONSULTA
1
.
Para abandonar una conferencia: Pulsar la tecla
terminar.
Retrollamada
El usuario está ocupado o no responde:
R
ETRO
-
LLAMADA
.
Desactivar las funciones activas
Puede desactivar todos los desvíos de llamada y
otras funciones temporalmente activas: Para des-
activar una función, pulsar
M
ENÚ
>
F
UNCIONES
A
C
-
TIVAS
>
S
ELECC
.
y
D
ESACTIVAR
/
C
ANCELAR
.
Instalación y conexión
Puede colocar el teléfono en un ángulo de 40° o
de 25°:
1.Inserte el pie según está indicado en el diagra-
ma de instalación hasta que encaje en el sitio.
2.Conecte los cables del microteléfono y del telé-
fono y páselos por las guías.
3.Insertar el módulo de teclado de extensión
Aastra M530/M535
2
según está indicado en el
dibujo, encájarlo en el sitio y conectar el cable
y el conector de alimentación.
Notas
• Puede que algunos comandos de función de la
llamada por voz vocal
3
no funcionen en este
teléfono.
• Desconecte siempre el teléfono de la alimenta-
ción antes de conectar o desconectar un mód-
ulo de teclado Aastra M530/M535
2
.
• Monte siempre el pie antes de conectar los ca-
bles.
• Quite siempre los cables antes de desmontar el
pie.
Conexiones
Designación del documento
• N° de documento: eud-0989 / 1.2
• Válido a partir de: Aastra 5000 R5.1 / Aastra 400 Se-
ries as of R1.0 / Aastra IntelliGate® Series as of I7.7
• Copyright © 09.2010 Aastra Technologies Limited
La declaración de conformidad, las instrucciones
de funcionamiento detalladas y otros documen-
tos se encuentran en www.aastra.com/
docfinder
2
o www.aastra.com
3
.
Conectar a la red IP
(sólo para Aastra 5380ip)
Connectar el PC
(sólo para Aastra 5380ip)
Conectar la alimentación
(sólo para Aastra 5380ip)
Cable de conexión del teléfono
(sólo para Aastra 5380)
Conectar el microteléfono
Conectar el auricular
Conectar el módulo de teclado ex-
tendido Aastra M530/M535
2
o la ali-
mentación
Conectar el módulo de teclado ex-
tendido Aastra M530/M535
2
Conectar la alimentación o el módulo
de teclado extendido Aastra M535
2
or

Aastra 5380 / Aastra 5380ip
Para descobrir qual o sistema onde se encontra
ligado, prima a
M
ENU
>
C
ONFIGURAÇÕ
>
G
ERAL
>
ID
P
RÓPRIO
. Nome, Número e é apresentado o siste-
ma de comunicações.
Marcar por nome
Selecciona um nome entre todos os nomes ar-
mazenados no sistema telefónico.
Nos Sistemas Aastra 400 / Aastra IntelliGate®
2
:
1.Introduza as primeiras letras do nome preten-
dido até aparecer a selecção correspondente.
2.Seleccione o utilizador que pretende.
3.Prima a tecla de chamada para marcar os nú-
meros de telefone guardados.
Nos Sistemas Aastra 5000
3
:
1.Insira as primeiras letras do nome pretendido.
2.Seleccionar
C
ONSULT
depois
S
EGUINTE
até apa-
recer a selecção correspondente.
3.Seleccionar
C
HAMADA
.
Para aceder às listas telefónicas externas
disponíveis
1
:
Premir a tecla da agenda, seleccionar
P
ROCURA
AVANÇADA
e introduzir as primeiras letras do
nome que procura até aparecer a selecção cor-
Português
1 A implementação e disponibilidade de fun-
ções, facilidades e produtos depende do siste-
ma ligado.
2 suportado apenas por Sistemas Aastra 400 /
Aastra IntelliGate®
3 suportado apenas por Sistemas Aastra 5000
Indicador LED:
• O LED esquerdo pisca: Chamada de
entrada.
• O LED direito pisca: Voice Mail,
mensagem ou rechamada
2
.
Tecla de chamada: Efectuar ou aten-
der uma chamada.
Tecla Terminar:
• Terminar uma chamada.
• Termina a introdução sem guardar:
• No menu: voltar ao estado de des-
canso.
Teclas de volume/cursor: Configura o
volume do toque e do auscultador.
Tecla de microfone: Microfone de
mãos livres ou de auscultador ligado/
desligado.
Tecla de Altifalante: Funcionamento
de mãos livres/modo de audição liga-
do/desligado.
Tecla de agenda telefónica: Abre as
agendas disponíveis.
Tecla de remarcação: Último(s) nú-
mero(s) de telefone marcado(s).
Tecla de Ausência com LED. Pré-con-
figuração dependente do sistema
1
.
Também configurável como tecla nu-
mérica/tecla de função.
Foxkey: Executa a função apresenta-
da utilizando a tecla.
Tecla de navegação: Avança/retrocede
uma vez no menu, navega nas listas.
Mais informação disponível usando a
tecla direita da navegação (símbolo
de mostrar).
Tecla de correcção: Elimina o último
caractere e recua um passo no menu.
Mais teclas Fox disponíveis (símbolo
de mostrar).
Bluetooth activado
2
(símbolo de
mostrar).
Teclas configuráveis com LED no mó-
dulo de teclas de expansão
Aastra M530/M535
2
. Marca o número
de telefone guardado o activa a fun-
çãoguardada: Prima rapidamente
uma ou duas vezes seguidas
1
.
Memoriza o número da chamada ou
a função:
•Manter premido
2
.
•Prima a
M
ENU
>
C
ONFIGURAÇÃO
>
T
ECLAS
3
.
Teclado de expansão Aastra M530
(opcional): 20 teclas configuráveis
com LED.
Teclado de expansão Aastra M535
2
(opcional): 3 x 15 teclas configuráveis
com LED.

respondente.
Reenvio de chamadas
1. Prima a
M
ENU
, a seguir
T
RANSFERÊNCIA
>
S
ELECC
.
2.Seleccionar o tipo de desvio
1
.
3.Seleccionar o destino (utilizador
2
/extensão
3
).
4.Introduzir e validar o número de telefone.
Retirar um desvio de chamadas: Seleccionar
M
ENU
a seguir
F
UNÇÕES
A
CTIVADAS
>
S
ELECC
.
>
D
ESACTIVAR
/
A
PAGAR
.
Transferir uma Chamada durante o Toque
1.Prima a
TRANSFERIR durante o toque.
2.Introduzir o número de telefone e prima a
O
K
2
.
Transferênccia durante uma chamada
1.Prima a tecla de chamada ou
C
ONSULTA
, marcar
o número pretendido e aguardar até que a
chamada seja atendida.
2. Prima a
L
IGAR
2
/
T
RANSFER
.
3
; a chamada é transferi-
da. Se ninguém atender, cancele com
T
ERMINAR
2
/
R
ETOMAR
3
e atenda a primeira chamada.
Comutar
Comutar entre dois interlocutores sem interrup-
ção das chamadas. Está a fazer/receber uma cha-
mada:
1. Prima a
C
ONSULTA
, marcar o número pretendido
e aguardar até que a chamada seja atendida.
2.Prima a
C
OMUTAÇÃO
para recuar e avançar entre
as chamadas.
Chamada de Conferência
Liga vários interlocutores numa conferência de
chamadas. Está a fazer/receber uma chamada:
1. Prima a
C
ONSULTA
, marcar o número pretendido
e aguardar até que a chamada seja atendida.
2.Prima a
C
ONFERÊNCIA
.
3.Adicionar outras chamadas usando
C
ONSULTA
1
novamente.
Abandonar Chamada de conferência: Premir a te-
cla Terminar.
Rechamada
Essa pessoa está ocupada ou não atende:
R
ECHAMADA
.
Desactivar as funções activadas
É possível desactivar novamente todos os reen-
vios de chamadas e outras funções temporaria-
mente activas: Premir a
M
ENU
>
F
UNÇÕES
A
CTIVA
-
DAS
>
S
ELECC
.
e
D
ESACTIVAR
/
A
PAGAR
a função pre-
tendida.
Instalação e ligação
Pode colocar o telefone ou em um ângulo de 40°
o de 25°:
1.Introduza o pé do telefone como indicado no
diagrama de instalação até ouvir o estalido de
encaixe.
2.Ligar os cordãos do auscultador e o telefone e
coloque-os na ranhura apropriada na base do
telefone.
3. Insira o módulo de teclas de expansão
Aastra M530/M535
2
como indicado no esque-
ma, colocá-lo no conector apropriado e ligue o
cabo de ligação e de alimentação se necessário.
Notas
• Alguns comandos de função das instruções de
voz
3
podem não funcionar com este terminal.
• Desligar sempre o telefone da electricidade an-
tes de ligar ou desligar um teclado de expan-
são Aastra M530/M535
2
.
• Instale sempre o pé do telefone antes de ligar
os cabos.
• Retire sempre os cabos antes de retirar o pé do
telefone.
Ligações
Designação do documento
• N° do documento: eud-0989 / 1.2
• Válido desde: Aastra 5000 R5.1 / Aastra 400 Series
as of R1.0 / Aastra IntelliGate® Series as of I7.7
• Copyright © 09.2010 Aastra Technologies Limited
Pode encontrar a Declaração de Conformidade,
as Instruções de Funcionamento e outros docu-
mentos e www.aastra.com/docfinder
2
ou
www.aastra.com
3
.
Ligar a rede IP (só Aastra 5380ip)
Ligação do PC (só Aastra 5380ip)
Ligar a corrente eléctrica
(só Aastra 5380ip)
Ligar o telefone (só Aastra 5380)
Ligar o microtelefone
Ligar o auricular
Ligação no módulo de teclas de ex-
pansõ Aastra M530/M535
2
ou ali-
mentação
Ligação no teclado de expansão
Aastra M530/M535
2
Ligação à alimentação ou ao módulo
teclas de expansão Aastra M535
2
or

Aastra 5380 / Aastra 5380ip
Om te weten op welk systeem u aangesloten
bent, druk
M
ENU
>
I
NSTELLINGEN
>
A
LGEMEEN
>
E
I
-
GEN
ID
. Naam, oproepnummer en communicatie-
systeem worden weergegeven.
Naamkeuze
Kies een naam uit alle namen die opgeslagen zijn
in het telefoonsysteem:
On Aastra 400 / Aastra IntelliGate® systemen
2
:
1.Geef de beginletters in van de naam van de
abonnee die u wenst op te bellen totdat de ge-
wenste abonnee of een lijst tevoorschijn komt.
2.Selecteer de gewenste gebruiker.
3.Druk op Oproep toets om in het geheugen op-
geslagen nummers te bellen.
On Aastra 5000 systemen
3
:
1.Geef de beginletters van de gewenste naam in.
2.Selecteer
C
ONSULTEER
, dan
V
OLGENDE
tot de
corresponderende selectie verschijnt.
3.Selecteer
O
PROEP
.
Toegang tot de beschikbare ext. telefoonboeken
1
:
Druk op de toets van het telefoonboek, selecteer
G
EAVANCEERD
Z
OEKEN
en geef de eerste paar let-
ters van de naam in tot de overeenstemmende se-
lectie verschijnt.
Nederlands
1 De implementatie en de beschikbaarheid van
functies, eigenschappen en producten zijn af-
hankellijk van het aangesloten systeem.
2 alleen ondersteund door Aastra 400 /
Aastra IntelliGate® systemen
3 alleen ondersteund door Aastra 5000 systemen
Indicatie LED:
• Linker LED knippert: Binnenko-
mend gesprek.
• Rechter LED knippert: Voice Mail,
Bericht of Terugbellen
2
.
Oproep toets: Een oproep starten of
beantwoorden.
End toets:
• Het gesprek beëindigen.
• Beëindigen van de invoer, zonder
opslaan.
• Tijdens een menu: terug naar rust-
situatie.
Volume/cursor toetsen: Stel het volu-
me van de bel en de hoorn.
Microfoon toets: Handenvrij of hand-
set microfoon aan/uit.
Luidspreker toets: Handenvrij bellen/
starten van de luidsprekerfunctie.
Telefoonboek toets: Beschikbare te-
lefoonboeken openen.
Herhaal toets: Laatst gekozen num-
mer(s).
Afwezigheidstoets met LED. Configu-
ratie is systeem afhankelijk
1
. Instel-
baar als nummer en functie toets.
Fox toets: De weergegeven functie
met de toets uitvoeren.
Navigatietoets: Scrolt vooruit/achter-
uit in de menu, navigeert door lijsten.
Meer informatie is beschikbaar onder
de rechter navigatietoets (display
symbolen).
Correctietoets: Wist het laatste karak-
ter of gaat één stap terug in de menu.
Meer Fox toetsen beschikbaar (dis-
play symbolen).
Bluetooth geactiveerd
2
(display sym-
bolen).
Configureerbare toetsen met LED op
Aastra M530/M535
2
uitbreidingsmodule.
Kiest het opgeslagen nummer of acti-
veert een opgeslagen functie: Druk 1
mal of tweemaal kort achter elkaar
1
.
Bewaart oproepnummers of functies:
• Drukken en ingedrukt houden
2
.
•Druk
M
ENU
>
I
NSTELLINGEN
>
T
OETSEN
3
.
Aastra M530 uitbreidingsmodule
(optioneel): 20 Programmeerbare
toetsen met LED.
Aastra M535
2
uitbreidingsmodule
(optioneel): 3 x 15 configureerbare
toetsen met LED.

Oproepdoorschakeling
1.Druk op
M
ENU
, druk vervolgens op
O
MLEIDEN
>
S
ELECT
.
2.Selecteer het type van forwarding
1
.
3. Selecteer de bestemming (gebruiker
2
/abonnee
3
).
4.Voer het nummer in en druk op Ok.
Reset oproepdoorschakeling med
M
ENU
, dan
A
C
-
TIEVE
FUNCTIES
>
S
ELECT
>
R
ESET
/
W
ISSEN
.
Een oproep ombuigen gedurende de oproepfase
1.Druk op
O
MBUIGEN
tijdens de oproepfase.
2.Voer het nummer in en druk op
OK
2
.
Een gesprek doorverbinden tijdens een actie-
ve Verbinding
1.Druk op
R
UGGESPRAAK
, kies het telefoonnum-
mer en wacht op beantwoording.
2.Druk op
V
ERBINDEN
2
/
T
RANSFER
3
; en het gesprek
wordt doorverbonden. Als niemand ant-
woordt, annuleer met
E
INDE
2
/
H
ERNEEM
3
en
neem de eerste oproep terug.
Pendelen
Tussen twee bellers wisselen zonder de oproe-
pen te onderbreken. U bent aan de lijn/een ge-
sprek aan het voeren:
1.Druk op
R
UGGESPRAAK
, kies het telefoonnum-
mer en wacht op beantwoording.
2.Druk op
P
ENDELEN
om te pendelen tussen deze
twee partijen.
Conferentiegesprek
Conferentiegesprek met meerdere gebruikers. U
bent aan de lijn/een gesprek aan het voeren:
1.Druk op
R
UGGESPRAAK
, kies het telefoonnum-
mer en wacht op beantwoording.
2.Druk op
C
ONFERENTIE
.
3.Voeg andere gesprekspartners med
R
UGGESPRAAK
1
.
Hoe verlaat ik een conferentiegesprek: Druk op
de End toets.
Terugbellen
De persoon is bezet of antwoordt niet:
T
ERUGBELLEN
.
Reset van actieve functies
U kan alle omleidingen en andere tijdelijke func-
ties deactiveren: Druk op
M
ENU
>
A
CTIEVE
FUNC
-
TIES
>
S
ELECT
og
R
ESET
/
W
ISSEN
om de betreffen-
de functie te deactiveren.
Installatie en aansluiten
U kunt het toestel gebruiken onder een hoek van
40 of 25 graden voor een optimale afleesbaar-
heid en bediening:
1. Plaats de burostandaard zoals aangegeven in het
installatieschema totdat het op zijn plaats klikt.
2.Verbindt de hoorn en de verbindingskabel en
voer deze door de daarvoor bestemde kabel-
geleidingsgleuven van de burostandaard.
3.Voeg de Aastra M530/M535
2
uitbreidingsmo-
dule toe zoals aangegeven op het installatie-
schema, klik het vast en sluit de aansluitingska-
bel en stroomkabel aan indien nodig.
Notities
• Sommige functiecommando’s van de gespro-
ken gids zijn
3
niet van toepassing op dit toestel.
• Verbreek altijd de netvoeding voordat een uit-
breidingstoetsenbord Aastra M530/M535
2
wordt geplaatst of losgenomen.
• U dient de verstelbare voet altijd eerst te instal-
leren voordat u de kabels aansluit.
• Verwijder altijd de kabels eerst voordat u de
burostandaard demonteert.
Aansluiten
Document toepassing
• Documentnummer: eud-0989 / 1.2
• Geldig van: Aastra 5000 R5.1 / Aastra 400 Series
as of R1.0 / Aastra IntelliGate® Series as of I7.7
• Copyright © 09.2010 Aastra Technologies Limited
Verklaring van overeenkomst, Gebruiksaanwij-
zing en andere documenten kan u terugvinden
op www.aastra.com/docfinder
2
of
www.aastra.com
3
.
Verbinden met het IP netwerk
(alleen Aastra 5380ip)
Aansluiten van uw PC
(alleen Aastra 5380ip)
Aansluiten van de netadapter
(alleen Aastra 5380ip)
Telefoon verbindingskabel
(alleen Aastra 5380)
Aansluiten van de hoorn
Aansluiten van de headset
Het aansluiten van de Aastra M530/
M535
2
uitbreidingstoetsenmodule of
netvoeding
De Aastra M530/M535
2
uitbreidings-
modul aansluite
Het aansluiten van de netvoeding of
Aastra M535
2
uitbreidingstoetsen-
module
or

Aastra 5380 / Aastra 5380ip
For at finde ud af hvilket system du er tilsluttet,
tryk
M
ENU
>
I
NDSTILLINGER
>
G
ENERELT
>
E
GEN
ID
.
Navn, lokalnummer og systemtype vises.
Navnekald
Vælg fra alle navne der er gemt i systemet.
På Aastra 400 / Aastra IntelliGate® systemer
2
:
1.Tast de første bogstaver af navnet indtil navnet
eller en liste vises i displayet.
2.Vælg navnet du søgte.
3.Tryk på Opkaldstasten for at ringe til det valgte
nummer.
På Aastra 5000 systemer
3
:
1.Tast de første bogstaver af navnet du søger.
2.Vælg
C
ONSULT
og
N
ÆSTE
indtil navnet vises i
displayet.
3.Vælg
K
ALD
.
Adgang til eksterne telefonbøger
1
:
Tryk på telefonbogstasten, vælg
A
VANCERET
SØG
-
NING
og indtast de første få bogstavet i navnet du
søger indtil navnet vises.
Dansk
1 Implementering og tilgængelige funktioner,
faciliteter afhænger af systemet telefonen er
tilsluttet.
2 kun supporteret af Aastra 400 /
Aastra IntelliGate® Systemer
3 kun supporteret af Aastra 5000 Systemer
Indikatorlampen:
• Venstre LED blinker: Indkommende
opkald.
• Højre LED blinker: Voice Mail, Be-
sked eller Notering
2
.
Opkaldstast: Opkald eller besvar op-
kald.
End tast:
• Afslutte opkald.
• For at afslutte din indtastning uden
at gemme.
• I en menu: tilbage til ledigt status.
Volumen/cursor taster: Sæt ringe og
håndsæt styrke.
Mikrofontast: Håndfri eller håndsæt-
mikrofon tændt/slukket.
Højttalertast: Håndfri tilstand/Med-
hør.
Telefonbogstast: Åbner tilgængelige
telefonbøger.
Genopkalds tast: Sidst kaldte telefon-
nummer.
Fraværstast med LED lampe. Prækon-
figuration afhænger af system
1
. Kan
også konfigureres som nummer/
funktionstast.
Foxtast: Udfører den viste funktion
ved at trykke på tasten.
Navigationstast: Scroller fremad/
baglæns i menuen, navigerer lister.
Mere information er tilgængelig med
højre navigationstast (display sym-
bol).
Slette tast: Slettet sidst indtastet karak-
ter eller går et step tilbage i menuen.
Flere Foxtast tilgængelige (display
symbol).
Bluetooth aktiveret
2
(display sym-
bol).
Programmerbare taster med LED på
Aastra M530/M535
2
udvidelsesmo-
dul.
Ringer til det gemte telefonnummer
eller aktiverer den programmerede
funktion: Tryk to gange hurtigt (Dob-
beltklik)
1
.
Gemmer opkaldsnumre eller funktion:
• Ttryk og hold nede
2
.
•Tryk
M
ENU
>
I
NDSTILLINGER
>
T
ASTER
3
.
Aastra M530 udvidelsesmodul (tilbe-
hør): 20 programmerbare taster med
LED.
Aastra M535
2
udvidelsesmodul (til-
behør): 3 x 15 programmerbare taster
med LED.

Viderestil kald
1.Tryk på
M
ENU
, derefter
V
IDERESTIL
>
V
ÆLG
.
2.Vælg hvilken type viderestil du ønsker
1
.
3.Vælg destination (bruger
2
/nummer
3
).
4.Indtast et nummer og tryk Ok.
Annuller viderestilling
M
ENU
derefter
A
KTIVERET
F
UNKTIONER
>
V
ÆLG
>
A
NNULLER
/
S
LET
.
Omdiriger et kald i ringefasen
1.Tryk
V
IDERESTIL
under ringningen.
2.Indtast et nummer og tryk
OK
2
.
Omstilling under samtale
1.Tryk på et Opkaldstast eller
2. O
PKALD
.
, indtast
nummeret og vent til kaldet besvares.
2.Tryk på
T
ILSLUTTET
2
/
O
MSTIL
3
; kaldet er videre-
stillet. Hvis der ikke svares, annuller medmed
A
FSLUT
2
/
G
ENOPRET
3
og tag kaldet tilbage.
2.Part
Skift mellem 2 parter uden afbrydelse af forbin-
delserne. Du har et kald:
1.Tryk
2. O
PKALD
.
på Foxtasten, indtast numme-
ret og vent til kaldet besvares.
2.Tryk på
B
ROKERING
for at skifte mellem samta-
lerne.
Konference kald
Flere partnere kan deltage i en konference. Du
har et kald:
1.Tryk
2. O
PKALD
.
på Foxtasten, indtast numme-
ret og vent til kaldet besvares.
2.Tryk
K
ONFERENCE
.
3.Tilføj andre partnere med
2.O
PKALD
1
igen.
Forlade en konference: Tryk Endtasten.
Notering
Personen er optaget elle svarer ikke:
N
OTERING
.
Annuller aktiveret funktioner
Du kan deaktivere alle viderestillinger og andre
midlertidige funktioner: Tryk
M
ENU
>
A
KTIVE
F
UNKTIONER
>
V
ÆLG
og
A
NNULLER
/
S
LET
funktio-
nen du ønsker.
Installation og tilslutning
Du kan placere din telefon i en 40 graders eller 25
graders vinkel:
1.Placer foden, som vist, i installationsdiagram-
met indtil den klikker på plads.
2.Tilslut telefonrør og ledning og før ledningerne
gennem rillerne.
3.Indsæt Aastra M530/M535
2
udvidelsesmodul
som vist på tegningen, klik det på plads og til-
slut ledning og strømforsyning hvis nødven-
digt.
Bemærkninger
• Nogle funktions kommandoer i stemme
guiden
3
kan ikke anvendes på denne terminal.
• Afbryd altid forbindelserne til telefonen inden
du tilslutter/fjerner udvidelsesmodul
Aastra M530/M535
2
.
• Påsæt altid fodstykket før du tilslutter lednin-
gerne.
• Fjern altid ledningerne før du afmonterer fod-
stykket.
Tilslutninger
Manual placering
• Dokumentnummer: eud-0989 / 1.2
• Gyldigt fra: Aastra 5000 R5.1 / Aastra 400 Series
as of R1.0 / Aastra IntelliGate® Series as of I7.7
• Copyright © 09.2010 Aastra Technologies Limited
Declaration of Conformity, User’s Guide og andre
documenter kan findes på www.aastra.com/
docfinder
2
eller www.aastra.com
3
.
Tilslut til IP netværket
(kun Aastra 5380ip)
Tilslut til PC (kun Aastra 5380ip)
Tilslut strømforsyningen
(kun Aastra 5380ip)
Telefon tilslutnings ledning
(kun Aastra 5380)
Tilslutning af håndsæt
Tilslutning af hovedsæt
Tilslutninf af Aastra M530/M535
2
ud-
videlsesmodul og strømforsyning
Tilslut Aastra M530/M535
2
udvidel-
sesmodul
Tilslutninf af strømforsyning og
Aastra M535
2
udvidelsesmodul
or

Aastra 5380 / Aastra 5380ip
För att ta reda på vilket system du är kopplad till,
tryck
M
ENY
>
I
NSTÄLLNINGAR
>
A
LLMÄNT
>
E
GET
ID
.
Namn, samtalsnummer och kommunikationssys-
tem visas.
Ringa via namn
Ringer upp ett namn av alla namn som finns lag-
rade i telefonsystemet.
På Aastra 400 / Aastra IntelliGate® system
2
:
1.Skriv in dom första bokstäverna i namnet du
söker tills abonnenten eller en lista visas.
2.Välj den använare du vill ha.
3.Tryck samtalsknappen för att ringa lagrade
nummer.
På Aastra 5000 system
3
:
1.Skriv in dom första bokstäverna i namnet du
söker.
2.Välj
K
ONSULT
, sedan
N
ÄSTA
tills motsvarande ur-
val visas.
3.Välj
R
INGA
.
Tillgång till de externa telefonböckerna
1
:
Tryck på knappen telefonbok, välj
A
VANCERAD
SÖKNING
och skriv in de första bokstäverna i det
namn du söker tills det rätta visas.
Svenska
1 Implementering och tillgänglighet av funktio-
ner, finesser och produkter beror på tillkopplat
system.
2 Stöds endast av Aastra 400 / Aastra IntelliGate®
system
3 Stöds endast av Aastra 5000 system
Indikerings-LED:
• Vänster LED blinkar: Inkommande
samtal.
• Höger LED blinkar: Voice Mail, med-
delande eller återuppringning
2
.
Samtalsknappen: Etablera eller be-
svarar ned ett samtal.
End-knappen:
• Avsluta ett samtal.
• Avsluta inmatningen utan att spara.
• I meny: Tillbaka till vänteläge.
Markörpil/volymknapp: Fastställ
ringning eller volymen på handenhe-
ten.
Mikrofonknapp: Handsfree eller han-
denhetens mikrofon på/av.
Högtalarknapp: Handsfree/öppet av-
lyssningsläge på/av.
Telefonboksknapp: Öppnar tillgäng-
liga telefonböcker.
Återuppringningsknapp: Telefon-
nummer senast ringt.
Frånvaroknappen med LED. Förin-
ställning beroende på system
1
. Kan
även programmeras som siffer-
knapp/funktionsknapp.
Fox-knappen: Utför aktuell funktion
med knappen.
Navigationsknapp: Scrolla framåt/till-
baka i menyn, navigerar listor.
Du hittar mer info med höger naviga-
tionsknapp (display symbol).
Korrigeringsknapp: Raderar sista teck-
net eller går tillbaka ett steg i menyn.
Fler Foxkeys tillgängliga (display
symbol).
Bluetooth aktiverad
2
(display sym-
bol).
Konfigurerbara knappar med LED på
extra knappsats Aastra M530/M535
2
.
Ringer dom lagrade telefonnumren
eller aktiverar lagrade funktioner:
Tryck en gång eller två gånger i
snabb följd
1
.
Sparar telefonnummer eller funktion:
• Tryck och håll ner
2
.
•Tryck
M
ENY
>
I
NSTÄLLNINGAR
>
K
NAPPAR
3
.
Expansions knappsats Aastra M530
(valfri): 20 programmerbara knappar
med LED.
Expansions knappsats Aastra M535
2
(valfri): 3 x 15 programmerbara knap-
par med LED.

Koppla samtal
1.Tryck på
M
ENY
, sedan
V
IDAREKOPPLING
>
V
ÄLJ
.
2.Välj typ av vidarekoppling
1
.
3.Välj destination (användare
2
/abonnent
3
).
4.Skriv in telefonnumret och tryck Ok.
Ställa om vidarekoppling: Välj
M
ENY
sedan
A
KTI
-
VERADE
F
UNKTIONER
>
V
ÄLJ
>
A
NNULLERA
/
R
ADERA
.
Överföra ett samtal under påringning
1.Tryck
V
IDAREKOPPLA
under ringningen.
2.Skriv in telefonnumret och tryck
OK
2
.
Omkoppling under ett samtal
1.Tryck på Samtalsknappen eller
N
YTT
SAMTAL
, slå
numret och vänta till samtalet besvaras.
2.Tryck
K
OPPLA
; amtalet kopplas. Om ingen sva-
rar, avbryt med
A
V
.
SAM
.
2
/
Å
TERHÄMTA
3
för att
återgå till det första samtalet.
Pendling
Pendla mellan två samtal utan avbrott. Du ringer
upp/tar emot ett samtal:
1.Tryck på
N
YTT
SAMTAL
, slå numret och vänta till
samtalet besvaras.
2.Tryck på
P
ENDLING
för att växla mellan dina
samtalspartner.
Konferenssamtal
Kopplar ihop flera samtalspartner för ett konfe-
renssamtal. Du ringer upp/tar emot ett samtal:
1.Tryck på
N
YTT
SAMTAL
, slå numret och vänta till
samtalet besvaras.
2.Tryck på
K
ONFERENS
.
3.Lägg till andra samtalspartner genom att
trycka på
N
YTT
SAMTAL
1
igen.
Lämna ett konferenssamtal: Tryck på End-knap-
pen.
Ring tillbaka
Personen är upptagen eller svarar inte:
Å
TERUPP
-
RINGNING
.
Ställa om aktiva funktioner
Du kan inaktivera alla vidarekopplingar av samtal
och andra tillfälligt aktiva funktioner: Tryck på
M
ENY
>
A
KTIVERADE
F
UNKTIONER
>
V
ÄLJ
och
A
N
-
NULLERA
/
R
ADERA
önskad funktion.
Installation och koppling
Du kan sätta upp telefonen antigen i 40° eller
25°'s vinkel:
1.Skjut in stativet enligt installationsdiagram-
met, tills ett klick hörs.
2.Anslut kablarna till handenheten och telefo-
nen och för dem genom kabelhållarna.
3.För in expansions knappsatsen Aastra M530/
M535
2
som indikerat på beskrivningen, fäst så
att ett klick hörs, om det behövs anslut kopp-
lingskabeln samt strömkabeln.
Obs.
• Vissa funktionskommandon av denna vocal
announcements
3
går ej att använda på denna
terminal.
• Dra alltid ur kontakten till telefonen innan du
ansluter/tar bort ett utökat Aastra M530/
M535
2
expansions knappsats.
• Montera alltid stativet innan du ansluter ka-
blarna.
• Koppla alltid ur kablarna innan du demonterar
stativet.
Förbindelse
Dokument betäckning
• Dokumentnumret: eud-0989 / 1.2
• Giltigt från: Aastra 5000 R5.1 / Aastra 400 Series
as of R1.0 / Aastra IntelliGate® Series as of I7.7
• Copyright © 09.2010 Aastra Technologies Limited
Konformitetsförklaring, Bruksanvisning och an-
dra dokument hittas på www.aastra.com/
docfinder
2
eller www.aastra.com
3
.
Koppla till IP nätverket
(endast Aastra 5380ip)
Anslutning av PC
(endastAastra 5380ip)
Ansluta strömförsörjning
(endast Aastra 5380ip)
Telefon kopplingskabel (endast
Aastra 5380)
Ansluta handset
Ansluta headset
Koppla Aastra M530/M535
2
expan-
sions knappsatsmodulen eller ström-
försörjning
Koppla expansions knappsatsen
Aastra M530/M535
2
Koppla strömfösörjning ellerr
Aastra M535
2
expansions knappsats-
modulen
or

Aastra 5380 / Aastra 5380ip
For å finne ut hvilket system du er tilkoblet, trykk
M
ENY
>
I
NNSTILLINGER
>
G
ENERELT
>
E
GEN
ID
.
Navn, telefonnummer og kommunikasjonssys-
tem vil vises.
Ringe med navn
Ringer et navn blant alle navnene som er lagret i
telefonsystemet.
På Aastra 400 / Aastra IntelliGate® systemer
2
:
1.Tast inn de første bokstavene i navnet, til bru-
ker og en liste vises.
2.Velg den bruker du vil ha.
3.Trykk på ringetasten for å ringe telefonnum-
mer som er lagret.
På Aastra 5000 systemer
3
:
1.Tast inn de første bokstavene i navnet du søker.
2.Velg
K
ONSULTER
, deretter
N
ESTE
til det ønskede
valget vises.
3.Velg
R
ING
OPP
.
Tilgang til eksterne, tilgjengelige telefonbøker
1
:
Trykk på telefonboktasten, velg
A
VANSERT
SOK
og
tast inn de første bokstavene i navnet søker til til-
svarende valg vises.
Norsk
1 Implementering og tilgjengelige funksjoner,
tjenester og produkt avhenger av det tilkoble-
de systemet.
2 supportert kun av Aastra 400 /
Aastra IntelliGate® Systemer
3 supportert kun av Aastra 5000 Systemer
Indikator LED:
• Venstre LED blinker: Innkommende
samtale.
• Høyre LED blinker: VoiceMail, be-
skjed eller tilbakeanrop
2
.
Samtaletast: Aktiverer eller svarer på
en samtale.
End-tasten:
• Avslutte en samtale.
• Avslutter inntastingen uten å lagre.
• I en meny: Tilbake til hvilemodus.
Justeringstast: Angir ringe- og tele-
fonrørvolum.
Mikrofontast: Håndfri- eller telefon-
rørmikrofon på/av.
Høyttalertast: Håndfri betjening/
høyttalermodus på/av.
Listetast: Åpner tilgjengelige telefon-
bøker.
Repetisjonstasten: Gjentar sist slåtte
nummer.
Fritt programmerbare taster med
LED. Forhåndsdefinert avhengig av
type system
1
. Kan også forhåndpro-
grammeres som nummertast/funk-
sjonstast.
Revetast: Utførelse av viste funksjon
ved hjelp av tasten.
Navigeringstast: Går frem/tilbake et
steg I menyen, leter I lister.
Mer tilgjengelig informasjon om bruk
av riktig navigeringstast (vis symbol).
Rette- tast: Sletter det siste tegnet el-
ler går tilbake et trinn i menyen.
Flere revetaster tilgjengelig (vis sym-
bol).
Bluetooth aktivert
2
(vis symbol).
Programmerbare taster med LED på
ekstra tastemodul Aastra M530/
M535
2
.
Ringer det lagrede telefonnummeret
eller aktiverer den lagrede funksjo-
nen: Trykk én eller to ganger i rask
rekkefølge
1
.
Lagrer telefonnummer eller funksjon:
•Langt trykk
2
.
•Trykke
M
ENY
>
I
NNSTILLINGER
>
T
OETSEN
3
.
Aastra M530 ekstra tastemodul (valg-
fritt): 20 programmerbare taster med
LED.
Aastra M535
2
ekstra tastemodul
(valgfritt): 3 x 15 programmerbare
taster med LED.
A página está carregando...
A página está carregando...
A página está carregando...
A página está carregando...
-
 1
1
-
 2
2
-
 3
3
-
 4
4
-
 5
5
-
 6
6
-
 7
7
-
 8
8
-
 9
9
-
 10
10
-
 11
11
-
 12
12
-
 13
13
-
 14
14
-
 15
15
-
 16
16
-
 17
17
-
 18
18
-
 19
19
-
 20
20
-
 21
21
-
 22
22
-
 23
23
-
 24
24


Aastra 5380 Quick User Manual
- Tipo
- Quick User Manual
- Este manual também é adequado para
em outras línguas
- español: Aastra 5380
- français: Aastra 5380
- italiano: Aastra 5380
- English: Aastra 5380
- Nederlands: Aastra 5380
- Deutsch: Aastra 5380
- dansk: Aastra 5380
- čeština: Aastra 5380
- svenska: Aastra 5380
Artigos relacionados
-
Aastra 5380 Quick User Manual
-
-
-
Aastra 5360ip Quick User Manual
-
Aastra 7434ip Quick Reference Manual
-
Aastra 5361ip Quick User Manual
-
Aastra IntelliGate Quick User Manual
-
Aastra 612d Quick User Manual
-
Aastra Aastra 610d Quick User Manual
-