Stanley SFMCPW1500B Manual do usuário
- Categoria
- Ferramentas elétricas
- Tipo
- Manual do usuário

www.stanley.eu
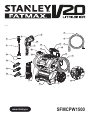
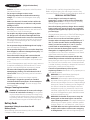
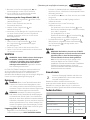
Fig.A
SFMCPW1500
25
5
6
22
23
3
4
2
26
1
27
18
21
19
15
7
9
10
8
16
17
12
13
14
11
20
24

23
English (original instructions) 6
Deutsch (Übersetzung der Originalanweisung) 18
Français (traduction de la notice d’instructions originale) 31
Italiano (tradotto dalle istruzioni originali) 44
Nederlands (vertaald vanuit de originele instructies) 57
Español (traducido de las instrucciones originales) 70
Português (traduzido das instruções originais) 83
Svenska (översatt från de ursprungliga instruktionerna) 96
Norsk (oversatt fra de originale instruksjonene) 108
Dansk (oversat fra original brugsvejledning) 119
Suomi (käännetty alkuperäisestä käyttöohjeesta) 131
Ελληνικά (μετάφραση από τις πρωτότυπες οδηγίες) 143

23
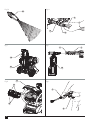
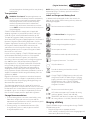
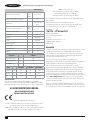
Fig.B
21
16
17
16
7
Fig.C
Fig.D
29
28 1
19
Fig.E
Fig.F Fig.G1
28
7
5
6 5
22
23
30 24
35 18
22

45
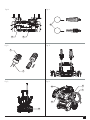
Fig.G2 Fig.H
Fig.I Fig.J
Fig.K Fig.L
26
16
7
14
32
33
8
23
31
18
2
7
7
26

45
1213
2
4
Fig.M Fig.N
Fig.O Fig. P
34
25
20
15
27
1
Fig.Q Fig.R

6
ENGLISH (Original instructions)
CAUTION: Read the instructions before using
thismachine.
Intended Use
Your STANLEY FATMAX SFMCPW1500 Pressure Washer has
been designed for cleaning boats, cars, decks, driveways, grills,
house siding, motorcycles, patios, and outdoor furniture. These
appliances are intended for consumer useonly.
Components
1 High pressure hose (6M)
2 Self priming suction hose (6M)
3 Float ball
4 Suction hose filter
5 Spray lance
6 Nozzle button
7 Spray gun
8 Spray gun handle grip
9 Trigger lock-off button
10 Trigger
11 Pressure washer unit
12 Speed selector switch (Hi/Low)
13 Boost button
14 Battery port cover
15 Roll cage
16 Telescoping handle
17 Handle release button
18 Garden hose water intake
19 High pressure water outlet
20 Spray gun handle storage hook
21 Wheels
22 Adjustable (spray fan/pencil) nozzle
23 Turbo/Rotating nozzle (Not for use on vehicles or glass)
24 Transparent inlet filter
25 Nozzle cleaning pin
26 Soap bottle 0.6L
27 Hose storage strap
SAFETY INSTRUCTIONS
WARNING! When using mains‑powered/cordless
appliances, basic safety precautions, including the
following, should always be followed to reduce
the risk of fire, electric shock, personal injury and
materialdamage.
WARNING: When using this pressure washer, basic
safety precautions should always be followed
including thefollowing:
• This machine is not intended for use by persons (including
children) with reduced physical, sensory or mental
capabilities, or lack of experience andknowledge.
• Children should be supervised to ensure that they do not
play with theappliance.
• Read all the instructions before using theproduct.
• To reduce the risk of injury, close supervision is necessary
when a product is used nearchildren.
• Know how to stop the product and bleed pressures quickly.
Be thoroughly familiar with thecontrols.
• Stay alert – watch what you aredoing.
• Do not operate the product when fatigued or under the
influence of alcohol ordrugs.
• Keep operating area clear of allpersons andanimals.
• Do not overreach or stand on unstable support. Keep good
footing and balance at alltimes.
• Follow the maintenance instructions specified in
themanual.
WARNING: Risk of injection or injury – do not direct
discharge stream atpersons oranimals.
WARNING: Read this entire manual before attempting
to assemble, operate or install theproduct.
WARNING: This unit was designed for specific
applications. It should not be modified and/or used for
any application other than that which it was designed.
NOTICE: Always store your pressure washer in a
location where the temperature will not fall below 40°F
(4°C). Freeze damage is not covered by thewarranty.
1 . Do not touch plug or outlet with wethands.
2 . Avoid accidental starts. Move switch on unit to OFF
position before connecting or disconnectingbatteries.
3 . Water spray must never be directed towards any electric
wiring or directly towards the pressure washer machine itself
or fatal electric shock mayoccur.
4 . The narrow pinpoint stream is very powerful. It is not
recommended for use on painted surfaces, wood surfaces or
items attached with an adhesivebacking.
5 . Keep operating area clear of all persons andanimals.
6 . Always use both hands when operating pressure washer to
maintain complete control of thewand.
7 . Do not touch nozzle or water spray while operating.
Never place hands in front ofnozzle.
8 . Wear safety goggles while operating. Wear
protective clothing and footwear to protect against
accidentalspraying.
9 . Disconnect power plug from the outlet when not in use and
prior to the detaching of the high pressurehose.
10 . Never tie knots or kink the high pressure hose as
damage could result. Inspect the high pressure
hose regularly. Replace the hose immediately if it is
damaged, worn or shows any signs of cracks, bubbles,
pinholes, or other leakage. Never grasp a high‑pressure
hose that is leaking ordamaged.
English (original instructions)

7
ENGLISH
(Original instructions)
11 . Do not operate or store this product in temperatures below
40°F (4°C). Freeze damage is not covered by thewarranty.
12 . Carefully observe all chemical instructions and
warnings before using. Use only approved pressure
washer cleaners. Do not use bleach, chlorine, or any
cleaners containing acids. Always follow manufacturer’s
label recommendations for proper use of cleaners. Always
protect eyes, skin and respiratory system fromcleaners.
13 . The pressure washer should not be used in areas
where gas vapors may be present. An electric spark could
cause an explosion orfire.
14 . To minimise the amount of water getting into the pressure
washer, the unit should be placed as far as possible from the
cleaning site duringoperation.
15 . To prevent accidental discharge, the spray gun should be
secured by locking the trigger when not inuse.
16 . To allow free air circulation, the pressure washer should NOT
be covered duringoperation.
17 . Never touch, grasp or attempt to cover a pinhole or similar
water leak on the high‑pressure hose. The stream of water IS
under high pressure and WILL penetrateskin.
18 . Use only hoses and accessories rated for pressure higher than
your pressure washer’s PSI / Bar. Never use with any other
manufacturer’s accessories orcomponents.
19 . Never defeat the safety features of thisproduct.
20 . Do not operate machine with missing, broken or
unauthorisedparts.
21 . Never spray flammable liquids or use pressure washer in
areas containing combustible dust, liquid, orvapors.
WARNING: This machine has been designed for use
with the cleaning agent supplied or recommended by
the manufacturer. The use of other cleaning agents
or chemicals may adversely affect the safety of
themachine.
WARNING: During use of high pressure cleaners,
aerosols may be formed. Inhalation of aerosols can be
hazardous tohealth.
WARNING: High pressure jets can be dangerous
if subject to misuse. The jet must not be directed at
persons, live electrical equipment or the machineitself.
WARNING: Do not use the machine within range of
persons unless they wear protectiveclothing.
WARNING: Do not direct the jet against yourself or
others in order to clean clothes orfootwear.
WARNING: Risk of explosion – Do not spray
flammableliquids.
WARNING: High pressure cleaners shall not be used by
children or untrainedpersonnel.
WARNING: High pressure hoses, fittings and couplings
are important for the safety of the machine. Use
only hoses, fittings and couplings recommended by
themanufacturer.
WARNING: To ensure machine safety, use only original
spare parts from the manufacturer or approved by
themanufacturer.
WARNING: Water that has flowed through backflow
preventers is considered to benonpotable.
WARNING: The machine shall be disconnected from
its power source during cleaning or maintenance and
when replacingparts.
WARNING: Do not use the machine if important parts
of the machine are damaged, e.g., safety devices, high
pressure hoses, triggergun.
WARNING: Always switch off the mains disconnecting
switch when leaving the machineunattended.
WARNING: Depending on the application, shielded
nozzles can be used for high pressure cleaning,
which will reduce the emission of hydrous aerosols
dramatically. However, not all applications allow the use
of such a device. If shielded nozzles are not applicable
for the protection against aerosols, a respiratory mask of
class FFP 2or equivalent may be needed, depending on
the cleaningenvironment.
WARNING! High pressure jets can be dangerous if
subject tomisuse.
According to the applicable regulations, the
appliance must never be used on the drinking
water network without a system separator. Use
a separator as per IEC 61770. Water flowing
through a system separator is considered
notdrinkable.
Read all of this manual carefully before operating
theappliance.
• The intended use is described in this manual. The use
of any accessory or attachment or the performance
of any operation with this appliance other than those
recommended in this instruction manual may present a risk
of personalinjury.
• Retain this manual for futurereference.
Vibration
The declared vibration emission values stated in the technical
data and the declaration of conformity have been measured
in accordance with a standard test method provided by
EN60335-2-79 and may be used for comparing one tool with
another. The declared vibration emission value may also be
used in a preliminary assessment ofexposure.
WARNING: The vibration emission value during actual
use of the pressure washer can differ from the declared
value depending on the ways in which the tool is used.
The vibration level may increase above the levelstated.

8
ENGLISH (Original instructions)
When assessing vibration exposure to determine safety
measures required by 2002/44/EC to protect persons regularly
using power tools in employment, an estimation of vibration
exposure should consider the actual conditions of use and
the way the tool is used, including taking account of all parts
of the operating cycle such as the times when the tool is
switched off and when it is running idle in addition to the
triggertime.
Safety of Others
• This machine can be used by people with reduced physical,
sensory or mental capabilities or lack of experience
and knowledge if they have been given supervision or
instruction concerning use of the machine in a safe way and
understand the hazardsinvolved.
• Machines shall not be used by children. Children should be
supervised to ensure that they do not play with themachine.
ADDITIONAL SAFETY INSTRUCTIONS FOR
PRESSURE CLEANERS
• To protect your feet and legs while operating the
appliance, always wear heavy duty footwear and
longtrousers.
• Always switch off your product and remove the battery:
‑When you leave your productunattended.
‑When clearing ablockage.
‑When checking, adjusting, cleaning or working on
yourproduct.
‑If the appliance starts to vibrateabnormally.
• Do not place the inlet or outlet of the pressure cleaner
near eyes or ears when operating. Never point in the
direction ofbystanders.
• Do not use in the rain or leave outdoors while it israining.
• Do not cross gravel paths or roads whilst your product is
switched on. Walk, neverrun.
• Do not place your unit down on gravel while it is
switchedon.
• Always be sure of your footing, particularly on slopes.
• Do not overreach and keep your balance at alltimes.
• Do not place any objects into the openings. Never use if
the openings are blocked - keep free of hair, lint, dust and
anything that may reduce theairflow.
WARNING! Always use your product in the manner
outlined in this manual. Your product is designed to
be used in an upright mode and if it is used in any other
way it may result in injury. Never run your product whilst
lying on its side or upsidedown.
• The operator or user is responsible for accidents or hazards
occurring to other people or theirproperty.
Labels on Appliance
The following warning symbols are found on the appliance
along with the date code:
Read the manual prior tooperation.
Always remove the battery from the
appliance before performing any
cleaning ormaintenance.
Machine not suitable for connection to
the potable watermains.
95
Directive 2000/14/EC guaranteed
soundpower.
Never direct the water jet at
people, animals, the machine or
electriccomponents.
Using Your Appliance
Always take care when using theappliance.
• The liquid or steam must not be directed towards
equipment containing electrical components, such as the
interior ofovens.
• The appliance is not to be used if it has been dropped, if
there are visible signs of damage or if it isleaking.
• Always use safety glasses orgoggles.
• Do not allow children or animals to come near the work
area or to touch theappliance.
• Close supervision is necessary when the appliance is used
nearchildren.
• This appliance is not intended for use by young or infirm
persons withoutsupervision.
• This appliance is not to be used as atoy.
• Only use the appliance in daylight or good artificiallight.
• Use in a dry location only. Do not allow the appliance to
becomewet.
• Avoid using the appliance in bad weather conditions,
especially when there is a risk oflightning.
• Do not immerse the appliance inwater.
• Do not open the body casing. There are not
user-serviceable partsinside.
• Do not operate the appliance in explosive atmospheres,
such as in the presence of flammable liquids, gases
ordust.
Residual Risks
Additional residual risks may arise when using the tool which
may not be included in the enclosed safety warnings.

9
ENGLISH
(Original instructions)
These risks can arise from misuse, prolonged use, etc.
Even with the application of the relevant safety regulations
and the implementation of safety devices, certain residual risks
cannot be avoided.
These include:
• Injuries caused by touching any rotating/movingparts.
• Injuries caused when changing any parts, blades
oraccessories.
• Injuries caused by prolonged use of a tool. When
using any tool for prolonged periods ensure you take
regularbreaks.
• Impairment ofhearing.
• Health hazards caused by breathing dust developed when
using your tool (example: working with wood, especially
oak, beech andMDF).
After Use
• When not in use, the appliance should be stored in a dry,
well ventilated place out of reach ofchildren.
• Children should not have access to storedappliances.
• When the appliance is stored or transported in a
vehicle it should be placed in the boot or restrained to
prevent movement following sudden changes in speed
ordirection.
Inspection and Repairs
• Before use, check the appliance for damaged or defective
parts. Check for breakage of parts and any other
conditions that may affect itsoperation.
• Do not use the appliance if any part is damaged or
defective.
• Have any damaged or defective parts repaired or replaced
by an authorised repairagent.
• Never attempt to remove or replace any parts other than
those specified in thismanual.
Chargers
STANLEY FATMAX chargers require no adjustment and are
designed to be as easy as possible tooperate.
Electrical Safety
The electric motor has been designed for one voltage only.
Always check that the battery pack voltage corresponds to the
voltage on the rating plate. Also make sure that the voltage of
your charger corresponds to that of yourmains.
iYour STANLEY FATMAX charger is double insulated
in accordance with EN60335; therefore, no earth
wire isrequired.
If the supply cord is damaged, it must be replaced only by
STANLEY FATMAX or an authorised serviceorganisation.
Mains Plug Replacement
(U.K.& Ireland Only)
If a new mains plug needs to be fitted:
• Safely dispose of the oldplug.
• Connect the brown lead to the live terminal in theplug.
• Connect the blue lead to the neutralterminal.
WARNING: No connection is to be made to the
earthterminal.
Follow the fitting instructions supplied with good quality
plugs. Recommended fuse: 3A.
Using an Extension Cable
An extension cord should not be used unless absolutely
necessary. Use an approved extension cable suitable for the
power input of your charger (refer to Technical Data). The
minimum conductor size is 1mm
2
; the maximum length
is30m.
When using a cable reel, always unwind the cablecompletely.
Important Safety Instructions for All
BatteryChargers
SAVE THESE INSTRUCTIONS: This manual contains important
safety and operating instructions for compatible battery
chargers (refer to TechnicalData).
• Before using charger, read all instructions and cautionary
markings on charger, battery pack, and product using
batterypack.
WARNING: Shock hazard. Do not allow any liquid to
get inside charger. Electric shock mayresult.
WARNING: We recommend the use of a residual current
device with a residual current rating of 30mA orless.
CAUTION: Burn hazard. To reduce the risk of injury,
charge only STANLEY FATMAX rechargeable batteries.
Other types of batteries may burst, causing personal
injury anddamage.
CAUTION: Children should be supervised to ensure that
they do not play with theappliance.
NOTICE: Under certain conditions, with the charger
plugged into the power supply, the exposed charging
contacts inside the charger can be shorted by foreign
material. Foreign materials of a conductive nature such
as, but not limited to, steel wool, aluminium foil or any
buildup of metallic particles should be kept away from
charger cavities. Always unplug the charger from the
power supply when there is no battery pack in the cavity.
Unplug charger before attempting toclean.
• DO NOT attempt to charge the battery pack with
any chargers other than the ones in this manual.
The charger and battery pack are specifically designed to
worktogether.
• These chargers are not intended for any uses other
than charging STANLEY FATMAX rechargeable

10
ENGLISH (Original instructions)
batteries. Any other uses may result in risk of fire, electric
shock orelectrocution.
• Do not expose charger to rain orsnow.
• Pull by plug rather than cord when disconnecting
charger. This will reduce risk ofdamage to electric plug
andcord.
• Make sure that cord is located so that it will not be
stepped on, tripped over, or otherwise subjected to
damage orstress.
• Do not use an extension cord unless it is absolutely
necessary. Use of improper extension cord could result in
risk of fire, electric shock, orelectrocution.
• Do not place any object on top of charger or place
the charger on a soft surface that might block the
ventilation slots and result in excessive internal heat.
Place the charger in a position away from any heat source.
The charger is ventilated through slots in the top and the
bottom of thehousing.
• Do not operate charger with damaged cord or plug—
have them replacedimmediately.
• Do not operate charger if it has received a sharp blow,
been dropped, or otherwise damaged in any way. Take
it to an authorised servicecentre.
• Do not disassemble charger; take it to an authorised
service centre when service or repair is required. Incorrect
reassembly may result in a risk of electric shock, electrocution
orfire.
• In case of damaged power supply cord, the supply cord must
be replaced immediately by the manufacturer, its service
agent or similar qualified person to prevent anyhazard.
• Disconnect the charger from the outlet before
attempting any cleaning. This will reduce the risk of
electric shock. Removing the battery pack will not reduce
thisrisk.
• NEVER attempt to connect two chargerstogether.
• The charger is designed to operate on standard
230V household electrical power. Do not attempt to
use it on any other voltage. This does not apply to the
vehicularcharger.
Charger Cleaning Instructions
WARNING: Shock hazard. Disconnect the charger
from the AC outlet before cleaning. Dirt and grease
may be removed from the exterior of the charger using
a cloth or soft non‑metallic brush. Do not use water or
any cleaning solutions. Never let any liquid get inside the
tool; never immerse any part of the tool into aliquid.
Battery Packs
Important Safety Instructions for All
BatteryPacks
When ordering replacement battery packs, be sure to include
catalogue number andvoltage.
The battery pack is not fully charged out of the carton.
Before using the battery pack and charger, read the safety
instructions below. Then follow charging proceduresoutlined.
READ ALL INSTRUCTIONS
• Do not charge or use battery in explosive
atmospheres, such as in the presence of flammable
liquids, gases or dust. Inserting or removing the battery
from the charger may ignite the dust orfumes.
• Never force battery pack into charger. Do not modify
battery pack in any way to fit into a non‑compatible
charger as battery pack may rupture, causing serious
personalinjury.
• Charge the battery packs only in STANLEY FATMAXchargers.
• DO NOT splash or immerse in water or otherliquids.
• Do not store or use the tool and battery pack in
locations where the temperature may fall below 4˚C
(40˚F) (such as outside sheds or metal buildings in
winter), or reach or exceed 40˚C (104˚F) (such as
outside sheds or metal buildings insummer).
• Do not incinerate the battery pack even if it is severely
damaged or is completely worn out. The battery pack
can explode in a fire. Toxic fumes and materials are created
when lithium‑ion battery packs areburned.
• If battery contents come into contact with the skin,
immediately wash area with mild soap and water. If
battery liquid gets into the eye, rinse water over the open eye
for 15minutes or until irritation ceases. If medical attention
is needed, the battery electrolyte is composed of a mixture of
liquid organic carbonates and lithiumsalts.
• Contents of opened battery cells may cause
respiratory irritation. Provide fresh air. If symptoms persist,
seek medicalattention.
WARNING: Burn hazard. Battery liquid may be
flammable if exposed to spark orflame.
WARNING: Never attempt to open the battery pack for
any reason. If battery pack case is cracked or damaged,
do not insert into charger. Do not crush, drop or damage
battery pack. Do not use a battery pack or charger that
has received a sharp blow, been dropped, run over or
damaged in any way (i.e., pierced with a nail, hit with
a hammer, stepped on). Electric shock or electrocution
may result. Damaged battery packs should be returned
to service centre forrecycling.
WARNING: Fire hazard. Do not store or carry the
battery pack so that metal objects can contact
exposed battery terminals. For example, do not place
the battery pack in aprons, pockets, tool boxes, product
kit boxes, drawers, etc., with loose nails, screws, keys,etc.
CAUTION: When not in use, place tool on its side on
a stable surface where it will not cause a tripping
or falling hazard. Some tools with large battery packs

11
ENGLISH
(Original instructions)
will stand upright on the battery pack but may be easily
knockedover.
Transportation
WARNING: Fire hazard. Transporting batteries can
possibly cause fire if the battery terminals inadvertently
come into contact with conductive materials. When
transporting batteries, make sure that the battery
terminals are protected and well‑insulated from
materials that could contact them and cause a short
circuit. NOTE: Lithium‑ion batteries should not be put in
checkedbaggage.
STANLEY FATMAX batteries comply with all applicable
shipping regulations as prescribed by industry and legal
standards, which include UN Recommendations on the
Transport of Dangerous Goods; International Air Transport
Association (IATA) Dangerous Goods Regulations; International
Maritime Dangerous Goods (IMDG) Regulations; and the
European Agreement Concerning The International Carriage
of Dangerous Goods by Road (ADR). Lithium-ion cells
and batteries have been tested to section 38.3of the UN
Recommendations on the Transport of Dangerous Goods
Manual of Tests andCriteria.
In most instances, shipping a STANLEY FATMAX battery pack
will be excepted from being classified as a fully regulated
Class9Hazardous Material. In general, only shipments
containing a lithium-ion battery with an energy rating greater
than 100Watt Hours (Wh) will require being shipped as
fully regulated Class9. All lithium-ion batteries have the Wh
rating marked on the pack. Furthermore, due to regulation
complexities, STANLEY FATMAX does not recommend air
shipping lithium-ion battery packs alone regardless of Wh
rating. Shipments of tools with batteries (combo kits) can be air
shipped as excepted if the Wh rating of the battery pack is no
greater than 100Wh.
Regardless of whether a shipment is considered excepted
or fully regulated, it is the shipper's responsibility to consult
the latest regulations for packaging, labeling/marking and
documentationrequirements.
The information provided in this section of the manual is
provided in good faith and believed to be accurate at the time
the document was created. However, no warranty, expressed
or implied, is given. It is the buyer’s responsibility to ensure
that its activities comply with the applicableregulations.
Storage Recommendations
1. The best storage place is one that is cool and dry away
from direct sunlight and excessive heat or cold. For
optimum battery performance and life, store battery packs
at room temperature when not inuse.
2. For long storage, it is recommended to store a fully
charged battery pack in a cool, dry place out of the
charger for optimalresults.
NOTE: Battery packs should not be stored completely
depleted of charge. The battery pack will need to be
recharged beforeuse.
Labels on Charger and Battery Pack
In addition to the pictographs used in this manual, the
labels on the charger and the battery pack may show the
followingpictographs:
LRead instruction manual beforeuse.
p See Technical Data for chargingtime.
q Do not probe with conductiveobjects.
r Do not charge damaged batterypacks.
s Do not expose towater.
t Have defective cords replacedimmediately.
u Charge only between 4˚C and 40˚C.
v Only for indooruse.
x Discard the battery pack with due care for
theenvironment.
y Charge STANLEY FATMAX battery packs only with
designated STANLEY FATMAX chargers. Charging
battery packs other than the designated STANLEY
FATMAX batteries with a STANLEY FATMAX
charger may make them burst or lead to other
dangeroussituations.
z Do not incinerate the batterypack.
B USE (without transport cap). Example: Wh rating
indicates 108Wh (1battery with 108Wh).
A TRANSPORT (with built-in transport cap). Example:
Wh rating indicates 3x 36Wh (3batteries of 36Wh).
Charging a Battery
STANLEY FATMAX chargers are designed to charge STANLEY
FATMAX batterypacks.
• Plug the charger into an appropriateoutlet.
• Insert and fully seat battery pack. Green charging light will
continuously blink whilecharging.

12
ENGLISH (Original instructions)
• Charging is complete when the green charging light
remains continuously ON. Battery pack can be left in
charger orremoved.
• Recharge discharged batteries as soon as possible after
use or battery life may be greatly diminished.
For longest battery life, do not discharge batteries fully.
It is recommended that the batteries be recharged after
eachuse.
Charger Diagnostics
This charger is designed to detect certain problems that can
arise with the battery packs or the power source. Problems
are indicated by one LED flashing in differentpatterns.
Bad Battery
The charger can detect a weak or damaged battery. The LED
flashes in the pattern indicated on the label. If you see this bad
battery blink pattern, do not continue to charge the battery.
Return it to a service centre or a collection site forrecycling.
Hot/Cold Pack Delay
When the charger detects a battery that is excessively hot or
excessively cold, it automatically starts a Hot/Cold Pack Delay,
suspending charging until the battery has normalised. After
this happens, the charger automatically switches to the Pack
Charging mode. This feature ensures maximum battery life.
The light flashes in the pattern indicated on thelabel.
Leaving the Battery in the Charger
The charger and battery pack can be left connected with the
LED glowing indefinitely. The charger will keep the battery
pack fresh and fully charged.
This charger features an automatic tune-up mode which
equals or balances the individual cells in the battery pack to
allow it to function at peak capacity.
Battery packs should be tuned up weekly or whenever the
battery no longer delivers the same amount of work. To use
the automatic tune-up mode, place the battery pack in the
charger and leave it for at least 8hours.
ASSEMBLY AND ADJUSTMENTS
WARNING! To reduce the risk of serious personal injury,
turn unit off and remove the battery pack before making
any adjustments or removing/installing attachments or
accessories. An accidental start‑up can causeinjury.
Telescoping Handle (Fig.A, B)
This pressure washer has a convenient, built-in telescoping
handle and transportwheels.
1. To unlock the telescoping handle16, press the handle
release button17 and slide the handle upwards. You will
hear an audible click when it snaps intoposition.
2. To store the telescoping handle16, press the handle
release button17 and slide the telescoping handle down
and into the pressure washer body. You will hear an audible
click when it snaps intoposition.
3. To move the pressure washer, tilt the unit so the transport
wheels21 are touching the ground and pull the unit by
the telescopinghandle.
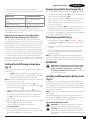
Attaching Spray Gun (Fig.C)
1. To connect the spray gun7 to the spray lance5, insert
the end of the spray gun onto the end of the spraylance.
2. Press in and turn the spray gun counterclockwise to lock
it into position.
Attaching High Pressure Hose (Fig.A, D)
CAUTION: NEVER PULL WATER SUPPLY HOSE TO
MOVE pressure washer. This could damage hose and/
or pumpinlet.
This pressure washer has a hook and loop hose storage
strap27 on the roll cage15 (Fig. A) of the pressure washer
unit to store the coiled high pressure hose1.
NOTE: Uncoil the high pressure hose1 before installation to
preventkinks.
NOTE: Avoid cross threading when installing the hose. Cross
threading will causeleaks.
1. To connect the high pressure hose1 to the spray gun7,
thread the hose collar28 onto the inlet coupler29.
2. To connect the high pressure hose to the pressure washer
unit11, thread the hose collar28 onto the high pressure
water outlet19.
Attaching Garden Hose (Fig.E)
NOTE: Before connecting the garden hose to the pressure
washer unit, run water through the garden hose for thirty
seconds to clear any debris from inside thegardenhose.
1. To connect the garden hose to the pressure washer
unit11, screw the transparent inlet filter24 to the
garden hose water intake18.
2. Connect the garden hose to the hose connector35
by loosening the screw of the garden connector and
attaching the hose onto theconnector.
3. Attach the garden hose mounted onto the connector
to the transparent inlet filter24 until it "clicks."
Attaching Nozzles (Fig.F, G2)
DANGER: Risk of fluid injection. Do not direct discharge
stream toward persons, unprotected skin, eyes or any
pets or animals. Serious injury willoccur.
WARNING: Flying objects could cause risk of serious
injury. DO NOT attempt to change nozzles while pressure
washer is running. Turn pressure washer unit OFF before
changingnozzles.
1. To connect a nozzle to the spray lance5 depress the
nozzle button6 on the spray lance and insert the
appropriatenozzle.

13
ENGLISH
(Original instructions)
2. Release the button to lock the nozzle inplace.
3. Give the nozzle a firm tug to ensure the nozzle is locked
intoplace.
Nozzle type Suitable applications
Adjustable (Spray fan/Pencil)
Nozzle
For gentle wide angle
cleaning
Turbo/Rotating Nozzle For abrasive cleaning
NOTE: The Turbo/Rotating nozzle23 (refer to Fig. G2) is
suitable for cleaning concrete and masonry. We do not
recommend using this nozzle for car/vehicle cleaning as it can
cause damage to thesurface.
Adjusting Spray Pattern of the Adjustable
Nozzle from Spray Fan to Pencil (Fig.G1)
The angle of spray coming out of the spray lance may be
adjusted by rotating the nozzle. This will vary the spray pattern
from approximately a 0° narrow high impact stream to a 60°
wide fan spray. A wide fan pattern distributes the impact of
the water over a larger area, resulting in excellent cleaning
action with a reduced risk of surface damage. Large surface
areas can be cleaned more quickly using a wide fan pattern.
A narrow pencil jet stream distributes the impact of the water
in a concentrated area, resulting in a high impact force on
the cleaning surface. Use a narrow pencil jet stream for deep
cleaning in a concentrated area. However, use it cautiously, as
it may damage somesurfaces.
To Attach the Self Priming Suction Hose
(Fig.H)
Use the suction hose to pull water from a bucket or other fresh
watersource.
NOTICE: Do not use to suction soap, chemicals, dirty
or corrosive liquids, such as window cleaner, plant food,
fertilizers or bleach. Do not use with saltwater.
NOTE: Avoid cross threading when installing the suction hose.
Cross threading will causeleaks.
1. To connect the self priming suction hose2 to the
pressurewasherunit, thread the suction hose collar31
onto the water intake18.
2. Securely tighten the suction hose collar31 byhand.
NOTE: Always disconnect the suction hose afterusage.
3. Place other end of suction hose, with the suction hose
filter4 on it, into a container of fresh water or a fresh
watersource.
4. Adjust the float ball3 on the suction hose so the suction
hose filter4 stays covered in theliquid.
5. Select the correct nozzle to be used. Refer to
AttachingNozzles.
6. After the job being performed is complete, place the
suction hose into a container of clean water and draw the
clean water through the system torinse.
Removing Soap Bottle from Storage (Fig.
I
)
Always completely empty the soap bottle26 beforestoring.
1. Unlock the telescoping handle16, and slide it upwards so
you can access the soap bottle26.
2. To remove the soap bottle26 from the built-in storage
space in the pressure washer unit, grasp the soap
bottle with one hand and pull it out and away from the
pressure washerunit.
3. To place the soap bottle26 into its storage slot, press the
soap bottle firmly into the storage slot until it snaps into
the built-in storage space in the pressure washerunit.
4. Ensure that soap bottle is secured into the storage position
by gently tugging on the soapbottle.
Attaching Soap Bottle (Fig.J)
1. To connect the soap bottle26 to the spray gun
7
, pull
the nozzle button6 toward the spray gun and insert the
soap bottle.
2. Release the quick connect collar to lock the soap bottle
in place.
3. Give the soap bottle a firm tug after the quick connect
collar has locked intoplace to ensure the soap bottle is
locked intoplace.
NOTE: The soap bottle should be positioned with the bottle
towards the ground. Do not position the soap bottle above the
spray lance as this will lead to soap dripping on the spraylance.
OPERATION
WARNING: To reduce the risk of serious personal
injury, turn unit off and remove the battery pack
before making any adjustments or removing/
installing attachments or accessories. An accidental
start‑up can causeinjury.
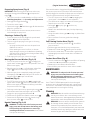
Installing and Removing the Battery Packs
(Fig.K)
This pressure washer is designed to operate on two battery
packs of equal capacity. The pressure washer will not operate
on a single battery pack, and if using different capacity battery
packs, the smaller capacity battery pack, when depleted, will
cause the unit to turnoff.
NOTE: For best results, make sure your battery packs are both
fullycharged.
For optimum performance and runtime, we recommend
using 4.0Ah (SFMCB204) or 6.0Ah (SFMCB206) battery packs.
The pressure washer requires 2x batteries torun.
To Install the Battery Packs
WARNING: Ensure speed selector switch is in the OFF,
centred position, before installing batterypacks.
CAUTION: Unit stops running when the battery port
cover is open. If the speed selector switch is in the HI or
LO position the unit will power ON when the battery port
covercloses.

14
ENGLISH (Original instructions)
DEUTSCH
CAUTION: Do not hold the trigger when closing the
battery portcover.
1. Lift and hold the battery port cover14 up to expose the
batteryports.
2. Align the battery packs32 with the rails inside the battery
port and slide them in until the battery packs are firmly
seated in the tool and ensure that they will notdisengage.
3. Close the battery port cover14. Ensure the cover is fully
latched into position before startingtool.
NOTE: The unit will not operate if the battery door is not
fullyclosed.
To Remove the Battery Packs
1. Lift and hold the battery port cover14 up to expose the
battery packs32.
2. Press the battery release buttons33 on the battery
packs32 and firmly pull the battery packs out oftool.
3. Insert the batteries into a charger as described in the
charger section of thismanual.
Proper Hand Position (Fig.L)
WARNING: To reduce the risk of serious personal injury,
ALWAYS use proper hand position as shown.
WARNING: To reduce the risk of serious personal injury,
ALWAYS hold securely in anticipation of a suddenreaction.
Proper hand position requires one hand on the spray gun
handle grip8 and the other hand on the spray gun7.
Speed Selector Switch (Fig.A, M)
This pressure washer gives you the choice to operate at a high
pressure or lower pressure for more delicate jobs, and can also
boost pressure for high-performancecleaning.
The speed switch selector12 toggles to three positions;
‑Off,centred.
‑HI, rightside.
‑LO, leftside.
To turn the pressure washer ON, toggle the speed switch
selector12 to the right or leftpositions.
To turn the pressure washer OFF, toggle the speed switch
selector12 to the centreposition.
For higher pressure washing, press the speed switch
selector12 to the right to the "HI" position. This mode is best
for applications that need higherPSI.
For lower pressure washing, press the speed switch
selector12 to the left to the "LO" position. This mode is best
for projects that require a more delicate cleaning. This mode
also generally offers moreruntime.
NOTE: When in "HI" mode, runtime will be decreased as
compared to when pressure washer is in "LO"mode.
To activate Boost mode, press the boost button13, the
green LED will illuminate when activated. This mode is best for
applications that require maximum availablePSI.
NOTE: Boost mode will only function for up to five minutes.
You can press the boost button again to exit boost mode
before five minutes and you will go back to the mode the
speed switch selector12 is set to. When you near the end of
five minutes the green LED will start to flash, and the unit will
return to the mode the speed switch selector is set to after
boost mode timesout.
NOTE: After boost mode is used for a full five minutes, the
unit requires a cool down cycle before boost mode can be
reactivated. The green LED will flash, for approximately eight
minutes, until the cool down cycle is complete. Once the cool
down cycle is complete, the green LED will turn off. Boost
mode can now be used again by pressing the boostbutton.
NOTE: The unit can be used in high or low mode during the
cool downcycle.
Pressure Washing (Fig.A–M)
WARNING: To reduce the risk of serious personal
injury, turn unit off and remove the battery pack
before making any adjustments or removing/
installing attachments or accessories. An accidental
start‑up can causeinjury.
Preparing Surface for Cleaning
• Remove objects from the area which could create a hazard
such as children's toys or outdoor furniture.
• Insure that all doors and windows are closed tight.
Protect all plants and trees in the adjacent area with a
drop cloth ensuring that they will not be harmed by
anyoverspray.
• Pre-rinse cleaning area with freshwater.
• Use only detergents formulated for pressurewashers.
• Always test detergent in an inconspicuous area beforeuse.
Preparing Pressure Washer Unit for Use
DANGER: Risk of fluid injection and laceration. When
using the high‑pressure setting, DO NOT allow the
high‑pressure spray to come in contact with unprotected
skin, eyes, or with any pets or animals. Serious injury
willoccur.
CAUTION: Before operation:
1 . Connect the high pressure hose to the pressure washer
and the pressure wand. For instructions on connecting
the high pressure hose to the pressure washer and pressure
wand, please refer to Attaching High Pressure Hose
under Assembly andAdjustments.
2 . Connect the water supply to the pressure washer. For
instructions on connecting the water supply to the pressure
washer, please refer to Attaching Garden Hose under
Assembly andAdjustments.
3 . Lift and hold the battery port cover14 up to expose the
batteryports. Install the two battery packs32 . Close the
battery port cover. Ensure the cover is fully latched into
position, please refer to To Install the Battery Packs
under Installing and Removing the BatteryPacks.

15
ENGLISH
(Original instructions)
Preparing Spray Lance (Fig.A)
IMPORTANT: Before turning on the pressure washer unit,
disengage the trigger lock-off button9 and squeeze the
trigger10.
1. Spray lance must be assembled before use. Please refer to
Attaching Spray Gun under Assembly andAdjustments.
2. Disengage the trigger lock-off9.
3. Turn on the watersupply.
4. Squeeze the trigger10. Hold the trigger for 30seconds to
purge the system ofair.
5. If air is still found in the water stream, continue to run
water through the spraylance.
Cleaning a Surface (Fig.M)
1. To start the pressure washer, toggle the speed switch
selector12 to the HI or LOposition.
2. The best angle for spraying water against a cleaning
surface is 45°.
‑Spraying head-on tends to cause dirt particles to
imbed in thesurface.
‑When working on vertical surfaces, it is best to
apply detergent starting at the bottom and working
upwards which will prevent the detergent from sliding
down and causingstreaks.
3. To disengage the spray gun, release thetrigger.
Moving the Pressure Washer (Fig.A, B)
1. Turn OFF the pressure washer unit11 and toggle the
speed switch selector12 to the centre position. Then turn
off the watersupply.
2. Point the spray lance5 in a safe direction and pull the
trigger10 to release remaining waterpressure.
3. When the spray lance is completely empty, pull up the
telescoping handle16 and pull the pressure washer unit
using the wheels21 to your nextlocation.
Shutdown (Fig.A)
1. Turn OFF the pressure washer unit11 by toggling the
speed switch selector12 to the centre position. Then turn
off the watersupply
and
remove the battery packs from
the pressure washer unit11
.
2. Discharge residual pressure by squeezing the trigger10
until no more water comes out of the spray lance5.
3. Engage the spray trigger lock-off button9.
4. Disconnect the garden hose from the water intake18.
5. Disconnect the high pressure hose1 from the high
pressure water outlet19 and drainhose.
Nozzle Cleaning (Fig.A, N)
WARNING: To reduce the risk of serious personal
injury, turn unit off and remove the battery pack
before making any adjustments or removing/
installing attachments or accessories. An accidental
start‑up can causeinjury.
If the nozzle becomes clogged with foreign materials, such as
dirt, excessive pressure may develop. If the nozzle becomes
partially clogged or restricted, the pump pressure will pulsate.
Clean the nozzle immediately using the nozzlecleaner.
1. Turn OFF the pressure washer unit11 by toggling the
speed switch selector12 to the centerposition.
2. Turn off the watersupply
and
remove the battery packs
from the pressure washer unit11
.
3. Pull trigger10 on spray gun7 to relieve any
waterpressure.
4. Remove the nozzle from the spray lance by depressing
thebutton.
5. Using the nozzle cleaning pin25 unclog any debris from
the nozzle.
6. Run water from a faucet or garden hose through
thenozzle.
Self Priming Suction Hose (Fig.H)
1. To clean the self priming suction hose2, shut off the
pressurewasher.
2. Pull the trigger switch to relieve any waterpressure.
3. Remove the suction hose2 from the pressurewasher.
4. To clean the suction hose, use water from a garden hose
to thoroughly rinse out the suction hose and allow it to
fullydry.
Suction Hose Filter (Fig.O)
1. Turn the suction hose filter4 on the end of the self priming
suction hose2 counterclockwise andremove.
2. Remove the strainer from inside of thefilter.
3. Rinse all of the parts with clean water andreassemble.
MAINTENANCE
WARNING: To reduce the risk of serious personal
injury, turn unit off and remove the battery pack
before making any adjustments or removing/
installing attachments or accessories. An accidental
start‑up can causeinjury.
Your STANLEY FATMAX power tool has been designed
to operate over a long period of time with a minimum of
maintenance. Continuous satisfactory operation depends
upon proper tool care and regularcleaning.
Cleaning
WARNING: Blow dirt and dust out of the main housing
with dry air as often as dirt is seen collecting in and
around the air vents. Wear approved eye protection and
approved dust mask when performing thisprocedure.
WARNING: Never use solvents or other harsh chemicals
for cleaning the non‑metallic parts of the tool. These
chemicals may weaken the plastic materials used in
these parts. Use a cloth dampened only with water and
mild soap. Never let any liquid get inside the tool; never
immerse any part of the tool into aliquid.

16
ENGLISH (Original instructions)
Storage (Fig.A, H, I, P–R)
• Store in a dry, covered location above freezing
temperature. STOREINDOORS.
• Always completely empty water from high pressure hose,
pressure washer unit, spray lance, nozzles, soap bottle, and
spraygun.
• The soap bottle26 snaps into place on the unit, as shown
in Fig.I.
• Nozzles can be stored on the unit as shown in Fig.P.
• Spray lance can be stored, broken down into twopieces.
‑The spray lance can be stored in the lance storage
compartment34 on the back of the pressure
washer unit as shown inFig.Q.
‑The spray gun can be attached to the spray gun
handle storage hook20 on the roll cage15 as
shown in Fig.R.
• High pressure hose1 and self priming suction hose2
(Fig. A) can be stored coiled up and secured to the roll
cage15 using the hook and loop hose storage strap27
as shown in Fig.R.
Accessories
WARNING: Since accessories, other than those
offered by STANLEY FATMAX, have not been tested
with this product, use of such accessories with this
tool could be hazardous. To reduce the risk of injury,
only STANLEY FATMAX recommended accessories should
be used with this product. Recommended accessories for
use with your tool are available at extra cost from your
local dealer or authorised servicecentre.
Protecting the Environment
w
Separate collection. Products and batteries marked
with this symbol must not be disposed of with
normal householdwaste.
Products and batteries contain materials that can be
recovered or recycled, reducing the demand for raw materials.
Please recycle electrical products and batteries according to
local provisions.
Technical Data
SFMCPW1500
Type 1
Power 2 x 18V
Rated Flow Rate L/min 4.5
Max Flow Rate L/min 5.0
Rated Pressure (Bar/PSI/MPa)
Bar/
PSI/
MPa
103/1500/10.3
Max Pressure (Bar/PSI/MPa)
Bar/
PSI/
MPa
145/2103/14.5
Max Water Inlet Temperature C50
Inlet Water Cold clean water
Guaranteed sound power level LWA
dB(A) 95
Maximum Input Pressure MPa 1
Motor Protection IPX5
Motor Type Brushless
Pump Aluminium
Self Priming Yes
Hose Length M
Integrated Filter Yes
Weight Kg 9.3
Charger SFMCB12
Input Voltage VAC 230
Output Voltage VDC 18
Current A 2
Battery SFMCB202 SFMCB204 SFMCB206
Voltage VDC 18 18 18
Capacity Ah 2.0 4.0 6.0
Type Li‑Ion Li‑Ion Li‑Ion
SFMCPW1500
Emission sound pressure level LPA: 80dB(A); K=3.0 dB(A)
Measured sound power level: LWA: 92dB(A); K=2.4 dB(A)
Vibration emission value ah: less than 2.5 m/s2 ; K=0.6 m/s2

17
ENGLISH
(Original instructions)
EC DECLARATION OF CONFORMITY
MACHINERY DIRECTIVE
OUTDOOR NOISE DIRECTIVE
SFMCPW1500 Pressure Washer
STANLEY FATMAX declares that these products described
under "Technical data" are in compliance with:
2006/42/EC, EN 60335-1:2012+A11:2014+A13:2017+A1:2019
+A14:2019+A2:2019+A15:2021, EN60335-2-79:2012.
2000/14/EC Annex V
LWA (measured sound power level) 92dB(A),
uncertainty (K) = 2.4 dB (A),
LWA (guaranteed sound power) 95dB(A).
These products also comply with Directive 2014/30/EU and
2011/65/EU.
The undersigned is responsible for compilation of the
technical file and makes this declaration on behalf of STANLEY
FATMAX. .
Patrick Diepenbach
General Manager, Benelux
Stanley,
Egide Walschaertsstraat 14-18
2800Mechelen, Belgium
2022.12.30
DECLARATION OF CONFORMITY
THE SUPPLY OF MACHINERY (SAFETY)
REGULATIONS 2008
SFMCPW1500 Pressure Washer
Stanley Europe declares that these products described under
“Technical data” are in compliancewith:
The Supply of Machinery (Safety) Regulations, 2008, S.I.
2008/1597 (asamended).
EN 60335-1:2012+A11:2014+A13:2017+A1:2019+A14:2019+
A2:2019+A15:2021, EN60335-2-79:2012.
The Noise Emission in the Environment by Equipment for use
Outdoors Regulations 2001, S.I. 2001/1701 (as amended).
Schedule8.
LWA (measured sound power level) 92dB(A),
uncertainty (K) = 2.4 dB (A),
LWA (guaranteed sound power) 95dB(A).
These products also conform to the following UK Regulations:
Electromagnetic Compatibility Regulations, 2016,
S.I.2016/1091 (asamended).
The Restriction of the Use of Certain Hazardous Substances
in Electrical and Electronic Equipment Regulations 2012, S.I.
2012/3032 (as amended).
For more information, please contact Stanley Europe at the
following address or refer to the back of the manual.
The undersigned is responsible for compilation of the technical
file and makes this declaration on behalf of StanleyEurope.
The undersigned is responsible for compilation of the technical
file and makes this declaration on behalf of StanleyEurope.
Paul Featherstone
Product Director, Outdoors Group
Black and Decker UK,
270Bath Road, Slough
Berkshire, SL1 4DX
England
Guarantee
STANLEY FATMAX is confident of the quality of its products
and offers consumers a 12-month guarantee from the date
of purchase. This guarantee is in addition to and in no way
prejudices your statutory rights.
The guarantee is valid within the territories of the Member
States of the European Union and the European Free Trade
Area and the UnitedKingdom.
To claim on the guarantee, the claim must be in accordance
with STANLEY FATMAX Terms and Conditions and you
will need to submit proof of purchase to the seller or an
authorised repair agent. Terms and conditions of the STANLEY
FATMAX 1-year guarantee and the location of your nearest
authorised repair agent can be obtained on the Internet at
www.2helpU.com, or by contacting your local STANLEY
FATMAX office at the address indicated in thismanual.
Please visit our website www.stanley.eu/3 to register your
new STANLEY FATMAX product and receive updates on new
products and specialoffers.

18
(Übersetzung der ursprünglichen Anweisungen)
DEUTSCH
VORSICHT: Lesen Sie die Anweisungen, bevor Sie dieses
Gerätbenutzen.
Verwendungszweck
Ihr STANLEY FATMAX Hochdruckreiniger SFMCPW1500
wurde zur Reinigung von Booten, Autos, Decks, Einfahrten,
Grills, Hausverkleidungen, Motorrädern, Terrassen und
Außenmöbeln entwickelt. Diese Geräte sind nicht für den
gewerblichen Einsatzvorgesehen.
Komponenten
1 Hochdruckschlauch (6m)
2 Selbstansaugender Saugschlauch (5m)
3 Schwimmerkugel
4 Saugschlauchfilter
5 Sprühlanze
6 Düsentaste
7 Sprühpistole
8 Griff des Sprühpistolenstiels
9 Auslösersperre
10 Auslöser
11 Hochdruckreiniger
12 Geschwindigkeitsregler (Hi/Low)
13 Boost-Taste
14 Akkuanschlussabdeckung
15 Sicherheitskäfig
16 Teleskopgriff
17 Grifflösetaste
18 Gartenschlauchwassereinlass
19 Hochdruckwasserauslass
20 Aufbewahrungshaken für den Sprühpistolengriff
21 Laufrollen
22 Verstellbare Düse (Sprühfächer/Punktstrahl)
23 Turbo-/Rotationsdüse (nicht für Fahrzeuge oder Glas
geeignet)
24 Transparenter Einlassfilter
25 Düsenreinigungsstift
26 Seifenflasche 0,6 Liter
27 Schlauchhalterungsband
SICHERHEITSHINWEISE
WARNUNG! Beachten Sie beim Umgang mit
netzstrombetriebenen/kabellosen Geräten stets
die grundlegenden Sicherheitshinweise, die
im Folgenden beschrieben werden. Dadurch
verhindern Sie Brände, Stromschläge sowie Sach‑
undPersonenschäden.
WARNUNG: Bei Verwendung dieses
Hochdruckreinigers sollten immer die
grundlegenden Sicherheitsmaßnahmen befolgt
werden, einschließlich der folgenden:
• Das Gerät darf nicht von Personen (einschließlich Kindern)
mit eingeschränkten physischen, sensorischen oder
mentalen Fähigkeiten oder ohne ausreichende Erfahrung
oder Kenntnisse verwendetwerden.
• Lassen Sie nicht zu, dass Kinder mit dem Gerätspielen.
• Lesen Sie alle Anweisungen, bevor Sie das
Produktverwenden.
• Um das Risiko von Verletzungen zu verringern, ist eine
genaue Überwachung notwendig, wenn das Produkt in der
Nähe von Kindern verwendetwird.
• Sie sollten wissen, wie Sie das Produkt anhalten und den
Druck schnell ablassen können. Machen Sie sich gründlich
mit den Bedienelementenvertraut.
• Verwenden Sie das Gerät mitUmsicht.
• Bedienen Sie das Gerät nicht, wenn Sie müde sind oder
unter dem Einfluss von Alkohol, Medikamenten oder
Drogenstehen.
• Halten Sie den Arbeitsbereich von Menschen und Tierenfrei.
• Nehmen Sie keine anormale Körperhaltung ein und stellen
Sie sich nicht auf eine instabile Fläche. Sorgen Sie für einen
festen Stand und halten Sie jederzeit dasGleichgewicht.
• Befolgen Sie die im Handbuch
angegebenenWartungsanweisungen.
WARNUNG: Injektions‑ oder Verletzungsgefahr – Strahl
nicht auf Menschen oder Tiererichten.
WARNUNG: Lesen Sie dieses Handbuch vollständig
durch, bevor Sie das Produkt zusammenbauen,
bedienen oderinstallieren.
WARNUNG: Dieses Gerät wurde für spezielle
Anwendungen entwickelt. Es darf nicht verändert und/
oder für andere als die vorgesehenen Anwendungen
eingesetzt werden.
HINWEIS: Lagern Sie den Hochdruckreiniger immer an
einem Ort, an dem die Temperatur nicht unter 4°C fällt.
Frostschäden sind nicht durch die Garantie abgedeckt.
1 . Berühren Sie den Netzstecker und die Steckdose nicht mit
nassenHänden.
2 . Vermeiden Sie eine unbeabsichtigte Inbetriebnahme.
Stellen Sie den Geräteschalter auf OFF (Aus), bevor Sie Akkus
anschließen odertrennen.
3 . Der Wasserstrahl darf niemals auf elektrische Leitungen oder
direkt auf den Hochdruckreiniger selbst gerichtet werden, da
dies zu einem tödlichen Stromschlag führenkann.
4 . Der schmale, punktförmige Strahl ist sehr stark. Er
wird nicht für die Verwendung auf lackierten Oberflächen,
Holzoberflächen oder auf Gegenständen, die mit einer
Klebefläche befestigt sind,empfohlen.
5 . Halten Sie den Arbeitsbereich von Menschen und Tierenfrei.
6 . Benutzen Sie immer beide Hände, wenn Sie den
Hochdruckreiniger bedienen, um die vollständige Kontrolle
über die Sprühlanze zubehalten.
Deutsch (Übersetzung der Originalanweisung)

19
(Übersetzung der ursprünglichen Anweisungen) DEUTSCH
7 . Berühren Sie während des Betriebs weder die Düse
noch den Wasserstrahl. Halten Sie niemals die Hände vor
dieDüse.
8 . Tragen Sie bei der Arbeit eine Schutzbrille. Tragen Sie
Schutzkleidung und ‑schuhe, um sich vor dem Sprühstrahl
zuschützen.
9 . Ziehen Sie den Netzstecker aus der Steckdose, wenn
Sie das Gerät nicht benutzen und bevor Sie den
Hochdruckschlauchabnehmen.
10 . Der Hochdruckschlauch darf niemals verknotet
oder geknickt werden, da dies zu Beschädigungen
führen kann. Inspizieren Sie den Hochdruckschlauch
regelmäßig. Tauschen Sie den Schlauch sofort aus,
wenn er beschädigt oder abgenutzt ist oder Anzeichen
von Rissen, Blasen, Nadellöchern oder anderen
Undichtigkeiten aufweist. Fassen Sie niemals einen
Hochdruckschlauch an, der undicht oder beschädigtist.
11 . Betreiben oder lagern Sie dieses Produkt nicht bei
Temperaturen unter (4°C). Frostschäden sind nicht durch die
Garantieabgedeckt.
12 . Beachten Sie vor der Verwendung sorgfältig alle
Anweisungen und Warnhinweise zu Chemikalien.
Verwenden Sie nur für Hochdruckreiniger zugelassene
Reinigungsmittel. Verwenden Sie weder Bleiche, noch
Chlor oder säurehaltige Reinigungsmittel. Befolgen Sie
immer die Herstellerempfehlungen zur ordnungsgemäßen
Verwendung von Reinigungsmitteln. Augen, Haut und
Atmungsorgane sind immer vor Reinigungsmitteln
zuschützen.
13 . Der Hochdruckreiniger sollte nicht in Bereichen
eingesetzt werden, in denen Gasdämpfe vorhanden
sein können. Ein elektrischer Funke könnte sonst eine
Explosion oder einen Brandverursachen.
14 . Um das Eindringen von Wasser in den Hochdruckreiniger
zu minimieren, sollte das Gerät während des Betriebs
so weit wie möglich von der Reinigungsstelle entfernt
aufgestelltwerden.
15 . Um versehentliches Aktivieren des Sprühstrahls zu
verhindern, sollte die Sprühpistole bei Nichtgebrauch
gesichert werden, indem der Auslöser gesperrtwird.
16 . Zur Ermöglichung einer freien Luftzirkulation darf
der Hochdruckreiniger während des Betriebs NICHT
abgedecktwerden.
17 . Berühren Sie an einem aktiven Hochdruckschlauch
niemals ein Nadelloch oder ein ähnliches Wasserleck
und versuchen Sie nicht, es abzudecken. Der
Wasserstrahl steht unter hohem Druck und WIRD die
Hautdurchdringen.
18 . Verwenden Sie nur Schläuche und Zubehörteile, die
für einen höheren Druck als die PSI / Bar‑Werte Ihres
Hochdruckreinigers ausgelegt sind. Niemals mit
Zubehör oder Komponenten anderer Herstellerverwenden.
19 . Niemals die Sicherheitsfunktionen dieses Produkts außer
Kraftsetzen.
20 . Betreiben Sie das Gerät nicht mit fehlenden, defekten oder
nicht zugelassenenTeilen.
21 . Versprühen Sie niemals brennbare Flüssigkeiten und
verwenden Sie den Hochdruckreiniger niemals in Bereichen,
in denen sich brennbare Stäube, Flüssigkeiten oder
Dämpfebefinden.
WARNUNG: Dieses Gerät ist für die Verwendung
des mitgelieferten oder vom Hersteller empfohlenen
Reinigungsmittels ausgelegt. Die Verwendung anderer
Reinigungsmittel oder Chemikalien kann die Sicherheit
des Gerätsbeeinträchtigen.
WARNUNG: Bei der Verwendung von
Hochdruckreinigern können sich Aerosole
bilden. Das Einatmen von Aerosolen kann
gesundheitsgefährdendsein.
WARNUNG: Hochdruckwasserstrahlen können bei
falscher Verwendung gefährlich sein. Der Strahl darf
nicht auf Menschen, stromführende elektrische Geräte
oder die Maschine selbst gerichtetwerden.
WARNUNG: Verwenden Sie das Gerät nicht in der Nähe
von Menschen, es sei denn, diese tragenSchutzkleidung.
WARNUNG: Richten Sie den Strahl nicht auf sich selbst
oder andere, um Kleidung oder Schuhe zureinigen.
WARNUNG: Explosionsgefahr – Keine brennbaren
Flüssigkeitenversprühen.
WARNUNG: Hochdruckreiniger dürfen nicht von
Kindern oder ungeschulten Personen verwendetwerden.
WARNUNG: Für die Sicherheit der Maschine ist es
wichtig, hochdruckfähige Schläuche, Armaturen
und Kupplungen zu verwenden. Verwenden Sie nur
Schläuche, Armaturen und Kupplungen, die vom
Hersteller empfohlenwerden.
WARNUNG: Um die Sicherheit des Geräts zu
gewährleisten, verwenden Sie nur Originalersatzteile des
Herstellers oder vom Hersteller zugelasseneTeile.
WARNUNG: Wasser, das durch einen
Rückflussverhinderer geflossen ist, gilt als nichttrinkbar.
WARNUNG: Die Maschine muss während der Reinigung
oder Wartung und beim Austausch von Teilen von der
Stromquelle getrenntwerden.
WARNUNG: Benutzen Sie das Gerät nicht, wenn
wichtige Teile der Maschine beschädigt sind, z.B.
Sicherheitseinrichtungen, Hochdruckschläuche, Pistole
mitAuslöser.
WARNUNG: Schalten Sie immer den Netzschalter aus,
wenn Sie das Gerät unbeaufsichtigtlassen.
WARNUNG: Je nach Anwendung können bei der
Hochdruckreinigung abgeschirmte Düsen verwendet
werden, wodurch die Emission von wasserhaltigen
Aerosolen drastisch reduziert wird. Allerdings erlauben

20
(Übersetzung der ursprünglichen Anweisungen)
DEUTSCH
nicht alle Anwendungen die Verwendung einer solchen
Vorrichtung. Wenn abgeschirmte Düsen zum Schutz vor
Aerosolen nicht verwendet werden können, kann je nach
Reinigungsumgebung eine Atemschutzmaske der Klasse
FFP2oder eine gleichwertige Maske erforderlichsein.
WARNUNG! Hochdruckwasserstrahlen können bei
falscher Verwendung gefährlichsein.
Nach den geltenden Vorschriften darf das
Gerät keinesfalls ohne Systemtrenner im
Trinkwassernetz eingesetzt werden. Verwenden
Sie ein Trennelement gemäß IEC 61770.
Wasser, das durch einen Systemtrenner fließt,
gilt als nichttrinkbar.
Lesen Sie diese Anleitung vollständig und aufmerksam
durch, bevor Sie das Gerätverwenden.
• Der vorgesehene Verwendungszweck ist in dieser
Anleitung beschrieben. Bei Verwendung von Zubehör
oder Anbauteilen, die nicht in dieser Anleitung empfohlen
werden, sowie bei der Verwendung des Geräts in
Abweichung von den in dieser Anleitung beschriebenen
Verfahren bestehtVerletzungsgefahr.
• Bewahren Sie diese Anleitungauf.
Vibration
Die in den Abschnitten „Technische Daten“ und
„EU-Konformitätserklärung“ angegebenen Werte für die
Vibrationsemission wurden mit einer Standard-Prüfmethode
nach EN60335-2-79 ermittelt und können zum Vergleich
verschiedener Geräte herangezogen werden. Außerdem kann
mit Hilfe dieses Werts die Belastung bei Verwendung des
Geräts schon im Voraus eingeschätztwerden.
WARNUNG: Die bei Verwendung des
Hochdruckreinigers auftretende Vibrationsemission
hängt von der Art des Gerätegebrauchs ab und kann
dementsprechend von dem angegebenen Wert
abweichen. Gegebenenfalls kann die Vibration über dem
angegebenen Wertliegen.
Für die Ermittlung der Vibrationsbelastung müssen die
tatsächlichen Einsatzbedingungen und Verwendungen des
Geräts während des gesamten Arbeitsgangs berücksichtigt
werden, einschließlich der Zeiten, wenn das Gerät nicht
verwendet oder im Leerlauf betrieben wird. Diese Werte
werden benötigt, um die gemäß 2002/44/EG erforderlichen
Sicherheitsmaßnahmen zum Schutz von Personen festlegen
zukönnen.
Sicherheit anderer Personen
• Dieses Gerät darf von Personen mit eingeschränkten
körperlichen, sensorischen oder geistigen Fähigkeiten sowie
mangelnder Erfahrung und Wissen in Bezug auf dessen
Gebrauch bedient werden, wenn sie bei der Verwendung
des Geräts beaufsichtigt oder angeleitet werden und die
möglichen Gefahrenverstehen.
• Dieses Gerät darf nicht von Kindern verwendet werden.
Kinder müssen beaufsichtigt werden, um sicherzustellen,
dass sie nicht mit dem Gerätspielen.
ZUSÄTZLICHE SICHERHEITSHINWEISE FÜR
HOCHDRUCKREINIGER
• Tragen Sie zum Schutz Ihrer Füße und Beine stets
feste Schuhe und eine lange Hose, wenn Sie mit dem
Gerätarbeiten.
• Schalten Sie das Gerät immer aus, bevor Sie den Akku
entfernen:
‑Wenn Sie das Gerät unbeaufsichtigtlassen.
‑Wenn Blockaden entferntwerden.
‑Wenn das Gerät überprüft, eingestellt oder
gereinigtwird.
‑Wenn das Gerät ungewöhnlich stark zu
vibrierenbeginnt.
• Halten Sie während des Betriebs Ihre Augen und
Ohren von der Einlass- und der Auslassöffnung des
Hochdruckreinigers fern. Richten Sie den Sprühstrahl nicht
in Richtung von Personen in IhrerNähe.
• Verwenden Sie das Gerät nicht bei Regen, und lassen Sie
es nicht im Regenliegen.
• Schalten Sie das Gerät vor dem Überqueren von
Kieswegen aus. Betreiben Sie das Gerät nur im Gehen, nie
imRennen.
• Legen Sie das eingeschaltete Gerät nicht auf Kiesab.
• Achten Sie stets auf Trittsicherheit, insbesondere bei
Arbeiten an Hängen.
• Achten Sie jederzeit auf einen sicheren Stand und eine
sichereBalance.
• Stecken Sie keine Gegenstände in die Öffnungen
des Geräts. Verwenden Sie das Gerät nicht, wenn die
Öffnungen verstopft sind. Halten Sie die Öffnungen frei
von Haaren, Flusen, Staub usw., damit der Luftstrom nicht
beeinträchtigtwird.
WARNUNG! Befolgen Sie beim Gebrauch stets die
Anweisungen in dieser Anleitung. Verwenden Sie
das Gerät nur in aufrechter Position, um Verletzungen
zu vermeiden. Betreiben Sie das Gerät nicht mit der
Saugöffnung nach oben oder wenn es auf der Seiteliegt.
• Der Bediener bzw. Benutzer ist für eventuelle Personen-
oder Sachschädenverantwortlich.
Warnsymbole am Gerät
Am Gerät sind die folgenden Warnsymbole inklusive
Datumscode angebracht:
Lesen Sie vor Inbetriebnahme
dieBedienungsanleitung.
A página está carregando ...
A página está carregando ...
A página está carregando ...
A página está carregando ...
A página está carregando ...
A página está carregando ...
A página está carregando ...
A página está carregando ...
A página está carregando ...
A página está carregando ...
A página está carregando ...
A página está carregando ...
A página está carregando ...
A página está carregando ...
A página está carregando ...
A página está carregando ...
A página está carregando ...
A página está carregando ...
A página está carregando ...
A página está carregando ...
A página está carregando ...
A página está carregando ...
A página está carregando ...
A página está carregando ...
A página está carregando ...
A página está carregando ...
A página está carregando ...
A página está carregando ...
A página está carregando ...
A página está carregando ...
A página está carregando ...
A página está carregando ...
A página está carregando ...
A página está carregando ...
A página está carregando ...
A página está carregando ...
A página está carregando ...
A página está carregando ...
A página está carregando ...
A página está carregando ...
A página está carregando ...
A página está carregando ...
A página está carregando ...
A página está carregando ...
A página está carregando ...
A página está carregando ...
A página está carregando ...
A página está carregando ...
A página está carregando ...
A página está carregando ...
A página está carregando ...
A página está carregando ...
A página está carregando ...
A página está carregando ...
A página está carregando ...
A página está carregando ...
A página está carregando ...
A página está carregando ...
A página está carregando ...
A página está carregando ...
A página está carregando ...
A página está carregando ...
A página está carregando ...
A página está carregando ...
A página está carregando ...
A página está carregando ...
A página está carregando ...
A página está carregando ...
A página está carregando ...
A página está carregando ...
A página está carregando ...
A página está carregando ...
A página está carregando ...
A página está carregando ...
A página está carregando ...
A página está carregando ...
A página está carregando ...
A página está carregando ...
A página está carregando ...
A página está carregando ...
A página está carregando ...
A página está carregando ...
A página está carregando ...
A página está carregando ...
A página está carregando ...
A página está carregando ...
A página está carregando ...
A página está carregando ...
A página está carregando ...
A página está carregando ...
A página está carregando ...
A página está carregando ...
A página está carregando ...
A página está carregando ...
A página está carregando ...
A página está carregando ...
A página está carregando ...
A página está carregando ...
A página está carregando ...
A página está carregando ...
A página está carregando ...
A página está carregando ...
A página está carregando ...
A página está carregando ...
A página está carregando ...
A página está carregando ...
A página está carregando ...
A página está carregando ...
A página está carregando ...
A página está carregando ...
A página está carregando ...
A página está carregando ...
A página está carregando ...
A página está carregando ...
A página está carregando ...
A página está carregando ...
A página está carregando ...
A página está carregando ...
A página está carregando ...
A página está carregando ...
A página está carregando ...
A página está carregando ...
A página está carregando ...
A página está carregando ...
A página está carregando ...
A página está carregando ...
A página está carregando ...
A página está carregando ...
A página está carregando ...
A página está carregando ...
A página está carregando ...
A página está carregando ...
A página está carregando ...
A página está carregando ...
A página está carregando ...
A página está carregando ...
A página está carregando ...
A página está carregando ...
A página está carregando ...
A página está carregando ...
-
 1
1
-
 2
2
-
 3
3
-
 4
4
-
 5
5
-
 6
6
-
 7
7
-
 8
8
-
 9
9
-
 10
10
-
 11
11
-
 12
12
-
 13
13
-
 14
14
-
 15
15
-
 16
16
-
 17
17
-
 18
18
-
 19
19
-
 20
20
-
 21
21
-
 22
22
-
 23
23
-
 24
24
-
 25
25
-
 26
26
-
 27
27
-
 28
28
-
 29
29
-
 30
30
-
 31
31
-
 32
32
-
 33
33
-
 34
34
-
 35
35
-
 36
36
-
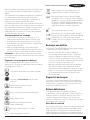 37
37
-
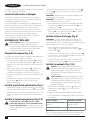 38
38
-
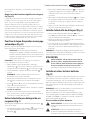 39
39
-
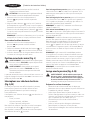 40
40
-
 41
41
-
 42
42
-
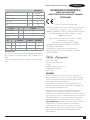 43
43
-
 44
44
-
 45
45
-
 46
46
-
 47
47
-
 48
48
-
 49
49
-
 50
50
-
 51
51
-
 52
52
-
 53
53
-
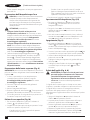 54
54
-
 55
55
-
 56
56
-
 57
57
-
 58
58
-
 59
59
-
 60
60
-
 61
61
-
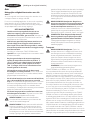 62
62
-
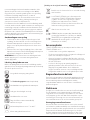 63
63
-
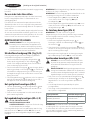 64
64
-
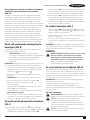 65
65
-
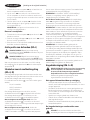 66
66
-
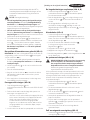 67
67
-
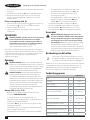 68
68
-
 69
69
-
 70
70
-
 71
71
-
 72
72
-
 73
73
-
 74
74
-
 75
75
-
 76
76
-
 77
77
-
 78
78
-
 79
79
-
 80
80
-
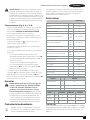 81
81
-
 82
82
-
 83
83
-
 84
84
-
 85
85
-
 86
86
-
 87
87
-
 88
88
-
 89
89
-
 90
90
-
 91
91
-
 92
92
-
 93
93
-
 94
94
-
 95
95
-
 96
96
-
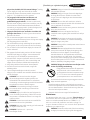 97
97
-
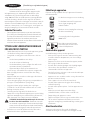 98
98
-
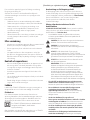 99
99
-
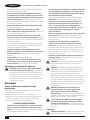 100
100
-
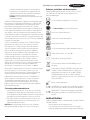 101
101
-
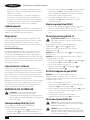 102
102
-
 103
103
-
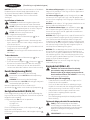 104
104
-
 105
105
-
 106
106
-
 107
107
-
 108
108
-
 109
109
-
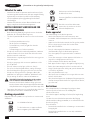 110
110
-
 111
111
-
 112
112
-
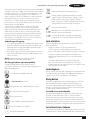 113
113
-
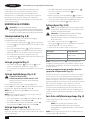 114
114
-
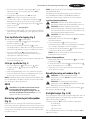 115
115
-
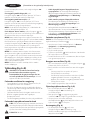 116
116
-
 117
117
-
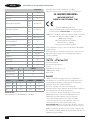 118
118
-
 119
119
-
 120
120
-
 121
121
-
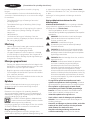 122
122
-
 123
123
-
 124
124
-
 125
125
-
 126
126
-
 127
127
-
 128
128
-
 129
129
-
 130
130
-
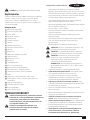 131
131
-
 132
132
-
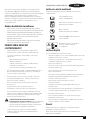 133
133
-
 134
134
-
 135
135
-
 136
136
-
 137
137
-
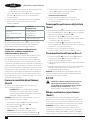 138
138
-
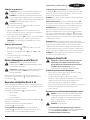 139
139
-
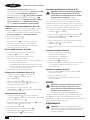 140
140
-
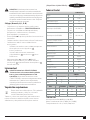 141
141
-
 142
142
-
 143
143
-
 144
144
-
 145
145
-
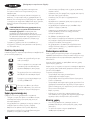 146
146
-
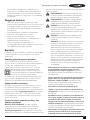 147
147
-
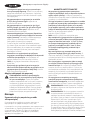 148
148
-
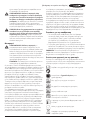 149
149
-
 150
150
-
 151
151
-
 152
152
-
 153
153
-
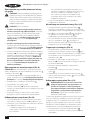 154
154
-
 155
155
-
 156
156
-
 157
157
-
 158
158
-
 159
159
-
 160
160


Stanley SFMCPW1500B Manual do usuário
- Categoria
- Ferramentas elétricas
- Tipo
- Manual do usuário
em outros idiomas
- español: Stanley SFMCPW1500B Manual de usuario
- français: Stanley SFMCPW1500B Manuel utilisateur
- italiano: Stanley SFMCPW1500B Manuale utente
- English: Stanley SFMCPW1500B User manual
- Nederlands: Stanley SFMCPW1500B Handleiding
- Deutsch: Stanley SFMCPW1500B Benutzerhandbuch
- dansk: Stanley SFMCPW1500B Brugermanual
- svenska: Stanley SFMCPW1500B Användarmanual
- suomi: Stanley SFMCPW1500B Ohjekirja
Artigos relacionados
-
Stanley SFMCBLB76B Manual do proprietário
-
-
-
-
-
-
-
-
-

