
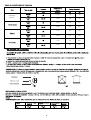
CPCGY2304N
CPCGY2314W
CPCGY2303N
CPCGY2313W

CPCGY2304N
CPCGY2314W
CPCGY2303N
CPCGY2313W
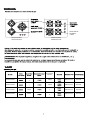
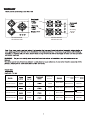
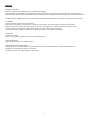
2700W
2700W
Quemadores
auxiliares
1000W
1000W
600x510x100
600x510x100
600x510x100
600x510x100
560x480
560x480
560x480
560x480
CPCGY2304N
CPCGY2314W
CPCGY2303N
CPCGY2313W
2.7kW Quemadores
auxiliares
1.0kW

2
LIMPIEZA
ESMALTE VITREO
Placa de cocción, tapas de quemadores, soportes de bandeja.
Paño escurrido en agua jabonosa caliente. Manchas rebeldes. Se puede eliminar con una pasta de crema.
aprobado por el Consejo de Desarrollo de Esmalte Vítreo, limpiador líquido o frotando con almohadillas de jabón de
lana de acero fino. NOTA: Los soportes de la bandeja también se pueden limpiar en el lavavajillas.
ALUMINIO
Cuerpos de quemadores de placa calefactora.
Similar a la limpieza de pintura arriba. Use un cepillo de nailon para eliminar cualquier material de limpieza, agua o
suciedad de los cuerpos del quemador de la placa de cocción. Después de limpiar, seque y vuelva a colocar en la
encimera, asegurándose de que estén correctamente asentados. Compruebe que las piezas se vuelven a
ensamblar correctamente encendiendo los quemadores y dejando que se sequen.
Mandos de plastico de control.
Limpie con un paño escurrido en agua jabonosa caliente.
ACERO INOXIDABLE
Paño escurrido en agua jabonosa caliente.
LAS INSTRUCCIONES DE SEGURIDAD
Asegúrese de leer estas notas y de leer todo el manual de instrucciones antes de instalarlo o ponerlo en
funcionamiento.
Las instrucciones se proporcionan en interés de su seguridad.

3
REGULACIONES DE SEGURIDAD DE GAS (INSTALACIÓN Y USO)
1. Es la ley que todos los aparatos de gas son instalados por personas competentes de acuerdo con
Edición actual de las normas anteriores. Le interesa a usted y al de seguridad garantizar el cumplimiento de la ley.
2. Las reparaciones o reparaciones de este producto solo deben ser realizadas por un servicio de un agente autorizado
y el agente utilizando solo piezas aprobadas.
3. No se debe intentar modificar este aparato.
4. Los aparatos de cocción se calientan mucho al usarlos, por lo tanto, asegúrese de que los niños y las mascotas se
mantengan alejados. Se recomienda el uso de guantes de horno cuando, durante el uso,
5. No permita que los niños operen o jueguen con ninguna parte del aparato.
6. No use recipientes inestables y coloque el asa lejos del borde de la encimera. El uso de una encimera adecuada.
7. Por razones de seguridad e higiene, asegúrese de que la placa se mantenga limpia, ya que la acumulación de grasa
podría causar
8. Este aparato está diseñado solo para cocinar en el hogar; La restauración comercial puede invalidar la garantía.
9. No cubra la placa de cocción ni coloque materiales combustibles sobre o cerca de la superficie, incluso cuando la
placa no esté en uso.
10. No llene sartenes con mucha grasa más de un tercio lleno de aceite. No lo deje desatendido.
11. Antes de limpiar la encimera, apagar en la red eléctrica.
12. Cuando termine de cocinar, apague todos los controles y deje que se enfríe.
13. Si vende o transfiere la propiedad de este producto, transmita estas instrucciones al nuevo propietario.
14. Este dispositivo no está destinado a ser utilizado por personas (incluidos niños) con capacidades físicas, sensoriales
o mentales reducidas, o por falta de experiencia y conocimiento, a menos que hayan sido supervisados o instruidos
sobre el uso del dispositivo por una persona responsable de su uso. la seguridad.
15. Los niños deben ser supervisados para asegurarse de que no jueguen con el aparato.
16. Si el cable de alimentación está dañado, debe ser reemplazado por el fabricante o su agente de servicio o una
persona con calificaciones similares para evitar un peligro.
17. No sumerja el aparato ni el cable de alimentación en agua ni en ningún otro líquido.
18. Por favor, saque el pasador cuando haga la limpieza y el mantenimiento. Cuando el aparato está instalado, puede
sacar el pasador.
INSTRUCCIONES DE INSTALACIÓN
INFORMACIÓN TÉCNICA
La instalación, los ajustes, las conversiones y el mantenimiento enumerados en esta parte solo deben ser realizados
por personal cualificado.
Los dispositivos de seguridad y de ajuste automático del aparato solo pueden ser modificados por un agente de servicio
autorizado. La instalación de esta cocina de gas debe cumplir con las normas vigentes.
Este aparato no está conectado a una chimenea para la descarga de los productos de combustión; por lo tanto, debe
estar conectado de acuerdo con las reglas de instalación mencionadas anteriormente. Se debe prestar especial
atención a las instrucciones que se dan a continuación para la ventilación y ventilación.
ATENCIÓN
!
El aparato no debe estar conectado a un dispositivo de evacuación de productos de combustión. Se instalará y
conectará de acuerdo con las normas de instalación vigentes. Se prestará especial atención a las instrucciones
pertinentes relativas a la ventilación.
UBICACIÓN
La cocina se puede ubicar en una cocina, cocina / cena o en una sala de estar, pero no en una habitación con baño o
ducha. La encimera no debe instalarse en una sala de estar de menos de 20 m3.
Los modelos de GLP no deben instalarse en una habitación o espacio interno debajo del nivel del suelo, por ejemplo. en
un sótano.
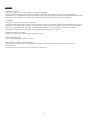
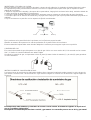
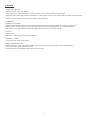
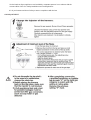
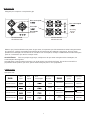
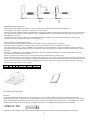
PROVISIÓN PARA LA VENTILACIÓN
Cuando se usa un aparato de gas, produce calor y humedad en la habitación donde se instala. Por este motivo, la sala
debe estar bien ventilada, manteniendo libres las aberturas de ventilación natural (fig. 1) y conectando el sistema de
aireación mecánico (campana de aspiración o ventilador eléctrico, figs. 2 y 3).
Si la cocina se utiliza durante mucho tiempo, puede ser necesaria una aireación adicional, por ejemplo, abrir una
ventana o una aireación más efectiva al aumentar la potencia del sistema mecánico, si existe.
NOTA:
(*) Sección mínima de entrada de aire: 100cm2.

F G
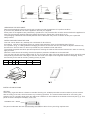
DESEMBALAJE DEL APARATO
Retire todo el embalaje antes de usarlo y verifique que el aparato esté en perfectas condiciones. Si tiene alguna duda, no
utilice el aparato y llame a su proveedor.
Algunas partes del aparato están protegidas por una película de plástico. Esta película protectora debe retirarse antes de
utilizar el aparato. Recomendamos cortar con cuidado la película de plástico a lo largo de los bordes con un cuchillo afilado
o un alfiler.
Los materiales de embalaje deben desecharse cuidadosamente y no dejarse al alcance de los niños, ya que son un peligro
potencial para la seguridad.
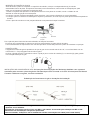
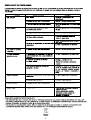
INSTALANDO Y FIJANDO LA COCINA
Su encimera se puede colocar en cualquier encimera con un grosor de 40 a 50 mm,
de acuerdo con No debe sobresalir la superficie o la campana extractora debe estar más cerca de la placa de cocción que
750 mm.
Fije en posición en la fig. 4. Si instala una unidad de puente de 600 mm sobre la unidad de encimera de 700 mm, los lados
de los gabinetes adyacentes pueden ser inferiores a 760 mm hasta 334 mm, siempre que sean resistentes al calor y al
vapor.
La encimera tiene un sello especial que evita que el líquido ingrese al gabinete. Siga estas instrucciones para aplicar
correctamente este sello:
Separe los sellos de su respaldo, para que la protección transparente aún se adhiera al sello mismo.
Gire la encimera y coloque correctamente el sello * E * (fig. 5) debajo del borde de la encimera, de modo que la parte
exterior del sello coincida perfectamente con el borde exterior de la encimera. Los extremos de las tiras deben encajar entre
sí sin superposición. Igualmente
y fije firmemente el sello a la encimera, presionándolo firmemente en su lugar.
AB
C D
E F G
560 480 65 62 150 min. 90 min. 750 min.
Unit: mm
OPCIONES DE INSTALACIóN
OPCIÓN:
Al instalar una encimera de gas sobre un cajón o una unidad de alojamiento estándar, deben tomarse las precauciones
adecuadas para evitar el contacto. con la carcasa de la encimera, que se calienta mucho durante el funcionamiento. El
método recomendado para superar este problema es arreglar un panel de madera dentro del gabinete a una distancia de
15 mm por debajo de la parte inferior de la encimera (ver fig. 1). Este panel debe tener ventilación adecuada en la parte
trasera.
El panel que se encuentra debajo de la encimera debe ser fácilmente desmontable para permitir cualquier necesidad de
mantenimiento.
4

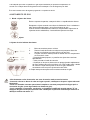
INSERTANDO Y FIJANDO LA COCINA
Antes de insertar la placa en la superficie de trabajo, coloque el sello adhesivo (a) alrededor del borde inferior de la placa.
Es importante fijar esta junta de manera uniforme, sin huecos ni superposiciones para evitar que los líquidos se filtren
debajo de la encimera.
1. Retire los soportes de la bandeja y las tapas de los quemadores, luego gire la encimera hacia abajo, teniendo cuidado de
no dañar las bujías de encendido y los termopares.
2. Coloque la junta alrededor del borde inferior de la encimera como se muestra en la ilustración de abajo (izquierda).
3. Coloque la placa en la abertura de instalación y empújela hacia abajo para que la placa quede firmemente apoyada en el
gabinete.
4. Fije la encimera en su posición con los soportes de fijación suministrados.
a
Fije la encimera en la parte inferior de la encimera con las fijaciones proporcionadas.
Atornille un extremo del soporte en los orificios perforados en la parte inferior de la encimera.
El otro extremo del soporte debe estar ubicado debajo de la encimera para asegurar la placa en su posición.
CONEXION DE GAS
El accesorio de entrada de gas del aparato es un tipo de gas cónico con rosca macho de 1/2 "de acuerdo con las normas
ISO 7-1. Realice la conexión utilizando una tubería rígida.
Al realizar la conexión de gas, es importante colocar la junta (A) entre el tubo de entrada (C) y el codo (B), para garantizar
un cierre hermético. B A c
INSTRUCCIONES DE CONVERSIÓN DE GAS:
Las instrucciones de servicio de los fabricantes detallan cómo el personal autorizado puede convertir la cocina de gas de
gas natural a universal LPG o de universal LPG a gas natural. Póngase en contacto con el fabricante o agente según sea
necesario.
Este dispositivo debe instalarse y conectarse de acuerdo con las normas de instalación vigentes en el país en el
que se va a utilizar el dispositivo.
Este aparato se suministra para funcionar con GLP y gas natural. La conversión para su uso en GLP y gas natural
Screw Worktop
Fixing
bracket
5

debe ser realizada por una persona calificada.
Una vez instalado, compruebe que no haya fugas utilizando una solución jabonosa (nunca una llama).
Es la ley que todos los aparatos de gas son instalados por personas competentes de acuerdo con la edición actual del
Reglamento de Instalación y Uso de Seguridad de Gas.
Le interesa a usted y al de seguridad garantizar el cumplimiento de la ley.
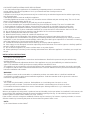
AJUSTE DE GAS
LUGAR DEL INYECTOR
- Tome precauciones en los ajustes y operaciones cuando lleve a cabo el cambio de un gas a otro.
- Todos los trabajos deben ser llevados a cabo por un técnico especialista.
- Antes de empezar, apague el gas y la corriente eléctrica del aparato.
6

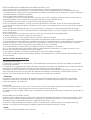
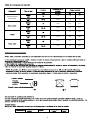
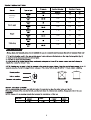
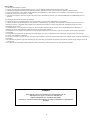
Quemadores
auxiliares
0.72
0.52
0.94
0.65
1.13
0.83
1.27
0.94
1.0
1.0
1.75
1.75
2.7
2.7
3.3
3.3
73
73
127
127
196
196
240
240
2700W


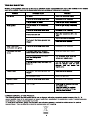
Acerca de ERP
A) Métodos de medición y cálculo.
La cocina de gas fue aprobada por la CE de acuerdo con las Directivas de aparatos de gas 2009/142 / EC.
La eficiencia energética de esta cocina de gas se probó y midió de acuerdo con la norma EN 30-2-1-1998 + A1-2003 + A2-2005.
El quemador semi-rápido y el quemador rápido se probaron por separado; el quemador auxiliar no se requiere para la prueba porque su
calor nominal
La entrada es inferior a 1.16kW.
La eficiencia energética de los quemadores de gas y la encimera se calcularon de acuerdo con el REGLAMENTO (UE) No. 66/2014 DE
LA COMISIÓN.
B) Uso racional de la energía y del aparato.
La cocina de gas está diseñada solo para uso doméstico, no la utilice para fines comerciales.
La cocina de gas está diseñada para usarse con gas (GLP y gas natural), los productos de combustión contienen monóxido de carbono
y carbono.
Dióxido de carbono, el escape de los productos de combustión está afectando nuestro medio ambiente cuando se alcanza una cierta
cantidad de CO y CO2.
Para garantizar un uso racional de la energía, instale la cocina de gas de acuerdo con las especificaciones de la cláusula 5 y asegúrese
de que
Están utilizando el diámetro correcto de la sartén para cada quemador.
Para garantizar el uso seguro, lea este manual de instrucciones antes de usarlo; Por favor siga la instalación, operación y
mantenimiento.
guía.
Para garantizar la vida útil óptima de la cocina de gas, siga estrictamente las pautas de operación y mantenimiento; por favor no lo
hagas
Modificar el aparato.
Póngase en contacto con su servicio de postventa local para reparar e intercambiar los componentes (como la válvula de gas, la perilla
de control) si
necesario.
Los materiales de la encimera de gas son metálicos; deseche el reciclaje de la encimera de gas cuando la encimera de gas llegue al
final de su vida útil.
Los materiales de embalaje de estos aparatos son reciclables, por favor haga un buen uso de los materiales de desecho.
¡¡¡¡¡ATENCIÓN!!!!!
Este aparato debe instalarse de acuerdo con las disposiciones vigentes vigentes y solo
debe utilizarse en habitaciones equipadas con ventilación adecuada.
Consulte el manual de instrucciones antes de proceder con la instalación o el uso del
aparato.
33
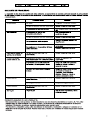
9

CPCGY2304N
CPCGY2314W
CPCGY2303N
CPCGY2313W

CPCGY2304N
CPCGY2314W
CPCGY2303N
CPCGY2313W
2.7kW 1.0kW
CPCGY2304N
CPCGY2314W
CPCGY2303N
CPCGY2313W
2700W
2700W
1000W
1000W
600x510x100
600x510x100
600x510x100
600x510x100
560x480
560x480
560x480
560x480
Auxiliary
burner
Auxiliary
burner
Black Glass
White Glass
Black Glass
Size Built-in
White Glass

2
CLEANING
VITREOUS ENAMEL
Hotplate, burner caps, pan supports.
Cloth wrung out in hot soapy water. Stubborn stains. Can be removed with a cream paste
approved by the Vitreous Enamel Development Council, liquid cleaner or by rubbing with fine steel wool soap pads.
NOTE: The pan supports can also be cleaned in the dishwasher.
ALUMINIUM
Hotplate burner bodies.
Similar to paint cleaning above. Use a nylon brush to remove any cleaning materials, water or dirt from the
hotplate burner bodies. After cleaning, wipe dry and refit to the hob ensuring they are correctly seated.
Check parts are reassembled correctly by lighting the burners and allowing to dry out.
PLASTIC
Control knobs.
Wipe with a cloth wrung out in hot soapy water.
STAINLESS STEEL
Cloth wrung out in hot soapy water.
SAFETY INSTRUCTIONS
Ensure that these notes and that the whole of this instruction book is thoroughly read and understood
before installation or operation of the hob.
The instructions are provided in the interest of your safety.

3
GAS SAFETY (INSTALLATION & USE) REGULATIONS
1. It is the law that all gas appliances are installed by competent persons in accordance with
current edition of the above regulations. It is in your interest and that of safety to ensure
compliance with the law.
2. Repairs or servicing of this product must only be carried out by an authorized agent service and the agent using
only approved parts.
3. No attempt must be made to modify this appliance.
4. Cooking appliances become very hot in use, therefore ensure children and pets are kept away. The use of oven
gloves is recommended when during use,
5. Do not allow children to operate or play with any part of the appliance.
6. Do not use unstable pans and position handle away from the edge of the hob. The use of a suitable hob.
7. In the interests of safety and hygiene, ensure the hob is kept clean as a buildup of grease could cause
8. This appliance is designed for domestic cooking only; commercial catering may invalidate the warranty.
9. Do not cover the hob or place combustible materials on or near the surface even when the hob is not in use.
10. Do not fill deep fat frying pans more than one third full of oil. Do not leave unattended.
11. Before cleaning the hob, switch off at the mains.
12. When finished cooking, switch all controls off and allow to cool.
13. If you sell or transfer ownership of this product, please pass on these instructions to the new owner.
14. This appliance is not intended for use by persons (including children) with reduced physical, sensory or mental
capabilities, or lack of experience and knowledge, unless they have been given supervision or instruction concerning
use of the appliance by a person responsible for their safety.
15. Children should be supervised to ensure that they do not play with the appliance.
16. If the supply cord is damaged, it must be replaced by the manufacturer or its service agent or a similarly qualified
person in order to avoid a hazard.
17. Do not immerse appliance or power cord into water or any other liquids.
18. Please pull the pin out when you do cleaning and maintenance. When the appliance is installed, you can pull out
the pin.
INSTALLATION INSTRUCTIONS
TECHNICAL INFORMATION
The Installation, the adjustments, conversions and maintenance listed in this part must only be carried out by
qualified persons.
The safety and automatic adjustment devices of the appliance may only be modified by an authorized service
agent. The Installation of this gas hob must comply with the standards in force.
This appliance is not connected to a flue for discharge of the combustion products; therefore, it must be connected
in compliance with the above-mentioned installation rules. Particular attention must be paid to the instructions given
below for ventilation and aeration.
W
ARNING!
The appliance must not be connected to a combustion products evacuation device. It shall be installed and
connected in accordance with current installation regulations. Particular attention shall be given to the relevant
instructions regarding ventilation.
LOCATION
The cooker may be located in a kitchen, kitchen/dinner or a bed-sitting room, but not in a room
containing a bath or shower. The hob must not be installed in a bed-sitting room of less than 20m
3
.
LPG models shall not be installed in a room or internal space below ground level, e.g. in a basement.
PROVISION FOR VENTILATION
When a gas appliance is being used, it produces heat and humidity in the room where it is installed. For this reason, the
room must be well ventilated, keeping the natural ventilation openings free (fig. 1) and switching on the mechanical
aeration system (suction hood or electric fan, Figs. 2 and 3).
If the cooker is used for a long time additional aeration may be necessary, for instance, opening a window, or a more
effective aeration by increasing the power of the mechanical system if there is one.
NOTE:
(*) Air inlet minimum section:100cm
2

4
F
G
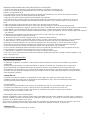
UNPACKING THE APPLIANCE
Remove all packaging before use and check to make sure that the appliance is in perfect condition.
If you have any doubts do not use the appliance and call your supplier.
Some parts on the appliance are protected by a plastic film. This protective film must be removed before the appliance is
used. We recommend carefully slitting the plastic film along the edges with a sharp knife or pin.
The packaging materials should carefully discard and not left within easy reach of children as they are a potential
safety hazard.
INSTALLING AND FIXING THE HOB
Your hob can be fitted to any worktop with a thickness of 40 to 50 mm,
accordance with No overhanging surface or cooker hood should be closer to the hotplate than 750 mm.
Fix in position in fig, 4. If fitting a 600-mm bridging unit above the 700-mm hob unit, the sides of adjacent cabinets may
be lower than 760 mm down to 334 mm provided they are resistant to heat and steam.
The hob has a special seal which prevents liquid from entering the cabinet Follow these instructions in order to correctly
apply this seal:
Detach the seals from their backing, that the transparent protection still adheres to the seal itself.
Turn over the hob and correctly position seal *E* (fig. 5) under the edge of the hob itself, so that the outer part of the seal
itself perfectly matches the outer edge of the hob. The ends of the strips must fit together without overlapping. Evenly
and securely fix the seal to the hob, pressing it firmly in place.
A
B C D
E
F G
560 480 65 62 150 min. 90 min. 750 min.
Unit: mm
INSTALLATION OPTIONS
OPTION:
When fitting a gas hob above a drawer or standard housing unit, suitable precautions must be taken to prevent contact.
with the casing of the hob, which becomes very hot during operation. The recommended method for overcoming this
problem is to fix a wooden panel within the cabinet at a distance of 15mm below the underside of the hob (see fig 1). This
panel must have adequate ventilation to the rear.
The panel underneath the hob must be easily removable to allow for any servicing requirements.

5
INSERTING AND FIXING THE HOB
Before inserting the hob into the work surface, place the adhesive seal (a) around the underside edge of the hob. It is
important to fix this gasket evenly, without gaps or overlapping to prevent liquids from seeping underneath the hob.
1. Remove the pan stands and the burner caps then turn the hob upside down, taking care not to damage the ignition
plugs and the thermocouples.
2. Place the gasket around the bottom edge of the hob as shown in the illustration overleaf (left).
3. Place the hob in the installation opening and push it down so that the hob is resting firmly on the cabinet.
4. Secure the hob in position using the fixing brackets supplied.
a
Secure the hob to the underside of the worktop using the fixings provided.
Screw one end of the bracket into the pre-drilled holes in the underside of the hob.
The other end of the bracket should be located underneath the worktop to secure the hob in position.
GAS CONNECTION
The appliance's gas inlet fitting is a 1/2" male threaded conic gas type in accordance with the ISO 7-1 standards. Make
the connection using rigid pipe.
When making the gas connection, it is important to place the gasket (A) in between the inlet pipe (C) and the elbow (B),
to ensure a gas tight seal. B
A
C
GAS CONVERSION INSTRUCTIONS:
The manufacturers servicing instructions detail how authorized personnel may convert the gas hob from Natural gas to
Universal LPG or from Universal LPG to Natural gas. Contact the manufacturer or agent as required.
This appliance must be installed and connected in accordance with installation Regulations in force in the country
in which the appliance is to be used.
This appliance is supplied to run on LPG and natural gas. Conversion for use on LPG and Natural gas must be
undertaken by a qualified person.
Once installed, check there are no leaks using a soapy solution (never a flame).
Screw Worktop
Fixing
bracket

6
It is the law that all gas appliances are installed by competent persons in accordance with the
current edition of the Gas Safety Installation and Use Regulations.
It is in your interest and that of safety to ensure compliance with the law.
GAS ADJUSTMENT

0.72
0.52
0.94
0.65
1.13
0.83
1.27
0.94
1.0
1.0
1.75
1.75
2.7
2.7
3.3
3.3
73
73
127
127
196
196
240
240
2700W
Auxiliary
burner


9
About
ERP
A) Measurement and calculation methods
The gas hob was CE approval according to the Gas Appliance Directives 2009/142/EC.
The energy efficiency of this gas hob was tested and measured according to EN 30-2-1-1998+A1-2003+A2-2005.
The semi-rapid burner and rapid burner were tested separately; the auxiliary burner is not required for test because its nominal heat
input is less than 1.16kW.
The energy efficiency of the gas burners and the hob were calculated according to COMMISSION REGULATION (EU) No. 66/2014.
B) Rational use of the energy and the appliance
The gas hob is designed for domestic use only, please do not use for commercial.
The gas hob is designed for use with gas (LPG and Natural gas), the combustion products contain carbon monoxide and carbon
dioxide, the exhaust of combustion products is affecting our environment when reach a certain amount of CO and CO2.
To ensure the rational use of energy, please install the gas hob according to the specifications in clause 5, and please make sure you
are using the correct diameter of pan for each burner.
To ensure the safety use, please read this instruction manual before use; please follow the installation, operation and maintenance
guideline.
To ensure the optimal life expectancy of the gas hob, please follow the operation and maintenance guideline strictly; please do not
modify the appliance.
Please contact your local after-sale service for repairing and exchanging of the components (such as gas valve, control knob) if
necessary.
The materials of the gas hob are metal, please dispose the gas hob recycling when the gas hob comes to the end-of-life.
The packaging materials of this appliances is recyclable, please make good use of waste materials.
ATTENTION!!!!!
This appliance must be installed in
compliance with the current
provisions in force and only used in
rooms equipped with adequate ventilation.
Consult the instruction manual before proceeding with installation or use of the appliance
A página está carregando...
A página está carregando...
A página está carregando...
A página está carregando...
A página está carregando...
A página está carregando...
A página está carregando...
A página está carregando...
A página está carregando...
A página está carregando...
A página está carregando...
A página está carregando...
A página está carregando...
-
 1
1
-
 2
2
-
 3
3
-
 4
4
-
 5
5
-
 6
6
-
 7
7
-
 8
8
-
 9
9
-
 10
10
-
 11
11
-
 12
12
-
 13
13
-
 14
14
-
 15
15
-
 16
16
-
 17
17
-
 18
18
-
 19
19
-
 20
20
-
 21
21
-
 22
22
-
 23
23
-
 24
24
-
 25
25
-
 26
26
-
 27
27
-
 28
28
-
 29
29
-
 30
30
-
 31
31
-
 32
32
-
 33
33


CORBERO CPCGY2304N Manual do usuário
- Tipo
- Manual do usuário
- Este manual também é adequado para
em outras línguas
- español: CORBERO CPCGY2304N Manual de usuario
- English: CORBERO CPCGY2304N User manual