
1
sps.honeywell.com
©2023 Honeywell International Inc
Part No. 46001871 Rev. G
Honeywell International Inc. Honeywell Safety Products Australia Pty Ltd.
855 S. Mint. St.
Charlotte NC. 28202
45 Grosvenor Street
Abbotsford. Vic 3067.
USA Australia
Telephone: 800 873 5242 Telephone (Australia): +61 1300 139 166
Telephone (New Zealand): +64 80 032 2200
Honeywell Ind. de Tecnologia Ltda.
CNPJ 00.094.716/0002-09
Rua Oswaldo Cruz, 615 - Itajubá/MG -
+55 11 3711 6770
7600 Series Full Facepiece
Operating and Maintenance Instruction
Manual

2
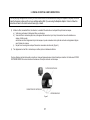
INTRODUCTION
The 7600 Series is comprised of full facepiece masks that are one component of a complete respirator. Components of these
respirators are sold separately. Only those components manufactured by Honeywell and listed on the approval label may be
used. These User Instructions refer only to the use and maintenance of this full facepiece, and to the assembly and use of this
full facepiece as part of an air-purifying respirator. This respirator should only be used and maintained by individuals who have
completely read and understand the instructions contained within this Instruction Manual and any other Operating and
Maintenance Instruction Manuals included with the other components of a complete respirator. For more information and a
complete listing of approved components refer to the Honeywell web site www.honeywellsafety.com.
Before occupational use of this respirator, a written respiratory protection program must be implemented meeting all
the local government requirements. In the United States, employers must comply with OSHA 29 CFR 1910.134 which
includes medical evaluation, training, and fit-testing.
NIOSH CERTIFICATIONS
When components listed on the NIOSH Approval Label are used, these respirators are approved as part of air-purifying, powered
air-purifying or supplied air respirators. Refer to the User Instructions of those components and the NIOSH approval labels supplied
with these products for a listing of all components that must be used to assemble a complete NIOSH approved respirator.
When used as air-purifying respirators the 7600 Series is for protection from hazardous gases, vapors and / or particulates where-
where the concentration does not exceed 50 times the Permissible Exposure Limit (PEL) is below the contaminant’s Immediately
Dangerous to Life or Health (IDLH) threshold; and there is sufficient oxygen according to the OSHA or CSA requirements.
.
This respirator offers nuisance level relief from organic vapors, acid gases, and ozone that are below the Permissible Exposure
Limit (PEL) when used with the 75FFP100NL filter. Nuisance level refers to concentrations not exceeding the OSHA PEL or
other government occupational exposure limits, whichever is lower.
AUSTRALIAN CERTIFICATIONS
When components listed on the AS/NZS Approval Label are used, these respirators are approved under Australian and New
Zealand Standard 1716.2012 Lic. SMK 0563 for respiratory protection against hazardous gases, vapors and/or particulates;
depending on the air-purifying cartridges and/or filters used and the contaminant concentration and/or toxicity; and if there is
sufficient oxygen present in the contaminated atmosphere to support life.
BRAZILIAN CERTIFICATIONS
These respirators are approved under Brazilian Standards NBR 13695, NBR 13696 and NBR 13697 for respiratory protection
against hazardous gases, vapors and/or particulates, depending on the air-purifying cartridges and/or filters used and the
contaminant concentration and/or toxicity, and if there is sufficient oxygen present in the contaminated atmosphere to support life.

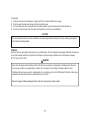
TERMINOLOGY
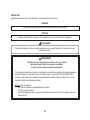
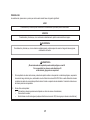
Warnings, cautions and notes used in this manual have the following significance:
NOTE
CAUTION
WARNING
Procedures and techniques which, if not carefully followed, will result in damage to the equipment.
Procedures and techniques that are considered important enough to emphasize.
Procedures and techniques which, if not carefully followed, will expose the user to the risk of serious injury, illness or death.
WARNING
Improper Use of Your Respirator Can Be Harmful or Deadly!
For Your Safety, Read and Follow These Directives.
If You Do Not Understand Them—Ask Your Supervisor!
1. Failure to follow these instructions and warnings may result in exposure to the hazardous materials, exposing the
user to the risk of serious injury, illness or death. These instructions DO NOT APPLY if your full facepiece is being
used as part of a powered air-purifying or supplied air respirator. Refer to the User Instructions for those
components.
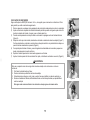
2. Never use this respirator:
•To perform or observe sand-blasting/abrasive-blasting;
•To fight fires;
•In oxygen deficient atmospheres (any atmosphere having less than 19.5% oxygen by volume at sea level);

4
•In atmospheres where the concentrations of toxic contaminants are unknown, or are Immediately Dangerous to
Life or Health (IDLH). An IDLH atmosphere is any atmosphere which has a concentration of any toxic, corrosive
or asphyxiant substance that poses an immediate threat to life, which would cause irreversible debilitating
effects on health, or which would interfere with the ability to escape from a dangerous atmosphere.
•In atmospheres where the concentration of the contaminant exceeds:
I. If part of an OSHA or CSA Respiratory Protection Program:
1. 50 times the contaminant’s peoormissible exposure limit (PEL). PEL is defined as the maximum
permissible 8-hour time weighted average (TWA) concentration established by applicable OSHA or
other government regulations, or by NIOSH, ACGIH or CSA.
2. Any lower Maximum Use Concentration for that contaminant established by OSHA or other
government regulations, NIOSH, ACGIH or CSA publications, or shown in the contaminant’s Material
Safety Data Sheet.
II. If part of a Worksafe Australia Respiratory Protection Program:
1. In atmospheres where the concentration of the contaminant exceeds 50 times the contaminant’s
permissible exposure limit set by Worksafe Australia or other government regulations.
•If part of a Brazilian Ministry of Labor (MTE) Respiratory Protection Program:
I. In atmospheres where the concentration of the contaminant exceeds 100 times the contaminant's
permissible exposure limit set by NR 15 or other government regulations.
•With any filters or cartridges other than those certified for use with this facepiece by the appropriate certifying
organization.
•To protect against contaminants not listed on the label for that filter or cartridge.
I. If part of an OSHA or CSA Respiratory Protection Program the label is the NIOSH Approval label included
with NIOSH approved cartridges and included with these User Instructions.
•If part of a Worksafe Australia Respiratory Protection Program the ratings on filters and cartridges are marked
on cartridges certified to Australian and New Zealand Standards as P, A, B, E and/or K.
•If these contaminants are included in filter or cartridge User Instructions
•To protect against oil-based aerosols unless an ‘R’ or ‘P’ filter (defined by NIOSH) is used when the respirator is
used as part of an OSHA or CSA Respiratory Protection Program.
•Without either an End-of-Service-Life Indicator (ESLI) on the cartridge for the gas and/or vapor present, or an
established cartridge change schedule for all gases and vapors for which there is no ESLI.
•In poorly ventilated areas, or confined spaces such as tanks, small rooms, tunnels or vessels, unless the
confined space is well ventilated and the concentration of toxic contaminants is known to be, and will continue
to be, below the Maximum Use Concentration recommended for the respirator.

5
HEALTH LIMITATIONS
You should be certified medically fit prior to using this respirator. In addition there are both physiological and psychological
limitations which should be considered before using respirators. They include, but are not limited to:
a) Emphysema
b) Chronic obstructive pulmonary disease
c) Bronchial asthma
d) X-ray evidence of pneumoconiosis
e) Evidence of reduced pulmonary function
f) Coronary artery disease
g) Severe or progressive hypertension
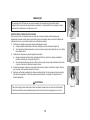
3. FOR USE IN NANOTECHNOLOGY ENVIRONMENT: OSHA recommends the use of HEPA filters or the equivalent
NIOSH 42 CFR 84 particulate filters (N100, R100 or P100) for protection from exposure to particles created during
nanotechnology processes. P3 is the equivalent per the AS/NZS and NBR Standards. Nano particles are defined as
matter between approximately 1 and 100 nanometers (nm). Air-purifying respirators reduce, but will not completely
eliminate, exposure to these contaminants. Because of their extremely small size, nano particles may enter the
breathing zone from any minute opening in the facepiece where other particles would not be able to enter. Use of
powered air-purifying respirators or supplied air respirators would provide better protection against nano particles.
4. Immediately leave work area and remove respirator if:
•Breathing becomes difficult;
•You become dizzy or disoriented;
•You smell, taste or otherwise sense contaminants; or
•Your respirator is damaged.
5. This respirator will not protect exposed areas of face or body from gases, vapors or airborne particles that can
irritate, burn or be absorbed through your skin. You must wear hand and/or body protection.
6. Do not alter or modify this device in any way. Any alterations or modifications, including painting, affixing labels or
using unapproved replacement parts can reduce protection and expose the user to the risk of illness, injury or death.

6
h) Epilepsy (grand mal or petit mal)
i) Pernicious anemia
j) Diabetes (insipidus or mellitus)
k) Breathing difficulties when wearing a supplied air respirator
l) Claustrophobia or anxiety when wearing a supplied air respirator
m) Abnormal EKG results from resting or stress tests
n) Punctured or ruptured ear drum
o) Medications
TRAINING PROGRAM
These brief written instructions cannot substitute for a formal Respirator Training Program. Such training must be taken prior to
first use of this product and should include an opportunity for you to handle the respirator, learn how to inspect it, have it properly
fitted, wear it in normal air for a long familiarity period, and finally, to wear it in a test atmosphere.
The Training Program should be based on the most recent OSHA Regulation 29 CFR Section 1910.134, CSA Standard Z94.4, or
Australian and New Zealand Standard 1715. You should also be familiar with any other pertinent regulations promulgated by
various Regulatory Authorities including ANSI Z88.2 in the USA.
FIT TESTING
Any respirator with a tight fitting facepiece may not be assigned until the user is given a qualitative or quantitative respirator fit
test and the results of the test indicate that the facepiece of the respirator fits that person properly. The 7600 Series is available in
two sizes. The letters “M/L” or “S” on oral/nasal cup indiicate sizes Medium/Large or Small. See instructions below for putting on
the respirator. Before occupational use of this respirator, a written respiratory protection program must be implemented meeting
all the local government requirements. In the United States, employers must comply with OSHA 29 CFR 1910.134 which includes
medical evaluation, training, and fit testing. In Canada employers must follow CSA Z94; Australia employers must follow (AS/NZA
1715) for specific Fit Test Procedures; in Brazil employers must follow MTE Respiratory Protection Program.
KEY TO NIOSH APPROVAL LABEL CAUTIONS AND LIMITATIONS FOR AIR-PURIFYING RESPIRATORS
A Not for use in atmospheres containing less than 19.5 percent oxygen.
B Not for use in atmospheres immediately dangerous to life or health.
C Do not exceed maximum use concentrations established by regulatory standards.
H Follow established cartridge and canister change schedules or observe ESLI to ensure that cartridges and
canisters are replaced before breakthrough occurs.
J Failure to properly use and maintain this product could result in injury or death.
L Follow the manufacturer’s User Instructions for changing cartridges, canister and/or filters.

7
INSPECTION
Each and every time you put on your respirator and prior to storage, you must inspect all components for wear or damage.
1) Check the nose cup and sealing area for any tears, holes or other damage.
2) Check the inhalation and exhalation valves to assure they are not missing or damaged.
3) Pull gently on the head straps to assure they are not worn. Check the head strap buckles for any damage.
4) Check the lens for any cracks or other damage.
5) Check the cartridge connectors to assure they are seated properly and are not cracked.
WARNING
If any components are missing or damaged, do not use this respirator until all damaged and missing components are replaced with
new or unused/undamaged NIOSH approved Honeywell replacement parts
Failure to comply with these warnings will result in the risk of serious injury, illness or death.
M All approved respirators shall be selected, fitted, used and maintained in accordance with OSHA and other
applicable regulations.
N Never substitute, modify, add or omit parts. Use only exact replacement parts in the configuration as specified by
the manufacturer.
O Refer to User Instructions, and/or maintenance manuals for information on use and maintenance of these
respirators.
P NIOSH does not evaluate respirators for use as surgical masks.
S Special or critical User Instructions and/or specific use limitations. Refer User Instructions before donning.
1 Honeywell and N-Series gas and vapor cartridges manufactured after August, 2012 require the use of a spider
(P/N N750038) when a pad style filter is used with the cartridge.
2 If the air-purifying cartridges have an ESLI, you must be able to see the indicator without moving the facepiece in
any way that could break the facepiece-to-face seal.
3 This respirator can offer nuisance level relief from organic vapors and acid gasses that are below the permissible
exposure limit (PEL). Nuisance levels refers to concentrations not exceeding the OSHA PEL or other government
occupational exposure limits, whichever is lower.

8
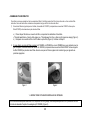
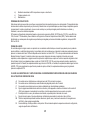
ASSEMBLING THE RESPIRATOR
To use this full facepiece as an air-purifying respirator, you need to attach a filter, cartridge or
cartridge/filter combination. Follow the directions below for the filter or cartridge type you are using.
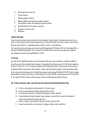
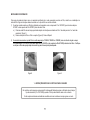
1. If you are using a pad style filter only, you will need P/N N750037 (includes two
N750027 covers and two N750015 filter holders) in addition to the two filters.
a) Place each filter into the filter cover, paying attention to the instructions on the
filter “this side towards face” or “this side away from face” (Figure 1).
b) Snap the filter cover and filter onto the filter holder (Figure 2). Proceed to Step 5.
2. If you are using a pair of pad style filters (either 7506N95, 7506R95 or 7506N99) with
a gas or vapor cartridge, you will need P/N N750036 (includes two N750027 filter
covers and two N750038 filter supports) in addition to the two filters. Ensure the pad
filters are the same type to provide proper protection.
Figure 1
Figure 2
1 - SPECIAL OR CRITICAL USER’S INSTRUCTIONS
Honeywell N-Series gas and vapor cartridges require the use of a filter support (P/N N750038) when a pad style filter is used with the
cartridge. Failure to follow this instruction will result in the risk of serious illness, injury or death.

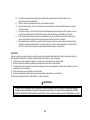
9
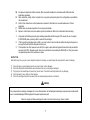
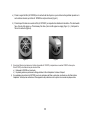
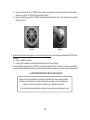
a) Place the filter support (P/N N750038) on the cartridge so the eight indented notches nestle on the inner raised circle
and the part number “N750038” is not backwards (see Figure 3).
b) Place each filter into the filter cover (P/N N750027), paying attention to the instructions on the filter “this side towards
face” or “this side away from face” (see Figure 1). Snap the filter assembly onto the cartridge filter “this side towards
face” or “this side away from face. Snap the filter assembly onto the cartridge (see Figure 4)
Figure 3
Figure 4
3. If you are using flexible filters with a gas or vapor cartridge, you will need two N750035 adapters in addition to the filters.
a) Snap the N750035 onto the cartridge.
b) Being careful not to cross thread, attach the filter to the adapter. Proceed to Step 5.
4. If you are using the Backpack Adapter (P/N BP1002) with any combination of filters or cartridges, attach them to the male
threaded end of the adapter. Check that the cartridges or filters are effectively sealed against the gasket on the back plate
connector.

10
2 - SPECIAL OR CRITICAL USER’S INSTRUCTIONS
If the air-purifying cartridges have an ESLI, you must be able to see the indicator without moving the facepiece in any way that could
break the facepiece-to-face seal. Do not use cartridges with an ESLI if you are using the Backpack Adapter. Failure to follow this
instruction will result in the risk of serious illness, injury or death.
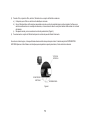
5. Attach your filter, filter assembly, cartridge, filter/cartridge or backpack assembly onto the facepiece.
•Make sure the filters or cartridges do not cross thread.
•Turn filters / cartridges until they are seated snugly against the gasket and you notice resistance to further turning.
Ensure the cartridges are flush with the facepiece seal and that the cartridge connectors and gaskets are also flush
with the inside of the mask.
•Do not overtighten, as this may crack the cartridge connectors (Figure 5).
6. Tug slightly on your filter / cartridge assembly to assure that it is firmly affixed.
If you use prescription eyewear, Honeywell offers several styles of spectacle inserts, Refer ADDITIONAL COMPONENTS for a listing.
Follow the instructions with your spectacle insert to assemble to the facepiece.

11
WARNINGS
The NIOSH and AS/NZS approvals and all Honeywell warranties for this respirator are nullified if cartridges and/or filters from
other manufacturers are used.
Filters, cartridges, and filter cartridge combinations must be the same on both sides of the respirator.
Only use filters, cartridges or filter cartridge combinations for protection from contaminants listed on that filter or cartridge
NIOSH or AS/NZS Approval Label.
Do not use the Backpack Adapter with cartridges that have an ESLI as you will not be able to see the indicators while
wearing the respirator, and will not know when to change the cartridges.
Failure to comply with these warnings will result in the risk of serious injury, illness or death.

12
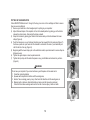
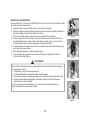
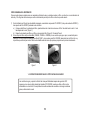
PUTTING ON THE RESPIRATOR
Follow INSPECTION directions 1 through 4, then tug once more on the cartridges or filters to assure
they are securely attached.
1) Remove your hard hat or other headgear prior to putting on your respirator.
2) Adjust the head straps of the respirator to their full outward position by pulling up on the tabs to
release the strap tension, then pulling the straps outward.
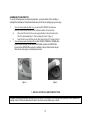
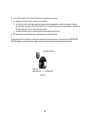
3) Grasp the harness by placing your hands in the harness and your thumbs between the lower
straps (Figure 6).
4) Push the harness up on your forehead, brushing your hair upward from the seal area (Figure 7).
Continue up and over your head until the harness is centered at the rear of your head and your
chin fits into the chin cup (Figure 8).
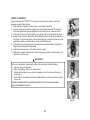
5) Beginning with the lower straps, pull on the end tabs in small, equal increments to ensure they are
tightened evenly.
6) Tighten the upper straps in small, equal increments.
7) Tighten the top strap until the entire facepiece is snug, comfortable and centered on your face
(Figure 9).
WARNING
Figure 6
Figure 7
Figure 8
Figure 9
Do not use your respirator if you cannot achieve a good facepiece-to-face seal due to:
1. Facial hair, including stubble,
2. Eyewear with temples that interfere with the sealing area,
3. Head or face coverings, jewelry or any other items that interfere with the sealing area, or
4. Missing teeth or dentures, facial deformities or deep scars that prevent a good seal.
Failure to follow these warnings will result in the risk of serious injury, illness or death.

13
NOTE
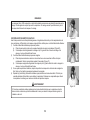
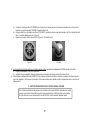
USER SEAL CHECKS
Each time you put on a respirator before entering a hazardous atmosphere, and periodically while
wearing the respirator in the contaminated area, you must check the effectiveness of the facepiece-to-
face seal by conducting a User Seal Check.
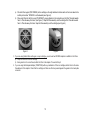
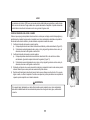
1) Positive Pressure User Seal Check
a) Place the palm of your hand over the exhalation valve and exhale normally (Figure10).
b) If the facepiece moves away from your face slightly and no air leaks between the face and the
facepiece, an effective seal has been obtained.
2) Negative Pressure User Seal Check
a) Place the palms of both hands over the cartridges or filter covers and inhale normally. Hold
your breath for (5) seconds (Figure 11).
b) If the facepiece pulls into your face slightly and no air leaks between the face and the
facepiece, an effective seal has been obtained.
3) If you detect any leaks, reseat the facepiece and/or readjust the tension of the head straps. Note
that sometimes the straps may need to be loosened.
4) Repeat the User Seal Check(s) until an effective seal has been obtained. If you cannot achieve a
seal, do not use this respirator. See your Supervisor for either a replacement respirator or to be
refitted to an appropriate size.
WARNING
Figure 10
Figure 11
Figure 12
7600 Series facepieces have a double-flanged sealing area to assure a maximum seal to the face.
Be careful not to overtighten the respirator. Overtightening could distort the seal and may cause
leakage between the facepiece-to-face seal.
If you cannot promptly achieve an effective seal while wearing the respirator in a contaminated
area, you should immediately leave the contaminated area to prevent the risk of serious injury,
illness or death.

14
NOTE
You are now ready to enter the contaminated area for which this respirator was designed.
EMERGENCY DURING USE
Immediately leave the contaminated area if breathing becomes difficult; you become dizzy or disoriented; you smell, taste or
otherwise sense contaminants; or your respirator becomes damaged.
SERVICE LIFE
When this respirator is used for protection from gases or vapors with defined occupational exposure limits, you must follow a
change-out schedule to assure the cartridges are changed before the end of their useful life. If the cartridges have an End-of-
Service-Life Indicator (ESLI), the cartridges must be changed per the instructions that come with the ESLI cartridge. Filters must
be replaced when breathing becomes difficult.
REMOVING THE RESPIRATOR
WARNING
Loosen the head straps by pulling up and releasing the head strap latches (Figure 12). Remove the respirator.
CLEANING YOUR FACEPIECE
During breaks and between a more thorough cleaning, a refresher wipe pad may be used to clean the portion of the mask that
comes in contact with your face. For a thorough cleaning:
OSHA 29 CFR 1910.134 Appendix B requires either a Positive or a Negative User Seal Check following the Manufacturer’s
instructions. CSA recommends following the Manufacturer’s instructions, and provides guidelines for a Positive and Negative
User Seal Check in Z94.4 Annex A.
Honeywell provides instructions for both seal checks since many Industrial Hygienists prefer the use of both methods, but only
one of either two methods needs to be conducted. If you are conducting both a Positive and a Negative User Seal Check,
conduct the Positive Seal Check first.
Before removing your respirator you must go to an area with uncontaminated air.
Failure to follow this warning will result in the risk of serious injury, illness or death

15
1. Remove the respirator’s components.
a. Unthread the cartridges or filters and dispose or store
them per the instructions in the section STORAGE.
b. Unthread the Backpack Adapter and pull out the spectacle
insert if used.
c. Remove the oral/nasal cup it by gently pulling it away from
the speech diaphragm housing.
d. Pull out the inhalation valves and valve seats in the oral/
nasal cup.
e. Unthread the exhalation valve guard from the seat.
Remove the valve and valve seat, and threaded flange
holding the valve seat.
f. Remove the speech diaphragm assembly by unthreading
the speech diaphragm nut on the outside of the mask.
Push the speech diaphragm housing into the mask to
remove it. Turn the locking ring counter-clockwise to
remove the speech diaphragm, being careful not to lose
the two orange O-rings.
g. Push in on the cartridge connectors to unseat them from
the gaskets. Pull the cartridge gaskets out of the lens
2. Inspect all components for any wear or damage.
a. Check components for holes, tears crazing or other signs
of wear.
b. Replace any components that are damaged or
missing.
3. Wash the facepiece components.
a. Prepare a solution of cleaner sanitizer according to
instructions.
b. Wash the facepiece and components thoroughly in
the cleaner sanitizer solution. Use a soft brush on the
facepiece and headgear assembly to loosen any caked on
dirt.
c. Rinse the facepiece and components in clean warm water
and then let dry completely.
4. Reassemble your facepiece after following all steps outlined
in INSPECTION. Use the REPLACEMENT PART schematic
at the end of these User Instructions or on the Honeywell
Facepiece Replacement Part Poster.
a. Inspect all components as they are being assembled.
Replace any that are damaged or missing. Verify that
the oral/nasal cup is the same size as the facepiece
by verifying the letter(s) on the front of the oral/nasal
cup. If you have a 760008A the cup should have an
“M/L” (medium/Large) (P/N 80815-H5), and if you
have a 760008AS the cup should have an “S” (small)
(P/N 80800-H5).
b. Place the grommet (P/N 80871A) in the lens, making sure
that the larger flange is on the inside and the inner and
outer flanges lie flat against the lens.
c. Put one set of inhalation valves (P/N 770017) on the
cartridge connectors (P/N 770016), making sure they lie
flat against the connectors.
d. Insert the cartridge connectors by pushing through the
grommets from the inside of the facepiece. Make sure the
connectors are all the way through and lying flat against
the flanges.
e. Insert the speech diaphragm (P/N 80870-H5) into the
speech diaphragm housing (P/N 80858-H5) so the holes
in the speech diaphragm are facing out, and the smaller
orange O-ring (P/N 80857A) is between the speech
diaphragm and the housing. Put the locking ring on top of
the speech diaphragm and hand-tighten by turning
clockwise.
f. Place the larger of the O-rings (P/N 80861A) onto

16
the speech diaphragm housing and insert the speech
diaphragm assembly into the larger port of the lens so the
keys in the port line up with the notches in the housing,
and the O-ring is between the inside of the lens and the
speech diaphragm housing. When inserted properly the
threads of the housing will be completely through the lens
and the housing will be flush up against the inside of the
lens.
g. Insert the outer nut (P/N 80862-H5) onto the housing
threads and hand-tighten by turning clockwise.
h. Put the remaining inhalation valves (P/N 770017) on the
valve seats (P/N 80814A) for the oral/nasal cup (P/N
80815-H5 for medium/large or 80800-H5 for small)
making sure they lie flat against the seats. Insert the
seat and inhalation valve assembly into the oral/nasal
cup.
i. Position the oral/nasal cup by first pulling the lower flange
on the cup through the small port on the lens so it lies
flush with the lens. Straighten the cup by turning it so the
peak of the nasal area is on top. Work larger opening of
the cup into groove of the speech diaphragm housing that
is furthest from the lens.
j. Insert the exhalation valve (P/N 770018) into the
exhalation valve seat (P/N 80862-H5) and pull in the tab
until you hear a “click”. When inserted correctly the flat
end of the exhalation valve will be on the thread side of
the seat and sit flush with the seat.
k. Push the exhalation valve assembly through the lower
opening of the oral/nasal cup that is now assembled onto
the facepiece. You may need to use a slight pressure
to push the assembly completely through. Insert the
exhalation housing guard (P/N 80867-H5) onto the
housing threads and hand-tighten by turning clockwise.
WARNING
REPLACING THE LENS AND LENS CLAMP
For routine cleaning the lens and lens clamps should not need to be removed. For a complete cleaning or repair they may need
to be removed and/or replaced. Required: Phillips screwdriver and needle-nose pliers.
To Remove:
1) Follow instructions above to remove all components.
2) Use the needle-nose pliers to hold the nut on the lens clamp and loosen the screws located on either side of the lens clamp.
3) Pull the lens clamps off the face seal.
4) Pull the face seal away from the lens.
Never allow cartridges or filters to come in contact with water or cleaning and sanitizing solutions. Moisture can damage the
cartridges or filters. Failure to comply with these warnings will result in the risk of serious injury, illness or death.

17
To Assemble:
1) Work the lens seal onto the facepiece, making sure that it is centered and there are no gaps.
2) Work the upper and lower lens clamps onto the lens and face seal.
3) Use the needle-nose pliers to bring the two lens clamps together. Insert the screws so the thread side faces up.
4) Seat the nut into the cavity of the lens clamp and thread the nut onto the screw and tighten.
CAUTIONS
STORAGE
Store in a clean, dry area away from the chance of any contamination. Use the respirator storage bag provided with the facepiece
or any other sealable container that will protect the facepiece. Optimum storage conditions are room temperature, between
50°F (10°C) and 100°F (38°C).
WARNING
Do not use abrasive cleaners on the lens. Abrasives can remove the protective coating from the lens, making it susceptible to
scratch and chemical degradation.
Never store the facepiece with cartridges or filters that have been exposed to contaminants. If cartridges and/or filters are
to be reused, seal them in a separate bag or container. Do not expose to direct sunlight, chemical pollutants or dust.
Cartridges that have been exposed to contaminants with a low boiling point, and all NIOSH rated R filters that have been
exposed to oil-based aerosols must be discarded at the end of a shift.
Failure to comply with these warnings will result in the risk of serious injury, illness or death.

18
NOTE
When discarding contaminated cartridges, facepieces or components, follow local, state and/or national
regulations pertaining to disposal of HazMat and/or other contaminated articles. Consult your supervisor and/or
proper authorities.
CAUTION
Do not expose the respirator to excessive heat (above 140°F [60°C]), moisture or contaminative substances, or stack undue
weight on top of the facepiece or components during storage because such conditions may distort the facepiece, resulting in
the inability to achieve a proper fit the next time the facepiece is worn, or they may compromise the functionality of the
component.

19
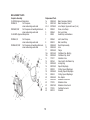
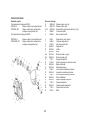
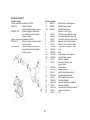
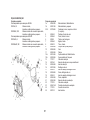
REPLACEMENT PARTS
Complete Assembly
For NIOSH Approved Respirators:
760008A, S Full Facepiece,
sizes medium/large and small
760008AW, SW Full Facepiece with welding attachment,
sizes medium/large and small
For AS/NZS Approved Respirators:
Replacement Parts
1a 80840-H5 Basic Facepiece, Med/Lrg
1b 80801-H5 Basic Facepiece, Small
2 & 3 80798-H5 Lens Clamps, Upper and Lower (1 set)
480843A Screw, Lens Clamp
580844A Nut, Lens Clamp
680845 Head Strap, less Hardware
760008AA, S
Full Facepiece,
7
80846A
Latch, Head Strap
sizes medium/large and small
8
80847A
Bail, Head Strap
760008AAW, SW
Full Facepiece with welding attachment,
9
80848-H5
Neck Strap Assembly
sizes medium/large and small
10
80849-H5
Lens
11
80852-H5
Flange
12a
80815-H5
Oral/Nasal Cup, Med/Lrg
12b
80800-H5
Oral/Nasal Cup, Small
13
770017
Inhalation Valve
14
80814A
Valve Seat for Oral/Nasal Cup
15
80855-H5
Locking Ring
16
80870-H5
Speech Diaphragm
17
80857A
O-Ring, Speech Diaphragm
18
80858-H5
Housing, Speech Diaphragm
19
80861A
O-Ring, Speech Diaphragm
20
80862-H5
Nut, Adapter
21
80863-H5
Exhalation Valve Seat
22
770018
Exhalation Valve
23
80867-H5
Exhalation Valve Guard
24
770016
Cartridge Connector
25
80871A
Grommet

20
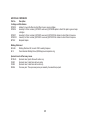
ADDITIONAL COMPONENTS
Part No. Description
Cartridge and Filter Holders
N750035 Adapter for low profile filters to attach filters to gas or vapor cartridges
N750036 Assembly for filters. Includes (2) N750027 covers and (2) N750038 spiders to attach filter pads to gas and vapor
cartridges
N750037 Assembly for filters. Includes (2) N750027 covers and (2) N750015 filter holders to attach filters to facepiece
N750037A Assembly for filters. Includes (2) N750027 covers and (2) N750015 filter holders to attach filters to facepiece
BP1002 Backpack Adapter
Welding Attachment
8404-H5 Welding Attachment Kit, converts 7600 to welding facepiece
8419 Flame Resistant Welding Shroud (NIOSH approved respirators only)
Spectacle Inserts & Peel-away Lenses
80100-H5 Spectacle Insert, plastic frame with suction cup
760023 Spectacle Insert, metal frame with wire spring
760024 Spectacle Insert, metal frame with suction cup
80836A Peel-away lens. Three peel-away lenses per assembly, five assemblies per pack
A página está carregando...
A página está carregando...
A página está carregando...
A página está carregando...
A página está carregando...
A página está carregando...
A página está carregando...
A página está carregando...
A página está carregando...
A página está carregando...
A página está carregando...
A página está carregando...
A página está carregando...
A página está carregando...
A página está carregando...
A página está carregando...
A página está carregando...
A página está carregando...
A página está carregando...
A página está carregando...
A página está carregando...
A página está carregando...
A página está carregando...
A página está carregando...
A página está carregando...
A página está carregando...
A página está carregando...
A página está carregando...
A página está carregando...
A página está carregando...
A página está carregando...
A página está carregando...
A página está carregando...
A página está carregando...
A página está carregando...
A página está carregando...
A página está carregando...
A página está carregando...
A página está carregando...
A página está carregando...
A página está carregando...
A página está carregando...
A página está carregando...
A página está carregando...
A página está carregando...
A página está carregando...
A página está carregando...
A página está carregando...
A página está carregando...
A página está carregando...
A página está carregando...
A página está carregando...
A página está carregando...
A página está carregando...
A página está carregando...
A página está carregando...
A página está carregando...
A página está carregando...
A página está carregando...
A página está carregando...
A página está carregando...
A página está carregando...
A página está carregando...
-
 1
1
-
 2
2
-
 3
3
-
 4
4
-
 5
5
-
 6
6
-
 7
7
-
 8
8
-
 9
9
-
 10
10
-
 11
11
-
 12
12
-
 13
13
-
 14
14
-
 15
15
-
 16
16
-
 17
17
-
 18
18
-
 19
19
-
 20
20
-
 21
21
-
 22
22
-
 23
23
-
 24
24
-
 25
25
-
 26
26
-
 27
27
-
 28
28
-
 29
29
-
 30
30
-
 31
31
-
 32
32
-
 33
33
-
 34
34
-
 35
35
-
 36
36
-
 37
37
-
 38
38
-
 39
39
-
 40
40
-
 41
41
-
 42
42
-
 43
43
-
 44
44
-
 45
45
-
 46
46
-
 47
47
-
 48
48
-
 49
49
-
 50
50
-
 51
51
-
 52
52
-
 53
53
-
 54
54
-
 55
55
-
 56
56
-
 57
57
-
 58
58
-
 59
59
-
 60
60
-
 61
61
-
 62
62
-
 63
63
-
 64
64
-
 65
65
-
 66
66
-
 67
67
-
 68
68
-
 69
69
-
 70
70
-
 71
71
-
 72
72
-
 73
73
-
 74
74
-
 75
75
-
 76
76
-
 77
77
-
 78
78
-
 79
79
-
 80
80
-
 81
81
-
 82
82
-
 83
83


em outras línguas
- español: Honeywell 46001871RG Manual de usuario
- français: Honeywell 46001871RG Manuel utilisateur
Outros documentos
-
3M DIN Port Base 6883, 5 EA/Case Instruções de operação
-
3M Full Facepiece Reusable Respirator 6800 Medium 4 EA/Case Instruções de operação
-
-
-
3M 6000 Series 6200 Half Facepiece Respirator Instruções de operação
-
-
-
-
-
TPP TubeSpin Instruções de operação