Kenwood HDP308WH Manual do proprietário
- Categoria
- Liquidificadores
- Tipo
- Manual do proprietário
Este manual também é adequado para

TYPE HDP30
TYPE HDP40
instructions
istruzioni
instrucciones
Bedienungsanleitungen
gebruiksaanwijzing
Instrukcja obsługi
instruções
TYPE HDP30
TYPE HDP40

English 2 - 8
Nederlands 9 - 17
Français 18 - 26
Deutsch 27 - 35
Italiano 36 - 44
Português 45 - 52
Español 53 - 60
Dansk 61 - 67
Svenska 68 - 74
Norsk 75 - 81
Suomi 82 - 88
Türkçe 89 - 95
Česky 96 - 103
Magyar 104 - 111
Polski 112 - 120
Ekkgmij 121 - 129
Slovenčina 130 - 137
Українська 138 - 146
´¸∂w
١٥٣ - ١٤٧

2
1
3
4
5
6
7
8
9
5
1
2
2
bl
bk
bn
bp
bo
bq
br
bs
bq
bm
3
5
4

cm
cp
cocn
bt
bt
ck
cl
6
7
8
bk
bl
9
A B

safety
general
l
Read these instructions carefully and retain
for future reference.
l
Remove all packaging and any labels.
l
If the plug or cord is damaged it must, for
safety reasons, be replaced by Kenwood or
an authorised Kenwood repairer in order to
avoid a hazard.
l
Never touch the blades while the machine’s
plugged in.
l
Keep fingers, hair, clothing and utensils away
from moving parts.
l
Unplug after use and before changing
attachments.
l
Never blend hot oil or fat.
l
For safest use it is recommended to let hot
liquids cool to room temperature before
blending.
l
Never use a damaged hand blender. Get
it checked or repaired: see ‘service and
customer care’.
l
Never put the power handle in water or let
the cord or plug get wet - you could get an
electric shock.
l
Never let the cord touch hot surfaces or
hang down where a child could grab it.
l
Never use an unauthorised attachment.
l
Always disconnect the hand blender from
the power supply if it is left unattended
and before assembling, disassembling or
cleaning.
l
Appliances can be used by persons with
reduced physical, sensory or mental
2
English

3
capabilities or lack of experience and
knowledge if they have been given
supervision or instruction concerning use
of the appliance in a safe way and if they
understand the hazards involved.
l
Misuse of your appliance can result in
injury.
l
This appliance shall not be used by
children. Keep the appliance and its cord
out of reach of children.
l
Children should be supervised to ensure
that they do not play with the appliance.
l
Only use the appliance for its intended
domestic use. Kenwood will not accept
any liability if the appliance is subject to
improper use, or failure to comply with
these instructions.
l
The rated power is based on the chopper
attachment. Other attachments may draw
less power.
chopper attachment
l
Don’t touch the sharp blades.
l
Remove the chopper blade before
emptying the bowl.
l
Never remove the cover until the chopper
blade has completely stopped.
l
Always hold the chopper blade by the
finger grip away from the cutting blades,
both when handling and cleaning.
important
l
With heavy mixtures to ensure long life of
your machine, don’t use your hand blender
for longer than 50 seconds in any 4 minute
period.
l
Don’t use the whisk attachment for longer
than 3 minutes in any 10 minute period.

4
before plugging in
l
Make sure your electricity supply is
the same as the one shown on the
hand blender.
l
This appliance conforms to EC
Regulation 1935/2004 on materials
and articles intended to come into
contact with food.
before using for the first
time
l
Throw away the blade cover
from the chopper blade as it is
there to protect the blade during
manufacture and transit only. Take
care as the blades are very sharp.
l
Wash all parts - see “care and
cleaning”.
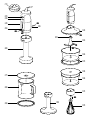
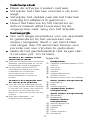
key
hand blender
1
variable speed control (TYPE
HDP40)
2
on button
3
turbo button
4
power handle
5
blender shaft release buttons
6
blender shaft with fixed triblade.
beaker (if supplied)
7
beaker lid
8
beaker
9
rubber ring base
bk
soup blender (if supplied)
whisk (if supplied)
bl
whisk collar
bm
wire whisk
chopper (if supplied)
bn
chopper cover
bo
finger grip
bp
chopper blade
bq
bowl
br
rubber ring base
bs
bowl lid
A
Plastic masher (if supplied)
bt
masher collar
ck
masher foot
cl
masher paddle
B
Metal masherpro™ (if
supplied)
bt
masher collar
cm
masher shaft
cn
fine screen
co
coarse screen
cp
masher paddle
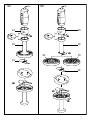
to use the hand blender
l
You can blend soups, sauces, milk
shakes, mayonnaise and baby
food etc.
for beaker blending (if
beaker supplied)
l
Fit the rubber ring base
9
on the
bottom of the beaker. (This stops
the beaker sliding on the worktop).
l
Don’t fill the beaker more than
2/3rds full.
l
After blending you can fit the lid to
the top of the beaker.
Note
If no beaker is supplied in your
pack, select a suitably sized
container. We would recommend
a tall, straight sided vessel with a
diameter slightly larger than the
foot of the hand blender to allow
movement of the ingredients but
tall enough to prevent splashing.
for saucepan blending
l
For safest use it is recommended
to take the pan off the heat
and let hot liquids cool to room
temperature before blending.
l
Use the soup blender (if supplied)
to quickly process soups
etc., directly in the saucepan.
Alternatively use the hand blender.
l
Do not use the soup blender
to process uncooked
vegetables.
1 Fit the blender shaft to the power
handle
1
– push to lock.
2 Plug in.
3 Place the food into the beaker or a
similar container, then holding the
beaker steady:
TYPE HDP30 - press the on
button.
TYPE HDP40 - select the required
speed then press the on button.

5 6
(Select a low speed for slower
blending and to minimise splashing
and a higher speed or turbo for
faster blending).
l
To avoid splashing, place
the blade in the food before
switching on.
l
Don’t let liquid get above the join
between the power handle and
blender shaft.
l
Move the blade through the food
and use a mashing or stirring action
to incorporate the mixture.
l
Your hand blender is not
suitable for ice crushing.
l
If your blender gets blocked,
unplug before clearing.
4 After use release the on or turbo
button. Unplug and press the
release buttons
2
to remove
the blender shaft from the power
handle.
to use the whisk
l
You can whip light ingredients such
as egg whites; cream and instant
desserts.
l
Don’t whisk heavier mixtures such
as margarine and sugar - you’ll
damage the whisk.
1 Push the wire whisk into the whisk
collar
3
.
2 Fit the power handle to the whisk
collar. Push to lock.
3 Place your food in a bowl.
l
Don’t whisk more than 4 egg
whites or 400ml (
3
⁄4pt) cream.
4 Plug in and press the on button.
To whisk on a faster speed, select
a higher speed or press the Turbo
button. Move the whisk clockwise.
TYPE HDP40 - To reduce
splashing, select a low speed then
press the on button.
l
Don’t let liquid get above the whisk
wires.
5 After use release the on or turbo
button, unplug and dismantle.
to use the chopper (if
supplied)
l
You can chop meat, vegetables,
herbs, bread, biscuits and nuts.
l
Don’t chop hard foods such as
coffee beans, ice cubes, spices
or chocolate - you’ll damage the
blade.
1 Remove any bones and cut food
into 1-2cm (
1
⁄2-1”) cubes.
2 Fit the rubber ring base
br
on
the bottom of the chopper bowl.
(This stops the bowl sliding on the
worktop.)
3 Fit the chopper blade over the pin
in the bowl
4
.
4 Add your food.
5 Fit the chopper cover, turn and
lock
5
.
6 Fit the power handle to the
chopper cover - push to lock.
7 Plug in. Hold the bowl steady. Then
press the turbo button. Alternatively
press the turbo button in short
bursts to achieve a pulsing action.
8 After use, unplug and dismantle.
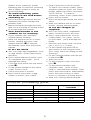
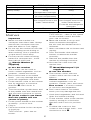
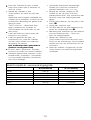
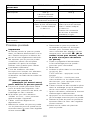
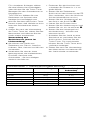
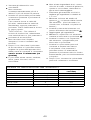
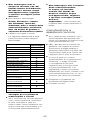
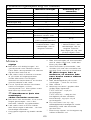
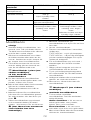
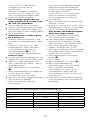
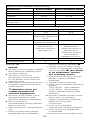
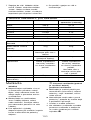
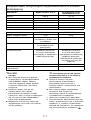
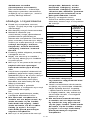
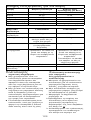
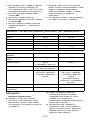
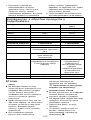
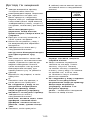
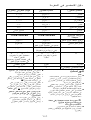
Chopper processing guide
Food Maximum amount Approx. time (in
seconds
Meat 250g 10-15
Herbs 30g 5-10
Nuts 200g 10-15
Bread 1 slice 5-10
Hardboiled eggs 3 3-5
Onions 200g Pulse

5 6
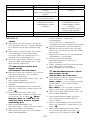
Prune Marinade TYPE HDP30 TYPE HDP40
Small soft prunes 75g 50g
Runny honey 325g
Refrigerated overnight
325g
Water 20g
(at room temperature)
60g
Processing Add the ingredients to
the chopper bowl in the
order stated above.
Add the ingredients to
the chopper bowl in the
order stated above.
Fit the lid and refrigerate
overnight.
Speed Turbo Max Turbo
Processing Time (secs) 5 3
Mashers
important
l
Never use the masher in a
saucepan over direct heat. Always
remove the saucepan from the
heat and allow to cool slightly.
l
Do not tap the masher on the side
of the cooking vessel during or
after mashing. Use a spatula to
scrape excess food away.
l
For best results when mashing
never fill a saucepan etc., more
than half full with food.
A
Plastic Masher (if
supplied)
to use the masher
l
The masher can be used to
mash cooked vegetables such as
potatoes, swede and carrot.
l
Don’t mash hard or uncooked
foods - you may damage the unit.
1 Cook the vegetables and drain.
2 Fit the masher collar to the masher
foot by turning in a clockwise
direction
6
until it locks in
position.
3 Turn the masher upside down and
fit the paddle over the central hub
and turn anti clockwise to secure
7
. (If the collar is not fitted
then the paddle will not
secure in place).
4 Fit the power handle to the masher
assembly - push to lock.
5 Plug in.
6 Place the masher in the saucepan
or bowl etc.
TYPE HDP30 - press the on
button.
TYPE HDP40 - select a low speed
on the variable control and then
press the on button.
l
Move the masher in an up and
down movement throughout
the mix until the desired result is
achieved.
7 After use release the on button and
unplug.
8
Press the blender shaft release
buttons to release the masher
assembly.
9 Remove the paddle from the
masher by turning clockwise.
10 Unscrew the collar from the
masher foot.
B
Metal Masherpro™ (if
supplied)
to use the masher
l
The masher comes with two
screens which can be used as
follows:-
Coarse screen - to mash
cooked vegetables such as
potatoes, swede, yams and carrot.
Fine screen - to mash cooked
or soft fruits and vegetables.
l
Don’t mash hard or uncooked
foods you may damage the unit.
1 Cook hard vegetables and fruit and
drain first before mashing.
2 Fit the masher collar to the masher
shaft by turning in a clockwise
direction until it locks in position
8
.
3 Fit either the coarse or fine
screen to the masher shaft – turn
clockwise to lock
9
.

7 8
4 Turn the masher upside down and
fit the paddle over the central hub
and turn anti-clockwise to secure
bk
.
(If the collar is not fitted
then the paddle will not
secure in place).
5 Fit the power handle to the masher
assembly - push to lock.
6 Plug in.
7 Place the masher in the saucepan
or bowl etc.
TYPE HDP30 - press the on
button.
TYPE HDP40 - select a low speed
on the variable control and then
press the on button.
l
Move the masher in an up and
down movement throughout
the mix until the desired result is
achieved. Increase the speed if
required.
8 After use release the on button and
unplug.
9 Press the blender shaft release
buttons to release the masher
assembly.
10 Remove the paddle from the
masher by turning clockwise.
11 Remove the screen by turning anti-
clockwise
bl
and then lift off.
12 Unscrew the collar from the masher
shaft.
optional attachment (not
supplied in pack)
Mini chopper - refer to “service and
customer care” section to order.
care and cleaning
l
Always switch off and unplug
before cleaning.
l
Don’t touch the sharp blades.
l
Some foods, eg carrot, may
discolour the plastic. Rubbing with
a cloth dipped in vegetable oil may
help to remove discolouration.
power handle, whisk collar,
chopper cover, masher collar
and shaft
l
Wipe with a slightly damp cloth,
then dry.
l
Never immerse in water or use
abrasives.
l
Do not dishwash.
hand blender shaft/soup
blender
either
l
Part fill the beaker or a similar
container with warm soapy water.
Plug into the power supply, then
insert the hand blender shaft or
soup blender and switch on.
l
Unplug, then dry
or
l
Wash the blades under running
water, then dry thoroughly.
l
Never immerse in water or
allow liquid inside the shaft.
If water does get inside,
drain and allow to dry before
use.
l
Do not dishwash.
whisk, beaker, chopper
bowl, chopper blade, masher
paddle and screens, rubber
ring bases and beaker/bowl
lids
l
Wash up, then dry.
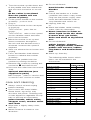
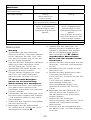
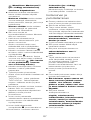
The following table shows which
items can be washed in the
dishwasher.
item suitable for
dishwashing
power handle 8
blender shaft 8
soup blender 8
beaker 4
beaker lid 8
beaker rubber ring base 4
chopper cover 8
chopper bowl 4
chopper blade 4
chopper bowl lid 8
chopper bowl rubber
ring base 4
whisk collar 8
whisk 4
masher shaft 8
masher foot 8
masher paddle 4
masher collar 8
masher screens 4

7 8
hint on cleaning the masher
foot/shaft and screens
l
If food has been allowed to dry
onto the masher attachment,
remove the paddle. Soak the
paddle and bottom of the masher
shaft in warm water to soften and
then wash thoroughly.
l
Never immerse the masher
shaft in water or allow liquid
inside the shaft. If water
does get inside, drain and
allow to dry before use.
important - don’t allow the
masher collar to get wet.
service and customer
care
l
If you experience any problems with
the operation of your appliance,
before requesting assistance visit
www.kenwoodworld.com.
l
Please note that your product
is covered by a warranty, which
complies with all legal provisions
concerning any existing warranty
and consumer rights in the country
where the product was purchased.
l
If your Kenwood product
malfunctions or you find any
defects, please send it or bring
it to an authorised KENWOOD
Service Centre. To find up to date
details of your nearest authorised
KENWOOD Service centre visit
www.kenwoodworld.com or the
website specific to your Country.
l
Designed and engineered by
Kenwood in the UK.
l
Made in China.
IMPORTANT INFORMATION
FOR CORRECT DISPOSAL
OF THE PRODUCT IN
ACCORDANCE WITH THE
EUROPEAN DIRECTIVE ON
WASTE ELECTRICAL AND
ELECTRONIC EQUIPMENT
(WEEE)
At the end of its working life, the
product must not be disposed of as
urban waste.
It must be taken to a special local
authority differentiated waste collection
centre or to a dealer providing this
service.
Disposing of a household appliance
separately avoids possible negative
consequences for the environment
and health deriving from inappropriate
disposal and enables the constituent
materials to be recovered to obtain
significant savings in energy and
resources. As a reminder of the need
to dispose of household appliances
separately, the product is marked with
a crossed-out wheeled dustbin.

9
veiligheid
algemeen
l
Lees deze instructies zorgvuldig door en
bewaar ze voor toekomstig gebruik.
l
Verwijder de verpakking en alle labels.
l
Als de stekker of het snoer beschadigd
is, moet het om veiligheidsredenen
door Kenwood of een door Kenwood
geautoriseerd reparatiebedrijf vervangen
worden, om gevaar te voorkomen.
l
Raak nooit de messen aan terwijl
de stekker van het apparaat in het
stopcontact zit.
l
Houd uw vingers, haar, kleding en
keukengerei uit de buurt van bewegende
onderdelen.
l
Haal na gebruik en voordat u de
accessoires verwisselt de stekker uit het
stopcontact.
l
Gebruik de staafmixer niet in hete olie of
vet.
l
Voor het veiligste gebruik raden we u aan
hete vloeistoffen tot kamertemperatuur te
laten afkoelen voordat u ze met de blender
verwerkt.
l
Gebruik de staafmixer nooit als deze
beschadigd is. Laat hem dan nakijken
of repareren: zie “onderhoud en
klantenservice”.
l
Dompel het motorgedeelte nooit onder in
water en laat het snoer en de stekker niet
nat worden – u zou een elektrische schok
kunnen krijgen.
Nederlands
Vouw de voorpagina a.u.b. uit voordat u begint te lezen. Op deze
manier zijn de afbeeldingen zichtbaar

10
l
Laat kinderen of zieke personen de
handmixer nooit zonder toezicht gebruiken.
l
Gebruik nooit accessoires die niet bij de
staafmixer horen.
l
Haal de stekker van de handblender altijd
uit het stopcontact als u deze onbeheerd
achterlaat en voordat u de blender
monteert, demonteert of reinigt.
l
Dit apparaat kan worden gebruikt door
personen met verminderde lichamelijke,
sensorische of geestelijke capaciteiten
of gebrek aan ervaring en kennis mits ze
onder toezicht staan of instructie hebben
gekregen over het veilige gebruik van
het apparaat, en de betrokken risico’s
begrijpen.
l
Misbruik van dit apparaat kan persoonlijk
letsel veroorzaken.
l
Dit apparaat mag niet door kinderen
worden gebruikt. Houd het apparaat en
het snoer buiten het bereik van kinderen.
l
Op kinderen moet toezicht gehouden
worden om er zeker van te zijn dat ze niet
met het apparaat spelen.
l
Gebruik het apparaat alleen voor het
huishoudelijke gebruik waarvoor het is
bedoeld. Kenwood kan niet aansprakelijk
worden gesteld in als het apparaat is
misbruikt of als deze instructies niet zijn
opgevolgd.
l
Het nominale vermogen is gebaseerd op
het hak-accessoire. Andere accessoires
trekken mogelijk minder stroom.

11
hakhulpstuk
l
Raak de scherpe messen niet aan.
l
Verwijder het hakmes voordat u de kom
leegt.
l
Verwijder het deksel pas als het hakmes
volledig tot stilstand is gekomen.
l
Houd het hakmes bij het hanteren en
schoonmaken altijd bovenaan bij de
vingergreep vast, weg van het snijvlak.
belangrijk
l
Om een lange levensduur van uw apparaat
te garanderen bij het verwerken van
zware mengsels, dient u uw handmixer
niet langer dan 50 seconden binnen een
periode van vier minuten te gebruiken.
l
Gebruik het gardehulpstuk niet langer dan
3 minuten per 10 minuten.
voordat u de stekker in het
stopcontact steekt
l
Zorg dat de elektriciteitsvoorziening
dezelfde spanning heeft als op de
handblender wordt aangegeven.
l
Dit apparaat voldoet aan EG
Verordening 1935/2004 inzake
materialen en voorwerpen
die bestemd zijn om met
levensmiddelen in contact te
komen.
voordat u het apparaat voor
de eerste keer gebruikt
l
Gooi de mesbescherming van het
mes weg, omdat dit alleen bedoeld
is om het mes tijdens de productie
en vervoer te beschermen. Pas
goed om, want de messen zijn erg
scherp.
l
Was alle onderdelen - zie
onderhoud en reiniging.
legenda
handblender
1
variabele snelheidsregelaar (TYPE
HDP40)
2
aan-knop
3
turboknop
4
handvat
5
ontgrendelingsknop
blenderschacht
6
blenderschacht met vast triblade.
beker (indien meegeleverd)
7
bekerdeksel
8
beker
9
rubber-ringbasis
bk
soepblender (indien
meegeleverd)
garde (indien meegeleverd)
bl
gardekraag
bm
draadgarde
hakmes (indien
meegeleverd)
bn
deksel hakhulpstuk
bo
vingergreep
bp
hakmes
bq
kom
br
rubber-ringbasis
bs
komdeksel

12
A
Plastic pureerhulpstuk
(indien meegeleverd)
bt
kraag pureerhulpstuk
ck
voetstuk pureerhulpstuk
cl
pureerblad
B
Metalen masherpro™
(indien meegeleverd)
bt
kraag pureerhulpstuk
cm
schacht pureerhulpstuk
cn
fijne pureerschijf
co
grove pureerschijf
cp
pureerblad
gebruik van de handblender
l
U kunt soepen, sauzen,
milkshakes, mayonaise en
babyvoedsel enz. mengen.
gebruik van blender in beker
(indien meegeleverd)
l
Breng de rubber-ringbasis
9
onder op de beker aan. (Dit
voorkomt dat de beker over het
werkoppervlak glijdt).
l
Vul de beker niet verder dan
2/3 vol.
l
Na het mengen kunt u het deksel
op de beker zetten.
Let op!
Als uw verpakking geen beker
bevat, selecteert u een container
met geschikte afmetingen. We
raden u aan een lange container
met rechte zijkanten te gebruiken
met een iets grotere diameter dan
de voet van de handblender, zodat
de ingrediënten kunnen bewegen,
maar door de lengte van de
container niet spatten.
blenden in de steelpan
l
Voor het veiligste gebruik raden
we u aan de pan van het vuur te
nemen en hete vloeistoffen tot
kamertemperatuur te laten afkoelen
voordat u ze met de blender
verwerkt.
l
Gebruik de soepblender (indien
meegeleverd) om snel soepen
enz. rechtstreeks in de steelpan
te verwerken. U kunt ook de
staafmixer gebruiken.
l
Gebruik de soepblender
niet om rauwe groenten te
verwerken.
1 Zet de schacht van de blender op
het handvat
1
– aanduwen tot hij
vastklikt.
2 Steek de stekker in het
stopcontact.
3 Plaats het voedsel in de beker of
een soortgelijke container’ houd de
beker vast:
TYPE HDP30 – druk op de aan
knop.
TYPE HDP40 – selecteer de
vereiste snelheid en druk dan op de
aan knop.
(Selecteer een lage snelheid om
langzaam te mixen en zo min
mogelijk te spatten, en een hogere
snelheid of turbo om snel te mixen).
l
Om spatten te voorkomen,
plaats u het mes in het
voedsel voordat u het
apparaat inschakelt.
l
Laat de vloeistof niet boven
de verbinding tussen het
motorgedeelte en het middenstuk
van de mixer uitkomen.
l
Beweeg het mes door het voedsel
en gebruik een prakkende of
roerende beweging om de massa
goed te mengen.
l
Uw handblender is
niet geschikt voor het
verbrijzelen van ijsblokjes.
l
Als uw blender geblokkeerd
raakt, dient u de stekker uit het
stopcontact te halen voordat u het
apparaat reinigt.
4 Laat na gebruik de aan- of
turboknop los. Haal de stekker
uit het stopcontact en druk op de
ontgrendelingsknoppen
2
om de
blenderschacht van het handvat te
halen.
gebruik van de klopper
l
U kunt lichte ingrediënten, zoals
eiwitten, room en instant toetjes
opkloppen.
l
Klop geen zwaardere mengsels
zoals margarine en suiker – zo
beschadigt u de klopper.
1 Duw de klopper in de klopperhals
3
.
2 Zet het handvat in de kraag van
de garde. Duw het aan om het te
vergrendelen.

13 14
3 Doe het voedsel in een schaal.
l
Klop niet meer dan 4 eiwitten of
400 ml room.
4 Steek de stekker in het
stopcontact en druk op de aan
knop.
Selecteer een hogere snelheid om
sneller op te kloppen of druk op de
turboknop. Beweeg de garde met
de klok mee.
TYPE HDP40 – Selecteer een
lage snelheid om spatten te
verminderen en druk dan op de
aan knop.
l
Laat de vloeistof niet boven de
kloppers uit komen.
5 Laat na gebruik de aan- of
turboknop los, trek de stekker
uit het stopcontact en haal het
apparaat uit elkaar.
het hakhulpstuk gebruiken
(indien meegeleverd)
l
U kunt vlees, groenten, kruiden,
brood, biscuitjes en noten hakken.
l
Verwerk geen hard voedsel, zoals
koffiebonen, ijsblokjes, specerijen
of chocolade; hierdoor wordt het
mes beschadigd.
1 Verwijder eventueel aanwezige
botten en snijd het voedsel in
dobbelsteentjes van 1-2 cm.
2 Breng de rubber-ringbasis
br
onder op de de kom van het
hakapparaat aan. (Dit voorkomt dat
de kom over het werkoppervlak
glijdt).
3 Plaats het hakmes op de pen in de
kom
4
.
4 Voeg het voedsel toe.
5 Zet het deksel op het hakhulpstuk,
draai en vergrendel het
5
.
6 Bevestig het handvat op het deksel
van het hakhulpstuk – duw om
hem te vergrendelen.
7 Steek de stekker in het
stopcontact en houd de kom vast.
Druk op de turboknop. Druk enkele
malen kort op de turboknop om te
pulseren.
8 Haal de stekker na gebruik uit het
stopcontact en haal het apparaat
uit elkaar.
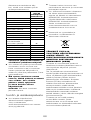
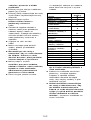
Hakhulpstuk verwerkingsgids
Voedsel Maximale
hoeveelheid
Tijd (bij benadering
in seconden)
Vlees 250 g 10-15
Kruiden 30 g 5-10
Noten 200 g 10-15
Brood 1 snee 5-10
Hardgekookte eieren 3 3-5
Uien 200 g Pulseren

13 14
Pruimenmarinade TYPE HDP30 TYPE HDP40
Kleine, zachte
gedroogde pruimen
75 g 50 g
Vloeibare honing 325 g
Eerst een nachtje in de
koelkast zetten
325 g
Water 20 g
(op kamertemperatuur)
60 g
Bereiding Doe de ingrediënten
in de bovenstaande
volgorde in de kom van
de blender.
Doe de ingrediënten
in de bovenstaande
volgorde in de kom van
de blender.
Plaats het deksel en zet
het een nachtje in de
koelkast.
Snelheid Turbo Max Turbo
Verwerkingstijd
(seconden)
5 3
Pureerhulpstukken
belangrijk
l
Gebruik het pureerhulpstuk nooit
in een steelpan over direct vuur.
Verwijder de steelpan van het vuur
en laat hem even afkoelen.
l
Tik het pureerhulpstuk tijdens of na
het pureren niet tegen de zijkant
van de pan. Gebruik een spatel
om het teveel aan voedsel weg te
schrapen.
l
Voor de beste pureerresultaten vult
I de steelpan, enz. nooit verder dan
halfvol met voedsel.
A
Plastic pureerhulpstuk
(indien meegeleverd)
het pureerhulpstuk
gebruiken
l
Het pureerhulpstuk kan worden
gebruikt om gekookte groenten,
zoals aardappelen, koolraap en
wortelen te pureren.
l
Pureer geen hard of ongekookt
voedsel – hierdoor zou het
apparaat beschadigd kunnen
worden.
1 Kook de groenten en giet ze af.
2 Bevestig de kraag van het
pureerhulpstuk op het voetstuk
van het pureerhulpstuk door naar
rechts te draaien totdat hij is
vergrendeld
6
.
3 Keer het pureerhulpstuk
ondersteboven en plaats het
pureerblad over de centrale
as; draai naar links om het te
vergrendelen
7
. (Als de kraag
niet is bevestigd kan het
blad niet op zijn plaats
worden gezet).
4 Bevestig het handvat op het
pureerhulpstuk – duw om het te
vergrendelen.
5 Steek de stekker in het
stopcontact.
6 Zet het pureerhulpstuk in de
steelpan of kom enz.
TYPE HDP30 – druk op de aan
knop
TYPE HDP40 – selecteer een
lage snelheid op de variabele
bedieningsregelaar en druk dan op
de aan knop.
l
Beweeg het pureerhulpstuk
omhoog en omlaag door de hele
mix totdat het gewenste resultaat
is bereikt.
7 Laat na gebruik de aan-knop
los en haal de stekker uit het
stopcontact.
8 Druk op de ontgrendelingsknoppen
op de blenderschacht om het
pureerhulpstuk te ontgrendelen.
9 Haal het pureerblad van het
pureerhulpstuk door naar rechts te
draaien.
10 Schroef de kraag van het voetstuk
van het pureerhulpstuk.

15
B
Metalen masherproTM
(indien meegeleverd)
het pureerhulpstuk
gebruiken
l
Het pureerhulpstuk wordt met twee
schijven geleverd, die als volgt
kunnen worden gebruikt:-
Grove schijf – voor het pureren
van gekookte groenten, zoals
aardappels, koolrapen, yams en
wortels.
Fijne schijf – voor het pureren
van gekookte of zachte groenten
en fruit.
l
Pureer geen hard of ongekookt
voedsel – hierdoor zou het
apparaat beschadigd kunnen
worden.
1 Kook harde groenten en fruit en
giet ze voor het pureren af.
2 Bevestig de schacht van het
pureerhulpstuk op het voetstuk
van het pureerhulpstuk door naar
rechts te draaien totdat hij is
vergrendeld
8
.
3 Bevestig òf de grove òf de fijne
schijf aan de schacht van het
pureerhulpstuk en draai naar rechts
om te vergrendelen
9
.
4 Keer het pureerhulpstuk
ondersteboven en plaats het
pureerblad over de centrale
as; draai naar links om het te
vergrendelen
bk
. (Als de kraag
niet is bevestigd kan het
blad niet op zijn plaats
worden gezet).
5 Bevestig het handvat op het
pureerhulpstuk – duw om het te
vergrendelen.
6 Steek de stekker in het
stopcontact.
7 Zet het pureerhulpstuk in de
steelpan of kom enz.
TYPE HDP30 – druk op de aan
knop
TYPE HDP40 – selecteer een
lage snelheid op de variabele
bedieningsregelaar en druk dan op
de aan knop.
l
Beweeg het pureerhulpstuk
omhoog en omlaag door de hele
mix totdat het gewenste resultaat is
bereikt.
8 Laat na gebruik de aan-knop los en
haal de stekker uit het stopcontact.
9 Druk op de ontgrendelingsknoppen
op de blenderschacht om het
pureerhulpstuk te ontgrendelen.
10 Haal het pureerblad van het
pureerhulpstuk door naar rechts te
draaien.
11 Verwijder de schijf door naar links
te draaien
bl
en hem er dan af te
halen.
12 Schroef de kraag los van de
schacht van het pureerhulpstuk.
optioneel hulpstuk (niet in
pak meegeleverd)
Mini-hakhulpstuk – raadpleeg
het gedeelte “onderhoud en
klantenservice” om te bestellen.
onderhoud en reiniging
l
Schakel de staafmixer altijd uit en
haal de stekker uit het stopcontact
voordat u hem gaat reinigen.
l
Raak de scherpe messen niet aan.
l
Sommige ingrediënten, zoals
wortelen, kunnen het plastic
verkleuren. U kunt de verkleuring
verwijderen door het plastic met
een in plantaardige olie gedoopte
doek te wrijven.
handvat, gardekraag, deksel
hakapparaat, kraag en
schacht pureerhulpstuk
l
Met een vochtige doek afvegen en
daarna drogen.
l
Nooit in water onderdompelen of
schuurmiddelen gebruiken.
l
Was deze niet in de afwasmachine.
schacht staafmixer/
soepblender
of
l
Vul de beker of een soortgelijke
container gedeeltelijk met warm
zeepsop. Steek de stekker in het
stopcontact, plaats de schacht van
de staafmixer of soepblender op
het apparaat en schakel de blender
in.
l
Trek de stekker uit het stopcontact
en laat drogen
of
l
Was de messen onder stromend
water en droog ze vervolgens goed
af.

16
l
Nooit in water
onderdompelen of vloeistof
in de schacht laten
lopen. Als er toch water
binnendringt, laat u dit
weglopen en laat de schacht
vóór gebruik drogen.
l
Was het apparaat niet in de
afwasmachine.
Garde, beker, kom
hakapparaat, mes
hakapparaat, pureerblad
en schijven, beker, rubber-
ringbases en deksels beker/
kom
l
Wassen en afdrogen.
In de volgende tabel kunt u zien
welke artikelen in de afwasmachine
kunnen worden gereinigd.
artikel geschikt
voor
afwas-
machine
handvat 8
blenderschacht 8
soepblender 8
beker 4
bekerdeksel 8
rubber-ringbasis beker 4
deksel hakhulpstuk 8
kom hakhulpstuk 4
hakmes 4
komdeksel hakhulpstuk 8
rubber-ringbasis
kom hakhulpstuk 4
gardekraag 8
garde 4
schacht pureerhulpstuk 8
voetstuk pureerhulpstuk 8
pureerblad 4
kraag pureerhulpstuk 8
pureerschijven 4
tip voor het reinigen van
het voetstuk/de schacht
en de schijven van het
pureerhulpstuk
l
Als voedsel is opgedroogd op het
pureerhulpstuk, verwijdert u het
pureerblad. Week het pureerblad
en het onderste deel van de
schacht van het pureerhulpstuk in
warm water om het voedsel zacht
te maken en was ze vervolgens
goed af.
l
De schacht van het
pureerhulpstuk nooit in
water onderdompelen of
vloeistof in de schacht laten
lopen. Als er toch water
binnendringt, laat u dit
weglopen en laat de schacht
vóór gebruik drogen.
belangrijk – zorg dat de kraag
van het pureehulpstuk niet nat
wordt.
onderhoud en
klantenservice
l
Als u problemen ondervindt
met de werking van dit
apparaat, gaat u eerst naar
www.kenwoodworld.com voordat u
hulp inroept.
l
Dit product is gedekt door een
garantie die voldoet aan alle
wettelijke regels voor bestaande
garanties en consumentenrechten
die gelden in het land waar het
product is gekocht.
l
Als uw Kenwood product
niet goed functioneert of als
u defecten opmerkt, kunt u
het naar een erkend Service
Center van KENWOOD sturen
of brengen. Voor informatie
over het KENWOOD Service
Center in uw buurt gaat u naar
www.kenwoodworld.com of naar
de specifieke website in uw land.
l
Ontworpen en ontwikkeld door
Kenwood in het VK.
l
Vervaardigd in China.

17 18
BELANGRIJKE INFORMATIE
VOOR DE JUISTE
VERWIJDERING VAN HET
PRODUCT VOLGENS DE
EUROPESE RICHTLIJN
BETREFFENDE AFGEDANKTE
ELEKTRISCHE EN
ELEKTRONISCHE APPARATUUR
(AEEA)
Aan het einde van de levensduur
van het product mag het niet samen
met het gewone huishoudelijke
afval worden verwerkt. Het moet
naar een speciaal centrum voor
gescheiden afvalinzameling van de
gemeente worden gebracht, of naar
een verkooppunt dat deze service
verschaft. Het apart verwerken van
een huishoudelijk apparaat voorkomt
mogelijke gevolgen voor het milieu
en de gezondheid die door een
ongeschikte verwerking ontstaan en
zorgt ervoor dat de materialen waaruit
het apparaat bestaat, teruggewonnen
kunnen worden om een aanmerkelijke
besparing van energie en grondstoffen
te verkrijgen. Om op de verplichting
tot gescheiden verwerking van
elektrische huishoudelijke apparatuur
te wijzen, is op het product het
symbool van een doorgekruiste
vuilnisbak aangebracht.
A página está carregando...
A página está carregando...
A página está carregando...
A página está carregando...
A página está carregando...
A página está carregando...
A página está carregando...
A página está carregando...
A página está carregando...
A página está carregando...
A página está carregando...
A página está carregando...
A página está carregando...
A página está carregando...
A página está carregando...
A página está carregando...
A página está carregando...
A página está carregando...
A página está carregando...
A página está carregando...
A página está carregando...
A página está carregando...
A página está carregando...
A página está carregando...
A página está carregando...
A página está carregando...
A página está carregando...
A página está carregando...
A página está carregando...
A página está carregando...
A página está carregando...
A página está carregando...
A página está carregando...
A página está carregando...
A página está carregando...
A página está carregando...
A página está carregando...
A página está carregando...
A página está carregando...
A página está carregando...
A página está carregando...
A página está carregando...
A página está carregando...
A página está carregando...
A página está carregando...
A página está carregando...
A página está carregando...
A página está carregando...
A página está carregando...
A página está carregando...
A página está carregando...
A página está carregando...
A página está carregando...
A página está carregando...
A página está carregando...
A página está carregando...
A página está carregando...
A página está carregando...
A página está carregando...
A página está carregando...
A página está carregando...
A página está carregando...
A página está carregando...
A página está carregando...
A página está carregando...
A página está carregando...
A página está carregando...
A página está carregando...
A página está carregando...
A página está carregando...
A página está carregando...
A página está carregando...
A página está carregando...
A página está carregando...
A página está carregando...
A página está carregando...
A página está carregando...
A página está carregando...
A página está carregando...
A página está carregando...
A página está carregando...
A página está carregando...
A página está carregando...
A página está carregando...
A página está carregando...
A página está carregando...
A página está carregando...
A página está carregando...
A página está carregando...
A página está carregando...
A página está carregando...
A página está carregando...
A página está carregando...
A página está carregando...
A página está carregando...
A página está carregando...
A página está carregando...
A página está carregando...
A página está carregando...
A página está carregando...
A página está carregando...
A página está carregando...
A página está carregando...
A página está carregando...
A página está carregando...
A página está carregando...
A página está carregando...
A página está carregando...
A página está carregando...
A página está carregando...
A página está carregando...
A página está carregando...
A página está carregando...
A página está carregando...
A página está carregando...
A página está carregando...
A página está carregando...
A página está carregando...
A página está carregando...
A página está carregando...
A página está carregando...
A página está carregando...
A página está carregando...
A página está carregando...
A página está carregando...
A página está carregando...
A página está carregando...
A página está carregando...
A página está carregando...
A página está carregando...
A página está carregando...
A página está carregando...
A página está carregando...
A página está carregando...
A página está carregando...
A página está carregando...
A página está carregando...
A página está carregando...
-
 1
1
-
 2
2
-
 3
3
-
 4
4
-
 5
5
-
 6
6
-
 7
7
-
 8
8
-
 9
9
-
 10
10
-
 11
11
-
 12
12
-
 13
13
-
 14
14
-
 15
15
-
 16
16
-
 17
17
-
 18
18
-
 19
19
-
 20
20
-
 21
21
-
 22
22
-
 23
23
-
 24
24
-
 25
25
-
 26
26
-
 27
27
-
 28
28
-
 29
29
-
 30
30
-
 31
31
-
 32
32
-
 33
33
-
 34
34
-
 35
35
-
 36
36
-
 37
37
-
 38
38
-
 39
39
-
 40
40
-
 41
41
-
 42
42
-
 43
43
-
 44
44
-
 45
45
-
 46
46
-
 47
47
-
 48
48
-
 49
49
-
 50
50
-
 51
51
-
 52
52
-
 53
53
-
 54
54
-
 55
55
-
 56
56
-
 57
57
-
 58
58
-
 59
59
-
 60
60
-
 61
61
-
 62
62
-
 63
63
-
 64
64
-
 65
65
-
 66
66
-
 67
67
-
 68
68
-
 69
69
-
 70
70
-
 71
71
-
 72
72
-
 73
73
-
 74
74
-
 75
75
-
 76
76
-
 77
77
-
 78
78
-
 79
79
-
 80
80
-
 81
81
-
 82
82
-
 83
83
-
 84
84
-
 85
85
-
 86
86
-
 87
87
-
 88
88
-
 89
89
-
 90
90
-
 91
91
-
 92
92
-
 93
93
-
 94
94
-
 95
95
-
 96
96
-
 97
97
-
 98
98
-
 99
99
-
 100
100
-
 101
101
-
 102
102
-
 103
103
-
 104
104
-
 105
105
-
 106
106
-
 107
107
-
 108
108
-
 109
109
-
 110
110
-
 111
111
-
 112
112
-
 113
113
-
 114
114
-
 115
115
-
 116
116
-
 117
117
-
 118
118
-
 119
119
-
 120
120
-
 121
121
-
 122
122
-
 123
123
-
 124
124
-
 125
125
-
 126
126
-
 127
127
-
 128
128
-
 129
129
-
 130
130
-
 131
131
-
 132
132
-
 133
133
-
 134
134
-
 135
135
-
 136
136
-
 137
137
-
 138
138
-
 139
139
-
 140
140
-
 141
141
-
 142
142
-
 143
143
-
 144
144
-
 145
145
-
 146
146
-
 147
147
-
 148
148
-
 149
149
-
 150
150
-
 151
151
-
 152
152
-
 153
153
-
 154
154
-
 155
155
-
 156
156
-
 157
157
-
 158
158


Kenwood HDP308WH Manual do proprietário
- Categoria
- Liquidificadores
- Tipo
- Manual do proprietário
- Este manual também é adequado para
em outras línguas
- español: Kenwood HDP308WH El manual del propietario
- français: Kenwood HDP308WH Le manuel du propriétaire
- italiano: Kenwood HDP308WH Manuale del proprietario
- English: Kenwood HDP308WH Owner's manual
- Nederlands: Kenwood HDP308WH de handleiding
- slovenčina: Kenwood HDP308WH Návod na obsluhu
- Deutsch: Kenwood HDP308WH Bedienungsanleitung
- dansk: Kenwood HDP308WH Brugervejledning
- čeština: Kenwood HDP308WH Návod k obsluze
- svenska: Kenwood HDP308WH Bruksanvisning
- polski: Kenwood HDP308WH Instrukcja obsługi
- Türkçe: Kenwood HDP308WH El kitabı
- suomi: Kenwood HDP308WH Omistajan opas
Artigos relacionados
-
Kenwood HDP306WH Manual do proprietário
-
Kenwood HDP109WG Manual do proprietário
-
-
-
Kenwood HB714P Manual do proprietário
-
-
-
-
-

