A página está carregando...

G502 HERO
Setup Guide
Guide d’installation


English 3
1
2
Your G502 is ready to play games.
If you would like to customize your G502,
refer to the next section.
3
You can customize the three onboard
proles of the G502— button programming,
lighting color, lighting eects, and tracking
behavior—using the Logitech Gaming
Software. Download this free software
and learn how to customize the G502
at www.logitechG.com/support/g502-hero
On
USB

4 English
4 To adjust the weight and balance of your G502,
rst open the weight door by grasping
the mouse rmly in your right hand and pulling
the tab down with your left thumb.

English 5
5 You can place up to ve 3.6 gram weights
in a number of dierent orientations.
Experiment with dierent positions
for the weights to nd an overall weight
and balance that feels right for you.

6 English
6 After inserting the weights, close the weight
door by inserting the tabs on the weight door
into the slots on the left side of the mouse
and rotating the door down until the magnet
holds the weight door rmly closed.
English 7
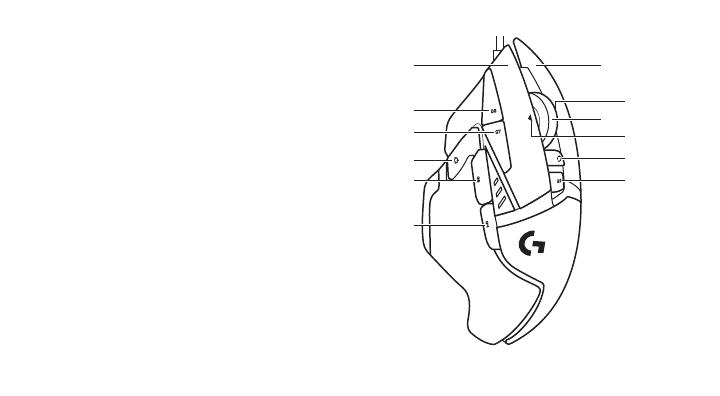
11 fully programmable buttons
1. Left (Button 1)
2. Right (Button 2)
3. Wheel click (Button 3)
4. Back (Button 4)
5. Forward (Button 5)
6. DPI Shift (Button G6)
7. DPI Down (Button G7)
8. DPI Up (Button G8)
9. Scroll left (wheel tilt left)
10. Scroll right (wheel tilt right)
11. Prole select (Button G9)
12. Wheel mode shift (not programmable)
5
6
7
8
1
11
12
3
9
10
2
4

8 English
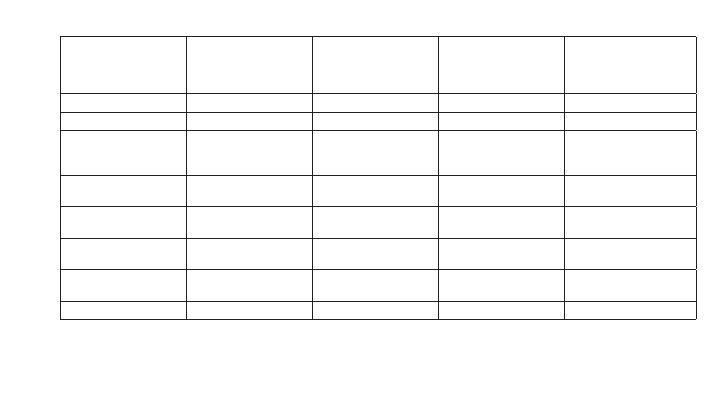
Prole 1*
(High-DPI
gaming)
Prole 2*
(Low-DPI gaming)
Prole 3*
(Standard:
unshifted)
Prole 3*
(Standard:
G-shifted)
DPI values 1200, 2400, 3200,
6400
400, 800, 1600,
2400
2400 2400
Default DPI
value
2400 1600 2400 2400
DPI Shift value 1200 400 N/A N/A
Reports/sec 1000 1000 500 500
1Button 1
(left click)
Button 1
(left click)
Button 1
(left click)
Button 1
(left click)
2Button 2
(right click)
Button 2
(right click)
Button 2
(right click)
Button 2
(right click)
3Button 3
(middle click)
Button 3
(middle click)
Button 3
(middle click)
Ctrl-T

English 9
Prole 1*
(High-DPI
gaming)
Prole 2*
(Low-DPI gaming)
Prole 3*
(Standard:
unshifted)
Prole 3*
(Standard:
G-shifted)
4Button 4 (back) Button 4 (back) Button 4 (back) Ctrl-Shift-Tab
5Button 5
(forward)
Button 5
(forward)
Button 5
(forward)
Ctrl-Tab
6DPI Shift (sniper) DPI Shift (sniper) G-Shift (double
functions)
N/A
7DPI Down DPI Down Ctrl-C Ctrl-X
8DPI Up DPI Up Ctrl-V Ctrl-Z
9Scroll left Scroll left Scroll left Ctrl-F4
10 Scroll right Scroll right Scroll right Ctrl-Shift-T
11 Next prole Next prole Next prole Ctrl-0

10 English
Onboard proles
The G502 has three precongured proles, one
each for high sensitivity gaming, low sensitivity
gaming, and standard mouse usage. Use Button
9 (see mouse drawing) to rotate through
these default proles. When you change proles,
the DPI indicator lights will change color to
blue for three seconds and will indicate the new
mode as shown here:
DPI indicators
DPI values are shown using the three LEDs
indicated in the mouse drawing. The image
below shows which DPI value is being indicated
by the LED panel.
Prof. 1 Prof. 2 Prof. 3
DPI 1 DPI 2 DPI 3 DPI 4 DPI 5

English 11
Hyperfast Scroll Wheel
The G502 features Logitech’s exclusive dual-
mode hyperfast scroll wheel. Click the button
right below the wheel (Button G12) to switch
between the two modes.
Tips
Weight and balance tuning is very much
an exercise in personal preference.
Generally speaking, more weight makes it easier
to control high DPI settings, while less weight
makes low-DPI gaming less fatiguing.
Centering weights along an imaginary
line between your thumb and right-side
grip nger(s) will help maintain optimal front-
to-back balance.
The eects of changing weights may not be
immediately apparent. After changing the
position or number of weights, give yourself
some time to experience the dierence before
changing them again.
Try the default prole settings in practice games
before changing these settings.
Advanced gamers can customize each game
according to their specic button conguration
and sensitivity switching needs. The Logitech
Gaming Software stores this information
and applies it automatically when the game
is detected.

12 English
If the mouse doesn’t work
• Unplug and re-plug the USB cable to ensure
a good connection.
• Try the mouse USB cable in another USB port
on the computer.
• Use only a powered USB port.
• Try rebooting the computer.
• If possible, test the mouse on another
computer.
• Visit www.logitechG.com/support/g502-hero
for more suggestions and assistance.

Français 13
1
2
Votre souris G502 est prête à l'emploi.
Reportez-vous à la section suivante si
vous souhaitez personnaliser son utilisation.
3
Il est possible de personnaliser les trois prols
enregistrés de la souris G502, notamment la
programmation des boutons, la couleur de
l'éclairage, les eets lumineux et le compor-
tement de suivi à l'aide de l'assistant pour
jeux vidéo de Logitech. Téléchargez ce logiciel
gratuit et découvrez comment personnaliser
votre souris G502 en vous rendant sur
www.logitechG.com/support/g502-hero
On
USB

14 Français
4 Pour régler le poids et l'équilibre de votre souris
G502, ouvrez d'abord le clapet du compartiment
de poids: tenez fermement la souris dans votre
main droite et tirez la languette vers le bas avec
votre pouce gauche.

Français 15
5 Vous pouvez y placer jusqu'à cinq poids
de 3,6 g dans un grand nombre d'orientations
diérentes. Essayez de placer les poids dans
diérentes positions an de trouver le poids
et l'équilibre qui vous conviennent.

16 Français
6 Après avoir inséré les poids dans le compart-
iment, fermez le clapet: insérez les languettes
situées sur le compartiment dans les fentes
du côté gauche de la souris, puis pivotez
le clapet vers le bas jusqu'à ce que l'aimant
le maintienne bien fermé.

Français 17
11boutons entièrement
programmables
1. Gauche (bouton 1)
2. Droit (bouton 2)
3. Clic de roulette (bouton 3)
4. Précédent (bouton 4)
5. Suivant (bouton 5)
6. Changement de résolution (bouton G6)
7. Diminution de la résolution (bouton G7)
8. Augmentation de la résolution (bouton G8)
9. Délement vers la gauche (inclinaison de la
roulette vers la gauche)
10. Délement vers la droite (inclinaison de la
roulette vers la droite)
11. Sélection de prol (bouton G9)
12. Alternance de la roulette (non
programmable)
5
6
7
8
1
11
12
3
9
10
2
4

18 Français
Prol 1*
(jeu haute
résolution)
Prol 2*
(jeu basse résolution)
Prol 3*
(standard: sans
modication)
Prol 3*
(standard:
modication
avec sélecteur G)
Valeurs PPP 1 200, 2 400, 3 200,
6 400
400, 800, 1 600, 2 400 2 400 2 400
Valeur PPP par
défaut
2 400 1 600 2 400 2 400
Valeur de
changement de
résolution
1 200 400 Non applicable Non applicable
Rapports/s 1 000 1 000 500 500
1Bouton 1
(clic gauche)
Bouton 1
(clic gauche)
Bouton 1
(clic gauche)
Bouton 1
(clic gauche)
2Bouton 2
(clic droit)
Bouton 2
(clic droit)
Bouton 2
(clic droit)
Bouton 2
(clic droit)
3Bouton 3
(clic central)
Bouton 3
(clic central)
Bouton 3
(clic central)
Ctrl + T
Français 19
Prol 1*
(jeu haute
résolution)
Prol 2*
(jeu basse résolution)
Prol 3*
(standard: sans
modication)
Prol 3*
(standard:
modication avec
sélecteur G)
4Bouton 4 (précédent) Bouton 4 (précédent) Bouton 4 (précédent) Ctrl + Maj + Tab
5Bouton 5 (suivant) Bouton 5 (suivant) Bouton 5 (suivant) Ctrl + Tab
6Changement
de résolution (sniper)
Changement
de résolution (sniper)
Sélecteur G
(fonctionnalité
des boutons doublée)
Non applicable
7Diminution
de la résolution
Diminution
de la résolution
Ctrl + C Ctrl + X
8Augmentation
de la résolution
Augmentation
de la résolution
Ctrl + V Ctrl + Z
9Délement vers
la gauche
Délement vers
la gauche
Délement vers
la gauche
Ctrl + F4
10 Délement vers
la droite
Délement vers
la droite
Délement vers
la droite
Ctrl + Maj + T
11 Prol suivant Prol suivant Prol suivant Ctrl + 0

20 Français
Prols enregistrés
La souris G502 possède trois prols
précongurés: pour le jeu avec haute sensibilité,
le jeu avec basse sensibilité et l'utilisation
normale de la souris. Utilisez le bouton 9
(voir le schéma de la souris) pour passer
d'un prol par défaut à un autre. Lorsque vous
changez de prol, les témoins lumineux PPP
passent au bleu pendant trois secondes et
indiquent le nouveau mode comme illustré
ci-dessous:
Témoins lumineux PPP
Les valeurs PPP sont illustrées à l'aide des trois
témoins lumineux sur le schéma de la souris.
L'image ci-dessous signale quelle valeur PPP est
indiquée par le panneau des témoins lumineux.
Prof. 1 Prof. 2 Prof. 3
DPI 1 DPI 2 DPI 3 DPI 4 DPI 5
/

