Français — 19
9.
6.
2.
14.
13.
12.
1.
7.
11.
8.
10.
5.
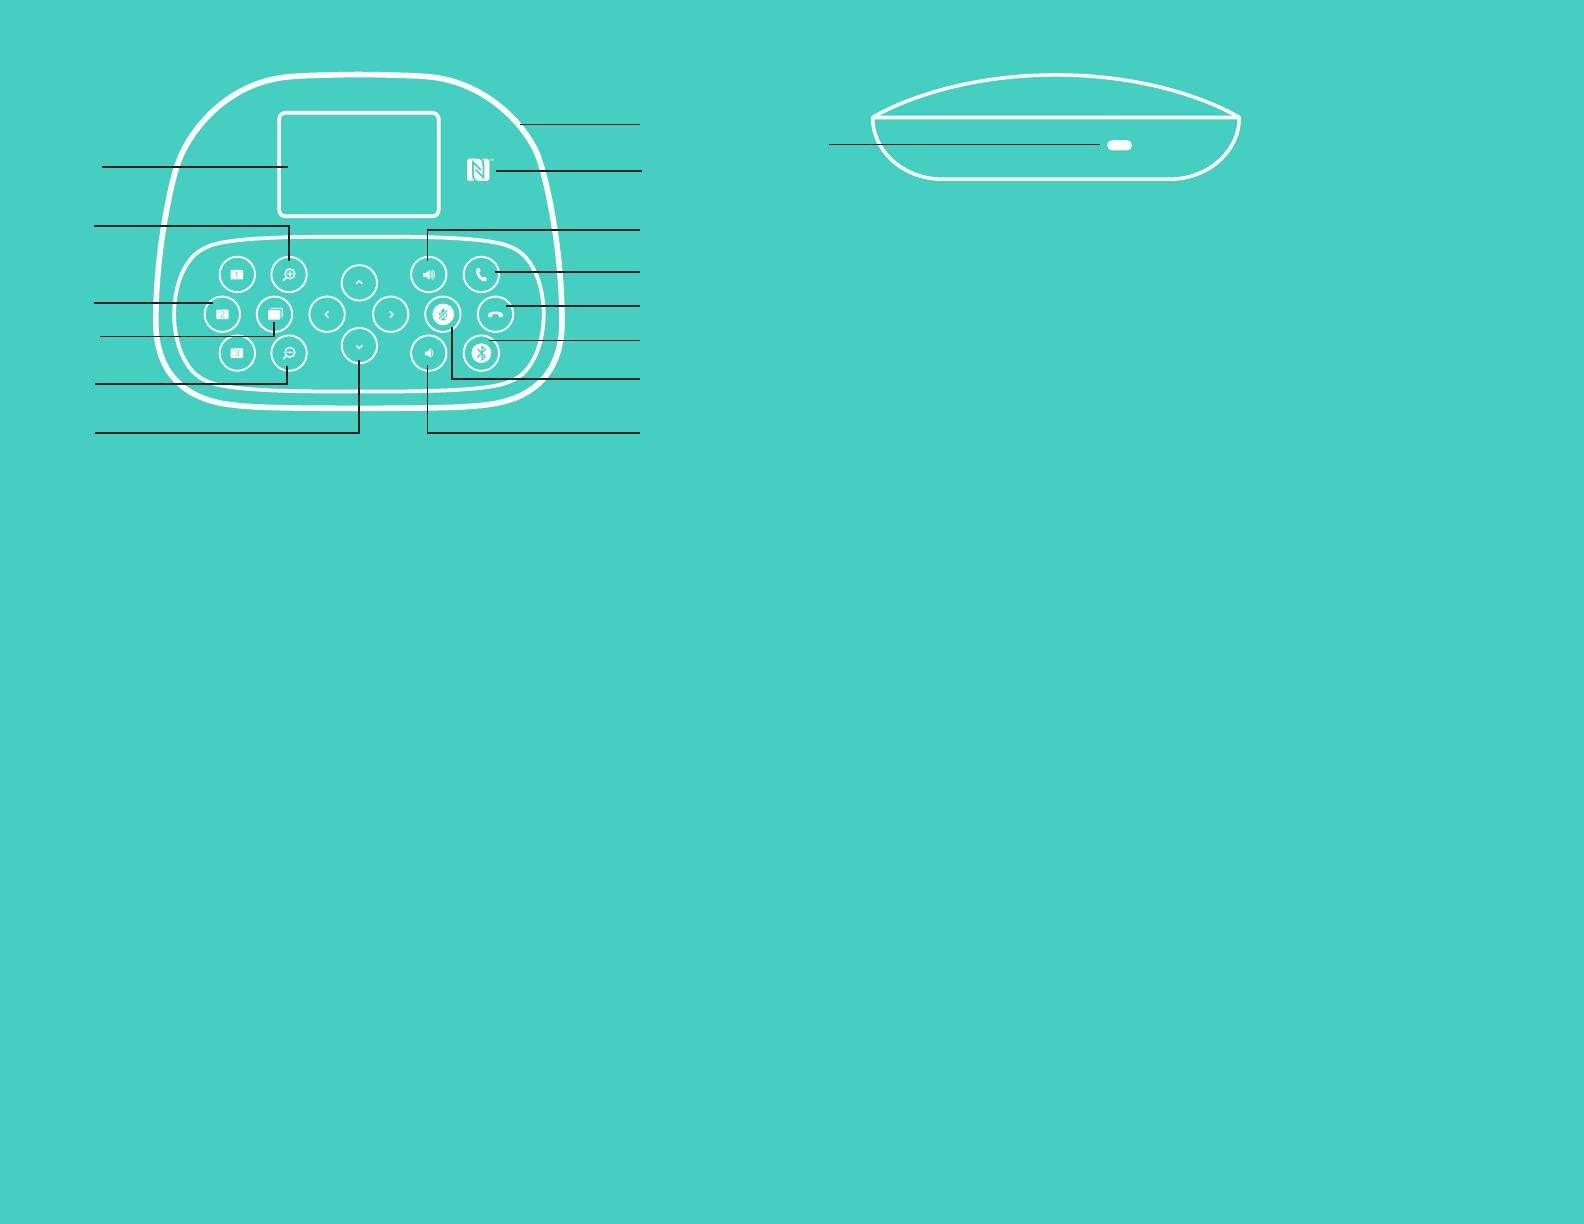
MODULE MAINS LIBRES
1. Répond aux appels entrants dans les applications prises
en charge.
•
Remarque : Les boutons de prise et de n d'appel
pouvant ne pas fonctionner dans certaines applications,
utilisez simplement votre application vidéo pour
répondre aux appels et y mettre n. Pour activer les
boutons de prise et de n d'appel avec Skype ou Cisco
Jabber, téléchargez les plug-ins dédiés, disponibles sur
www.logitech.com/support/group.
2. Coupe le son des microphones.
3. Diminue le volume du haut-parleur.
4. Fait eectuer un mouvement panoramique et une
inclinaison à la caméra. Pour un réglage progressif,
procédez par pressions courtes ; pour un contrôle
Panoramique ou Inclinaison continu, maintenez une
pression longue. Attention : Ne faites pas pivoter la caméra
manuellement car vous risqueriez de l'endommager.
5. Exécute un zoom arrière avec la caméra.
6. Préréglages de la caméra : GROUP comporte 5 préréglages de caméra
(les préréglages 1 à 3 gurent sur la télécommande et le module mains libres
et les préréglages 4 & 5 gurent sur la télécommande) vous permettant de
placer la caméra à un endroit prédéni en appuyant sur un bouton. Pour dénir
le préréglage de caméra, déplacez la caméra vers l'emplacement désiré, puis appuyez
sur le bouton de préréglage de la caméra et maintenez-le enfoncé jusqu'à ce que
l'écran ache l'icône associée et qu'un signal sonore soit émis, conrmant l'activation
du paramètre.
7. Met n à l'appel entrant dans les applications prises en charge.
8. Augmente le volume du haut-parleur.
9. Eectue un zoom avant de la caméra allant jusqu'à 10x.
10. Commande de caméra proximité/éloignement : Dans les applications prises
en charge, ce bouton vous permet de contrôler le zoom numérique panoramique
d'une caméra GROUP, ConferenceCam CC3000e ou ConferenceCam BCC950.
Certaines applications prennent en charge cette fonction de manière native,
tandis que d'autres peuvent être activées via une application téléchargeable
à partir du site www.logitech.com/support/group. Pour plus d'informations,
accédez à la page de téléchargement dédiée..
11. Bouton de couplage Bluetooth. Reportez-vous à la section Connexion et conguration
pour plus d'information.
12. Emplacement de l'antenne NFC. Placez votre dispositif mobile NFC ici pour démarrer
le couplage Bluetooth.
13. Témoins lumineux d'activité du module mains libre :
•
Bleu — GROUP est en cours d'utilisation pour un appel.
•
Bleu clignotant — Appel entrant.
•
Bleu clair clignotant dans un appel — L'appel a été placé en attente
(via la fonction dédiée dans l'application)
•
Bleu clignotant rapidement — Dans le mode de couplage Bluetooth.
•
Il se peut que le témoin lumineux d'activité bleu du module mains libres
ne fonctionne pas pour certaines applications.
•
Rouge — Le son est coupé.
14. L'écran ache l'activité relative à l'appel ainsi que le volume et le statut de connexion.
15. Emplacement de sécurité Kensington pour sécuriser le module mains libres et
la caméra.
15.
9.
6.
3.
2.
14.
13.
12.
1.
7.
11.
8.
10.
5.
4.


