Yamaha MT50 Manual do usuário
- Categoria
- Mixers de áudio
- Tipo
- Manual do usuário

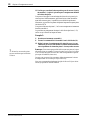
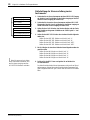
Multitrack Cassette Recorder
User’s Guide
Manuel de l’utilisateur
Bedienungsanleitung
Guía del Usuario
–+
–+
–+
–+
–+
–+
–+
–+
–
+
000
HIGH
LOW
AUX
PAN
1
OFF
L
REC
SEL
LR
010
CUE
10
0
MIC/LINE
1
10
9
8
7
6
5
4
3
2
1
0
+6
+3
0
-5
-10
REC
HIGH
LOW
AUX
PAN
2
OFF
R
REC
SEL
LR
010
CUE
10
0
MIC/LINE
2
10
9
8
7
6
5
4
3
2
1
0
+6
+3
0
-5
-10
REC
HIGH
LOW
AUX
PAN
3
OFF
L
REC
SEL
LR
010
CUE
10
0
MIC/LINE
3
10
9
8
7
6
5
4
3
2
1
0
+6
+3
0
-5
-10
REC
HIGH
LOW
AUX
PAN
4
OFF
R
REC
SEL
LR
010
CUE
10
0
MIC/LINE
4
10
9
8
7
6
5
4
3
2
1
0
+6
+3
0
-5
-10
REC
LR
STEREO OUT
LR
MONITOR OUT
SYNC OUT AUX SEND L (MONO) R
AUX RETURN
AUX RETURN
POWER MONITOR/PHONES
MONITOR SELECT
STEREO MIX CUE
PITCH
MIN MAX
ZERO STOP
OFF ON
SYNC OFF ON
MULTITRACK CASSETTE RECORDER
NOISE REDUCTION SYSTEM
PLAY REW FF STOP PAUSEREC
PUSH OPEN
0 10
GAIN
MIC
LINE
GAIN
MIC
LINE
GAIN
MIC
LINE
GAIN
MIC
LINE

Dette apparat overholder det gaeldende EF-direktiv vedtrørende
radiostøj.
Cet appareil est conforme aux prescriptions de la directive
communautaire 87/308/CEE.
Diese Geräte entsprechen der EG-Richtlinie 82/499/EWG und/
oder 87/308/EWG.
This product complies with the radio frequency interference
requirements of the Council Directive 82/499/EEC and/or 87/308/
EEC.
Questo apparecchio è conforme al D.M.13 aprile 1989 (Direttiva
CEE/87/308) sulla soppressione dei radiodisturbi.
Este producto está de acuerdo con los requisitos sobre interferencias
de radio frequencia fijados por el Consejo Directivo 87/308/CEE.
YAMAHA CORPORATION
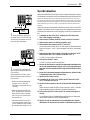
FCC INFORMATION (U.S.A.)
1. IMPORTANT NOTICE: DO NOT MODIFY THIS UNIT!
This product, when installed as indicated in the instructions contained
in this manual, meets FCC requirements. Modifications not expressly
approved by Yamaha may void your authority, granted by the FCC, to
use the product.
2. IMPORTANT: When connecting this product to accessories and/or
another product use only high quality shielded cables. Cable/s
supplied with this product MUST be used. Follow all installation
instructions. Failure to follow instructions could void your FCC
authorization to use this product in the USA.
*
This applies only to products distributed by YAMAHA CORPORATION OF
AMERICA.

i
MT50 User’s Guide
Precautions
Read through the following precautions before operating your MT50.
Safety precautions
• Make sure the AC adaptor’s cord is not located in a position where it is
likely to be walked on or pinched by other equipment.
• Do not expose the MT50 to direct sunlight, extremes of temperature,
humidity, dust, vibration, or severe shocks.
• The ambient temperature where the MT50 is located should be between
10˚C and 35˚C (50˚F and 95˚F).
• Use only the AC adaptor supplied with the MT50. Do not use another
manufacturer’s AC adaptor.
• The AC adaptor should be connected only to an AC power outlet of the
type stated on the AC adaptor or in this
User’s Guide.
• Before connecting the AC adaptor to the MT50, disconnect the adaptor
from the AC outlet. Always connect the AC adaptor to the MT50, then
plug the AC adaptor into the AC outlet.
• Grip the plug of the AC adaptor firmly when removing it from an AC
outlet. Do not pull the adaptor’s cord.
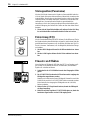
Handling precautions
• To reduce the risk of electric shock, do not open the MT50.
• To reduce the risk of fire or electric shock, do not expose the MT50 to
rain or moisture.
• In an extremely humid environment, condensation may form on the
inside and outside of the MT50. If condensation does occur, leave the
MT50 powered on, but do not use it until the condensation has cleared.
Maintenance
• Use a soft, dry cloth to clean the MT50.
• If the MT50 should require more thorough cleaning, use a soft, lightly
moistened cloth. Stubborn marks can be removed using a mild deter-
gent. Do not use abrasive or solvent based cleaners such as alcohol and
benzine.
Service and repair
• Refer all servicing to qualified personnel.
• If any of the following incidents occur, the MT50 should be serviced by
qualified personnel:
The AC adaptor’s cord or plug is damaged.
Metal objects or liquids get inside the MT50.
The MT50 is exposed to rain.
The MT50 is dropped or the enclosure is damaged.
The MT50 does not operate normally or you notice a marked change in
performance.
© 1994 Yamaha Corporation. All rights reserved.
All trademarks are the property of their respective holders.

ii
ProMix 01 User’s Guide
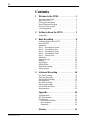
Contents
1 Welcome to the MT50 . . . . . . . . . . . . . . . . 1
About this User’s Guide . . . . . . . . . . . . . . . . . . . . . . . . . . 1
What is the MT50? . . . . . . . . . . . . . . . . . . . . . . . . . . . . . . 1
Choosing Cassette Tapes . . . . . . . . . . . . . . . . . . . . . . . . . 1
About Multitrack Recording . . . . . . . . . . . . . . . . . . . . . . 2
Are Four Tracks Enough? . . . . . . . . . . . . . . . . . . . . . . . . 2
A Few Suggestions . . . . . . . . . . . . . . . . . . . . . . . . . . . . . . 2
2 Getting to Know the MT50 . . . . . . . . . . . 3
Connections . . . . . . . . . . . . . . . . . . . . . . . . . . . . . . . . . . . 7
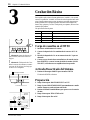
3 Basic Recording . . . . . . . . . . . . . . . . . . . . 8
Loading Cassettes into the MT50 . . . . . . . . . . . . . . . . . . 8
Power ON/OFF . . . . . . . . . . . . . . . . . . . . . . . . . . . . . . . . 8
Preparation . . . . . . . . . . . . . . . . . . . . . . . . . . . . . . . . . . . . 8
Step 1 — Recording the Drums . . . . . . . . . . . . . . . . . . . . 9
Step 2 — Recording the Bass . . . . . . . . . . . . . . . . . . . . . 10
Step 3 — Recording the Guitar . . . . . . . . . . . . . . . . . . . 11
Step 4 — Recording the Vocals . . . . . . . . . . . . . . . . . . . 12
Step 5 — Mixing Down . . . . . . . . . . . . . . . . . . . . . . . . . 13
Preparation . . . . . . . . . . . . . . . . . . . . . . . . . . . . . . . . . . . 13
Balancing Levels . . . . . . . . . . . . . . . . . . . . . . . . . . . . . . 13
Panning . . . . . . . . . . . . . . . . . . . . . . . . . . . . . . . . . . . . . . 14
Applying EQ . . . . . . . . . . . . . . . . . . . . . . . . . . . . . . . . . 14
Adding Effects . . . . . . . . . . . . . . . . . . . . . . . . . . . . . . . . 14
Mixdown Recording . . . . . . . . . . . . . . . . . . . . . . . . . . . . 14
Setting example . . . . . . . . . . . . . . . . . . . . . . . . . . . . . . . 15
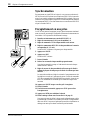
4 Advanced Recording . . . . . . . . . . . . . . . 16
One-Take Recording . . . . . . . . . . . . . . . . . . . . . . . . . . . 16
Ping-Pong Recording . . . . . . . . . . . . . . . . . . . . . . . . . . . 16
Punch-In/Out Recording . . . . . . . . . . . . . . . . . . . . . . . . 16
Synchronization . . . . . . . . . . . . . . . . . . . . . . . . . . . . . . . 16
One-Take Recording . . . . . . . . . . . . . . . . . . . . . . . . . . . 17
Ping-Pong Recording . . . . . . . . . . . . . . . . . . . . . . . . . . . 21
Punch In/Out Recording . . . . . . . . . . . . . . . . . . . . . . . . . 23
Synchronization . . . . . . . . . . . . . . . . . . . . . . . . . . . . . . . 25
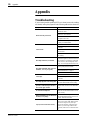
Appendix . . . . . . . . . . . . . . . . . . . . . . . . . 26
Troubleshooting . . . . . . . . . . . . . . . . . . . . . . . . . . . . . . . 26
MT50 Maintenance . . . . . . . . . . . . . . . . . . . . . . . . . . . . 27
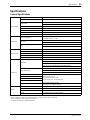
Specifications . . . . . . . . . . . . . . . . . . . . . . . . . . . . . . . . . 29
General Specifications . . . . . . . . . . . . . . . . . . . . . . . . 29
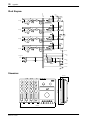
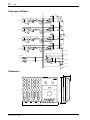
Block Diagram . . . . . . . . . . . . . . . . . . . . . . . . . . . . . 30
Dimensions . . . . . . . . . . . . . . . . . . . . . . . . . . . . . . . . 30
Glossary . . . . . . . . . . . . . . . . . . . . . . . . . . 31

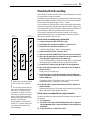
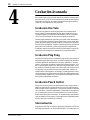
Welcome to the MT50
1
MT50 User’s Guide
Welcome to the MT50
Thank you for choosing the Yamaha MT50 Multitrack Cassette Recorder.
The MT50 is an easy-to-use four-track cassette tape recorder that will allow
you to capture your music at a very high level of quality. To take best advan-
tage of the MT50‘s multitrack features, please read this manual thoroughly.
About this User’s Guide
This
User’s Guide
consists of four main chapters.
• Chapter 1: Welcome to the MT50
• Chapter 2: Getting to Know the MT50
• Chapter 3: Basic Recording
• Chapter 4: Advanced Recording
“Chapter 2: Getting to Know the MT50” explains the MT50’s controls and
connections. “Chapter 3: Basic Recording” explains basic setup and the
power-on procedure and contains a step-by-step tutorial for overdub record-
ing and mixdown. “Chapter 4: Advanced Recording” explains some
advanced MT50 recording techniques, such as one-take recording,
ping-pong recording, punch in/out recording, and MIDI tape synchroniza-
tion.
If you’re new to the world of multitrack recording, read Chapter 2 thor-
oughly. The Appendix provides technical information and a glossary.
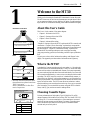
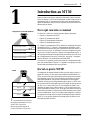
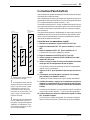
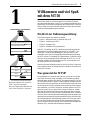
What is the MT50?
A standard hi-fi cassette recorder uses only two tracks (i.e., left and right)
and both tracks are recorded simultaneously. The MT50, on the other hand,
can record four tracks on a standard audio cassette. Even more importantly,
you can record and play back these four tracks individually. You can record
all four tracks simultaneously, or one at a time (a technique called overdub
recording). The MT50 uses only one side of a standard audio cassette; in
effect, there is no B side. If you turn the cassette over, you’ll hear the four
tracks play backwards. This is because the MT50 uses the full width of the
tape to record four tracks. The MT50 uses dbx noise reduction to reduce
tape hiss and keep your recordings clean and crisp. Once you’ve recorded
your four tracks, you can mixdown into stereo using the MT50’s flexible
mixer, with EQ, pan, and an aux send for adding effects.
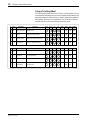
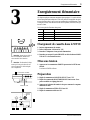
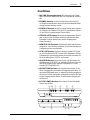
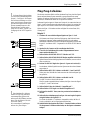
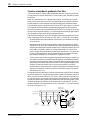
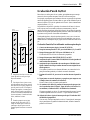
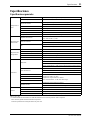
Choosing Cassette Tapes
For best performance use high-quality Type II (High Bias 70
µ
s EQ)
chrome cassettes of 90 minutes or less, such as TDK SA, Maxell UD-XLII,
and Sony UX-S. Do not use metal tapes or 120 minute tapes. At normal
speed a 60-minute cassette provides about 15 minutes of recording time.
That’s because the tape runs at twice the speed of a standard cassette
recorder and you use only side A.
1
• MT50
Track 4:
Track 3:
Track 2:
Track 1:
Transport
direction
B side Track 1 L channel
B side Track 2 R channel
A side Track 2 L channel
A side Track 1 R channel
• Standard Cassette Deck
Transport
direction
Transport
direction
High-position (Chrome, type II),
Less than 90 minutes
High Bias 70µs EQ
90 min. Approx. 22.5 min.
60 min. Approx. 15 min.
30 min. Approx. 7.5 min.
* dbx noise reduction system was manu-
factured based on a patent license from
THAT Corporation.
dbx is a trademark of Carillon Elec-
tronics Corporation..

2
Chapter 1: Welcome to the MT50
MT50 User’s Guide
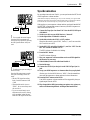
About Multitrack Recording
Multitrack recording simply refers to recording on more than one track (a
track is a physical strip on a recording tape). Invented by Les Paul in the
1950’s, multitrack recording constituted a revolutionary breakthrough in
the recording arts. Suddenly, you could record multiple instruments on sep-
arate tracks on a tape and mix them together later, making adjustments to
each track independently.
The MT50 gives you this incredible capability in a compact, portable unit
that you can use to make multitrack recordings almost anywhere--at the
rehearsal studio with the band, or in your bedroom. If you combine the
MT50 with other music technologies such as MIDI and digital effects pro-
cessing, you can make some great-sounding recordings.
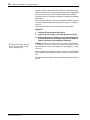
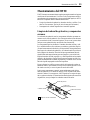
Are Four Tracks Enough?
The MT50 is a four-track tape recorder: its recording heads create four sep-
arate tracks on a tape.
You will also notice that the left side of the unit is composed of four groups
or “modules” of identical controls. These modules control four separate
mixer channels with faders, tone, pan, and auxiliary send controls.
This combination of four inputs, four mixer channels, and four tracks gives
you an enormous amount of flexibility. You can create a signal that runs
from any input to any track on the tape. (In other words, there is no need to
record input module 1 to track 1 on the tape; input 1 can be routed to tracks
2, 3, or 4.)
You can overdub your own recordings, listening to one part while recording
another.
You can also transfer recorded takes from up to three tracks to an unre-
corded track. Then you can record over the initial tracks, and perhaps repeat
the process. Using this technique--called ping-pong recording--you can
effectively expand your four track studio into a virtual ten-or-more track
studio!
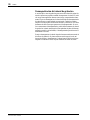
A Few Suggestions
• Avoid rheostats (dimmer switches for electric lights), air conditioners,
and fluorescent or neon lights. They all add hum to your recordings.
• If you use microphones to record, it is helpful to record in a room that
sounds good: in other words, an appropriate acoustic environment.
Also, you can experiment with the placement of your microphones;
minor adjustments can deeply affect the sound quality.
• Use high quality, shielded cables.
• If you have an analog or digital reverb effect unit, you will probably
want to use it. However, use it sparingly. Too much reverb can quickly
muddy your sound. Consider saving reverb until the final mixdown, so
you apply it evenly to the entire mix

Getting to Know the MT50
3
MT50 User’s Guide
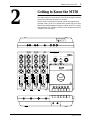
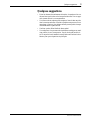
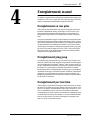
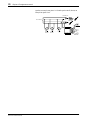
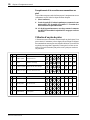
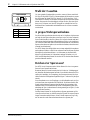
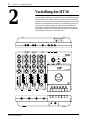
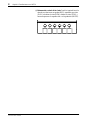
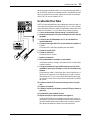
Getting to Know the MT50
This chapter takes you on a guided tour of the MT50 and explains what the
controls and connections do, and how to use them.
First the module controls, then the general controls, are illustrated and
explained. Finally, the MT50’s connections are covered. Refer to the illus-
trations below and throughout this chapter to identify the MT50’s controls
and connections. This will make it easier for you to complete the tutorial in
“Chapter 3: Basic Recording.”
2
–+
–+
–+
–+
–+
–+
–+
–+
–
+
000
HIGH
LOW
AUX
PAN
1
OFF
L
REC
SEL
LR
010
CUE
10
0
MIC/LINE
1
10
9
8
7
6
5
4
3
2
1
0
+6
+3
0
-5
-10
REC
HIGH
LOW
AUX
PAN
2
OFF
R
REC
SEL
LR
010
CUE
10
0
MIC/LINE
2
10
9
8
7
6
5
4
3
2
1
0
+6
+3
0
-5
-10
REC
HIGH
LOW
AUX
PAN
3
OFF
L
REC
SEL
LR
010
CUE
10
0
MIC/LINE
3
10
9
8
7
6
5
4
3
2
1
0
+6
+3
0
-5
-10
REC
HIGH
LOW
AUX
PAN
4
OFF
R
REC
SEL
LR
010
CUE
10
0
MIC/LINE
4
10
9
8
7
6
5
4
3
2
1
0
+6
+3
0
-5
-10
REC
LR
STEREO OUT
LR
MONITOR OUT
SYNC OUT AUX SEND L (MONO) R
AUX RETURN
AUX RETURN
POWER MONITOR/PHONES
MONITOR SELECT
STEREO MIX CUE
PITCH
MIN MAX
ZERO STOP
OFF ON
SYNC OFF ON
MULTITRACK CASSETTE RECORDER
NOISE REDUCTION SYSTEM
PLAY REW FF STOP PAUSEREC
PUSH OPEN
0 10
GAIN
MIC
LINE
GAIN
MIC
LINE
GAIN
MIC
LINE
GAIN
MIC
LINE

4
Chapter 2: Getting to Know the MT50
MT50 User’s Guide
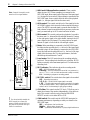
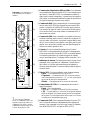
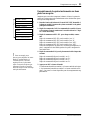
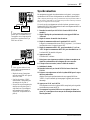
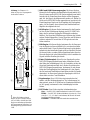
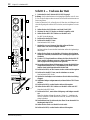
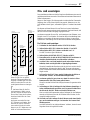
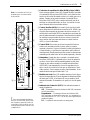
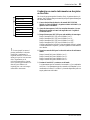
1
HIGH and LOW equalization controls:
These controls
adjust the tone (EQ). When something is connected to the
MIC/LINE input, these controls affect the tone of the input signal
(i.e., the signal to be recorded). When nothing is connected to the
MIC/LINE input, these controls affect the tone of the playback
signal (i.e., the tape signal fed into the stereo mix).
2
AUX control:
This control sets the level of the signal fed to the
AUX SEND output, which is used to feed an external effects pro-
cessor. The MT50’s aux send signal is sourced after the fader. To
feed a channel’s signal to an external effects processor via the aux
send, you must turn up its AUX control and raise its fader.
3
PAN control:
This control positions the playback of a sound in
the stereo mix (i.e., between the left and right channels). Turning
to the right pans a signal to the right channel; turning to the left
pans a signal to the left channel. For center position, an equal
amount of signal is fed to both the left and right outputs.
4
Fader:
When something is connected to the MIC/LINE input,
the fader sets the recording level (i.e., the level of the input signal
recorded to tape). When nothing is connected to the MIC/LINE
input, this fader sets the playback level (i.e., the level of the tape
signal fed to the stereo mix). For best performance, the fader
should be positioned between 7 and 8.
5
Level meter:
This LED meter shows the recording and play-
back level. The recording level should be set so that the +6 LED
lights occasionally at the maximum input level. The fader sets the
recording level.
6
REC indicator:
This indicator shows the recording mode.
Off
— REC SEL switch set to OFF.
Flashing
— REC SEL switch set to one of the “on” positions (i.e.,
set to 1, 2, 3, 4, L, or R, in which case the track is ready to record).
Lit
— Recording in progress or recording paused.
7
REC SEL switch:
This switch selects the signal to be recorded.
Off
— Recording is not active.
1 (2, 3, 4)
— The MIC/LINE input signal is recorded.
L (R)
— The left (right) stereo mix signal is recorded. Left signals
can be recorded to tracks 1 and 3. Right signals can be recorded to
tracks 2 and 4. Use this setting for ping-pong recording.
8
CUE slider:
This control sets the CUE level. CUE allows you to
adjust the volume of the monitor independently of the fader set-
tings. This control is effective only when the MONITOR
SELECT switch is set to either MIX or CUE.
9
GAIN switch:
This switch sets the MIC/LINE input gain for
optimum performance, depending on what you connect to the
MIC/LINE input.
MIC
— microphones, low-level devices.
Middle
— electric guitar, electric bass.
LINE
— synthesizer, drum machine, CD player, high-level devices.
! For the technically minded, the
HIGH control has a center fre-
quency of 12kHz and the LOW con-
trol, 80Hz. Both controls offer up to
12dB of cut and boost.
Note: Controls 1 through 9 are the
same for all four input modules.
– +
– +
HIGH
LOW
AUX
PAN
1
OFF
L
REC
SEL
LR
010
CUE
10
0
MIC/LINE
10
9
8
7
6
5
4
3
2
1
0
+6
+3
0
-5
-10
REC
1
GAIN
MIC
LINE
1
9
8
7
6
5
4
3
2

Getting to Know the MT50
5
MT50 User’s Guide
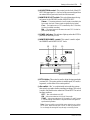
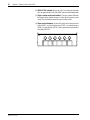
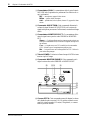
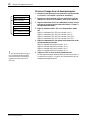
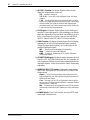
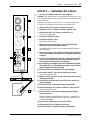
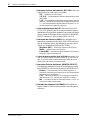
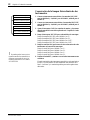
0
AUX RETURN control:
This control sets the level of the AUX
RETURN input signal (i.e., the level of the processed signal from
an external effects processor) back into the stereo mix.
A
MONITOR SELECT switch:
This switch determines the sig-
nal source for the PHONES and the MONITOR OUT.
Stereo
— This setting selects the L and R signals controlled by the
Pan control (the level of these signals is adjusted by the faders).
Cue
— The signal source is CUE (controlled by the CUE sliders).
Use this for overdub recording.
Mix
— The signal source is the stereo mix and CUE. Use this for
punch-in/out recording.
B
POWER indicator:
This indicator lights up when the MT50 is
powered-on and ready for use.
C
MONITOR/PHONES control:
This control is used to adjust
the PHONES and MONITOR OUT levels.
D
PITCH slider:
This control is used to adjust the tape speed plus
or minus 10%. The center position is normal speed (9.5 cm/sec).
In general, set this slider to the center position.
E
dbx switch:
“dbx” is a sophisticated noise reduction system
that can help you make cleaner-sounding recordings. This switch
is used to turn the dbx noise reduction ON and OFF. The switch
has three positions:
OFF
— dbx noise reduction is OFF.
ON
— dbx noise reduction is ON for all four tracks.
SYNC
— dbx noise reduction is ON for tracks 1, 2, and 3, but not
4. Use this setting when track 4 is striped with the FSK signal for
synchronized operation.
Note:
If you recorded a tape with dbx noise reduction set to either
ON or SYNC, make sure that ON or SYNC is used for playback too.
Do not change this setting half way through a recording session.
–
+
000
AUX RETURN POWER MONITOR/PHONES
0
10
MAXMIN
ZERO STOP
OFF ON
PITCH
SYNC OFF ON
STEREO MIX CUE
MONITOR SELECT
MULTITRACK CASSETTE RECORDER
0A C
B
D
E
F
G

6
Chapter 2: Getting to Know the MT50
MT50 User’s Guide
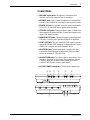
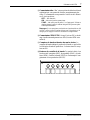
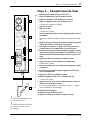
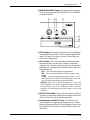
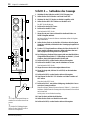
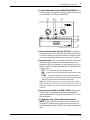
F
ZERO STOP switch:
When set to ON, rewind stops automati-
cally at approximately 999 (the REW button remains depressed).
G
Tape counter and reset button:
The tape counter indicates
the tape position, making it easy to locate specific points in your
songs. The reset button resets the tape counter to 000.
H
Tape control buttons:
From left to right, their functions are to
record (REC); to play back the tape (PLAY); to rewind the tape
(REW); to stop the tape (STOP); and to pause either playback or
recording (PAUSE).
PLAY REW FF STOP PAUSEREC
PUSH OPEN
NOISE REDUCTION SYSTEM

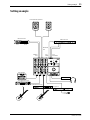
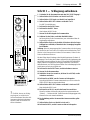
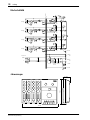
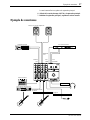
Connections
7
MT50 User’s Guide
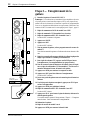
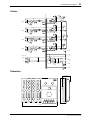
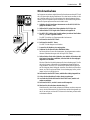
Connections
1
MIC/LINE input jacks: Microphones, instruments, and
line-level sources are connected here for recording.
2 PHONES jack: A pair of stereo headphones is connected here
to enable you to monitor the recording or playing back of tracks.
3 PUNCH I/O jack: An optional footswitch, such as the Yamaha
FC4 or FC5, is connected here for punch-in/out recording.
4 STEREO OUT jacks: During mix down, signal is output from
these outputs to the master recorder. Connect these outputs to the
inputs of the master recorder.
5 MONITOR OUT jacks: The monitor signal is output from these
L/R jacks. Connect a pair of speakers with built-in amplifiers.
6 SYNC OUT jack: This jack outputs the FSK signal to synchro-
nize the MT50 and a MIDI sequencer or drum machine. Connect
a MIDI-FSK convertor such as the Yamaha YMC10.
7 AUX SEND jack: The aux send signal is output at this jack.
Connect this jack to the input on an external effects processor,
such as the Yamaha FX770 or REV100.
8 AUX RETURN jacks: The effects signal is returned here. Con-
nect this to the output on an external effects processor. Use the
L(MONO) input jack for mono return signals. Use both the
L(MONO) and R jacks for stereo return signals.
9 DC 12V POWER connector: Connect the AC adaptor here.
231
9
8
6
5
4
7

8 Chapter 3: Basic Recording
MT50 User’s Guide
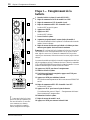
Basic Recording
This chapter explains how to perform overdub recording. Overdub record-
ing is the basis of all multi-track recording. It enables you to record
track-by-track, while listening to previously recorded tracks. In the follow-
ing example, we will use a drum machine, bass, guitar, and vocals. You can,
of course, use any instruments you prefer.
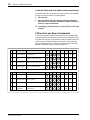
Here’s our track list.
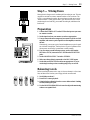
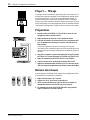
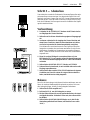
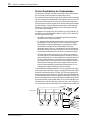
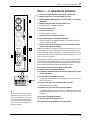
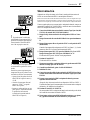
Loading Cassettes into the MT50
1. Carefully insert the cassette.
2. Connect the supplied AC adaptor to the DC 12V connector.
3. Plug the AC adaptor into a suitable AC outlet.
4. Connect a pair of stereo headphones to the PHONES jack, or con-
nect the MONITOR OUT to speakers with built-in amps.
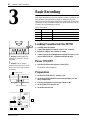
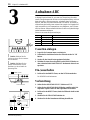
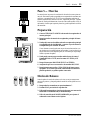
Power ON/OFF
1. Press the POWER switch to power ON the MT50.
The POWER indicator lights up.
Preparation
2. Set the MONITOR SELECT switch to CUE.
3. Set the MONITOR/PHONES control to about halfway. You can
always readjust later.
4. Press the reset button to reset the tape counter to 000.
5. Set the ZERO STOP switch to ON.
6. Set the dbx switch to ON.
Track # Instrument Other Info
1 Drums RYZZ drum machine. Song #10 “I love you”
2 Bass Dave’s bass with chorus effects pedal
3 Guitar My strat through marsh-ball amp
4 Vocal Sandra with FM58 microphone
3
! Warning: Before making any
connections, power OFF all your
equipment.
! Warning: The AC adaptor
should be connected only to an AC
outlet of the voltage type stated on
the adaptor.
NOISE REDUCTION SYSTEM
PLAY REW FF STOP PAUSEREC
PUSH OPEN
–
+
POWER Switch
1
–
+
000
AUX RETURN POWER MONITOR/PHONES
0
10
MAXMIN
ZERO STOP
OFF ON
PITCH
SYNC OFF ON
MULTITRACK CASSETTE RECORDER
STEREO MIX CUE
MONITOR SELECT
2
3
45 6
Reset Button

Step 1 — Recording the Drums 9
MT50 User’s Guide
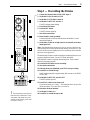
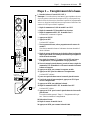
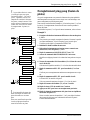
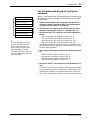
Step 1 — Recording the Drums
1. Connect the drum machine to MIC/LINE input 1.
2. Set Module 1’s GAIN switch to LINE.
3. Set Module 1’s CUE slider to about 8.
4. Set Module 1’s REC SEL switch to 1.
The REC indicator starts flashing.
5. Press the PAUSE button.
6. Press the REC button.
The REC indicator lights up.
7. Start the drum machine
8. Raise Module 1’s fader gradually.
You should be able to hear the drum machine and Module 1’s level
meter should light up.
9. Set the fader so that the +6 light comes on occasionally at the max-
imum input level.
The module fader is used to set the recording level and should be set in con-
junction with the level meter. Use the CUE slider and MONI-
TOR/PHONES control to adjust the monitoring levels. These controls
affect only the monitor signals.
10.Press the PAUSE button to start recording.
11.Start the drum machine.
12.When the drum part is finished, press STOP to stop recording.
13.Press REW to rewind the tape.
It will stop automatically at approximately 999, because we set ZERO
STOP to ON.
14.Set Module 1’s REC SEL switch to OFF.
The REC indicator goes off.
15.Press PLAY to listen to the drum track.
If you like the track, go to “Step 2 — Recording the Bass” once you fin-
ish this procedure. If you don’t like it, re-record it.
16.Disconnect the drum machine.
17.Set Module 1’s fader to 0.
18.Press REW to rewind the tape to 000.
Note: If the drum machine volume is very low you can not achieve the opti-
mum recording level with the maximum fader setting, set the fader to 0, and
set the GAIN switch to the middle position (for instruments). Raise the fader
again and set as appropriate.
! The easiest song to record is one
that starts with a drum intro. If your
song starts with drums, bass, and
synth all on the first bar, you’ll need
to record a count-in.
9
4
3
2
1
8
– +
REC
SEL
LR
010
CUE
10
0
MIC/LINE
10
9
8
7
6
5
4
3
2
1
0
+6
+3
0
-5
-10
REC
– +
1
GAIN
MIC
LINE
HIGH
LOW
AUX
PAN
1
OFF
L
Drum Machine

10 Chapter 3: Basic Recording
MT50 User’s Guide
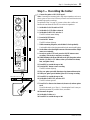
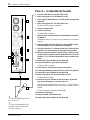
Step 2 — Recording the Bass
1. Connect the bass to MIC/LINE input 2.
2. Set Module 2’s GAIN switch to LINE.
3. Set Module 2’s CUE slider to about 8.
4. Set Module 2’s REC SEL switch to 2.
The REC indicator starts flashing.
5. Press the PAUSE button.
6. Press the REC button.
The REC indicator lights up.
7. While strumming the bass, raise Module 2’s fader gradually.
You should be able to hear the bass and the level meter should light up.
8. Set the fader so that the +6 light is on occasionally at the maximum
input level.
9. In order to set the CUE levels, press the PAUSE button to start
recording. (This is only a temporary recording.)
10.While listening to the drum track, play the bass and set Module 1
and 2’s CUE sliders so that you can hear the drums and bass clearly.
11.Press REW to rewind the tape to 000.
12.Press the REC button to start recording.
The REC indicator lights up.
13.Play your bass part while listening to the drum track.
14.When your bass part is finished, press STOP to stop recording.
15.Press REW to rewind the tape to 000.
16.Set Module 2’s REC SEL switch to OFF.
The REC indicator goes off.
17.Press PLAY to listen to the drum track and new bass track.
If you like the track, go to “Step 3 — Recording the Guitar” once you
finish this procedure. If you don’t like it, re-record it.
18.Disconnect the bass.
19.Set Module 2’s fader to 0.
20.Press REW to rewind the tape to 000.
Note: Connecting an instrument with a high output impedance such as an
electric guitar or bass to the MT50 may increase noise and distortion and
preclude high quality recordings.
If this happens, connect a direct box or effect unit between the instrument
and the MT50 to reduce the impedance.
– +
OFF
R
REC
SEL
LR
010
CUE
10
0
MIC/LINE
10
9
8
7
6
5
4
3
2
1
0
+6
+3
0
-5
-10
REC
GAIN
MIC
LINE
HIGH
LOW
9
4
3
2
8
– +
2
2
AUX
PAN
YAMAHA
Bass Effect
Processor
FX550B
1

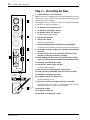
Step 3 — Recording the Guitar 11
MT50 User’s Guide
Step 3 — Recording the Guitar
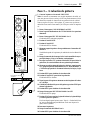
1. Connect the guitar to MIC/LINE input 3.
2. Set Module 3’s GAIN switch to LINE.
3. Set Module 3’s CUE slider to about 8.
4. Set Module 3’s REC SEL switch to 3.
The REC indicator starts flashing.
5. Press the PAUSE button.
6. Press the REC button.
The REC indicator lights up.
7. While strumming the guitar, raise Module 3’s fader gradually.
You should be able to hear the guitar and the level meter should light up.
8. Set the fader so that the 0 light is on most of the time and the +6 light
comes on occasionally.
9. In order to set the CUE levels, press the PAUSE button to start
recording. (This is only a temporary recording.)
10.While listening to the drum and bass tracks, play the guitar and set
Module 1, 2, and 3’s CUE sliders so that you can hear the drums,
bass, and guitar clearly.
11.Press REW to rewind the tape to 000.
12.Press the REC button to start recording.
The REC indicator lights up.
13.Play your guitar part while listening to the drum and bass tracks.
14.When your guitar part is finished, press STOP to stop recording.
15.Press REW to rewind the tape to 000.
16.Set Module 3’s REC SEL switch to OFF.
The REC indicator goes off.
17.Press PLAY to listen to the drum track, bass track, and new guitar
track.
If you like the track, go to “Step 4 — Recording the Vocals” once you
finish this procedure. If you don’t like it, re-record it.
18.Disconnect the guitar.
19.Set Module 3’s fader to 0.
20.Press REW to rewind the tape to 000.
Note: Connecting an instrument with a high output impedance such as an
electric guitar or bass to the MT50 may increase noise and distortion and
preclude high quality recordings.
As explained in Step 1 on page 10, connect a direct box or effect unit
between the instrument and the MT50 to reduce the impedance.
– +
HIGH
LOW
REC
SEL
LR
010
CUE
10
0
MIC/LINE
10
9
8
7
6
5
4
3
2
1
0
+6
+3
0
-5
-10
REC
3
GAIN
MIC
LINE
9
4
3
2
8
3
OFF
L
AUX
PAN
– +
FX770
Guitar Effect Processor
1

12 Chapter 3: Basic Recording
MT50 User’s Guide
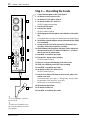
Step 4 — Recording the Vocals
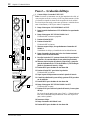
1. Connect the microphone to MIC/LINE input 4.
2. Set Module 4’s GAIN switch to MIC.
3. Set Module 4’s CUE slider to about 8.
4. Set Module 4’s REC SEL switch to 4.
The REC indicator starts flashing.
5. Press the PAUSE button.
6. Press the REC button.
The REC indicator lights up.
7. While singing into the microphone, raise Module 4’s fader gradu-
ally.
You should be able to hear the vocal and the level meter should light up.
8. Set the fader so that the 0 light is on most of the time and the +6 light
is on occasionally.
9. In order to set the CUE levels, press the PAUSE button to start
recording. (This is only a temporary recording.)
10.While listening to the drum, bass, and guitar tracks, sing into the
microphone and set the CUE sliders on Modules 1, 2, 3, and 4 so
that you can hear all sounds clearly.
11.Press REW to rewind the tape to 000.
12.Press the REC button to start recording.
The REC indicator lights up.
13.Sing your vocal part while listening to the other tracks.
14.When you’ve finished, press STOP to stop recording.
15.Press REW to rewind the tape to 000.
16.Set Module 4’s REC SEL switch to OFF.
The REC indicator goes off.
17.Press PLAY to listen to the drum track, bass track, guitar track,
and new vocal track.
If you like the track, go to “Step 5 — Mixing Down” once you finish
this procedure. If you don’t like it, re-record it.
At this point, we are finished recording.
18.Disconnect the microphone.
19.Set Module 4’s fader to 0.
20.Press REW to rewind the tape to 000.
REC
SEL
LR
010
CUE
10
0
MIC/LINE
10
9
8
7
6
5
4
3
2
1
0
+6
+3
0
-5
-10
REC
4
GAIN
MIC
LINE
HIGH
LOW
9
4
3
2
1
8
4
OFF
R
AUX
PAN
– +
– +
YAMAHA
Compressor
! Use a compressor to even out
the vocal level.
! Watch out for feedback. Don’t
place your microphone too close to
your speakers.

Step 5 — Mixing Down 13
MT50 User’s Guide
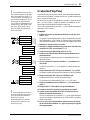
Step 5 — Mixing Down
Mixing-down is the process of combining all four tracks into one. This mix
can then be recorded to a stereo cassette recorder or DAT machine. The
MT50 is your multitrack recorder; the second tape recorder serves as the
“master recorder.” During the mix-down, you can tailor the tone of each
sound using the two-band EQ, pan sounds left and right, and balance the
fader levels.
Preparation
1. Connect the STEREO OUT on the MT50 to the input on your mas-
ter cassette recorder.
2. Set the input levels on your master recorder as appropriate.
3. You can connect the stereo outputs of your master recorder to a hi-fi
amplifier, and connect a pair of speakers to the amplifier, to monitor
the mix.
Alternatively, you can use a pair of stereo headphones or a pair of speak-
ers with built-in amplifiers. The best choice is a pair of speakers with a
flat response, uncolored by boosted bass or treble settings.
4. You can connect a multi-effects processor, such as the Yamaha
REV100 or FX770, between the AUX SEND and AUX RETURN
jacks .
5. Set the MONITOR SELECT switch to STEREO.
6. Make sure that nothing is connected to the MIC/LINE inputs.
7. Set the dbx and ZERO STOP switches as appropriate. If you’re
continuing from the previous recording steps, they are set OK.
Balancing Levels
Before recording the stereo mix to tape, it’s best to rehearse it a few times
first, and then record it when you’re happy with the overall sound.
1. Set all faders to about 7.
2. Press PLAY to start playback.
3. Using the faders, adjust the levels to create a balanced mix. Nothing
too loud, nothing too quiet.
4. Use the MONITOR/PHONES level control to adjust the monitoring
volume to an optimal level.
– +
T
R
A
C
K
1
T
R
A
C
K
2
T
R
A
C
K
3
T
R
A
C
K
4
S
T
E
R
E
O
L
E
F
T
S
T
E
R
E
O
R
I
G
H
T
REC
10
9
8
7
6
5
4
3
2
1
0
TRACK
1
10
9
8
7
6
5
4
3
2
1
0
TRACK
2
10
9
8
7
6
5
4
3
2
1
0
TRACK
3
10
9
8
7
6
5
4
3
2
1
0
TRACK
4

14 Chapter 3: Basic Recording
MT50 User’s Guide
Panning
Panning allows you to position sounds in the stereo mix (i.e., between the
left and right speakers). There are no hard and fast rules about positioning
instruments in the stereo image. Experiment! Some early Beatles record-
ings achieved remarkable effects by panning vocals, for example, hard
right, while bass and guitar were panned hard left.
1. Turn the PAN control to the left to position a sound to the left, and
to the right to position a sound to the right.
Applying EQ
The two-band equalizer enables you to boost or cut both high and low fre-
quencies. Make sure you can hear desirable high frequencies, such as the
hi-hats in the drum track. Don’t let low frequencies, such as the bass track,
become too “boomy,” or overwhelm the mix.
1. Use the HIGH control to boost and cut high frequencies.
2. Use the LOW control to boost and cut low frequencies.
Adding Effects
If you have an effects processor, such as the Yamaha REV100 or FX770,
you can connect it to the MT50 and apply effects to recorded sounds.
1. Connect the AUX SEND to the effects processor’s input.
2. Connect the AUX RETURN to the effects processor’s outputs.
If you have a stereo effects processor, connect both the L(MONO) and
R AUX RETURN connectors. If your effects processor has a mono out-
put, connect to the L(MONO) connector.
3. Turn up an AUX control to send a sound to the effects processor.
4. Turn up the AUX RETURN control to add the processed sounds to
the stereo mix.
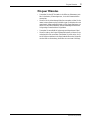
Mixdown Recording
Once you’re happy with the mix, you’re ready to record it to the master
recorder.
1. Set your master recorder ready to record.
2. Play the MT50 and set the recording level on the master recorder.
3. Stop MT50 and rewind the tape back to approximately 999.
4. Start recording on the master recorder.
5. Press PLAY on the MT50 to start playback.
The stereo mix is recorded to the master recorder.
6. At the end of the song, stop the MT50 and master recorder.
7. Rewind the master recorder and play your masterpiece.
PAN
LR
– +
HIGH
– +
LOW
REC
! To prevent accidentally erasing
your original recording, remove the
write-protect tabs from both sides
of the audio cassette you used in
your MT50.

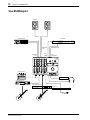
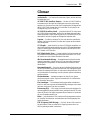
Setting example 15
MT50 User’s Guide
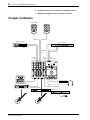
Setting example
REC
Master Recorder
Effect Processor
Powered Monitor Speakers
Guitar Effect Processor
Drum Machine
STEREO
OUT
MONITOR
OUT
AUX
RETURNS
AUX
SEND
YAMAHA
YAMAHA
Bass Effect Processor
YAMAHA YAMAHA
YAMAHA
Compressor
Footswitch

16 Chapter 4: Advanced Recording
MT50 User’s Guide
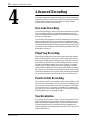
Advanced Recording
This chapter explains how to perform advanced multi-track recording tech-
niques on your MT50. The MT50 is so flexible that you can perform sophis-
ticated recording techniques with relative ease on a single, compact
machine. Here’s a little of what you can do.
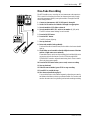
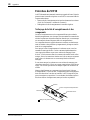
One-Take Recording
This recording technique is used to record several instruments at the same
time. It is extremely helpful for recording live performances. You can
record the instruments direct and apply reverb and other effects during mix-
down at a recording studio.
You can also use this technique to record four instruments live to two tracks,
leaving a couple tracks free. Or, you could record a complex drum part,
miking three drums in the kit separately. Later you could mix the tracks into
a very sophisticated rhythm part, and ping-pong it to the open track. Finally,
you can also use this technique to retain the stereo placement of MIDI-pro-
grammable stereo devices.
Ping-Pong Recording
Ping-Pong Recording takes its name from the parlor game that features a
little white bouncing ball. It allows you to combine previously recorded
tracks by mixing them together and recording (or “bouncing”) them to an
unrecorded track. Whereas basic overdub recording allows you to record
four times, this technique enables you to record, in theory, an unlimited
number of tracks. This is because each time you ping-pong, you make
tracks available for additional recording. Due to the limitations of magnetic
tape, however, you can record only several times before the tracks will dete-
riorate due to generational loss. (In other words, recording again and again
will wear down the tape so much that your tracks will lose their punch).
Punch-In/Out Recording
This technique is used to re-record short sections, correct mistakes, or add
new sections to silent passages. You play your part while punching in and
out to start and stop the recorder. If you have a footswitch, you can punch
in and out using your foot. This keeps your hands free for making music.
Its a great way to create a fantastic guitar solo. You can keep re-recording
difficult passages until you get things just right!
Synchronization
By recording an FSK signal onto track 4, you can synchronize the MT50
with a drum machine or MIDI sequencer. With this technique, you don’t
need to record MIDI instruments to tape. You save tracks because the an
FSK signal triggers the MIDI instruments, effectively expanding your
song’s arrangement. This technique requires a MIDI to FSK converter, such
as the Yamaha YMC10.
4
A página está carregando ...
A página está carregando ...
A página está carregando ...
A página está carregando ...
A página está carregando ...
A página está carregando ...
A página está carregando ...
A página está carregando ...
A página está carregando ...
A página está carregando ...
A página está carregando ...
A página está carregando ...
A página está carregando ...
A página está carregando ...
A página está carregando ...
A página está carregando ...
A página está carregando ...
A página está carregando ...
A página está carregando ...
A página está carregando ...
A página está carregando ...
A página está carregando ...
A página está carregando ...
A página está carregando ...
A página está carregando ...
A página está carregando ...
A página está carregando ...
A página está carregando ...
A página está carregando ...
A página está carregando ...
A página está carregando ...
A página está carregando ...
A página está carregando ...
A página está carregando ...
A página está carregando ...
A página está carregando ...
A página está carregando ...
A página está carregando ...
A página está carregando ...
A página está carregando ...
A página está carregando ...
A página está carregando ...
A página está carregando ...
A página está carregando ...
A página está carregando ...
A página está carregando ...
A página está carregando ...
A página está carregando ...
A página está carregando ...
A página está carregando ...
A página está carregando ...
A página está carregando ...
A página está carregando ...
A página está carregando ...
A página está carregando ...
A página está carregando ...
A página está carregando ...
A página está carregando ...
A página está carregando ...
A página está carregando ...
A página está carregando ...
A página está carregando ...
A página está carregando ...
A página está carregando ...
A página está carregando ...
A página está carregando ...
A página está carregando ...
A página está carregando ...
A página está carregando ...
A página está carregando ...
A página está carregando ...
A página está carregando ...
A página está carregando ...
A página está carregando ...
A página está carregando ...
A página está carregando ...
A página está carregando ...
A página está carregando ...
A página está carregando ...
A página está carregando ...
A página está carregando ...
A página está carregando ...
A página está carregando ...
A página está carregando ...
A página está carregando ...
A página está carregando ...
A página está carregando ...
A página está carregando ...
A página está carregando ...
A página está carregando ...
A página está carregando ...
A página está carregando ...
A página está carregando ...
A página está carregando ...
A página está carregando ...
A página está carregando ...
A página está carregando ...
A página está carregando ...
A página está carregando ...
A página está carregando ...
A página está carregando ...
A página está carregando ...
A página está carregando ...
A página está carregando ...
A página está carregando ...
A página está carregando ...
A página está carregando ...
A página está carregando ...
A página está carregando ...
A página está carregando ...
A página está carregando ...
A página está carregando ...
A página está carregando ...
A página está carregando ...
A página está carregando ...
A página está carregando ...
A página está carregando ...
A página está carregando ...
A página está carregando ...
A página está carregando ...
A página está carregando ...
A página está carregando ...
A página está carregando ...
A página está carregando ...
A página está carregando ...
A página está carregando ...
A página está carregando ...
A página está carregando ...
A página está carregando ...
A página está carregando ...
A página está carregando ...
A página está carregando ...
A página está carregando ...
-
 1
1
-
 2
2
-
 3
3
-
 4
4
-
 5
5
-
 6
6
-
 7
7
-
 8
8
-
 9
9
-
 10
10
-
 11
11
-
 12
12
-
 13
13
-
 14
14
-
 15
15
-
 16
16
-
 17
17
-
 18
18
-
 19
19
-
 20
20
-
 21
21
-
 22
22
-
 23
23
-
 24
24
-
 25
25
-
 26
26
-
 27
27
-
 28
28
-
 29
29
-
 30
30
-
 31
31
-
 32
32
-
 33
33
-
 34
34
-
 35
35
-
 36
36
-
 37
37
-
 38
38
-
 39
39
-
 40
40
-
 41
41
-
 42
42
-
 43
43
-
 44
44
-
 45
45
-
 46
46
-
 47
47
-
 48
48
-
 49
49
-
 50
50
-
 51
51
-
 52
52
-
 53
53
-
 54
54
-
 55
55
-
 56
56
-
 57
57
-
 58
58
-
 59
59
-
 60
60
-
 61
61
-
 62
62
-
 63
63
-
 64
64
-
 65
65
-
 66
66
-
 67
67
-
 68
68
-
 69
69
-
 70
70
-
 71
71
-
 72
72
-
 73
73
-
 74
74
-
 75
75
-
 76
76
-
 77
77
-
 78
78
-
 79
79
-
 80
80
-
 81
81
-
 82
82
-
 83
83
-
 84
84
-
 85
85
-
 86
86
-
 87
87
-
 88
88
-
 89
89
-
 90
90
-
 91
91
-
 92
92
-
 93
93
-
 94
94
-
 95
95
-
 96
96
-
 97
97
-
 98
98
-
 99
99
-
 100
100
-
 101
101
-
 102
102
-
 103
103
-
 104
104
-
 105
105
-
 106
106
-
 107
107
-
 108
108
-
 109
109
-
 110
110
-
 111
111
-
 112
112
-
 113
113
-
 114
114
-
 115
115
-
 116
116
-
 117
117
-
 118
118
-
 119
119
-
 120
120
-
 121
121
-
 122
122
-
 123
123
-
 124
124
-
 125
125
-
 126
126
-
 127
127
-
 128
128
-
 129
129
-
 130
130
-
 131
131
-
 132
132
-
 133
133
-
 134
134
-
 135
135
-
 136
136
-
 137
137
-
 138
138
-
 139
139
-
 140
140
-
 141
141
-
 142
142
-
 143
143
-
 144
144
-
 145
145
-
 146
146
-
 147
147
-
 148
148
-
 149
149
-
 150
150
-
 151
151
-
 152
152
-
 153
153


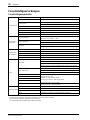
Yamaha MT50 Manual do usuário
- Categoria
- Mixers de áudio
- Tipo
- Manual do usuário
em outros idiomas
- español: Yamaha MT50 Manual de usuario
- français: Yamaha MT50 Manuel utilisateur
- italiano: Yamaha MT50 Manuale utente
- English: Yamaha MT50 User manual
- русский: Yamaha MT50 Руководство пользователя
- Nederlands: Yamaha MT50 Handleiding
- Deutsch: Yamaha MT50 Benutzerhandbuch
- dansk: Yamaha MT50 Brugermanual
- čeština: Yamaha MT50 Uživatelský manuál
- svenska: Yamaha MT50 Användarmanual
- polski: Yamaha MT50 Instrukcja obsługi
- 日本語: Yamaha MT50 ユーザーマニュアル
- Türkçe: Yamaha MT50 Kullanım kılavuzu
- română: Yamaha MT50 Manual de utilizare
Artigos relacionados
-
Yamaha MT8XII Manual do usuário
-
-
-
-
-
-
-
-
-