
OptiPlex 5055 Tower
Quick Start Guide
Guide de démarrage rapide
Guia de início rápido
Hızlı Başlangıç Kılavuzu
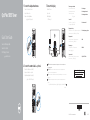
1 Connect the keyboard and mouse
Connectez le clavier et la souris
Ligar o teclado e o rato
Klavye ve farenin bağlanması
2 Connect the network cable — optional
Branchez le câble réseau (facultatif)
Ligue o cabo de rede — opcional
Ağ kablosunu bağlayın (isteğe bağlı)
3 Connect the display
Branchez l’écran
Ligue o ecrã
Ekranı bağlayın
NOTE: If you ordered your computer with a discrete graphics card, connectthe display to the
discrete graphics card.
REMARQUE: Si vous avez commandé votre ordinateur avec une carte graphique séparée,
branchez l’écran sur la carte graphique séparée.
NOTA: Se encomendou o computador com uma placa gráfica dedicada, ligue o ecrã a essa mesma
placa gráfica.
NOT: Bilgisayarınızı bağımsız bir grafik kartıyla sipariş ettiyseniz ekranı bağımsız grafik kartına
bağlayın.
:ةظحم
Product support and manuals
Assistance produits et manuels
Suporte do produto e manuais
Ürün desteği ve kılavuzlar
Dell.com/support
Dell.com/support/manuals
Dell.com/support/windows
Contact Dell
Contacter Dell | Contactar a Dell
Dell’e başvurun | Dell
Dell.com/contactdell
Regulatory and safety
Réglementations et sécurité | Regulamentos e segurança
Mevzuat ve güvenlik |
Dell.com/regulatory_compliance
Regulatory model
Modèle réglementaire | Modelo regulamentar
Yasal model numarası |
D18M
Regulatory type
Type réglementaire | Tipo regulamentar
Yasal tür |
D18M004
Computer model
Modèle de l’ordinateur | Modelo do computador
Bilgisayar modeli |
OptiPlex 5055 Tower
2017-11© 2017 Dell Inc. or its subsidiaries.
Connection and use of this communications
equipment is permitted by the Nigerian
Communications Commission

Features
Caractéristiques | Funcionalidades | Özellikler |
1. Power button and power light
2. 5.25-inch internal bay
3. Optical drive (optional)
4. USB 2.0 port with PowerShare
5. Line-out port
6. Hard-drive activity light
7. Memory card reader (optional)
8. DisplayPorts
9. Headset port
10. Serial port
11. USB 2.0 port
12. PS/2 keyboard port
13. USB 3.1 Gen 1 ports
14. USB 2.0 ports (supports Smart
Power On)
15. Expansion card slots
16. Power connector port
17. Power supply diagnostic light
18. Cable cover lock slot
19. Release latch
20. VGA port (optional)
21. PS/2 mouse port
22. Network port
23. Kensington security cable slot
24. Padlock ring
1. Bouton d’alimentation et voyant
d’alimentation
2. Baie externe de 5,25pouces
3. Lecteur optique (en option)
4. port USB2.0 avec PowerShare
5. port de sortie de ligne
6. Voyant d’activité du disque dur
7. Lecteur de carte mémoire (en
option)
8. Ports DisplayPort
9. Port casque
10. Port série
11. Port USB2.0
12. Port PS/2 pour clavier
13. Ports USB3.1 Gen1
14. Ports USB2.0 (prennent en charge
la mise sous tension intelligente)
15. Emplacements pour carte
d’extension
16. Port du connecteur d’alimentation
17. Voyant de diagnostic d’alimentation
18. Emplacement du verrou du cache-
câbles
19. Loquet de dégagement
20. Port VGA (en option)
21. Port PS/2 pour souris
22. Port réseau
23. Emplacement pour câble de sécurité
Kensington
24. Anneau pour cadenas
1. Botão de alimentação e luz de
alimentação
2. Compartimento interno de 5,25
polegadas
3. Unidade óptica (opcional)
4. porta USB 2.0 com PowerShare
5. Porta de saída
6. Luz de atividade da unidade de disco
rígido
7. Leitor de cartão de memória
(opcional)
8. DisplayPorts
9. Porta de auscultadores
10. Porta de série
11. Porta USB 2.0
12. Porta PS/2 do teclado
13. Portas USB 3.1 Gen 1
14. Portas USB 2.0 (suporta Smart
Power On)
15. Slots da placa de expansão
16. Porta do transformador
17. Luz de diagnóstico da fonte de
alimentação
18. Encaixe do cadeado para proteção
do cabo
19. Trava de liberação
20. Porta VGA (opcional)
21. Porta PS/2 do rato
22. Porta de rede
23. Encaixe do cabo de segurança
Kensington
24. Anel para cadeado
1. Güç düğmesi veya güç ışığı
2. 5,25 inç dahili bölme
3. Optik sürücü (isteğe bağlı)
4. PowerShare ile birlikte USB 2.0
bağlantı noktası
5. Hat çıkışı bağlantı noktası
6. Sabit sürücü etkinliği ışığı
7. Bellek kartı okuyucu (isteğe bağlı)
8. DisplayPorts
9. Mikrofonlu kulaklık girişi
10. Seri bağlantı noktası
11. USB 2.0 bağlantı noktası
12. PS/2 klavye bağlantı noktası
13. USB 3.1 Gen 1 portları
14. USB 2.0 bağlantı noktaları (Akıllı
Açılmayı destekler)
15. Genişleme kart yuvaları
16. Güç konektörü bağlantı noktası
17. Güç kaynağı tanılama ışığı
18. Kablo kapağı kilit yuvası
19. Serbest bırakma mandalı
20. VGA bağlantı noktası (isteğe bağlı)
21. PS/2 fare bağlantı noktası
22. Ağ bağlantı noktası
23. Kensington güvenlik kablosu yuvası
24. Asmakilit halkası
4 Connect the power cable and
press the power button
Branchez le câble d’alimentation et appuyez sur le bouton d’alimentation
Ligue o cabo de alimentação e prima o botão de ligar/desligar
Güç kablosunu takın ve güç düğmesine basın
1 .
2 .5.25
3 .
4 .
PowerShare
5 .
6 .
7 .
8 .DisplayPort
9 .
10 .
11 .
12 .PS/2
13 .
14 .
15 .
16 .
17 .
18 .
19 .
20 .VGA
21 .PS/2
22 .
23 .Kensington
24 .
-
 1
1
-
 2
2


em outras línguas
Artigos relacionados
-
Dell OptiPlex 5055 A-Series Guia rápido
-
-
-
-
Dell OptiPlex 5055 Ryzen CPU Guia rápido
-
Dell OptiPlex 7050 Guia rápido
-
-
-
Dell Precision 7920 Tower Guia rápido
-
Dell Precision 7820 Tower Guia rápido