SICK SENSICK WL9L Instruções de operação
- Categoria
- Brinquedos
- Tipo
- Instruções de operação

DEUTSCH
Reflexions-Lichtschranke
mit Laserlicht
Betriebsanleitung
wavelength: 655nm
pulse length: 5us
max.output<4,0mW
LASER CLASS 2
INTO BEAM
DO NOT STARE
LIGHT
LASER-
LASER APERTURE
No. 50, July 2001
to laser notice
1040.11 except for
deviations pursuant
21 CFR1040.10 and
Complies with
EN60825-1:2001
/AM.2: 2001
IEC 60825-1
Sicherheitshinweise
‡ Kein Sicherheitsbauteil gemäß EU-Maschinenrichtlinie.
‡ Vor der Inbetriebnahme die Betriebsanleitung lesen.
‡ Anschluss, Montage und Einstellung nur durch Fachpersonal.
‡ Gerät bei Inbetriebnahme vor Feuchte und Verunreinigung
schützen.
We reserve the right to make changes without prior notification
Änderungen vorbehalten
Angegebene Produkteigenschaften und technische Daten stellen keine
Garantieerklärung dar
Sous réserve de modifications
Reservam-se alteraç ões
Ret til ændringer forbeholdes
Con riserva di modifiche
Wijzigingen voorbehouden
Reservado el derecho a introducir modificaciones
A 1
Bestimmungsgemäße Verwendung
Die Reflexions-Lichtschranke WL9L ist ein optoelektronischer
Sensor und wird zum optischen, berührungslosen Erfassen von
Sachen, Tieren und Personen eingesetzt. Zum Betrieb ist ein
Reflektor erforderlich.
Inbetriebnahme
1
L: hellschaltend, bei Lichtempfang schaltet Ausgang (Q);
D: dunkelschaltend, bei Lichtunterbrechung schaltet
Ausgang (Q).
2
Leitungsdose spannungsfrei aufstecken und festschrauben.
Für Anschluss in B gilt: brn=braun, blu=blau, blk=schwarz,
wht=weiß.
Leitungen anschließen.
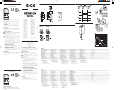
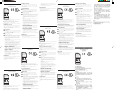
3
Geeigneten Reflektor gegenüber der Lichtschranke
montieren und grob ausrichten. Dabei Reichweite
beachten (s. technische Daten am Ende dieser Betriebsan-
leitung und s. Diagramm; x=Reichweite,
y=Funktionsreserve, y
B
=Betriebsreichweite,
y
G
=Grenzreichweite).
Sensor an Betriebsspannung legen (s. Typenaufdruck).
Justage Lichtempfang:
Ein-Ausschaltpunkte der Empfangsanzeige (gelbe LED)
durch horizontales und vertikales Schwenken der
Lichtschranke ermitteln. Mittelstellung so wählen, dass der
rote Sendelichtstrahl in der Reflektormitte auftrifft. Bei
optimalem Lichtempfang leuchten die grünen und gelben
LEDs permanent.
Einstellung mit Standard-EmpfEinstellung mit Standard-Empf
Einstellung mit Standard-EmpfEinstellung mit Standard-Empf
Einstellung mit Standard-Empf
indlichkindlichk
indlichkindlichk
indlichk
eit:eit:
eit:eit:
eit:
Teach-in-Knopf > 2 s drücken, gelbe LED erlischt und
leuchtet. Teach-in wird eingeleitet, beide LEDs blinken.
Teach-in-Knopf loslassen, Empfindlichkeit ist nichtflüchtig
gespeichert.
Einstellung mit fEinstellung mit f
Einstellung mit fEinstellung mit f
Einstellung mit f
einer Empfeiner Empf
einer Empfeiner Empf
einer Empf
indlichkindlichk
indlichkindlichk
indlichk
eit:eit:
eit:eit:
eit:
Teach-in-Knopf > 5 s drücken. Teach-in wird eingeleitet,
beide LEDs blinken. Teach-in-Knopf loslassen, Empfindlich-
keit ist nichtflüchtig gespeichert.
Leuchten sie nicht, wird kein oder zuwenig Licht empfan-
gen: Lichtschranke und Reflektor neu justieren bzw.
reinigen.
Wartung
SICK-Lichtschranken sind wartungsfrei. Wir empfehlen, in
regelmäßigen Abständen
- die optischen Grenzflächen zu reinigen,
- Verschraubungen und Steckverbindungen zu überprüfen.
B
2
3
WL9L
12
22
40
20
3
3
1,5
1
3
2
3
20
6
11
4
5
WL9L
1
L+
Q
Q
4
2
3
M
brn
wht
blu
blk
1
L+
Q
Q
4
2
3
M
brn
wht
blu
blk
WL9L-P330
WL9L-N330
WL9L-P430
WL9L-N430
8010170.0706 GO KE
ENGLISH
Photoelectric Reflex Switch
with laser light
Operating Instructions
wavelength: 655nm
pulse length: 5us
max.output<4,0mW
LASER CLASS 2
INTO BEAM
DO NOT STARE
LIGHT
LASER-
LASER APERTURE
No. 50, July 2001
to laser notice
1040.11 except for
deviations pursuant
21 CFR1040.10 and
Complies with
EN60825-1:2001
/AM.2: 2001
IEC 60825-1
‡ No safety component in accordance with EU machine
guidelines.
‡ Read the operating instructions before starting operation.
‡ Connection, assembly, and settings only by competent
technicians.
‡ Protect the device against moisture and soiling when
operating.
‡
CC
CC
C
AA
AA
A
UTION:UTION:
UTION:UTION:
UTION:
The use of controls or adjustments or
performance of procedures other than those specified
herein may result in hazardous radiation exposure.
Proper Use
The WL9L photoelectric reflex switch is an opto-electronic
sensor and is used for optical, non-contact detection of
objects, animals, and persons. A reflector is required for
operation.
Starting Operation
1
L: light-switching; if light received, output (Q) switches.
D: dark-switching; if light interrupted, output (Q) switches;
2
The following apply for connection in B: brn=brown,
blu=blue, blk=black, wht=white.
Connect cables.
3
Mount suitable reflector opposite photoelectric switch and
align roughly. Adjust for scanning range (see technical data
at end of these operating instructions and see diagram;
x=scanning range, y=operating reserve, yb=operating
range, yg=limiting scanning distance).
Connect sensor to operating voltage (see type label).
Adjustment of light reception:
Determine the on/off points of the LED signal strength
indicator (LED yellow) by swiveling the photoelectric reflex
switch horizontally and vertically. Select the middle position,
so that the red sender beam hits the reflector center. The
green and yellow LEDs light continuously.
Setting with standard sensitivity:Setting with standard sensitivity:
Setting with standard sensitivity:Setting with standard sensitivity:
Setting with standard sensitivity:
Press teach-in button > 2 s; the yellow LED switches off
and lights. Teach-in is initiated; both LEDs blink. Press teach-
in button; sensitivity is stored permanently.
Setting with precise sensitivity:Setting with precise sensitivity:
Setting with precise sensitivity:Setting with precise sensitivity:
Setting with precise sensitivity:
Press teach-in button > 5 s. Teach-in is initiated; both LEDs
blink. Press teach-in button; sensitivity is stored permanently.
If they do not light, no or too little light is received: Realign
or clean photoelectric switch and reflector.
Maintenance
SICK photoelectric switches do not require any maintenance.
We recommend that you clean the external lens surfaces and
check the screw connections and plug-in connections at
regular intervals.
2468
100
10
y
B
y
G
1
10 12
y
x [m]
PL 40 A
Reflexfolie
PL 80 A
Australia
Phone +61 3 9497 4100
E-Mail: [email protected]
Belgium/Luxembourg
Phone +32 (0)2 466 55 66
E-Mail: [email protected]
Brasil
Phone +55 11 5091-4900
E-Mail: [email protected]
Ceská Republika
Phone +420 2 57 91 18 50
E-Mail: [email protected]
China
Phone +852-2763 6966
E-Mail: [email protected]
Danmark
Phone +45 45 82 64 00
E-Mail: [email protected]
Deutschland
Phone +49 (0)2 11 53 01-0
E-Mail: [email protected]
España
Phone +34 93 480 31 00
E-Mail: [email protected]
France
Phone +33 1 64 62 35 00
E-Mail: [email protected]
Great Britain
Phone +44 (0)1727 831121
E-Mail: [email protected]
India
Phone +91 –22– 2822 7084
E-Mail: [email protected]
Italia
Phone +39 02 27 43 41
E-Mail: [email protected]
Japan
Phone +81 (0)3 3358 1341
E-Mail: [email protected]
Nederlands
Phone +31 (0)30 229 25 44
E-Mail: [email protected]
Norge
Phone +47 67 81 50 00
E-Mail: [email protected]
Österreich
Phone +43 (0)22 36 62 28 8-0
E-Mail: of[email protected]
Polska
Phone +48 22 837 40 50
E-Mail: [email protected]
Republic of Korea
Phone +82-2 786 6321/4
E-Mail: [email protected]
Republika Slowenija
Phone +386 (0)1-47 69 990
E-Mail: of[email protected]
Russia
Phone +7 495 775 05 34
E-Mail denis.kesaev@sick-
automation.ru
Schweiz
Phone +41 41 619 29 39
E-Mail: [email protected]
Singapore
Phone +65 6744 3732
E-Mail: [email protected]
Suomi
Phone +358-9-25 15 800
E-Mail: [email protected]
Sverige
Phone +46 8 680 64 50
E-Mail: [email protected]
Taiwan
Phone +886 2 2365-6292
E-Mail: [email protected]
Türkiye
Phone +90 216 587 74 00
E-Mail: [email protected]
USA/Canada/México
Phone +1(952) 941-6780
E-Mail: [email protected]
More representatives and agencies
in all major industrial nations at
www.sick.com
00 BZ int27ɛThe specified product features and technical data do not represent any guarantee

FRANÇAIS
Barrière réflex
à lumière laser
Instructions de Service
wavelength: 655nm
pulse length: 5us
max.output<4,0mW
LASER CLASS 2
INTO BEAM
DO NOT STARE
LIGHT
LASER-
LASER APERTURE
No. 50, July 2001
to laser notice
1040.11 except for
deviations pursuant
21 CFR1040.10 and
Complies with
EN60825-1:2001
/AM.2: 2001
IEC 60825-1
‡ N’est pas un composant de sécurité au sens de la directive
européenne concernant les machines.
‡ Lire les Instructions de Service avant la mise en marche.
‡ Installation, raccordement et réglage ne doivent être
effectués que par du personnel qualifié.
‡ Lors de la mise en service, protéger l’appareil de l’humidité
et des saletés.
Utilisation correcte
La barrière réflex WL9L est un capteur opto-électronique qui
s’utilise pour la saisie optique de choses, d’animaux et de
personnes sans aucun contact. Pour son fonctionnement, il est
nécessaire de disposer d’un réflecteur.
Mise en service
1
L: commutation claire, la sortie (Q) connecte à la réception
de lumière;
D: commutation sombre, la sortie (Q) connecte lorsque le
trajet lumineux est interrompu.
2
Pour le raccordement dans B on a: brn=brun, blu=bleu,
blk=noir, wht=blanc.
Raccorder les conducteurs.
3
Installer un réflecteur approprié en face de la barrière et
l’aligner de façon grossière. Ce faisant, tenir compte de la
portée (voir les caractéristiques techniques à la fin des
présentes Instructions de Service ainsi que le diagramme;
x=portée, y=lumière suffisante, yb=portée pratique,
yg=portée limite).
Appliquer la tension de service au capteur (voir inscription
indiquant le modèle).
Ajustement Réception de la lumière :
Déterminer les points d'allumage et d'extinction du témoin
de réception (LED jaune) en faisant basculer la barrière
opto-électronique horizontalement et verticalement.
Choisir une position intermédiaire telle que le rayon de
lumière rouge émise tombe au milieu du réflecteur.
Lorsque la réception de la lumière est optimale, les LED
jaune et verte sont allumées en permanence.
Réglage aRéglage a
Réglage aRéglage a
Réglage a
vv
vv
v
ec sensibilité standard :ec sensibilité standard :
ec sensibilité standard :ec sensibilité standard :
ec sensibilité standard :
Appuyer sur le bouton Teach-in > 2 s, la LED jaune s'éteint
et s'allume de nouveau. L'opération d'apprentissage se
déclenche, les deux LED clignotent. Relâcher le bouton
Teach-in, la sensibilité est stockée en mémoire non volatile.
Réglage aRéglage a
Réglage aRéglage a
Réglage a
vv
vv
v
ec sensibilité fec sensibilité f
ec sensibilité fec sensibilité f
ec sensibilité f
ine :ine :
ine :ine :
ine :
Appuyer sur le bouton Teach-in > 5 s, l'opération
d'apprentissage se déclenche, les deux LED clignotent.
Relâcher le bouton Teach-in, la sensibilité est stockée en
mémoire non volatile.
Si elles ne s'allument pas, c'est que la lumière reçue est
absente ou insuffisante : ajuster de nouveau barrière
lumineuse et réflecteur ou les nettoyer.
Maintenance
Les barrières lumineuses SICK ne nécessitent pas d’entretien.
Nous recommandons, à intervalles réguliers
- de nettoyer les surfaces optiques,
- de contrôler les assemblages vissés et les connexions à fiche
et à prise.
PORTUGUÊS
Barreira de luz com reflexão por espelho
com luz de raios laser
Instruções de operação
wavelength: 655nm
pulse length: 5us
max.output<4,0mW
LASER CLASS 2
INTO BEAM
DO NOT STARE
LIGHT
LASER-
LASER APERTURE
No. 50, July 2001
to laser notice
1040.11 except for
deviations pursuant
21 CFR1040.10 and
Complies with
EN60825-1:2001
/AM.2: 2001
IEC 60825-1
‡ Não se trata de elemento de segurança segundo a Diretiva
Máquinas da União Europêa.
‡ Antes do comissionamento dev ler as instruções de
operação.
‡ Conexões, montagem e ajuste devem ser executados
exclusivamente por pessoal devidamente qualificado.
‡ Guardar o aparelho ao abrigo de umidade e sujidade.
DANSK
Refleksions-fotoceller
med laserlys
Driftsvejlening
wavelength: 655nm
pulse length: 5us
max.output<4,0mW
LASER CLASS 2
INTO BEAM
DO NOT STARE
LIGHT
LASER-
LASER APERTURE
No. 50, July 2001
to laser notice
1040.11 except for
deviations pursuant
21 CFR1040.10 and
Complies with
EN60825-1:2001
/AM.2: 2001
IEC 60825-1
‡ Ingen sikkerhedskomponent iht. EU-maskindirektiv.
‡ Driftsvejledningen skal gennemlæses før idrifttagning.
‡ Tilslutning, montage og indstilling må kun foretages af fagligt
personale.
‡ Apparatet skal beskyttes mod fugtighed og snavs ved
idrifttagningen.
Beregnet anvendelse
Refleksions-fotocellen WL9L er en opto-elektronisk føler, som
benyttes til optisk, berøringsløs registrering af ting, dyr og
personer. Driften kræver en reflektor.
Idrifttagning
1
L: bliver lys, ved lysmodtagelse kobler udgang (Q);
D: bliver mørk, ved lysafbrydelse kobler udgang (Q).
2
For tilslutning i B gælder: brn=brun, blu=blå, blk=sort,
wht=hvid.
Ledninger tilsluttes.
3
Egnet reflektor monteres over for fotocellen og indstilles
groft. Vær i denne forbindelse opmærksom på rækkevidden
(se Tekniske data i slutningen af denne driftsvejledning og
se diagram; x=rækkevidde, y=funktionsreserve,
yb=driftsrækkevidde, yg=grænserækkevidde).
Justering af lysmodtagelsen:
Find frem til lysbommens ind-/udkoblingspunkter for
modtagelsesindikatoren (gul LED) ved at dreje sensoren
vandret og lodret. Vælg midterstillingen sådan, at den røde
sendelysstråle rammer i midten af reflektoren. Ved en
optimal lysmodtagelse lyser de grønne og gule LED’er
konstant:
Indstilling med standard-følsomhed:Indstilling med standard-følsomhed:
Indstilling med standard-følsomhed:Indstilling med standard-følsomhed:
Indstilling med standard-følsomhed:
Tryk på Teach-in-knappen > 2 sek., den gule LED slukker og
lyser. Teach-in indledes, begge LED'er blinker. Slip Teach-in-
knappen, følsomheden er ikke-flygtigt lagret.
Indstilling med fIndstilling med f
Indstilling med fIndstilling med f
Indstilling med f
in følsomhed:in følsomhed:
in følsomhed:in følsomhed:
in følsomhed:
Tryk på Teach-in-knappen > 5 sek., Teach-in indledes, begge
ITALIANO
Barriere luminose a riflessione
con luce laser
Istruzioni per l'uso
wavelength: 655nm
pulse length: 5us
max.output<4,0mW
LASER CLASS 2
INTO BEAM
DO NOT STARE
LIGHT
LASER-
LASER APERTURE
No. 50, July 2001
to laser notice
1040.11 except for
deviations pursuant
21 CFR1040.10 and
Complies with
EN60825-1:2001
/AM.2: 2001
IEC 60825-1
‡ Non componente di sicurezza secondo la Direttiva macchine
EN.
‡ Leggere prima della messa in esercizio.
‡ Allacciamento, montaggio e regolazione solo da parte di
personale qualificato.
‡ Durante la messa in esercizio proteggere da umidità e
sporcizia.
Impiego conforme allo scopo
La barriera luminosa a riflessione WL9L è un sensore
optoelettronico che viene impiegatoper il rilevamento ottico a
distanza di oggetti, animali e persone. Per l’esercizioè necessario
un riflettore.
Messa in esercizio
1
L: commutazione a chiaro, con ricezione di luce commuta
uscita (Q);
D: commutazione a scuro, con cessazione di luce commuta
l’uscita (Q).
2
Per collegamento B osservare: brn=marrone, blu=blu,
blk=nero, wht=bianco.
Collegare i cavi.
3
Montare un riflettore adatto di fronte alla barriera
luminosa e orientare approssimativamente. Tenere conto
della portata di ricezione (cf. Scheda tecnica alla fine di
queste Istruzioni e Diagramma; x=portata di ricezione,
y=riserva funzione, yb=portata di ricezione, yg=limite di
portata).
Allacciare il sensore a tensione di esercizio (v.
stampigliatura).
Aggiustare la ricezione luce:
Individuare i punti di inserimento e disinserimento
dell'indicatore di ricezione (LED giallo) orientando la
barriera luminosa in senso verticale e orizzontale. Scegliere
la posizione mediana, in modo che il raggio di luce rossa
colpisca il centro del riflettore. Quando la ricezione è
ottimale i LED giallo e verde si accendono
permanentemente.
Regolazione con sensibilità standard:Regolazione con sensibilità standard:
Regolazione con sensibilità standard:Regolazione con sensibilità standard:
Regolazione con sensibilità standard:
Premere il tasto di Teach-in > 2 s, il LED giallo si spegne e
si accende. Ha inizio il Teach-in, entrambi i LED
lampeggiano. Rilasciare il tasto di Teach-in, la sensibilità
viene memorizzata in modo permanente.
Regolazione con sensibilità alta:Regolazione con sensibilità alta:
Regolazione con sensibilità alta:Regolazione con sensibilità alta:
Regolazione con sensibilità alta:
Premere il tasto di Teach-in > 5 s, ha inizio il Teach-in,
entrambi i LED lampeggiano. Rilasciare il tasto di Teach-in, la
sensibilità viene memorizzata in modo permanente.Se i
LED non si accendono, la ricezione di luce manca o è
insufficiente. Riaggiustare o pulire la barriera luminosa e il
riflettore.
Manutenzione
Le barriere luminose SICK non richiedono manutenzione. Si
consiglia
- di pulire regolarmente le superfici limite ottiche,
- di controllare regolarmente gli avvitamenti e i collegamenti a
spina.
NEDERLANDS
Reflectie-fotocel
met laserlicht
Gebruiksaanwijzing
wavelength: 655nm
pulse length: 5us
max.output<4,0mW
LASER CLASS 2
INTO BEAM
DO NOT STARE
LIGHT
LASER-
LASER APERTURE
No. 50, July 2001
to laser notice
1040.11 except for
deviations pursuant
21 CFR1040.10 and
Complies with
EN60825-1:2001
/AM.2: 2001
IEC 60825-1
‡ Geen veiligheidscomponent conform EU-machinerichtlijn.
‡ Lees voor de ingebruikneming de gebruiksaanwijzing.
‡ Aansluiting, montage en instelling alleen door vakbekwaam
personeel laten uitvoeren.
‡ Apparaat voor ingebruikneming tegen vocht en
verontreiniging beschermen.
Gebruik volgens bestemming
De reflextastkop WL9L is een optisch-elektronische sensor en
wordt gebruikt voor het optisch, contactloos registreren van
goederen, dieren en personen. Een reflector is noodzakelijk.
Ingebruikneming
1
L: helderschakelend, bij lichtontvangst schakelt uitgang (Q);
D: donkerschakelend, bij lichtonderbreking schakelt uitgang
(Q).
2
Voor de aansluiting in B geldt: brn=bruin, blu=blauw,
blk=zwart, wht=wit.
Kabels aansluiten.
3
Monteer een geschikte reflector tegenover de fotocel en
richt de reflector en de fotocel grof op elkaar uit. Houdt
daarbij rekening met de reikwijdte (zie technische gegevens
aan het einde van de gebruiksaanwijzing alsmede diagram;
x=reikwijdte, y=functiereserve, yb=reikwijdte,
yg=grensreikwijdte ).
Systeem onder bedrijfsspanning zetten (zie typeplaatje).
Uitrichten lichtontvangst:
Bepaal de in-/uitschakelpunten van de ontvangstaanduiding
(LED geel) door de fotocel horizontaal en verticaal te
verdraaien. Kies de middenstand zo, dat de rode
zenderlichtstraal de reflector in het midden raakt. Bij een
optimale lichtontvangst branden de groene en gele LED
permanent.
Instelling met standaard gevInstelling met standaard gev
Instelling met standaard gevInstelling met standaard gev
Instelling met standaard gev
oeligheid:oeligheid:
oeligheid:oeligheid:
oeligheid:
Druk de teach-in-knop > 2 s in, de gele LED dooft en licht
op. Teach-in wordt ingeleid, beide LED´s knipperen. Laat de
teach-in-knop los, de gevoeligheid is niet-vluchtig
opgeslagen.
Instelling met fInstelling met f
Instelling met fInstelling met f
Instelling met f
ijne gevijne gev
ijne gevijne gev
ijne gev
oeligheid:oeligheid:
oeligheid:oeligheid:
oeligheid:
Druk de teach-in-knop > 5 s in. Teach in wordt ingeleid,
beide LED´s knipperen. Laat de teach-in-knop los, de
gevoeligheid is niet-vluchtig opgeslagen. Als de LED´s niet
oplichten, wordt geen of te weinig licht ontvangen: Richt de
fotocel en de reflector opnieuw uit of maak ze schoon.
Onderhoud
SICK-fotocellen zijn onderhoudsvrij. Wij bevelen aan,
regelmatig
- de optische grensvlakken schoon te maken,
- schroef en langsverbindingen te controleren.
ESPAÑOL
Barrera de luz de reflexión
con luz laser
Manual de Servicio
wavelength: 655nm
pulse length: 5us
max.output<4,0mW
LASER CLASS 2
INTO BEAM
DO NOT STARE
LIGHT
LASER-
LASER APERTURE
No. 50, July 2001
to laser notice
1040.11 except for
deviations pursuant
21 CFR1040.10 and
Complies with
EN60825-1:2001
/AM.2: 2001
IEC 60825-1
‡ No es elemento constructivo de seguridad según la
Directiva UE sobre maquinaria.
‡ Leer el Manual de Servicio antes de la puesta en marcha.
‡ Conexión, montaje y ajuste solo por personal técnico.
‡ A la puesta en marcha proteger el aparato contra humedad
y suciedad.
Utilização devida
A barreira de luz com reflexão por espelho WL9L é um
sensor opto-eletrônico que serve para a análise ótica, sem
contato, de objetos, animais e pessoas. O seu funcionamento
requer um refletor.
Comissionamento
1
L: ativado com luz significa que a saída (Q) é ativada
quando recebe luz;
D: ativado quando escuro, significa que a saída (Q) é
ativada quando a luz está interrompida.
2
Para a ligação elétrica em B é: brn=marron, blu=azul,
blk=preto, wht=branco.
Fazer a cablagem elétrica.
3
Montar um refletor apropriado oposto à barreira de luz e
ajustá-lo mais ou menos. Atender ao alcance da luz (ver
dados técnicos no final destas instruções de operação e
ver diagrama; x=alcance da luz, y=reserva de
funcionamento, yb= alcance de serviço, yg=alcance do
limite).
Colocar o sensor na tensao de serviço (ver letreiro de
tipo).
Ajuste da recepção luminosa:
Determinar os pontos de ligação e de desligamento do
indicador de recepção (LED amarelo) basculando a
barreira fotoelétrica na horizontal e na vertical. Selecionar
a posição central de modo que o raio luminoso de
emissão, vermelho, atinja o centro do refletor. No caso de
recepção luminosa otimizada, os LEDs verde e amarelo
acendem em permanência.
Ajuste com sensibilidade padrão:Ajuste com sensibilidade padrão:
Ajuste com sensibilidade padrão:Ajuste com sensibilidade padrão:
Ajuste com sensibilidade padrão:
apertar o botão teach-in > 2 s, o LED amarelo apaga e
acende. O Teach-in é iniciado, ambos os LEDs com luz
pisca-pisca. Soltar o botão teach-in, a sensibilidade está
memorizada de modo não volátil.
Ajuste com menor sensibilidade:Ajuste com menor sensibilidade:
Ajuste com menor sensibilidade:Ajuste com menor sensibilidade:
Ajuste com menor sensibilidade:
apertar o botão teach-in > 5 s, o Teach-in é iniciado, ambos
os LEDs com luz intermitente. Soltar o botão teach-in, a
sensibilidade está memorizada de modo não volátil.
Se não acender, não é recebida luz ou a recepção é
insuficiente: Ajustar de novo ou limpar barreira fotoelétrica
e refletor.
Manutenção
As barreiras de luz SICK não requerem manutenção.
Recomendamos que se faça, em intervalos regulares,
- a limpeza das superfícies óticas,
- e um controle às conexões roscadas e uniões de conetores.
LED'er blinker. Slip Teach-in-knappen, følsomheden er
ikke-flygtigt lagret.
Hvis de ikke lyser, modtages der ikke noget eller for lidt lys:
Juster eller rens lysbom og reflektor igen.
Vedligeholdelse
SICK-fotoceller kræver ingen vedligeholdelse. Vi anbefaler, at
- de optiske grænseflader rengøres
- forskruninger og stikforbindelser kontrolleres med
regelmæssige mellemrum.
Empleo para usos debidos
La barrera fotoelectrica de reflexión WL9L es un sensor
opto-electrónico, empleado para detección óptica y sin
contacto de objetos, animales y personas. para el servicio es
necesario un reflecto.
Puesta en marcha
1
L: conexión en claro, con recepción de luz conecta salida
(Q);
D: conexión en oscuro, con interrupción de luz conecta
salida (Q).
2
Para conectar en B: brn=marrón, blu=azul, blk=negro,
wht=blanco.
Conectar los conductores.
3
Montar el reflector adecuado frente a la barrera
fotoelectrica y ajustarlo superficialmente. Al hacerlo,
téngase en cuenta el alcance (ver características técnicas al
final del presente Manual de Servicio y el diagrama;
x=alcance, y=reserva de funcionamiento, yb=alcance de
servicio, yg=límite de alcance).
Conectar el sensor a la tensión de servicio (ver impresión
de tipo).
Ajuste de la recepción de luz:
Determinar los puntos de conexión/desconexión de la
indicación de recepción (LED amarillo) mediante giro
horizontal y vertical de la barrera fotoeléctrica. Elegir la
posición central de forma que el haz luminoso rojo emitido
caiga en el centro del reflector. Con una recepción óptima
de luz se encienden permanentemente los LEDs verde y
amarillo.
Ajuste con sensibilidad estándarAjuste con sensibilidad estándar
Ajuste con sensibilidad estándarAjuste con sensibilidad estándar
Ajuste con sensibilidad estándar
::
::
:
Pulsar el botón de Teach-in > 2 s, el LED amarillo se apaga
y se enciende. El Teach-in se inicia, ambos LEDs parpadean.
Soltar el botón de Teach-in, la sensibilidad queda
almacenada de forma permanente.
Ajuste con sensibilidad fAjuste con sensibilidad f
Ajuste con sensibilidad fAjuste con sensibilidad f
Ajuste con sensibilidad f
ina:ina:
ina:ina:
ina:
Pulsar el botón de Teach-in > 5 s, el Teach-in se inicia,
ambos LEDs parpadean. Soltar el botón de Teach-in, la
sensibilidad queda almacenada de forma permanente.
Si éstos no se encienden, no se recibe luz o se recibe luz
insuficiente: Reajustar o limpiar. Barrera fotoeléctrica y
reflector.
Mantenimiento
Las barreras fotoeléctricas SICK están libres de mantenimiento.
Recomendamos a intérvalos regulares
- limpiar las superficies ópticas limítrofes,
- controlar los prensaestopas y las conexiones de enchufe.
wavelength: 655nm
pulse length: 5us
max.output<4,0mW
LASER CLASS 2
INTO BEAM
DO NOT STARE
LIGHT
LASER-
LASER APERTURE
No. 50, July 2001
to laser notice
1040.11 except for
deviations pursuant
21 CFR1040.10 and
Complies with
EN60825-1:2001
/AM.2: 2001
IEC 60825-1
-
 1
1
-
 2
2


SICK SENSICK WL9L Instruções de operação
- Categoria
- Brinquedos
- Tipo
- Instruções de operação
em outras línguas
- español: SICK SENSICK WL9L Instrucciones de operación
- français: SICK SENSICK WL9L Mode d'emploi
- italiano: SICK SENSICK WL9L Istruzioni per l'uso
- Nederlands: SICK SENSICK WL9L Handleiding
- Deutsch: SICK SENSICK WL9L Bedienungsanleitung
- dansk: SICK SENSICK WL9L Betjeningsvejledning
Artigos relacionados
-
SICK SENSICK WS/WE9L Instruções de operação
-
-
-
-
-
-
-
-
-