
3-296-079-11 (1)
Remote Commander
Télécommande
Operating Instructions
Mode d’emploi
Bedienungsanleitung
Manual de instrucciones
Gebruiksaanwijzing
Bruksanvisning
Istruzioni per l’uso
Manual de instruções
И
нструкция по эксплуатации
English
WARNING
To reduce fire or shock hazard, do not expose the unit to
rain or moisture.
Notice for the customers in the countries applying EU
Directives
The manufacturer of this product is Sony Corporation, 1-7-1
Konan Minato-ku Tokyo, 108-0075, Japan. The Authorized
Representative for EMC and product safety is Sony Deutschland
GmbH, Hedelfinger Strasse 61, 70327 Stuttgart, Germany. For
any service or guarantee matters please refer to the addresses
given in separate service or guarantee documents.
Disposal of Old Electrical & Electronic Equipment
(Applicable in the European Union and other European
countries with separate collection systems)
This symbol on the product or on its packaging indicates that this
product shall not be treated as household waste. Instead it shall
be handed over to the applicable collection point for the recycling
of electrical and electronic equipment. By ensuring this product
is disposed of correctly, you will help prevent potential negative
consequences for the environment and human health, which
could otherwise be caused by inappropriate waste handling of
this product. The recycling of materials will help to conserve
natural resources. For more detailed information about recycling
of this product, please contact your local Civic Office, your
household waste disposal service or the shop where you
purchased the product.
For the customers in U.S.A.
This device complies with Part 15 of the FCC Rules. Operation is
subject to the following two conditions:
(1)This device may not cause harmful interference, and (2) this
device must accept any interference received, including
interference that may cause undesired operation.
CAUTION
You are cautioned that any changes or modifications not
expressly approved in this manual could void your authority to
operate this equipment.
Note:
This equipment has been tested and found to comply with the
limits for a Class B digital device, pursuant to Part 15 of the FCC
Rules. These limits are designed to provide reasonable protection
against harmful interference in a residential installation. This
equipment generates, uses, and can radiate radio frequency
energy and, if not installed and used in accordance with the
instructions, may cause harmful interference to radio
communications. However, there is no guarantee that
interference will not occur in a particular installation. If this
equipment does cause harmful interference to radio or television
reception, which can be determined by turning the equipment off
and on, the user is encouraged to try to correct the interference
by one or more of the following measures:
– Reorient or relocate the receiving antenna.
– Increase the separation between the equipment and receiver.
– Connect the equipment into an outlet on a circuit different from
that to which the receiver is connected.
– Consult the dealer or an experienced radio/TV technician for
help.
For the customers in Canada
This Class B digital apparatus complies with Canadian ICES-003.
Features
• The RM-AV2 Remote Commander can be connected to a Sony
video camera equipped with an A/V Remote Connector.
• The Remote Commander can be operated by attaching it to the
pan handle of the tripod or to the shoulder belt with the Clip (i).
Notes
• Be sure not to drop the Remote Commander or spill liquid on it.
• Do not leave the Remote Commander under the direct sunlight,
near a heater, or in locations of high humidity.
• Store the Remote Commander in the supplied pouch after use.
• Arrange the cord (g) with a band.
• When turning off the Remote Commander with the POWER
switch (a), be sure that the POWER Lamp is off before turning it
on again. If you operate the POWER switch (a) repeatedly, the
unit connected to the Remote Commander may not turn on
properly.
• When inserting or pulling the A/V Remote Connector (h), be sure
to do so in a straight line. Performing this operation forcibly may
damage either the A/V Remote Connector (h) or the unit
connected.
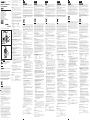
Identifying the parts (See Figure A)
a POWER switch f REC Lamp
b PHOTO button g cord
c START/STOP button h A/V Remote Connector
d Zoom button i Clip
e POWER Lamp
1 Attaching the Remote Commander
1. Attach the Remote Commander to a certain object with the
Clip (i).
* When you use the Remote Commander attached to the
pan handle of the tripod, it is recommended that you hold
the Remote Commander in your hand to operate it as
shown in Figure B.
2. Be sure the video camera to be used is turned off before you
insert the A/V Remote Connector (h) of the Remote
Commander into that of the video camera.
The POWER Lamp of the Remote Commander flashes in
green.
2 Setting the video camera recorder/digital still
camera to record images
Refer to the operating instructions of the unit used with the
Remote Commander for further information.
Note
The recorder may turn off automatically when standby mode
stays on for a while.
Slide the POWER switch (a) along the arrow mark in Figure A
to set it to standby mode again.
3 Using the Remote Commander to record
Recording moving images:
Press the START/STOP button (c) to start recording. The REC
Lamp lights in red.
Press the START/STOP button (c) again to stop recording. The
REC Lamp goes off.
Recording still images:
When you press the PHOTO button (b) all the way down, the
image is recorded.
* Refer to the operating instructions of the unit used with the
Remote Commander for further information.
* Some video camera recorders do not record still images.
Notes
• If an abnormality occurs, the REC Lamp (f) may flash. In this
case, refer to the operating instructions of the video camera
for further information.
• When you turn the Remote Commander on, video cameras
automatically start from camera mode, which is one of those
models' functions. Use the mode switch of the video camera
to switch to the other functions than camera mode.
• A video camera turned off cannot be operated with the
Remote Commander.
4 Using the zoom feature
Press the Zoom button (d) of the Remote Commander halfway
down.
• T side (for telephoto): subject appears closer.
• W side (for wide-angle): subject appears farther away.
The video camera zooms slowly when you press the Zoom
button (d) halfway down, and zooms quickly when you press
the button all the way down.
Refer to the operating instructions of the video camera for further
information as well.
Specifications
Dimensions: Approx. 39 × 40 × 36 mm
(1 9/16 × 1 5/8 × 1 7/16 in.) (w/h/d)
(excluding the projecting parts)
Remote cord: Approx. 1.5 m (4.9 feet)
Mass: Approx. 47 g (1.7 oz)
Included items: Remote Commander (1), Pouch (1), Set of
printed documentation
Design and specifications are subject to change without notice.
©2008 Sony Corporation Printed in Japan
RM-AV2
A
B
Printed on 70% or more recycled paper using
VOC (Volatile Organic Compound)-free
vegetable oil based ink.
Français
AVERTISSEMENT
Afin de réduire les risques d’incendie ou de décharge
électrique, n’exposez pas cet appareil à la pluie ou à
l’humidité.
Avis aux consommateurs des pays appliquant les Directives
UE
Le fabricant de ce produit est Sony Corporation, 1-7-1 Konan
Minato-ku Tokyo, 108-0075, Japon. Le représentant agréé pour la
compatibilité électromagnétique et la sécurité du produit est Sony
Deutschland GmbH, Hedelfinger Strasse 61, 70327 Stuttgart,
Allemagne. Pour toute question relative à la garantie ou aux
réparations, reportez-vous à l’adresse que vous trouverez dans les
documents ci-joints, relatifs à la garantie et aux réparations.
Traitement des appareils électriques et électroniques en fin
de vie (Applicable dans les pays de l’Union Européenne et
aux autres pays européens disposant de systèmes de
collecte sélective)
Ce symbole, apposé sur le produit ou sur son emballage, indique
que ce produit ne doit pas être traité avec les déchets ménagers. Il
doit être remis à un point de collecte approprié pour le recyclage
des équipements électriques et électroniques. En s’assurant que ce
produit est bien mis au rebut de manière appropriée, vous aiderez à
prévenir les conséquences négatives potentielles pour
l’environnement et la santé humaine. Le recyclage des matériaux
aidera à préserver les resources naturelles. Pour toute information
supplémentaire au sujet du recyclage de ce produit, vous pouvez
contacter votre municipalité, votre déchetterie ou le magasin où
vous avez acheté le produit.
Pour les clients au Canada
Cet appareil numérique de la classe B est conforme à la norme
NMB-003 du Canada.
Caractéristiques
• La Télécommande RM-AV2 peut être raccordée à un caméscope
Sony doté d’un connecteur A/V à distance.
• La Télécommande peut être utilisée fixée sur la poignée
panoramique du trépied ou sur la bandoulière à l’aide du pince
(i).
Remarques
• Veillez à ne pas faire tomber la Télécommande et à ne pas
renverser de liquides dessus.
• Ne laissez pas la Télécommande dans un endroit exposé aux
rayons directs du soleil, à côté d’un chauffage ou dans des
endroits très humides.
• Rangez la Télécommande dans l’étui fourni à cet effet.
• Installez le cordon (g) avec une bande.
• Après avoir éteint la Télécommande avec le commutateur
POWER (a), veillez à ce que le témoin POWER soit éteint avant de
la rallumer. En cas d’activation répétée du commutateur POWER
(a), l’appareil raccordé à la Télécommande peut ne pas se mettre
correctement sous tension.
• Lors du branchement ou du débranchement du connecteur A/V à
distance (h), assurez-vous de pousser ou tirer bien droit. Si vous
branchez ou débranchez la fiche de force, le connecteur A/V à
distance (h) ou l’appareil raccordé risque d’être endommagé.
Identification des pièces (voir Ill. A)
a Commutateur POWER f Témoin REC
b Touche PHOTO g Cordon
c Touche START/STOP h Connecteur A/V à distance
d Touche de zoom i Pince
e Témoin POWER
1 Fixation de la Télécommande
1. Fixez la Télécommande sur un objet à l’aide du clip (i).
* Lors de l’utilisation de la Télécommande fixée sur la
poignée panoramique du trépied, il est recommandé de
tenir la Télécommande tel qu’indiqué dans
l’illustration B.
2. Vérifiez bien que le caméscope à utiliser est hors tension
avant de brancher le connecteur A/V à distance (h) de la
Télécommande dans celui du caméscope.
Le témoin POWER de la Télécommande clignote en vert.
2 Réglage du caméscope ou de l’appareil photo
numérique pour la prise de vue
Pour de plus amples informations, reportez-vous au mode
d’emploi de l’appareil utilisé avec la Télécommande.
Remarque
Il est possible que le caméscope s’éteigne automatiquement
lorsqu’il reste en mode d’attente pendant quelques instants.
Pour remettre l’appareil en mode d’attente, faites glisser le
commutateur POWER (a) le long de la flèche, tel qu’indiqué
dans l’illustration A.
3 Utilisation de la Télécommande pour une prise
de vue
Prise de vue d’images animées :
Appuyez sur la touche REC START/STOP (c) pour lancer la
prise de vue. Le témoin REC s’allume en rouge.
Pour interrompre l’enregistrement, appuyez de nouveau sur la
touche START/STOP (c). Le témoin REC s’éteint.
Prise de photos :
Lorsque vous appuyez à fond sur la touche PHOTO (b), la
photo est prise.
* Pour de plus amples informations, reportez-vous au mode
d’emploi de l’appareil utilisé avec la Télécommande.
* Certains caméscopes ne permettent pas de prendre des
photos.
Remarques
• Si une anomalie se produit, il est possible que le témoin REC
(f) clignote. Dans ce cas, reportez-vous au mode d’emploi du
caméscope pour de plus amples informations.
• Lorsque vous mettez la Télécommande sous tension, les
caméscope démarrent automatiquement en mode appareil
photo, qui est l’une des fonctions de ces modèles. Utilisez le
commutateur de mode du caméscope pour passer à d’autres
fonctions.
• Il est impossible d’utiliser un caméscope hors tension avec la
Télécommande.
4 Utilisation de la fonction de zoom
Enfoncez à moitié la touche de zoom (d) de la Télécommande.
• Côté T (téléobjectif) : l’objet semble plus rapproché.
• Côté W (grand-angle) : l’objet semble plus éloigné.
Le caméscope effectue un zoom lentement lorsque vous
enfoncez à moitié la touche de zoom (d) et il effectue un zoom
rapide lorsque vous appuyez à fond sur la touche.
Pour de plus amples informations, reportez-vous également au
mode d’emploi du caméscope.
Spécifications
Dimensions: environ 39 × 40 × 36 mm
(1 9/16 × 1 5/8 × 1 7/16 po.) (l/h/p)
(parties saillantes non comprises)
Cordon de la Télécommande:
environ 1,5 m (4,9 pieds)
Poids: environ 47 g (1,7 on)
Articles inclus: Télécommande (1), Etui (1),
Jeu de documents imprimés
La conception et les spécifications peuvent être modifiées sans
préavis.
Deutsch
WARNUNG
Um Feuer- oder Berührungsgefahr zu verringern, setzen
Sie das Gerät weder Regen noch Feuchtigkeit aus.
Hinweis für Kunden in Ländern, in denen EU-Richtlinien
gelten
Der Hersteller dieses Produkts ist Sony Corporation, 1-7-1 Konan
Minato-ku Tokyo, 108-0075, Japan. Autorisierter Vertreter für EMV
und Produktsicherheit ist die Sony Deutschland GmbH,
Hedelfinger Strasse 61, 70327 Stuttgart, Deutschland. Für Fragen im
Zusammenhang mit Kundendienst oder Garantie wenden Sie sich
bitte an die in den separaten Kundendienst- oder
Garantieunterlagen genannten Adressen.
Entsorgung von gebrauchten elektrischen und
elektronischen Geräten (anzuwenden in den Ländern der
Europäischen Union und anderen europäischen Ländern
mit einem separaten Sammelsystem für diese Geräte)
Das Symbol auf dem Produkt oder seiner Verpackung weist darauf
hin, dass dieses Produkt nicht als normaler Haushaltsabfall zu
behandeln ist, sondern an einer Annahmestelle für das Recycling
von elektrischen und elektronischen Geräten abgegeben werden
muss. Durch Ihren Beitrag zum korrekten Entsorgen dieses
Produkts schützen Sie die Umwelt und die Gesundheit Ihrer
Mitmenschen. Umwelt und Gesundheit werden durch falsches
Entsorgen gefährdet. Materialrecycling hilft, den Verbrauch von
Rohstoffen zu verringern. Weitere Informationen über das
Recycling dieses Produkts erhalten Sie von Ihrer Gemeinde, den
kommunalen Entsorgungsbetrieben oder dem Geschäft, in dem Sie
das Produkt gekauft haben.
Merkmale und Funktionen
• Die Fernbedienung RM-AV2 können Sie an eine Videokamera
von Sony mit einem A/V-Fernbedienungsanschluss anschließen.
• Die Fernbedienung lässt sich mit der Klammer (i) am
Schwenkarm des Stativs oder am Schulterriemen anbringen.
Hinweise
• Lassen Sie die Fernbedienung nicht fallen und verschütten Sie
keine Flüssigkeiten darauf.
• Schützen Sie die Fernbedienung vor direktem Sonnenlicht und
lassen Sie sie nicht in der Nähe von Wärmequellen oder an Orten
mit hoher Luftfeuchtigkeit.
• Bewahren Sie die Fernbedienung nach dem Gebrauch im
mitgelieferten Beutel auf.
• Befestigen Sie das Kabel (g) mit einem Riemen.
• Wenn Sie die Fernbedienung am Schalter POWER (a)
ausschalten, vergewissern Sie sich, dass die Anzeige POWER
erloschen ist, bevor Sie die Fernbedienung wieder einschalten.
Wenn Sie den Schalter POWER (a) mehrmals hintereinander
betätigen, lässt sich das an die Fernbedienung angeschlossene
Gerät möglicherweise nicht richtig einschalten.
• Der A/V-Fernbedienungsanschluss (h) muss gerade eingesteckt
und herausgezogen werden. Wenn Sie ihn mit Gewalt schräg
einstecken oder herausziehen, kann der A/V-
Fernbedienungsanschluss (h) oder das angeschlossene Gerät
beschädigt werden.
Lage und Funktion der Teile und Bedienelemente
(siehe Abbildung A)
a Schalter POWER f Anzeige REC
b Taste PHOTO g Kabel
c Taste START/STOP h A/V-Fernbedienungsanschluss
d Zoom-Taste i Klammer
e Anzeige POWER
1 Anbringen der Fernbedienung
1. Bringen Sie die Fernbedienung mit der Klammer (i) an
einem angegebenen Gegenstand an.
* Wenn Sie die Fernbedienung am Schwenkarm eines
Stativs anbringen, empfiehlt es sich, die Fernbedienung
beim Bedienen wie in Abbildung B dargestellt in der
Hand zu halten.
2. Vergewissern Sie sich, dass die zu verwendende
Videokamera ausgeschaltet ist, bevor Sie den A/V-
Fernbedienungsanschluss (h) der Fernbedienung in den der
Videokamera stecken.
Die Anzeige POWER der Fernbedienung blinkt grün.
2 Einstellen der Videokamera/digitalen
Standbildkamera zum Aufnehmen von Bildern
Weitere Informationen finden Sie in der Bedienungsanleitung
zu dem Gerät, das mit der Fernbedienung verwendet wird.
Hinweis
Die Kamera schaltet sich unter Umständen automatisch aus,
wenn sie sich eine Zeit lang im Bereitschaftsmodus befindet.
Schieben Sie den Schalter POWER (a) wie in Abbildung A
dargestellt in Pfeilrichtung, um wieder in den
Bereitschaftsmodus zu wechseln.
3 Starten der Aufnahme mit der Fernbedienung
Aufnehmen von bewegten Bildern:
Starten Sie die Aufnahme mit der Taste START/STOP (c). Die
Anzeige REC leuchtet rot.
Wenn Sie die Taste START/STOP (c) erneut drücken, stoppt
die Aufnahme. Die Anzeige REC erlischt.
Aufnehmen von Standbildern:
Wenn Sie die Taste PHOTO (b) ganz nach unten drücken, wird
das Bild aufgenommen.
* Weitere Informationen finden Sie in der
Bedienungsanleitung zu dem Gerät, das mit der
Fernbedienung verwendet wird.
* Mit einigen Videokameras lassen sich keine Standbilder
aufnehmen.
Hinweise
• Wenn Störungen auftreten, blinkt unter Umständen die
Anzeige REC (f). Schlagen Sie in diesem Fall weitere
Informationen in der Bedienungsanleitung zur Videokamera
nach.
• Wenn Sie die Fernbedienung einschalten, starten einige
Videokameras automatisch mit dem Kameramodus, einer
der Funktionen jener Modelle. Mit dem Modusschalter an
der Videokamera können Sie an der Kamera eine andere
Funktion als den Kameramodus einstellen.
• Eine ausgeschaltete Videokamera lässt sich mit der
Fernbedienung nicht bedienen.
4 Der Zoom
Drücken Sie die Zoom-Taste (d) der Fernbedienung halb nach
unten.
• T-Seite (für Teleaufnahmen): Das Motiv erscheint näher.
• W-Seite (für Weitwinkelaufnahmen): Das Motiv erscheint
weiter entfernt.
Das Zoomen bei der Videokamera erfolgt langsam, wenn Sie
die Zoom-Taste (d) halb nach unten drücken, und schneller,
wenn Sie die Taste ganz nach unten drücken.
Weitere Informationen finden Sie in der Bedienungsanleitung zur
Videokamera.
Technische Daten
Abmessungen: Ca. 39 × 40 × 36 mm
(B/H/T) (ohne vorstehende Teile)
Fernbedienungskabel: Ca. 1,5 m
Gewicht: Ca. 47 g
Mitgeliefertes Zubehör:
Fernbedienung (1), Beutel(1), Anleitungen
Änderungen bei Design und technische Daten bleiben ohne
vorherige Ankündigung vorbehalten.
Español
AVISO
Para reducir el riesgo de incendio o descarga elécrica, no
exponga la unidad a la lluvia ni a la humedad.
Aviso para los clientes de países en los que se aplican las
directivas de la UE
El fabricante de este producto es Sony Corporation, 1-7-1 Konan
Minato-ku Tokyo, 108-0075, Japón. El representante autorizado en
lo referente al cumplimiento de la directiva EMC y a la seguridad
de los productos es Sony Deutschland GmbH, Hedelfinger Strasse
61, 70327 Stuttgart, Alemania. Para resolver cualquier asunto
relacionado con el soporte técnico o la garantía, consulte las
direcciones que se indican en los documentos de soporte técnico y
garantía suministrados por separado.
Tratamiento de los equipos eléctricos y electrónicos al final
de su vida útil (aplicable en la Unión Europea y en países
europeos con sistemas de recogida selectiva de residuos)
Este símbolo en el equipo o el embalaje indica que el presente
producto no puede ser tratado como residuos domésticos normales,
sino que debe entregarse en el correspondiente punto de recogida
de equipos eléctricos y electrónicos. Al asegurarse de que este
producto se desecha correctamente, Ud. ayuda a prevenir las
consecuencias negativas para el medio ambiente y la salud humana
que podrían derivarse de la incorrecta manipulación en el momento
de deshacerse de este producto. El reciclaje de materiales ayuda a
conservar los recursos naturales. Para recibir información detallada
sobre el reciclaje de este producto, póngase en contacto con el
ayuntamiento, el punto de recogida más cercano o el
establecimiento donde ha adquirido el producto.
Características
• El Controlador remoto RM-AV2 puede conectarse a una
videocámara Sony equipada con un conector remoto de A/V.
• El Controlador remoto se puede utilizar fijado al mango
panorámico del trípode o a la bandolera mediante la pinza (i).
Notas
• Asegúrese de no dejar caer el Controlador remoto y de no verter
líquidos encima.
• No exponga el Controlador remoto a la luz solar directa. No lo
coloque cerca de fuentes de calor ni en lugares con mucha
humedad.
• Guarde el Controlador remoto en la bolsa suministrada después
de utilizarlo.
• Recoja el cable (g) mediante una banda.
• Cuando apague el Controlador remoto mediante el selector
POWER (a), asegúrese de que el indicador POWER esté apagado
antes de volver a encenderlo. Si utiliza el selector POWER (a) de
forma repetida, es posible que la unidad conectada al Controlador
remoto no funcione correctamente.
• Cuando inserte o extraiga el conector remoto de A/V (h),
asegúrese de hacerlo en línea recta. Si lo hace de manera forzada,
puede dañar el conector remoto de A/V (h) o la unidad
conectada.
Identificación de los componentes
(consulte la figura A)
a Selector POWER f Indicador REC
b Botón PHOTO g Cable
c Botón START/STOP h Conector remoto de A/V
d Botón de zoom i Pinza
e Indicador POWER
1 Fijación del Controlador remoto
1. Fije el Controlador remoto a un objeto mediante la pinza (i).
* Cuando utilice el Controlador remoto fijado al mango
panorámico del trípode, se recomienda sostenerlo con la
mano para manejarlo, tal y como se muestra en la figura
B.
2. Compruebe que la videocámara que va a utilizar esté
apagada antes de insertar el conector remoto de A/V (h) del
Controlador remoto en el de la videocámara.
El indicador POWER del Controlador remoto parpadeará en
verde.
2 Ajuste de la videocámara o la cámara digital de
imágenes fijas para grabar imágenes
Consulte el manual de instrucciones de la unidad utilizada con
el Controlador remoto para obtener más información.
Nota
Es posible que la grabadora se apague automáticamente si el
modo de espera permanece activado durante cierto tiempo.
Deslice el selector POWER (a) en la dirección que indica la
flecha de la figura A para volver a ajustarla en el modo de
espera.
3 Utilización del Controlador remoto para grabar
Grabación de imágenes en movimiento:
Pulse el botón START/STOP (c) para iniciar la grabación. El
indicador REC se iluminará en rojo.
Pulse de nuevo el botón START/STOP (c) para detener la
grabación. El indicador REC se apagará.
Grabación de imágenes fijas:
Cuando pulse completamente el botón PHOTO (b), la imagen
se grabará.
* Consulte el manual de instrucciones de la unidad utilizada
con el Controlador remoto para obtener más información.
* Algunas videocámaras no pueden grabar imágenes fijas.
Notas
• Si se produce alguna anomalía, es posible que el indicador
REC (f) parpadee. En tal caso, consulte el manual de
instrucciones de la videocámara para obtener más
información.
• Al encender el Controlador remoto, la videocámara se
enciende automáticamente en el modo de cámara, que es una
de las funciones de estos modelos. Utilice el selector de modo
de la videocámara para cambiar a funciones distintas de las
que ofrece el modo de cámara.
• No es posible utilizar una videocámara apagada con el
Controlador remoto.
4 Utilización de la función de zoom
Pulse el botón del zoom (d) del Controlador remoto hasta la
mitad.
• Lado T (para telefoto): el motivo aparece más cerca.
• Lado W (para gran angular): el motivo aparece más lejos.
La videocámara realiza el zoom lentamente si pulsa el botón
del zoom (d) hasta la mitad, y lo realiza rápidamente si pulsa
dicho botón completamente.
Consulte el manual de instrucciones de la videocámara para
obtener más información.
Especificaciones
Dimensiones: Aprox. 39 × 40 × 36 mm (an/al/prf)
(excluidas las piezas protectoras)
Cable remoto: Aprox. 1,5 m
Peso: Aprox. 47 g
Elementos incluidos: Controlador remoto (1), Bolsa (1),
Juego de documentación impresa
El diseño y las especificaciones están sujetos a cambio sin previo
aviso.
Nederlands
WAARSCHUWING
Om het gevaar van brand of elektrische schokken te
verkleinen, mag het apparaat niet worden blootgesteld
aan regen of vocht.
Kennisgeving voor klanten in de landen waar EU-
richtlijnen van toepassing zijn
De fabrikant van dit product is Sony Corporation, 1-7-1 Konan
Minato-ku Tokyo, 108-0075, Japan. De geautoriseerde
vertegenwoordiger voor EMC en productveiligheid is Sony
Deutschland GmbH, Hedelfinger Strasse 61, 70327 Stuttgart,
Duitsland. Voor kwesties met betrekking tot service of garantie
kunt u het adres in de afzonderlijke service- en garantiedocumenten
gebruiken.
Verwijdering van oude elektrische en elektronische
apparaten (Toepasbaar in de Europese Unie en andere
Europese landen met gescheiden ophaalsystemen)
Het symbool op het product of op de verpakking wijst erop dat dit
product niet als huishoudelijk afval mag worden behandeld. Het
moet echter naar een plaats worden gebracht waar elektrische en
elektronische apparatuur wordt gerecycled. Als u ervoor zorgt dat
dit product op de correcte manier wordt verwijderd, voorkomt u
voor mens en milieu negatieve gevolgen die zich zouden kunnen
voordoen in geval van verkeerde afvalbehandeling. De recycling
van materialen draagt bij tot het vrijwaren van natuurlijke bronnen.
Voor meer details in verband met het recyclen van dit product,
neemt u contact op met de gemeentelijke instanties, het bedrijf of de
dienst belast met de verwijdering van huishoudafval of de winkel
waar u het product hebt gekocht.
Kenmerken
• De afstandsbediening RM-AV2 kan worden aangesloten op een
Sony-videocamera met een A/V R-aansluiting.
• De afstandsbediening kan worden gebruikt door deze te
bevestigen aan de handgreep voor pannen op het statief of aan de
schouderband met de clip (i).
Opmerkingen
• Laat de afstandsbediening niet vallen en mors geen vloeistof op
het apparaat.
• Laat de afstandsbediening niet achter in direct zonlicht, in de
buurt van een verwarmingstoestel of op plaatsen met een hoge
vochtigheidsgraad.
• Berg de afstandsbediening na gebruik op in de bijgeleverde
draagtas.
• Pas het snoer (g) aan met een riem.
• Als u de afstandsbediening uitschakelt met de POWER-
schakelaar (a), moet u controleren of het POWER-lampje uit is
voordat u de afstandsbediening weer inschakelt. Als u de
POWER-schakelaar (a) herhaaldelijk bedient, wordt het apparaat
dat op de afstandsbediening is aangesloten, mogelijk niet correct
ingeschakeld.
• Als u de A/V R-aansluiting (h) aansluit of verwijdert, moet u dit
in een rechte lijn doen. Als u deze handeling met kracht verkeerd
uitvoert, kan de A/V R-aansluiting (h) of het aangesloten
apparaat worden beschadigd.
Onderdelen (zie afbeelding A)
a POWER-schakelaar f REC-lampje
b PHOTO-toets g Snoer
cSTART/STOP-toets h A/V R-aansluiting
d Zoomtoets i Clip
e POWER-lampje
1 De afstandsbediening bevestigen
1. Bevestig de afstandsbediening op een voorwerp met de clip
(i).
* Als u de afstandsbediening gebruikt en deze aan de
handgreep voor pannen op het statief is bevestigd, kunt u
het beste de afstandsbediening in de hand houden om
deze te bedienen (zie afbeelding B).
2. Controleer of de videocamera die u wilt gebruiken, is
uitgeschakeld voordat u de A/V R-aansluiting (h) van de
afstandsbediening aansluit op de videocamera.
Het POWER-lampje van de afstandsbediening knippert
groen.
2 De videocamera/digitale camera instellen om
beelden op te nemen
Raadpleeg de gebruiksaanwijzing van het apparaat dat wordt
gebruikt met de afstandsbediening voor meer informatie.
Opmerking
De recorder kan automatisch worden uitgeschakeld als de
stand-bystand enige tijd geactiveerd blijft.
Schuif de POWER-schakelaar (a) in de richting van de pijl die
in afbeelding A wordt weergegeven, om de stand-bystand
weer te activeren.
3 Opnemen met de afstandsbediening
Bewegende beelden opnemen:
Druk op de START/STOP-toets (c) om de opname te starten.
Het REC-lampje gaat rood branden.
Druk nogmaals op de START/STOP-toets (c) om de opname te
stoppen. Het REC-lampje gaat uit.
Stilstaande beelden opnemen:
Als u de PHOTO-toets (b) volledig indrukt, wordt het beeld
opgenomen.
* Raadpleeg de gebruiksaanwijzing van het apparaat dat
wordt gebruikt met de afstandsbediening voor meer
informatie.
* Bepaalde videocamera's kunnen geen stilstaande beelden
opnemen.
Opmerkingen
• Als er een probleem optreedt, kan het REC-lampje (f) gaan
knipperen. In dit geval raadpleegt u de gebruiksaanwijzing
van de videocamera voor meer informatie.
• Wanneer u de afstandsbediening inschakelt, worden
bepaalde videocamera's automatisch gestart in de
camerastand. Dit is een van de functies van de betreffende
modellen videocamera's. Gebruik de schakelaar voor standen
van de videocamera als u wilt overschakelen naar andere
functies dan de camerastand.
• Een videocamera die is uitgeschakeld, kan niet worden
bediend met de afstandsbediening.
4 De zoomfunctie gebruiken
Druk de zoomtoets (d) van de afstandsbediening half in.
• T-zijde (voor tele-opnamen): het onderwerp lijkt dichterbij.
• W-zijde (voor groothoekopnamen): het onderwerp lijkt
verder weg.
De videocamera zoomt langzaam wanneer u de zoomtoets (d)
half ingedrukt en zoomt sneller wanneer u de toets volledig
indrukt.
Raadpleeg ook de gebruiksaanwijzing van de videocamera voor
meer informatie.
Technische gegevens
Afmetingen: Ongeveer 39 × 40 × 36 mm
(b/h/d) (exclusief uitstekende delen)
Snoer van afstandsbediening:
Ongeveer 1,5 m
Gewicht: Ongeveer 47 g
Bijgeleverd toebehoren:
Afstandsbediening (1), Draagtas (1),
Handleiding en documentation
Wijzigingen in ontwerp en technische gegevens voorbehouden,
zonder kennisgeving.
Svenska
VARNING
Utsätt inte kameran för regen eller fukt eftersom det kan
medföra risk för brand eller elstötar.
Anmärkning för kunder i de länder som följer EU-direktiv
Tillverkaren av den här produkten är Sony Corporation, 1-7-1
Konan Minato-ku Tokyo, 108-0075, Japan. Auktoriserad
representant för EMC och produktsäkerhet är Sony Deutschland
GmbH, Hedelfinger Strasse 61, 70327 Stuttgart, Tyskland. För
eventuella ärenden gällande service och garanti, se adresserna i de
separata service-respektive garantidokumenten.
Omhändertagande av gamla elektriska och elektroniska
produkter (Användbar i den Europeiska Unionen och andra
Europeiska länder med separata insamlingssystem)
Symbolen på produkten eller emballaget anger att produkten inte
får hanteras som hushållsavfall. Den skall i stället lämnas in på
uppsamlingsplats för återvinning av el- och
elektronikkomponenter. Genom att säkerställa att produkten
hanteras på rätt sätt bidrar du till att förebygga eventuella negativa
miljö- och hälsoeffekter som kan uppstå om produkten kasseras
som vanligt avfall.
Återvinning av material hjälper till att bibehålla naturens resurser.
För ytterligare upplysningar om återvinning bör du kontakta lokala
myndigheter eller sophämtningstjänst eller affären där du köpte
varan.
Egenskaper
• Fjärrkontrollen RM-AV2 kan anslutas till en Sony videokamera
med anslutning för A/V-Fjärrkontroll.
• Du kan manövrera fjärrkontrollen sedan du har fäst den på
kamerastativets panoreringshandtag eller på axelremmen med
hjälp av clipset (i).
Obs!
• Se upp så att du inte tappar fjärrkontrollen eller spiller vätska på
den.
• Lämna inte fjärrkontrollen i direkt solljus, nära ett värmeelement
eller på en plats där det är mycket fuktigt.
• När du använt fjärrkontrollen förvarar du den i den medföljande
väskan.
• Samla ihop kabeln till fjärrkontrollen (g) med ett band.
• Om du stänger av strömmen till fjärrkontrollen med POWER-
omkopplaren (a), måste du vänta tills POWER-lampan slocknat
innan du slår på den igen. Om du använder POWER-
omkopplaren (a) flera gånger efter varandra kan det hända att
enheten som är ansluten till fjärrkontrollen inte slås på som den
ska.
• När du sätter i eller kopplar bort anslutningen för A/V-
Fjärrkontroll (h) måste du se till att du håller den rakt. Om du
använder våld när du kopplar i eller ur kontakten kan antingen
anslutningen för A/V-Fjärrkontroll (h) eller den anslutna enheten
skadas.
Identifiering av delar och kontroller (se fig. A)
a POWER-omkopplare f REC-lampa
b PHOTO-knapp g kabel
c START/STOP-knapp h Anslutning för A/V-Fjärrkontroll
d Zoomknapp i Clips
e POWER-lampa
1 Fästa fjärrkontrollen
1. Fäst fjärrkontrollen på önskad plats med hjälp av clipset (i).
* När du använder fjärrkontrollen på kamerastativets
panoreringshandtag bör du hålla fjärrkontrollen i handen,
som i fig. B, när du använder den.
2. Kontrollera att videokameran är avstängd innan du ansluter
fjärrkontrollens anslutning för A/V-Fjärrkontroll (h) i
motsvarande anslutning på videokameran.
Fjärrkontrollens POWER-lampa blinkar grönt.
2 Ställa in videokameran/den digitala
stillbildskameran för att spela in bilder
Mer information finns i bruksanvisningen till den enhet som
du använder fjärrkontrollen för.
Obs!
Kameran kan stängas av automatiskt om du lämnar den i
standbyläge under en viss tid.
Ställ den i standbyläge igen genom att skjuta POWER-
omkopplaren (a) som pilen i fig. A visar.
3 Använda fjärrkontrollen för inspelning
Spela in rörliga bilder:
Du startar inspelningen genom att trycka på START/STOP (c).
REC-lampan tänds och lyser rött.
Du avbryter inspelningen genom att trycka på START/STOP-
knappen (c) igen. REC-lampan släcks.
Spela in stillbilder:
Bilden tas när du trycker in PHOTO-knappen (b) helt.
* Mer information finns i bruksanvisningen till den enhet som
du använder fjärrkontrollen för.
* Vissa videokameror kan inte spela in stillbilder.
Obs!
• Om någon funktionsstörning inträffar kan det hända att
REC-lampan (f) blinkar. I så fall finns mer information i
bruksanvisningen till videokameran.
• När du slår på strömmen till fjärrkontrollen kan vissa
videokameramodeller starta automatiskt i kameraläget,
vilket kan vara en av dessa modellers funktioner. Om du vill
använda ett annat läge än kameraläget, växlar du läge med
videokamerans lägesomkopplare.
• En avstängd videokamera kan inte användas med
fjärrkontrollen.
4 Använda zoomningsfunktionen
Tryck ned zoomknappen (d) på fjärrkontrollen halvvägs.
• T-sidan (för telefoto): motivet verkar ligga närmare.
• W-sidan (för vidvinkelinspelning): motivet verkar ligga
längre bort.
När du trycker in zoomknappen (d) halvvägs zoomar
videokameran långsamt, när du trycker ned knappen helt
zoomar videokameran snabbt.
Mer information finns även i bruksanvisningen till videokameran.
Tekniska data
Storlek: Ca. 39 × 40 × 36 mm
(b/h/d) (exklusive utskjutande delar)
Fjärrkontrollkabel: Ca. 1,5 m
Vikt: Ca. 47 g
Inkluderade artiklar: Fjärrkontrollen (1), Väska (1), Uppsättning
tryckt dokmentation
Utförande och specifikationer kan ändras utan föregående
meddelande.
Italiano
AVVERTENZA
Per ridurre il pericolo di incendi o scosse elettriche, non
esporre l’apparecchio alla pioggia o all’umidità.
Avviso per i clienti residenti nei paesi che applicano le
direttive UE
Questo prodotto è realizzato da Sony Corporation, 1-7-1 Konan
Minato-ku Tokyo, 108-0075, Giappone. Il Rappresentante
autorizzato per la conformità alle direttive EMC e per la
sicurezza dei prodotti è Sony Deutschland GmbH, Hedelfinger
Strasse 61, 70327 Stuttgart, Germania. Per qualsiasi questione
relativa all’assistenza o alla garanzia, consultare gli indirizzi
forniti a parte nei relativi documenti.
Trattamento del dispositivo elettrico od elettronico a
fine vita (applicabile in tutti i paesi dell’Unione Europea
e in altri paesi europei con sistema di raccolta
differenziata)
Questo simbolo sul prodotto o sulla confezione indica che il
prodotto non deve essere considerate come un normale rifiuto
domestico, ma deve invece essere consegnato ad un punto di
raccolta appropriato per il riciclo di apparecchi elettrici ed
elettronici. Assicurandovi che questo prodotto sia smaltito
correttamente, voi contribuirete a prevenire potenziali
conseguenze negative per l’ambiente e per la salute che
potrebbero altrimenti essere causate dal suo smaltimento
inadeguato. Il riciclaggio dei materiali aiuta a conservare le
risorse naturali. Per informazioni più dettagliate circa il
riciclaggio di questo prodotto, potete contattare l’ufficio
comunale, il servizio locale di smaltimento rifiuti oppure il
negozio dove l’avete acquistato.
Caratteristiche
• Il telecomando RM-AV2 può essere collegato ad una
videocamera Sony dotata di un connettore remoto A/V.
•È possibile utilizzare il telecomando collegandolo alla maniglia
panoramica del treppiede o alla cinghia da trasporto
utilizzando il fermaglio (i).
Note
• Non lasciare cadere né bagnare il telecomando.
• Non lasciare il telecomando alla luce solare diretta, in
prossimità di radiatori o in luoghi soggetti a umidità elevata.
• Dopo avere utilizzato il telecomando, riporlo nell’apposita
custodia in dotazione.
• Avvolgere il cavo (g) utilizzando un fermacavo.
• Se si spegne il telecomando mediante l’interruttore POWER (a),
accertarsi che la spia POWER sia spenta prima di riattivarlo. Se
l’interruttore POWER (a) viene utilizzato ripetutamente, è
possibile che l’apparecchio collegato al telecomando non si
accenda correttamente.
• Durante l’inserimento o la rimozione del connettore remoto A/
V (h), assicurarsi di eseguire l’operazione tenendo il connettore
in posizione orizzontale. Non eseguire tale operazione in modo
forzato, onde evitare di danneggiare il connettore remoto A/V
(h) o l’apparecchio collegato.
Identificazione delle parti (vedere la figura A)
a Interruttore POWER f Spia REC
b Tasto PHOTO g Cavo
c Tasto START/STOP h Connettore remoto A/V
d Tasto Zoom i Fermaglio
e Spia POWER
1 Collegamento del telecomando
1. Collegare il telecomando all’oggetto desiderato
utilizzando il fermaglio (i).
* Se il telecomando viene collegato alla maniglia
panoramica del treppiede, si consiglia di tenerlo in
mano per utilizzarlo, come mostrato nella figura B.
2. Prima di inserire il connettore remoto A/V (h) del
telecomando in quello della videocamera, assicurarsi che
la videocamera da utilizzare sia spenta.
La spia POWER del telecomando lampeggia in verde.
2 Impostazione della videocamera/macchina
fotografica ferma digitale per la registrazione
di immagini
Per ulteriori informazioni, consultare le istruzioni per l’uso
dell’apparecchio utilizzato con il telecomando.
Nota
È possibile che il registratore si spenga automaticamente se
rimane attivato nel modo di attesa per alcuni minuti.
Fare scorrere l’interruttore POWER (a) in direzione della
freccia come illustrato nella figura A per impostarlo di
nuovo sul modo di attesa.
3 Uso del telecomando per la registrazione
Registrazione di immagini in movimento:
Premere il tasto START/STOP (c) per avviare la
registrazione. La spia REC si illumina in rosso.
Premere di nuovo il tasto START/STOP (c) per arrestare la
registrazione. La spia REC si spegne.
Registrazione di fermi immagine:
L’immagine viene registrata quando il tasto PHOTO (b)
viene premuto completamente.
* Per ulteriori informazioni, consultare le istruzioni per l’uso
dell’apparecchio utilizzato con il telecomando.
* Alcune videocamere non effettuano la registrazione di
fermi immagine.
Note
• In caso di problemi, è possibile che la spia REC (f)
lampeggi. Se ciò dovesse verificarsi, per ulteriori
informazioni, consultare le istruzioni per l’uso della
videocamera.
• Al momento dell’accensione del telecomando, alcuni
modelli di videocamera vengono automaticamente
impostati sul modo Camera, che costituisce una delle
funzioni della videocamera stessa. Per utilizzare funzioni
diverse dal modo Camera, è necessario cambiare il modo
utilizzando l’apposito interruttore della videocamera.
• Se la videocamera viene spenta, non è possibile utilizzarla
mediante il telecomando.
4 Uso della funzione di zoom
Premere il tasto Zoom (d) del telecomando a metà.
• Lato T (per teleobiettivo): il soggetto appare più vicino.
• Lato W (per grandangolo): il soggetto appare più lontano.
Premendo a metà il tasto Zoom (d), la videocamera effettua
lo zoom lentamente, mentre premendolo completamente, lo
zoom viene eseguito rapidamente.
Per ulteriori informazioni, consultare inoltre le istruzioni per
l’uso della videocamera.
Caratteristiche tecniche
Dimensioni: Circa 39 × 40 × 36 mm
(l/a/p) (escluso le parti sporgenti)
Cavo del telecomando:
Circa 1,5 m
Peso: Circa 47 g
Accessori inclusi: Telecomando (1), Custodia (1),
Corredo di documentazione stampata
Disegno e caratteristiche tecniche sono soggetti a modifiche senza
preavviso.

Português
AVISO
Para reduzir o risco de incêndio ou choque eléctrico, não
exponha a unidade à chuva ou à humidade.
Nota para os clientes nos países que apliquem as
Directivas da UE
O fabricante deste produto é a Sony Corporation, 1-7-1 Konan
Minato-ku Tokyo, 108-0075, Japan. O Representante Autorizado
para EMC e segurança de produto é a Sony Deutschland GmbH,
Hedelfinger Strasse 61, 70327, Stuttgart, Germany. Para questões
acerca de serviço e acerca da garantia, consulte as moradas
fornecidas em separado, nos documentos de serviço e garantia.
Tratamento de Equipamentos Eléctricos e Electrónicos no
final da sua vida útil (Aplicável na União Europeia e em
países Europeus com sistemas de recolha selectiva de
resíduos)
Este símbolo, colocado no produto ou na sua embalagem, indica
que este não deve ser tratado como resíduo urbano
indiferenciado. Deve sim ser colocado num ponto de recolha
destinado a resíduos de equipamentos eléctricos e electrónicos.
Assegurando-se que este produto é correctamente depositado, irá
prevenir potenciais consequências negativas para o ambiente
bem como para a saúde, que de outra forma poderiam ocorrer
pelo mau manuseamento destes produtos. A reciclagem dos
materiais contribuirá para a conservação dos recursos naturais.
Para obter informação mais detalhada sobre a reciclagem deste
produto, por favor contacte o município onde reside, os serviços
de recolha de resíduos da sua área ou a loja onde adquiriu o
produto.
Características
•O telecomando RM-AV2 pode ser ligado a uma câmara de
vídeo da Sony equipada com um conector remoto A/V.
• Pode utilizar o telecomando ligando-o ao manípulo de
deslocação horizontal do tripé ou à correia a tiracolo,
utilizando o clip (i).
Notas
• Não deixe cair o telecomando, nem o salpique com líquidos.
• Não deixe o telecomando exposto directamente aos raios
solares, junto a um aquecedor, ou em locais com muita
humidade.
• Depois de utilizar o telecomando, guarde-o na bolsa fornecida.
• Enrole o cabo (g) com um suporte indicado para esse fim.
• Quando desligar o interruptor POWER do telecomando (a),
verifique se o indicador luminoso POWER está apagado antes
de voltar a ligá-lo. Se utilizar várias vezes o interruptor
POWER (a), o aparelho ligado ao telecomando pode não ligar
correctamente.
• Quando introduzir ou retirar o conector remoto A/V (h), faça-o
a direito. Se forçar o movimento, pode danificar o conector
remoto A/V (h) ou o aparelho ligado.
Identificação das peças (consulte a figura A)
a Interruptor POWER f Indicador luminoso REC
b Botão PHOTO g Cabo
c Botão START/STOP h Conector remoto A/V
d Botão de zoom i Clip
e Indicador luminoso POWER
1 Prender o telecomando
1. Prenda o telecomando ao objecto desejado, utilizando o
clip (i).
* Quando utilizar o telecomando preso ao manípulo de
deslocação horizontal do tripé, recomenda-se que o
agarre com a mão, como se mostra na figura B.
2. Antes de introduzir o conector remoto A/V do
telecomando (h), verifique se desligou a câmara de vídeo.
O indicador luminoso POWER do telecomando pisca com
uma luz verde.
2 Programar a câmara de vídeo/máquina
fotográfica digital para gravar imagens
Para obter mais informações, consulte o Manual de
Instruções do equipamento utilizado com o telecomando.
Nota
A câmara pode desligar-se automaticamente se permanecer
no modo de espera durante algum tempo.
Faça deslizar o interruptor POWER (a) na direcção indicada
pela seta, como se mostra na figura A, para voltar ao modo
de espera.
3 Utilizar o telecomando para gravar
Gravar imagens em movimento:
Para iniciar a gravação, carregue no botão START/STOP (c).
O indicador luminoso REC acende-se com uma luz
vermelha.
Para parar a gravação, carregue novamente no botão
START/STOP (c). O indicador luminoso REC apaga-se.
Gravar imagens fixas:
Se carregar até ao fim no botão PHOTO (b), a imagem fica
gravada.
* Para obter mais informações, consulte o Manual de
Instruções do equipamento utilizado com o telecomando.
* Algumas câmaras de vídeo não gravam imagens fixas.
Notas
• Se ocorrer alguma anomalia, o indicador luminoso REC (f)
pisca. Neste caso, consulte o Manual de Instruções da
câmara de vídeo para obter mais informações.
A
B
• Quando ligar o telecomando, as câmaras de vídeo arrancam
automaticamente no modo de câmara, que é uma das funções
deste modelo. Se quiser utilizar outras funções para além do
modo de câmara, active o modo com o interruptor de modo
da câmara de vídeo.
• Não pode controlar uma câmara de vídeo desligada com o
telecomando.
4 Utilizar a função de zoom
Carregue até meio no botão de zoom (d) do telecomando.
• Lado T (teleobjectiva): o motivo aparece mais perto.
• Lado W (grande angular): o motivo aparece mais longe.
O zoom da câmara de vídeo é mais lento se carregar até meio
no botão de zoom (d), mas é mais rápido quando carrega no
botão até ao fim.
Consulte igualmente o Manual de Instruções da câmara de vídeo
para obter mais informações.
Especificações
Dimensões: Aprox. 39 × 40 × 36 mm
(1 9/16 × 1 5/8 × 1 7/16 polegadas) (c/a/p)
(excluindo as peças salientes)
Cabo do telecomando: Aprox. 1,5 m (4,9 pés)
Peso: Aprox. 47 g (1,7 on.)
Itens incluídos: Telecomando (1), Bolsa (1),
Documentos impressos
O design e as especificações estão sujeitos a alterações sem aviso
prévio.
Русский
Изготовитель: Сони Корпорейшн
Адрес: 1-7-1 Конан, Минато-ку, Токио, 108-0075 Япония
Страна-производитель: Япония
ПРЕДУПРЕЖДЕНИЕ
Для уменьшения опасности возгорания или
поражения электрическим током не подвергайте
аппарат воздействию дождя или влаги.
Примечание для покупателей в странах, где
действуют директивы ЕС
Производителем данного устройства является корпорация
Sony Corporation, 1-7-1 Konan Minato-ku Tokyo, 108-0075, Japan.
Уполномоченным представителем по электромагнитной
совместимости (EMC) и безопасности изделия является
компания Sony Deutschland GmbH, Hedelfinger Strasse 61,
70327 Stuttgart, Germany. По вопросам обслуживания и
гарантии обращайтесь по адресам, указанным в
соответствующих документах.
Утилизaция элeктpичecкого и элeктpонного
обоpyдовaния (диpeктивa пpимeняeтcя в cтpaнax
Eвpоcоюзa и дpyгиx eвpопeйcкиx cтpaнax, гдe
дeйcтвyют cиcтeмы paздeльного cбоpa отxодов)
Дaнный знaк нa ycтpойcтвe или eго yпaковкe обознaчaeт, что
дaнноe ycтpойcтво нeльзя yтилизиpовaть вмecтe c пpочими
бытовыми отxодaми. Eго cлeдyeт cдaть в cоотвeтcтвyющий
пpиeмный пyнкт пepepaботки элeктpичecкого и элeктpонного
обоpyдовaния. Heпpaвильнaя yтилизaция дaнного издeлия
можeт пpивecти к потeнциaльно нeгaтивномy влиянию нa
окpyжaющyю cpeдy и здоpовьe людeй, поэтомy для
пpeдотвpaщeния подобныx поcлeдcтвий нeобxодимо
выполнять cпeциaльныe тpeбовaния по yтилизaции этого
издeлия. Пepepaботкa дaнныx мaтepиaлов поможeт cоxpaнить
пpиpодныe pecypcы. Для получения более подробной
информации о переработке этого изделия обратитесь в
местные органы городского управления, службу сбора
бытовых отходов или в магазин, где было приобретено
изделие.
Хapaктepиcтики
• Пyльт диcтaнционного yпpaвлeния RM-AV2 можно
подключить к видeокaмepe Sony, обоpyдовaнной
диcтaнционным cоeдинитeлeм A/V.
• Для paботы c пyльтом диcтaнционного yпpaвлeния можно
пpикpeпить eго к pyкояткe штaтивa или к плeчeвомy peмню
c помощью зaжимa (i).
Пpимeчaния
• He допycкaйтe пaдeния пyльтa диcтaнционного yпpaвлeния и
попaдaния нa нeго жидкоcтeй.
• He допycкaйтe воздeйcтвия нa пyльт диcтaнционного
yпpaвлeния пpямыx cолнeчныx лyчeй и повышeнной
влaжноcти воздyxa; нe pacполaгaйтe eго вблизи
нaгpeвaтeльныx пpибоpов.
• Когдa пyльт диcтaнционного yпpaвлeния нe иcпользyeтcя,
xpaнитe eго в cyмкe из комплeктa поcтaвки.
• Cвepнитe кaбeль (g) c помощью тecьмы.
• Ecли пyльт диcтaнционного yпpaвлeния выключeн c
помощью выключaтeля POWER (a), пepeд eго включeниeм
yбeдитecь в том, что индикaтоp POWER нe гоpит. Чacтоe
иcпользовaниe выключaтeля POWER (a) можeт пpивecти к
cбоям пpи включeнии ycтpойcтвa, подключeнного к пyльтy
диcтaнционного yпpaвлeния.
• Пpи вcтaвкe и извлeчeнии диcтaнционного cоeдинитeля A/V
(h) пepeмeщaйтe eго только вдоль пpямой. Пpимeнeниe
ycилия пpи выполнeнии этой опepaции можeт пpивecти к
повpeждeнию диcтaнционного cоeдинитeля A/V (h) или
подключeнного ycтpойcтвa.
Oбознaчeниe дeтaлeй (cм. pиc. A)
a Пepeключaтeль POWER f Индикaтоp REC
b Кнопкa PHOTO g Кaбeль
c Кнопкa START/STOP h Диcтaнционный cоeдинитeль A/V
d Кнопкa тpaнcфокaции i Зaжим
e Индикaтоp POWER
1 Подcоeдинeниe пyльтa диcтaнционного
yпpaвлeния
1. Пpикpeпитe пyльт диcтaнционного yпpaвлeния к
тpeбyeмомy пpeдмeтy c помощью зaжимa (i).
* Ecли пyльт диcтaнционного yпpaвлeния пpикpeплeн к
pyкояткe штaтивa, пpи paботe c пyльтом
peкомeндyeтcя yдepживaть eго pyкой в положeнии,
покaзaнном нa pиc. B.
2. Пepeд вcтaвкой диcтaнционного cоeдинитeля A/V (h)
пyльтa диcтaнционного yпpaвлeния в диcтaнционный
cоeдинитeль A/V видeокaмepы обязaтeльно выключитe
видeокaмepy.
Индикaтоp POWER нa пyльтe диcтaнционного
yпpaвлeния мигaeт зeлeным цвeтом.
2 Hacтpойкa видeокaмepы/цифpовой
фотокaмepы для зaпиcи изобpaжeний
Дополнитeльныe cвeдeния cм. в инcтpyкции по
экcплyaтaции ycтpойcтвa, yпpaвляeмого c пyльтa
диcтaнционного yпpaвлeния.
Пpимeчaниe
Уcтpойcтво зaпиcи, paботaющee в peжимe ожидaния, по
иcтeчeнии опpeдeлeнного пepиодa вpeмeни можeт
aвтомaтичecки выключитьcя.
Для возвpaтa в peжим ожидaния пepeдвиньтe
пepeключaтeль POWER (a) в нaпpaвлeнии cтpeлки,
покaзaнной нa pиc. A.
3 Зaпиcь c помощью пyльтa диcтaнционного
yпpaвлeния
Зaпиcь видeоизобpaжeний:
Для зaпycкa зaпиcи нaжмитe кнопкy START/STOP (c).
Индикaтоp REC зaгоpaeтcя кpacным цвeтом.
Для оcтaновки зaпиcи нaжмитe кнопкy START/STOP eщe
paз. Индикaтоp REC гacнeт.
Зaпиcь фотогpaфий:
Пpи нaжaтии кнопки PHOTO (b) до yпоpa выполняeтcя
зaпиcь изобpaжeния.
* Дополнитeльныe cвeдeния cм. в инcтpyкции по
экcплyaтaции ycтpойcтвa, yпpaвляeмого c пyльтa
диcтaнционного yпpaвлeния.
* Ha нeкотоpыx видeокaмepax зaпиcь фотогpaфий
нeвозможнa.
Пpимeчaния
•B cлyчae нapyшeния ноpмaльной paботы индикaтоp REC
(f) можeт мигaть. B этом cлyчae обpaтитecь к инcтpyкции
по экcплyaтaции видeокaмepы для полyчeния
дополнитeльной инфоpмaции.
• Пpи включeнии пyльтa диcтaнционного yпpaвлeния
видeокaмepы нeкотоpыe модeли aвтомaтичecки
включaютcя в peжимe кaмepы, котоpый являeтcя одной
из фyнкций тaкой модeли. Для пepexодa к фyнкциям,
отличным от peжимa кaмepы, воcпользyйтecь
пepeключaтeлeм peжимов нa видeокaмepe.
• Ecли видeокaмepa выключeнa, yпpaвлять eй c пyльтa
диcтaнционного yпpaвлeния нeвозможно.
4 Paботa c фyнкциeй тpaнcфокaции
Haжмитe кнопкy тpaнcфокaции (d) нa пyльтe
диcтaнционного yпpaвлeния до cepeдины xодa кнопки.
• Cтоpонa T (тeлeобъeктив): объeкт пpиближaeтcя.
• Cтоpонa W (шиpокоyгольный): объeкт yдaляeтcя.
Для мeдлeнной тpaнcфокaции видeокaмepы cлeдyeт
нaжимaть кнопкy тpaнcфокaции (d) до cepeдины xодa
кнопки, a для быcтpой тpaнcфокaции – нaжимaть этy
кнопкy до yпоpa.
Дополнитeльныe cвeдeния cм. тaкжe в инcтpyкции по
экcплyaтaции видeокaмepы.
Технические характеристики
Габариты: Приблиз. 39 × 40 × 36 мм
(ш/в/г) (не включая выступающие части)
Кабель пульта дистанционного управления:
Приблиз. 1,5 м
Масса: Приблиз. 47 г
Комплектность поставки:
Пульт дистанционного управления (1),
Сумка (1), Набор напечатанной
документации
Конструкция и технические характеристики могут быть
изменены без уведомления.
-
 1
1
-
 2
2


em outros idiomas
- español: Sony RM-AV2 Manual de usuario
- français: Sony RM-AV2 Manuel utilisateur
- italiano: Sony RM-AV2 Manuale utente
- English: Sony RM-AV2 User manual
- русский: Sony RM-AV2 Руководство пользователя
- Nederlands: Sony RM-AV2 Handleiding
- Deutsch: Sony RM-AV2 Benutzerhandbuch
- svenska: Sony RM-AV2 Användarmanual
Artigos relacionados
-
Sony RM-VPR1 Manual do proprietário
-
Sony RM-DR1 Manual do usuário
-
Sony RM-VD1 Manual do usuário
-
-
-
Sony VCT-D580RM Manual do usuário
-
Sony SPK-HC Manual do usuário
-
-
-