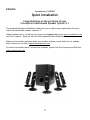
Conceptronic CLLSPK51 Quick Installation
- Categoria
- Receptores de mídia para carro
- Tipo
- Quick Installation

NEDERLANDS
1
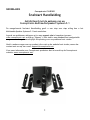
Conceptronic CLLSPK51
Snelstart Handleiding
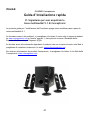
Gefeliciteerd met de aankoop van uw
Conceptronic Multimedia Speaker Systeem 5.1
De meegeleverde Snelstart Handleiding geeft u een stap voor stap uitleg hoe u het
Multimedia Speaker Systeem 5.1 kunt aansluiten.
Ingeval van problemen adviseren wij u onze support-site te bezoeken (ga naar:
www.conceptronic.net
en klik op ‘Support’). Hier vindt u een database met veelgestelde
vragen waar u hoogstwaarschijnlijk de oplossing voor uw probleem kunt vinden.
Heeft u andere vragen over uw product die u niet op de website kunt vinden, neem dan
contact met ons op via e-mail: su[email protected]
Voor meer informatie over Conceptronic producten kunt u terecht op de Conceptronic
website: www.conceptronic.net
.

NEDERLANDS
2
1. Inhoud van de verpakking
• 1x Subwoofer Luidspreker
• 1x Midden Satelliet Luidspreker (met 3mtr kabel)
• 2x Voor Satelliet Luidspreker (met 3mtr kabel)
• 2x Achter Satelliet Luidspreker (met 7mtr kabel)
• 3x RCA kabel (2x RCA male naar 2x RCA male)
• 3x RCA Conversiekabel (2x RCA ‘female’ naar 1x 3,5mm connector ‘male’)
• 1x 3,5mm naar 3,5mm connector kabel.
• 1x afstandsbediening (bedraad, met 3mtr kabel)
• 1x Handleiding
2. Gebruik
Dit multimedia luidspreker systeem kan gebruikt worden in samenhang met een:
• Computer;
• Walkman / MP3-Speler;
• Radio;
• TV, DVD, Cd-speler etc.
3. Kenmerken
De Conceptronic Multimedia Luidspreker set heeft een subwoofer met 5 satelliet
luidsprekers welke magnetisch afgeschermd zijn en een actief gescheiden circuit
hebben voor de frequenties.

NEDERLANDS
3
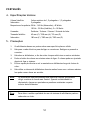
4. Technische Specificaties
Satelliet Luidspreker: 1.5 inch + 1.5 inch stereo luidspreker
Subwoofer: 5 inch
Frequentiebereik: 50Hz – 160Hz (Subwoofer); 40 watt
120Hz – 20Khz (Satelliet); 5x 10 watt
Afstandsbediening: Power / Volume / Bass / Line-In
Formaat Satelliet: 45mm(W) * 200mm(H) * 35mm(D)
Formaat Subwoofer: 180mm(W) * 282mm(H) * 285mm(D)
5. Let op!
1. De luidsprekers moeten op een vaste & stevige plek neergezet of opgehangen
worden.
2. Trek niet aan de kabels wanneer deze afgekoppeld worden. Om de kabels af te
koppelen, trek dan aan de connector.
3. Open de behuizing niet. Dit kan een elektrische schok of ander incident
veroorzaken.
4. Zet de volume schakelaar uit of beperk deze tot het minimum voordat de
stroomschakelaar omgezet wordt. U kunt het volume nadat de spanning op het
apparaat staat wijzigen.
5. Voorkom blootstelling aan direct zonlicht en zet de luidsprekers niet op een hete
plek.
6. Als u de luidsprekers te lang met een extreem hard volume beluistert dan kan dit
uw gehoor beschadigen.
Let op: De satelliet luidsprekers zijn uitgerust met een geïntegreerde rotatiebal. U kunt
de luidspreker in de door u gewenste positie zetten. Wanneer de elasticiteit
minder wordt (de rotatiebal komt losser te zitten) dan kunt u de schroeven aan
de onderkant weer steviger vast schroeven.
Tip: Voor het verkrijgen van de beste geluidskwaliteit dient u de subwoofer op de
grond te plaatsen.

NEDERLANDS
4
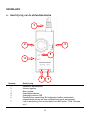
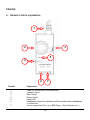
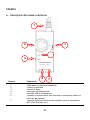
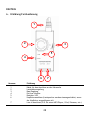
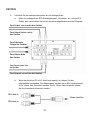
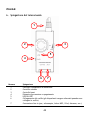
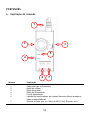
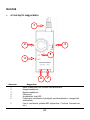
6. Beschrijving van de afstandsbediening
Nummer Beschrijving
1 Subwoofer aansluitkabel
2 Volume regelaar
3 Bass regelaar
4 Spanningsschakelaar
5 Spannings indicatie LED
6 Hoofdtelefoon aansluiting (De luidsprekers zullen automatisch
uitgeschakeld worden als een hoofdtelefoon wordt aangesloten)
7 Line-In aansluiting (Voor bijvoorbeeld een MP3-Speler, I-Pod, Discman,
etc.)
1
2
5
7
6
4
3

NEDERLANDS
5
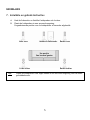
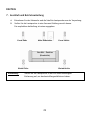
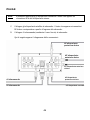
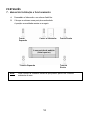
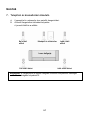
7. Installatie en gebruik Instructies
A. Haal de Subwoofer en Satelliet luidsprekers uit de doos.
B. Plaats de luidsprekers in een surround omgeving.
De geadviseerde positie voor de luidsprekers is hieronder afgebeeld:
Tip: Plaats de luidsprekers naar eigen smaak in een surround omgeving voor de beste
geluidsbelevenis.
Midden
& Subwoofer
Links voor
Links achter
Rechts achter
Rechts voor
Uw positie
Van bovenaf gezien

NEDERLANDS
6
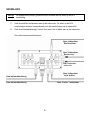
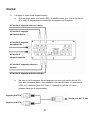
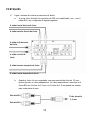
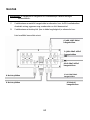
C. Sluit de satelliet luidsprekers aan op de subwoofer. De tekst op de RCA
aansluitingen moeten overeenkomen met de aansluitingen op de subwoofer.
D. Sluit de afstandsbediening (Control Out) met Line-In kabel aan op de subwoofer.
Zie onderstaand aansluitschema:
Naar luidspreker:
‘Rechts achter’
Naar luidspreker:
‘Links voor’
Naar ‘Center’
luidspreker
Naar luidspreker:
‘Links Achter’
Naar luidspreker:
‘Rechts voor’
Naar afstandsbediening
Naar afstandsbediening
Let op: De luidsprekers kunnen geïdentificeerd worden met de tekst op de RCA
aansluiting.

NEDERLANDS
7
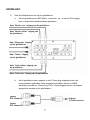
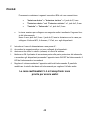
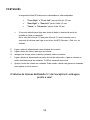
E. Sluit de luidsprekerset aan op een geluidsbron:
a. Als uw geluidsbron een DVD-Speler, versterker, etc. is met 6x RCA uitgang
kunt u onderstaand aansluitschema gebruiken:
b. Als de geluidsbron een computer is met 3,5mm plug uitgangen kunt u de
conversiekabels gebruiken. Deze meegeleverde kabels zetten de 6xRCA
aansluiting om naar 3x 3,5mm plug. De 3x 3,5mm pluggen kunnen vervolgens
aangesloten worden op de geluidskaart:
Naar ‘Rechts voor’ uitgang van de geluidsbron
Naar ‘Rechts achter’ uitgang van
de
g
eluidsbron
Naar ‘Subwoofer’ uitgang
van de geluidsbron
Naar ‘Center’ uitgang
van de geluidsbron
Naar ‘Links achter’ uitgang van
de geluidsbron
Naar ‘Links voor’ uitgang van de geluidsbron
Ingang:
RCA connector
Ingang:
RCA connector
Uitgang:
3
,
5mm connector

NEDERLANDS
8
De volgende RCA connectoren moeten gecombineerd worden op 1
conversiekabel:
• “Rechts voor” en “Links voor” naar 1x 3,5mm connector
• “Rechts achter” en “Links achter” naar 1x3,5mm connector
• “Center” en “Subwoofer” naar 1x3,5mm connector
c. De derde aansluitmethode is via de Line-In aansluiting op de
afstandsbediening. Gebruik de meegeleverde 3,5mm Jack naar 3,5mm kabel
om uw MP3-Speler, Discman, I-Pod, etc. aan te sluiten op de luidsprekerset.
F. Sluit de stroomkabel aan op een vrij stopcontact.
G. Schakel de aangesloten geluidsbron in.
H. Controleer of alle volume instellingen op het minimale niveau staan.
I. Schakel de spanning in met de schakelaar op de achterzijde van de subwoofer. Zet
vervolgens de luidsprekerset aan met de spanningsschakelaar op de
afstandsbediening. De LED op de afstandsbediening zal aangaan.
J. Zet het volume op uw eigen voorkeur. U kunt de BASS instelling wijzigen via de
knop op de afstandsbediening om het geluidsniveau aan te passen.
De Conceptronic Multimedia Speaker Systeem 5.1
is gereed voor gebruik!

ENGLISH
9
Conceptronic CLLSPK51
Quick installation
Congratulations on the purchase of your
Conceptronic Multimedia Speaker System 5.1
The enclosed Hardware Installation Guide gives you a step-by-step explanation of how to
install the Multimedia Speaker System 5.1
When problems occur, we advise you to go to our support-site (go to www.conceptronic.net
and click ‘Support’. Here you will find the Frequently Asked Questions Database.
When you have other questions about your product and you cannot find it at our website,
then contact us by e-mail: [email protected]
For more information about Conceptronic products, please visit the Conceptronic Web Site:
www.conceptronic.net

ENGLISH
10
1. Package Content
• 1x Subwoofer Speaker
• 1x Center Satellite Speaker (with 3mtr cable)
• 2x Front Satellite Speaker (with 3mtr cable)
• 2x Rear Satellite Speaker (with 7mtr cable)
• 3x RCA Cable (2x RCA male to 2x RCA male)
• 3x RCA Converter Cable (2x RCA female to 1x 3,5mm Jack male)
• 1x 3,5mm Jack to 3,5mm Jack Cable.
• 1x Wired Remote Control (with 3mtr cable)
• 1x User’s Manual
2. Usage
This multimedia speaker system can be used together with a,
• Computer;
• Walkman / MP3-Player;
• Radio;
• TV, DVD, CD-Player etc.
3. Features
The Conceptronic Multimedia Speaker set has a Subwoofer speaker with 5 satellite
speakers what are magnetically shielded and have an active separated circuit for the
frequencies.

ENGLISH
11
4. Technical Specification
Satellite Speaker: 1.5 inch + 1.5 inch stereo speaker
Subwoofer: 5 inch
Frequency Response: 50Hz – 160Hz (Subwoofer); 40 watt
120Hz – 20Khz (Satellite); 5x 10 watt
Remote Control: Power / Volume / Bass / Line-In
Size Satellite: 45mm(W) * 200mm(H) * 35mm(D)
Subwoofer: 180mm(W) * 282mm(H) * 285mm(D)
5. Precautions
1. The loudspeakers should be placed on a flat and solid surface
2. Do not pull the electric cord to unplug the connectors. You should hold the
connector to unplug it.
3. Do not open the housing to avoid electric shock or other accidents
4. Turn the volume knob to the minimum position before turning on the power. You
can adjust the volume after turning the power on.
5. Avoid direct sunlight and keep the speakers from a source what can become heat.
6. Do not use the loudspeaker system for long hours under maximum volume. This can
damage your ears.
Note: The satellite speakers are provided with an integrated rotation ball to make the
aiming of the music more flexible. When the elasticity is getting less, please
fasten the screws on the bottom of the satellite speaker.
Tip: To get the best sound quality out of the speaker set, please put the subwoofer
on the ground.

ENGLISH
12
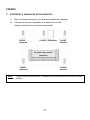
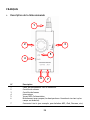
6. Remote Control explanation
Number Explanation
1 Cable for connection to the Subwoofer
2 Volume Control
3 Bass Control
4 Power Switch
5 Power LED
6 Headphone Connection (Speakers will be muted when a Headphone
is connected)
7 Line-In connection (For e.g. a MP3-Player, I-Pod, Discman, etc.)
1
2
5
4
3
7
6

ENGLISH
13
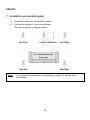
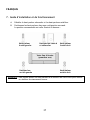
7. Installation and operation guide
A. Unpack the Subwoofer and Satellite speakers.
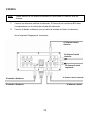
B. Position the speakers in a surround situation.
The advised position is displayed below:
Note: You can position the speakers on a distance you prefer for the best sound
environment.
Center & Subwoofer
Front Left
Rear Left Rear Right
Front Right
Your Listening Position
(from top)

ENGLISH
14
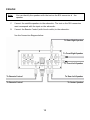
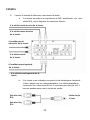
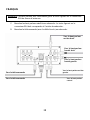
C. Connect the satellite speakers to the subwoofer. The text on the RCA connectors
must correspond with the input on the subwoofer.
D. Connect the Remote Control (with Line-In cable) to the subwoofer.
See the Connection Diagram below:
To Rear-Right Speaker
To Front-Left Speaker
To Center Speaker
To Rear-Left Speaker
To Front-Right Speaker
To Remote Control
To Remote Control
Note: You can identify the speakers with the
text on the
RCA connector of
the
speaker.

ENGLISH
15
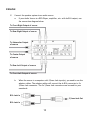
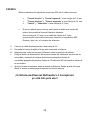
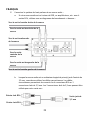
E. Connect the speaker system to an audio source:
a. If your Audio Source is a DVD-Player, amplifier, etc. with 6x RCA output, use
the connection diagram below:
b. When the source is a computer with 3,5mm Jack input(s), you need to use the
adapter cables. The adapter cables will convert the 6x RCA connector to 3x
3,5mm Jack connector. The 3x 3,5mm Jack connectors can be used for your
soundcard:
To Front-Right Output of source
To Rear-Right Output of source
To Subwoofer Output
of source
To Center Output
of source
To Rear-Left Output of source
To Front-Left Output of source
RCA Jack In
RCA Jack In
3,5mm Jack Out

ENGLISH
16
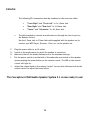
The following RCA connectors must be combined in the converter cable:
• “Front-Right” and “Front-Left” to 1x 3,5mm Jack
• “Rear-Right” and “Rear-Left” to 1x3,5mm Jack
• “Center” and “Subwoofer” to 1x3,5mm Jack
c. The third method to connect an audio source is through the Line-In port on
the Remote Control.
Use the 3,5mm Jack to 3,5mm Jack cable supplied with the speaker set to
connect your MP3-Player, Discman, I-Pod, etc. to the speaker set.
F. Plug the power cable to an AC outlet.
G. Switch on the audio source to which the speaker is connected.
H. Make sure that all the knobs (Volume) are at the minimum settings.
I. Put the power switch on at the back of the subwoofer and switch on the speaker
system pushing the power button on the remote control. The LED on the remote
control will light up.
J. Adjust the volume knob on the remote control. You can alter the bass knob at the
remote control to adjust the sound effect.
The Conceptronic Multimedia Speaker System 5.1 is now ready to use!

ESPAÑOL
17
CLLSPK51 de Conceptronic
Guía de instalación rápida
Felicidades por la compra de su
sistema de altavoces multimedia 5.1 de Conceptronic
Esta guía de instalación le orientará paso a paso sobre cómo instalar el sistema de altavoces
multimedia 5.1 de Conceptronic.
Si encuentra problemas, le aconsejamos que se dirija a nuestra página web
www.conceptronic.net
y haga clic en «Support». Aquí encontrará la base de datos de las
preguntas más frecuentes o FAQ.
Si tiene otras preguntas sobre su producto y no las encuentra en nuestro sitio web, póngase
en contacto con nuestro servicio técnico por correo electrónico:
Para obtener más información acerca de productos de Conceptronic por favor visite el lugar
Web de Conceptronic: www.conceptronic.net

ESPAÑOL
18
1. Contenido del embalaje
• 1x Altavoz Subwoofer
• 1x Altavoz satélite central (con cable de 3 metros)
• 2x Altavoces satélite frontales (con cable de 3 metros)
• 2x Altavoces satélite traseros (con cable de 7 metros)
• 3x Cables RCA (2x RCA macho a 2x RCA macho)
• 3x Cables conversores RCA (2x RCA hembra a 1x clavija macho de 3,5mm)
• 1x clavija de 3,5mm a cable de clavija de 3,5mm.
• 1x Mando a distancia por cable (con cable de 3 metros)
• 1x Manual del Usuario
2. Uso
Este sistema de altavoces multimedia puede utilizarse con un
• ordenador,
• walkman / reproductor de MP3,
• radio, y
• TV, DVD, reproductor de CD, etc.
3. Características
El sistema de altavoces multimedia de Conceptronic tiene un altavoz para graves
(subwoofer) con dos altavoces satélite blindados magnéticamente y con un circuito
independiente para las frecuencias.

ESPAÑOL
19
4. Especificaciones técnicas
Altavoz satélite: Altavoz de 1,5 pulgadas + altavoz de 1,5 pulgadas estéreo
Subwoofer: 5 pulgadas
Respuesta en frecuencia:50Hz – 160Hz (Subwoofer); 40 vatios
120Hz – 20Khz (Satellite); 5x 10 vatios
Mando a distancia: Encendido/Apagado / Volumen / Bajos / Entrada de línea
Tamaño de los altavoces
satélite: 45mm(l) * 200mm(H) * 35mm(L)
Subwoofer: 180mm(l) * 282mm(H) * 285mm(L)
5. Precauciones
1. Los altavoces deben colocarse sobre una superficie plana y sólida.
2. No tire del cable eléctrico para desenchufar los conectores. Sujete el conector
para desenchufarlo.
3. No abra la caja, evitará choques eléctricos u otros accidentes.
4. Gire el control del volumen hasta el mínimo antes de conectar la alimentación.
Ajuste el volumen después de conectar la alimentación.
5. Evite el contacto directo con la luz del sol y mantenga los altavoces alejados de
fuentes de calor.
6. No utilice el sistema de altavoces al máximo volumen durante un tiempo
prolongado, ya que puede dañar su oído.
Nota: Los altavoces satélite vienen con un cojinete integrado que permite orientar la
música. Cuando la flexibilidad se vaya reduciendo, apriete los tornillos de la
p
arte inferior del altavoz satélite.
Consejo:Para obtener la mayor calidad de sonido del sistema de altavoces, coloque el
subwoofer en el suelo.

ESPAÑOL
20
6. Descripción del mando a distancia
Número Explicación
1 Cable para la conexión al Subwoofer
2 Control de volumen
3 Control de bajos
4 Interruptor de alimentación
5 Indicador LED de alimentación
6 Conexión a los auriculares (Los altavoces se silenciarán cuando se
conecten auriculares)
7 Conector de entrada de línea (Por ejemplo, para un reproductor
MP3, iPod, Discman, etc.)
1
2
4
3
7
6
A página está carregando...
A página está carregando...
A página está carregando...
A página está carregando...
A página está carregando...
A página está carregando...
A página está carregando...
A página está carregando...
A página está carregando...
A página está carregando...
A página está carregando...
A página está carregando...
A página está carregando...
A página está carregando...
A página está carregando...
A página está carregando...
A página está carregando...
A página está carregando...
A página está carregando...
A página está carregando...
A página está carregando...
A página está carregando...
A página está carregando...
A página está carregando...
A página está carregando...
A página está carregando...
A página está carregando...
A página está carregando...
A página está carregando...
A página está carregando...
A página está carregando...
A página está carregando...
A página está carregando...
A página está carregando...
A página está carregando...
A página está carregando...
A página está carregando...
A página está carregando...
A página está carregando...
A página está carregando...
A página está carregando...
A página está carregando...
A página está carregando...
A página está carregando...
A página está carregando...
-
 1
1
-
 2
2
-
 3
3
-
 4
4
-
 5
5
-
 6
6
-
 7
7
-
 8
8
-
 9
9
-
 10
10
-
 11
11
-
 12
12
-
 13
13
-
 14
14
-
 15
15
-
 16
16
-
 17
17
-
 18
18
-
 19
19
-
 20
20
-
 21
21
-
 22
22
-
 23
23
-
 24
24
-
 25
25
-
 26
26
-
 27
27
-
 28
28
-
 29
29
-
 30
30
-
 31
31
-
 32
32
-
 33
33
-
 34
34
-
 35
35
-
 36
36
-
 37
37
-
 38
38
-
 39
39
-
 40
40
-
 41
41
-
 42
42
-
 43
43
-
 44
44
-
 45
45
-
 46
46
-
 47
47
-
 48
48
-
 49
49
-
 50
50
-
 51
51
-
 52
52
-
 53
53
-
 54
54
-
 55
55
-
 56
56
-
 57
57
-
 58
58
-
 59
59
-
 60
60
-
 61
61
-
 62
62
-
 63
63
-
 64
64
-
 65
65


Conceptronic CLLSPK51 Quick Installation
- Categoria
- Receptores de mídia para carro
- Tipo
- Quick Installation
em outras línguas
- español: Conceptronic CLLSPK51
- français: Conceptronic CLLSPK51
- italiano: Conceptronic CLLSPK51
- Nederlands: Conceptronic CLLSPK51
Artigos relacionados
-
Conceptronic CLLSPKTRVTUBE Guia de instalação
-
Conceptronic 2.5" Multi Media Player Pocket Guia de usuario
-
-
Conceptronic 3.5" Multi Media Player Manual do usuário
-
Conceptronic 500 GB 3.5" Media Player SATA + HDMI Manual do usuário
-
Conceptronic Media Giant Pro, 500GB Manual do usuário
Outros documentos
-
Philips SWA3032W/10 Manual do usuário
-
Philips SPA2310/00 Guia rápido
-
-
 Acoustic Authority A-5640 Manual do proprietário
-
 Audio Authority A-3780 Manual do proprietário
-
Silvercrest SLB 1.2 A1 User Manual And Service Information
-
 Altec Lansing CS21 Manual do usuário
-
-
 Altec Lansing VS3121 Manual do usuário
-


