

NOTE:
This equipment has been tested and found to comply with the limits
for a Class A digital device, pursuant to part 15 of the FCC Rules.
These limits are designed to provide reasonable protection against
harmful interference when the equipment is operated in a commercial
environment.
This equipment generates, uses, and can radiate radio frequency
energy and, if not installed and used in accordance with the
instruction manual, may cause harmful interference to radio
communications. Operation of this equipment in a residential area is
likely to cause harmful interference in which case the user will be
required to correct the interference at his own expense.
REMARQUE :
Cet équipement a fait l'objet de tests et a été déclaré conforme aux
limites établies pour un appareil numérique de classe A,
conformément à la section 15 des règlements de la FCC. Ces limites
sont conçues pour offrir une protection raisonnable contre les
interférences nuisibles lorsque l'équipement est utilisé dans un
environnement commercial.
Cet appareil produit, utilise et peut rayonner une énergie sous la
forme de radiofréquences et, s'il n'est pas installé et employé en
conformité avec les instructions du manuel, il peut provoquer des
interférences nuisibles au niveau des communications radios.
L'utilisation de cet équipement dans un environnement résidentiel est
susceptible de provoquer des interférences nuisibles, auquel cas
l'utilisateur devra les corriger à ses propres frais.

1
English
IMPORTANT SAFETY INSTRUCTIONS
This document contains important safety and operating
instructions. Please read these instructions carefully and save
them for future reference.
Before using the battery charger, read all the instructions and
cautionary markings on (1) the charger and (2) the battery.
1. To reduce risk of damage to the power cords, pull the
plug rather than the cord when disconnecting from the AC
outlet or the charger.
2. An extension cord should not be used unless absolutely
necessary. Use of an improper extension cord could result in risk of
fire and electric shock. If an extension cord must be used, make
sure that the cord size is 18 AWG for lengths of up to 6.5 feet
(2.0 m), and 16 AWG for lengths up to 9.8 feet (3.0 m).
3. To reduce risk of fire, electric shock, or injury, do not operate the
charger if it has been broken or damaged in any way. Take it to a
qualified Motorola Solutions service representative.
4. Do not disassemble the charger. It is not repairable and
replacement parts are not available. Disassembly of the charger
may result in risk of electric shock or fire.
5. To reduce risk of electric shock, unplug the charger from the AC
outlet before attempting any maintenance or cleaning.
6. To reduce risk of injury, charge only the rechargeable Motorola
Solutions Authorized Batteries listed in Table 1. Other batteries
may explode, causing personal injury and damage.
7. Use of accessories not recommended by Motorola Solutions may
result in risk of fire, electric shock, or injury.
OPERATIONAL SAFETY GUIDELINES
• Turn off the radio when charging the battery.
• This equipment is not suitable for outdoor use. Use only in dry
locations and conditions.
• Maximum ambient temperature around the charger must not exceed
40 °C (104 °F).
English

2
English
• Connect the charger only to an appropriate power supply and power
cord listed in Table 2, Table 3, and Table 4.
• The AC outlet to which the power cord is connected should be close
and easily accessible.
• Make sure the power cord is located where it will not be stepped on,
tripped over, or subjected to water, damage, or stress.
• Connect the power cord only to an appropriately fused and wired AC
outlet with the correct voltage, as specified on the product.
• Disconnect from line voltage by removing the power cord from the
AC outlet.
* UL certification only applied when charger kits shipped with the power supplies listed above.
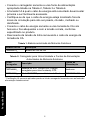
Table 1: Motorola Solutions Authorized Battery
Kit Number Description
PMNN4578_ Li-Ion Battery
Table 2:
Motorola Solutions Authorized Single Unit Charger And Power
Supplies
Charger Kit Description Power Supplies
PMPN4468_ DTR Single Unit Charger (SUC) Tray None
PMPN4469_
DTR Single Unit Charger (SUC) Kit for North
America
PS000228A01*

3
English
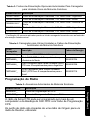
* UL certification only applied when charger kits shipped with the power supplies listed above.
Programming The Radio
The DTR Series radio is programmable using a computer and the
DTR Single Unit Charger (SUC) Tray with CPS Programming Cable.
The radio profiles are cloned from one Source radio to a Target radio
by using:
• a DTR 6-Pocket Multi-Unit Charger (MUC) Tray
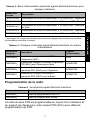
Table 3: Motorola Solutions Authorized Optional Power Supplies For Single
Unit Charger
Kit Number Description
PS000132A05* Switch Mode Power Supply, 3 W, Micro USB - Argentina
PS000132A08* Switch Mode Power Supply, 3 W, Micro USB - Brazil
PS000227A11* Switch Mode Power Supply, 5 W, Micro USB - North America
PS000042A15* Switch Mode Power Supply, 5 W, Micro USB - Argentina
PS000042A18* Switch Mode Power Supply, 5 W, Micro USB - Brazil
Table 4:
Motorola Solutions Authorized Multi-Unit Charger And Power Cords
Charger Kit Description Power Cords
PMPN4464_
DTR 6-Pocket Multi-Unit Charger (MUC)
Tray
None
PMPN4465_
DTR 6-Pocket Multi-Unit Charger (MUC) Kit
for North America
3004209T04
PMPN4466_
DTR 6-Pocket Multi-Unit Charger (MUC) Kit
for Argentina
3004209T08
PMPN4467_
DTR 6-Pocket Multi-Unit Charger (MUC) Kit
for Brazil
3004209T16
Table 5:
Motorola Solutions Authorized Accessories
Kit Number Description
HKKN4027_ CPS Programming Cable
HKKN4028_ Radio-to-Radio Cloning Cable

4
English
• two DTR Single Unit Charger (SUC) Tray and a Radio-to-Radio
cloning cable (optional accessory)
Refer to the DTR Series Radio User Guide for more operational
details. The CPS Programming Cable and Radio-to-Radio Cloning
Cable are accessories sold separately. Please contact your Motorola
Solutions point of purchase for more information.
Operating Instructions For DTR Single Unit Charger
(SUC) Kit
Prior to charging a battery with radio, turn off the radio. Batteries
charge best at room temperature.
1. This DTR Single Unit Charger (SUC) Kit is able to charge DTR
Series radios with batteries or radios with batteries and holsters.
2. This DTR Single Unit Charger (SUC) Kit is able to charge stand-
alone batteries as listed in Table 1.

5
English
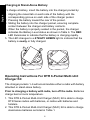
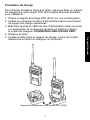
Charging Procedure
To charge the battery (with the radio attached), place it in a Motorola
Solutions approved DTR SUC Tray (see Table 2):
1. Place the DTR SUC Tray on a flat surface.
2. Insert the connector of the power supply into the port on the side of
the drop-in tray charger.
3. Plug the wall receptacle end of the power supply cord into
appropriate AC outlet. A successful power-up sequence in
indicated by a SINGLE FLASH GREEN on the charger indicator.
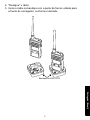
4. Turn the radio “OFF”.
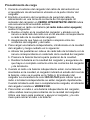
5. Insert the radio into the tray with the front of the radio facing the
front of the charger, as shown.
DTR SUC Tray

6
English
Charging A Stand-Alone Battery
To charge a battery, insert the battery into the charger pocket by:
1. Aligning the raised tab on each side of the battery with the
corresponding groove on each side of the charger pocket.
2. Pressing the battery toward the rear of the pocket.
3. Sliding the battery into the charger pocket, ensuring complete
contact between the charger and battery contacts.
4. When the battery is properly seated in the pocket, the charger
indicates the Battery Level status as shown in Table 6. The RED
LED illuminates to indicate that the battery is charging rapidly.
5. The LED changes to a STEADY GREEN light to indicate that the
battery is nearly or fully charged.
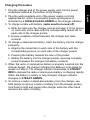
Operating Instructions For DTR 6-Pocket Multi-Unit
Charger Kit
The charger pockets 1–6 will accommodate either a radio with battery
attached or stand-alone battery.
Prior to charging a battery with radio, turn off the radio. Batteries
charge best at room temperature.
1. This DTR 6-Pocket Multi-Unit Charger (MUC) Kit is able to charge
DTR Series radios with batteries, or radios with batteries and
holsters.
2. This DTR 6-Pocket Multi-Unit Charger (MUC) Kit is able to charge
stand-alone batteries as listed in Table 1.
1
2

7
English
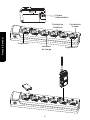
Charging Procedure
1. Plug the charger end of the power supply cord into the power
receptacle located at the bottom of the charger.
2. Plug the wall receptacle end of the power supply cord into
appropriate AC outlet. A successful power-up sequence in
indicated by a SINGLE FLASH GREEN on the charger indicator.
3. To charge a radio with battery (radio must be turned off):
a. Slide the radio into the charger pocket and align it to the groove
on each side of the radio with the corresponding raised rail on
each side of the charger pocket.
b. Ensure complete contact between the charger and radio
contacts.
4. To charge a stand-alone battery, insert the battery into the charger
pocket by:
a. Aligning the raised tab on each side of the battery with the
corresponding groove on each side of the charger pocket.
b. Pressing the battery towards the rear of the pocket.
c. Sliding the battery into the charger pocket, ensuring complete
contact between the charger and battery contacts.
5. When the radio or stand-alone battery is properly inserted into the
charger pocket, the charger indicates the Battery Level status as
shown in Table 6. The charger indicator illuminates in STEADY
RED to indicate the radio or stand-alone battery is charging rapidly.
When the battery is nearly or fully charged, charger indicator
changes to STEADY GREEN.
6. To remove a radio or stand-alone battery from the charger, use
both hands to remove a radio or battery from the charger pocket.
One hand to hold and support the charger while the other hand
removes the radio or battery.

8
English
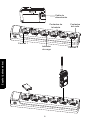
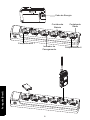
Power Cord
Radio
Contacts
Pocket 1
Pocket 6
Battery
Contacts
Charging
Indicator

9
English
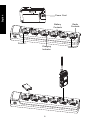
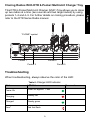
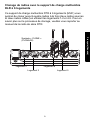
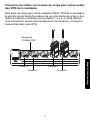
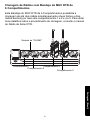
Cloning Radios With DTR 6-Pocket Multi-Unit Charger Tray
This DTR 6-Pocket Multi-Unit Charger (MUC) Tray allows you to clone
up two radios at a time (two sources and two target radios) by using
pockets 1–2 and 4–5. For further details on cloning procedure, please
refer to the DTR Series Radio manual.
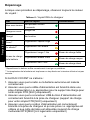
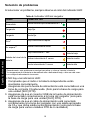
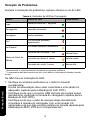
Troubleshooting
When troubleshooting, always observe the color of the LED:
Table 6: Charger LED Indicator
Status LED Status Comments
Power On
Green for approx. 1 sec
Charging
Steady red
Charged
Steady green
Error*
Red fast flash
Pocket 1
“CLONE” symbol
Pocket 2
Pocket 4
Pocket 5

10
English
* Normally, re-positioning the battery pack will correct this issue.
** Battery temperature is too warm or too cold or wrong power voltage is being used.
If there is NO LED indication:
1. Check that the radio, or stand-alone battery, is inserted correctly.
2. Ensure the power supply is plugged into an appropriate AC outlet.
(for DTR Single Unit Charger (SUC) Tray only).
3. Ensure the USB connector of the power supply is plugged securely
into the charger socket (for DTR Single Unit Charger (SUC) Tray
only).
4. Ensure the power cord is plugged securely into the charger socket
with an appropriate AC outlet and there is power to the outlet (for
DTR 6-Pocket Multi-Unit Charger Tray only)
5. Confirm that the battery used with the radio is Motorola Solutions
authorized batteries listed in Table 1.
Mounting DTR 6-Pocket Multi-Unit Charger
1. Mounted the charger to wall using the appropriate mounting
hardware required for the type of wall material fixture it is being
mounted to.
Note: It is recommended to use #6x1 inch flat head tapping screw on
wood stud and solid-flat concrete or brick wall.
Standby**
Amber slow flash
Battery Level Status
Flash red 1 time
Battery low
Flash amber 2 times
Battery medium
Flash green 3 times
Battery high
Table 6:
Charger LED Indicator (Continue)
Status LED Status Comments

11
English
The Charger Kit for North America is covered under the Motorola
Solutions one year limited warranty. If your charger is defective,
please contact your Motorola Solutions Partner where the unit was
purchased. Order a Replacement Charging Kit if necessary.
For product-related questions, contact:
1-800-448-6686 (US & Canada)
For product information, visit: www.motorolasolutions.com
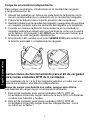
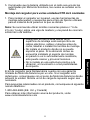
• Ensure the area behind the mounting surface is
always free of electrical wires, cables, and pipes
before cutting, drilling, or installing the mounting
screws.
• Do not install the product where the weight
cannot be supported. If the strength of the
location where the wall mount is installed is not
strong enough, it can fall off and cause an injury.
• Do not install on a structure that is prone to
vibration, movement, or chance of impact.
!
W A R N I N G
!

12
English
MOTOROLA, MOTO, MOTOROLA SOLUTIONS and the Stylized M logo are
trademarks or registered trademarks of Motorola Trademark Holdings, LLC and are
used under license. All other trademarks are the property of their respective owners.
© 2018 Motorola Solutions, Inc. All rights reserved.

1
Français (Canada)
INSTRUCTIONS DE SÉCURITÉ IMPORTANTES
Ce document contient d’importantes directives relatives à la
sécurité et au fonctionnement de l’appareil. Veuillez lire
attentivement cette notice et la conserver pour vous y référer
ultérieurement.
Avant d’utiliser le chargeur de batterie, lisez toutes les directives
et les marquages d’avertissement sur (1) le chargeur et (2) la
batterie.
1. Afin de réduire la possibilité d’endommager les cordons
d’alimentation, tirez sur la prise et non sur le cordon au
moment de le débrancher de la prise c.a. ou du chargeur.
2.Il n’est pas recommandé d’utiliser une rallonge, sauf en
cas de nécessité absolue. L’utilisation d’une rallonge
inappropriée pourrait causer un risque d’incendie et de décharge
électrique. Si une rallonge doit être utilisée, assurez-vous que le
format du cordon est de calibre 18 lorsque sa longueur est de 2,0 m
(6,5 pieds) ou moins et de calibre 16 lorsque sa longueur est de 3,0 m
(9,8 pieds) ou moins.
3. Pour réduire le risque d’incendie, de décharge électrique ou de
blessure, n’utilisez pas le chargeur s’il est brisé ou endommagé
de quelque manière que ce soit. Portez-le chez un représentant
de service Motorola Solutions.
4. Ne désassemblez pas le chargeur. Il ne peut pas être réparé et
aucune pièce de rechange n’est disponible. Le désassemblage
du chargeur pourrait occasionner des risques de décharge
électrique ou d’incendie.
5. Pour réduire les risques de décharge électrique, débranchez le
chargeur de la prise c.a. avant de procéder à une maintenance
ou à un nettoyage.
6. Pour réduire les risques de blessure, ne chargez que les
batteriesne chargez que les batteries rechargeables agréées
Motorola Solutions apparaissant dans Tableau 1. Les batteries non
agréées pourraient exploser et causer des blessures corporelles et
d’autres dommages.
7. L’utilisation d’accessoires non recommandés par Motorola
Solutions pourrait occasionner des risques d’incendie, de décharge
électrique ou de blessure.
!
Mise en garde
Français (Canada)

2
Français (Canada)
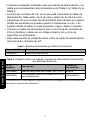
DIRECTIVES D’UTILISATION SÉCURITAIRE
• Éteignez la radio lorsque vous chargez la batterie.
• Cet équipement n’est pas conçu pour une utilisation à l’extérieur.
Ne l’utilisez que dans des emplacements secs et sous des
conditions sans risque d’humidité.
• La température ambiante maximale autour du chargeur ne doit pas
dépasser 40 °C (104 °F).
• Branchez le chargeur uniquement à un bloc et un cordon
d’alimentation appropriés comme indiqué dans "Tableau 2, Tableau 3"
et Tableau 4.
• La prise de courant à laquelle le cordon d’alimentation est branché
doit se trouver à proximité et être facilement accessible.
• Assurez-vous que le cordon d’alimentation est placé à un endroit
où il ne sera pas écrasé ou endommagé, ne gênera pas le passage,
ne sera pas tendu de façon anormale et ne sera pas exposé à une
source d’humidité.
• Ne branchez le cordon d’alimentation qu’à une prise à fusible câblée
appropriée et de tension prescrite (telle que spécifiée sur le produit).
• Débranchez le chargeur de la tension de secteur en retirant le cordon
d’alimentation de la prise de courant.
* Homologué UL uniquement lorsque les trousses de chargeur sont livrées avec les blocs
d’alimentation énumérés ci-dessus.
Tableau 1 : Batterie agréée Motorola Solutions
Numéro de
trousse
Description
PMNN4578_ Batterie lithium-ion
Tableau 2 :
Chargeur pour appareil unique agréé Motorola Solutions et blocs
d’alimentation
Trousse de
chargeur
Description
Blocs
d’alimentation
PMPN4468_ Support de charge pour unité simple DTR (SUC) Aucun
PMPN4469_
Ensemble de chargeur pour unité simple DTR
(SUC) pour l’Amérique du Nord
PS000228A01*

3
Français (Canada)
* Homologué UL uniquement lorsque les trousses de chargeur sont livrées avec les blocs
d’alimentation énumérés ci-dessus.
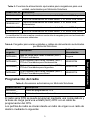
Programmation de la radio
La radio de série DTR est programmable au moyen d’un ordinateur et
du support de charge pour unité simple DTR (SUC) avec câble de
programmation de CPS.
Tableau 3 : Blocs d’alimentation optionnels agréés Motorola Solutions pour
chargeur individuel
Numéro de
trousse
Description
PS000132A05* Alimentation en mode de commutation, 3 W, micro-USB – Argentine
PS000132A08* Alimentation en mode de commutation, 3 W, micro-USB – Brésil
PS000227A11*
Alimentation en mode de commutation, 5 W, micro-USB – Amérique
du Nord
PS000042A15* Alimentation en mode de commutation, 5 W, micro-USB – Argentine
PS000042A18* Alimentation en mode de commutation, 5 W, micro-USB – Brésil
Tableau 4 :
Chargeur multiunités agréé Motorola Solutions et cordons
d’alimentation
Trousse de
chargeur
Description
Cordons
d’alimentation
PMPN4464_
Support de charge multiunités DTR à
6 logements (MUC)
Aucun
PMPN4465_
Ensemble de chargeur multiunités 6 logements
DTR (MUC) pour l’Amérique du Nord
3004209T04
PMPN4466_
Ensemble de chargeur multiunités 6
logements DTR (MUC) pour l’Argentine
3004209T08
PMPN4467_
Ensemble de chargeur multiunités 6
logements DTR (MUC) pour le Brésil
3004209T16
Tableau 5 :
Accessoires agréés Motorola Solutions
Numéro de trousse Description
HKKN4027_ Câble de programmation de CPS
HKKN4028_ Câble de clonage radio à radio

4
Français (Canada)
Les profils radio sont clonés depuis une radio source vers une radio
cible à l’aide des éléments suivants :
• un support de charge multiunités DTR à 6 logements (MUC)
• deux supports de charge pour unité simple DTR (SUC) et un câble
de clonage de radio à radio (accessoire en option)
Reportez-vous au Guide de l’utilisateur de la radio de série DTR pour
en savoir plus sur son fonctionnement. Le câble de programmation de
CPS et le câble de clonage radio à radio sont des accessoires vendus
séparément. Veuillez communiquer avec votre point de vente
Motorola Solutions pour en savoir plus.
Instructions d’utilisation de la trousse de chargeur pour
unité simple DTR (SUC)
Avant de charger une batterie avec la radio, éteignez cette
dernière. Pour des résultats optimaux, chargez la batterie à la
température ambiante.
1. Cette trousse de chargeur pour unité simple de série DTR (SUC)
peut charger les radios de la série DTR avec batteries ou les radios
avec batteries et étuis.
2. Cet ensemble de chargeur pour unité simple de série DLR (SUC)
peut charger les batteries autonomes indiquées dans Tableau 1

5
Français (Canada)
Procédure de charge
Pour charger la batterie (fixée à la radio), placez-la dans un support
de charge pour unité simple DTR (SUC) agréé Motorola Solutions
(voir Tableau 2) :
1. Placez le support de charge DTR (SUC) sur une surface plane.
2. Insérez le connecteur du bloc d’alimentation dans le port latéral
du support de charge instantanée.
3. Branchez la prise du câble du bloc d’alimentation dans une prise
c.a. appropriée. Si la séquence de mise en marche a réussi,
le voyant du chargeur CLIGNOTERA UNE FOIS EN VERT.
4. Éteignez la radio.
5. Insérez la radio dans le support de charge, l’avant de la radio
faisant face à l’avant du chargeur, tel qu’illustré.
Support de charge pour unité simple DTR (SUC)

6
Français (Canada)
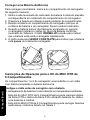
Charge d’une batterie autonome
Pour charger une batterie, insérez la batterie dans le logement du
chargeur comme suit :
1. Alignez la rainure en relief sur chaque côté de la batterie avec la
rainure correspondante sur chaque côté du logement du chargeur.
2. Appuyez la batterie contre l’arrière du logement.
3. Glissez la batterie dans le logement en vous assurant qu’un contact
parfait est établi entre le chargeur et les pôles de la batterie.
4. Lorsque la batterie est correctement insérée dans le logement, le
chargeur affiche le niveau de charge de la batterie comme indiqué
dans le tableau 6. Le voyant DEL ROUGE s’allume pour indiquer
que la batterie se recharge rapidement.
5. Le voyant passera au VERT CONTINU pour indiquer que la
batterie est complètement ou presque complètement chargée.
Instructions d’utilisation pour l’ensemble de chargeur
multiunités DTR à 6 logements
Les logements 1 à 6 peuvent accueillir chacun soit une radio avec
batterie, soit une batterie seule.
Avant de charger une batterie avec la radio, éteignez cette
dernière. Pour des résultats optimaux, chargez la batterie à la
température ambiante.
1. Cette trousse de chargeur multiunités DTR (MUC) à 6 logements
peut charger les radios de la série DTR avec batteries ou les radios
avec batteries et étuis.
2. Cette trousse de chargeur multiunités DTR (MUC) à 6 logements
peut charger les batteries autonomes indiquées dans Tableau 1.
1
2
A página está carregando...
A página está carregando...
A página está carregando...
A página está carregando...
A página está carregando...
A página está carregando...
A página está carregando...
A página está carregando...
A página está carregando...
A página está carregando...
A página está carregando...
A página está carregando...
A página está carregando...
A página está carregando...
A página está carregando...
A página está carregando...
A página está carregando...
A página está carregando...
A página está carregando...
A página está carregando...
A página está carregando...
A página está carregando...
A página está carregando...
A página está carregando...
A página está carregando...
A página está carregando...
A página está carregando...
A página está carregando...
A página está carregando...
A página está carregando...
A página está carregando...
A página está carregando...
-
 1
1
-
 2
2
-
 3
3
-
 4
4
-
 5
5
-
 6
6
-
 7
7
-
 8
8
-
 9
9
-
 10
10
-
 11
11
-
 12
12
-
 13
13
-
 14
14
-
 15
15
-
 16
16
-
 17
17
-
 18
18
-
 19
19
-
 20
20
-
 21
21
-
 22
22
-
 23
23
-
 24
24
-
 25
25
-
 26
26
-
 27
27
-
 28
28
-
 29
29
-
 30
30
-
 31
31
-
 32
32
-
 33
33
-
 34
34
-
 35
35
-
 36
36
-
 37
37
-
 38
38
-
 39
39
-
 40
40
-
 41
41
-
 42
42
-
 43
43
-
 44
44
-
 45
45
-
 46
46
-
 47
47
-
 48
48
-
 49
49
-
 50
50
-
 51
51
-
 52
52


em outras línguas
- español: Motorola PMPN4465 Manual de usuario
- français: Motorola PMPN4465 Manuel utilisateur
- English: Motorola PMPN4465 User manual
Artigos relacionados
-
Motorola DTR720 Quick Reference Manual
-
-
-
Motorola CLPe Series Manual do usuário
-
-
-
Motorola TALKABOUT Manual do proprietário
-
-
-