Candy FCS 605 X Manual do usuário
- Categoria
- Fornos
- Tipo
- Manual do usuário

OVENS
USER INSTRUCTIONS
GB
FORNI
ISTRUZIONI PER L’USO
IT
HORNOS EMPOTRABLES
INSTRUCCIONES DE USO
ES
EINBAUBACKKÖFEN
BEDIENUNGSANLEITUNG
DE
OVEN
GEBRUIKSAANWIJZING
NL
FOURS ENCASTRABLES
NOTICE D’EMPLOI ET D’INSTALLATION
FR
FORNOS
MANUAL DE INSTRUÇÕES DE UTILIZAÇÃO
PT
PIEKARNIKI DO ZABUDOWY
INSTRUKJA OBS UGIŁ
PL
TROUBY
NÁVOD K OBSLUZE
CZ
ФУРНИ
ИНСТРУКЦИИ ЗА ПОТРЕБИТЕЛЯ
BG
SI
NAVODILO ZA UPORABO
VEČNAMENSKE VGRADNE PEČICE
0002-1576
CANDY HOOVER GROUP S.R.L. • Via Comolli 16 • 20861 Brugherio (MB) - Italy

CONTENUTO
Indicazioni Di Sicurezza
1. Avvertenze Generali
1.1
1.2
1.3
1.4
1.5
1.6
Dichiarazione Di Conformità
Informazioni Sulla Sicurezza
Installazione
Inserimento Del Mobile
Importante
Allacciamento Elettrico
Dotazione Del Forno (secondo Modello)1.7
2.1
2.2
2. Consıglı Utili
Griglie Forno - Sistema Di Arresto
La Cottura Al Grıll
2.3 Secondo Modello Led Vision
2.
2.
4 Tempı Di Cottura
5 Pulizia E Manutenzione
2.6 AQUACTIVA
2.7 Pulızıa E Manutenzıone
2.8
3. Contamınutı
3.1
3.2
3.4
Uso Del Contaminuti
Uso Del Temporizzatore
3.3 Regolazione Ora
4. Istruzioni Per L’uso
5. Tabella Tempi Di Cottura
La Funzione
Garanzie
Timer Elettronico A Sfioramento
IT
...................................................................04
.......................................................................06
..........................................................06
..........................................................06
....................................................................................06
....................................................................06
.....................................................................................06
..................................................................06
.......................................06
.................................................07
............................................................................07
..........................................................07
............................................................................07
.................................................................07
..............................................................08
..................................................................08
..........................................................................................08
.....................................................................09
..................................................................09
............................................................................09
......................................................09
...................................................................................07
.....................................................................................09
.........................................................................10
...........................................................11-12
INHOUDSOPGAVE
VEILIGHEIDSVOORSCHRIFTEN
1. Algemene Aanwijzingen
2. Nuttige Tips
3. Kookwekker
4.
1.1 Lees Deze Handleiding Aandachtig
1.2 Veiligheıdsvoorschriften
1.3 Installatie
1.4 Inbouw Van De Oven
1.5 Belangrijk
1.6 Elektrische Aansluiting
1.7 Uitrustıng Van De Oven Afhankelijk Van Het Model
2.1 Veiligheidssysteem Voor De Roosters
2.2 Grilleren
2.3 De U-cook Modellen
2.4 Afhankelijk Van Model:u-see
2.5 Zelfreinigende Ovenwanden
2.6 Aquactivafunctie
2.7 Schoonmaken En Onderhoud
2.8 Servıce Dienst
3.1 Gebruik Van De Kookwekker
3.2 Gebruik Van De Tımer Met Uitschakelfunctie
3.3 De Juiste Tijd Instellen
3.4 Elektronische Programma's Gebruiken
5.
Instructies Voor Het Gebruik Van De Oven
Baktijden En-temperaturen Voor Geventileerde Oven
NL
.......................................................29
..................................................................31
...............................................31
.................................................................31
.......................................................................................31
......................................................................31
.......................................................................................31
..................................................................31
......................31
............................................32
..........................................................................................32
...................................................................32
.........................................................32
..........................................................32
............................................................................32
.......................................................32
...............................................................................33
.........................................................33
................................33
..................................................................33
.........................................33
....................................................................................32
......................................................................................33
................................34
...............35
CONTENTS
Safety Instructions
1. General Warnings
1.1 Declaration Of Compliance
1.2 Safety Hints
1.3 Installation
1.4 Fitting The Oven Into The Kitchen Unit
1.5 Important
1.6 Connecting To The Power Supply
1.7 Oven Equipment (according To The Model)
2.1 Shelf Safety System
2.2 Grilling
2.3 The U-Cook Models
2.4 U-See
2.5 Self-cleaning Oven With Catalytic
2.6 AQUACTIVA Function
2.7 Cleaning And Maintenance
2.8 Service Centre
3.1 Using The Minute Timer
3.2 Using The End Of Cooking Timer
3.3 Setting The Correct Time
3.4 Use Of The Electronic Programmer
2. Useful Tips
3. Timer
4. Operating Instructions
5. Tables Of Cooking Times
GB
.............................................................................13
............................................................................15
...........................................................15
....................................................................................15
.....................................................................................15
.........................................15
......................................................................................15
..................................................15
.................................15
.....................................................................16
...........................................................................................16
.....................................................................16
.............................................................................................16
.................................................16
...........................................................16
............................................................16
..............................................................................17
.................................................................17
...................................................17
................................................................17
...............................................17
......................................................................................16
................................................................................................17
......................................................................18
............................................................19-20
INHALTSVERZEICHNIS
SICHERHEITSVORSCHRIFTEN
1.1 Konformitätserklärung:
1.2 Sicherheitshınweise
1.3 Installation
1.4 Einbau In Den Schrank
1.5 Wichtig
1.6 Elektrischer Anschluß
1.7 Ofenausstattung (je Nach Modell)
2.1. Kippgesicherte Gitterroste
2.2. Grillen
2.4 Beleuchtungssystem U-see - Je Nach Modell
2.5 Katalytisches Selbstreinigungsset
2.6 Aquactiva Funktion
1. Allgemeine Hinweise
2. Einige Nützliche Hinweise
2.3 The U_cook Models
2.7 Reinigung Und Wartung
2.8 Technischer Kundendienst
3.1 Minutenzähler
3.2 Benutzung Des Timers Für Backzeitende
3.3 Einstellung Der Richtigen Uhrzeit
3.4 Touch Timer
3. Minutenzähler
4. Bedienungsanleitung
5. Garzeiten
DE
........................................................36
....................................................................37
..................................................................38
......................................................................38
......................................................................................38
..................................................................38
..........................................................................................38
....................................................................38
.................................................38
............................................................39
...........................................................................................39
......................................................................39
..............................39
.................................................39
......................................................................39
................................................................39
............................................................40
................................................................................40
.....................................40
.................................................40
...................................................................................40
............................................................39
...............................................................................40
....................................................................41
..................................................................................42-43
SOMMAIRE
CONSEILS DE SÉCURITÉ
1. Instructions Generales
1.1 Declaration De Conformité
1.2 Consignes De Securite
1.3 Installation
1.4 Mise En Place Du Four Dans Son Meuble
1.5 Important
1.6 Alimentation Electrique
1.7 Important
1.8
2.1 Grilles Du Four, Nouveau Système D’arrêt
2.2 La Cuısson Au Gril
Equipement Du Four Equipement Different Selon Le Type De Four
2. Consignes Utiles
2.3 Selon Modèle Le Pack U-cook
2.4 Selon Modèle U-see
2.5 Four Autonettoyant Par Catalyse
2.6 Fonction Aquactiva
2.7 Conseils De Nettoyage Et D’entretien
2.8 Assistance Technique
3.1 Sonore
3.2 Utilisation Du Mınuteur Coupe-circuit
3.3 L'heure
3.4
3. Minuteur
Utilisation Du Minuteur
Reglage De
4. Instructions Pour L’utilisation
5. Temps De Cuisson
Horloge À Commande Sensitive
FR
..............................................................44
....................................................................45
.............................................................46
...................................................................46
.....................................................................................46
....................................46
........................................................................................46
..................................................................46
......................................................................................46
...46
...................................47
.......................................................................47
.....................................................47
...................................................................47
..................................................47
........................................................................47
...........................................48
....................................................................48
......................................................48
.............................................48
.......................................................................48
....................................................48
............................................................................47
..........................................................................................48
......................................................49
....................................................................50-51
CONTENIDO
Instruccıones Para Un Uso Seguro
1. Instrucciones Generales
1.1 Declaración De Conformidad
1.2 Información Sobre Seguridad
1.3 Instalación
1.4 Introducción Del Mueble
1.5 Importante
1.6 Conexión Eléctrica
1.7 Equipamiento Del Horno - Según El Modelo -
2.1 Rejillas Horno - Sistema De Sujeción
2.2 La Coccıón Al Grill
2. Consejos Útiles
2.3 Los Modelos U-cook
2.4 Segùn Modelos U-see
2.5 Horno Autolımpiante Catalítico
2.6 Función Aquactiva
2.7 Limpieza Y Mantenimiento
2.8 Asistencıa Técnica
3.1 Uso Del Mınutero
3.2 Uso Del Temporizador
3.3 Ajuste De La Hora
3.4
3. Mınutero
4. Instrucciones De Uso
5. Tablas De Tiempos De Cocción
Temporizador Táctil
ES
....................................................21
...............................................................23
..
.......................................................23
.....................................................23
...................................................................................23
................................................................23
.....................................................................................23
........................................................................23
...............................23
............................................24
........................................................................24
..................................................................24
...................................................................24
......................................................24
.......................................................................24
...........................................................25
.........................................................................25
..........................................................................25
...................................................................25
........................................................................25
........................................................................25
................................................................................24
.........................................................................................25
....................................................................26
...............................................27-28

CONTEÚDO
INSTRUÇÕES DE SEGURANÇA
1. Indicações De Carácter Geral
2. Sugestões Úteis
3. Timer
4. Instruções De Operação
5. Tabelas De Tempos De Cozedura
1.1 Declaração De Conformidade:
1.2 Informação Sobre Segurança
1.3 Instalação
1.4 Montagem Do Forno
1.5 Importante
1.6 Ligação Do Forno À Rede De Alimentação De Energia
1.7 Equipamento Do Forno (de Acordo Com Modelo)
2.1 Sistema De Segurança Das Prateleiras
2.2 Grelhar
2.3 Os Models -u-cook
2.4 De Acordo Com O Modelo U-see
2.5 Forno Auto-limpante Com Revestimento Catalitico
2.6 Função de limpeza fácil “AQUACTIVA”
2.7 Limpeza E Manutenção
2.8 Assistêncıa Técnica
2.9 Condições De Garantia
3.1 Utilização Do Conta Mınutos
3.2 Utilização Do Programador De Fim De Cozedura
3.3 Acertar O Relógıo
3.4 Relógio (timer) Por Toque
PT
.......................................................52
.........................................................53
......................................................54
.......................................................54
.....................................................................................54
.....................................................................54
...................................................................................54
...............54
.........................54
........................................55
..........................................................................................55
........................................................................55
..................................................55
......................55
..........................................56
..............................................................................55
................................................................56
......................................................................56
...............................................................56
.........................................................57
........................57
..........................................................................57
.............................................................57
...............................................................................................57
...............................................................58
...........................................59-60
SPIS TREŚCI
PL
....................................................61
.......................................................................63
.......................................................................63
.............................................................................................63
..........................................................................................63
.............................................63
................................................................63
................................................................64
.......................................................................64
...........................................................................64
...........................................................64
.............................65
..........................................................................65
............................................................65
..........................................................................65
.................................................................66
...................................66
..........................................................................66
............................................................................66
.....................................................................64
........................................................................66
.................................................................67
...........................................................68-69
INSTRUKCJE BEZPIECZEŃSTWA
1. Wskaz wki Og lne
1.1 Deklaracja Zgodno ci
1.2 Uwaga
1.3Instalacja
1.4 Osadzenie Ur adzenia W Obudowie
1.5 Pod czenie Elektryczne
1.6 Wyposa enie Piekarnika
2. U
óó
ś
ż
łą
ż
żteczne Wskazówki
2.2 Pieczenie Z Grillem
2.3 Modele U.COOK
2.4 Zaleznie Od Modelu U.SEE
2.5 Katalityczny Piekarnik Samooczyszczający Się
2.6 Funkcja Aquactiva
2.7 Czyszczenie I Konserwacja
2.8 Serwis Techniczny
3.1 Korzystanie Z Minutnika
3.2 Korzystanie Z Wyłącznika Końca Pieczenia
3.3 Ustawianie Zegara
3.4 Zegar Dotykowy
3. Regulator Czasowy
4. Instrukcje Użytkowania
5. Tabela Czasów Wypieku
OBSAH
BEZPEČNOSTNÍ POKYNY
1.1
1.2
1.3
1.4 Vestavění Trouby Do Kuchyňské Linky
1.5 Důležité
1.6 Připojení K Elektrické Síti
1.7 ( Podle Modelu)
2.1 Bezpečnostní Systém Roštu
2.2 Grilování
2.3 U-cook Modely
2.4 Podle Modelu Led Vision
2.5 Samočištění Trouby Pomocí Katalytické Vložky
2.6 Funkce Aquactiva
2.7 ištění A Údržba
2.8
3.1 Použití Minutky
3.2 Použití asovače Ukončení Vaření
3.3
3.4
1. Všeobecná Upozornění
Prohlášení O Shodě
Bezpečnostní Tipy
Instalace
Vybavení Trouby
2. Užitečné Tipy
Č
Servisní Středisko
3. asom iČěřč
Č
Nastavení Správného Času
Využití asu Dotykové Ovládání Programmer - ProgramováníČ
4. Pokyny K Použití
5. Tabulky Časů Přípravy
CZ
................................................................70
................................................................72
.......................................................................72
.........................................................................72
........................................................................................72
.........................................72
.........................................................................................72
...............................................................72
................................................72
..........................................................73
..........................................................................................73
........................................................................73
...............................................................73
...........................73
..........................................................................73
.................................................................................73
..........................................................................74
.........................................................................74
..............................................................................74
...............................................74
...........................................................74
....74
......................................................................................74
...........................................................................75
............................................................76-77
VSEBINA
SI
..........................................................................78
...........................................................................79
.........................................................................79
............................................................................79
................................................................80
.....................................................80
..........................................................................80
......................................80
............................................80
................................................................81
...................................................................................................81
................................................................................81
...........................................................81
......................................................81
.........................................................................81
......................................................81
.....................................................................................81
............................................82
.........................................................82
.............................................................82
...............................................................82
...............................................................................81
.....................................................................................82
............................................................................................83
..................................................84-85
Varnostna Navodıla
1. Splošna Opozorıla
1.1 Izjava O Skladnostı
1.2 Varnostnı Napotkı
1.3
1.4
1.5 Pomembnı Napotkı
1.6
1.7 odvisno Od Modela)
2.1 Nekaj Korıstnıh Nasvetov
2. Korıstnı Nasvetı
2.2
2.3
2.4 Odvisno Od Modela: U-see
2.6 Funkcija Aquactiva
2.7
2.8 Servisiranje
3.
3.1 Uporaba Števca Mınut (kuhınjske Ure)
3.2
3.3
3.4
4.
5.
Namestitev In Priključitev
Vgradnja Pečice V Kuhinjski Niz
Priključitev Pečice Na Električno Omrežje
Oprema Pečice (
Žar
Modelı U-cook
Nastavljanje
Nastavljanje Trajanja Pečenja
Nastavljanje Točnega Časa
Uporaba Programske Ure
Funkcije
Razpredelnice Časov Pečenja
2.5 Čiščenje In Vzdrževanje Pečice
Čiščenje In Vzdrževanje Pečice
СЪДЪРЖАНИЕ
ТЕХНИКА НА БЕЗОПАСНОСТ
1. Общи мерки за безопасност
Декларация за съответствие
Съвети за безопасност
Монтаж
Монтиране на фурната в кухнята
1.1
1.2
1.3
1.4
1.5 Важно
Свързване към захранването
Оборудване на фурната в зависимост от модела
1.6
1.7 ( )
2.1
2. Полезни съвети
Система за безопасност на рафтовете
Грил
Модели
2.2
2.3 U-Cook
2.4 U-See
2.5 Време за готвене
Самопочистваща се ФУРНА с катализатор
функция
2.6
2.7 AQUACTIVA
2.8
2.9
Почистване и поддръжка
Сервизен център
Използване на таймера
3. Таймер
3.1
3.2
3.3
3.4
Използване на таймера за край на готвенето
Използване на електронния програматор
Настройка на точното време
4. Инструкции за работа
Таблици на времената за готвене5.
БГ
...........................................................86
........................................................87
........................................................87
.
.
................................................................88
..........................................................................................88
................................................88
..............................................................................................88
.......................................................88
....................88
.......................................89
.................................................................................................89
..............................................................................89
..............................................................................................89
...........................................................................89
.................................89
..............................................................89
..............................................................89
.........................................................................90
.................................................................90
.............................90
...................................90
........................................................90
..............................................................................89
.............................................................................................90
..................................................................91
..........................................92-93

INDICAZIONI DI SICUREZZA
04 IT
• Mantenere lontano dall'elettrodomestico i bambini di età inferiore agli 8 anni, a meno che non siano
continuamente supervisionati.
• Dopo la pulizia, rimontarle secondo le istruzioni.
• Non utilizzare materiali ruvidi, abrasivi o raschietti metallici affilati per pulire le porte in vetro del forno,
dato che possono graffiare la superficie e causare la frantumazione del vetro.
• Non utilizzare un getto di vapore per pulire l’elettrodomestico.
• Questa operazione deve essere eseguita solo da un tecnico adeguatamente addestrato. Il conduttore
di terra (giallo-verde) deve essere circa 10 mm più lungo degli altri conduttori. Per qualsiasi tipo di
riparazione, fare riferimento unicamente al Reparto di Assistenza Cliente e richiedere l'utilizzo di ricambi
originali.
• I bambini non devono giocare con l’elettrodomestico. L'elettrodomestico può essere utilizzato da
bambini di età superiore a 8 anni e da persone con ridotte capacità fisiche, sensoriali o mentali, oppure
prive di esperienza e conoscenza, che siano state supervisionate o istruite riguardo all’uso
dell’elettrodomestico in sicurezza, comprendendo i rischi che derivano dall'uso dello stesso.
• Utilizzare solo la sonda carne consigliata per questo forno.
Il collegamento alla rete di alimentazione può essere effettuato anche collocando un interruttore
automatico onnipolare tra l'elettrodomestico e la rete di alimentazione, in grado di supportare il carico
massimo collegato, in linea con la legislazione corrente.
• Collegare al cavo di alimentazione una spina dimensionata per la tensione, la corrente e la potenza
indicate nella targhetta e dotata del contatto di terra. La presa deve essere adatta al carico indicato sulla
targhetta e deve avere il contatto di terra collegato e in funzione. Il conduttore di terra è di colore giallo-
verde.
Il cavo di terra giallo-verde non deve essere interrotto dall'interruttore automatico. La presa o
l'interruttore automatico onnipolare utilizzati per il collegamento devono essere facilmente accessibili al
momento del montaggio dell'elettrodomestico.
Questa operazione deve essere eseguita solo da un tecnico adeguatamente addestrato. In caso di
incompatibilità tra presa e spina dell'elettrodomestico, richiedere ad un tecnico specializzato di sostituire
la presa con un'altra di tipo compatibile. La spina e la presa devono essere conformi alle normative attuali
del paese di installazione.
• Qualsiasi materiale fuoriuscito in eccesso deve essere tolto prima della pulizia.
• La disconnessione può essere eseguita con la spina accessibile o aggiungendo un interruttore sul
cablaggio fisso, nel rispetto delle normative relative ai cablaggi.
• Il mancato rispetto di quanto indicato sopra può compromettere la sicurezza dell'elettrodomestico e
rendere nulla la garanzia.
• Il forno deve essere spento prima di rimuovere le parti rimovibili.
• Se il cavo di alimentazione si danneggia, deve essere sostituito con un cavo o uno speciale fascio di
cavi disponibile presso il produttore o contattando il reparto assistenza al cliente.
• Il cavo di alimentazione deve essere di tipo H05V2V2-F
• Le operazioni di pulizia e manutenzione non devono essere effettuate dai bambini senza sorveglianza.
• AVVERTENZA: per evitare rischi causati da un involontario ripristino dell'interruttore automatico,
l'elettrodomestico non deve essere alimentato da un dispositivo di commutazione esterno, quale ad
esempio un
• Evitare di lasciare gli alimenti all'interno del forno dopo la cottura per più di 15/20 minuti.
contaminuti, oppure essere collegato ad un circuito che viene regolarmente acceso e spento.
• Durante la cottura, l'umidità può condensarsi all'interno del vano cottura o sul vetro della porta. Questa
è una condizione normale. Per ridurre questo effetto, attendere 10-15 minuti dopo l'accensione prima di
mettere gli alimenti all'interno del forno. In ogni caso, la condensa scompare quando il forno raggiunge la
temperatura di cottura.
•AVVERTENZA: l'elettrodomestico e le sue parti accessibili diventano calde durante l’uso.
• Cuocere le verdure in un contenitore con coperchio invece che in un vassoio aperto.
Fare attenzione a non entrare in contatto con componenti surriscaldati.
• AVVERTENZA: le parti accessibili possono diventare calde quando si utilizza il grill. I bambini devono
rimanere a distanza di sicurezza.
• AVVERTENZA: assicurarsi che l'elettrodomestico sia spento prima di sostituire la lampadina per
evitare ogni possibilità di folgorazione.

•ATTENZIONE: Non riempire il fondo della cavità con acqua durante la cottura o quando il forno è caldo.
contatto con lo smalto caldo, rischiano di
• Per far funzionare l'apparecchio alle frequenze nominali non sono necessarie ulteriori operazioni o
regolazioni.
• L’elettrodomestico non deve essere installato dietro a una porta a scopo ornamentale per evitarne il
surriscaldamento.
alluminio o qualsiasi altra protezione, a diretto
•AVVERTENZA: Non togliere mai la guarnizione della porta del forno.
• AVVERTENZA: Non rivestire le pareti del forno con fogli di alluminio o protezioni monouso disponibili
nei negozi. I fogli di
• L’interruzione prolungata dell’alimentazione durante una fase di cottura potrebbe causare un guasto
del monitor. In tal caso contattare il servizio clienti.
• Quando si posiziona uno scaffale all’interno, accertarsi che il blocco sia rivolto verso l’alto e nella parte
posteriore della guida. Lo scaffale deve essere inserito completamente nella guida
fondere e deteriorare lo smalto degli interni.
05 IT

1- AVVERTENZE GENERALI
Durante l’uso il forno diventa caldo, fare attenzione a non toccare gli elementi riscaldanti all’interno del forno.
• Conservare con cura questo libretto per ogni ulteriore consultazione.
Vi ringraziamo per aver scelto uno dei nostri prodotti, per ottenere da questo elettrodomestico le migliori prestazioni consigliamo di:
Alla prima accensione del forno può svilupparsi fumo di odore acre, causato dal primo riscaldamento del collante dei pannelli d’isolamento
avvolgenti il forno. Si tratta di un fenomeno assolutamente normale e, in caso si verificasse, occorre attendere la cessazione del fumo prima di
introdurre le vivande.
Il forno è per sua natura un apparecchio che diventa caldo, in modo particolare in corrispondenza del cristallo porta.
• Leggere attentamente le avvertenze contenute nel presente libretto.
Apponendo il marchio su questo prodotto, confermiamo la
conformità a tutti i requisiti di legge europei in materia di sicurezza,
salute e tutela ambientale applicabili per legge a questo prodotto.
Per i modelli sprovvisti di spina, montare sul cavo una spina
normalizzata che sia in grado di sopportare il carico indicato in targa. Il
conduttore di messa a terra e contraddistinto dai colori giallo-verde.
Tale operazione dovrà essere eseguita da personale professional-
mente qualificato.
Importante: in fase di installazione, posizionare il cavo di
alimentazione in modo che in nessun punto si raggiungano
temperature superiori di 50°C alla temperatura ambiente.
In caso di incompatibilità tra la presa e la spina dell’apparecchio fare
sostituire la presa con altra di tipo adatto, da personale professional-
mente qualificato. Si può effettuare anche l’allacciamento alla rete
interponendo tra l’apparecchio e la rete un interruttore omnipolare
dimensionato al carico e rispondente alle norme in vigore. Il cavo di
terra giallo-verde non deve essere interrotto dall’interruttore. La presa
o l’interruttore omnipolare usati per l’allacciamento devono essere
facilmente accessibili ad elettrodomestico installato.
L’apparecchio è conforme ai requisiti di sicurezza previsti dagli istituti
normativi. La sicurezza elettrica di questo apparecchio è assicurata
soltanto quando lo stesso è correttamente collegato ad un efficace
impianto di messa a terra come previsto dalle vigenti norme di
sicurezza elettrica, (in caso di dubbio, richiedere un controllo accurato
dell’impianto da parte di personale professionalmente qualificato).
Importante: la ditta costruttrice resta sollevata da ogni
responsabilità per eventuali danni a persone o cose, derivanti
dal mancato allacciamento della linea di terra.
ATTENZIONE: la tensione e la frequenza di alimentazione sono
indicate in targa matricola (figura in ultima pagina). Verificare
che la portata elettrica dell’impianto e delle prese di corrente
siano adeguate alla potenza massima dell’apparecchio indicate
in targa. In caso di dubbio rivolgersi ad una persona
professionalmente qualificata.
Inserire la spina in una presa di corrente munita di un terzo contatto
corrispondente alla presa di terra, che deve essere collegata in modo
efficiente.
1.6 ALLACCIAMENTO ELETTRICO
06 IT
1.1. DICHIARAZIONE DI CONFORMITÀ
1.2 INFORMAZIONI SULLA SICUREZZA
In particolare:
•Questo apparecchio dovrà essere destinato solo all’uso per il quale è
stato espressamente concepito, e cioè per la cottura di alimenti.
Ogni altro uso (ad esempio riscaldamento ambiente) è da
considerarsi improprio e quindi pericoloso. Il costruttore non può
essere considerato responsabile per eventuali danni derivanti da usi
impropri, erronei ed irragionevoli.
•L’uso di un qualsiasi apparecchio elettrico comporta
l’osservanza di alcune regole fondamentali.
-non tirare il cavo di alimentazione per staccare la spina dalla presa di
corrente
-non usare l’apparecchio a piedi nudi
- In caso di guasto e/o di cattivo funzionamento dell’apparecchio,
spegnerlo e non manometterlo.
aprire il coperchio morsettiera, togliere il cavo di alimentazione e
sostituirlo con uno corrispondente, (tipo H05RR-F, H05VVF,
H05V2V2-F) e adeguato alla portata dell’apparecchio.
Tale operazione dovrà essere eseguita da personale
professionalmente qualificato. Il conduttore di terra (giallo-verde),
deve obbligatoriamente essere più lungo di circa 10 mm rispetto ai
conduttori di linea.
Per l’eventuale riparazione rivolgersi solamente ad un centro di
assistenza tecnica autorizzato e richiedere l’utilizzo di ricambi
originali.
•Non rivestire le pareti del forno con fogli d'alluminio da cucina o
fogli monouso commerciali, perche potrebbero fondersi a
contatto con le superfici in smalto caldo e danneggiare le
superfici in smalto all'interno del forno.
-non toccare l’apparecchio con mani o piedi bagnati o umidi
-in generale è sconsigliabile l’uso di adattatori, prese multiple e
prolunghe.
•In caso di danneggiamento del cavo, provvedere tempestivamente
alla sua sostituzione secondo le seguendi indicazioni:
Il mancato rispetto di quanto sopra può compromettere la sicurezza
dell’apparecchio.
1.3 INSTALLAZIONE
L’installazione è a carico dell’acquirente e la Casa Costruttrice è
esonerata da questo servizio; gli eventuali interventi richiesti alla
Casa Costruttrice che dipendono da una errata installazione non sono
compresi nella garanzia.
L’installazione deve essere effettuata secondo le istruzioni da
personale professionalmente qualificato. Una errata installazione può
causare danni a persone, animali o cose, nei confronti dei quali il
costruttore non può essere considerato responsabile.
Per garantire un buon funzionamento dell’apparecchio da incasso è
necessario che il mobile sia di caratteristiche adatte. I pannelli dei
mobili adiacenti il forno dovranno essere in materiale resistente al
calore. In particolare nel caso di mobili in legno impiallicciato le colle
dovranno essere resistenti alla temperatura di 120°C: materiali
plastici o collanti non resistenti a questa temperatura sono causa di
deformazioni o scollature. In conformità alle norme di sicurezza, una
volta incassato l’apparecchio, non debbono essere possibili eventuali
contatti con le parti elettriche. Tutte le parti che assicurano la
protezione debbono essere fissate in modo tale da non poter essere
tolta senza l’aiuto di qualche utensile.
Per garantire una buona areazione è necessario eliminare la
parete posteriore del vano; inoltre il pianale di appoggio deve
avere una luce posteriore di almeno 45 mm.
Prima di utilizzare gli accessori del forno per la prima volta è
necessario pulirli. Per questa operazione si consiglia di utilizzare
una spugna. Successivamente risciacquare ed asciugare gli
accessori.
La griglia semplice serve da supporto per teglie, pirofile, stampi per i
dolci.
Grazie ai loro profili speciali, le griglie
restano sempre in orizzontale, anche
quando vengono estratte verso l'esterno.
Non c'é nessun rischio quindi che i tegami scivolino o si ribaltino.
La griglia porta-piatto serve in
particolare per le grigliate di carne
poiché sostiene anche la leccarda che
raccoglie i grassi che colano.
1.7 DOTAZIONE DEL FORNO (secondo modello)
1.4 INSERIMENTO DEL MOBILE
Inserire l’apparecchio nel vano del mobile (sottopiano o in colonna). Il
fissaggio si esegue con 4 viti attraverso i fori della cornice, visibili
aprendo la porta.(vedere ultima pagina). Per consentire la migliore
aerazione del mobile, i forni devono essere incassati rispettando le
misure e le distanze indicate nella figura in ultima pagina.
Nota: per i forni da abbinamento con piano cottura è indispensabile
rispettare le istruzioni contenute nel libretto allegato all’
apparecchiatura da abbinare.
1.5 IMPORTANTE

•Visibilità forno ottimale,
•Durata prolungata nel tempo,
•Consumo energetico
estremamemente
Vantaggi del sistema :
basso -95% dei tradizionali sistemi
di illuminazione forni,
“Apparecchio con luce LED bianca di classe 1M secondo la IEC 60825- 1:1993 +
A1:1997 + A2:2001 (equivalente a EN 60825-1: 1994 + A1:2002 + A2:2001) ;
massima potenza ottica emessa =459nm < 150uW. Non osservare direttamente con
strumenti ottici.”
•Elevato rendimento,
•Design high tech.
07 IT
2- CONSIGLI UTILI
2.1 GRIGLIE FORNO - SISTEMA DI ARRESTO
Il forno è dotato di un nuovo sistema di
arresto griglie. Questo sistema consente
di estrarre le griglie quasi completamente
senza che queste fuoriescano dal forno
mantenendole perfettamente in piano,
consentendo di verificare e mescolare il
cibo con la massima tranquillità e
sicurezza.
2.2. LA COTTURA AL GRILL
Questo tipo di cottura consente la doratura rapida dei cibi. A questo
scopo consigliamo di inserire la griglia generalmente nel 3° o 4°
ripiano, secondo le dimensioni dei cibi (Fig. pag. 8). Quasi tutte le
carni possono essere cotte al grill, fanno eccezione alcune carni
magre di selvaggina ed i polpettoni. La carne ed il pesce da cucinare
al grill vanno leggermente unti con olio.
2.4 SECONDO MODELLO
Il design creato per il supporto dei 14 Led regala un elegante effetto high-
tech
E’ un sistema che si sostituisce all’illuminazione con tradizionali
lampadine ad incandescenza; nella controporta del forno, completamente
in vetro temprato, sono stati inseriti 14 Led, di altissima qualità a luce
bianca, che illuminano l’interno del forno con una luce diffusa permettendo
una visione della cottura senza ombre, su più livelli.
2.5 FORNO AUTOPULENTE CATALITICO
La porosità dello smalto è fondamentale per garantire l’azione
autopulente.
N.B.: Tutti i pannelli autopulenti in commercio hanno un’efficacia di
rendimento di circa 300 ore di funzionamento forno. Dopo tale limite i
pannelli dovrebbero essere sostituiti.
I grassi proiettati sulle pareti durante la cottura, vengono decomposti
dallo smalto, mediante un processo catalitico di ossidazione e
trasformati in prodotti gassosi.
Speciali pannelli autopulenti ricoperti da uno smalto a struttura
microporosa, offerti come accessori opzionali per tutti i modelli,
eliminano la pulizia manuale del forno.
Schizzi eccessivi di grasso possono ostruire i pori e quindi impedire
l’autopulizia. Tale caratteristica può essere ripristinata mediante un
riscaldamento per circa 10-20 minuti del forno vuoto impostando la
manopola forno in corrispondenza della massima temperatura.
Si consiglia inoltre di utilizzare pentole a bordi alti nel caso di cotture di
vivande particolarmente grasse (arrosti, ecc.) e di usare la leccarda
quando si esegue la cottura al grill.
Non usare prodotti abrasivi, pagliette metalliche, oggetti appuntiti,
panni ruvidi, prodotti chimici o detersivi che possono danneggiare
irrimediabilmente lo smalto.
Qualora, per particolari condizioni di sporco, non fosse sufficiente
l’azione precedente, si consiglia di intervenire asportando i grassi con
un panno morbido od una spugna inumiditi con acqua calda.
Per estrarre le griglie è sufficiente, come indicato sul disegno, alzarle,
prendendole dalla parte anteriore e tirarle.
Tutti i forni sono dotati di funzione ,
permettendo una gestione della distribuzione di umidità e
temperatura. Riduce la perdita degli alimenti fino al 50%,
donando morbidezza e fragranza alle pietanze. Una
cottura cosi delicata è indicata sopratutto per il pane e la
pasticceria.
I forni sono dotati di controllo elettronico della ventilazione
di cottura, brevettato VarioFan; il sistema cambia automaticamente la
velocità della ventola del multifunzione per ottimizzare le correnti
d'aria e la temperatura interna della cavità mentre il forno sta
cucinando.
2.3 Secondo modello pacchetto di funzioni
del sistema
Riduce il tempo di preriscaldamento dei forni: sono
sufficienti solo 8 minuti per raggiungere i 200°C.
La nuova porta WIDE OOR ha un'ampia superficie in vetro che
assicura una più facile pulizia e un miglior isolamento termico.
”D”
Offre la possibilità di personalizzare il livello e l'intensità gr
di grigliatura, fino al 50% in più rispetto ad un forno
multifunzione tradizionale.
Pizza set é l'idéale per la cottura delle
pizze. Il set deve essere utilizzato in
abbinamento alla funzione Pizza.
La griglia piatta da combinare con la
leccarda per tutti i tipi di grigliate. Una
presina è fornita per permettere di estrarre
l’insieme dal forno senza scottarsi.
Non lasciare mai la presina nel forno.
Gli accessori devono essere tolti dal forno se non vengono utilizzati.
Attenzione: in tutti gli altri modi di cottura, la leccarda deve essere tolta dal forno.
Non usare mai la leccarda per cuocere gli arrosti perché ne risulterebbe un eccessivo sviluppo di fumo e vapori e il
forno si sporcherebbe inultimente.
Raccoglie i residui di cibo che gocciolano durante la cottura. Deve essere utilizzata solamente con il grill, il girarrosto o il
turbo girarrosto, secondo il modello.
RIMOZIONE E PULIZIA DELLE SCAFFALATURE A FILO
3- Dopo la pulizia, installarle in ordine inverso.
1- Rimuovere le griglie a rete tirandole in direzione
delle frecce (vedi sotto)
2- Per pulire le griglie a rete, metterle in lavastoviglie
o utilizzare una
spugna umida, assicurandosi che siano
successivamente asciugate.
Griglie laterali a rete
Si trovano su entrambi i lati del vano cottura.
Contengono griglie metalliche e vaschette
raccogligocce.
NOTA: Per un corretto utilizzo del forno, si consiglia di non porre gli alimenti a diretto contatto con griglie e vassoi, ma di utilizzare carte forno e/o
appositi contenitori.

2.8 GARANZIE
RISPARMIARE E RISPETTARE L'AMBIENTE
Questo apparecchio è contrassegnato in
conformità alla Direttiva europea 2012/19/EU sulle
apparecchiature elettriche ed elettroniche
(WEEE). I WEEE contengono sia le sostanze
inquinanti (che possono provocare conseguenze
negative sull'ambiente) che componenti di base
(che possono essere riutilizzati). È importante che i
WEEE siano soggetti a rattamenti specifici, per
rimuovere e smaltire correttamente tutti gli inquinanti e recuperare
e riciclare tutti i materiali.
I singoli possono giocare un ruolo importante nell'assicurare che i
WEEE non diventino un problema ambientale; è essenziale
seguire alcune regole di base:
• I WEEE non devono essere trattati come rifiuti domestici.
• I WEEE devono essere portati ai punti di raccolta appositi gestiti
dal comune o da società registrate. In molti Paesi, per i WEEE
grandi, potrebbe essere presente la raccolta domestica.
• Quando si acquista un nuovo apparecchio, quello vecchio
potrebbe essere restituito al rivenditore che deve acquisirlo
gratuitamente su base singola, sempre che l'apparecchio sia del
tipo equivalente e abbia le stesse funzioni di quello acquistato.
Ove possibile, evitare di pre-riscaldare il forno e cercare sempre di
riempirlo. Aprire la porta del forno quanto necessario, perché vi
sono dispersioni di calore ogni volta che viene aperta. Per
risparmiare molta energia sarà sufficiente spegnere il forno dai 5
ai 10 minuti prima della fine del tempo di cottura pianificato, e
servirsi del calore che il forno continua a generare. Tenere le
guarnizioni pulite e in ordine, per evitare eventuali dispersioni di
energia. Se si dispone di un contratto di energia elettrica a tariffa
oraria, il programma “cottura ritardata” renderà più semplice il
risparmio spostando l’avvio del programma negli orari a tariffa
ridotta.
08 IT
2.7 PULIZIA E MANUTENZIONE
Per la pulizia dei vetri della porta del forno non utilizzare materiali
abrasivi raschietti o oggetti che possono graffiare la superficie del
vetro. Pulire le superfici in acciaio inox e smaltate con acqua tiepida e
sapone, oppure con appositi prodotti in commercio, evitando
assolutamente l’uso di polveri abrasive che danneggerebbero le
superfici e le parti estetiche.
Usare detersivi e pagliette d’acciaio per le griglie inox. La pulizia delle
superfici in cristallo temperato deve essere eseguita quando le
superfici sono fredde. Eventuali rotture dovute alla non osservanza di
questa regola elementare non rientrano nei termini di garanzia.
Per eliminare questo fastidioso intervento, su tutti i modelli possono
essere inseriti pannelli autopulenti, offerti come accessori opzionali:
vedere apposito paragrafo«FORNOAUTOPULENTE CATALITICO »
La pulizia del forno è molto importante e deve essere effettuata ogni
volta che questo viene usato. Infatti, sulle pareti si depositano grassi
sciolti durante la cottura che potrebbero, alla successiva accensione,
produrre odori sgradevoli che nuocerebbero al buon esito della
cottura. Per la pulizia usare acqua calda e detersivo, sciacquando
accuratamente.
La lampada forno può essere sostituita disinserendo elettricamente
l’apparecchio e svitando l’ampolla che la racchiude, sostituendo la
lampada non funzionante con una analoga resistente alle alte
temperature.
La procedura “ ” utilizza il vapore per facilitare la
rimozione dal forno del grasso e dei pezzi di cibo rimasti.
AQUACTIVA
1. Inserire 300 ml di acqua distillata o potabile nel contenitore dell’
AQUACTIVA sul fondo del forno
4. Lasciar funzionare l'elettrodomestico per 30 minuti
Attenzione
Assicurarsi che l'elettrodomestico sia freddo prima di toccarlo, c'è il
rischio di scottarsi.
2. Impostare la funzione del forno su Statico ( ) o su Riscaldamento
( ) dal basso
Utilizzare acqua distillata o potabile.
3. Impostare la temperatura sull'icona ( )AQUACTIVA
5. Disattivare la macchina e lasciare che si raffreddi
Una volta che l'elettrodomestico si è raffreddato, pulire la superfice
interna del forno con uno straccio
2.6 AQUACTIVALA FUNZIONE
300 ml
Il prodotto è garantito, oltre che ai sensi di legge, alle condizioni e nei
termini riportati sul certificato di garanzia convenzionale inserito nel
prodotto. Il certificato dovrà essere conservato e mostrato al nostro
Centro di Assistenza Tecnica Autorizzato, in caso di necessità,
insieme allo scontrino comprovante l'acquisto dell'elettrodomestico.
Puoi consultare le condizioni di garanzia anche sul nostro sito
internet. Per ottenere assistenza compila l'apposito form on-line
oppure contattaci al numero che trovi indicato nella pagina di
assistenza del nostro sito internet.

Per selezionare il tempo prescelto, ruotare
la manopola di un giro completo, quindi
ritornare con l’indice nella posizione
corrispondente al tempo desiderato. Allo
scadere del tempo, entrerà in azione la
suoneria per alcuni secondi. Allo scadere del tempo prescelto, la
manopola raggiungerà la posizione di
suoneria O in corrispondenza della qua le i l
forno s i spegne automaticamente.
Il forno può essere acceso solo
impostando un tempo di cottura o girando la manopola in
posizione .
Con questo meccanismo è possibile
programmare la durata espressa in minuti
della cottura e quindi lo spegnimento
automatico del forno al termine del tempo
desiderato (max. 120 minuti).
3.1 USO DEL CONTAMINUTI 3.2 USO DEL TEMPORIZZATORE
•Imposta l'ora con i tasti " " " ".-+
•Premere il tasto centrale.
•Lasciare i tasti.
ATTENZIONE: la prima operazione da eseguire dopo l’installazione o dopo una interruzione di corrente
(tali situazioni si riconoscono perchè sul dispay lampeggia l’ora ) è la regolazione dell’ora, come di
seguito descritto.
12:00
3.4 TIMER ELETTRONICO A SFIORAMENTO
3.3 REGOLAZIONE ORA
ATTENZIONE: Il forno funziona solo se impostato in modalità manuale o cottura programmata.
3. CONTAMINUTI
BLOCCO
BAMBINO
FUNZIONE
COME SI ATTIVA COME SI SPEGNE COSA FA A COSA SERVE
CONTAMINUTI
DURATA
COTTURA
FINE
COTTURA
•Premere il tasto centrale
1 volta.
•Premere i tasti " " " "
per regolare la durata
•Lasciare i tasti
-+
•Al termine della durata
impostata la funzione si
spegne da sola ed avvisa
con un segnale sonoro (il
segnale sonoro si ferma da
solo; per fermarlo subito
premere il tasto) SELECT.
•Da un segnale sonoro al
termine di un tempo
stabilito
•Durante il funzionamento
il display visualizza il
tempo rimanente.
•Permette di utilizzare il
programmatore del forno
come una sveglia (può
essere usato con forno
funzionante o spento.
•Premere il tasto centrale
2 volte
•Premere i tasti " " " "
per regolare la durata
•Lasciare i tasti
•Selezionare la funzione
di cottura con la
manopola commutatore
-+
•Al termine della durata
impostata il forno si spegne
da solo; se deve essere
fermato prima si deve
portare la manopola
commutatore in posizione
O oppure portare a 0:00 la
durata della cottura
(tasti SELECT e " " " ").-+
•Permette di impostare la
durata della cottura del
cibo inserito nel forno
•Per visualizzare il tempo
rimanente premere il
tasto SELECT.
•Per modificare il tempo
rimanente premere il
tasto SELECT +" " " "-+
•Per interrompere il segnale
premere un tasto qualsiasi.
Premere il tasto centrale
per tornare alla funzione
orologio.
•Premere il tasto centrale
3 volte
•Premere i tasti " " " "
per regolare l’ora di fine
cottura
•Lasciare i tasti
•Selezionare la funzione
di cottura con la
manopola commutatore
-+
•All’ora impostata il forno
si spegne da solo; se deve
essere fermato prima
è necessario portare la
manopola commutatore
in posizione O.
•Permette di
memorizzare l’ora di fine
cottura
•Per visualizzare l’ora
programmata premere il
tasto centrale 3 volte
•Per modificare l’ora
programmata premere i
tasti SELECT + " " " "-+
•Al termine della durata impostata il
forno si spegne automaticamente
ed avvisa con un segnale sonoro.
Selezionare la funzione di cottura
desiderata Impostare la durata
cottura a 45 minuti ( )
Impostare la fine cottura alle ore
12:30 ( )
"" ""-+
"" ""-+La cottura avrà
auto-maticamente inizio alle 11:45
(12:30 meno 45 minuti), all’ora
impostata come fine cottura il
forno si spegne automaticamente.
ATTENZIONE: impostando solo la
fine cottura e non la durata della
cottura, il forno si accenderà
subito e si spegnerà all’ora di fine
cottura impostata.
•Tipicamente si utilizza questa
funzione con la funzione DURATA
COTTURA–ad esempio il cibo
desiderato deve cuocere per 45
minuti e desidero che sia pronto per le
ore 12:30; in tal caso:
•Tenere premuto per 5
secondi il tasto (+), Da
questo momento lo
schermo visualizza
alternativamente “STOP”
e il tempo preimpostato.
•Tenere premuto per 5
secondi il tasto (+). Da
questo momento tutle le
funzioni sono riabilitate.
00:00
select
09 IT

4. ISTRUZIONI PER L’USO
10 IT
Accende la luce interna.
Scongelamento
Questa posizione permette di far circolare l’aria a temperatura ambiente intorno al cibo
surgelato facendolo così scongelare in pochi minuti senza modificare od alterare il
contenuto proteico.
Sono in funzione le resistenze superiore e inferiore.
È la cottura tradizionale, ottima per arrostire cosciotti, selvaggina, ideale per biscotti,
mele al forno e per rendere i cibi molto croccanti
Convezione naturale
Forno ventilato
L’aria calda, viene ripartita sui diversi ripiani; è l’ideale per cuocere contemporaneament
e diversi tipi di cibo (carne, pesce), senza miscelare sapori e odori. Cottura delicata -
indicata per pan di Spagna, torte Margherita, pasta sfoglia, ecc...
Suola ventilata
Adatta per cotture delicate (torte-soufflè).
Grigliatura tradizionale a porta chiusa
In questa posizione viene inserita la resistenza del grill. Ottima nella cottura di carni di
medie e piccolo spessore (salsicce, costine, bacon).
TURBO-GRILL (a) : l'utilizzo del turbo-grill richiede la porta chiusa.
Utilizzando la ventilazione e la resistenza cielo contemporaneamente.
Si cuociono perfettamente grandi pezzi di cibo, come arrosti, pollame, ecc.. Mettete la
griglia a metà del forno e posizione la leccarda sotto di essa per raccogliere i grassi.
Assicuratevi che il cibo non sia troppo vicino al grill. Girate la carne a metà cottura.
* Testato secondo la norma EN 60350-1 ai fini della dichiarazione di consumo energetico e della classe energetica.
Manopola
commutatore
Temperatura
proposta
e regolazione
(Type A)
Manopola
termostato
FUNZIONE
(a) SUALCUNI MODELLI - Funzione con VARIO FAN : Vano Fan é l'esclusivo sistema di funzionamento sviluppato da Candy per ottimizzare i
risultati di cottura, la gestione della temperatura e la gestione dell'umidità. Il sistema Vario Fan modifica automaticamente la velocità di
rotazione della ventola per tutte le cotture in multifunzione. Questo sistema si attiva automaticamente tutte le volte che viene selezionata una
funzione all'interno dell'area tratteggiata sul pannello di controllo.
230
210
210

5. TABELLA TEMPI DI COTTURA
I tempi suggeriti nelle seguenti tabelle sono indicativi, infatti possono variare secondo la qualità, la freschezza, la dimensione e lo spessore degli
alimenti e secondo il vostro gusto. Lasciare sempre riposare per alcuni minuti prima di servire, perché tutti gli alimenti continuano a cuocere dopo
averli tolti dal forno.
CONSIGLIO UTILE: Per non rendere le superfici troppo secche è
consigliato abbassare la temperatura e allungare i tempi di cottura.
Posizione ripiani
4
3
2
1
11 IT
Forno elettrico statico Forno elettrico ventilato
22
• Pasta
22
22
22
11
21
22
33
22
21
2
2
Pietanza
Quantità
Ripiano
Tempo
di cottura
in minuti
Tempe-
ratura
forno
Ripiano
Tempo
di cottura
in minuti
Tempe-
ratura
forno
Osservazioni
Inserire le lasagne nel forno freddo
Preparate la pasta a forma di pagnotta e
incidere con un coltello una croce sulla
parte superiore della forma. Lasciare
lievitare a temperatura ambiente almeno 2
ore, ungere la leccarda e posizionate la
forma bene al centro della stessa.
Preriscaldate per 15min. il forno e
preparate le pizze nella leccarda
smaltata con pomodori, mozzarella e
prosciutto, olio, sale, origano
Disponete 24 vol au vent nella leccarda
e cuocete.
Preriscaldate per 15 min., ungere la teglia
del forno, disporre le 4 focacce oliate e
salate prima di infornare, lasciare lievitare
a temperatura ambiente per almeno 2 ore
Disporre la carne in una teglia Pirex a
bordo alto con sale pepe. Voltare a
metà cottura
Cuocere come sopra
Cuocere come sopra
Cuocere come sopra
Inserire i cannelloni nel forno freddo
Lasagne
Cannelloni
Pasta al forno
• Paste salate
Pane
Pizze
Pasta sfoglia
Vol au vent
(Surgelati)
Focaccia
(n° 4)
• Carne
Tutte le carni possono essere cotte in recipiente con bordo basso o bordo alto.
È consigliabile coprire il recipiente a bordo basso con un coperchio per evitare di sporcare il forno con schizzi del condimento.
Le carni coperte risultano più morbide e succose, mentre quelle scoperte risultano più croccanti.
I tempi indicati valgono per cotture con recipiente coperto o scoperto.
Roastbeef
intero
Arrosto di maiale
arrotolato
Arrosto di vitello
arrotolato
Arrosto di manzo
filetto
Kg 3,5
Kg 1,8
Kg 2,5
Kg 1
di pasta
Kg 1
n° 24
gr. 200
di pasta cad
Kg 1
Kg 1
Kg 1,3
Kg 1
70 ÷ 75
50 ÷ 60
55 ÷ 60
35
prerisc.10
25 ÷ 35
30 ÷ 35
25 ÷ 30
220
220
220
200
190
220
200
60 ÷ 65
40 ÷ 50
45 ÷ 50
30 ÷ 35
prerisc.10
20 ÷ 25
25 ÷ 30
20 ÷ 25
200
200
200
180
190
200
180
70 ÷ 80
100 ÷ 110
90 ÷ 110
80 ÷ 90
220
220
220
220
50 ÷ 60
80 ÷ 90
90 ÷ 100
80 ÷ 90
200
200
200
200
Inserire la pasta al forno nel forno freddo
RICETTE CONSIGLIATE
Muffin di verdure:
Ingredienti :
200 g di zucchine
200 g di patate pasta gialla
200 g di patate americana
•
•
•
Infarinare gli stampini monodose e riempirli fino all'orlo, ricoprirli con l'altra
metà del composto di pangrattato e Parmigiano, aggiungere un po' di olio
extravergine e cuocere con la funzione COOK LIGHT a 180° per 15/20 minuti,
fino al raggiungimento di una bella doratura.
Una volta lessate le patate, schiacciarle e aggiungerle alle altre verdure e alla
provola tagliata a pezzetti. Nel frattempo preparare un mix di pangrattato e
Parmigiano, e aggiungerne la metà alle verdure.
• Tagliare le zucchine e i peperoni a dadini e lessare qualche minuto le patate.
Una volta tagliate le verdure, saltarle 5 minuti in padella con olio extravergine di
oliva, paprika, sale e pepe.
Frittata autunnale al forno
Ingredienti:
6 uova
10 fiori di zucchina
•
•
• Tagliare la zucca a fette e metterla su una teglia da forno, infornare a 160 gradi
per 20 minuti circa. Una volta cotta, schiacciare la polpa con la forchetta.
Sbattere le uova e unirvi la patata lessata e la zucca schiacciata, aggiungere il
latte, il Parmigiano, la curcuma, sale e pepe. Amalgamare bene tutti gli
ingredienti e aggiungere per ultimo i fiori di zucchina, già puliti e tagliati a
pezzettini.
Versare il composto nello stampo e cuocere in forno con la funzione COOK
LIGHT a 180° per 20 minuti.
1 peperone rosso
1 peperone giallo
100 g di provola
•
•
•
1 cucchiaino di paprika
50 g di Parmigiano
20 g di pangrattato
•
•
•
1 patata lessata•
• 1 fettina di zucca lessata
200 g di Parmigiano•
Curcuma
6 cucchiai di latte
•
•

5. TABELLA TEMPI DI COTTURA
12 IT
• Pollame, Coniglio
Forno elettrico statico Forno elettrico ventilato
Pietanza
Quantità
Ripiano
Tempo
di cottura
in minuti
Tempe-
ratura
forno
Tempo
di cottura
in minuti
Tempe-
ratura
forno
Osservazioni
Sistemare la faraona in teglia Pirex o
ceramica a bordo alto condita con aromi
naturali e pochissimo olio.
Come per la faraona
Mettete i pezzi di uguali dimensioni nella
leccarda smaltata, condite con aromi
naturali. Se necessario voltate i pezzi.
In teglia per torte Ø 22. Prerisc. per 10
min.
In teglia per torte Ø 22. Prerisc. per 10
min.
In teglia per torte Ø 22. Prerisc. per 10
min.
In teglia per torte Ø 22. Prerisc. per 10
min.
Disponete i finocchi tagliati in 4 parti e
coperti in teglia di Pirex con burro e sale
e possibilmente con la parte interna
verso l’alto
Affettate le zucchine e cuocete in teglia
Pirex coperte con burro e sale
Tagliate le patate in parti uguali e
cuocetele coperte con olio, sale e
origano o rosmarino in teglia Pirex.
Tagliate le carote a fettine, copritele e
cuocetele in teglia Pirex.
Inserire il pane carrè sulla griglia supporto.
Dopo la 1° cottura capovolgere fino a
cottura ultimata.
Inserire i toasts sulla griglia supporto
leccarda;dopo la prima brunitura
capovolgere i toasts fino a brunitura ultimata.
Tagliare le salsiccie a metà e disporle sulla
griglia, con la parte interna verso l’alto.A metà
cottura capovolgere le salsiccie fino a cottura
ultimata. Avvertenza: ogni tanto controllate
visivamente l’uniformità di cottura. Nel caso
di disuniformità intercambiare quelle cotte
con quelle meno cotte.
Disporre le fette bene sotto l’azione del grill
e voltarle due volte.
Condite con aromi naturali e voltatele ogni
tanto.
La cottura con il grill deve essere eseguita ponendo il cibo sotto il grill elettrico. Attenzione: durante il funzionamento il grill diventa di colore rosso vivo. La
leccarda deve essere inserita sotto la griglia per raccogliere i sughi.
Ripiano
Faraona
Pollo
Coniglio a pezzi
Kg 1-1,3
Kg 1,5-1,7
Kg 1-1,2
22
60 ÷ 70
22
100 ÷ 110
22
50 ÷ 60
60 ÷ 80
110 ÷ 120
55 ÷ 65
220
220
220
200
200
200
Torta cacao
Scatola
Scatola
Scatola
1
1
1
1
1
50
55
180
160
• Dolci, Torte
Torta margherita
Torta di carote
Torta crostata
albicocca
700 gr
55
65
40
175
180
200
1
1
2
40 ÷ 45
50 ÷ 60
30 ÷ 35
160
160
180
• Verdura
Finocchi
Zucchine
Patate
Carote
800 gr
800 gr
800 gr
800 gr
1
1
2
1
70 ÷ 80
70
60 ÷ 65
80 ÷ 85
220
220
220
220
1
1
2
1
60 ÷ 70
60 ÷ 70
60 ÷ 65
70 ÷ 80
200
200
200
200
• Cottura a grill
Pane carrè
tostato
Toasts farciti
Salsiccie
Costate di manzo
Coscie di pollo
4 fette
4
n°6 / Kg 0,9
n°4 / Kg 1,5
n°4 / Kg 1,5
44
33
44
44
33
5 (5 prerisc.)
10 (5 prerisc.)
25/30
(5 prerisc.)
25
(5 prerisc.)
50/60
(5 prerisc.)
Grill Grill
Grill Grill
Grill Grill
Grill Grill
Grill Grill
5 (10 prerisc.)
5/8
(10 prerisc.)
15/20
(10 prerisc.)
15/20
(10 prerisc.)
50/60
(10 prerisc.)
• Fish
22
22
22
22
Cuocere le trote coperte con olio, sale e
cipolle in teglia Pirex.
Cuocere il salmone non coperto in teglia
Pirex con sale, pepe e olio.
Cuocete la sogliola con sale e un
cucchiaio d’olio.
Cuocere in recipiente coperto le orate con
olio e sale
Trota
• Pesci
Salmone
Sogliola
Orata
3 intere/Kg 1
700 g a fette
2,5 cm s.p.
Filetti / Kg 1
2 intere
40 ÷ 45
30 ÷ 35
40 ÷ 45
40 ÷ 45 220
220
220
220
35 ÷ 40
30 ÷ 25
35 ÷ 40
35 ÷ 40
200
200
200
200
Cuocere la frutta in teglia di Pirex o ceramica
non coperta. Lasciare raffreddare in forno.
Come sopra
Come sopra
• Frutta
Mele intere
Pere
Pesche
Kg 1
Kg 1
Kg 1
1
1
1
45 ÷ 55
45 ÷ 55
45 ÷ 55
220
220
220
2
2
2
45 ÷ 55
45 ÷ 55
45 ÷ 55
200
200
200

SAFETY INSTRUCTIONS
13 GB
• Cook the vegetables in a container with a lid instead of an open tray.
•Avoid leaving food inside the oven after cooking for more than 15/20 minutes.
• WARNING: the appliance and accessible parts become hot during use. Be careful not to touch any hot
parts.
• WARNING: the accessible parts can become hot when the grill is in use. Children should be kept at a safe
distance.
• WARNING: ensure that the appliance is switched off before replacing the bulb, to avoid the possibility of
electric shocks.
• WARNING: in order to avoid any danger caused by the accidental resetting of the thermal interruption
device, the appliance should not be powered by an external switching device, such as a timer, or be
connected to a circuit that is regularly switched on and off.
• Children under 8 should be kept at a safe distance from the appliance if not continuously supervised.
• Children should not play with the appliance.
• The appliance can be used by those aged 8 or over and by those with limited physical, sensorial or mental
capacities, without experience or knowledge of the product, only if supervised or provided with instruction
as to the operation of the appliance, in a safe way with awareness of the possible risks.
• Cleaning and maintenance should not be carried out by unsupervised children.
• Do not use rough or abrasive materials or sharp metal scrapers to clean the oven door glasses, as they
can scratch the surface and cause the glass to shatter.
• During cooking, moisture may condense inside the oven cavity or on the glass of the door. This is a normal
condition. To reduce this effect, wait 10-15 minutes after turning on the power before putting food inside the
oven. ln any case, the condensation disappears when the oven reaches the cooking temperature.
• A long power supply failure during an occurring cooking phase may cause a malfunction of the monitor. ln
this case contact customer service.
• The appliance must not be installed behind a decorative door in order to avoid overheating.
• CAUTION: Do not refill the cavity bottom with water during cooking or when the oven is hot.
• Do not use a steam cleaner for cleaning operations.
• When you place the shelf inside, make sure that the stop is directed upwards and in the back of the cavity.
The shelf must be inserted completely into the cavity.
• Only use the meat probe recommended for this oven.
• The oven must be switched off before removing the removable parts. After cleaning, reassemble them
according the instructions.
• No additional operation/setting is required in order to operate the appliance at the rated frequencies.
• WARNING: Never remove the oven door seal.
• The disconnection may be achieved by having the plug accessible or by incorporating a switch in the fixed
wiring in accordance with the wiring rules.
• Failure to comply with the above can compromise the safety of the appliance and invalidate the guarantee.
•Any excess of spilled material should be removed before cleaning.
• Connect a plug to the supply cable that is able to bear the voltage, current and load indicated on the tag
and having the earth contact. The socket must be suitable for the load indicated on the tag and must have
ground contact connected and in operation. The earth conductor is yellow-green in colour. This operation
should be carried out by a suitably qualified professional. ln case of incompatibility between the socket and
the appliance plug, ask a qualified electrician to substitute the socket with another suitable type. The plug
and the socket must be conformed to the current norms of the installation country. Connection to the power
source can also be made by placing an omnipolar breaker between the appliance and the power source
that can bear the maximum connected load and that is in line with current legislation. The yellow-green
earth cable should not be interrupted by the breaker. The socket or omnipolar breaker used for the
connection should be easily accessible when the appliance is installed.
• lf the power cable is damaged, it should be substituted with a cable or special bundle available from the
manufacturer or by contacting the customer service department. The type of power cable must be
H05V2V2-F. This operation should be carried out by a suitably qualified professional. The earth conductor
(yellow-green) must be approximately 10 mm longer than the other conductors. For any repairs, refer only
to the Customer Care Department and request the use of original spare parts.
• WARNING: Do not line the oven walls with aluminium foil or single-use protection available from stores.
Aluminium foil or any other protection, in direct contact with the hot enamel, risk melting and deteriorating
the enamel of the insides.

14 GB
ENERGY SAVING AND RESPECTING THE ENVIRONMENT
Where possible, avoid pre-heating the oven and always try to fill it. Open the oven door as infrequently as possible, because heat from the cavity disperses every
time it is opened. For a significant energy saving, switch off the oven between 5 and 10 minutes before the planned end of the cooking time, and use the residual heat
that the oven continues to generate. Keep the seals clean and in order, to avoid any heat dispersal outside of the cavity. If you have an electric contract with an hourly
tariff, the "delayed cooking" programme makes energy saving more simple, moving the cooking process to start at the reduced tariff time slot.
• WEEE shall not be treated as household waste.
• When you buy a new appliance, the old one may be returned to the retailer who has to collect it free of charge on a one-to-one basis, as long as the equipmentisof
equivalent type and has the same functions as the supplied equipment.
• WEEE shall be handed over to the relevant collection points managed by the municipality or by registered companies. In many countries, for large
WEEE, home collection could be present.
This appliance is marked according to the European directive 2012/19/EU on Waste Electrical and Electronic Equipment (WEEE). WEEE contains both
polluting substances (which can cause negative consequences for the environment) and basic components (which can be re-used). It is important to
have WEEE subjected to specific treatments, in order to remove and dispose properly all pollutants, and recover and recycle all materials. Individuals
can play an important role in ensuring that WEEE does not become an environmental issue; it is essential to follow some basic rules:

1.6 CONNECTING TO THE POWER SUPPLY
15 GB
1.2 SAFETY HINTS
– Do not touch the oven with wet or damp hands or feet.
– Do not pull on the power cable to remove the plug from the socket.
When replacing the cable, follow these instructions. Remove the power
cable and replace it with one of the H05RRF, H05VV-F, H05V2V2-F type.
The cable must be able to bear the electrical current required by the oven.
Cable replacement must be carried out by properly qualified technicians.
The earthing cable (yellow-green) must be 10 mm longer than the power
cable.
•Do not line the oven walls with aluminium foil or single-use
protection available from stores. Aluminium foil or any other
protection, in direct contact with the hot enamel, risks melting and
deteriorating the enamel of the insides.
•The oven must be used only for the purpose for which it was designed: it
must only be used for cooking food. Any other use, e.g. as a form of
heating, is an improper use of the oven and is therefore dangerous.
•The manufacturers cannot be held responsible for any damage caused
by improper, incorrect or unreasonable use. When using any electrical
appliance you must follow a few basic rules.
– Do not use the oven unless you are wearing something on your feet.
– It is not generally a good idea to use adapters, multiple sockets for
several plugs and cable extensions.
– If the oven breaks down or develops a fault switch it off at the mains and
do not touch it.
•If the cable is at all damaged it must be replaced promptly.
Use only an approved service centre for repairs and ensure that only
original parts are used. If the above instructions are not adhered to the
manufacturers cannot guarantee the safety of the oven.
1.3 INSTALLATION
Installation is the customer’s responsibility. The manufacturers have no
obligation to carry this out. If the assistance of the manufacturer is required
to rectify faults arising from incorrect installation, this assistance is not
covered by the guarantee.
The installation instructions for professionally qualified personal must be
followed. Incorrect installation may cause harm or injury to people,
animals or belongings. The manufacturer cannot be held responsible for
such harm or injury.
Remove the back of the kitchen unit to ensure an adequate current of air
circulates around the oven. The hob must have a rear gap of at least
45 mm.
If the oven is to work properly, the kitchen housing must be suitable. The
panels of the kitchen unit that are next to the oven must be made of a heat
resistant material. Ensure that the glues of units made of veneered wood can
withstand temperatures of at least 120 °C. Plastics or glues that cannot
withstand such temperatures will melt and deform the unit. Once the oven has
been lodged inside the unit, the electrical parts must be completely insulated.
This is a legal safety requirement. All guards must be firmly fixed into place so
that it is impossible to remove them without using special tools.
It is necessary to do an initial cleaning of the equipment before the
first use of each of them.Wash them with a sponge. Rinse and dry off.
1.7 OVEN EQUIPMENT (according to the model)
1.4 FITTING THE OVEN INTO THE KITCHEN UNIT
Note: For ovens that are combined with a hob unit the instructions contained
in the manual for the hob unit must be followed.
Fit the oven into the space provided in the kitchen unit; it may be fitted
underneath a work top or into an upright cupboard. Fix the oven in position by
screwing into place, using the four fixing holes in the frame. (Fig.on last page).
To locate the fixing holes, open the oven door and look inside.To allow
adequate ventilation, the measurements and distances indicated in the
diagram on last page must be adhered to when fixing the oven.
1.5 IMPORTANT
The special profile of the shelves means
they stay horizontal even when pulled
right out. There is no risk of a dish sliding
or spilling.
The tray holder shelf is especially good
for grilling things. Use it with the drip tray.
The simple shelf can take moulds and
dishes.
The drip tray catches the juices from
grilled foods. It is only used with the Grill,
Rotisserie, or Fan Assisted Grill ; remove it
from the oven for other cooking methods.
Never use the drip tray as a roasting tray as this creates smoke and fat will
spatter your oven making it dirty.
The pizza set is designed for pizza cooking. In
order to obtain the best results the set must be
used together with Pizza function.
The tray holder
The tray holder shelf is ideal for grilling. Use
it in conjunction with the drip tray. A handle
is included to assist in moving the both
accessories safely. Do no leave the handle
inside the oven.
The manufacturers cannot be held responsible for any harm or injury to
persons, animals or belongings caused by failure to properly earth the
oven.
An ON/OFF switch may also be connected to the power supply. The
connections must take account of the current supplied and must comply with
current legal requirements. The yellow-green earthing cable must not be
governed by the ON/OFF switch. The socket or the ON/OFF switch used for
connecting to the power supply must be easily accessible when the oven has
been installed.
Plug into the power supply. Ensure first that there is a third contact that acts as
earthing for the oven. The oven must be properly earthed.
Important: During installation, position the power cable in such a way that it
will not be subjected to temperatures of above 50°C at any point.
The cabling and wiring system must be able to bear the maximum electric
power required by the oven. This is indicated on the specifications plate. If you
are in any doubt at all, use the services of a professionally qualified person.
The oven complies with safety standards set by the regulatory bodies. The
oven is safe to use only if it has been adequately earthed in compliance with
current legal requirements on wiring safety. You must ensure that the oven
has been adequately earthed.
WARNING: the voltage and the supply frequency are showed on the
rating plate (fig. on last page).
If the model of oven is not fitted with a plug, fit a standard plug to the power
cable. It must be able to bear the power supply indicated on the specifications
plate. The earthing cable is yellowgreen. The plug must be fitted by a properly
qualified person. If the socket and the plug are incompatible the socket must
be changed by a properly qualified person.A properly qualified person must
also ensure that the power cables can carry the current required to operate
the oven.
1. Remove the wire racks by pulling them in the direction of the arrows
(see below)
3. After the cleaning process install the wire racks in reverse order.
2. To clean the wire racks either put them in the dishwasher or use a
wet sponge, ensuring that they are dried afterwards.
Removing and cleaning wire racks
By placing the mark on the appliance, we are confirming compliance
to all relevant European safety, health and environmental requirements
which are applicable in legislation for this product.
When you have unpacked the oven, make sure that it has not been
damaged in any way. If you have any doubts at all, do not use it: contact a
professionally qualified person. Keep packing materials such as plastic
bags, polystyrene, or nails out of the reach of children because they are
dangerous for children.
1.1 DECLARATION OF COMPLIANCE
Lateral wire grids
It located at both sides of the oven cavity.
It holds metal grills and drip pans.
1. GENERAL WARNINGS
When the oven is first switched on it may give out acrid smelling fumes.
This is because the bonding agent for insulating panels around the oven
has been heated up for the first time.
This is a completely normal, if it does occur you merely have to wait for the
fumes to clear before putting the food into the oven.
• Keep this booklet in a safe place for easy, future reference.
Thank you for choosing one of our products. To get the most out of your
oven we recommend that you:
All accessible parts are hot when the appliance is in operation, take care to
not touch these elements.
• Read the notes in this manual carefully: they contain important
instructions on how to install, use and service this oven safely.
An oven by its very nature becomes very hot. Especially the glass of the
oven door.

All ovens feature the function.
This allows a management of the distribution of moisture
and temperature. It reduces the loss of humidity of the 50
%, which guarantees the food remains tender and tastes
better. This a delicate cooking is recommended for the
baking of the bread and pastry.
Ovens have an electronic control of the fan speed, called
and patented VARIOFAN. During the cooking, this system changes
automatically the speed of the fan (in multifunction mode) in order to
optimize the air flow and the internal temperature in the cavity of the
oven.
16 GB
2. USEFUL TIPS
2.1 SHELF SAFETY SYSTEM
This allows you to pull out the oven
shelves when inspecting the food
without danger of food spillages or
shelves falling accidentally out of the
oven.
The oven features a new shelf safety
system.
To remove the shelves pull out and lift.
2.2 GRILLING
Meat and fish that are going to be grilled should first be lightly
doused with oil.
Almost all food can be cooked under the grill except for very lean
game and meat rolls.
Grilling makes it possible to give food a rich brown colour quickly.
For browning we recommend that you insert the grill onto the
fourth level, depending on the proportions of the food (see fig.
page 7).
2.3 The MODELS
It reduces the time of preheating of ovens: only 8 minutes
to reach 200 degrees Celsius.
Some ovens are equipped with the new doorj " WIDE DOOR " which
has a bigger window area, this allows better maintenance and a
improved thermal insulation.
It gives the possibility of setting level and intensity of
grilling, up to 50 % more power in comparison with a
traditional multifunction oven.
comparison with the traditional
• Verylow energy consumption, -95% in
“Appliance with white light LED of the 1M Class according to IEC
60825- 1:1993 + A1: 1997 + A2: 2001 (equivalent to EN 60825-1: 1994
+ A1: 2002 + A2: 2001); the maximum light power emitted 459nm <
150uW.
l
• Long life illumination
• Optimum view
System, besides providing excellent illumination inside the
oven, lasts longer than the traditional light bulb its easier and to
maintain and most of all saves energy.
Not observed directly with optical instruments. “
Advantages :
illumination High
2.4 According to the model
Is an illumination system which replaces the traditional « light bulb ».
14 LED lights are integrated within the door.These produce white high
quality illumination which enables to view the inside of the oven with
clarity without any shadows on all the shelves.
2.5 SELF-CLEANING OVEN WITH CATALYTIC
It is a good idea to use deep roasting trays to roast fatty foods such as
joints of meat etc. and to put a tray underneath the grill to catch surplus
fat.If the walls of the oven are so thickly coated in grease that the
catalytic lining is no longer effective remove surplus grease with a soft
cloth or sponge soaked in hot water.
The lining must be porous for self-cleaning to be effective.
N.B.: All catalytic linings currently on the market have a working life of
about 300 hours. They should therefore be replaced after about 300
hours.
The fat that is splattered onto the sides of the oven during roasting is
eliminated by the microporous coating which breaks the fat down by
catalysis and transforms it into gas.
Do not use abrasive products, metal cleaning wads, sharp objects,
rough cloths, or chemical products and detergents that may
permanently damage the catalytic lining.
Special self-cleaning panels covered in a micro-porous coating are
available as optional extras for all models. If they are fitted, the oven
no longer needs to be cleaned by hand.
Excessive splattering may nevertheless block the pores and therefore
hinder self-cleaning. The self-cleaning capacity may be restored by
switching on the empty oven to maximum for about 10-20 minutes.
2.6 AQUACTIVA FUNCTION
The Aquactiva procedure uses steam to help remove remaining fat
and food particles from the oven.
1. Pour 300 ml of water into the Aquactiva container at the bottom of
the oven.
Care must be taken with all hot surfaces as there is a risk of burns.
2. Set the oven function to Static ( )or Bottom ( )heater
Use distilled or drinkable water.
6. When the appliance is cool, clean the inner surfaces of the oven
with a cloth.
Warning:
4.Allowthe program to operate for 30 minutes.
5. After 30 minutes switch off the program and allow the oven to cool
down.
3. Set the temperature to theAquactiva icon
Make sure that the appliance is cool before you touch it.
300 ml
2.7 CLEANING AND MAINTENANCE
Never use abrasive cleaners, wire wool or sharp objects to clean the
glass oven door.
Use detergents and abrasive metal pads like «brillo pads» for the
stainless steel grills.
The glass surfaces as the top, oven door and warming compartment
door must be cleaned when they are cold. Damage that occurs to them
because this rule was not adhered to are not covered by the guarantee.
To replace the interior light:
• switch off the mains power supply and unscrew bulb. Replace with an
identical bulb that can withstand very high temperatures
To make this chore unnecessary all models can be lined with catalytic
self-cleaning panels: these are supplied as an optional extra (see the
section SELF-CLEANING OVEN WITH CATALYTIC LINING).
Clean the stainless steel and enamelled surfaces with warm, soapy
water or with suitable brand products. On no account use abrasive
powders that may damage surfaces and ruin the oven’s appearance. It
is very important to clean the oven each time that it is used. Melted fat is
deposited on the sides of the oven during cooking. The next time the
oven is used this fat could cause unpleasant odours and might even
jeopardise the success of the cooking. Use hot water and detergent to
clean; rinse out thoroughly.

17 GB
•This function is typically used with
“cooking time” function.
For example if the dish has to be
cooked for 45 minutes and needs
to be ready by 12:30, simply select
the required function, set the
cooking time to 45 minutes and the
end of cooking time to 12:30.
•At the end of the cooking set time,
the oven will switch off
automatically and an audible alarm
will ring.
•Cooking will start automatically at
11:45 (12:30 minus 45 mins) and
will continue until the pre-set end-
of-cooking-time, when the oven
will switch itself off automatically.
WARNING.
If the END of cooking is selected
without setting the length of
cooking time, the oven will start
cooking immediately and it will
stop at the END of cooking time
set.
2.8 SERVICE CENTRE
If the cause of the fault cannot be detected:
Before calling the Service Centre remember to make a note of the
serial number on the specifications plate (see fig. On last page).
Before calling the Service Centre
If the oven is not working, we recommend that:
you check that the oven is properly plugged into the power supply.
disconnect the oven from the mains, do not touch the oven and call the
after sales service.
The oven is supplied with a guarantee certificate that ensures that it
will be repaired free of charge by the Service Centre
3.4 USE OF TOUCH CONTROL CLOCK PROGRAMMER
WARNING : the first operation to
carry out after the oven has been
installed or following the
interruption of power supply (this
is recognizable the display
pulsating and showing ) is
setting the correct time. This is
achieved as follows.
12:00
3.3 SETTING THE CORRECT TIME
To set the cooking time, turn dial one
complete revolution and then position the
index to the required time. When the time
has lapsed, the signal will ring for a few
seconds.
3.1 USING THE MINUTE TIMER
3. TIMER
3.2 USING THE END OF COOKING TIMER
The timer will count down from the set time
return to the O position and switch off
automatically.
This control enables to set the desired cooking
time (max. 120 min.) the oven will automatically
switch off at the end of the set time.
To set the oven ensure the timer is not on the O
position.
For normal use of oven set the timer to the
position.
•Push the central button.
•Set time with " " " " buttons.-+
•Release all buttons.
ATTENTION: The oven will only operate providing the clock is set.
FUNCTION
HOW TO ACTIVATE IT
HOW TO SWITCH ITOFF
WHAT IT DOES WHAT IT IS FOR
KEY LOCK
MINUTE
MINDER
COOKING
TIME
END OF
COOKING
•Child Lock function is
activated by touching Set (+)
for a minimum of 5 seconds.
From this moment on all other
function are locked and the
display will flash STOP and
preset time intermittently.
•Child Lock function is
deactivated by touching
touchpad Set (+) again for a
minimum of 5 seconds. From
this moment on all functions
are selectable again.
•Push the central button
1 times
•Press the buttons " " " "
to set the required time
•Release all the buttons
-+
•When the set time as elapsed
an audible alarm is activated
(this alarm will stop on its own,
however it can be stopped
immediately by pressing the
button) SELECT.
•Sounds an alarm at the end of
the set time.
•During the process, the
display shows the remaining
time.
•Allows to use the oven as alarm
clock (could be activated either
with operating the oven or with
out operating the oven)
• Release all buttons
• Press the buttons "-" or "+"to
set the lenght of cooking
required
• Set the cooking function with
the oven function selector
• Push the central button 2 times
Should you wish to stop cooking
earlier either turn the function
selector to 0, or set time to 0:00
(SELECT and "-" "+" buttons)
•When the time is elapsed the
oven will switch off
automatically.
• To check how long is left to run
press the SELECT button 2 Times.
• It allows to preset the cooking
time required for the recipe
chosen.
• To alter/change the preset time
press SELECT and "-" "+"
buttons.
•Push any button to stop
the signal. Push the central
button to return to the clock
function
•At the time set, the oven
will switch off. To switch
off manually, turn the oven
function selector to
position O.
•Enables you to set the end of
cooking time
•To check the preset time p
•To modify the preset time
press buttons SELECT + " " " "-+
ush
the central button 3 times
•
•Press the buttons " "
" " to set the time at which you
wish the oven to switch off
•Release the buttons
•Set the cooking function with
the oven function selector
-
+
Push the central button 3
times
00:00
select

18 GB
* Tested in accordance with the EN 60350-1 for the purpose of energy consumption declaration and energy class.
4. OPERATING INSTRUCTIONS
230
210
210

5. TABLES OF COOKING TIMES
The overall suggested cooking times set out below are intended as a rough guide only. They may in fact vary according to the quality, the freshness,
the size and the thickness of the food cooked and of course cooking time is also partly a matter of taste. Let the food stand for a few minutes before
serving because the ingredients continue cooking after they have been removed from the oven.
HANDY TIP: Lower the temperature so as to avoid the surface of the
food becoming hard and dry.
Shelf position
4
3
2
1
19 GB
Static electric oven
Electric fan oven
22
• Pasta
22
22
22
11
21
22
33
22
21
22
Food
Quantity
Shelf
Time
of cooking
in minutes
Oven
tempe-
rature
Shelf
Time
of cooking
in minutes
Oven
tempe-
rature
Remarks
Put the lasagne into an unheated oven
Put the oven baked pasta into an
unheated oven
Form the dough into a loaf and make a
cross with a knife on top of the dough
leave the dought to rise for at least 2
hours. Grease the baking tin and put the
dough in the middle of it.
Warm the oven for 15 minutes and
place the pizzas on the greased baking
tray. Garnish them with tomatoes,
mozzarella, ham, oil, salt and origano.
Place 24 vol au vents in the oven and
bake.
Warm the oven for 15 minutes, grease
the baking tray, season the 4 focaccia
with oil and salt and leave them to rise at
room temperature for at least 2 hours
before put ting them in the oven.
Put the meat into a deep Pyrex dish and
season with salt and pepper; turn the
meat half way through cooking.
Cook the meat in a covered Pyrex dish
with herbs, spice, oil and butter.
Cook as indicated above
Cook as indicated above.
Lasagne
Cannelloni
Oven baked
pasta
• Baking (not cakes)
Bread
Pizza
Pastry (frozen)
vol au vents
Focaccia
(n° 4)
• Meat
All meats can be roasted in shallow or deep roasting trays.
It is advisable to cover the shallow trays to avoid splattering the sides of the oven with grease.
The roasting times are the same whether the meat has been covered up or not.
Whole joint of
beef
Joint of
deboned
Joint of
deboned veal
Joint of
fillet of beef
Kg 3,5
Kg 1,8
Kg 2,5
Kg 1
di pasta
Kg 1
n° 24
gr. 200 of
dough each
Kg 1
Kg 1
Kg 1,3
Kg 1
70 ÷ 75
50 ÷ 60
55 ÷ 60
35
10
(pre-heating)
25 ÷ 35
30 ÷ 35
25 ÷ 30
220
220
220
200
190
220
200
60 ÷ 65
40 ÷ 50
45 ÷ 50
30 ÷ 35
10
(pre-heating)
20 ÷ 25
25 ÷ 30
20 ÷ 25
200
200
200
180
190
200
180
70 ÷ 80
100 ÷ 110
90 ÷ 110
80 ÷ 90
220
220
220
220
50 ÷ 60
80 ÷ 90
90 ÷ 100
80 ÷ 90
200
200
200
200
Put the cannelloni into an unheated oven
SUGGESTED RECIPES
Vegetable Muffins
Ingredients :
200 g of courgettes
200 g of potatoes
200 g of sweet potatoes
•
•
•
In the meantime, prepare a mixture of breadcrumbs and parmesan cheese, mix half
of it into the vegetables.
Once the potatoes are boiled mash and add to the other vegetables and chopped
provolone.
• Cut the courgettes and peppers and dice the potatoes, boil for a few minutes on
hob top. Cut and stir fry the other vegetables for 5 minutes in a pan with olive oil
and paprika, salt and pepper.
Flour the muffin molds and fill to the brim, put the remaining of bread and cheese
mixture on the top and add a little olive oil. Bake in the oven with the COOK
LIGHT function at 180 degrees for 15-20 minutes, until they are beautifully
golden in colour.
Autumn Baked Frittata
Ingredients:
6 eggs
10 courgette flowers
1 boiled potato
•
•
•
Beat the eggs and add the boiled potato and the crushed pumpkin, milk, parmesan
cheese, turmeric, salt and pepper.
Once cooked, mash with a fork .
• Cut and boil 1 potato. Cut the pumpkin into slices and place on a baking sheet,
put into the oven at 160 degrees for approximately 20 minutes.
Pour the mixture into the tin and bake with the COOK LIGHT function in the
oven preheated at 180 for 20 minutes.
Mix all the ingredients together and add the courgette flowers, ensure that they
are cleaned and cut into small pieces.
1 red pepper
1 yellow pepper
100 g of provolone cheese
•
•
•
1 teaspoon paprika
50 g of parmesan cheese
20 g of breadcrumbs
•
•
•
1 slice of boiled pumpkin
200 g of parmesan cheese
•
•
turmeric
6 tablespoons of milk
•
•

5. TABLES OF COOKING TIMES
20 GB
• Rabbits and Poultry
Static electric oven
Electric fan oven
Food
Quantity
Shelf
Time
of cooking
in minutes
Oven
tempe-
rature
Time
of cooking
in minutes
Oven
tempe-
rature
Remarks
Place the guinea fowl in a deep Pyrex or
pottery dish with very little oil and
season with herbs and spices.
Follow the procedure for cooking the
guinea fowl.
Put all the pieces of the same size in the
glazed tray.Season with herbs and spices.
Turn the pieces as and when required.
10 mins.
Use a tin that is 22 cm deep. Pre-heat for
10 mins.
Use a tin that is 22 cm deep. Pre-heat for
Use a tin that is 22 cm deep. Pre-heat for
10 mins.
Use a tin that is 22 cm deep. Pre-heat for
10 mins.
Cut the fennel into four pieces, add
butter, salt and potatoes if required and
place in a Pyrex face up. Cover the dish.
Slice the courgettes, place in a Pyrex
dish and add butter and salt.
Cut the potatoes into equal parts and
place in a Pyrex dish. Season with salt,
origano and rosemary. Cook in oil.
Slice the carrots, place in a Pyrex dish and
cook.
Lay the bread on the grill tray. When one
side of the bread has been toasted, turn
over and toast the other side. Remember:
keep the toast warm at the bottom of the
oven until you are ready to serve it.
Lay the bread on the grill tray. When one
side of the sandwich has been toasted, turn
over and toast the other side.
Cut the sausages in half and lay them face
down on the grill. Half way through grilling
turn them over. Every so often, check that
they are being cooked equally all over. (If
this is not happening, turn and reposition
the ones being cooked ether less or more
than the others.
Make sure that the ribs of beef are exposed
to the full effect on the main grill.
Turn them over twice during grilling
Place the food to be grilled underneath the infra-red grill. Warning: When the grill is on it takes on a bright red colour. Place the tray underneath the grill to
collect juices and fat from the food being grilled.
Shelf
Guinea fowl
Chicken
Rabbit pieces
Kg 1-1,3
Kg 1,5-1,7
Kg 1-1,2
22
60 ÷ 70
22
100 ÷ 110
22
50 ÷ 60
60 ÷ 80
110 ÷ 120
55 ÷ 65
220
220
220
200
200
200
Coconut cake
baked in a tin
1
1
1
1
1
50
55
180
160
• Cakes
Sponge cake
Carrot cake
baked in a tin
Apricot pie
700 gr
55
65
40
175
180
200
1
1
2
40 ÷ 45
50 ÷ 60
30 ÷ 35
160
160
180
• Vegetable
Fennel
Courgettes
Potatoes
Carrots
800 gr
800 gr
800 gr
800 gr
1
1
2
1
70 ÷ 80
70
60 ÷ 65
80 ÷ 85
220
220
220
220
1
1
2
1
60 ÷ 70
60 ÷ 70
60 ÷ 65
70 ÷ 80
200
200
200
200
• Grilling
Squares of
bread for
toasting
Toasted
sandwiches
Sausages
Ribs of beef
Chicken legs
4 pieces
4
n°6 / Kg 0,9
n°4 / Kg 1,5
n°4 / Kg 1,5
44
33
44
44
33
5
(5 to heat up
grill)
10
(10 to heat up
grill)
25/30
(5 to heat up
grill)
25 (5 to
heat up grill)
50/60 (5 to
heat up grill)
Grill Grill
Grill Grill
Grill Grill
Grill Grill
Grill Grill
5
(10 to heat up
grill)
5/8
(10 to heat up
grill)
15/20
(10 to heat up
grill)
15/20 (10 to
heat up grill)
50/60 (10 to
heat up grill)
• Fish
22
22
22
22
Cover the trout with salt, oil and onions
and cook in a Pyrex dish.
Cook the salmon in an open Pyrex dish
with salt, pepper and oil.
Cook the sole with salt and a spoonful
of oil.
Cook the bream in oil and salt in a
covered dish.
Trout
• Fish
Salmon
Sole
Bream
3 whole trout
or / Kg 1
700 g
2,5 cm slice
Kg 1
2 whole ones
40 ÷ 45
30 ÷ 35
40 ÷ 45
40 ÷ 45 220
220
220
220
35 ÷ 40
30 ÷ 25
35 ÷ 40
35 ÷ 40
200
200
200
200
Bake the fruit in an open Pyrex or earthen-
ware dish. Leave it to cool inside the oven.
Follow procedure above.
Follow procedure above.
• Fruit
Whole apples
Pears
Peaches
Kg 1
Kg 1
Kg 1
1
1
1
45 ÷ 55
45 ÷ 55
45 ÷ 55
220
220
220
2
2
2
45 ÷ 55
45 ÷ 55
45 ÷ 55
200
200
200
A página está carregando...
A página está carregando...
A página está carregando...
A página está carregando...
A página está carregando...
A página está carregando...
A página está carregando...
A página está carregando...
A página está carregando...
A página está carregando...
A página está carregando...
A página está carregando...
A página está carregando...
A página está carregando...
A página está carregando...
A página está carregando...
A página está carregando...
A página está carregando...
A página está carregando...
A página está carregando...
A página está carregando...
A página está carregando...
A página está carregando...
A página está carregando...
A página está carregando...
A página está carregando...
A página está carregando...
A página está carregando...
A página está carregando...
A página está carregando...
A página está carregando...
A página está carregando...
A página está carregando...
A página está carregando...
A página está carregando...
A página está carregando...
A página está carregando...
A página está carregando...
A página está carregando...
A página está carregando...
A página está carregando...
A página está carregando...
A página está carregando...
A página está carregando...
A página está carregando...
A página está carregando...
A página está carregando...
A página está carregando...
A página está carregando...
A página está carregando...
A página está carregando...
A página está carregando...
A página está carregando...
A página está carregando...
A página está carregando...
A página está carregando...
A página está carregando...
A página está carregando...
A página está carregando...
A página está carregando...
A página está carregando...
A página está carregando...
A página está carregando...
A página está carregando...
A página está carregando...
A página está carregando...
A página está carregando...
A página está carregando...
A página está carregando...
A página está carregando...
A página está carregando...
A página está carregando...
A página está carregando...
A página está carregando...
A página está carregando...
-
 1
1
-
 2
2
-
 3
3
-
 4
4
-
 5
5
-
 6
6
-
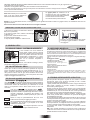 7
7
-
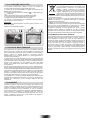 8
8
-
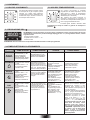 9
9
-
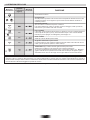 10
10
-
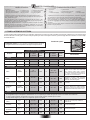 11
11
-
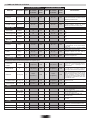 12
12
-
 13
13
-
 14
14
-
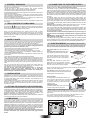 15
15
-
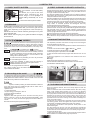 16
16
-
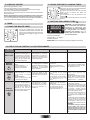 17
17
-
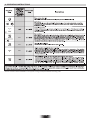 18
18
-
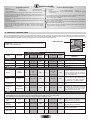 19
19
-
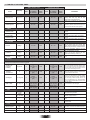 20
20
-
 21
21
-
 22
22
-
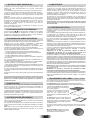 23
23
-
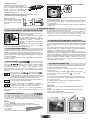 24
24
-
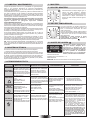 25
25
-
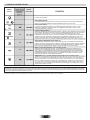 26
26
-
 27
27
-
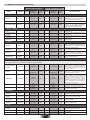 28
28
-
 29
29
-
 30
30
-
 31
31
-
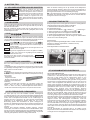 32
32
-
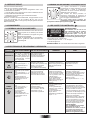 33
33
-
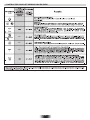 34
34
-
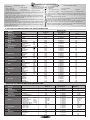 35
35
-
 36
36
-
 37
37
-
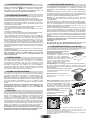 38
38
-
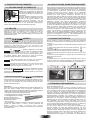 39
39
-
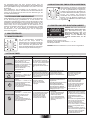 40
40
-
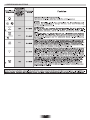 41
41
-
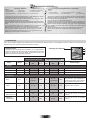 42
42
-
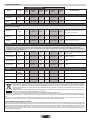 43
43
-
 44
44
-
 45
45
-
 46
46
-
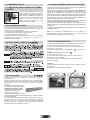 47
47
-
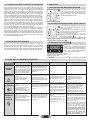 48
48
-
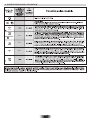 49
49
-
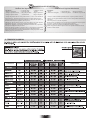 50
50
-
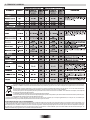 51
51
-
 52
52
-
 53
53
-
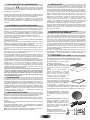 54
54
-
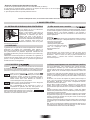 55
55
-
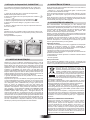 56
56
-
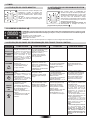 57
57
-
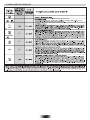 58
58
-
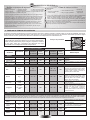 59
59
-
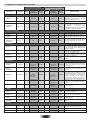 60
60
-
 61
61
-
 62
62
-
 63
63
-
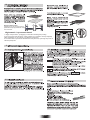 64
64
-
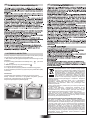 65
65
-
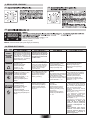 66
66
-
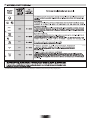 67
67
-
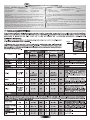 68
68
-
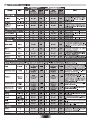 69
69
-
 70
70
-
 71
71
-
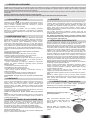 72
72
-
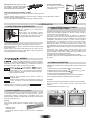 73
73
-
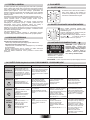 74
74
-
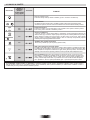 75
75
-
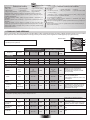 76
76
-
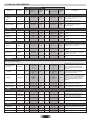 77
77
-
 78
78
-
 79
79
-
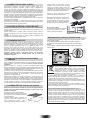 80
80
-
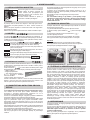 81
81
-
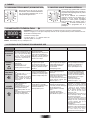 82
82
-
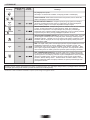 83
83
-
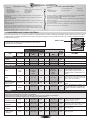 84
84
-
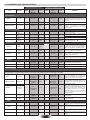 85
85
-
 86
86
-
 87
87
-
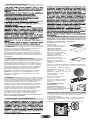 88
88
-
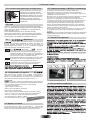 89
89
-
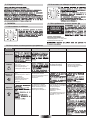 90
90
-
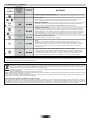 91
91
-
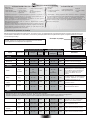 92
92
-
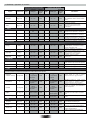 93
93
-
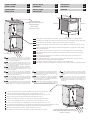 94
94
-
 95
95


Candy FCS 605 X Manual do usuário
- Categoria
- Fornos
- Tipo
- Manual do usuário
em outras línguas
- español: Candy FCS 605 X Manual de usuario
- français: Candy FCS 605 X Manuel utilisateur
- italiano: Candy FCS 605 X Manuale utente
- English: Candy FCS 605 X User manual
- Nederlands: Candy FCS 605 X Handleiding
- Deutsch: Candy FCS 605 X Benutzerhandbuch
- čeština: Candy FCS 605 X Uživatelský manuál