
1 EN
Joining us
Congratulations for the purchase of an ARCHOS device! This quick start guide helps you to start using
your device properly. If you have more questions concerning the use of your device, visit us at:
twitter.com/archos
www.facebook.com/archos
Blog
https://blog.archos.com/
http://faq.archos.com/
www.archos.com, click Support > After-sales support
www.archos.com, click Support > Downloads > Declaration of conformity
WARRANTY LEGAL AND SAFETY NOTICES www.archos.com/support/warranty.html
As we are often updating and improving our products, your device’s software may have a slightly
different appearance or modified functionality than presented in this quick start guide.

2
INPUT: 5V 1.5A
Model: AC101AS3GV2
MADE IN PRC
ARCHOS SA. 12 rue Ampère 91430 Igny France
Access 101
3G
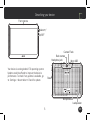
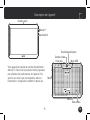
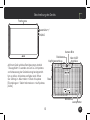
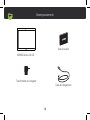
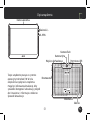
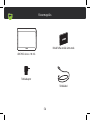
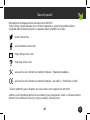
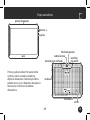
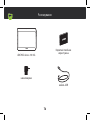
Unboxing
ARCHOS Access 101 3G
Quick start guide
Charger adapter
Charging cable

INPUT: 5V 1.5A
Model: AC101AS3GV2
MADE IN PRC
ARCHOS SA. 12 rue Ampère 91430 Igny France
Access 101
3G
INPUT: 5V 1.5A
Model: AC101AS3GV2
MADE IN PRC
ARCHOS SA. 12 rue Ampère 91430 Igny France
Access 101
3G
3 EN
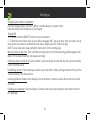
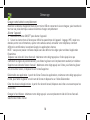
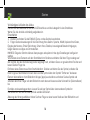
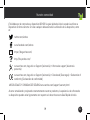
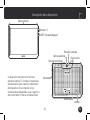
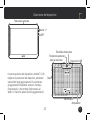
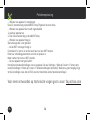
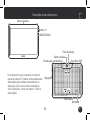
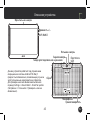
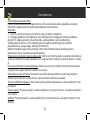
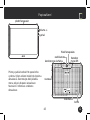
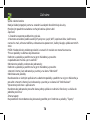
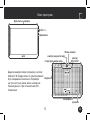
Describing your device
Volume+/-
Micro-USB
Front camera
Headphone jack
Reset
Your device is running Android 7.0 operating system.
Updates could be offered to improve the device’s
performance. To check if any update is available, go
to: Settings > About tablet > Check for update.
Back camera
ON/OFF
Loudspeaker
Microphone
Camera Flash

4
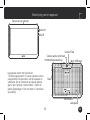
Starting up
Charging your battery completely
Plug the charging cable in the Micro-USB port and the adapter in a power outlet.
Leave the device until the battery is fully charged.
Turning ON
1. Press and hold the ON/OFF button to turn on the device.
2. Follow the instructions to set up your device: language, WiFi, copy your data, enter your name, set up
email, protect your phone, notifications to be shown, Google services, third party apps.
NOTE: You can skip some steps and define them later from the Settings app.
Moving a home screen item: Touch and hold your finger onto it until the positioning gridlines appear, then
slide it to the desired location, and release your finger.
Removing a home screen item: Touch and hold it, slide your finger towards the top of the screen and drop
it over the Remove icon.
Uninstalling an item: From the All apps screens, touch and hold it, slide your finger towards the top of the
screen and drop it over Uninstall bin.
Creating application folders: Drop one app icon over another on a home screen and the two icons will be
combined.
Changing your wallpaper: Hold your finger on a home screen at an empty location, then choose from the
list: Wallpaper.

5 EN
Hints & tips
Widgets: Hold your finger on a home screen at an empty location, then choose from the list: Widgets.
Securing your device: Define a lock screen to protect your privacy. Select the Settings app, then Security.
Choose a screen lock.
Android device manager: When your device is lost, you can use the android device manager page (https://
www.google.com/android/devicemanager) to erase all your contents, to lock the device, to locate the
device or to make it ring.
Scheduled power on&off: Schedule power on & off to set when the device turns off and turn on. For
example, you can set it for sleep time.

6
EN
Troubleshooting
- If your device is frozen:
Press the ON/OFF button for 10 seconds or use the reset button.
- If your device doesn’t turn on:
1. Charge your device.
2. Press the ON/OFF button for 10 seconds.
- If your device functioning is too slow:
Close all apps which are not currently used.
- If your WiFi reception is too low:
Make sure you are not far from the WiFi hotspot.
Reset and redefine your connection parameters.
Contact your WiFi connection provider.
- If your device has dysfunctions:
Reinitialize your device. Go to Settings > Backup & reset > Factory data reset. If you can’t have access to
the settings for any reason, consult our FAQs about the reinitialization process.
For more answers about your technical difficulties, do not hesitate to
visit: faq.archos.com

7
FR
Félicitations! Vous venez d’acquérir un appareil ARCHOS! Ce guide de démarrage rapide vous aide à
bien débuter l’usage de votre appareil. Si vous avez d’autres questions sur l’usage de votre appareil,
visitez nos liens ci-dessous :
twitter.com/archos
www.facebook.com/archos
Blog
https://blog.archos.com/
http://faq.archos.com/
www.archos.com, click Support > After-sales support
www.archos.com, cliquez Support > Téléchargements > Déclaration de conformité
MENTIONS LÉGALES ET CONSIGNES DE SÉCURITÉ www.archos.com/support/warranty.html
Comme nous mettons à jour et améliorons régulièrement nos produits, le logiciel de votre appareil peut
présenter une interface ou des fonctionnalités légèrement différentes de celles décrites dans ce guide.
Contactez-nous

8
INPUT: 5V 1.5A
Model: AC101AS3GV2
MADE IN PRC
ARCHOS SA. 12 rue Ampère 91430 Igny France
Access 101
3G
Déballage
ARCHOS Access 101 3G
Guide d’utilisation rapide
Adaptateur
Câble de charge

9
INPUT: 5V 1.5A
Model: AC101AS3GV2
MADE IN PRC
ARCHOS SA. 12 rue Ampère 91430 Igny France
Access 101
3G
INPUT: 5V 1.5A
Model: AC101AS3GV2
MADE IN PRC
ARCHOS SA. 12 rue Ampère 91430 Igny France
Access 101
3G
FR
Description de l’appareil
Caméra avant
Votre appareil est équipé du système d’exploitation
Android 7.0. Des mises à jour peuvent être proposées
pour améliorer les performances de l’appareil. Pour
savoir si une mise à jour est disponible, allez sur :
Paramètres > A propos de la tablette > Mise à jour.
Reset
Prise jack
Caméra arrière
Micro-USB
Volume+/-
Marche/Arrêt
Haut-parleur
Micro
Flash d’appareil photo

10
Charger votre batterie complètement
Branchez le câble de chargement dans le port micro-USB et connectez-le à son chargeur, puis branchez le
tout sur une prise électrique. Laissez la batterie charger complètement.
Allumer l’appareil
1. Maintenez le bouton ON/OFF pour allumer l’appareil.
2. Suivez les instructions à l’écran pour définir les paramètres de l’appareil : langage, WiFi, copier vos
données, entrer vos informations, ajouter votre adresse email, verrouiller votre téléphone, comment
afficher les notifications, les options Google, les applications tierces.
NOTE : vous pouvez passer certaines étapes sans les définir et les régler plus tard dans l’application
Paramètres.
Déplacer une icône de l’écran d’accueil : Maintenez votre doigt appuyé sur l’icône jusqu’à ce que
s’affichent les lignes de positionnement, puis faites-la glisser vers l’emplacement souhaité, et relâchez.
Supprimer une icône de l’écran d’accueil : Maintenez votre doigt appuyé sur l’icône, puis faites-la glisser
vers le haut de l’écran, et déposez-la sur l’icône Supprimer.
Désinstaller une application : A partir de l’écran Toutes les applications, maintenez votre doigt appuyé sur
l’icône, puis faites-la glisser vers le haut de l’écran et déposez-la sur l’icône Désinstaller.
Créer des dossiers d’applications : A partir d’un écran d’accueil, déposez une icône sur une autre pour les
rassembler.
Changer le fond d’écran : Maintenez votre doigt appuyé sur un emplacement vide de l’écran d’accueil.
Sélectionnez fonds d’écran.
Démarrage

11 FR
Widgets : Maintenez votre doigt appuyé sur un emplacement vide de l’écran d’accueil. Sélectionnez
Widgets.
Verrouiller votre appareil : Définissez un type de verrouillage pour protéger vos données. Sélectionnez
l’application Paramètres, puis Sécurité. Sélectionnez un type de verrouillage.
Android device manager : Lorsque votre appareil est perdu, vous pouvez utiliser la page android device
manager (https://www.google.com/android/devicemanager) pour effacer tous vos contenus, verrouiller
l’appareil, localiser l’appareil ou le faire sonner.
Programmation Marche/Arrêt : Programmer l’extinction et l’allumage de l’appareil. Vous pouvez faire la
programmation pourSchedule power on & off to set when the device turns off and turn on. For example,
you can set it for sleep time.
Trucs & astuces

12
FR
Dépannage
- Si votre appareil est bloqué :
Appuyez sur le bouton ON/OFF pendant 10 secondes ou utilisez le bouton de Reset.
- Si votre appareil ne s’allume pas :
1. Chargez votre appareil.
2. Appuyez sur le bouton ON/OFF pendant 10 secondes.
- Si votre appareil a un fonctionnement lent :
Fermez toutes les applications inutilisées.
- Si votre réception WiFi est trop faible :
Assurez-vous de ne pas être loin de la borne WiFi.
Réinitialisez et redéfinissez vos paramètres connexion.
Contactez votre fournisseur d’accès WiFi.
- Si votre appareil a des dysfonctionnements :
Réinitialisez votre appareil. Allez dans Paramètres > Sauvegarde & réinitialisation > Réinitialiser votre
appareil. Si vous ne pouvez pas accéder à ces paramètres, consultez notre foire aux questions sur le
processus de réinitialisation.
Pour plus de renseignements sur vos problèmes techniques, n’hésitez
pas à consulter la page : faq.archos.com

13
DE
Vielen Dank, dass Sie sich für ein ARCHOS-Gerät entschieden haben! Diese Schnellstartanleitung wird
Sie bei der ordnungsgemäßen Bedienung Ihres Geräts unterstützen. Falls Sie bezüglich der Bedienung
Ihres Geräts weitere Fragen haben, besuchen Sie uns unter:
twitter.com/archos
www.facebook.com/archos
Blog
https://blog.archos.com/
http://faq.archos.com/
www.archos.com, klicken Sie auf Support > After-Sales-Support
www.archos.com, klicken Sie auf Support > Downloads > Konformitätserklärung
RECHTS- UND SICHERHEITSHINWEISE www.archos.com/support/warranty.html
Da unsere Produkte kontinuierlich aktualisiert und weiterentwickelt werden, kann die Software Ihres
Geräts in Erscheinung und Funktionalität geringfügige Abweichungen zu den Darstellungen in dieser
Schnellstartanleitung aufweisen.
Willkommen

INPUT: 5V 1.5A
Model: AC101AS3GV2
MADE IN PRC
ARCHOS SA. 12 rue Ampère 91430 Igny France
Access 101
3G
14
Verpackungsinhalt
ARCHOS Access 101 3G
Benutzerhandbuch
Lade-/Netzgerät
Ladekabel

INPUT: 5V 1.5A
Model: AC101AS3GV2
MADE IN PRC
ARCHOS SA. 12 rue Ampère 91430 Igny France
Access 101
3G
INPUT: 5V 1.5A
Model: AC101AS3GV2
MADE IN PRC
ARCHOS SA. 12 rue Ampère 91430 Igny France
Access 101
3G
15 DE
Beschreibung des Geräts
Auf Ihrem Gerät wird das Betriebssystem Android
7.0 ausgeführt. Es werden von Zeit zu Zeit Updates
zur Verbesserung der Geräteleistung bereitgestellt.
Um zu prüfen, ob Updates verfügbar sind, öffnen
Sie: Settings > About tablet > Check for update
[Einstellungen > Tablet-Informationen > Auf Updates
prüfen].
Frontkamera
Kopfhöreranschluss
Micro-USB-
Anschluss
Rückkamera
Lautsprecher
EIN/AUS
Lautstärke +/-
Reset
Mikrofon
Kamera-Blitz

16
Starten
Vollständiges Aufladen des Akkus
Stecken Sie das Ladekabel in den Micro-USB-Anschluss und das Ladegerät in eine Steckdose.
Warten Sie, bis der Akku vollständig aufgeladen ist.
Einschalten
1. Drücken und halten Sie die EIN/AUS-Taste, um das Gerät einzuschalten.
2. Folgen Sie den Anweisungen für die Einrichtung Ihres Geräts: Sprache, WLAN, Kopieren Ihrer Daten,
Eingabe des Namens, E-Mail-Einrichtung, Schutz Ihres Telefons, Anzuzeigende Benachrichtigungen,
Google-Dienste und Apps von Drittanbietern.
HINWEIS: Einige der Schritte können übersprungen und später mit der App Einstellungen konfiguriert
werden.
Verschieben eines Elements auf dem Startbildschirm: Berühren und halten Sie Ihren Finger solange auf
dem Symbol, bis das Positionierungsraster angezeigt wird, schieben Sie es zur gewünschten Position und
lassen Sie den Finger los.
Entfernen eines Elements auf dem Startbildschirm: Drücken und halten Sie das Symbol, schieben Sie
Ihren Finger auf dem Bildschirm nach oben und das Symbol über dem Symbol "Entfernen" loslassen.
Element deinstallieren: Vom Bildschirm All Apps (Apps) aus berühren und halten Sie das Symbol und
schieben dann Ihren Finger auf dem Bildschirm nach oben und lassen es über Uninstall bin (Deinstallieren)
los.
Erstellen von Anwendungsordnern: Lassen Sie ein App-Symbol über einem anderen Symbol im
Startbildschirm los und die zwei Symbole werden kombiniert.
Änderung des Hintergrundbildes: Halten Sie Ihren Finger an einer leeren Stelle auf dem Bildschirm und

17
DE
Hinweise & Tipps
wählen Sie dann aus der Liste: Hintergrundbilder.
Widgets: Halten Sie Ihren Finger an einer leeren Stelle auf dem Bildschirm und wählen Sie dann aus der
Liste: Widgets.
Sicherung Ihres Geräts: Definieren Sie eine Displaysperre zum Schutz Ihrer Privatsphäre. Wählen Sie die
App Settings [Einstellungen] und dann Security [Sicherheit].
Wählen Sie eine Displaysperre aus.
Android-Geräte-Manager Wenn Ihr Gerät verloren geht, können Sie mit dem Android Geräte-Manager
(https://www.google.com/android/devicemanager) Ihre gesamten Inhalte löschen sowie das Gerät
sperren, orten oder klingeln lassen.
Automatisches Ein- und Ausschalten: Richten Sie eine automatische Ein- und Abschaltung ein, um das
Gerät zu einer bestimmten Uhrzeit aus- und einzuschalten. Sie können es z. B. zur Nachtzeit ausschalten.

18
DE
Fehlerbehebung
Weitere Antworten bei technischen Problemen finden Sie unter:
faq.archos.com
- Bei einem Absturz des Geräts:
Halten Sie die Taste EIN/AUS 10 Sekunden lang gedrückt oder verwenden Sie die Reset-Taste.
- Schaltet sich das Gerät nicht ein:
1. Laden Sie Ihr Gerät.
2. Halten Sie die Taste EIN/AUS 10 Sekunden lang gedrückt.
- Bei zu langsamer Gerätefunktion:
Schließen Sie alle Apps, die derzeit nicht verwendet werden.
- Bei schlechtem WLAN-Empfang:
Vergewissern Sie sich, dass Sie nicht zu weit vom WLAN-Hotspot entfernt sind.
Die Verbindungsparameter zurücksetzen und neu definieren.
Kontaktieren Sie den Anbieter Ihrer WLAN-Verbindung.
- Bei einer Funktionsstörung des Geräts:
Initialisieren Sie das Gerät neu. Gehen Sie zu Settings > Backup & reset > Factory data reset
[Einstellungen > Sichern & zurücksetzen > Zurücksetzen auf Werkseinstellungen]. Falls Sie keinen Zugriff
auf die Einstellungen haben, konsultieren Sie bitte unsere FAQs über den Vorgang der Neuinitialisierung.

19
ES
Nuestra comunidad
¡Felicidades por la compra de su dispositivo ARCHOS! La guía rápida de inicio le ayudará a utilizar su
dispositivo de forma correcta. Si tiene cualquier duda acerca de la utilización de su dispositivo, entre
en:
twitter.com/archos
www.facebook.com/archos
Blog
https://blog.archos.com/
http://faq.archos.com/
www.archos.com, haga clic en Support (Asistencia) > After-sales support (Asistencia
posventa)
www.archos.com, haga clic en Support (Asistencia) > Downloads (Descargas) > Declaration of
conformity (Declaración de conformidad)
AVISOS LEGALES Y CONSIGNAS DE SEGURIDA www.archos.com/support/warranty.html
Al estar actualizando y mejorando constantemente nuestros productos, la apariencia o el software de
su dispositivo pueden variar ligeramente con respecto a lo descrito en esta Guía Rápida de Inicio.

INPUT: 5V 1.5A
Model: AC101AS3GV2
MADE IN PRC
ARCHOS SA. 12 rue Ampère 91430 Igny France
Access 101
3G
20
ARCHOS Access 101 3G
Guía de usuario
Contenido de la caja
Adaptador/cargador
Cable de carga
A página está carregando...
A página está carregando...
A página está carregando...
A página está carregando...
A página está carregando...
A página está carregando...
A página está carregando...
A página está carregando...
A página está carregando...
A página está carregando...
A página está carregando...
A página está carregando...
A página está carregando...
A página está carregando...
A página está carregando...
A página está carregando...
A página está carregando...
A página está carregando...
A página está carregando...
A página está carregando...
A página está carregando...
A página está carregando...
A página está carregando...
A página está carregando...
A página está carregando...
A página está carregando...
A página está carregando...
A página está carregando...
A página está carregando...
A página está carregando...
A página está carregando...
A página está carregando...
A página está carregando...
A página está carregando...
A página está carregando...
A página está carregando...
A página está carregando...
A página está carregando...
A página está carregando...
A página está carregando...
A página está carregando...
A página está carregando...
A página está carregando...
A página está carregando...
A página está carregando...
A página está carregando...
A página está carregando...
A página está carregando...
A página está carregando...
A página está carregando...
A página está carregando...
A página está carregando...
A página está carregando...
A página está carregando...
A página está carregando...
A página está carregando...
A página está carregando...
A página está carregando...
A página está carregando...
A página está carregando...
-
 1
1
-
 2
2
-
 3
3
-
 4
4
-
 5
5
-
 6
6
-
 7
7
-
 8
8
-
 9
9
-
 10
10
-
 11
11
-
 12
12
-
 13
13
-
 14
14
-
 15
15
-
 16
16
-
 17
17
-
 18
18
-
 19
19
-
 20
20
-
 21
21
-
 22
22
-
 23
23
-
 24
24
-
 25
25
-
 26
26
-
 27
27
-
 28
28
-
 29
29
-
 30
30
-
 31
31
-
 32
32
-
 33
33
-
 34
34
-
 35
35
-
 36
36
-
 37
37
-
 38
38
-
 39
39
-
 40
40
-
 41
41
-
 42
42
-
 43
43
-
 44
44
-
 45
45
-
 46
46
-
 47
47
-
 48
48
-
 49
49
-
 50
50
-
 51
51
-
 52
52
-
 53
53
-
 54
54
-
 55
55
-
 56
56
-
 57
57
-
 58
58
-
 59
59
-
 60
60
-
 61
61
-
 62
62
-
 63
63
-
 64
64
-
 65
65
-
 66
66
-
 67
67
-
 68
68
-
 69
69
-
 70
70
-
 71
71
-
 72
72
-
 73
73
-
 74
74
-
 75
75
-
 76
76
-
 77
77
-
 78
78
-
 79
79
-
 80
80


Archos Access 101 3G Manual do usuário
- Tipo
- Manual do usuário
- Este manual também é adequado para
em outras línguas
- français: Archos Access 101 3G Manuel utilisateur
- italiano: Archos Access 101 3G Manuale utente
- slovenčina: Archos Access 101 3G Používateľská príručka
- polski: Archos Access 101 3G Instrukcja obsługi
Artigos relacionados
-
 Archos Junior Tab Series Junior Tab Manual do usuário
-
Archos 101 Access Wi-Fi Instruções de operação
-
-
-
-
-
Mode d'Emploi Access 40 - 3G Manual do usuário
-
-
 Archos 101 Series User Neon 101f Manual do usuário
-
 Manual del Usuario Archos Neon 101f Manual do usuário


