Danby DAP290BAW Manual do usuário
- Categoria
- Purificadores de ar
- Tipo
- Manual do usuário

Please write down your serial number and date of purchase. You
must keep the original proof of purchase receipt to receive warranty
services.
Register your new appliance online and fi ll out a product survey to
receive a FREE 2 MONTH WARRANTY EXTENSION at www.danby.
com/support/product-registration/
Visit www.Danby.com to access self-service tools, FAQs and much more.
For Customer Service, please fi ll out the web form at www.danby.com/
support, or call 1-800-263-2629.
*
*
Danby Products Ltd, Guelph, Ontatrio, Canada N1H 6Z9
Danby Products Inc, Findlay, Ohio, USA 45840
*Trademark of Danby Products Printed in China
2023.04.10
We are proud of our quality
products and we believe in
dependable service. You are
entitled to warranty coverage as
described in this owner’s manual.
AIR PURIFIER
Model Number DAP290BAW
Serial Number
Date of Purchase

Important Safety Information
READ AND FOLLOW ALL SAFETY INSTRUCTIONS
SAVE THESE INSTRUCTIONS!
2
SAFETY REQUIREMENTS
This appliance is not intended for use by persons (including children)
whose physical, sensory or mental capabilities may be different or
reduced, or who lack experience or knowledge, unless such persons
receive supervision or training to operate the appliance by a person
responsible for their safety.
Children should be supervised to ensure that they do not play with the
appliance.
Do not store or use combustible materials such as gasoline or other
fl ammable vapors or liquids in the vicinity of this or any other appliance.
Do not insert fi ngers or other objects into grilles or openings in the
appliance.
Do not cover or block the intake and exhaust openings.
Do not operate the appliance without the fi lter installed.
Do not operate the appliance near heat sources.
This appliance is intended for indoor, residential applications only.
Do not use this appliance outdoors. Do not use this appliance for
commercial or industrial applications.
Warning - To reduce the risk of fi re or electric shock, do not use this fan
with any solid-state speed control device.

Important Safety Information
READ AND FOLLOW ALL SAFETY INSTRUCTIONS
SAVE THESE INSTRUCTIONS!
3
SAFETY REQUIREMENTS
Do not connect the appliance to extension cords, adapters or together
with another appliance in the same wall outlet.
Do not splice the power cord. If the power supply cord is damaged,
it must be replaced by the manufacturer, its service agent or similar
qualifi ed person in order to avoid hazard.
To reduce the risk of electric shock, this appliance has a polarized plug
(one blade is wider than the other). This plug will fi t in a polarized outlet
only one way. If the plug does not fi t fully in the outlet, reverse the plug.
If it still does not fi t, contact a licensed electrician to install the proper
outlet. Do not alter the plug in any way.
To avoid risk of electric shock, do not operate this appliance in an area
that is likely to accumulate standing water. If this condition develops,
disconnect the power supply before stepping into the water.
This appliance complies with the maximum allowable concentration
of ozone of 0.05 parts per million by volume in a 24 hour period.
The Health Canada Guideline 2010 recommends that the maximum
exposure limit, based on an average of 8 hours, is 0.02 ppmv or less
when tested in a sealed, controlled room approximately 30 m3.

4
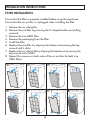
INSTALLATION INSTRUCTIONS
FILTER INSTALLATION
Ensure that the fi lter is properly installed before using the appliance.
Ensure that the air purifi er is unplugged when installing the fi lter.
1. Remove the air inlet grille.
2. Remove the pre-fi lter by pressing the U-shaped buckle and pulling
outward.
3. Remove the true HEPA fi lter.
4. Remove the packaging from the fi lter.
5. Install the fi lter.
6. Replace the pre-fi lter by aligning the bottom and pressing the top
inward until it clicks.
7. Replace the air inlet grille by aligning the bottom and pressing the
top inward until it clicks.
8. Repeat this process on both sides of the air purifi er for both true
HEPA fi lters.
1
234
5678

5
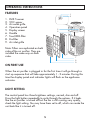
FEATURES
1. PM2.5 sensor
2. VOC sensor
3. Air outlet grille
4. Operation panel
5. Display screen
6. Handle
7. True HEPA fi lter
8. Pre-fi lter
9. Air inlet grille
Note: Filters are replicated on both
sides of the air purifi er. They are
installed the same way on both
sides.
OPERATING INSTRUCTIONS
3
1
2
6
5
7
8
9
4
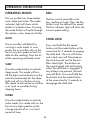
ON FIRST USE
When the air purifi er is plugged in for the fi rst time it will go through a
start up sequence that will take approximately 1 - 2 minutes. During this
time the display panel and indicator lights will fl ash as the appliance
activates.
LIGHT SETTING
The control panel has three brightness settings, normal, dim and off.
Press the light button repeatedly to cycle through the options. If it looks
like the air purifi er is turned off but the fan is still running very quietly,
check the light setting. You may have them set to off, which can make the
unit look like it is turned off.

OPERATING INSTRUCTIONS
6
OPERATING MODES
This air purifi er has three modes:
auto, sleep and turbo. The mode
indicator light will show which
mode is currently active. Pressing
the mode button will cycle through
the options: auto, sleep and turbo.
AUTO
The air purifi er will default to
running in auto mode. In auto
mode, the air purifi er will run the
fan at very low speed so that it is
able to take readings from the air
while remaining extremely quiet.
SLEEP
Press the mode button to activate
sleep mode. This mode will turn
off the lights and indicators on the
control panel except for the sleep
light and will run the fan at very
low speed to ensure the air purifi er
is as quiet as possible during
sleeping hours.
TURBO
Press the mode button to activate
turbo mode. This mode will run the
fan at very high speed to purify
a large amount of air in a short
period of time.
FAN
The fan can be manually set to
low, medium or high. Press the fan
button to set the desired fan speed.
The fan indicator light will show the
current speed setting.
CHILD LOCK
Press and hold the fan speed
button and the mode button at the
same time for 3 seconds to engage
the child lock. The unit will chime
and a lock icon will illuminate on
the control panel next to the pre-
fi lter check light. The buttons on
the control panel will not function
when the child lock is engaged. If
any buttons are pressed, the lock
icon will fl ash. Press and hold the
fan button and the mode button
at the same time for 3 seconds to
disengage the child lock.

OPERATING INSTRUCTIONS
7
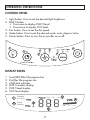
CONTROL PANEL
1. Light button: Press to set the desired light brightness.
2. PM2.5 button:
• Press once to display PM2.5 level.
• Press twice to display VOC level.
3. Fan button: Press to set the fan speed.
4. Mode button: Press to set the desired mode: auto, sleep or turbo.
5. Power button: Press to turn the air purifi er on or off.
1
2
34
5
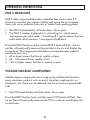
DISPLAY PANEL
1. True HEPA fi lter life progress bar
2. Pre-fi lter life progress bar
3. Child lock indicator
4. PM2.5 number display
5. PM2.5 level display
6. VOC level display
Clean Fair Poor
Clean Fair Poor
Replace
True HEPA
Check
Pre-filter
1
23
4
56

OPERATING INSTRUCTIONS
8
PM2.5 MOLECULES
PM2.5 refers to particulate matter molecules that are less than 2.5
microns in size that can reduce visibility and cause the air to appear
hazy such as air pollution from cars or smoke from cooking grease.
• The PM2.5 level display will show clean, fair or poor.
• The PM2.5 number displayed in is units of μg/m³, which means
‘micrograms per cubic meter’. A reading of 1 μg/m³ means that one
cubic meter of air contains 1 microgram of pollutant.
Press the PM2.5 button and the current PM2.5 level will fl ash. The air
purifi er will continually measure the particles in the air and display the
current level. The ranges provided below are approximate, ambient
conditions may vary.
• 65 or lower means that the air quality is clean.
• 65 - 140 means the air quality is fair.
• 140 or higher means that the air quality is poor.
VOLATILE ORGANIC COMPOUNDS
Volatile organic compounds are a large group of chemicals found in
many consumer products such as paint, varnishes, cooking oils, air
fresheners, etc. These can be released into the air and can pose health
risks.
• The VOC level display will show clean, fair or poor.
Press the PM2.5 button twice and the current VOC level will fl ash. The
air purifi er will continually measure the VOCs in the air and display the
current level.

9
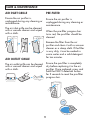
CARE & MAINTENANCE
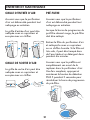
AIR INLET GRILLE
Ensure the air purifi er is
unplugged during any cleaning or
maintenance.
The air inlet grille can be cleaned
with a vacuum cleaner and wiped
with a cloth.
AIR OUTLET GRILLE
The air outlet grille can be cleaned
with a vacuum cleaner and wiped
with a cloth.
PRE-FILTER
Ensure the air purifi er is
unplugged during any cleaning or
maintenance.
When the pre-fi lter progress bar
turns red, the pre-fi lter should be
cleaned.
Remove the fi lter from the air
purifi er and clean it with a vacuum
cleaner or a damp cloth. If the fi lter
is very dirty, it can be soaked in
warm water and a mild detergent
for ten minutes.
Ensure the pre-fi lter is completely
dry before replacing it in the air
purifi er. Once replaced, press and
hold the PM2.5 detection button
for 3 seconds to reset the pre-fi lter
progress bar.

CARE & MAINTENANCE
10
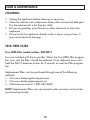
CLEANING
• Unplug the appliance before cleaning or servicing.
• Clean the cabinet with a lukewarm damp cloth and neutral detergent.
Dry the cabinet with a lint-free dry cloth.
• Do not use gasoline, paint thinner or other chemicals to clean the
appliance.
• Do not wash the appliance directly under a tap or using a hose. It
may cause electrical damage.
TRUE HEPA FILTER
True HEPA fi lter model number: DAP290-F
Two are included with the air purifi er. When the True HEPA fi lter progress
bar turns red, the fi lters should be replaced. Once replaced, press and
hold the PM2.5 detection button for 3 seconds to reset the fi lter progress
bar.
Replacement fi lters can be purchased through one of the following
methods:
• Visit www.danbyapplianceparts.com
• Visit www.danbyapplianceparts.ca
• Call consumer care at 1-800-263-2629.
NOTE: Replacement fi lters are not covered under warranty and must be
purchased separately.

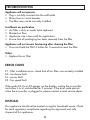
11
Appliance will not operate
• Plug is not fully inserted into the wall outlet
• Blown fuse or circuit breaker
• The fi lter may not be correctly installed
Insuffi cient air purifi cation
• Air fi lter is dirty or needs to be replaced
• Blocked air fl ow
• Appliance size is too small for application
• Ensure that all packaging has been removed from the fi lter
Appliance will not resume functioning after cleaning the fi lter
• Press and hold the PM2.5 button for 3 seconds to reset the fi lter
Odors
• Replace the air fi lter
ERROR CODES
E1 - fi lter installation error; check that all air fi lters are correctly installed
E0 - hardware fault
Eu - sensor fault
E3 - fan speed fault
If the codes E0, Eu or E3 appear on the display, unplug the air purifi er
and allow it to sit undisturbed for 5 minutes. If the error code persists
when the air purifi er is plugged in, please contact a local service depot.
DISPOSAL
This appliance should not be treated as regular household waste. Check
for local regulatory compliance regarding the approved and safe
disposal of this appliance.
TROUBLESHOOTING

Danby Products Ltd.
Guelph, Ontario, Canada Danby Products Inc.
Findlay, Ohio, U.S.A.
1-800-263-2629
LIMITED “CARRY IN” WARRANTY
This quality product is warranted to be free from manufacturer’s defects in material and
workmanship, provided that the unit is used under the normal operating conditions intended by
the manufacturer. This warranty is available only to the person to whom the unit was originally
sold by Danby Products Limited (Canada) or Danby Products Inc. (U.S.A.) (hereafter “Danby”) or
by an authorized distributor of Danby, and is non-transferable.
TERMS OF WARRANTY
Plastic parts are warranted for thirty (30) days from the date of purchase, with no extensions
provided.
First 24 months: During the fi rst twenty-four (24) months, any functional parts of this product
found to be defective, will be repaired or replaced, at warranter’s option, at no charge to the
original purchaser.
To obtain service: Contact the dealer where the unit was purchased, or contact the nearest
authorized Danby service depot, where service must be performed by a qualifi ed service
technician. If service is performed on the unit by anyone other than an authorized service depot,
all obligations of Danby under this warranty shall be void.
It is the responsibility of the purchaser to transport the appliance to the nearest authorized
service depot. Transportation charges to and from the service location are not protected by
this warranty and are the responsibility of the purchaser
Nothing within this warranty shall imply that Danby will be responsible or liable for any
spoilage or damage to food or other contents of this appliance, whether due to any defect of
the appliance, or its use, whether proper or improper.
EXCLUSIONS
Save as herein provided, by Danby, there are no other warranties, conditions, representations
or guarantees, express or implied, made or intended by Danby or its authorized distributors
and all other warranties, conditions, representations or guarantees, including any warranties,
conditions, representations or guarantees under any Sale of Goods Act or like legislation or
statute is hereby expressly excluded. Save as herein provided, Danby shall not be responsible
for any damages to persons or property, including the unit itself, howsoever caused or any
consequential damages arising from the malfunction of the unit and by the purchase of the
unit, the purchaser does hereby agree to indemnify and hold harmless Danby from any claim
for damages to persons or property caused by the unit.
GENERAL PROVISIONS
No warranty or insurance herein contained or set out shall apply when damage or repair is
caused by any of the following:
1) Power failure.
2) Damage in transit or when moving the appliance.
3) Improper power supply such as low voltage, defective house wiring or inadequate fuses.
4) Accident, alteration, abuse or misuse of the appliance such as inadequate air circulation in the
room or abnormal operating conditions (ie. extremely high or low room temperature).
5) Use for commercial or industrial purposes (ie. If the appliance is not installed in a domestic
residence).
6) Fire, water damage, theft, war, riot, hostility, acts of God such as hurricanes, fl oods etc.
7) Service calls resulting in customer education.
8) Improper Installation (ie. Building-in of a free standing appliance or using an appliance
outdoors that is not approved for outdoor application, including but not limited to: garages,
patios, porches or anywhere that is not properly insulated or climate controlled).
Proof of purchase date will be required for warranty claims; retain bills of sale. In the event
that warranty service is required, present the proof of purchase to our authorized service
depot.

13
Veuillez noter votre numéro de série et la date d’achat. Vous devez
conserver la preuve d’achat originale pour bénéfi cier des services de
garantie.
Enregistrez votre nouvel appareil en ligne et remplissez un sondage sur
le produit pour recevoir une EXTENSION DE GARANTIE GRATUITE DE 2
MOIS sur www.danby.com/support/product-registration/
Visitez www.Danby.com pour accéder aux outils en libre-service, aux
FAQ et bien plus encore.
Pour le service client, veuillez remplir le formulaire Web à l’adresse
www.danby.com/support ou appeler le 1-800-263-2629.
Danby Products Ltd, Guelph, Ontatrio, Canada N1H 6Z9
Danby Products Inc, Findlay, Ohio, USA 45840
*Marque de commerce des produits Danby Imprimé en chine
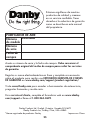
Nous sommes fi ers de nos produits
de qualité et nous croyons en un
service fi able. Vous avez droit à
la couverture de la garantie telle
que décrite dans ce manuel du
propriétaire.
*
*
PURIFICATEUR D’AIR
Numéro
de modèle
DAP290BAW
Numéro
de série
Date
d’achat

Informations de sécurité importantes
LISEZ ET SUIVEZ TOUTES LES INSTRUCTIONS DE SÉCURITÉ
CONSERVEZ CES INSTRUCTIONS!
14
EXIGENCES DE SÉCURITÉ
Cet appareil n’est pas destiné à être utilisé par des personnes (y compris
des enfants) dont les capacités physiques, sensorielles ou mentales
peuvent être différentes ou réduites, ou qui n’ont pas d’expérience ou
de connaissances, à moins que ces personnes ne soient surveillées ou
formées pour faire fonctionner l’appareil par une personne responsable
de leur sécurité.
Les enfants devraient être surveillés pour s’assurer qu’ils ne jouent pas
avec l’appareil.
Ne pas stocker ou utiliser des matériaux combustibles tels que de
l’essence ou d’autres vapeurs ou liquides infl ammables à proximité de ce
ou d’un autre appareil.
Ne pas insérer de doigts ou d’autres objets dans des grilles ou des
ouvertures dans l’appareil.
Ne pas couvrir ou bloquer les ouvertures d’admission et d’échappement.
N’utilisez pas l’appareil sans le fi ltre installé.
N’utilisez pas l’appareil à proximité de sources de chaleur.
Cet appareil est destiné uniquement à des applications résidentielles et
intérieures. N’utilisez pas cet appareil à l’extérieur. N’utilisez pas cet
appareil pour des applications commerciales ou industrielles.
Avertissement - Pour réduire le risque d’incendie ou de choc électrique,
n’utilisez pas ce ventilateur avec un dispositif de contrôle de vitesse à
semi-conducteurs.

Informations de sécurité importantes
LISEZ ET SUIVEZ TOUTES LES INSTRUCTIONS DE SÉCURITÉ
CONSERVEZ CES INSTRUCTIONS!
15
EXIGENCES DE SÉCURITÉ
Ne branchez pas l’appareil à des rallonges, des adaptateurs ou à un
autre appareil dans la même prise murale.
Ne pas épisser le cordon d’alimentation. Si le cordon d’alimentation est
endommagé, il doit être remplacé par le fabricant, son agent de service
ou une personne qualifi ée similaire afi n d’éviter tout risque.
Pour réduire le risque de choc électrique, cet appareil est équipé d’une
fi che polarisée (une lame est plus large que l’autre). Cette fi che ne peut
être insérée dans une prise polarisée que dans un sens. Si la fi che ne
rentre pas complètement dans la prise, inversez la prise. Si cela ne
convient toujours pas, contactez un électricien agréé pour installer la
prise appropriée. Ne modifi ez pas la fi che de quelque façon que ce soit.
Pour éviter tout risque de choc électrique, ne pas utiliser cet appareil
dans une zone susceptible d’accumuler de l’eau stagnante. Si cette
condition se développe, débranchez l’alimentation avant de pénétrer
dans l’eau.
Cet appareil est conforme à la concentration maximale permise d’ozone
de 0,05 partie par million en volume sur une période de 24 heures.
La ligne directrice 2010 de Santé Canada recommande que la limite
d’exposition maximale, basée sur une moyenne de 8 heures, soit de
0,02 ppmv ou moins lorsqu’elle est testée dans une pièce étanche et
contrôlée d’environ 30 m3.

16
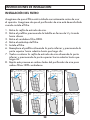
INSTRUCTIONS D’INSTALLATION
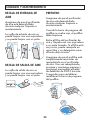
INSTALLATION DU FILTRE
Assurez-vous que le fi ltre est correctement installé avant d’utiliser
l’appareil. Assurez-vous que le purifi cateur d’air est débranché lors de
l’installation du fi ltre.
1. Retirez la grille d’entrée d’air.
2. Retirez le préfi ltre en appuyant sur la boucle en forme de U et en
tirant vers l’extérieur.
3. Retirez le vrai fi ltre HEPA.
4. Retirez l’emballage du fi ltre.
5. Installez le fi ltre.
6. Remplacez le préfi ltre en alignant le bas et en appuyant sur le haut
vers l’intérieur jusqu’à ce qu’il s’enclenche.
7. Remplacez la grille d’entrée d’air en alignant le bas et en appuyant
sur le haut vers l’intérieur jusqu’à ce qu’il s’enclenche.
8. Répétez ce processus des deux côtés du purifi cateur d’air pour les
deux vrais fi ltres HEPA.
1
234
5678

17
INSTRUCTIONS D’UTILISATION
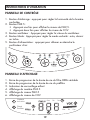
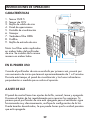
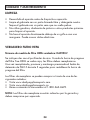
CARACTÉRISTIQUES
1. Capteur PM2.5
2. Capteur COV
3. Grille de sortie d’air
4. Panneau de commande
5. Écran d’affi chage
6. Gérer
7. Véritable fi ltre HEPA
8. Pré-fi ltre
9. Grille d’entrée d’air
Remarque : Les fi ltres sont
reproduits des deux côtés du
purifi cateur d’air. Ils sont installés
de la même manière des deux
côtés.
3
1
2
6
5
7
8
9
4
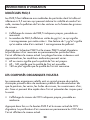
À LA PREMIÈRE UTILISATION
Lorsque le purifi cateur d’air est branché pour la première fois, il passe
par une séquence de démarrage qui prend environ 1 à 2 minutes.
Pendant ce temps, le panneau d’affi chage et les voyants clignotent
lorsque l’appareil s’active.
RÉGLAGE DE LA LUMIÈRE
Le panneau de commande dispose de trois réglages de luminosité,
normal, faible et désactivé. Appuyez plusieurs fois sur le bouton
d’éclairage pour faire défi ler les options. S’il semble que le purifi cateur
d’air est éteint mais que le ventilateur fonctionne toujours très
silencieusement, vérifi ez le réglage de la lumière. Vous pouvez les
désactiver, ce qui peut donner l’impression que l’appareil est éteint.

INSTRUCTIONS D’UTILISATION
18
MODES DE FONCTIONNEMENT
Ce purifi cateur d’air a trois modes
: auto, veille et turbo. Le voyant
de mode indiquera quel mode est
actuellement actif. Appuyez sur le
bouton de mode pour faire défi ler
les options : auto, veille et turbo.
AUTO
Le purifi cateur d’air fonctionnera
par défaut en mode automatique.
En mode automatique, le
purifi cateur d’air fera fonctionner
le ventilateur à très basse vitesse
afi n qu’il puisse prendre des
mesures dans l’air tout en restant
extrêmement silencieux.
DORMIR
Appuyez sur le bouton mode
pour activer le mode veille. Ce
mode éteindra les lumières et les
indicateurs sur le panneau de
commande à l’exception de la
lumière de veille et fera fonctionner
le ventilateur à très basse vitesse
pour s’assurer que le purifi cateur
d’air est aussi silencieux que
possible pendant les heures de
sommeil.
TURBO
Appuyez sur le bouton de mode
pour activer le mode turbo. Ce
mode fera fonctionner le ventilateur
à très haute vitesse pour purifi er
une grande quantité d’air en peu
de temps.
VENTILATEUR
Le ventilateur peut être réglé
manuellement sur faible, moyen ou
élevé. Appuyez sur le bouton du
ventilateur pour régler la vitesse de
ventilateur souhaitée. Le voyant du
ventilateur indiquera le réglage de
vitesse actuel.
VERROUILLAGE ENFANT
Appuyez et maintenez le bouton
de vitesse du ventilateur et
le bouton de mode en même
temps pendant 3 secondes pour
activer le verrouillage enfant.
L’appareil sonnera et une icône
de verrouillage s’allumera sur le
panneau de commande à côté
du voyant de vérifi cation du
préfi ltre. Les boutons du panneau
de commande ne fonctionnent
pas lorsque la sécurité enfants est
activée. Si vous appuyez sur un
bouton, l’icône de verrouillage
clignote. Appuyez et maintenez le
bouton du ventilateur et le bouton
de mode en même temps pendant
3 secondes pour désactiver le
verrouillage enfant.

INSTRUCTIONS D’UTILISATION
19
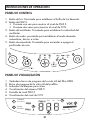
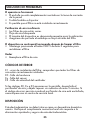
PANNEAU D’AFFICHAGE
1. Barre de progression de la durée de vie du fi ltre HEPA véritable
2. Barre de progression de la durée de vie du préfi ltre
3. Indicateur de verrouillage enfant
4. Affi chage du nombre PM2.5
5. Affi chage du niveau PM2.5
6. Affi chage du niveau de COV
Clean Fair Poor
Clean Fair Poor
Replace
True HEPA
Check
Pre-filter
1
23
4
56
PANNEAU DE CONTRÔLE
1. Bouton d’éclairage: appuyez pour régler la luminosité de la lumière
souhaitée.
2. Bouton PM2.5:
• Appuyez une fois pour affi cher le niveau de PM2,5.
• Appuyez deux fois pour affi cher le niveau de COV.
3. Bouton ventilateur : Appuyez pour régler la vitesse du ventilateur.
4. Bouton Mode : Appuyez pour régler le mode souhaité : auto, dormir
ou turbo.
5. Bouton d’alimentation: appuyez pour allumer ou éteindre le
purifi cateur d’air.
1
2
34
5

INSTRUCTIONS D’UTILISATION
20
MOLÉCULES PM2,5
Les PM2,5 font référence aux molécules de particules dont la taille est
inférieure à 2,5 microns qui peuvent réduire la visibilité et rendre l’air
voilé, comme la pollution de l’air des voitures ou la fumée des graisses
de cuisson.
• L’affi chage du niveau de PM2,5 indiquera propre, passable ou
mauvaise.
• Le nombre de PM2,5 affi ché en unités de μg/m³, ce qui signifi e
«microgrammes par mètre cube». Une lecture de 1 μg/m³ signifi e
qu’un mètre cube d’air contient 1 microgramme de polluant.
Appuyez sur le bouton PM2.5 et le niveau PM2.5 actuel clignotera.
Le purifi cateur d’air mesurera en permanence les particules dans
l’air et affi chera le niveau actuel. Les plages fournies ci-dessous sont
approximatives, les conditions ambiantes peuvent varier.
• 65 ou moins signifi e que la qualité de l’air est propre.
• 65 - 140 signifi e que la qualité de l’air est passable.
• 140 ou plus signifi e que la qualité de l’air est mauvaise.
LES COMPOSÉS ORGANIQUES VOLATILS
Les composés organiques volatils sont un grand groupe de produits
chimiques présents dans de nombreux produits de consommation tels
que la peinture, les vernis, les huiles de cuisson, les assainisseurs d’air,
etc. Ceux-ci peuvent être rejetés dans l’air et présenter des risques pour
la santé.
• L’affi chage du niveau de COV indiquera propre, passable ou
médiocre.
Appuyez deux fois sur le bouton PM2.5 et le niveau actuel de COV
clignotera. Le purifi cateur d’air mesurera en permanence les COV dans
l’air et affi chera le niveau actuel.
A página está carregando...
A página está carregando...
A página está carregando...
A página está carregando...
A página está carregando...
A página está carregando...
A página está carregando...
A página está carregando...
A página está carregando...
A página está carregando...
A página está carregando...
A página está carregando...
A página está carregando...
A página está carregando...
A página está carregando...
A página está carregando...
-
 1
1
-
 2
2
-
 3
3
-
 4
4
-
 5
5
-
 6
6
-
 7
7
-
 8
8
-
 9
9
-
 10
10
-
 11
11
-
 12
12
-
 13
13
-
 14
14
-
 15
15
-
 16
16
-
 17
17
-
 18
18
-
 19
19
-
 20
20
-
 21
21
-
 22
22
-
 23
23
-
 24
24
-
 25
25
-
 26
26
-
 27
27
-
 28
28
-
 29
29
-
 30
30
-
 31
31
-
 32
32
-
 33
33
-
 34
34
-
 35
35
-
 36
36


Danby DAP290BAW Manual do usuário
- Categoria
- Purificadores de ar
- Tipo
- Manual do usuário
em outras línguas
- español: Danby DAP290BAW Manual de usuario
- français: Danby DAP290BAW Manuel utilisateur
- English: Danby DAP290BAW User manual