Electrolux EGE6182NOK Manual do usuário
- Categoria
- Fogões
- Tipo
- Manual do usuário

(*(12.
.................................................. ...............................................
(1
+2% 86(50$18$/
37
3/$&$ 0$18$/'(,16758(6
75
2&$. .8//$10$.,/$98=8

CONTENTS
1. SAFETY INFORMATION . . . . . . . . . . . . . . . . . . . . . . . . . . . . . . . . . . . . . . . . . . . . . . . . . . . . 3
2. PRODUCT DESCRIPTION . . . . . . . . . . . . . . . . . . . . . . . . . . . . . . . . . . . . . . . . . . . . . . . . . . 5
3. DAILY USE . . . . . . . . . . . . . . . . . . . . . . . . . . . . . . . . . . . . . . . . . . . . . . . . . . . . . . . . . . . . . . 6
4. HELPFUL HINTS AND TIPS . . . . . . . . . . . . . . . . . . . . . . . . . . . . . . . . . . . . . . . . . . . . . . . . . 7
5. CARE AND CLEANING . . . . . . . . . . . . . . . . . . . . . . . . . . . . . . . . . . . . . . . . . . . . . . . . . . . . 8
6. TROUBLESHOOTING . . . . . . . . . . . . . . . . . . . . . . . . . . . . . . . . . . . . . . . . . . . . . . . . . . . . . 9
7. INSTALLATION . . . . . . . . . . . . . . . . . . . . . . . . . . . . . . . . . . . . . . . . . . . . . . . . . . . . . . . . . 11
8. TECHNICAL INFORMATION . . . . . . . . . . . . . . . . . . . . . . . . . . . . . . . . . . . . . . . . . . . . . . . . 14
9. ENVIRONMENT CONCERNS . . . . . . . . . . . . . . . . . . . . . . . . . . . . . . . . . . . . . . . . . . . . . . . 15
WE’RE THINKING OF YOU
Thank you for purchasing an Electrolux appliance. You’ve chosen a product that brings with it
decades of professional experience and innovation. Ingenious and stylish, it has been designed with
you in mind. So whenever you use it, you can be safe in the knowledge that you’ll get great results
every time.
Welcome to Electrolux.
Visit our website for:
Get usage advice, brochures, trouble shooter, service information:
www.electrolux.com
Register your product for better service:
www.electrolux.com/productregistration
Buy Accessories, Consumables and Original spare parts for your appliance:
www.electrolux.com/shop
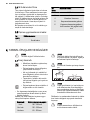
CUSTOMER CARE AND SERVICE
We recommend the use of original spare parts.
When contacting Service, ensure that you have the following data available.
The information can be found on the rating plate. Model, PNC, Serial Number.
Warning / Caution-Safety information
General information and tips
Environmental information
Subject to change without notice.
2
www.electrolux.com

1.
SAFETY INFORMATION
This appliance is suitable for the following
markets: PT
TR
Before the installation and use of the appli-
ance, carefully read the supplied instruc-
tions. The manufacturer is not responsible
if an incorrect installation and use causes
injuries and damages. Always keep the in-
structions with the appliance for future ref-
erence.
1.1 Children and vulnerable
people safety
WARNING!
Risk of suffocation, injury or perma-
nent disability.
• Do not let persons, children included,
with reduced physical sensory, reduced
mental functions or lack of experience
and knowledge use the appliance. They
must have supervision or instruction for
the operation of the appliance by a per-
son who is responsible for their safety.
• Do not let children play with the appli-
ance.
• Keep all packaging away from children.
• Keep children and pets away from the
appliance when it operates or when it
cools down. Accessible parts are hot.
• If the appliance has a child safety device,
we recommend that you activate it.
1.2 Installation
WARNING!
Only a qualified person must install
this appliance.
• Remove all the packaging.
• Do not install or use a damaged appli-
ance.
• Obey the installation instruction supplied
with the appliance.
• Keep the minimum distance from the
other appliances and units.
• Always be careful when you move the
appliance because it is heavy. Always
wear safety gloves.
• Seal the cut surfaces with a sealant to
prevent moisture to cause swelling.
• Protect the bottom of the appliance from
steam and moisture.
• Do not install the appliance adjacent to a
door or under a window. This prevents
hot cookware to fall from the appliance
when the door or the window is opened.
• If the appliance is installed above draw-
ers make sure that the space, between
the bottom of the appliance and the up-
per drawer, is sufficient for air circulation.
• The bottom of the appliance can get hot.
We recommend to install a non-combus-
tile separation panel under the appliance
to prevent access to the bottom.
Electrical connection
WARNING!
Risk of fire and electrical shock.
• All electrical connections must be made
by a qualified electrician.
• Before every wiring make sure the main
terminal of the appliance is not live.
• Make sure the appliance is installed cor-
rectly. Loose and incorrect plug and
socket can make the terminal become
too hot.
• Make sure that a shock protection is in-
stalled.
• Do not let the electricity bonds touch the
appliance or hot cookware, when you
connect the appliance to the near sock-
ets.
• Do not let the electricity bonds tangle.
• Use a strain relief clamp on cable.
• Use the correct mains cable.
• Make sure not to cause damage to the
mains plug and to the mains cable. Con-
tact the Service or an electrician to
change a damaged mains cable.
• The electrical installation must have an
isolation device which lets you discon-
nect the appliance from the mains at all
poles. The isolation device must have a
contact opening width of minimum 3
mm.
• Use only correct isolation devices: line
protecting cut-outs, fuses (screw type
fuses removed from the holder), earth
leakage trips and contractors.
ENGLISH 3

Gas connection
• All gas connections should be made by
a qualified person.
• Make sure that there is air circulation
around the appliance.
• The information about the gas supply is
on the rating plate.
• This appliance is not connected to a de-
vice, which evacuates the products of
combustion. Make sure to connect the
appliance according to current installa-
tion regulations. Pay attention to require-
ments regarding adequate ventilation.
1.3 Use
WARNING!
Risk of injury, burns or electric
shock.
• Use this appliance in a household envi-
ronment.
• Do not change the specification of this
appliance.
• Do not use an external timer or a sepa-
rate remote-control system to operate
the appliance.
• Do not let the appliance stay unattended
during operation.
• Do not operate the appliance with wet
hands or when it has contact with water.
• Do not put cutlery or saucepan lids on
the cooking zones. They become hot.
• Set the cooking zone to “off” after use.
• Do not use the appliance as a work sur-
face or as a storage surface.
• If the surface of the appliance is cracked,
disconnect immediately the appliance
from the power supply. This to prevent
an electrical shock.
WARNING!
Risk of fire or explosion.
• Fats and oil when heated can release
flammable vapours. Keep flames or
heated objects away from fats and oils
when you cook with them.
• The vapours that very hot oil releases
can cause spontaneous combustion.
• Used oil, that can contain food rem-
nants, can cause fire at a lower tempera-
ture than oil used for the first time.
• Do not put flammable products or items
that are wet with flammable products in,
near or on the appliance.
• Do not try to extinguish a fire with water.
Disconnect the appliance and cover the
flame with a lid or a fire blanket.
WARNING!
Risk of damage to the appliance.
• Do not keep hot cookware on the con-
trol panel.
• Do not let cookware to boil dry.
• Be careful not to let objects or cookware
fall on the appliance. The surface can be
damaged.
• Do not activate the cooking zones with
empty cookware or without cookware.
• Do not put aluminium foil on the appli-
ance.
• Cookware made of cast iron, aluminium
or with a damaged bottom can cause
scratches on the glass ceramic. Always
lift these objects up when you have to
move them on the cooking surface.
• Provide good ventilation in the room
where the appliance is installed.
• Make sure that the ventilation openings
are not blocked.
• Use only stable cookware with the cor-
rect shape and diameter larger than the
dimensions of the burners. There is a risk
of overheating and rupture of the glass
plate (if applicable).
• Make sure the flame does not go out
when you quickly turn the knob from the
maximum to the minimum position.
• Make sure pots are centrally positioned
on the rings and do not stick out over
edges of the cooking surface.
• Use only the accessories supplied with
the appliance.
• Do not install a flame diffuser on the
burner.
1.4 Care and Cleaning
WARNING!
Risk of damage to the appliance.
• Clean regularly the appliance to prevent
the deterioration of the surface material.
• Do not use water spray and steam to
clean the appliance.
4
www.electrolux.com

• Clean the appliance with a moist soft
cloth. Only use neutral detergents. Do
not use abrasive products, abrasive
cleaning pads, solvents or metal objects.
1.5 Disposal
WARNING!
Risk of injury or suffocation.
• Contact your municipal authority for in-
formation on how to discard the appli-
ance correctly.
• Disconnect the appliance from the mains
supply.
• Cut off the mains cable and discard it.
• Flat the external gas pipes.
2. PRODUCT DESCRIPTION
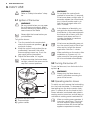
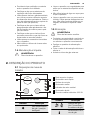
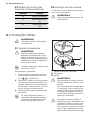
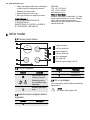
2.1 Cooking surface layout
3
27
1
6
5
4
180
mm
1
Hob top
2
Semi-rapid burner
3
Control knobs
4
Auxiliary burner
5
Residual heat indicator
6
Rapid burner
7
Electric cooking zone 1800 W
2.2 Control knobs
Symbol Description
no gas supply / off
position
ignition position /
maximum gas
supply
minimum gas sup-
ply
2.3 Electric cooking zones
control knobs
Symbol Function
0 off position
Symbol Function
1
minimum heat
6 maximum heat
2.4 Residual heat indicator
The residual heat indicator comes on when
a cooking zone is hot.
WARNING!
Risk of burns from residual heat!
ENGLISH 5

3. DAILY USE
WARNING!
Refer to "Safety information" chap-
ter.
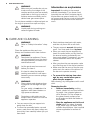
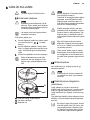
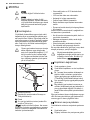
3.1 Ignition of the burner
WARNING!
Be very careful when you use open
fire in kitchen environment. Manu-
facturer decline any responsibility in
case misuse of the flame
Always light the burner before you
put cookware.
To light the burner:
1.
Turn the control knob counterclock-
wise to the maximum position (
)
and push it down.
2.
Keep the control knob pushed for ap-
proximately 5 seconds; this will let
thermocouple to warm up. If not, the
gas supply will be interrupted.
3.
Adjust the flame after it is regular.
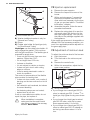
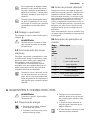
If after some tries the burner does
not light, check if the crown and its
cap are in correct positions.
A
B
C
A)
Burner cap and crown
B)
Thermocouple
C)
Ignition candle
WARNING!
Do not keep the control knob
pushed for more than 15 seconds.
If the burner does not light after 15
seconds, release the control knob,
turn it into off position and try to
light the burner again after mini-
mum 1 minute.
In the absence of electricity you
can ignite the burner without elec-
trical device; in this case approach
the burner with a flame, push the
relevant knob down and turn it
counter-clockwise to maximum
gas release position.
If the burner accidentally goes out,
turn the control knob to the off po-
sition and try to light the burner
again after minimum 1 minute.
When switching on the mains, after
installation or a power cut, it is
quite normal for the spark genera-
tor to be activated automatically.
3.2 Turning the burner off
To put the flame out, turn the knob to the
symbol
.
WARNING!
Always turn the flame down or
switch it off before removing the
pans off the burner.
3.3 Operating electric zones
To switch on and increase the heat setting
turn the knob clockwise. To decrease the
heat setting turn the knob counter-clock-
wise. To switch off turn the knob to the 0.
Power indicator is activated when electric
cooking zone is turned on, and will stay on
until electric cooking zone is switched off.
When a cooking zone operates, it
hums for a short time. This is typi-
cal of all ceramic glass cooking
zones and does not show that the
appliance operates incorrectly.
6
www.electrolux.com

3.4 Before first use
Put on all cooking zones a pan filled with
some water. Set the maximum position
and operate the appliance for approximate-
ly 10 minutes until water inside the pans
boils. After that, operate the appliance at
minimum position for 20 minutes. During
this period, an odour and smoke can oc-
cur. This is normal. Make sure that the air-
flow is sufficient.
After this operation, clean the appliance
with a soft cloth soaked in warm water.
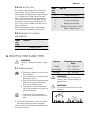
3.5 Examples of cooking
applications
Heat
set-
ting:
Use to:
1 Keeping warm
Heat
set-
ting:
Use to:
2 Gentle simmering
3 Simmering
4 Frying / browning
5 Bringing to the boil
6 Bringing to the boil / quick
frying / deep-frying
4. HELPFUL HINTS AND TIPS
WARNING!
Refer to "Safety information" chap-
ter.
4.1 Energy saving
• If possible, always put the lids on
the cookware.
• Put cookware on a cooking zone
before you start it.
• Stop the electrical cooking zones
before the end of the cooking
time to use residual heat.
• The bottom of pans and electri-
cal cooking zones must have the
same dimensions.
• The bottom of the cookware
must be as thick and flat as pos-
sible.
• When the liquid starts to boil, turn down
the flame to barely simmer the liquid.
Use cookware with diameters applicable to
the size of burners.
Burner Diameters of cook-
ware
Rapid 160 - 260 mm
Semi-rapid 120 - 220 mm
Auxiliary 80 - 160 mm
WARNING!
Do not use cast iron pans, pot-
stones, grill or toaster plates on
gas burners.
WARNING!
Do not put the same pan on two
burners.
ENGLISH 7

WARNING!
Make sure pot handles do not pro-
trude over the front edge of the
cooktop and that pots are centrally
positioned on the rings in order to
achieve maximum stability and to
obtain lower gas consumption.
Do not place unstable or deformed pots on
the rings to prevent from spill and injury.
WARNING!
Liquids spilt during cooking can
cause the glass to break
Information on acrylamides
Important! According to the newest
scientific knowledge, if you brown food
(specially the one which contains starch),
acrylamides can pose a health risk. Thus,
we recommend that you cook at the lowest
temperatures and do not brown food too
much.
5. CARE AND CLEANING
WARNING!
Refer to "Safety information" chap-
ter.
Clean the appliance after each use.
Always use cookware with clean bottom.
WARNING!
Deactivate the appliance. Discon-
nect the appliance from the electri-
cal supply before you clean or do
maintenance work.
Let the gas burner become cool
before you clean it.
It is best to clean the electrical
cooking zone while it is still warm
because you can remove spillage
more easily.
WARNING!
Sharp objects and abrasive clean-
ing agents can damage the appli-
ance.
For your safety, do not clean the
appliance with steam blasters or
high-pressure cleaners.
Scratches or dark stains on the
surface have no effect on how the
appliance operates.
• You can remove the pan supports to
easily clean the hob.
• To clean the enamelled parts, cap and
crown, wash them with warm soapy wa-
ter and dry them carefully before you put
them back.
• Wash stainless steel parts with water,
and then dry them with a soft cloth.
• The pan supports are not dishwasher
proof. You must wash them by hand.
• When you wash the pan supports by
hand, be careful when you dry them as
the enamel coating occasionally can
have rough edges. If necessary, you can
remove stubborn stains with a paste
cleaner.
• After you clean the pan supports, make
sure that they are in the correct position.
• Make sure that the arms of the pan sup-
ports are in the centre of the burner for
the burner to operate correctly.
• To prevent the hob top from dam-
age, be very careful when you re-
place the pan supports.
After cleaning, dry the appliance with a soft
cloth.
Removing the dirt:
1.
– Remove immediately: melting
plastic, plastic foil, and food contain-
ing sugar. Use a special glass ce-
ramic scraper. Put the scraper on
the glass ceramic surface at an
acute angle and slide the blade on
the surface.
–
Stop the appliance and let it cool
down before you clean: limescale
rings, water rings, fat stains, shiny
metallic discolorations. Use a special
cleaner applicable for surface of
hob..
8
www.electrolux.com

2.
Clean the appliance with a damp cloth
and some detergent.
3.
At the end rub the appliance dry
with a clean cloth.
WARNING!
Do not use knives, scrapers or sim-
ilar instruments to clean the surface
of the glass or between the rims of
the burners and the frame (if appli-
cable).
WARNING!
Do not slide cookware over the
glass because it could scratch the
surface. Also, do not let hard or
sharp objects fall onto the glass or
hit the edge of the hob.
5.1 Cleaning of the spark plug
This feature is obtained through a ceramic
ignition candle with a metal electrode. Keep
these components well clean to prevent
difficult lighting and check that the burner
crown holes are not obstructed.
5.2 Periodic maintenance
Periodically speak your local Service Force
Centre to check the conditions of the gas
supply pipe and the pressure adjuster, if fit-
ted.
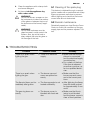
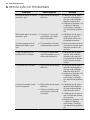
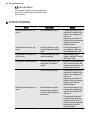
6. TROUBLESHOOTING
Problem Possible cause Remedy
There is no spark when
lighting the gas.
• There is no electrical
supply.
• Make sure that the ap-
pliance is connected
and the electrical supply
is switched on.
• Do a check of the fuse.
If the fuse is released
more than one time, re-
fer to a qualified electri-
cian.
There is no spark when
lighting the gas.
• The burner cap and
crown are placed un-
evenly.
• Make sure that the
burner cap and crown
are in the correct posi-
tions.
The flame is blown out im-
mediately after ignition.
• The thermocouple is not
heated sufficiently.
• After lightning the flame,
keep the knob pushed
for approximately 5 sec-
onds.
The gas ring burns un-
evenly.
• The burner crown is
blocked with food resi-
due.
• Make sure that the in-
jector is not blocked
and the burner crown is
clear of food particles.
ENGLISH 9

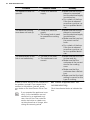
Problem Possible cause Remedy
The appliance does not
operate.
• There is no electrical
supply.
• Make sure that the ap-
pliance is connected
and the electrical supply
is switched on.
• Do a check of the fuse.
If the fuse is released
more than one time, re-
fer to a qualified electri-
cian.
The electrical cooking
zone does not heat up.
• There is no electrical
supply.
• The wrong knob is used
to operate the cooking
zone.
• Make sure that the ap-
pliance is connected
and the electrical supply
is switched on.
• Make sure that you turn
the correct control
knob.
• Do a check of the fuse.
If the fuse is released
more than one time, re-
fer to a qualified electri-
cian.
The effectiveness of the
hob is not satisfactory.
• The hob is not clean.
• The cookware is not
correct.
• Make sure that the hob
is clean and dry.
• Make sure that the
cookware is the correct
size for the cooking
zone.
• Make sure that the
cookware has a flat bot-
tom.
• Make sure that the heat
setting is correct for this
type of cooking.
If there is a fault, first try to find a solution to
the problem yourself. If you cannot find a
solution to the problem yourself, speak
your dealer or the local Service Force Cen-
tre.
If you operated the appliance incor-
rectly, or the installation was not
carried out by a registered engi-
neer, the visit from the customer
service technician or dealer may
not take place free of charge, even
during the warranty period.
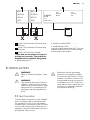
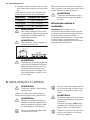
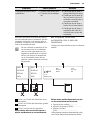
6.1 Labels supplied with the
accessories bag
Stick the adhesive labels as indicated be-
low:
10
www.electrolux.com

MOD.
PROD.NO.
SER.NO
DATA
MOD.
PROD.NO.
SER.NO
DATA
MODELMODEL
MOD.
PROD.NO.
SER.NO.
03 IT
MADE IN ITALY
TYPE
230V-50Hz
IP20
0049
1 2 3
1
Stick it on Guarantee Card and send
this part
2
Stick it on Guarantee Card and keep
this part
3
Stick it on instruction booklet
These data are necessary to help you
quickly and correctly. These data are
available on the supplied rating plate.
• Model description .................
• Product number (PNC) .................
• Serial Number (S.N.) .................
Use the original spare parts only. They are
available at Service Force Centre and ap-
proved spare parts shops.
7. INSTALLATION
WARNING!
Refer to "Safety information" chap-
ter.
WARNING!
The following instructions about in-
stallation, connection and mainte-
nance must be carried out by quali-
fied personnel in compliance with
standards and local regulations in
force.
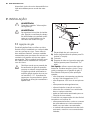
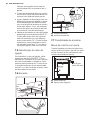
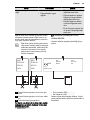
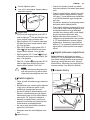
7.1 Gas Connection
Choose fixed connections or use a flexible
pipe in stainless steel in compliance with
the regulation in force. If you use flexible
metallic pipes, be careful they do not come
in touch with mobile parts or they are not
squeezed. Also be careful when the hob is
put together with an oven.
Make sure that the gas supply
pressure of the appliance obeys
the recommended values. The ad-
justable connection is fixed to the
comprehensive ramp by means of
a threaded nut G 1/2". Screw the
parts without force, adjust the con-
nection in the necessary direction
and tighten everything.
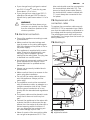
ENGLISH 11

A
B
C
D
A)
End of shaft with nut
B)
Washer (additional washer is only for
Slovenia and Turkey)
C)
Elbow
D)
Rubber pipe holder for liquid gas (only
for Slovenia and Turkey)
Liquid gas: use the rubber pipe holder. Al-
ways engage the gasket. Then continue
with the gas connection. The flexible pipe is
prepared for apply when:
– it can not get hot more than room tem-
perature, higher than 30°C;
– it is no longer than 1500 mm;
– it shows no throttles;
– it is not subject to traction or torsion;
– it does not get in touch with cutting
edges or corners;
– it can be easily examined in order to
check its condition.
The control of preservation of the flexible
pipe consists in checking that:
– it does not show cracks, cuts, marks of
burnings on the two ends and on its full
length;
– the material is not hardened, but shows
its correct elasticity;
– the fastening clamps are not rusted;
– expired term is not due.
If one or more defects are visible, do not
repair the pipe, but replace it.
When installation is complete,
make sure that the seal of each
pipe fitting is correct. Use a soapy
solution, not a flame!
7.2 Injectors replacement
1.
Remove the pan supports.
2.
Remove the caps and crowns of the
burner.
3.
With a socket spanner 7 remove the
injectors and replace them with the
ones which are necessary for the type
of gas you use (see table in "Technical
Information" chapter).
4.
Assemble the parts, follow the same
procedure backwards.
5.
Replace the rating plate (it is near the
gas supply pipe) with the one for the
new type of gas supply. You can find
this plate in the package supplied with
the appliance.
If the supply gas pressure is changeable or
different from the necessary pressure, you
must fit an applicable pressure adjuster on
the gas supply pipe.
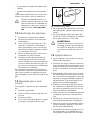
7.3 Adjustment of minimum level
To adjust the minimum level of the burners:
1.
Light the burner.
2.
Turn the knob on the minimum posi-
tion.
3.
Remove the control knob.
4.
With a thin screwdriver, adjust the by-
pass screw position.
A
A)
The by-pass screw
• If you change from natural gas G20 20
mbar (or natural gas G20 13 mbar
1)
) to
liquid gas, fully tighten the by-pass screw
in.
• If you change from liquid gas to natural
gas G20 20 mbar, undo the by-pass
screw approximately 1/4 of a turn.
• If you change from natural gas G20 20
mbar to natural gas G20 13 mbar
1)
un-
do the by-pass screw about 1/4 of a
turn.
1)
only for Russia
12
www.electrolux.com

• If you change from liquid gas to natural
gas G20 13 mbar
1)
, undo the by-pass
screw about 1/2 of a turn.
• If you change from natural gas G20 13
mbar
1)
to natural gas G20 20 mbar to
tighten the by-pass screw about 1/4 of a
turn.
WARNING!
Make sure the flame does not go
out when you quickly turn the knob
from the maximum position to the
minimum position.
7.4 Electrical connection
• Ground the appliance according to safe-
ty precautions.
• Make sure that the rated voltage and
type of power on the rating plate agree
with the voltage and the power of the lo-
cal power supply.
• This appliance is supplied with a mains
cable. It has to be supplied with a cor-
rect plug, able to support the load
marked on the rating plate. The plug has
to be fitted in a correct socket.
• Any electrical component must be instal-
led or replaced by the Service Force
Centre technician or qualified service
personnel.
• Always use a correctly installed shock-
proof socket.
• Make sure that there is an access to the
mains plug after installation.
• Do not pull the mains cable to discon-
nect the appliance. Always pull the
mains plug.
• The appliance must not be connected
with an extension cable, an adapter or a
multiple connection (risk of fire). Check
that the ground connection is in con-
formity with the standard and regulations
force.
• The power cable must be placed in such
a way that it does not touch any hot
part.
• Connect the appliance to the mains with
a device that lets to disconnect the ap-
pliance from the mains at all poles with a
contact opening width of minimum 3
mm, eg. automatic line protecting cut-
out, earth leakage trips or fuse.
• None of a parts of the connection cable
can not get a temperature 90 °C. The
blue neutral cable must be connected to
the terminal block label with "N". The
brown (or black) phase cable (fitted in
the terminal block contact marked with
"L") must always be connected to the
live phase.
7.5 Replacement of the
connection cable
To replace the connection cable use only
H05V2V2-F T90 or equivalent type. Make
sure that the cable section is applicable to
the voltage and the working temperature.
The yellow/green earth wire must be ap-
proximately 2 cm longer than the brown (or
black) phase wire.
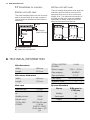
7.6 Building In
min.
55 mm
min.
650 mm
550 mm
470 mm
min.
450 mm
30 mm
B
A
A)
supplied seal
B)
supplied brackets
ENGLISH 13

7.7 Possibilities for insertion
Kitchen unit with door
The panel installed below the hob must be
easy to remove and let an easy access in
case a technical assistance intervention is
necessary.
min 20 mm
(max 150 mm)
30 mm
60 mm
B
A
A)
Removable panel
B)
Space for connections
Kitchen unit with oven
The hob recess dimensions must obey the
indication and the kitchen unit must be
equipped with vents to let a continuous
supply of air. The electrical connection of
the hob and the oven must be installed
separately for safety reasons and to let
easy remove oven from the unit.
50 cm2
360 cm2
180 cm2
120 cm2
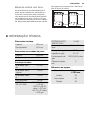
8. TECHNICAL INFORMATION
Hob dimensions
Width: 580 mm
Length: 510 mm
Hob recess dimensions
Width: 550 mm
Length: 470 mm
Heat input
Rapid burner: 2.7 kW
Semi-rapid burn-
er:
1.9 kW
Auxiliary burner: 1.0 kW
Electric zone: 1.8 kW
TOTAL GAS
POWER:
G20 (2H) 20 mbar
= 5.6 kW
G30/G31 (3B/P)
30/30 mbar = 407
g/h
TOTAL ELECTRIC
POWER:
1.8 kW
Electric supply: 230 V ~ 50 Hz
Gas category: II2H3B/P
Gas connection: G 1/2”
Gas supply: G20 (2H) 20 mbar
Appliance class: 3
By-pass diameters
Burner Ø By-pass in
1/100 mm
Auxiliary 28
Semi-rapid 32
Rapid 42
14
www.electrolux.com

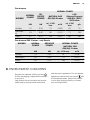
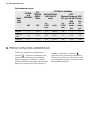
Gas burners
BURNER
NORMAL
POWER
RE-
DUCED
POWER
NORMAL POWER
NATURAL GAS
G20 (2H) 20 mbar
LPG
(Butane/Propane)
G30/G31 (3B/P)
30/30 mbar
kW kW
inj. 1/100
mm
m³/h
inj. 1/100
mm
g/h
Auxiliary 1.0 0.33 70 0.095 50 73
Semi-rap-
id
1.9 0.45 96 0.181 71 138
Rapid 2.7 0.75 130 0.257 86 196
Gas burners G20 13 mbar - only Russia
BURNER NORMAL
POWER
REDUCED
POWER
NORMAL POWER
NATURAL GAS
G20 (2H) 13 mbar
kW kW inj. 1/100 mm m³/h
Auxiliary 1.0 0.33 82 0.106
Semi-rapid 2.0 0.45 111 0.212
Rapid 3.0 0.75 149 0.318
9. ENVIRONMENT CONCERNS
Recycle the materials with the symbol
.
Put the packaging in applicable containers
to recycle it.
Help protect the environment and human
health and to recycle waste of electrical
and electronic appliances. Do not dispose
appliances marked with the symbol
with
the household waste. Return the product
to your local recycling facility or contact
your municipal office.
ENGLISH 15

ÍNDICE
1. INFORMAÇÕES DE SEGURANÇA . . . . . . . . . . . . . . . . . . . . . . . . . . . . . . . . . . . . . . . . . . . 17
2. DESCRIÇÃO DO PRODUTO . . . . . . . . . . . . . . . . . . . . . . . . . . . . . . . . . . . . . . . . . . . . . . . 19
3. UTILIZAÇÃO DIÁRIA . . . . . . . . . . . . . . . . . . . . . . . . . . . . . . . . . . . . . . . . . . . . . . . . . . . . . . 20
4. SUGESTÕES E CONSELHOS ÚTEIS . . . . . . . . . . . . . . . . . . . . . . . . . . . . . . . . . . . . . . . . . 21
5. MANUTENÇÃO E LIMPEZA . . . . . . . . . . . . . . . . . . . . . . . . . . . . . . . . . . . . . . . . . . . . . . . . 22
6. RESOLUÇÃO DE PROBLEMAS . . . . . . . . . . . . . . . . . . . . . . . . . . . . . . . . . . . . . . . . . . . . . 24
7. INSTALAÇÃO . . . . . . . . . . . . . . . . . . . . . . . . . . . . . . . . . . . . . . . . . . . . . . . . . . . . . . . . . . . 26
8. INFORMAÇÃO TÉCNICA . . . . . . . . . . . . . . . . . . . . . . . . . . . . . . . . . . . . . . . . . . . . . . . . . . 29
9. PREOCUPAÇÕES AMBIENTAIS . . . . . . . . . . . . . . . . . . . . . . . . . . . . . . . . . . . . . . . . . . . . 30
ESTAMOS A PENSAR EM SI
Obrigado por ter adquirido um aparelho Electrolux. Escolheu um produto que traz consigo décadas
de experiência profissional e inovação. Engenhoso e elegante, foi concebido a pensar em si. Assim,
quando o utilizar, terá a tranquilidade de quem sabe que terá sempre óptimos resultados.
Bem-vindo(a) à Electrolux.
Visite o nosso website para:
Resolver problemas e obter conselhos de utilização, catálogos e informações sobre
serviços:
www.electrolux.com
Registar o seu produto para beneficiar de um serviço melhor:
www.electrolux.com/productregistration
Adquirir acessórios, consumíveis e peças de substituição originais para o seu aparelho:
www.electrolux.com/shop
APOIO AO CLIENTE E ASSISTÊNCIA
Recomendamos a utilização de peças de substituição originais.
Quando contactar a Assistência, certifique-se de que tem os seguintes dados disponíveis.
A informação encontra-se na placa de características. Modelo, PNC, Número de Série.
Aviso / Cuidado - Informações de segurança.
Informações gerais e conselhos úteis
Informações ambientais
Sujeito a alterações sem aviso prévio.
16
www.electrolux.com

1.
INFORMAÇÕES DE SEGURANÇA
Este aparelho é adequado para os
seguintes mercados: PT
TR
Leia atentamente as instruções fornecidas
antes de instalar e utilizar o aparelho. O fa-
bricante não é responsável por lesões ou
danos resultantes de instalação e utilização
incorrectas. Guarde sempre as instruções
junto do aparelho para futura referência.
1.1 Segurança para crianças e
pessoas vulneráveis
ADVERTÊNCIA
Risco de asfixia, ferimentos ou in-
capacidade permanente.
• Não permita que o aparelho seja utiliza-
do por pessoas, incluindo crianças, com
capacidades físicas e sensoriais reduzi-
das, funções mentais reduzidas ou sem
experiência e conhecimento de utilização
do mesmo. Estas pessoas devem ser vi-
giadas ou ensinadas a utilizar o aparelho
por uma pessoa que seja responsável
pela sua segurança.
• Não permita que as crianças brinquem
com o aparelho.
• Mantenha todos os materiais de embala-
gem fora do alcance das crianças.
• Mantenha as crianças e os animais do-
mésticos afastados do aparelho quando
este estiver a funcionar ou a arrefecer.
As partes acessíveis estão quentes.
• Se o aparelho tiver um dispositivo de se-
gurança para crianças, recomendamos
que o active.
1.2 Instalação
ADVERTÊNCIA
A instalação deste aparelho só de-
ve ser efectuada por uma pessoa
qualificada.
• Remova todos os elementos da embala-
gem.
• Não instale nem utilize o aparelho se es-
te estiver danificado.
• Cumpra as instruções de instalação for-
necidas com o aparelho.
• Respeite as distâncias mínimas relativa-
mente a outros aparelhos e unidades.
• Tenha sempre cuidado quando deslocar
o aparelho porque é pesado. Use sem-
pre luvas de protecção.
• Vede as superfícies cortadas com um
vedante para impedir que a humidade
cause dilatações.
• Proteja a parte inferior do aparelho con-
tra vapor e humidade.
• Não instale o aparelho ao lado de uma
porta ou debaixo de uma janela. Isso
evita que a abertura de portas ou janelas
faça cair algum tacho quente do apare-
lho.
• Se o aparelho for instalado por cima de
gavetas, certifique-se de que o espaço
entre o fundo do aparelho e a gaveta su-
perior é suficiente para permitir a circula-
ção de ar.
• A parte inferior do aparelho pode ficar
quente. Recomendamos a instalação de
um painel de separação não combustível
debaixo do aparelho para evitar o aces-
so à parte inferior.
Ligação eléctrica
ADVERTÊNCIA
Risco de incêndio e choque eléctri-
co.
• Todas as ligações eléctricas têm de ser
efectuadas por um electricista qualifica-
do.
• Antes de fazer qualquer ligação eléctrica,
é necessário garantir que o terminal prin-
cipal do aparelho não está sob tensão.
• Certifique-se de que o aparelho é insta-
lado correctamente. Fichas de alimenta-
ção eléctrica e tomadas soltas ou inade-
quadas poderão provocar o sobreaque-
cimento dos terminais.
• Certifique-se de que a protecção contra
choque é instalada.
• Não permita que as ligações eléctricas
entrem em contacto com o aparelho ou
com algum tacho quente quando ligar o
aparelho a uma tomada próxima.
• Não permita que as ligações eléctricas
fiquem enredadas.
• Utilize uma braçadeira para libertar a
tensão do cabo.
PORTUGUÊS 17

• Utilize um cabo de alimentação adequa-
do.
• Certifique-se de que não danifica a ficha
e o cabo de alimentação eléctrica. Con-
tacte a Assistência Técnica ou um elec-
tricista para substituir o cabo de alimen-
tação se estiver danificado.
• A instalação eléctrica deve possuir um
dispositivo de isolamento que lhe permi-
ta desligar o aparelho da corrente eléctri-
ca em todos os pólos. O dispositivo de
isolamento deve ter uma abertura de
contacto com uma largura mínima de 3
mm.
• Utilize apenas dispositivos de isolamento
correctos: disjuntores de protecção, fu-
síveis (os fusíveis de rosca devem ser re-
tirados do suporte), diferenciais e con-
tactores.
Ligação do gás
• Todas as ligações de gás devem ser
efectuadas por uma pessoa qualificada.
• Certifique-se de que existe circulação de
ar em torno do aparelho.
• A informação relativa ao fornecimento de
gás encontra-se na placa de característi-
cas.
• Este aparelho não está ligado a um dis-
positivo de evacuação de produtos de
combustão. Certifique-se de que o apa-
relho é ligado em conformidade com os
regulamentos de instalação em vigor.
Tenha em atenção os requisitos para
uma ventilação adequada.
1.3 Utilização
ADVERTÊNCIA
Risco de ferimentos, queimaduras
ou choque eléctrico.
• Utilize este aparelho em ambiente do-
méstico.
• Não altere as especificações deste apa-
relho.
• Não utilize um temporizador externo ou
um sistema de controlo remoto separa-
do para activar/desactivar o aparelho.
• Não deixe o aparelho a funcionar sem vi-
gilância.
• Não utilize o aparelho com as mãos hú-
midas, nem se este tiver estado em con-
tacto com água.
• Não coloque talheres ou tampas de pa-
nelas sobre as zonas de cozedura. Fi-
cam quentes.
• Desligue (off) a zona de cozedura após
cada utilização.
• Não utilize o aparelho como superfície
de trabalho ou armazenamento.
• Se a superfície do aparelho tiver racha-
da, desligue-o imediatamente da corren-
te eléctrica. Isso evitará choques eléctri-
cos.
ADVERTÊNCIA
Risco de incêndio ou explosão.
• As gorduras e os óleos podem libertar
vapores inflamáveis quando aquecidos.
Mantenha as chamas e os objectos
aquecidos afastados das gorduras e dos
óleos quando cozinhar com este tipo de
produtos.
• Os vapores que o óleo muito quente li-
berta podem causar combustão espon-
tânea.
• O óleo usado, que pode conter restos
de alimentos, pode inflamar a uma tem-
peratura inferior à de um óleo usado pela
primeira vez.
• Não coloque produtos inflamáveis ou
objectos molhados com produtos infla-
máveis no interior, ao lado ou em cima
do aparelho.
• Não tente extinguir o fogo com água.
Desligue o aparelho e cubra a chama
com uma tampa de tacho ou uma manta
de incêndio.
ADVERTÊNCIA
Risco de danos no aparelho.
• Não coloque nenhum tacho quente so-
bre o painel de comandos.
• Não deixe que nenhum tacho ferva até
ficar sem água.
• Tenha cuidado e não permita que algum
objecto ou tacho caia sobre o aparelho.
A superfície pode ficar danificada.
• Não active zonas de cozedura com um
tacho vazio ou sem tacho.
• Não coloque folha de alumínio no apare-
lho.
• Os tachos de ferro fundido e de alumínio
ou que tenham a base danificada podem
riscar a vitrocerâmica. Levante sempre
estes objectos quando precisar de os
deslocar na mesa de trabalho.
18
www.electrolux.com

• Providencie boa ventilação na cozinha
onde o aparelho fica instalado.
• Certifique-se de que as aberturas de
ventilação não ficam bloqueadas.
• Utilize apenas tachos e panelas estáveis,
com forma correcta e diâmetro superior
às dimensões dos queimadores. Existe o
risco de sobreaquecimento e ruptura da
placa de vidro (se aplicável).
• Certifique-se de que a chama não se
apaga quando roda rapidamente o bo-
tão da posição do máximo para a posi-
ção do mínimo.
• Certifique-se de que os tachos ficam
centrados nos anéis e que não ficam sa-
lientes sobre a mesa de trabalho.
• Utilize apenas os acessórios fornecidos
com o aparelho.
• Não instale um difusor de chama sobre
um queimador.
1.4 Manutenção e limpeza
ADVERTÊNCIA
Risco de danos no aparelho.
• Limpe o aparelho com regularidade para
evitar que o material da superfície se de-
teriore.
• Não utilize jactos de água ou vapor para
limpar o aparelho.
• Limpe o aparelho com um pano macio e
húmido. Utilize apenas detergentes neu-
tros. Não utilize produtos abrasivos, es-
fregões, solventes ou objectos metáli-
cos.
1.5 Eliminação
ADVERTÊNCIA
Risco de ferimentos e asfixia.
• Contacte a sua autoridade municipal pa-
ra mais informações sobre a forma co-
mo eliminar o aparelho correctamente.
• Desligue o aparelho da alimentação
eléctrica.
• Corte o cabo de alimentação eléctrica e
elimine-o.
• Achate os tubos de gás externos.
2. DESCRIÇÃO DO PRODUTO
2.1 Disposição da mesa de
trabalho
3
27
1
6
5
4
180
mm
1
Parte superior da placa
2
Queimador semi-rápido
3
Botões de controlo
4
Queimador auxiliar
5
Indicador de calor residual
6
Queimador rápido
7
Zona de cozedura eléctrica 1800 W
2.2 Botões de comando
Símbolo Descrição
sem fornecimento
de gás / posição
desligado
Símbolo Descrição
posição de igni-
ção / fornecimen-
to máximo de gás
fornecimento míni-
mo de gás
PORTUGUÊS 19

2.3 Botões de controlo das
zonas de cozedura eléctricas
Símbolo Função
0 posição desligado
1
aquecimento míni-
mo
6
aquecimento má-
ximo
2.4 Indicação de calor residual
O indicador de calor residual acende quan-
do um foco está quente.
ADVERTÊNCIA
Perigo de queimaduras devido ao
calor residual!
3. UTILIZAÇÃO DIÁRIA
ADVERTÊNCIA
Consulte o capítulo "Informações
de segurança".
3.1 Ignição do queimador
ADVERTÊNCIA
Seja extremamente cuidadoso
aquando da utilização de chama
aberta no ambiente da cozinha. O
fabricante declina qualquer respon-
sabilidade em caso de utilização in-
correcta da chama.
Acenda o queimador sempre antes
de colocar o tacho.
Para acender o queimador:
1.
Rode o botão de comando para a es-
querda para a posição do nível máxi-
mo (
) e pressione-o.
2.
Mantenha o botão de controlo pressio-
nado durante aproximadamente 5 se-
gundos; tal irá permitir o aquecimento
do termopar. Caso contrário, o forneci-
mento de gás será interrompido.
3.
Regule a chama após a regularização
da mesma.
Se, após algumas tentativas, o
queimador não acender, verifique
se a coroa e a respectiva tampa
estão nas posições correctas.
A
B
C
A)
Tampa e coroa do queimador
B)
Termóstato
C)
Ignição
ADVERTÊNCIA
Não mantenha o botão de coman-
do pressionado por mais de 15 se-
gundos.
Se o queimador não acender após
15 segundos, solte o botão de co-
mando, rode-o para a posição off
(desligado) e aguarde no mínimo 1
minuto antes de tentar acender no-
vamente o queimador.
Na ausência de electricidade, é
possível acender o queimador sem
o dispositivo eléctrico. Neste caso,
aproxime uma chama do queima-
dor, pressione o respectivo botão e
rode-o para a esquerda para a po-
sição de libertação máxima de gás.
20
www.electrolux.com
A página está carregando...
A página está carregando...
A página está carregando...
A página está carregando...
A página está carregando...
A página está carregando...
A página está carregando...
A página está carregando...
A página está carregando...
A página está carregando...
A página está carregando...
A página está carregando...
A página está carregando...
A página está carregando...
A página está carregando...
A página está carregando...
A página está carregando...
A página está carregando...
A página está carregando...
A página está carregando...
A página está carregando...
A página está carregando...
A página está carregando...
A página está carregando...
-
 1
1
-
 2
2
-
 3
3
-
 4
4
-
 5
5
-
 6
6
-
 7
7
-
 8
8
-
 9
9
-
 10
10
-
 11
11
-
 12
12
-
 13
13
-
 14
14
-
 15
15
-
 16
16
-
 17
17
-
 18
18
-
 19
19
-
 20
20
-
 21
21
-
 22
22
-
 23
23
-
 24
24
-
 25
25
-
 26
26
-
 27
27
-
 28
28
-
 29
29
-
 30
30
-
 31
31
-
 32
32
-
 33
33
-
 34
34
-
 35
35
-
 36
36
-
 37
37
-
 38
38
-
 39
39
-
 40
40
-
 41
41
-
 42
42
-
 43
43
-
 44
44


Electrolux EGE6182NOK Manual do usuário
- Categoria
- Fogões
- Tipo
- Manual do usuário
em outras línguas
- English: Electrolux EGE6182NOK User manual
Artigos relacionados
-
Electrolux EQG4120BOZ Manual do usuário
-
Electrolux EGE6182NOK Manual do usuário
-
-
Electrolux EQG4120BOG Manual do usuário
-
-
-
-
-
-