
Quick Start Guide

1
Contents
Quick Start Guide ................................................... 1
Guide de démarrage rapide ................................... 14
Schnellstartanleitung ............................................ 27
Guida rapida ....................................................... 40
Snelstartgids ....................................................... 53
Guia de início rápido ............................................. 66
Guía de inicio rápido ............................................. 79

1
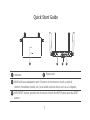
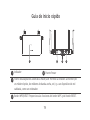
Quick Start Guide
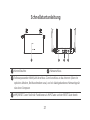
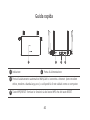
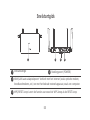
WAN/LAN auto-adaptation port: Connects to the Internet (such as optical
modem, broadband modes, etc.) and wired network device such as a computer.
WPS/RESET button: provides the functions of both the WPS button and the RESET
button.
Power port
Indicator 2
3
4
1
WPS/RESET
POWER
2 43
1000M WAN/LAN
1 2 3
1
2 3
POWER
LAN
PON
RESET
WPS/RESET
POWER
1000M WAN/LAN
1 2 3
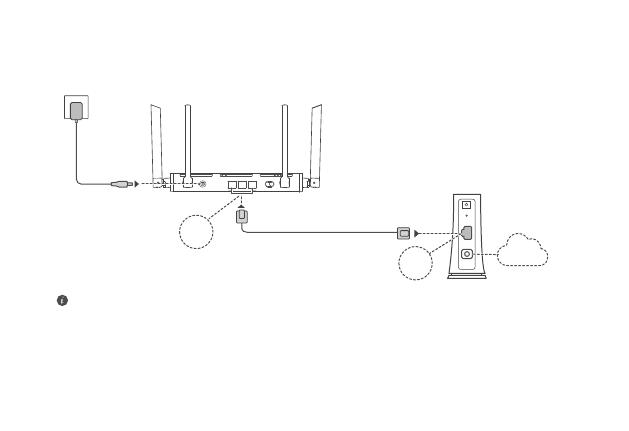
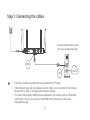
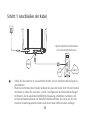
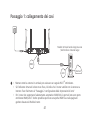
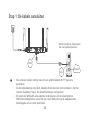
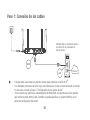
Step 1: Connecting the cables
WAN
LAN Internet
Optical/Broadband/cable modem
(from your broadband provider)
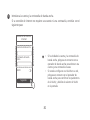
•Erect the all antennas upright to ensure optimized Wi-Fi® signal.
•If the indicator stays red, this indicates that the router is not connected to the Internet.
Please refer to "Step 2: Conguring the network settings".
• For routers that support WAN/LAN auto-adaptation, the network ports are WAN/LAN
combo ports. You can also specify a xed WAN port on the router's web-based
management page.

2 3
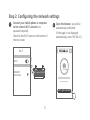
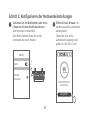
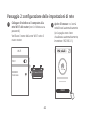
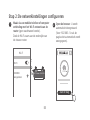
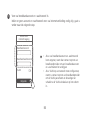
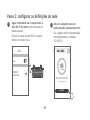
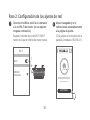
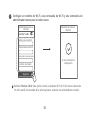
1Connect your mobile phone or computer
to the router's Wi-Fi network (no
password required).
Check for the Wi-Fi name on the bottom of
the new router.
Wi-Fi
Wi-Fi
Connected
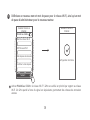
2Open the browser, you will be
automatically redirected.
(If the page is not displayed
automatically, enter 192.168.3.1) .
Let's get started
Step 2: Conguring the network settings
XXXXXX Wi-Fi Name: XXXXXX

4 5
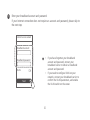
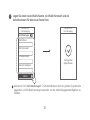
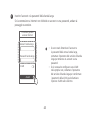
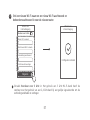
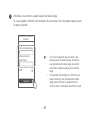
3Enter your broadband account and password.
If your Internet connection does not require an account and password, please skip to
the next step.
Internet access wizard
Broadband account
Broadband password
VLAN
Next
•If you have forgotten your broadband
account and password, contact your
broadband carrier to obtain a broadband
account and password.
• If you need to congure VLAN on your
network, contact your broadband carrier to
conrm the VLAN parameters, and enable
the VLAN switch on the screen.

4 5
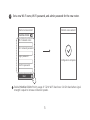
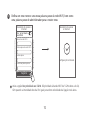
4Set a new Wi-Fi name, Wi-Fi password, and admin password for the new router.
Internet access wizard
Prioritize 5 GHz
Wi-Fi network name
Wi-Fi network password
Login password
Next
Internet access wizard
Conguration complete.
Enable Prioritize 5 GHz: Priority usage of 5 GHz Wi-Fi band over 2.4 GHz band when signal
strength is equal to increase connection speeds.
Conrm password
Next

6 7
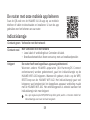
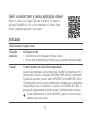
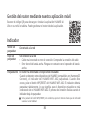
Indicator
Steady green
Steady red
Flashing
Connected to the network
Not connected to the network
•Loose cable or connect error. Check the cable.
•Broadband network error. Contact your broadband carrier.
The router has detected a pairable device.
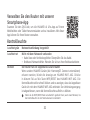
When other HUAWEI devices (support HarmonyOS Connect) are detected,
the indicator on the HUAWEI WiFi AX2 will flash. When this happens,
press the HUAWEI WiFi AX2's WPS/RESET button. The indicator should
flash quickly, indicating that the pairable device is connecting to the
HUAWEI WiFi AX2. The connection process is complete when the indicator
stops ashing.
If you touched the WPS/RESET button by accident, wait for 2 minutes till the
indicator returns to normal.
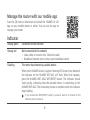
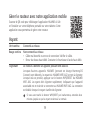
Manage the router with our mobile app
Scan the QR code to download and install the HUAWEI AI Life
App on your mobile phone or tablet. You can use the app to
manage your router.

6 7
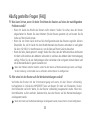
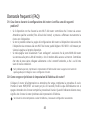
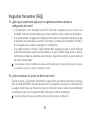
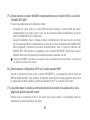
Frequently Asked Questions (FAQ)
Q1: What can I do if I encounter any of the following issues when conguring the router?
• If your device did not detect the router's Wi-Fi: Ensure that the router is powered on. Wait for a
moment (till the router is started) and try to search again on your device.
•If you cannot visit the router's conguration page on your device: Ensure that your device is
connected to the router's Wi-Fi network, and then enter 192.168.3.1 in the browser to visit this
page on your device.
•If the page displays "Cable disconnected": Ensure that the router's WAN port is connected to
the modem's LAN port, and the modem has Internet access. Check that all joints are securely
connected and in good contact, and the network cables are in good condition.
If the issue persists, restore the router to the factory settings, and follow the guide to reconnect the
cables and congure the router.
Q2: How do I restore the router to its factory settings?
Connect the router to the power supply and wait until the router completes the startup process.
Press the WPS/RESET button on the router for more than 8 seconds until the indicator light
goes out. Wait for the router to complete the restart process. When the indicator turns red, this
indicates that the router has been restored to its factory settings.
If the router has been factory reset, you need to congure it again.

8 9
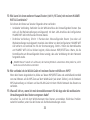
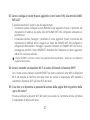
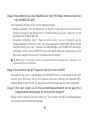
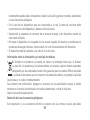
Q5: What should I do if I forget my login password for the app or the router's web-
based management page?
Try using the router's Wi-Fi password to login. If the issue persists, restore the router to the
factory settings.
Q3: How do I connect an add-on HUAWEI router (with H/Hi button) to my HUAWEI WiFi
AX2's network?
You can connect the router in either of the following ways:
•Wired connection. Connect the WAN port of the add-on router (new or restored to factory
settings) to the LAN port of the congured HUAWEI WiFi AX2 using an Ethernet cable.
•Wireless connection. Step 1: Place the add-on router (new or restored to factory settings)
within one meter of the congured HUAWEI WiFi AX2 and connect it to the power supply. Step 2:
When the indicator on the HUAWEI WiFi AX2 starts to ash, press the WPS/RESET button on it.
Wait until the indicator on the add-on router shows it is connected to the network.
"HUAWEI router" refers to routers that support HarmonyOS Mesh+. Please check if your
device supports such feature.
Q4: How do I connect a Wi-Fi device to my router using WPS?
When your router is powered on, press its WPS/RESET button, and then press the WPS button on
the Wi-Fi device (such as a phone) within two minutes, to initiate standard WPS negotiation and
connect the Wi-Fi device to the router's Wi-Fi network.

8 9
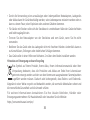
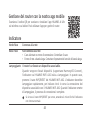
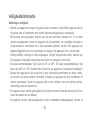
Safety information
Operation and safety
• Do not use your device if using the device is prohibited. Do not use the device if doing so
causes danger or interference with other electronic devices.
• Pacemaker manufacturers recommend that a minimum distance of 15 cm be maintained
between a device and a pacemaker to prevent potential interference with the pacemaker.
If using a pacemaker, hold the device on the side opposite the pacemaker and do not carry
the device in your front pocket.
• Avoid dusty, damp, or dirty environments. Avoid magnetic elds. Using the device in these
environments may result in circuit malfunctions.
• Ideal operating temperatures are 0 °C to 40 °C. Ideal storage temperatures are -40 °C to +70 °C.
Extreme heat or cold may damage your device or accessories.
• Keep the device and accessories in a well-ventilated and cool area away from direct
sunlight. Do not enclose or cover your device with towels or other objects. Do not place the
device in a container with poor heat dissipation, such as a box or bag.
• The device should be installed and operated with a minimum distance of 20 cm between
the radiator and your body.
• Using an unapproved or incompatible power adapter, charger, or battery may damage your
device, shorten its lifespan, or cause a re, explosion, or other hazards.

10 11
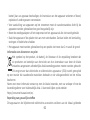
• For pluggable devices, the socket-outlet shall be installed near the devices and shall be
easily accessible.
• Unplug the power adapter from electrical outlets and the device when not in use.
• Do not touch the device or the charger with wet hands. Doing so may lead to short circuits,
malfunctions, or electric shocks.
• The device should be installed at a position no more than 2 m from the ground.
Disposal and recycling information
The symbol on the product, battery, literature, or packaging means that the products
and batteries should be taken to separate waste collection points designated by local
authorities at the end of the lifespan. This will ensure that EEE waste is recycled and
treated in a manner that conserves valuable materials and protects human health and
the environment.
For more information, please contact your local authorities, retailer, or household waste
disposal service or visit the website https://consumer.huawei.com/en/.
Reduction of hazardous substances
This device and its electrical accessories comply with local applicable rules on the restriction
of the use of certain hazardous substances in electrical and electronic equipment, such as
EU REACH regulation, RoHS and Batteries (where included) directive. For declarations of
conformity about REACH and RoHS, please visit the website
https://consumer.huawei.com/certication.

10 11
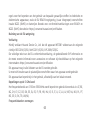
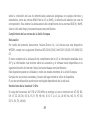
EU regulatory conformance
Statement
Hereby, Huawei Device Co., Ltd. declares that this device WS7001 is in compliance with the
following Directive: RED 2014/53/EU, RoHS 2011/65/EU, ErP 2009/125/EC.
The full text of the EU declaration of conformity, the detailed ErP information and most recent
information about accessories & software are available at the following internet address:
https://consumer.huawei.com/certication.
Restrictions in the 5 GHz band:
The 5150 to 5350 MHz frequency range is restricted to indoor use in: AT, BE, BG, CH, CY, CZ,
DE, DK, EE, EL, ES, FI, FR, HR, HU, IE, IS, IT, LI, LT, LU, LV, MT, NL, NO, PL, PT, RO, SE, SI, SK, TR,
UK(NI).
In accordance with the relevant statutory requirements in the UK, the 5150 to 5350 MHz
frequency range is restricted to indoor use in the United Kingdom.
Frequency Bands and Power
The frequency bands and transmitting power (radiated and/or conducted) nominal limits
applicable to this radio equipment are as follows: Wi-Fi 2.4G: 20 dBm, Wi-Fi 5G: 5150-5350
MHz: 23 dBm, 5470-5725 MHz: 30 dBm.

12 13
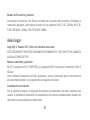
Legal Notice
Copyright © Huawei 2021. All rights reserved.
THIS DOCUMENT IS FOR INFORMATION PURPOSE ONLY, AND DOES NOT CONSTITUTE ANY
KIND OF WARRANTIES.
Trademarks and Permissions
Wi-Fi®, the Wi-Fi CERTIFIED logo, and the Wi-Fi logo are trademarks of Wi-Fi Alliance.
Other trademarks, product, service and company names mentioned may be the property of
their respective owners.
Version Update
In order to improve the security of the product and provide you with a better user experience,
we will push version update information to you on a regular basis when an important update
is released.
Privacy Policy
To better understand how we use and protect your personal information, please see the
privacy policy at https://consumer.huawei.com/privacy-policy.
End User License Agreement
Please read and agree to the End User License Agreement (HUAWEI EULA) on the product’s
management page before using the product.

12 13
For More Help
Please visit https://consumer.huawei.com/en/support/hotline for recently updated hotline and
email address in your country or region.

14 15
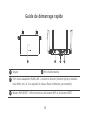
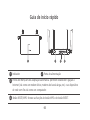
Guide de démarrage rapide
Bouton WPS/RESET: ore les fonctions du bouton WPS et du bouton RESET.
Port d'auto-adaptation WAN/LAN: connecte à Internet (modem optique, modems
haut débit, etc.) et à un appareil de réseau laire (ordinateur, par exemple).
Port d'alimentation
Voyant 2
3
4
1
WPS/RESET
POWER
2 43
1000M WAN/LAN
1 2 3
1

14 15
POWER
LAN
PON
RESET
WPS/RESET
POWER
1000M WAN/LAN
1 2 3
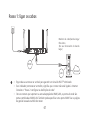
Étape 1: brancher les câbles
WAN
LAN Internet
Modem optique/haut débit/câble
(de votre fournisseur d'accès haut débit)
•Placez toutes les antennes en position verticale pour garantir un signal Wi-Fi® optimal.
• Si le voyant reste rouge, cela signie que le routeur n'est pas connecté à Internet.
Veuillez vous référer à "Étape 2 : congurer les paramètres réseau".
• Sur les routeurs qui prennent en charge l'auto-adaptation WAN/LAN, les ports réseau sont
des ports WAN/LAN combinés. Vous pouvez également spécier un port WAN xe dans la
page web d'administration du routeur.

16 17
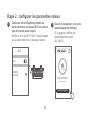
1Connectez votre téléphone portable ou
votre ordinateur au réseau Wi-Fi du routeur
(pas de mot de passe requis).
Vériez le nom du Wi-Fi (Wi-Fi name) indiqué
sur la partie inférieure du nouveau routeur.
Wi-Fi
Wi-Fi
Connecté
2Ouvrez le navigateur, vous serez
automatiquement redirigé.
(Si la page ne s'ache pas
automatiquement, saisir
192.168.3.1).
Commençons
Étape 2: congurer les paramètres réseau
XXXXXX Wi-Fi Name: XXXXXX

16 17
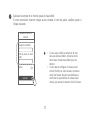
3Saisissez le compte et le mot de passe du haut débit.
Si votre connexion Internet n'exige aucun compte ni mot de passe, veuillez passer à
l'étape suivante.
Assistant d'accès à
Internet
Compte haut débit
Mot de passe du haut
débit
VLAN
Suivant
•Si vous avez oublié le compte et le mot
de passe du haut débit, contactez votre
fournisseur d'accès haut débit pour les
obtenir.
• Si vous devez congurer le réseau local
virtuel (VLAN) sur votre réseau, contactez
votre fournisseur d'accès haut débit pour
conrmer les paramètres du réseau local
virtuel, puis activez le bouton VLAN à l'écran.

18 19
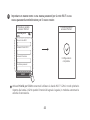
4Dénissez un nouveau nom et mot de passe pour le réseau Wi-Fi, ainsi qu'un mot
de passe d'administrateur pour le nouveau routeur.
Priorité au 5 GHz
Nom du réseau Wi-Fi
MDP réseau Wi-Fi
Suivant
Conguration terminée.
Activez Priorité au 5GHz : le réseau Wi-Fi 5 GHz sera utilisé en priorité par rapport au réseau
Wi-Fi 2.4 GHz quand la force du signal est équivalente, permettant des vitesses de connexion
accrues.
Mot de passe de connexion
Assistant d'accès à
Internet Assistant d'accès à
Internet
Conrmer le mot de passe
Suivant
A página está carregando...
A página está carregando...
A página está carregando...
A página está carregando...
A página está carregando...
A página está carregando...
A página está carregando...
A página está carregando...
A página está carregando...
A página está carregando...
A página está carregando...
A página está carregando...
A página está carregando...
A página está carregando...
A página está carregando...
A página está carregando...
A página está carregando...
A página está carregando...
A página está carregando...
A página está carregando...
A página está carregando...
A página está carregando...
A página está carregando...
A página está carregando...
A página está carregando...
A página está carregando...
A página está carregando...
A página está carregando...
A página está carregando...
A página está carregando...
A página está carregando...
A página está carregando...
A página está carregando...
A página está carregando...
A página está carregando...
A página está carregando...
A página está carregando...
A página está carregando...
A página está carregando...
A página está carregando...
A página está carregando...
A página está carregando...
A página está carregando...
A página está carregando...
A página está carregando...
A página está carregando...
A página está carregando...
A página está carregando...
A página está carregando...
A página está carregando...
A página está carregando...
A página está carregando...
A página está carregando...
A página está carregando...
A página está carregando...
A página está carregando...
A página está carregando...
A página está carregando...
A página está carregando...
A página está carregando...
A página está carregando...
A página está carregando...
A página está carregando...
A página está carregando...
A página está carregando...
A página está carregando...
A página está carregando...
A página está carregando...
A página está carregando...
A página está carregando...
A página está carregando...
A página está carregando...
A página está carregando...
-
 1
1
-
 2
2
-
 3
3
-
 4
4
-
 5
5
-
 6
6
-
 7
7
-
 8
8
-
 9
9
-
 10
10
-
 11
11
-
 12
12
-
 13
13
-
 14
14
-
 15
15
-
 16
16
-
 17
17
-
 18
18
-
 19
19
-
 20
20
-
 21
21
-
 22
22
-
 23
23
-
 24
24
-
 25
25
-
 26
26
-
 27
27
-
 28
28
-
 29
29
-
 30
30
-
 31
31
-
 32
32
-
 33
33
-
 34
34
-
 35
35
-
 36
36
-
 37
37
-
 38
38
-
 39
39
-
 40
40
-
 41
41
-
 42
42
-
 43
43
-
 44
44
-
 45
45
-
 46
46
-
 47
47
-
 48
48
-
 49
49
-
 50
50
-
 51
51
-
 52
52
-
 53
53
-
 54
54
-
 55
55
-
 56
56
-
 57
57
-
 58
58
-
 59
59
-
 60
60
-
 61
61
-
 62
62
-
 63
63
-
 64
64
-
 65
65
-
 66
66
-
 67
67
-
 68
68
-
 69
69
-
 70
70
-
 71
71
-
 72
72
-
 73
73
-
 74
74
-
 75
75
-
 76
76
-
 77
77
-
 78
78
-
 79
79
-
 80
80
-
 81
81
-
 82
82
-
 83
83
-
 84
84
-
 85
85
-
 86
86
-
 87
87
-
 88
88
-
 89
89
-
 90
90
-
 91
91
-
 92
92
-
 93
93


em outras línguas
- español: Huawei WiFi AX2 Guía del usuario
- français: Huawei WiFi AX2 Mode d'emploi
- italiano: Huawei WiFi AX2 Guida utente
- Nederlands: Huawei WiFi AX2 Gebruikershandleiding
- Deutsch: Huawei WiFi AX2 Benutzerhandbuch