
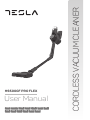
CORDLESS VACUUM CLEANER
HS500GF PRO FLEX
User Manual
ESPENG GRBGBIH/CG
HU MK PT RO SLO SRB
GERFR

2
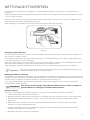
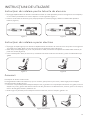
INSTRUCTION MANUAL
PLEASE READ THE SAFETY INSTRUCTIONS CAREFULLY BEFORE USE AND KEEP FOR FUTURE REFERENCE.
• The battery must be removed safely.
• Do not use near stairs or on the balconies. This
machine does not have a no avoidance sensors.
• This unit can be used by children from 8 years old
and people with physical, sensory or mental skills or
lack of experience and knowledge provided they
have been placed under supervision or have received
instructions for using the machine safely and that they
understand the dangers. Children should not play
with the appliance. The cleaning and maintenance
by the user should not be made by children without
supervision.
• This device is intended for domestic use only.
This unit is suitable for low to medium felt back
carpets. It is not suitable for uneven floors or mixed
carpets.
• Remove side brush at the under-carpet cleaning to
protect the side brush.
• If the adapter’s power cord is damaged, the adapter
must be discarded.
• Recharge / battery / s only with the charger supplied
by the manufacturer
• Use the device with the battery
(S) specifically created (S) for this purpose. The use of
any (S) other (S) battery (S) could cause an explosion
or fire
• Please use an adapter to use this product only.
• Do not use on wet or greasy dust.
• Before use, keep fragile items (glass, light, etc.) and
other objects that could entangle the brushes (long
hair, plastic bags, rope, wire, etc.).
• Do not sit on the machine and do not put heavy things
on it.
• WARNING: Make sure the unit can function freely in
the room (it is not blocked by an obstacle, it cannot fall
over) and that there is no obstacle on which the device
may tip and create a risk of danger (such as lighted
candles or a vase filled with water).
• Regularly clean the machine.
• Empty the dust container.
• Load the machine without using it for three months.
• Recharge only in the situation of a low power alarm or
when the power is turned off. Use it after fully charged.
• The battery must be removed from the apparatus
prior to its disposal; the device must be disconnected
from the mains when removing the battery;
• Do not dispose of batteries with household waste.
Eliminate them in accordance with local regulations.
• Recharge the battery / the robot only with the adapter
provided witn the device.
• The cable of this adapter external flexible cannot
be replaced; in case of damage to the cord, it is
necessary to put the adapter discarded and replaced
by an adapter of the same model.
• The appliance must be disconnected from the supply
mains when removing the battery.
• This appliance contains battery that are replaceable.
• WARNING: For the purposes of recharging the
battery, only use the defacnable supply unit provided
with this appliance.
Detachable supply
unit
• WARNING: Risk of entrapment hazard. Keep loose
clothing, hair, finger, etc. away from the motorized
brushes and nozzles.
• WARNING: the plug must be removed from the
socket-outlet before cleaning or maintaining the
appliance.
Household Use only.
Read this instruction manual carefully before using.
ENG
IMPORTANT WARNINGS
Safety instructions:
IMPORTANT
It is forbidden to replace the power cable by
yourself if damage.
If the device is dropped, please ask a qualified
person to check it before using it again. Internal
damage could cause accidents.
For any kind of problems or repairs, please
contact the customer service of the local
distributor, manufacturer or a qualified person
to avoid danger.

3
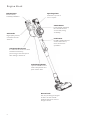
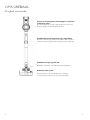
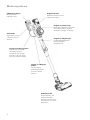
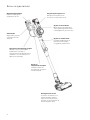
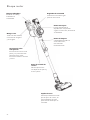
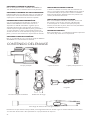
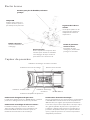
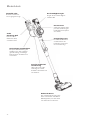
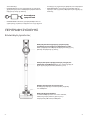
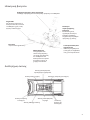
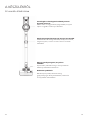
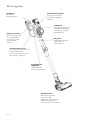
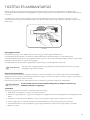
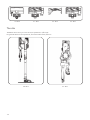
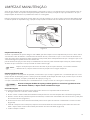
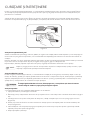
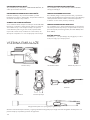
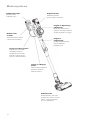
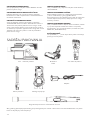
DESCRIPTION OF THE DEVICE
Product overview
3
Vacuum cleaner with centrifugal technology with
air-filtering sponge
Double filtration, high efficiency cleaning, to achieve the
best dust removal effect.
High-quality aluminum tube, light corrosion-resistant
Overlength design, easy to deal with high places, cracks
and other difficult corners.
Flexible rotation, convenient operation.
Free rotation, effective removal of dirt.
Electric floor brush
For easy cleaning of all
types of floors as well as thick woollen carpets to
remove all types of dirt.

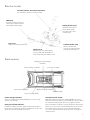
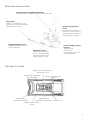
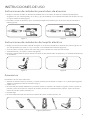
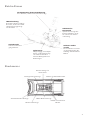
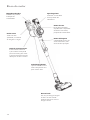
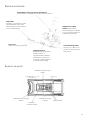
4
Engine block
Indicator lamp
Product work,
electricity indication.
Soft handle
High quality texture,
resistance to wear
and tear.
Transparent dust barrel
It is convenient to observe dust
collection and timely
processing, to avoid frequent
filter changes and costs.
Ash dumping button
Open the bottom cover
of the dusty barrel and
pour out the dust.
Lock button
Flexible combination of
various accessories,
more convenient
operation.
Switch button
It can rapidly start/stop
the vacuum cleaner
as needed, saving
electricity.
Speed regulator
Control the speed as
users’ request
Electric brush
For easy cleaning of all types
of floors as well as thick
woollen carpets to remove
all types of dirt.

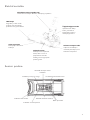
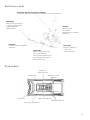
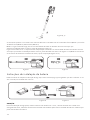
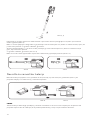
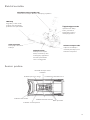
5
Electric brush
Dust sensor
Flexible rotation, convenient operation.
Free rotation, effective removal of dirt.
LED lamp
It is convenient to observe
dark dust, so that clean the
dust without blind spots.
Dust strip
Improve cleaning efficiency.
Nylon brush
Double layer fine nylon brush,
easy to deal with dirt between
short wool carpet and floor seam.
Collision buffer strip
Wear-resistant and
environ mentally friendly,
this tape protects your
Rolling brush cavity
Optimized design of
brush cavity, helps
to improve the dust
removal rate.
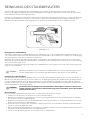
Rotating brush blockage
indicator
Auto mode switchPower change indicator
Manual switch
Motor blockage indicator
Dust sensor indicator
Auto mode indicator
Power change indicator:
This is an option when “AUTO MODE” is on to see the
power level change.
Rotary brush lock indicator:
Indicator indicates that the motor brush in the pedal is
blocked or not working. Recommendation to release the
brush for normal operation or clean it.
Automatic mode switch:
With this switch you can turn “AUTO MODE” on or off.
Vacuum cleaner operation. In “Auto Mode” it means that
the vacuum cleaner works at one strength of suction
power and when it draws in a large amount of dust and it
passes over the sensor, it detects that dust and increases
the suction power while the sensor detects that there
is no more dust and returns to the previous strength of
suction power.

6
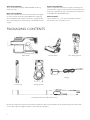
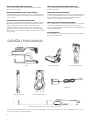
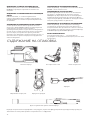
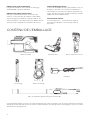
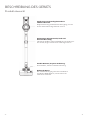
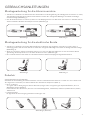
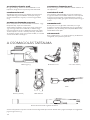
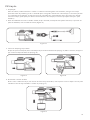
PACKAGING CONTENTS
Main body 2in1 dusting brush
Crevice tool Charging deck
Charger
Long aluminium tube with flexible hose
Due to the continuous improvement of the product, the above configuration will vary according to the model. We
reserve this right. The right to explain is owned by the company.
Electric brush
Auto mode indicator:
This is an indicator that the “AUTO MODE” cleaning
mode is on/off.
Dust sensor indicator:
When the indicator turns on more than half of the lights,
it is necessary to clean the upper HEPA filter. Ignoring
the led indicator can lead to side effects: clogged Hepa
filter, weakening of the suction power, destruction of the
engine.
Engine lock indicator:
This is an indicator when the air supply is blocked, the
air flow to the engine is obstructed or interrupted on the
path of the floor brush, pipe, dust container, metal filter,
TOP HEPA filter, Back HEPA filter).
Manual switch:
These switches (+, - ) are used to adjust the suction
power, there are five power levels.

7
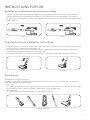
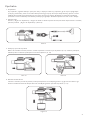
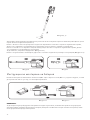
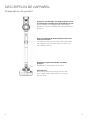
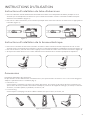
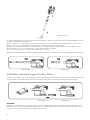
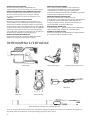
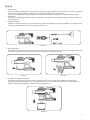
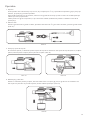
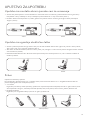
INSTRUCTIONS FOR USE
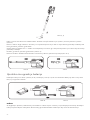
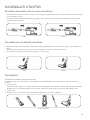
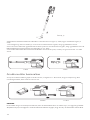
Installation instructions tor aluminum tubes
The electric brush instalation instructions
Accesories
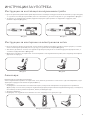
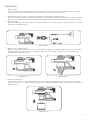
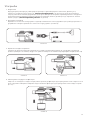
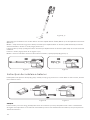
• Push the end of the aluminum tube horizontally into the vacuum hole of the main machine to ensure that it is
compact and not loosened, and that the installation is successful after the sound of clacking is heard. (figure 1
• To remove the aluminum tube, hold the main body with one hand and pull it out with the other hand pressing the
button. (figure 2)
• Push one end of the round brush mouth into the tube end of the air outlet to ensure it is tight and not loose; if the
sound is heard, it is installed successfully (Figure 3).
• If you want to remove the brush, the brush is held in one hand, and the button is pressed by the other hand
simultaneously, and the brush will be pulled out. (Figure 4)
• Electric brush can also use the method of aluminum tube connection, and directly be installed on the host.
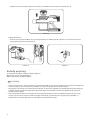
Instructions for using the accessories
In addition to using the aluminium tube and the electric brush, you can use a 2- in-1 brush and the long nozzle to
adapt the product to all situations (Fig. 5) :
• 2 in 1 brush
It is suitable for cleaning small room, gap or irregular object surface, such as wall corner, alloy window frame gap,
home appliance interior, drawer, car cushion, picture frame, ceiling, keyboard, etc.
• The long nozzle
It is suitable for inconvenient cleaning corners, such as corner, gap, etc.
Figure 1
Figure 3
Figure 5 (Accessory)
Figure 2
Figure 4

8
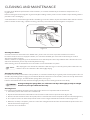
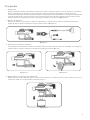
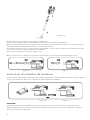
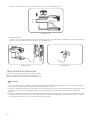
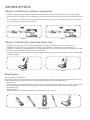
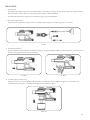
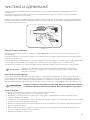
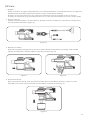
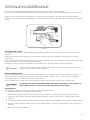
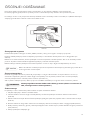
Figure (6, 7)
The accessories can be inserted in 2 different ways: directly at the end of the flexible tube (Mode 1) or at the end of the
motor block (Mode 2).
Mode 1: Take the long nozzle attachment, insert it into the end of the aluminium tube until you hear a click that
confirms installation. To remove it, pull directly on it.
Take the 2 in 1 brush accessory and do the same manipulation: insert it into the end of the aluminium tube until you
hear a click that confirms installation.
To remove it, pull directly on it. (Figure 6 and 7)
Mode 2: To insert the accessories directly to the engine block, repeat the operation (Figure 8 and 9).
Install the battery into the machine in the direction of (Fig.10) and install it as (Fig.11) to ensure no loosening. If the
sound is heard, it has been installed successfully.
ATTENTION:
For long term use, keep the battery in a cool and dry place, and leave the battery in a semi-charged state. Please wrap
the battery with non-conductive material to avoid direct contact with the battery which may cause damage to the
battery.
Battery installation instructions
Figure 8
Figure 10 Figure 11
Figure 9

9
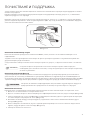
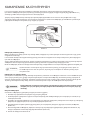
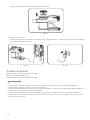
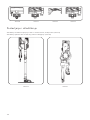
1. Preparation
Before use, please install the battery and check whether it is charged. If it is not, please charge it in time (refer to
“charging the product”), it can be used after recharging. According to the cleaning area, the accessories can be
chosen according to the demand. The company has been specially equipped with various accessories. According
to the clean area, the use can be chosen according to the clean area. (refer to the “Operation Instructions Annex”
for more details)
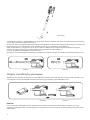
2. Starting work
Press the “switch button”, touch the button, the machine will start to work, if you need to stop working, loosen the
“switch button”. (Figure 12)
3. Product dumping ash
After stopping the machine, tap the dust tray on the side of the dust-barrel (Fig. 13) Open the caver, dump the
dust, and close the dust-barrel cover. (Fig. 14)
4. Disassemble the filter core
Rotate and remove the dust tray, you have access to the stainless steel filter, turn it to remove it. Do the reverse to
replace the stainless steel filter and the dust pan. (Fig. 15)
Usage
Figure 12
Figure 13
Figure 15
Figure 14

10
Remove the filter element in the direction indicated by the arrow. (Fig. 16)
5. Product charging
Connect the charger directly to the vacuum cleaner or charging station (Figure 17) and the other end to a wall
outlet in your home. (Figure 18)
Figure 16
Figure 17 Figure 18
About charging indicator
In operation: the light is illuminated continuously.
Partially charged: LED flashes.
Fully charged: the light is illuminated continuously.
• After the product leaves the factory every 3 months (in the case of conditions), please use our special charger to
charge the battery for 3 hours (do not need to be fully charged).
• Do not charge the battery for a long time, if you are still charging beyond normal charging time, please stop
immediately, otherwise there may be risks such as battery heating, deformation or burning.
• When the battery is not in service for a long time or when it is in deep discharge, it may decrease in the first few
times. It is recommended to discharge fully after charging (usually more than 6 hours). It is only need to repeat the
action twice.
NOTE

11
After wiping the inner wall of the dust barrel with wet rag, it is necessary to be placed under the sun,
and then cover the dust barrel after thoroughly drying.
During washing the sponge filter, use cold water and dry it thoroughly (usually in sunlight
for 24 hours, then put it back into the body.
NOTE
CLEANING AND MAINTENANCE
In order not to affect the performance of the machine, it is recommended that you maintain its components on a
regular basis.
Before cleaning the main body (the engine block) (the holding section), make sure the machine stops working and the
product is not in recharging.
Scrub with water or neutral detergent. Before scrubbing, ensure the cloth is dry. Do not infiltrate water into the internal
parts of vacuum cleaners (Fig. 19) After cleaning, do not to put it under the direct sunlight or in wet place.
Cleaning dust barrel
Once the amount of dust reaches the “MAX” value, please clear it as soon as possible and do not overfill it.
In order to make it easier to empty the dustbin, it is recommended that you remove the aluminum pipe or other
accessories before cleaning.
After the machine is stopped, open the dust barrel cover and dump the dust. If any stubborn dirt is found in the inner
wall of the dust barrel, please wipe it carefully with a wet rag.
After cleaning, close the dust barrel cover and make sure the lock button is in place.
Cleaning brush
It is recommended that the brush be cleaned once after 4-5 times of operation with electric brush:
1. Turn off the power and remove the electric brush.
2. Flip the brush and turn the lock button on the fixed cover with a coin to open the lock. (Figure 20)
3. Remove the roller brush to fix the cover plate, lift one end of the roller brush and pull out the roller brush. (Figure 21)
4. Use a pair of scissors or other sharp instrument to remove tangled animal hair and other waste (Figure 22).
5. When the cleanup is complete, push one end of the rolling brush into the floor brush and then clip the other end
into the floor brush. (Figure 23)
6. Cover the cover and lock it.
Cleaning the outlet filter
In order to ensure the performance of the product, it is recommended that you regularly clean it and replace it after 3-6
months. (depending on the usage), press and hold down the dust barrel release button, remove the body and turn the
cover, remove the sponge, and dust off the sponge filter. (see Fig. 16)
If dust is accumulated too much, wash it thoroughly and dry it before loading it into the main body.
Figure 19
NOTICE!

12
Figure 20 Figure 21 Figure 22 Figure 23
Sorting and storage
Figure 24 Figure 25
Charging deck storage: easy to take, saving space. (Figure 24)
Accessory storage: easy to take, easy to collection. (Figure 25)

13
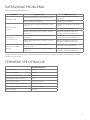
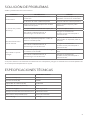
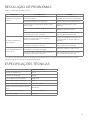
TROUBLESHOOTING
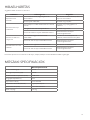
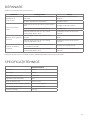
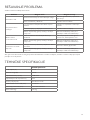
TECHNICAL SPECIFICATIONS
Analysis and treatment of common faults.
If above steps are not able to work properly with your device, please contact our after-sales service department for help.
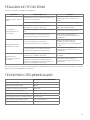
Problem Possible cause Solution
Vacuum cleaner doesn’t
work.
The product has no electricity or insufficient
power.
Please use it after the product is full of
electricity.
The vacuum opening was blocked. Clean up the vacuums opening.
Product suction
decreases.
The dust barrel, filter components are full of
dust.
Clean out dust barrel and filter
materials.
The rolling brush is entangled with hair, etc. Clean up the rolling brush.
After excluding the above situation, the
situation remains the same.
Please contact our after-sales service
for maintenance.
The motor operates with
abnormal sound.
The main suction pipe or aluminum pipe is
blocked.
Clear the obstacles inside the main
suction pipe, aluminum pipe.
After excluding the above situation, the
situation remains the same.
Please contact our after-sales service
for maintenance.
The product cannot be
recharged.
The main computer and charger interface is
not well connected. Please check and connect it well.
After excluding the above situation, the
situation remains the same.
Please contact our after-sales service
for maintenance.
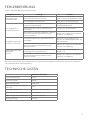
Technical parameter
Working voltage (V) 25.2 V
Rated power (W) 400 W
Battery capacity (mAh) 2500 mAh
Dust barrel capacity (L) 0.6 L
Once charging time (h) Between 3 to 5 hours
Continuous operating time (min) Up to 60 min
Product dimension (mm) 369 x 125 x 227mm
Net weight (kg) 2.65 kg

14
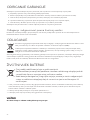
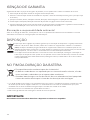
Disposal and environmental responsibility
In order to be environmentally friendly, we encourage you to have your device correctly. You can contact your local
authorities or recycling centers for more information.
DISCLAIMER OF WARRANTY
DISPOSAL
IN THE END OF BATTERY LIFE
The warranty does not cover the wear parts of the product, nor the problems or damage resulting from:
1. surface deterioration due to normal wear and tear of the product;
2. defects or deterioration due to contact with liquids and corrosion caused by rust or the presence of insects;
3. any incident, abuse, misuse, alteration, disassembly or unauthorized repair
4. improper maintenance, improper use concerning the product or connection to an incorrect voltage;
5. any use of accessories not supplied or not approved by the manufacturer.
The guarantee will be cancelled if the nameplate and / or serial number of the product are removed.
The presence of this logo on the product means that the disposal of the device is governed by Directive
2012/19 / EU dated July 4, 2012 relating to waste electrical and electronic equipment (WEEE).
Any hazardous substance contained in electrical or electronic equipment can have a potential impact on
the environment and health during recycling. Consequently, at the end of the device’s useful life, it must
not be disposed of with unsorted municipal waste.
Your role as an end consumer is essential in terms of reuse, recycling and obtaining other types of value creation from
this product. You have the choice of different collection and exchange systems organized by local authorities (recycling
centers) and distributors. It is your duty to use these possibilities.
This appliance contains battery that are non-replaceable.
Used batteries must be supported by a selective collection system in order to be
recycled thus reducing the impact on the environment.
When the battery reaches its end of life, you must place it in an appropriate
selective collection system that will handle its destruction and / or recycling.
• If the battery acid has leaked, avoid contact with skin, eyes and mucous membranes! The liquid that leaks from the
battery can cause rashes. If acid still had to contact with skin, immediately flush the affected areas with clean water
and consult a doctorimmediately.
• The batteries must be installed with the correct polarity +/-.
• Do not recharge non-rechargeable batteries because of the risk of explosion.
IMPORTANT
Under no circumstances should you dispose of the device or battery on the public highway.

15
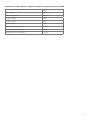
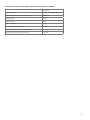
Information for external power supplies for Commission Regulation 2019 /1782/EU
Value
Input voltage 100-240V
Input AC frequency 50/60 Hz
Output voltage 30V
Output current 0.5A
Output power 15W
Average active efficiency >86.8%
Efficiency at low load (10 %) >72%
No-load power consumption <0.1 W

16
UPUTSTVO ZA UPOTREBU
PAŽLJIVO PROČITAJTE BEZBJEDNOSNA UPUTSTVA PRIJE UPOTREBE I SAČUVAJTE IH ZA BUDUĆU
REFERENCU.
• Bateriju morate bezbijedno ukloniti.
• Nemojte ga koristiti u blizini stepenica ili na
balkonima. Ovaj uređaj nema senzore za izbjegavanje.
• Ovu jedinicu mogu koristiti djeca od 8 godina i
osobe sa fizičkim, senzornim ili mentalnim vještinama
ili nedostatkom iskustva i znanja pod uslovom
da su stavljeni pod nadzor ili su dobili uputstva
za bezbijedno korištenje uređajaa i da razumiju
opasnosti. Djeca ne bi trebalo da se igraju sa
uređajem. Čišćenje i održavanje od strane korisnika ne
bi trebalo da ga prave djeca bez nadzora.
• Ovaj uređaj je namijenjen samo za kućnu upotrebu.
• Ova jedinica je pogodna za tepihe niskog do srednjeg
filca. Nije pogodan za neravne podove ili mješane
tepihe.
• Uklonite bočnu četku prilikom čišćenja ispod tepiha
da biste zaštitili bočnu četku.
• Ako je kabal za napajanje adaptera oštećen, adapter
se mora promijeniti.
• Punite bateriju samo sa punjačem koji je isporučio
proizvođač
• Koristite uređaj sa baterijom koje je specijalno kreiran
za ovaj uređaj. Upotreba bilo koje druge baterije
može izazvati eksploziju ili požar
• Koristite adapter koji je predviđen za ovaj proizvod.
• Ne koristite na mokroj ili masnoj prašini.
• Prije upotrebe čuvajte lomljive predmete (staklo,
svjetlo, itd.) i druge predmete koji bi mogli da zapletu
četke (duga kosa, plastične kese, konopac, žica, itd.).
• Ne sjedite na uređaju i ne stavljajte teške stvari na isti.
• UPOZORENJE: Uvjerite se da jedinica može slobodno
da funkcioniše u prostoriji (nije blokirana preprekom,
ne može da se prevrne) i da nema prepreke na koju bi
se uređaj mogao prevrnuti i stvoriti opasnost (kao što
su upaljene sveijće ili vaza napunjena vodom).
• Redovno čistite mašinu.
• Ispraznite posudu za prašinu.
• Punite bateriju, ako uređaj ne koristite tri mjeseca.
• Punite samo u situaciji alarma male snage ili kada se
uređaj isključi. Koristite ga nakon potpunog punjenja.
• Baterija mora biti uklonjena iz aparata prije njenog
odlaganja; uređaj mora biti isključen iz električne
mreže prilikom vađenja baterije;
• Ne bacajte baterije sa kućnim otpadom. Uklonite ih u
skladu sa lokalnim propisima.
• Punite bateriju samo pomoću adaptera koji ste dobili
uz uređaj.
• Kabal fleksibilnog eksternog adaptera se ne može
zamijeniti; u slučaju oštećenja kabla, potrebno je
adapter odbaciti i zamijeniti adapterom istog modela.
• Aparat se mora isključiti iz električne mreže prilikom
vađenja baterije.
• Ovaj uređaj sadrži bateriju koja se može zamijeniti.
• UPOZORENJE: Za potrebe punjenja baterije, koristite
samo adapter za napajanje koja se isporučuje uz ovaj
uređaj.
Adapter
za napajanje
• UPOZORENJE: Opasnost od uklještenja. Držite široku
odjeću, kosu, prste itd. dalje od motorizovanih četkica
i mlaznica.
• UPOZORENJE: utikač se mora izvaditi iz utičnice prije
čišćenja ili održavanja uređaja.
Household Use only.
Read this instruction manual carefully before using.
VAŽNA SIGURNOSNA UPUTSTVA
Bezbjednosna uputstva:
VAŽNO
Zabranjeno je samostalno zamijeniti kabal za
napajanje ako je oštećen.
Ako uređaj padne, zamolite kvalifikovanu
osobu da ga provjeri prije nego što ga ponovo
upotrebite. Unutrašnja oštećenja mogu izazvati
nesreće.
Za bilo kakve probleme ili popravke, obratite
se korisničkoj službi lokalnog distributera,
proizvođača ili kvalifikovane osobe kako biste
izbjegli opasnost.
BiH/CG

17
OPIS UREĐAJA
Pregled proizvoda
17
Usisivač sa centrifugalnom tehnologijom sa spužvom
za filtriranje zraka
Dvostruka filtracija i visoko efikasno čišćenje, kako bi se
postiglo najbolji efekat uklanjanja prašine.
Visokokvalitetna aluminijumska cijev, lagan dizajn
otporan na koroziju, prekomjerna dužina, lako se nosi sa
visokim mjestima, pukotinama i drugim teškim uglovima
Fleksibilna rotacija, zgodan rad.
Slobodno okretanje i efikasno uklanjanje prljavštine.
Električna četka za pod
Za lako čišćenje svih vrsta podova kao i debelih
vunenih tepiha za uklanjanje svih vrsta prljavštine.

18
Motorna jedinica
Indikatorska lampa
Rad proizvoda,
indikacija struje.
Soft handle
High quality texture,
resistance to wear
and tear.
Prozirna posuda za prašinu
Pogodno je posmatrati
sakupljanje prašine i
blagovremenu obradu,
kako bi se izbjegle česte
promjene filtera i troškovi.
Dugme za odlaganje
prašine
Otvorite donji
poklopac prašnjave
posude i izbacite
prašinu.
Dugme za zaključavanje
Fleksibilna kombinacija
raznih dodataka,
praktičniji rad.
Dugme za prebacivanje
Može brzo da pokrene/zaustavi
usisivač po potrebi, štedeći
električnu energiju. electricity.
Regulator brzine
Kontrolišite brzinu prema
zahtjevu korisnika.
Električna četka
Za lako čišćenje svih
vrsta podova kao i
debelih vunenih tepiha
za uklanjanje svih vrsta
prljavštine.

19
Električna četka
Senzor prašine
Fleksibilna rotacija, zgodan rad.
Slobodno okretanje i efikasno uklanjanje prljavštine
LED lampa
Pogodno je da bi uočili
prašinu, tako da očistite
prašinu bez slijepih tačaka.
Traka za prašinu
Poboljšajte efikasnost
čišćenja.
Najlonska četka
Dvoslojna fina najlonska
četka, lako se nosi sa
prljavštinom između
kratkog vunenog tepiha i
podnog šava.
Blokada rotirajuće četke
Indikator
Prekidač za automatski modIndikator promjene snage
Koliziona tampon traka
Otporna na habanje i
ekološki prihvatljiva, ova
traka štiti vaš parket.
Šuplja kotrljajuća četka
Optimizovan dizajn
četke, pomaže za
poboljšanje brzine i
uklanjanja prašine.
Ručni prekidač
Indikator blokade motora
Indikator senzora prašine
Indikator auto moda

20
SADRŽAJ PAKOVANJA
Tijelo 2u1 četka za prašinu
Alat za pukotine Doking za punjenje
Adapter
Duga aluminijumska cijev sa fleksibilnim crijevom
Zbog stalnog poboljšanja proizvoda, gornja konfiguracija će varirati u zavisnosti od modela. Zadržavamo ovo pravo.
Pravo na objašnjenje ima kompanija.
Električna četka
INDIKATOR PROMJENE NAPAJANJA:
Ovo je opcija kada je “AUTO MODE” uključen da vidite
promjenu nivoa snage.
INDIKATOR ZAKONA ROTACIJSKIH ČETKICA:
Indicarot označava da je četkica motora u pedali blokirana
ili da ne radi. Preporuka da otpustite četku za normalan rad
ili da je očistite.
AUTOMATSKI PREKIDAČ NAČINA RADA:
Pomoću ovog prekidača možete uključiti ili isključiti “AUTO
MODE”. Rad usisivača u “Auto Modu” to znači da usisivač
radi na jednoj jačini usisne snage i kada uvuče veliku
količinu prašine i ona pređe preko senzora, detektuje tu
prašinu i povećava snagu usisavanja dok senzor detektuje
da postoji nema više prašine i vraća se na prethodnu snagu
usisne snage.
INDIKATOR AUTOMATSKOG NAČINA RADA:
Ovo je indikator da je režim čišćenja “AUTO MODE”
uključen/isključen.
INDIKATOR SENZORA PRAŠINE:
Kada se indikator upali više od polovine lampica, potrebno
je očistiti gornji HEPA filter. Zanemarivanje LED indikatora
može dovesti do nuspojava: začepljenja Hepa filtera,
slabljenja usisne snage, uništenja motora.
INDIKATOR ZAKLJUČAVANJA MOTORA:
Ovo je indikator kada je dovod zraka blokiran, protok zraka
do motora je ometan ili prekinut na putu četke za pod,
cijevi, posude za prašinu, metalnog filtera, TOP HEPA filtera,
stražnjeg HEPA filtera).
RUČNI PREKIDAČ:
Ovi prekidači ( + , - ) služe za podešavanje snage usisavanja,
postoji pet nivoa snage.
A página está carregando...
A página está carregando...
A página está carregando...
A página está carregando...
A página está carregando...
A página está carregando...
A página está carregando...
A página está carregando...
A página está carregando...
A página está carregando...
A página está carregando...
A página está carregando...
A página está carregando...
A página está carregando...
A página está carregando...
A página está carregando...
A página está carregando...
A página está carregando...
A página está carregando...
A página está carregando...
A página está carregando...
A página está carregando...
A página está carregando...
A página está carregando...
A página está carregando...
A página está carregando...
A página está carregando...
A página está carregando...
A página está carregando...
A página está carregando...
A página está carregando...
A página está carregando...
A página está carregando...
A página está carregando...
A página está carregando...
A página está carregando...
A página está carregando...
A página está carregando...
A página está carregando...
A página está carregando...
A página está carregando...
A página está carregando...
A página está carregando...
A página está carregando...
A página está carregando...
A página está carregando...
A página está carregando...
A página está carregando...
A página está carregando...
A página está carregando...
A página está carregando...
A página está carregando...
A página está carregando...
A página está carregando...
A página está carregando...
A página está carregando...
A página está carregando...
A página está carregando...
A página está carregando...
A página está carregando...
A página está carregando...
A página está carregando...
A página está carregando...
A página está carregando...
A página está carregando...
A página está carregando...
A página está carregando...
A página está carregando...
A página está carregando...
A página está carregando...
A página está carregando...
A página está carregando...
A página está carregando...
A página está carregando...
A página está carregando...
A página está carregando...
A página está carregando...
A página está carregando...
A página está carregando...
A página está carregando...
A página está carregando...
A página está carregando...
A página está carregando...
A página está carregando...
A página está carregando...
A página está carregando...
A página está carregando...
A página está carregando...
A página está carregando...
A página está carregando...
A página está carregando...
A página está carregando...
A página está carregando...
A página está carregando...
A página está carregando...
A página está carregando...
A página está carregando...
A página está carregando...
A página está carregando...
A página está carregando...
A página está carregando...
A página está carregando...
A página está carregando...
A página está carregando...
A página está carregando...
A página está carregando...
A página está carregando...
A página está carregando...
A página está carregando...
A página está carregando...
A página está carregando...
A página está carregando...
A página está carregando...
A página está carregando...
A página está carregando...
A página está carregando...
A página está carregando...
A página está carregando...
A página está carregando...
A página está carregando...
A página está carregando...
A página está carregando...
A página está carregando...
A página está carregando...
A página está carregando...
A página está carregando...
A página está carregando...
A página está carregando...
A página está carregando...
A página está carregando...
A página está carregando...
A página está carregando...
A página está carregando...
A página está carregando...
A página está carregando...
A página está carregando...
A página está carregando...
A página está carregando...
A página está carregando...
A página está carregando...
A página está carregando...
A página está carregando...
A página está carregando...
A página está carregando...
A página está carregando...
A página está carregando...
A página está carregando...
A página está carregando...
A página está carregando...
A página está carregando...
A página está carregando...
A página está carregando...
A página está carregando...
A página está carregando...
A página está carregando...
A página está carregando...
A página está carregando...
A página está carregando...
A página está carregando...
A página está carregando...
A página está carregando...
A página está carregando...
A página está carregando...
A página está carregando...
-
 1
1
-
 2
2
-
 3
3
-
 4
4
-
 5
5
-
 6
6
-
 7
7
-
 8
8
-
 9
9
-
 10
10
-
 11
11
-
 12
12
-
 13
13
-
 14
14
-
 15
15
-
 16
16
-
 17
17
-
 18
18
-
 19
19
-
 20
20
-
 21
21
-
 22
22
-
 23
23
-
 24
24
-
 25
25
-
 26
26
-
 27
27
-
 28
28
-
 29
29
-
 30
30
-
 31
31
-
 32
32
-
 33
33
-
 34
34
-
 35
35
-
 36
36
-
 37
37
-
 38
38
-
 39
39
-
 40
40
-
 41
41
-
 42
42
-
 43
43
-
 44
44
-
 45
45
-
 46
46
-
 47
47
-
 48
48
-
 49
49
-
 50
50
-
 51
51
-
 52
52
-
 53
53
-
 54
54
-
 55
55
-
 56
56
-
 57
57
-
 58
58
-
 59
59
-
 60
60
-
 61
61
-
 62
62
-
 63
63
-
 64
64
-
 65
65
-
 66
66
-
 67
67
-
 68
68
-
 69
69
-
 70
70
-
 71
71
-
 72
72
-
 73
73
-
 74
74
-
 75
75
-
 76
76
-
 77
77
-
 78
78
-
 79
79
-
 80
80
-
 81
81
-
 82
82
-
 83
83
-
 84
84
-
 85
85
-
 86
86
-
 87
87
-
 88
88
-
 89
89
-
 90
90
-
 91
91
-
 92
92
-
 93
93
-
 94
94
-
 95
95
-
 96
96
-
 97
97
-
 98
98
-
 99
99
-
 100
100
-
 101
101
-
 102
102
-
 103
103
-
 104
104
-
 105
105
-
 106
106
-
 107
107
-
 108
108
-
 109
109
-
 110
110
-
 111
111
-
 112
112
-
 113
113
-
 114
114
-
 115
115
-
 116
116
-
 117
117
-
 118
118
-
 119
119
-
 120
120
-
 121
121
-
 122
122
-
 123
123
-
 124
124
-
 125
125
-
 126
126
-
 127
127
-
 128
128
-
 129
129
-
 130
130
-
 131
131
-
 132
132
-
 133
133
-
 134
134
-
 135
135
-
 136
136
-
 137
137
-
 138
138
-
 139
139
-
 140
140
-
 141
141
-
 142
142
-
 143
143
-
 144
144
-
 145
145
-
 146
146
-
 147
147
-
 148
148
-
 149
149
-
 150
150
-
 151
151
-
 152
152
-
 153
153
-
 154
154
-
 155
155
-
 156
156
-
 157
157
-
 158
158
-
 159
159
-
 160
160
-
 161
161
-
 162
162
-
 163
163
-
 164
164
-
 165
165
-
 166
166
-
 167
167
-
 168
168
-
 169
169
-
 170
170
-
 171
171
-
 172
172
-
 173
173
-
 174
174
-
 175
175
-
 176
176
-
 177
177
-
 178
178
-
 179
179
-
 180
180
-
 181
181
-
 182
182
-
 183
183
-
 184
184


em outras línguas
- français: Tesla HS500GF Manuel utilisateur
- română: Tesla HS500GF Manual de utilizare
Outros documentos
-
Solac AB2841 Manual do proprietário
-
Solac AB2850 Manual do proprietário
-
Rowenta AIR FORCE 360 RH9086 Manual do proprietário
-
-
-
-
-
Kärcher VC 6100 Manual do usuário
-
-
Rowenta RR7987 Guia de usuario