Shark NV500 Series Rotator Professional Lift Away XL Vacuum Manual do usuário
- Categoria
- Aspirador de pó
- Tipo
- Manual do usuário

®
sharkclean.com
1-800-798-7398
NV500
Series • Série • Serie
INSTRUCTIONS
INSTRUCCIONES

1 2
1-800-798-7398 sharkclean.com
ENGLISH
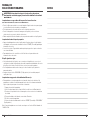
CONTENTS
THANK YOU
for purchasing the Shark® Rotator® Professional Lift-Away®
Important Safety Instructions � � � � � � � � � � � � � � � � � � � � � � � � � � � 3
Getting to Know Your Shark® Rotator®
Professional Lift-Away® � � � � � � � � � � � � � � � � � � � � � � � � � � � � � � � � 5
Assembling Your Vacuum � � � � � � � � � � � � � � � � � � � � � � � � � � � � � � 7
Using Your Vacuum in Upright Mode � � � � � � � � � � � � � � � � � � � � 9
What Does the Brushroll Indicator Light Mean? � � � � � � � � � � � � � 9
Using Your Vacuum in Above-Floor Mode � � � � � � � � � � � � � � � �11
The Benefits of Suction Control � � � � � � � � � � � � � � � � � � � � � � � � � � � 11
Using Your Vacuum in Lift-Away Mode � � � � � � � � � � � � � � � � � � 13
Lift-Away® Cleaning � � � � � � � � � � � � � � � � � � � � � � � � � � � � � � � � � � � � � � 13
Using Your Caddy � � � � � � � � � � � � � � � � � � � � � � � � � � � � � � � � � � � � 15
Compatible Accessories � � � � � � � � � � � � � � � � � � � � � � � � � � � � � � � 17
Maintenance � � � � � � � � � � � � � � � � � � � � � � � � � � � � � � � � � � � � � � � � � 19
Emptying the Dust Cup � � � � � � � � � � � � � � � � � � � � � � � � � � � � � � � � � � �19
Cleaning the Filters � � � � � � � � � � � � � � � � � � � � � � � � � � � � � � � � � � � � � � 20
Checking for Blockages � � � � � � � � � � � � � � � � � � � � � � � � � � � � � � � 21
Troubleshooting Guide � � � � � � � � � � � � � � � � � � � � � � � � � � � � � � � � 23
Warranty � � � � � � � � � � � � � � � � � � � � � � � � � � � � � � � � � � � � � � � � � � � � 26
PLEASE READ CAREFULLY AND KEEP
FOR FUTURE REFERENCE�
This Owner’s Guide is designed to help you get
a complete understanding of your new Shark
Rotator Professional Lift-Away.
If you should have a question, please call the
customer service line at 1-800-798-7398.
TECHNICAL SPECIFICATIONS
Voltage: 120V., 60Hz
Watts: 1200W
Amps: 10A
REGISTER YOUR PURCHASE
sharkclean.com
1-800-798-7398
RECORD THIS INFORMATION
Model Number: ��������������������������������������
Date Code: �����������������������������������������
Date of Purchase (Keep receipt): �����������������������
Store of Purchase: �����������������������������������
TIP: You can find the
model number on the
rating label located on
the back of your unit.
TIP: You can locate the
date code on one of the
prongs of the power
cordplug.

3 4
1-800-798-7398 sharkclean.com
ENGLISH
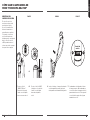
THE POWER NOZZLE, WAND, AND
HANDLE CONTAIN ELECTRICAL
CONNECTIONS:
• These are not serviceable parts.
• Do not use to vacuum any liquids.
• Do not immerse in water.
•
If handle/wand is damaged, discontinue use.
1 Inspect power cord or plug for any damage
before use. DO NOT use vacuum cleaner
with a damaged cord or plug. Turn off all
controls before plugging or unplugging
the vacuum cleaner. Store your vacuum
cleaner with the power cord secured
around the two cord hooks.
2 DO NOT use outdoors or on wet surfaces.
Use only on dry surfaces.
3 Unplug from electrical outlet when not in
use and before servicing.
4 If vacuum cleaner is not working as it
should, has been dropped, damaged, left
outdoors, or dropped into water, return it to
SharkNinja Operating LLC for examination,
repair, or adjustment.
5 The hose contains electrical wires. DO NOT
use when damaged, cut, or punctured.
6 DO NOT pull or carry vacuum cleaner by
the cord or use the cord as a handle.
7 DO NOT unplug by pulling on cord. Grasp
the plug, not the cord.
8 DO NOT handle plug or vacuum cleaner
with wet hands.
9 DO NOT run the vacuum cleaner over the
power cord, close a door on the cord, or
pull cord around sharp corners.
10 The use of an extension cord is NOT
recommended.
11 DO NOT leave vacuum cleaner unattended
when plugged in.
12 Keep cord away from heated surfaces.
GENERAL USE
13 Use only as described in this manual.
1 4 Keep your work area well lit.
15 Keep the vacuum cleaner moving over
the carpet surface at all times to avoid
damaging the carpet fibers.
16 DO NOT place vacuum cleaner on unstable
surfaces such as chairs or tables.
17 DO NOT put any objects into openings. DO
NOT use with any opening blocked; keep
free of dust, lint, hair, and anything that
may reduce airflow.
18 DO NOT allow the appliance to be used by
children. Close attention is necessary when
used near children. This is not a toy.
19 DO NOT use without dust cup and/or filters
in place.
DUST CUP/FILTERS/ACCESSORIES
Before turning on the vacuum:
20 Make sure that all filters are thoroughly dry
after routine cleaning.
21 Make sure that dust cup and all filters are
in place after routine maintenance.
22 Make sure accessories are free of
blockages.
23 Only use Shark-brand filters and
accessories (failure to do so will void
thewarranty).
HOSE ATTACHMENTS
24 DO NOT use if airflow is restricted; if the air
paths or the motorized floor nozzle become
blocked, turn the vacuum cleaner off and
unplug from electrical outlet. Remove
all obstructions before you turn on the
unitagain.
25 Keep the end of the hose and accessory
openings away from face and body.
26 Keep cleaning tools and hose suction
openings away from hair, face, fingers,
uncovered feet, or loose clothing.
2 7 Only use manufacturer’s recommended
attachments.
GENERAL CLEANING
28 DO NOT pick up large-sized objects.
29 DO NOT pick up hard or sharp objects
such as glass, nails, screws, or coins that
could damage the vacuum cleaner.
30 DO NOT use to pick up drywall dust,
fireplace ash, or embers. DO NOT use
as an attachment to power tools for dust
collection.
31 DO NOT pick up smoking or burning
objects such as hot coals, cigarette butts,
or matches.
32 DO NOT pick up flammable or combustible
materials (e.g., lighter fluid, gasoline, or
kerosene) or use vacuum in areas where
they may be present.
33 DO NOT pick up toxic solutions (e.g.,
chlorine bleach, ammonia, or drain cleaner).
34 DO NOT use in an enclosed space
where vapors are present from paint,
paint thinner, moth-proofing substances,
flammable dust, or other explosive or toxic
materials.
35 DO NOT vacuum up any liquids.
36 DO NOT immerse vacuum cleaner in water
or other liquids.
37 Use extra care when cleaning on stairs.
POLARIZED PLUG
To reduce the risk of electric shock, this
vacuum cleaner has a polarized plug (one
blade is wider than the other). As a safety
feature, this plug will fit into a polarized outlet
only one way. If the plug does not fit fully into
the outlet, reverse the plug. If it still does not fit,
contact a qualified electrician. DO NOT force
into outlet or try to modify to fit.
SAVE THESE INSTRUCTIONS
PLEASE READ CAREFULLY BEFORE USE
IMPORTANT SAFETY INSTRUCTIONS
FOR HOUSEHOLD USE ONLY
WARNING
To reduce the risk of injury, fire, electric shock, and property damage
resulting from improper use of the appliance, carefully observe the following
instructions� This unit contains electrical connections and moving parts that
potentially present risk to the user�

5 6
1-800-798-7398 sharkclean.com
ENGLISH
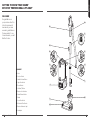
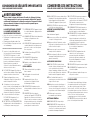
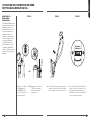
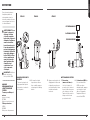
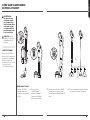
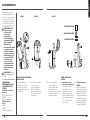
GETTING TO KNOW YOUR SHARK®
ROTATOR® PROFESSIONAL LIFT-AWAY®
WELCOME!
Congratulations on
your purchase. Use this
instruction manual to
learn about your new
vacuum’s great features.
From assembly to use
to maintenance, you will
find it all in here.
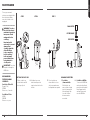
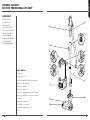
MAIN UNIT
A Hose
B Suction Control
C Handle Release Button
D Upper Cord Hook
E Power Button
F Lift-Away® Button
G Brushroll on/off button
H Wand Release Button
I Wand
J Lower Cord Hook
K Motorized Floor Nozzle
L Brushroll Indicator Light
M Headlights
E F
H
C
G
Cord
Hook
Cord
Hook
Cord
Hook
Cord
Hook
Cord
Hook
K
I
A
B
D
J
L
M

7 8
1-800-798-7398 sharkclean.com
ENGLISH
TIP: To store your
vacuum, wrap cord
around cord hooks.
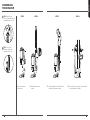
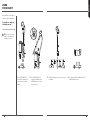
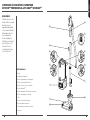
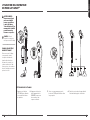
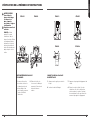
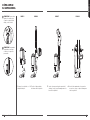
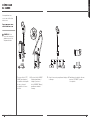
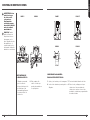
1 Place the pod onto
floornozzle.
ASSEMBLING
YOUR VACUUM
TIP: For quick cord
access, rotate upper hook
down and remove cord.
2 Slide wand into base
ofpod.
3 Insert handle into top of wand. Then
attach hose into base of pod.
4 Insert tools into accessory clips, then tuck
the hose between the clips.
STEP 1 STEP 2 STEP 3 STEP 4

9 10
1-800-798-7398 sharkclean.com
ENGLISH
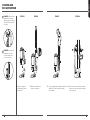
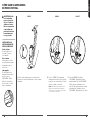
USING YOUR VACUUM
IN UPRIGHT MODE
WARNING: DO
NOT use to pick
up drywall dust,
fireplace ash, or
embers� DO NOT use
as an attachment to
power tools for dust
collection�
WHAT DOES THE
BRUSHROLL INDICATOR
LIGHT MEAN?
Solid Green
The brushroll is on and
working as it should.
Solid Red
There is a jam in the brushroll
area. Turn your vacuum off
and remove the blockage.
No Light
The brushroll is off. To turn it
on, press the BRUSHROLL
button. The light should turn
green, and the brushroll
should spin.
1 Plug power cord into outlet. Place foot on floor nozzle
andtilt handle back.
2 Press POWER to clean hard floor surfaces,
area rugs or above-floor. The brushroll will
not spin in this mode.
NOTE: For deep cleaning per ASTM F 608 (embedded
dirt in carpets) please ensure brushroll is on with the
suction control closed.
3 Press POWER and BRUSHROLL to clean
carpets. The BRUSHROLL button will
illuminate green. The brushroll will spin
only when the vacuum is reclined and the
BRUSHROLL button is green.
STEP 1 STEP 2 STEP 3
Brushroll
Indicator

11 12
1-800-798-7398 sharkclean.com
ENGLISH
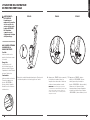
Suction
Control
MAX MIN
Cord
Hook
OR
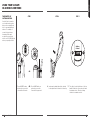
1 Press HANDLE release
button when you need to
clean within short reach.
USING YOUR VACUUM
IN ABOVE-FLOOR MODE
2 Insert wand or handle directly into desired
tool and pivot back to release tool from clip.
3 The collar is located at the base of the top
handle. Rotate the collar counterclockwise
to minimize suction. Close by rotating
clockwise to maximize suction.
Press WAND button on
pod when you need to
clean with a longer reach.
STEP 1 STEP 2 STEP 3
OR
THE BENEFITS OF
SUCTION CONTROL
Suction Control is a way for
you to adjust suction power
when you are using different
tools or vacuuming different
surfaces. For example, if
you are feeling resistance
vacuuming thick carpet
or upholstery, opening the
suction control to MIN will help
reduce your push/pull effort.

13 14
1-800-798-7398 sharkclean.com
ENGLISH
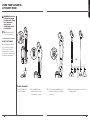
LIFT-AWAY CLEANING
1 Press LIFT-AWAY to lift
pod off floor nozzle.
USING YOUR VACUUM IN
LIFT-AWAY™ MODE
3 Or you can press WAND button on
pod when you need to clean with a
longerreach.
4 Attach desired cleaning tool to the end of
handle or wand.
WA
RNING: Ensure solid
footing when using in
Lift-Away mode� Using
for an application
where you lack
stability may result in
personal injury�
TIP: Hold pod in hand to
clean in Lift-Away mode.
WHAT IS LIFT-AWAY?
Our Lift-Away feature allows
you to remove the pod from
the floor nozzle to easily
clean stairs, above floor with
accessories, or hard floors with
the hard-floor attachments.
2 Press HANDLE release
button when you need to
clean within short reach.
Cord
Hook
OR

15 16
1-800-798-7398 sharkclean.com
ENGLISH
If your vacuum comes with a
caddy, use these instructions.
To purchase a caddy, go
to sharkclean�com
USING
YOUR CADDY
1 Press LIFT-AWAY to lift
pod off floor nozzle and
place pod onto canister
caddy.
2 Press WAND button to
release the wand or press
HANDLE button to release
the handle only.
3 Attach preferred accessory to the wand
orhandle.
4 To release pod from caddy, press LIFT-
AWAY and lift the pod.
TIP: Use the posts on the
caddy to store additional
cleaning accessories.

17 18
1-800-798-7398 sharkclean.com
ENGLISH
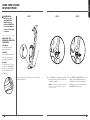
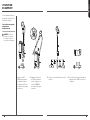
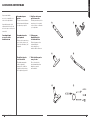
COMPATIBLE
ACCESSORIES
There are a variety of
accessories that are compatible
with this vacuumseries.
The top flap of your box shows
the select accessories that are
included with your model.
To purchase additional
accessories, go to
sharkclean�com
A Crevice Tool
Gives you extended
cleaning reach for small
spaces.
B Pet Power Brush
Designed for removal of
pet hair and ground-in dirt
from carpeted stairs and
upholstery.
D Under-Appliance Wand
Extend to access areas
under hard-to-move
appliances and furniture.
C Wide Upholstery Tool
Remove pet hair and
dust from curtains and
other delicate fabrics and
upholstery.
F Home & Car Detail Kit
Extension tubes and
micro-tools clean the
tightest spaces.
E Straight Suction Floor
Nozzle
Designed to pick up large
and small debris from all
hard floor surfaces and
area rugs.
AB
F
D
C
E

19 20
1-800-798-7398 sharkclean.com
ENGLISH
To keep your vacuum’s
suction power optimal, follow
these instructions. Make
sure unit is off and cord is
unplugged.
MAINTENANCE
RECOMMENDED
FILTER CLEANING
SCHEDULE:
Pre-Motor Filter Kit
(Foam & Felt)
XFF500
Clean every 3 months.
Post-Motor Filter
(HEPA)
XHF500
Clean once a year.
EMPTYING THE DUST CUP
1 Pull up on dust cup
release latches and lift
dust cup off pod.
2 Hold dust cup over a
trash bin and press the
empty-release latch on the
bottom.
3 Press top dust-cup
release latch to access
dust screen and remove
built-up debris asrequired.
CLEANING THE FILTERS
1 Pre-Motor
(foam and felt):
With the dust cup
removed, take out and
rinse the foam and felt
filters with water. Tap
loose dirt off filters
between washes
asneeded.
2 Post-Motor (HEPA):
To access the HEPA filter,
reach under the grill and
press the button and pull
the grill away from the
vacuum. Remove and
rinse the HEPA filter.
STEP 1 STEP 2 STEP 3
WARNING: To reduce
the risk of shock and
unintended operation,
turn power off and
unplug unit before
servicing�
Hand wash with
water only to prevent
damage from
cleaning chemicals�
Allow ALL filters
to dry completely
before replacing
in the vacuum to
prevent liquid from
being drawn into
electric parts�
IMPORTANT: Do not use
soap when cleaning the
HEPA filter.
HEPA
FELT FILTER
FOAM FILTER
FILTER FRAME

21 22
1-800-798-7398 sharkclean.com
ENGLISH
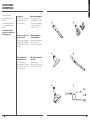
1 Using a coin, turn the
screws to the unlock
position and pull up
to expose the airway.
Remove the blockage.
CHECKING FOR BLOCKAGES
2 Remove any string, hair
or debris that may be
wrapped around the
brushroll.
1
Squeeze tabs and remove hose.
2
Tilt elbow down 90 degrees.
3
Press elbow release latch.
4
Remove elbow and check for blockages.
Once blockages are removed, replace
elbow by inserting back into the opening,
then clipping back into the latch.
WARNING: To reduce
the risk of shock and
unintended operation,
turn power off and
unplug unit before
servicing�
TIP: You can also check
for blockages in the hose
and tubes. Just remove
floor nozzle, dust cup and
hose and shine a flashlight
in the openings.
STEP 1 STEP 1STEP 2
STEP 2 STEP 4
STEP 3
BOTTOM OF FLOOR NOZZLE HOSE CUFF AT BASE OF POD

23 24
1-800-798-7398 sharkclean.com
ENGLISH
TROUBLESHOOTING
GUIDE
Vacuum is not picking up debris� No suction or light suction�
(Refer to Maintenance section for more information�)
• Check filters to see if they need cleaning. Follow instructions for rinsing and drying the filters
before re-inserting in the vacuum.
• Dust cup may be full; empty dust cup.
• Check hose, hose connections, nozzles, and accessories for blockages; clear blockages if required.
• Remove any string, carpet fibers, or hair that may be wrapped around the brushroll.
Vacuum lifts area rugs�
• Turn off unit to disengage the brushroll. Ensure brushroll is turned off and restart with the
POWER button for suction only cleaning.
• Suction is powerful. Take care when vacuuming area rugs or rugs with delicately sewn edges.
• To minimize suction, refer to Suction Control section for more information on how to use.
Brushroll does not spin�
• If Brushroll Indicator Light on the floor nozzle turns red, the brushroll has stopped spinning.
Immediately turn off and unplug vacuum, disconnect the nozzle, and remove blockage before
reconnecting and turning vacuum back on.
• With the power on, recline the handle, which will automatically turn on the brushroll.
• Ensure that the BRUSHROLL button is on for brushroll to spin
Vacuum turns off on its own or indicator light flashes red�
• This vacuum is equipped with a motor-protective thermostat. If your vacuum overheats, the
thermostat will automatically turn the suction motor off. Perform the following steps to restart
thethermostat:
1. Turn vacuum off and unplug it.
2. Empty dust cup and clean filters (see Maintenance section).
3. Check for blockages in hose, accessories, and inlet openings.
4. Allow unit to cool for a minimum of 45 minutes.
5. Plug in vacuum and turn it on.
6. Restart the unit using either the POWER or BRUSHROLL buttons.
Note: If vacuum still does not start, contact Customer Service at 1-800-798-7398.
WARNING: To reduce the risk of shock and unintended operation, turn
power off and unplug unit before servicing�
FIVE (5) YEAR
LIMITED WARRANTY
The 5 Year Limited Warranty applies to purchases made from authorized retailers of SharkNinja
Operating LLC. Warranty coverage applies to the original owner and to the original product only and is
not transferable.
SharkNinja warrants that the unit shall be free from defects in material and workmanship for a period of 5 years
from the date of purchase when it is used under normal household conditions and maintained according to the
requirements outlined in this instruction manual, subject to the following conditions and exclusions.
What is covered in my warranty?
1. The original unit and/or non-wearable components deemed defective, in SharkNinja’s sole discretion,
will be repaired or replaced for up to 5 years from the original purchase date.
2. In the rare event that a replacement unit is issued, the warranty coverage ends six months following the
receipt date of the replacement unit or the remainder of the existing warranty, whichever is greater. If
the unit is replaced, SharkNinja reserves the right to replace the unit with one of equal or greater value.
What is not covered in my warranty?
Our Customer Care/Product Specialists are available to provide all the warranty service options available to
you including the possibility of upgrading to our VIP Warranty Service Options for select product categories.
1. Normal wear and tear of wearable parts such foam filters, HEPA filters, pads etc., which require regular
maintenance and/or replacement to ensure the proper functioning of your unit are not covered by this warranty.
2. Any unit that has been tampered with or used for commercial purposes.
3. SharkNinja will cover the cost for the customer to send in the unit to us for repair or replacement. A
fee of $19.95 for return shipping costs will be charged at the time of return shipment of the repaired
or replacement unit. Our Customer Care /Product Specialists are available to provide all the warranty
service options available to you including upgrading to our VIP Warranty Service Options.
4.
Damage caused by misuse, abuse, or negligent handling, or damage due to mishandling in transit.
5. Consequential and incidental damages.
6. Defects caused by or resulting from damages from shipping or repairs, service, or alteration to the
product or any of its parts which have been performed by a repair person not authorized by SharkNinja.
7. Products purchased, used or operated outside of North America.
Problems with your unit/How to get service
If your appliance fails to operate properly while in use under normal household conditions within the
warranty period, visit www.sharkclean.com for product care/maintenance self- help. Our customer care
and product specialists are also available at 1-800-798-7398 to assist with product support and warranty
service options.
How to initiate a warranty claim
You must first activate your warranty by registering your unit online at sharkclean.com/customersupport.
(Note: Purchases made directly from SharkNinja are automatically registered with us and the warranty
activated.) Alternatively you can call 1-800-798-7398 to have a customer care specialist assist you. Please
note you must call 1-800-798-7398 to initiate a warranty claim. Return and Packing Instruction information
will be provided at that time.
The customer care line is open Monday-Saturday, 7am-11pm EST and Sunday, 9am-8pm EST.
Replacement parts are available for purchase at sharkclean.com. For more information on what is
classified as wearable and non-wearable parts, please visit sharkwarranty.com.
This warranty gives you specific legal rights, and you also may have other rights that vary from state to state.
Some states do not permit the exclusion or limitation of incidental or consequential damages, so the above
may not apply to you.

25 26
1-800-798-7398 sharkclean.com
FRANÇAIS
TABLE DES MATIÈRES
MERCI
d’avoir acheté l’aspirateur RotatorMD Professional Lift-AwayMD de SharkMD
Consignes de sécurité importantes � � � � � � � � � � � � � � � � � � � � � 27
Apprendre à connaître l’aspirateur RotatorMD
Professional Lift-AwayMD de SharkMD � � � � � � � � � � � � � � � � � � � � 29
Assemblage de l’aspirateur � � � � � � � � � � � � � � � � � � � � � � � � � � � � 31
Utilisation de l’aspirateur en position verticale � � � � � � � � � � � 33
Que signifie le témoin lumineux de la brosse rotative? � � � � � � 33
Utilisation de l’aspirateur en mode nettoyage
au-dessus du sol� � � � � � � � � � � � � � � � � � � � � � � � � � � � � � � � � � � � � � 35
Avantages du régulateur d’aspiration � � � � � � � � � � � � � � � � � � � � � 35
Utilisation de l’aspirateur en mode Lift-Away � � � � � � � � � � � � 37
Nettoyage avec Lift-AwayMD � � � � � � � � � � � � � � � � � � � � � � � � � � � � � 37
Utilisation du support � � � � � � � � � � � � � � � � � � � � � � � � � � � � � � � � � 39
Accessoires compatibles � � � � � � � � � � � � � � � � � � � � � � � � � � � � � � 41
Entretien � � � � � � � � � � � � � � � � � � � � � � � � � � � � � � � � � � � � � � � � � � � � 43
Vidange du récipient à poussière � � � � � � � � � � � � � � � � � � � � � � � � � 43
Nettoyage des filtres � � � � � � � � � � � � � � � � � � � � � � � � � � � � � � � � � � � � 44
Vérification de la présence d’obstructions � � � � � � � � � � � � � � � 45
Guide de dépannage � � � � � � � � � � � � � � � � � � � � � � � � � � � � � � � � � � 47
Garantie � � � � � � � � � � � � � � � � � � � � � � � � � � � � � � � � � � � � � � � � � � � � � 48
VEUILLEZ LIRE CE MANUEL
SOIGNEUSEMENT ET LE CONSERVER POUR
RÉFÉRENCE ULTÉRIEURE�
Ce manuel du propriétaire a été conçu pour vous
aider à acquérir une compréhension approfondie
de votre nouvel aspirateur Rotator Professional
Lift-Away de Shark.
Pour toute question, veuillez communiquer avec
le service à la clientèle au 1-800-798-7398.
CARACTÉRISTIQUES TECHNIQUES
Tension électrique: 120V, 60Hz
Watts: 1200W
Ampères: 10A
ENREGISTRER VOTRE ACHAT
sharkclean.com
1-800-798-7398
NOTER LES RENSEIGNEMENTS CI-DESSOUS
Numéro de modèle: ���������������������������������
Code de la date: ������������������������������������
Date d’achat (conserver le reçu): �����������������������
Magasin où l’appareil a été acheté : ��������������������
CONSEIL : Le numéro
de modèle est indiqué sur
la plaque signalétique qui
est située à l’arrière de
l’appareil.
CONSEIL : Le code de la
date est indiqué sur l’une
des broches du cordon
d’alimentation.

27 28
1-800-798-7398 sharkclean.com
FRANÇAIS
LA BUSE ÉLECTRIQUE, LE TUBE ET
LA POIGNÉE CONTIENNENT DES
RACCORDEMENTS ÉLECTRIQUES�
• Aucune de ces pièces ne nécessite d’entretien.
• N’utilisez pas cet aspirateur pour aspirer
des liquides.
• N’immergez pas l’aspirateur dans l’eau.
•
Cessez l’utilisation si la poignée ou le tube
sont endommagés.
1 Inspectez le cordon d’alimentation ou la
fiche pour déceler d’éventuels dommages.
N’UTILISEZ PAS l’aspirateur si le cordon
d’alimentation ou la fiche sont endommagés.
Fermez toutes les commandes avant de
brancher ou de débrancher l’aspirateur.
Rangez l’aspirateur en prenant soin
d’enrouler le cordon d’alimentation autour
des deux crochets à cordon.
2 N’UTILISEZ PAS l’appareil à l’extérieur ou
sur des surfaces humides. Utilisez l’appareil
uniquement sur des surfaces sèches.
3 Débranchez l’appareil de sa source
d’alimentation lorsqu’il n’est pas utilisé, et
avant d’entreprendre l’entretien.
4 Si l’aspirateur ne fonctionne pas comme
prévu, est tombé, a été endommagé, laissé à
l’extérieur ou est tombé dans l’eau, retournez-
le à SharkNinja Operating LLC aux fins
d’examen, de réparation ou d’ajustement.
5 Le boyau contient des fils électriques.
N’UTILISEZ PAS l’aspirateur s’il est
endommagé, coupé ou perforé.
6 NE TIREZ PAS ou NE TRANSPORTEZ PAS
l’aspirateur par le cordon d’alimentation ou
ne l’utilisez pas comme une poignée.
7 NE DÉBRANCHEZ PAS l’appareil en tirant
le cordon d’alimentation. Agrippez la fiche
et non le cordon.
8 NE MANIPULEZ PAS la fiche d’alimentation
électrique ou l’aspirateur avec des
mainshumides.
9 NE PASSEZ PAS l’aspirateur par-dessus le
cordon d’alimentation; ne fermez pas une
porte sur le cordon ou ne le tirez pas sur
des coins pointus.
10 L’utilisation d’une rallonge N’EST PAS
recommandée.
11 NE LAISSEZ PAS l’appareil sans
surveillance lorsqu’il est branché.
12 Gardez le cordon d’alimentation loin des
surfaces chaudes.
EMPLOI GÉNÉRAL
13 Utilisez seulement de la façon indiquée
dans ce manuel.
1 4 Veuillez garder votre zone de travail
bienéclairée.
15 L’aspirateur doit toujours être en
mouvement sur le tapis afin d’éviter
d’endommager les fibres.
16 NE PLACEZ PAS l’aspirateur sur des
surfaces instables comme des chaises ou
des tables.
17
N’INSÉREZ PAS d’objets dans les
ouvertures de l’appareil. N’UTILISEZ PAS
l’appareil si les ouvertures sont obstruées.
Veiller à ce que les ouvertures ne soient pas
bloquées par de la poussière, de la peluche,
des cheveux ou tout autre élément qui
pourrait gêner la circulation de l’air.
18
NE LAISSEZ PAS les jeunes enfants utiliser
l’aspirateur. Portez une attention particulière
lorsque l’appareil est utilisé à proximité
d’enfants. Cet appareil n’est pas un jouet.
19
NE PAS UTILISER si le récipient à poussière
ou les filtres ne sont pas en place.
RÉCIPIENT À POUSSIÈRE/FILTRES/
ACCESSOIRES
Avant de démarrer l’appareil:
20
Assurez-vous que les filtres sont complètement
secs après le nettoyage de routine.
21 Après avoir effectué l’entretien de routine,
vérifiez que le récipient à poussière et tous
les filtres sont bien en place.
22 Assurez-vous que les accessoires sont
exempts de toute obstruction.
23 Utilisez seulement les filtres et accessoires
de marque Shark (à défaut de quoi, la
garantie sera annulée).
ACCESSOIRES POUR BOYAU
24 NE PAS UTILISER si le débit d’air est
restreint; si la buse de plancher motorisée
ou les conduits d’air sont obstrués,
éteignez l’aspirateur et débranchez-le de la
prise de courant. Retirez toute obstruction
avant de remettre l’appareil en marche.
25 Tenez l’extrémité du boyau et les
ouvertures pour accessoires loin de votre
visage et de votre corps.
26 Gardez les accessoires de nettoyage et
les orifices d’aspiration éloignés de vos
cheveux, de votre figure, de vos doigts, de
vos pieds nus ou de vêtements amples.
2 7 N’utilisez que les accessoires
recommandés par le fabricant.
NETTOYAGE GÉNÉRAL
28 NE RAMASSEZ PAS de gros objets.
29 NE RAMASSEZ PAS de gros objets ou
des objets pointus comme du verre, des
clous, des vis ou de la monnaie, lesquels
pourraient endommager l’aspirateur.
30 N’UTILISEZ PAS l’aspirateur pour ramasser
de la poussière de cloison sèche, des
cendres de foyer ou de la braise. N’UTILISEZ
PAS l’aspirateur comme accessoire
d’équipement électrique de dépoussiérage.
31 NE RAMASSEZ PAS d’objets fumants ou
brûlants comme des braises chaudes, des
bouts de cigarettes ou des allumettes.
32
NE RAMASSEZ PAS de liquides inflammables
ou combustibles (p.ex. de l’essence à
briquets, du carburant ou du kérosène) ou
n’utilisez pas l’aspirateur dans des endroits
où ces produits peuvent être présents.
33
NE RAMASSEZ PAS de solutions toxiques
(p.ex. eau de javel, ammoniac ou
nettoyeur à drains).
34 N’UTILISEZ PAS l’aspirateur dans des
endroits clos où il y a des vapeurs
provenant de peinture, de diluants à
peinture, de substances antimites, de
la poussière inflammable ou tout autre
matériau explosif ou toxique.
35
NE PASSEZ PAS l’aspirateur sur aucun liquide.
36 NE PLONGEZ PAS l’aspirateur dans l’eau
ou tout autre liquide.
37 Soyez extrêmement prudent lorsque vous
nettoyez les escaliers.
FICHE POLARISÉE
Pour réduire le risque de décharge électrique,
cet aspirateur est muni d’une fiche polarisée
(une lame est plus large que l’autre). À des
fins de sécurité, cette fiche s’insère dans une
prise polarisée dans un seul sens. Si la fiche ne
s’insère pas entièrement dans la prise, inversez
la fiche. Si elle ne s’insère toujours pas,
communiquez avec un électricien accrédité.
NE FORCEZ PAS pour insérer la fiche dans la
prise, et ne tentez pas de la modifier.
CONSERVER CES INSTRUCTIONS
VEUILLEZ LIRE LES DIRECTIVES ATTENTIVEMENT AVANT L’UTILISATION�
CONSIGNES DE SÉCURITÉ IMPORTANTES
POUR USAGE DOMESTIQUE SEULEMENT
AVERTISSEMENT
Afin de réduire les risques de blessures, d’incendie, de décharge électrique
et de dommages matériels causés par une mauvaise utilisation de l’appareil,
veuillez suivre attentivement les instructions suivantes� Cet appareil contient
des raccordements électriques et des pièces mobiles pouvant exposer
l’utilisateur à certains risques�

29 30
1-800-798-7398 sharkclean.com
FRANÇAIS
APPRENDRE À CONNAÎTRE L’ASPIRATEUR
ROTATOR
MD
PROFESSIONAL LIFT-AWAY
MD
DE SHARK
MD
BIENVENUE!
Félicitations pour votre
achat. Utilisez ce mode
d’emploi pour en
apprendre davantage
sur les caractéristiques
fantastiques de votre
nouvel aspirateur.
De l’assemblage à
l’utilisation, en passant
par l’entretien, vous
trouverez tous les
renseignements que
vous cherchez ici. E F
H
C
G
Cord
Hook
Cord
Hook
Cord
Hook
Cord
Hook
Cord
Hook
K
I
A
B
D
J
L
M
UNITÉ PRINCIPALE
A Tuyau
B Régulateur d’aspiration
C Bouton de dégagement de la poignée
D Crochet d’enroulement du haut
E Bouton «Power» (mise en marche)
F Bouton Lift-AwayMD
G Bouton de marche-arrêt de la brosse rotative
H Bouton de dégagement du tube
I Tube
J Crochet d’enroulement du bas
K Buse de plancher motorisée
L Témoin lumineux de la brosse rotative
M Lumières

31 32
1-800-798-7398 sharkclean.com
FRANÇAIS
1 Placez le réceptacle
au-dessus de la buse
deplancher.
2 Glissez le tube dans la
base du réceptacle.
3 Insérez la poignée dans la partie supérieure
du tube. Puis, fixez le boyau à la base
duréceptacle.
4 Insérez les accessoires dans les pinces
pour accessoires, puis rentrez le boyau
entre les pinces.
ÉTAPE 1 ÉTAPE 2 ÉTAPE 3 ÉTAPE 4
CONSEIL : Pour accéder
rapidement au cordon,
faites pivoter vers le bas le
crochet du haut et retirez
le cordon.
CONSEIL : Pour ranger
l’aspirateur, enroulez
le cordon autour des
crochets à cordon.
ASSEMBLAGE
DE L’ASPIRATEUR

33 34
1-800-798-7398 sharkclean.com
FRANÇAIS
Brushroll
Indicator
UTILISATION DE L’ASPIRATEUR
EN POSITION VERTICALE
AVERTISSEMENT :
N’UTILISEZ PAS
l’aspirateur pour
ramasser de la poussière
de cloison sèche, des
cendres de foyer ou de
la braise� N’UTILISEZ
PAS l’aspirateur
comme accessoire
d’équipement électrique
de dépoussiérage�
QUE SIGNIFIE LE TÉMOIN
LUMINEUX DE LA
BROSSE ROTATIVE?
Vert fixe
La brosse rotative est en
marche et fonctionne comme
elle se doit.
Rouge fixe
Une obstruction a été
détectée dans la zone de
la brosse rotative. Éteignez
l’aspirateur, et retirez l’élément
qui cause l’obstruction.
Sans lumière
La brosse rotative est inactive.
Pour activer, appuyez sur
bouton «BRUSHROLL»
(brosse rotative). La lumière
devrait être verte et la brosse
rotative activée.
1 Branchez le cordon d’alimentation dans la prise. Placez le pied
sur la buse de plancher et inclinez la poignée vers l’arrière.
2 Appuyez sur «POWER» (mise en marche)
pour nettoyer les surfaces dures, les
carpettes ou au-dessus du sol. La brosse
rotative ne tourne pas dans ce mode.
REMARQUE : Pour un nettoyage en profondeur
conformément à la norme ASTM F608 (saleté incrustée
dans les tapis), veuillez vous assurer que la brosse
rotative soit activée et que le sélecteur de puissance
d’aspiration soit fermé.
3 Appuyez sur «POWER» (mise en
marche) et «BRUSHROLL» (brosse
rotative) pour nettoyer les tapis. Le
bouton «BRUSHROLL» (brosse rotative)
s’allume en vert. La brosse rotative
tournera seulement lorsque l’aspirateur
est incliné vers l’arrière et que le bouton
«BRUSHROLL» (brosse rotative) est vert.
ÉTAPE 1 ÉTAPE 2 ÉTAPE 3

35 36
1-800-798-7398 sharkclean.com
FRANÇAIS
Cord
Hook
MAX MIN
OU
1 Appuyez sur le bouton
de dégagement de
la POIGNÉE lorsque
vous devez nettoyer les
espaces restreints.
UTILISATION DE L’ASPIRATEUR EN MODE
NETTOYAGE AU-DESSUS DU SOL
2 Insérez le tube ou la poignée directement
dans l’accessoire désiré et tournez dans le
sens contraire pour relâcher l’accessoire.
3 Le collet est situé à la base du haut de la
poignée. Tournez le collet dans le sens
antihoraire pour réduire la puissance
d’aspiration. Pour fermer, tournez dans le
sens horaire afin de l’optimiser.
Appuyez sur le bouton du
TUBE sur le réceptacle
pour bénéficier d’une
longue portée.
ÉTAPE 1 ÉTAPE 2 ÉTAPE 3
OU
AVANTAGES DU
RÉGULATEUR
D’ASPIRATION
Le régulateur d’aspiration vous
permet de régler la puissance
d’aspiration lorsque vous
utilisez différents accessoires
ou passez l’aspirateur sur
différentes surfaces. Par
exemple, si vous sentez une
certaine résistance lorsque
vous passez l’aspirateur
sur du tapis épais ou des
articles rembourrés, réglez
le régulateur d’aspiration à
«MIN» contribuera à réduire
votre effort de traction et de
poussage.
Régulateur
d’aspiration

37 38
1-800-798-7398 sharkclean.com
FRANÇAIS
Cord
Hook
OU
1 Appuyez sur le bouton
LIFT-AWAY pour détacher
le réceptacle de la buse
de plancher.
UTILISATION DE L’ASPIRATEUR
EN MODE LIFT-AWAYMC
3 Sinon, vous pouvez appuyer sur le
bouton du TUBE pour bénéficier d’une
longueportée.
4 Fixez l’accessoire de nettoyage désiré à
l’extrémité de la poignée ou du tube.
A
VERTISSEMENT :
Assurez-vous d’avoir
une bonne stabilité
lorsque vous utilisez
le mode Lift-Away�
Toute utilisation où l’on
manquerait de stabilité
pourrait causer des
blessures corporelles�
CONSEIL : Tenez le
réceptacle en main pour
nettoyer en mode Lift-Away.
EN QUOI CONSISTE LE
MODE LIFT-AWAY?
Notre accessoire Lift-Away
vous permet de retirer le
réceptacle de la buse de
plancher afin de nettoyer
facilement les escaliers, les
surfaces surélevées à l’aide
d’accessoires, ou les surfaces
dures à l’aide des accessoires
prévus à cet effet.
2 Appuyez sur le bouton
de dégagement de la
POIGNÉE lorsque vous
devez nettoyer des
espaces restreints.
NETTOYAGE AVEC LIFT-AWAY
A página está carregando...
A página está carregando...
A página está carregando...
A página está carregando...
A página está carregando...
A página está carregando...
A página está carregando...
A página está carregando...
A página está carregando...
A página está carregando...
A página está carregando...
A página está carregando...
A página está carregando...
A página está carregando...
A página está carregando...
A página está carregando...
A página está carregando...
A página está carregando...
A página está carregando...
-
 1
1
-
 2
2
-
 3
3
-
 4
4
-
 5
5
-
 6
6
-
 7
7
-
 8
8
-
 9
9
-
 10
10
-
 11
11
-
 12
12
-
 13
13
-
 14
14
-
 15
15
-
 16
16
-
 17
17
-
 18
18
-
 19
19
-
 20
20
-
 21
21
-
 22
22
-
 23
23
-
 24
24
-
 25
25
-
 26
26
-
 27
27
-
 28
28
-
 29
29
-
 30
30
-
 31
31
-
 32
32
-
 33
33
-
 34
34
-
 35
35
-
 36
36
-
 37
37
-
 38
38
-
 39
39


Shark NV500 Series Rotator Professional Lift Away XL Vacuum Manual do usuário
- Categoria
- Aspirador de pó
- Tipo
- Manual do usuário