Philips BRL130/00 Manual do usuário
- Categoria
- Barbeadores femininos
- Tipo
- Manual do usuário
Este manual também é adequado para
A página está carregando...

ENGLISH
Introduction
Congratulations on your purchase and welcome
to Philips! To fully benet from the support that
Philips oers, register your product at
www.philips.com/welcome.
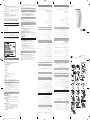
General description (Fig. 1)
1 Handle
2 On/o button
3 Charge indicator
4 Release button
5 Socket for small plug
6 Shaving head
7 Foil
8 Trimmers
9 Trimming comb
10 Skin stetcher cap (BRL140 only)
11 Soft glide cap (BRL140 only)
12 Cleaning brush
13 Adapter
Not shown: Pouch (BRL140 only)
Charging
Note: Charge the appliance fully before you use
it for the rst time.
Note: This appliance can only be used without cord.
To charge the appliance, insert the small plug into
the socket in the bottom of the appliance and put
the adapter in the wall socket.
- The charge indicator ashes white (Fig. 2):
the appliance is charging. Charging takes up to
8 hours.
- The charge indicator lights up white
continuously (Fig. 3): the appliance is fully
charged and has a cordless operating time up
to 60 minutes.
- The charge indicator does not light up when
the appliance is switched on: the appliance
contains enough energy to be used.
- The charge indicator ashes orange (Fig. 2):
the battery is almost empty and needs to be
charged.
Note: If the appliance is fully charged but still
connected to the mains, the charging light ashes a
few times when you press the on/o button.
This indicates that you should disconnect the
appliance from the mains before you can switch it on.
Using the appliance
Switching the appliance on and o
1 To switch on the appliance, press the on/o
button once (Fig. 4).
2 To switch o the appliance, press the on/o
button once more.
Attaching and detaching heads
1 To attach a head, press it onto the handle
(‚click‘) (Fig. 5).
2 To detach a head, press the release button on
the back of the appliance (Fig. 6).
Attaching and detaching accessories
1 To attach an accessory, align the indent in the
accessory with the notch on the attachment.
Then snap the accessory onto the attachment
(‚click‘) (Fig. 7).
2 To detach an accessory, grab its front and back
and pull it upwards o the attachment. (Fig. 8)
To detach a comb, do not pull at the front and
back but at the sides (Fig. 9).
Shaving and trimming
The appliance is suitable for use in the bath or
shower, but you can also use it dry. If you want to
use creams or body lotion, apply them after you
have used the appliance.
Note: The appliance can only be used without cord.
Note: When you use the appliance to trim hairs,
use it dry for the best result.
1 Place the appliance on your skin in such a
way that the attachment or accessory is in full
1contact with the skin (Fig. 10).
2 When you use the appliance on sensitive areas,
stretch the skin with your free hand. When you
use the appliance on your underarms, raise
your arm and put your hand on the back of
your head to stretch the skin (Fig. 11).
3 Move the appliance slowly against the direction
of hair growth (Fig. 12).
Note: If you move the appliance over your skin too
fast, you may not obtain a smooth result.
Shaving head
You can use the shaving head to shave your legs
and body.
Note: The appliance can be moved in two
directions, for easier shaving of underarms.
Note: Always check the foil before use. If it is
damaged in any way, replace the cutting unit right
away (see ‚Replacement‘).
Trimming comb
You can attach the trimming comb onto the
shaving head to trim hairs to a length of 3mm.
Skin stretcher cap (BRL140 only)
You can attach the skin stretcher cap onto the
shaving head to make the hairs stand upright
during shaving. This makes it easier to remove
them.
Soft glide cap (BRL140 only)
You can attach the soft glide cap onto the shaving
head to cover the back trimmer of the shaving
head for extra safety in curvy areas. The smooth
material makes it glide eortlessly over your skin.
Make sure that you attach the soft glide cap in
such a way that the back trimmer of the shaving
head is covered (Fig. 13).
Cleaning and storage
Keep the adapter dry.
1 Switch o the appliance.
2 Use the cleaning brush to brush away any hairs
that have collected under the trimmers of the
shaving head.
3 Pull the cutting unit out of the shaving head
(Fig. 14).
4 Clean all parts of the shaving head with the
cleaning brush, except the foil.
5 Rinse the cutting unit, shaving head and
accessories under the tap. Shake them rmly to
remove water drops.
6 Let all parts dry completely.
7 Place the cutting unit back into the shaving
head (‚click‘).
8 Put the trimming comb on the shaving head to
prevent damage to the shaving head when you
store it.
9 BRL140 only: Store the appliance, its heads and
accessories in the pouch.
Note: Lubricate trimmer teeth and foils with a drop
of sewing machine oil every six weeks for optimal
performance.
Replacement
To buy accessories or spare parts,
visit www.shop.philips.com/service or go to your
Philips dealer. You can also contact the Philips
Consumer Care Centre in your country (see the
worldwide guarantee leaet for contact details)
For optimal performance, we advise you to replace
the cutting unit of the shaving head every two
years. If you use the shaving head twice or more
times a week, replace the cutting unit more often.
Always replace the cutting unit with one of the
original type (BRL384).
한국의
소개
필립스 제품을 구입해 주셔서 감사합니다!
필립스가 드리는 지원 혜택을 최대한 누리시려면
www.philips.com/welcome에서 제품을
등록하십시오.
구성품 명칭(그림 1)
1 핸들
2 전원 버튼
3 충전 표시등
4 열림 버튼
5 소형 플러그 콘센트
6 쉐이빙 헤드
7 포일
8 트리머
9 트리밍 빗
10 피부 스트레처 캡(BRL140 모델만 해당)
11 소프트 글라이드 캡(BRL140 모델만 해당)
12 청소용 브러시
13 어댑터
그림 표시 안 됨: 파우치(BRL140 모델만 해당)
충전
참
고: 제품을 처음 사용하기 전에 완전히 충전하십시오.
참고: 이 제품은
무선으로만
작동됩니다.
제품을 충전하려면 소형 플러그를 제품 밑면의 소켓에
꽂고 어댑터를 벽면 콘센트에 연결하십시오.
- 충전 표시등이 흰색 (그림 2)으로 깜박이면 제품이
충전 중입니다. 충전 시간은 최대 8시간 걸립니다.
- 배터리 충전 표시등이 계속 흰색 (그림 3)으로
켜져 있으면 제품이 완전히 충전된 것이며 최대
60분간 무선으로 사용할 수 있습니다.
- 제품이 켜져 있을 때 충전 표시등에 불이 들어오지
않으면 제품이 완전히 충전된 것입니다.
- 충전 표시등이 주황색 (그림 2)으로 깜박이면
배터리가 거의 방전된 것이며 충전해야 합니다.
참고: 완전히 충전된 제품을 전원에 그대로 연결한
상태에서 전원 버
튼을 누르면 충전 표시등이 몇 차례
깜박입니다. 이것은 제품을 켜
려면 전원 콘센트에서
분리해야 한다는 뜻입니다.
제품 사용
제품 전원 켜기/끄기
1 제품의 전원을 켜려면 전원 버튼을 한 번 (그림 4)
누르십시오.
2 제품의 전원을 끄려면 전원 버튼을 한 번 더
누르십시오.
헤드 탈부착
1 헤드를 부착하려면 손잡이에 대고 누르십시오
(‚딸깍‘ 소리가 남) (그림 5).
2 헤드를 탈착하려면 제품 (그림 6) 뒷면의 열림
버튼을 누르십시오.
액세서리 탈부착
1 액세서리를 부착하려면 액세서리의 파인 부분을
어태치먼트의 홈에 맞추십시오. 그런 다음
액세서리를 어태치먼트에 끼우십시오(‚딸깍‘
소리가 남) (그림 7).
2 액세서리를 분리하려면 앞뒤를 잡고 위로 당겨
어태치먼트 (그림 8)에서 떼어 내십시오. 빗을
분리하려면 앞뒤로 당기지 말고 옆으로 (그림 9)
당기십시오.
면도 및 다듬기
이 제품은 목욕이나 샤워 중 사용하기에 적합하지만
건조 상태에서도 사용할 수 있습니다. 크림 또는 바디
로션은 제품을 사용한 뒤에 바르십시오.
참고: 이 제품은 무선으로만 작동됩니다.
참고: 이 제품으로 체모를 트리밍할 때는 건조한
상태에서 사용해야 최적의 효과를 얻을 수 있습니다.
1 어태치먼트 또는 액세서리가 피부 (그림 10)에
완전히 닿도록 제품을 피부에 대십시오.
2 민감한 부위에 제품을 사용할 경우, 면도기를
들지 않은 손으로 피부를 팽팽하게 당기십시오.
겨드랑이에 제품을 사용할 경우 팔을 들어올리고
손을 뒤통수에 대서 피부가 당겨지도록 합니다
(그림 11).
3 체모가 자라는 (그림 12) 반대 방향으로 제품을
천천히 움직이십시오.
참고: 피부 위에서 제품을 너무 빨리 움직이면
매끈하게 면도되지 않을 수도 있습니다.
쉐이빙 헤드
쉐이빙 헤드로 몸통과 다리도 제모할 수 있습니다.
참고: 이 제품은 양방향으로 움직일 수 있어
겨드랑이를 면도하기 쉽습니다.
참고: 사용하기 전에 포일을 항상 확인하십시오.
포일이 손상된 경우 절삭 단위를 바로 교체하십시오
(‚교체‘ 참조).
트리밍 빗
쉐이빙 헤드에 트리밍 빗을 부착하여 체모를 3mm
길이로 다듬을 수 있습니다.
피부 스트레처 캡(BRL140 모델만 해당)
피부 스트레처 캡을 쉐이빙 헤드에 부착하여 면도 중
체모가 위를 향하도록 만듭니다. 이렇게 하면 제모가
쉬워집니다.
소프트 글라이드 캡(BRL140 모델만 해당)
쉐이빙 헤드에 소프트 글라이드 캡을 부착하여 쉐이빙
헤드의 후면 트리머를 덮으면 굴곡 있는 부위를 더
안전하게 제모할 수 있습니다. 매끄러운 재질 덕분에
피부 위에서 부드럽게 움직입니다.
소프트 글라이드 캡을 부착할 때는 쉐이빙 헤드의
후면 트리머가 덮이도록 (그림 13) 하십시오.
세척 및 보관
충전기에 물이 묻지 않도록 주의하십시오.
1 제품 전원을 끄십시오.
2 쉐이빙 헤드의 트리머 아래에 모여 있는 체모를
청소용 브러시로 털어 내십시오.
3 쉐이빙 헤드 (그림 14)에서 커팅 유닛을 잡아당겨
빼십시오.
4 포일을 제외하고 쉐이빙 헤드의 모든 부분을
청소용 브러시로 청소하십시오.
5 커팅 유닛과 쉐이빙 헤드 및 액세서리를 수돗물로
세척하십시오. 세게 흔들어서 물을 털어 내십시오.
6 모든 부품을 완전히 자연 건조하십시오.
7 커팅 유닛을 쉐이빙 헤드에 다시 끼우십시오
(‚딸깍‘ 소리가 남).
8 쉐이빙 헤드에 트리밍 빗을 끼워서 쉐이빙 헤드가
손상되지 않도록 보관하십시오.
9 BRL140 모델만 해당: 제품과 헤드 및 액세서리를
파우치에 넣어 보관하십시오.
참고: 최적의 성능을 유지하기 위해 6주일마다
트리머의 날과 포일 부분에 재봉틀용 기름을 소량
바르십시오.
교체
액세서리 또는 예비 부품을 구입하려면
www.shop.philips.com/service를 방문하거나 필립스
대리점에 문의하십시오. 또한 해당 국가의 필립스
고객 상담실에 문의하셔도 됩니다(연락처 정보는 제품
보증서 참조).
최고의 성능을 얻으려면 2년에 한 번씩 쉐이빙 헤드의
커팅 유닛을 교체하는 것이 좋습니다. 쉐이빙 헤드를
1주일에 두 번 이상 사용할 경우 커팅 유닛을 그보다
자주 교체해야 합니다. 커팅 유닛은 반드시 정품으로
교체하여 사용하십시오(BRL384).
PORTUGUÊS DO BRASIL
Introdução
Parabéns pela sua compra e seja bem-vindo
à Philips! Para aproveitar todos os benefícios
oferecidos pelo suporte da Philips, registre seu
produto na página www.philips.com/welcome.
Descrição geral (Fig. 1)
1 Alça
2 Botão liga/desliga
3 Indicador de carga
4 Botão de liberação
5 Entrada para o plugue pequeno
6 Cabeça de corte
7 Lâmina
8 Aparadores
9 Pente para aparar
10 Tampa do esticador de pele (somente BRL140)
11 Tampa de deslize macio (somente BRL140)
12 Escova de limpeza
13 Adaptador
Não mostrado: Estojo (somente BRL140)
Carregamento
Nota: Carregue totalmente o aparelho antes de
usá-lo pela primeira vez.
Nota: Este aparelho só pode ser utilizado sem os.
Para carregar i aparelho, insira o pequeno plugue
na entrada localizada na parte inferior do aparelho
e conecte o adaptador à tomada elétrica.
- O indicador de carga pisca na cor branca (g. 2):
o aparelho está sendo carregado.
O carregamento leva até 8 horas.
- O indicador de carga acende na cor branca
continuamente (g. 3): o aparelho está
totalmente carregado e funciona por até
60 minutos desconectado da tomada.
- O indicador de carga não acende quando o
aparelho é ligado: o aparelho contém energia
suciente para usar.
- O indicador de carga pisca na cor laranja (g. 2):
a bateria está quase descarregada e precisa ser
carregada.
Nota: Se o aparelho estiver totalmente carregado
e permanecer conectado à tomada, a luz de
carregamento piscará algumas vezes quando você
pressionar o botão liga/desliga. Isso indica que o
aparelho deve ser desconectado da tomada antes
de ser ligado.
Utilização do aparelho
Como ligar e desligar o aparelho
1 Para ligar o aparelho, pressione o botão liga/
desliga uma vez (g. 4).
2 Para desligar o aparelho, pressione o botão
liga/desliga mais uma vez.
Encaixe e desencaixe das cabeças
1 Para encaixar uma cabeça, pressione-a no
cabo (você ouvirá um „clique“) (g. 5).
2 Para remover uma cabeça, pressione o botão
de liberação na parte traseira do aparelho
(g. 6).
Encaixe e desencaixe de acessórios
1 Para conectar um acessório, alinhe a
indentação do acessório ao entalhe do
aparador. Em seguida, encaixe o acessório ao
aparador („clique“) (g. 7).
2 Para remover um acessório, segure a parte
traseira e a frontal e puxe-o para cima
para removê-lo do aparador (g. 8). Para
desconectar um pente, não puxe as partes da
frente e de trás, puxe as laterais (g. 9).
Depilar e aparar
O aparelho é adequado para uso na banheira ou
no chuveiro, mas também pode ser usado seco.
Se você pretende usar cremes ou loções corporais,
aplique-os após usar o aparelho.
Nota: O aparelho só pode ser utilizado sem os.
Nota: Se deseja usar o aparelho para aparar pelos,
use-o seco para obter o melhor resultado.
1 Passe o aparelho na pele de modo que o
aparador ou acessório que totalmente em
contato com a pele (g. 10).
2 Quando você usa o aparelho em áreas
sensíveis, estique a pele com a mão que estiver
livre. Quando você usar o aparelho nas axilas,
levante o braço e coloque a mão na parte de
trás da cabeça para esticar a pele (g. 11).
3 Mova o aparelho lentamente, na direção
contrária ao crescimento dos pelos (g. 12).
Nota: Se você passar o aparelho sobre a pele
muito rapidamente, talvez não obtenha um bom
resultado.
Cabeça de corte
A cabeça de corte pode ser usada para depilar as
pernas e o corpo.
Nota: O aparelho pode ser movido em duas
direções para facilitar a depilação das axilas.
Nota: Verique sempre a lâmina antes de usar
o aparelho. Se ela tiver qualquer tipo de dano,
substitua a unidade de corte imediatamente
(consulte ‚Substituição‘).
Pente para aparar
Você pode conectar o pente aparador à cabeça de
corte para aparar os pelos a uma altura de 3 mm.
Tampa do esticador de pele (somente BRL140)
Você pode conectar a tampa do esticador de pele
à cabeça de corte para que os pelos quem na
posição vertical durante a depilação. Isso facilita a
remoção deles.
Tampa de deslize macio (somente BRL140)
Você pode conectar a tampa de deslize macio à
cabeça de corte para cobrir o aparador traseiro da
cabeça de corte para ter mais segurança em áreas
curvas. O material macio faz com que ele deslize
suavemente sobre sua pele.
Conecte a tampa de deslize macio de modo que o
aparador traseiro da cabeça de corte que coberto
(g. 13).
Limpeza e armazenamento
Mantenha o adaptador seco.
1 Desligue o aparelho.
2 Use a escova de limpeza para remover os pelos
acumulados sob os aparadores da cabeça de
corte.
3 Retire a unidade de corte da cabeça de corte
(g. 14).
4 Limpe todas as partes da cabeça de corte,
com exceção da lâmina, usando a escova de
limpeza.
5 Lave a unidade de corte, a cabeça de corte e
os acessórios em água corrente. Agite-os com
rmeza para remover as gotas de água.
6 Deixe todas as peças secarem por completo.
7 Coloque novamente a unidade de corte na
cabeça de corte (você ouvirá um „clique“).
8
Coloque o pente aparador na cabeça de corte
para evitar danos à cabeça de corte ao guardá-la.
9 Somente BRL140: Guarde o aparelho,
as cabeças e os acessórios no estojo.
Nota: Para que o desempenho seja ideal, lubrique
os dentes do aparador e as lâminas pingando uma
gota de óleo lubricante a cada seis semanas.
Substituição
Para comprar acessórios ou peças avulsas, acesse
www.shop.philips.com/service ou dirija-se até um
revendedor Philips. Você também pode entrar em
contato com a Central de Atendimento ao Cliente
Philips do seu país (consulte o folheto de garantia
mundial para ver as informações de contato)
Para obter o melhor desempenho, recomendamos
substituir a unidade de corte da cabeça de corte a
cada dois anos. Caso você use a cabeça de corte
duas ou mais vezes por semana, troque a unidade de
corte com mais frequência. Sempre substitua a
unidade de corte por outra do tipo original (BRL384).
IMPORTADO POR PHILIPS DO BRASIL LTDA.
AV. OTTO SALGADO, 250 - DISTR. INDUSTRIAL
CLÁUDIO GALVÃO NOGUEIRA
VARGINHA - MINAS GERAIS - CEP 37066-440 - CX.
POSTAL 311 - CNPJ(MF) 61 086 336/0144-06
FEITO NA CHINA
简体中文
介绍
感谢您的惠顾,欢迎光临飞利浦! 为了让您能充分享受
飞利浦提供的支持,请在 www.philips.com/welcome
上注册您的产品。
一般说明(图 1)
1 手柄
2 开/关按钮
3 充电指示灯
4 释放按钮
5 小插头插座
6 剃毛刀头
7 刀网
8 修剪器
9 修剪梳
10 皮肤拉紧器盖(仅 BRL140)
11 软滑盖(仅 BRL140)
12 清洁刷
13 适配器
未显示: 存储袋(仅 BRL140)
充电
注意: 首次使用之前,请为产品充满电。
注意: 本产品只能在不接电源的情况下使用。
要对产品进行充电,请将小插头插入产品底部的插孔
中,并将适配器插入墙上插座。
- 充电指示灯呈白色 (图 2)闪烁: 产品正在充电。
充电最长需 8 小时。
- 充电指示灯持续亮起白光 (图 3): 本产品已充满
电,可在不接电源的情况下工作长达 60 分钟。
- 当本产品处于打开状态时,充电指示灯不会亮起:
本产品所含电量足以完成剃毛。
- 充电指示灯呈橙色 (图 2)闪烁: 电池电量几乎耗
尽,需要进行充电。
注意: 如果本产品充满电后仍然连接在电源上,当您按
下开/关按钮时,充电指示灯会闪烁几次。 这表示在您
启动产品之前,应先断开产品电源。
使用本产品
打开或关闭产品
1 要打开本产品,请按一下 (图 4)开/关按钮。
2 要关闭本产品,请再按一下开/关按钮。
安装和拆卸刀头
1 要连接刀头,请将其推向手柄(听到“咔哒”
一声) (图 5)。
2 要拆卸刀头,请按下产品 (图 6)背面的释放按钮。
安装和拆卸配件
1 要安装配件,请将配件的凹痕对准附件上的槽口。
然后将配件扣合到附件上(听到“咔哒”一声)
(图 7)。
2 要拆卸一个配件,请抓住其正面和背面,向上将其
从附件 (图 8)上拔下。 要拆下修剪梳,请勿抓住其
正面和背面,而是要抓住其两侧 (图 9)将其拔下。
剃毛和修剪
本产品适合在沐浴或淋浴时使用,也可在干燥的情况下
使用。 如果您想使用乳霜或润肤乳,请在使用完本产
品后再涂抹。
注意: 本产品只能在不接电源的情况下使用。
注意: 当您使用本产品修剪毛发时,在毛发干燥的情况
下使用效果良好。
1 将产品放置在皮肤上,以使附件或配件充分地接触
皮肤 (图 10)。
2 在敏感部位使用本产品时,请用另外一只手来拉紧
您的皮肤。 当您在腋下部位使用本产品时,请抬起
手臂,将手置于脑后,使皮肤绷紧 (图 11)。
3 逆着毛发生长 (图 12)的方向缓慢移动本产品。
注意: 如果产品在皮肤上移动太快,您可能无法获得
顺滑的效果。
剃毛刀头
您可以使用剃毛刀头对腿部和身体进行剃毛。
注意: 为了更容易地剃除腋下的毛发,可以朝两个方向
移动本产品。
注意: 使用前,请务必检查刀网。 如果刀网有任何损
坏,请立即更换修剪部件(请参阅“更换”)。
修剪梳
您可以将修剪梳安装到剃毛刀头上,以便将毛发修剪成
3 毫米的长度。
皮肤拉紧器盖(仅 BRL140)
您可以将皮肤拉紧器盖套在剃毛刀头上,
使毛发在剃毛期间向上直立。 这样可以更轻松地剃毛。
软滑盖(仅 BRL140)
您可以将软滑盖安到剃毛刀头上,挡住剃毛刀头的背面
修剪器,以便更安全地对弯曲部位进行剃毛。 光滑的材
质使其可在皮肤表面毫不费力地顺畅滑过。
确保您安装的软滑盖能够挡住 (图 13)剃毛刀头的背面
修剪器。
清洁和存放
保持适配器干燥。
1 关闭产品。
2 用清洁刷清洁聚集在剃毛刀头修剪器下方的毛发。
3 把修剪组件从剃毛刀头 (图 14)中拉出。
4 使用清洁刷清洁剃毛刀头的所有部件
(不包括刀网)。
5 在水龙头下冲洗修剪部件、剃毛刀头和配件。
握紧并甩掉水份。
6 待所有部件完全干燥。
7
将修剪部件装回剃毛刀头(可听到“咔哒”一声)。
8 存放时,将修剪梳盖在剃毛刀头上,以防剃毛刀头
受损。
9 仅限 BRL140: 将产品、刀头及配件存放在存储袋
中。
注意: 为获得更好效果,每六个星期用一滴缝纫机油润
滑修剪器齿和刀网。
4222_003_0149_4_LF_A7_5x4_370x420mm_v1.indd 2 01/03/16 08:50
-
 1
1
-
 2
2


Philips BRL130/00 Manual do usuário
- Categoria
- Barbeadores femininos
- Tipo
- Manual do usuário
- Este manual também é adequado para
em outras línguas
- English: Philips BRL130/00 User manual
Artigos relacionados
-
Philips BRL160/00 Manual do usuário
-
-
Philips BRE640/00 Manual do usuário
-
Philips BRL170/00 Informação importante
-
Philips BRE640/00 Manual do usuário
-
Philips BRE610/00 Manual do usuário
-
-
-
Philips GC8652/80 Manual do usuário
-
Philips AT620/14 Manual do usuário