Hoover HBG750X Manual do usuário
- Categoria
- Exaustores
- Tipo
- Manual do usuário
Este manual também é adequado para

E
N
G
E
F
R
D
U
P
O
N
GLISH(
E
E
RMAN (
D
R
ENCH(F
U
TCH(NL
O
RTUGU
E
H
52
C
E
N)-------
-
D
E) -----
-
R)--------
-
)----------
-
E
SE(PT)
H
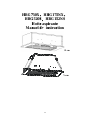
BG
7
HB
G
C
Ins
t
C
M
-
-----------
-
-----------
-
-
----------
-
-
-----------
-----------
-
7
50
X
G
520
S
C
oo
k
t
ruc
t
-----------
-
-
----------
-
-
-----------
-
-----------
-
-
-----------
X
,H
B
S
,H
B
k
er
H
t
ion
-
-----------
-
-----------
-
-
-----------
-
-----------
-
-----------
-
B
G1
7
B
G1
5
H
oo
d
Ma
n
-
----------
-
-
-----------
-----------
-
-
----------
-
-
-----------
-
7
5N
X
5
2N
S
d
n
ual
7
-
-----------
-
-----------
-
-
-----------
-
-----------
-
-
----------
-
X
,
S
7
5CM
-
----------
-
-
-----------
-----------
-
-
----------
-
-
-----------
-
-
---page
0
---page
0
-
---page
0
-
---page
0
-
--page
0
0
01
0
12
0
23
0
34
0
45

H
H
BG
7
HB
G
In
s
7
50
X
G
520
Co
o
s
tru
c
1
X
,H
B
S,
H
o
ker
c
tio
n
B
G1
7
H
BG
1
Ho
o
n
Ma
7
5N
X
1
52
N
o
d
nua
l
7
X
,
N
S
l
52cm
7
5cm

2
Content
1…………………………………..………………………………Safety instructions
2…………………………………..………………………………Installation
3…………………………………..………………………………Start using your cooker hood
4…………………………………..………………………………Troubleshooting
5…………………………………..………………………………Maintenance and cleaning
6…………………………………..………………………………Environment protection

3
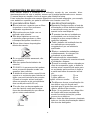
SAFETY INSTRUCTIONS
This manual explains the proper installation and use of your cooker hood,
please read it carefully before using even if you are familiar with the product.
The manual should be kept in a safe place for future reference.
These instructions shall also be available in an alternative format, e.g. on a
website or on request from the user in a format such as a DVD.
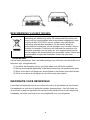
Never to do:
● D o not try to use the cooker hood
without the grease filters or if the filters
are excessively greasy!
●Do not install above a cooker with a
high level grill.
●Do not leave frying pans unattended
during use because overheated fats or
oils might catch fire.
●Never leave naked flames under the
cooker hood.
●If the cooker hood is damaged, do not
attempt to use.
●Do not flambé under the cooker hood.
●
CAUTION: Accessible parts may
become hot when used with cooking
appliances.
●
The minimum distance between the
supporting surface for the cooking
vessels on the hob and the lowest part
of the cooker hood. (When the cooker
hood is located above a gas appliance,
this distance shall be at least 65 cm)
●The air must not be discharged into a
flue that is used for exhausting fumes
from appliances burning gas or other
fuels.
Always to do:
● Important! Always switch off the
electricity supply at the mains during
installation and maintenance such as
light bulb replacement.
●The cooker hood must be installed in
accordance with the installation
instructions and all measurements
followed.
●All installation work must be carried
out by a competent person or qualified
electrician.
●Please dispose of the packing material
carefully. Children are vulnerable to it.
● P ay attention to the sharp edges
inside the cooker hood especially
during installation and cleaning.
●When the cooker hood is located
above a gas appliance,the minimum
distance between the supporting
surface for the cooking vessels on the
hob and the lowest part of the cooker
hood that distance must be:
Gas cookers: 75 cm
Electric cookers: 65 cm
Coal or oil cookers: 75 cm
●Make sure the ducting has no bends
sharper than 90 degrees as this will
reduce the efficiency of the cooker
hood.
●Warning: Failure to install the screws
or fixing device in accordance with
these instructions may result in
electrical hazards
●Warning: Before obtaining access to
terminals, all supply circuits must be
disconnected.

4
Always to do:
●Always put lids on pots and pans
when cooking on a gas cooker.
●When in extraction mode, air in the
room is being removed by the cooker
hood. Please make sure that proper
ventilation measures are being
observed. The cooker hood removes
odours from room but not steam.
●Cooker hood is for domestic use only.
●If the supply cord is damaged, it must
be replaced by the manufacturer, its
service agent or similarly qualified
persons in order to avoid a hazard.
●This appliance can be used by
children aged from 8 years and above
and persons with reduced physical,
sensory or mental capabilities or lack
of experience and knowledge if they
have been given supervision or
instruction concerning use of the
appliance in a safe way and
understand the hazards involved.
Children shall not play with the
appliance. Cleaning and user
maintenance shall not be made by
children without supervision.
●Warning: Before obtaining access to
terminals, all supply circuits must be
disconnected.
Always to do:
● Caution: The appliance and its
accessible parts can become hot
during operation. Be careful to avoid
touching the heating elements.
Children younger than 8 years old
should stay away unless they are
under permanent supervision.
● There shall be adequate ventilation of
the room when the cooker hood is
used at the same time as appliances
burning gas or other fuels.
●There is a fire risk if cleaning is not
carried out in accordance with the
instructions
●Regulations concerning the discharge
of air have to be fulfilled.
●Clean your appliance periodically by
following the method given in the
chapter MAINTENANCE.
●For safety reason, please use only the
same size of fixing or mounting screw
which are recommended in this
instruction manual.
●Regarding the details about the
method and frequency of cleaning,
please refer to maintenance and
cleaning section in the instruction
manual.
●Cleaning and user maintenance shall
not be made by children without
supervision.
●When the cooker hood and
appliances supplied with energy other
than electricity are simultaneously in
operation, the negative pressure in the
room must not exceed 4 Pa (4 x 10⁻⁵
bar).
●WARNING: Danger of fire: do not
store items on the cooking surfaces.
●
A steam cleaner is not to be used.
●
NEVER try to extinguish a fire with
water, but switch off the appliance and
then cover flame e.g. with a lid or a
fire blanket.

5
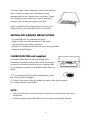
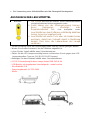
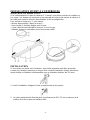
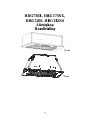
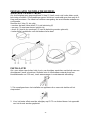
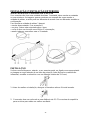
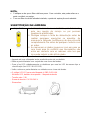
INSTALLATION (VENT OUTSIDE)
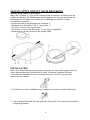
MOUNTING OF THE V-FLAP
If the cooker hood does not have an assembled V-flap 1, you should mount the half-
parts to its body.The images only show an example of how to mount the V-flap,the
outlet may be various according to different models and configuration.
To mount the V-flap 1 you should:
• Mount two half-parts 2 into the body 6
• a pin 3 should be top oriented;
• the axis 4 should be inserted in the holes 5 on body;
• repeat all the operations for the 2nd half-part
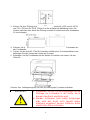
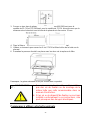
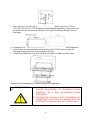
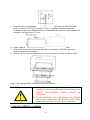
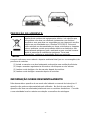
INSTALLATION
If you have an outlet to the outside, your cooker hood can be connected as below
picture by means of an extraction duct (enamel, aluminum, flexible pipe or inflammable
material with an interior diameter of 150mm)
1. Before installation, turn the unit off and unplug it from the outlet.
2. The cooker hood should be placed at a distance of 65~75cm above the cooking
surface for best effect.

6
3. Drill a hole in the cupboard, with hole wide 490*265(mm) for 52CM and
715*265(mm) for 75CM.Refer to pic below.Make sure the distance between the
edge of the hole and the edge of the cupboard edge is at least 35mm.
4. Remove the aluminum filter and remove the two front panel screws.
5. Use a screwdriver to secure the 8pcs ST4*18 screws and fix the hood body to the
cupboard.
6. Replace the front panel with the two screws and replace the filter.
Note:The expansion pipe is not included in the product.
WARNING:
For safety reason, please use only the same
size of fixing or mounting screw which are
recommended in this instruction manual.
Failure to install the screws or fixing device in
accordance with these instructions may result
in electrical hazards.
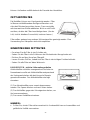
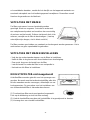
Start Using Your Cooker Hood

7
Toggle switch
There are 3 speeds for the motor and on off switch for the lamp.
1.Lamp – Turn on/off light
“O” – to switch off light
“I” – to switch on light
Power – Slide out drawer, power on; slide in drawer, power off.
2 .Speed –select speed to suit cooking conditions
“O” – to switch off motor
Low( I )– light frying/boiling
Medium( II ) – frying/wok cooking/heavy boiling
High ( III ) – grilling, intensive frying and wok cooking
Power – Slide out drawer, power on; slide in drawer, power off.
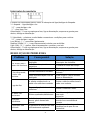
TROUBLESHOOTING
Fault Possible Cause Solution
Light on, but motor
does not work
Fan switch turned off Select a fan switch position.
Fan switch failed Contact service center.
Motor failed Contact service center.
Light does not
work, motor does
not work
House fuses blown Reset/Replace fuses.
Power cord loose or
disconnected
Refit cord to power outlet.
Switch power outlet on.
Oil leakage
One way valve and the outlet
are not tightly sealed
Take down the one way valve
and seal with sealant.
Leakage from the connection of
chimney and cover
Take chimney down and seal.
Lights not working Broken/Faulty globes
Replace globes as per this
instruction.
Insufficient suction
The distance between the
cooker hood and the gas top is
too far
Refit the cooker hood to the
correct distance.
The Cooker hood
inclines
The fixing screw not tight
enough
Tighten the hanging screw and
make it horizontal.
NOTE:
Any electrical repairs to this appliance must conform to your local, state and
federal laws.Please contact the service centre if in any doubt before

8
undertaking any of the above.Always disconnect the unit from the power source when
opening the unit.
MAINTENANCE AND CLEANING
Caution:
• Before maintenance or cleaning is carried out, the cooker hood
should be disconnected from the main power supply. Ensure that
the cooker hood is switched off at the wall socket and the plug
removed.
• External surfaces are susceptible to scratches and abrasions, so please follow the
cleaning instructions to ensure the best possible result is achieved without damage.
GENERAL
Cleaning and maintenance should be carried out with the appliance cold especially
when cleaning.Avoid leaving alkaline or acid substances (lemon juice, vinegar etc.) on
the surfaces.
STAINLESS STEEL
The stainless steel must be cleaned regularly (e.g.weekly) to ensure long life
expectancy.Dry with a clean soft cloth. A specialized stainless steel cleaning fluid may
be used.
NOTE:
Ensure that wiping is done along with the grain of the stainless steel to prevent any
unsightly crisscross scratching patterns from appearing.
CONTROL PANEL SURFACE
The inlay control panel can be cleaned using warm soapy water. Ensure the cloth is
clean and well wrung before cleaning. Use a dry soft cloth to remove any excess
moisture left after cleaning.
Important
Using neutral detergents and avoid using harsh cleaning chemicals, strong household
detergents or products containing abrasives,as this will affect the appliance
appearance and potentially remove any printing of artwork on the control panel and
will void manufactures warrantee.
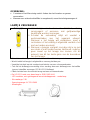
GREASE MESH FILTERS

9
The mesh filters can be cleaned by hand. Soak them for
about 3 minute in water with a grease-loosening
detergent then brush it gently with a soft brush. Please
do not apply too much pressure, avoid to damage it .
(Leave to dry naturally out of direct sun light)
Filters should be washed separately to crockery and
kitchen utensils. it is advisable not to use rinse aid.
INSTALLING GREASE MESH FILTERS
• To install filters for the following four steps .
- Angle the filter into slots at the back of the hood.
- Push the button on handle of the filter.
- Release the handle once the filter fits into a resting position.
- Repeat to install all filters.
CARBON FILTER-not supplied
Activated carbon filter can be used to trap odors.
Normally the activated carbon filter should be changed
at three or six months according to your cooking habit.
The installation procedure of activated carbon filter is as
below.
(1) The aluminum filter should be detached first. Press
the lock and pull it downward.
(2) Take out the carbon filter by rotating the carbon filter anti-clockwise.
(3) Replace the new carbon filter.
NOTE:
Make sure the filter is securely locked. Otherwise, it would loosen and cause
dangerous.
When activated carbon filter attached, the suction power will be lowered.

10
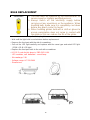
BULB REPLACEMENT
Important :
The bulb must be replaced by the manufacturer, its
service agent or similarly qualified persons.
Always switch off the electricity supply before
carrying out any operations on the appliance. When
handling bulb, make sure it is completely cool down
before any direct contact to hands.
When handling globes hold with a cloth or gloves to
ensure perspiration does not come in contact with
the globe as this can reduce the life of the globe.
• Switch the unit off and pull out the plug first.
• Wait until the light bulb is cooled down before replacement.
• Remove the front part with the aid of screwdriver.
• Pull out the LED light carefully and replace with the same type and rated LED light
(2*2W LSD-B LED light)
• Replace the front part back to the unit with screwdriver.
• ILCOS D code for this lamp is: DBR-2/65-H-64
– LED modules, self- ballasted – round lamp
– Max wattage: 2 W
– Voltage range: AC 220-240V
– Dimensions:

11
ENVIRONMENTAL PROTECTION:
This product is marked with the symbol on the selective sorting of
waste electronic equipment. This means that this product must not
be disposed of with household waste but must be supported by a
system of selective collection in accordance with Directive
2012/19/EU. It will then be recycled or dismantled to minimize
impacts on the environment, electrical and electronic products are
potentially dangerous for the environment and human health due to
the presence of hazardous substances.For more information, please
contact your local or regional authorities.
NOTE:
The following shows how to reduce total environmental impact (e.g. energy use) of the
cooking process).
(1) Install the cooker hood in a proper place where there is efficient ventilation.
(2) Clean the cooker hood regularly so as not to block the airway.
(3) Remember to switch off the cooker hood light after cooking.
(4) Remember to switch off the cooker hood after cooking.
INFORMATION FOR DISMANTLING
Do not dismantle the appliance in a way which is not shown in the user manual. The
appliance could not be dismantled by user. At the end of life, the appliance should
not be disposed of with household waste. Check with you Local Authority or retainer
for recycling advice.

H
H
H
BG7
5
H
B
G
Be
d
5
0X,
G
520
S
Abz
u
d
ienu
n
12
HB
S
,H
B
u
gsh
a
n
gsh
a
G17
5
B
G1
5
a
ube
a
ndb
u
5
NX,
5
2NS
u
ch
5
2
75
2
cm
cm

13
Inhalt
1…………………………………..………………………………Sicherheitshinweise
2………………………………………………………Installation
3………………………………………………………Inbetriebnahme der Abzugshaube
4………………………………………………………Fehlerbehebung
5………………………………………………………Wartung und Reinigung
6………………………………………………………Umweltschutz

14
SICHERHEITSHINWEISE
Dieses Handbuch beschreibt die ordnungsgemäße Installation und die Verwendung der
Dunstabzugshaube. Lesen Sie die Bedienungsanleitung daher sorgfältig durch, auch
wenn Sie das Produkt bereits kennen. Das Handbuch sollte für zukünftige
Nachschlagezwecke gut aufbewahrt werden.
Diese Hinweise werden auch in einem Alternativformat, z. B. auf einer Website oder auf
Verbraucheranfrage auch auf einer DVD bereitgestellt.
Was Sie auf keinen Fall tun
sollten:
● Lassen Sie die Abzugshaube nicht ohne
Fettfilter oder wenn diese übermäßig fettig
sind laufen.
●Nicht über einem Herd mit hochgelagertem
Grill aufhängen.
●Bratpfannen mit heißem Fett nicht
unbeaufsichtigt lassen, weil dieses Feuer
fangen könnte.
●Kein offenes Feuer unter der
Abzugshaubeentzünden.
●Abzugshaube außer Betrieb nehmen,
wenn sie beschädigt ist.
●Keine Gerichte unter der Abzugshaube
flambieren.
●ACHTUNG: Es kann sein, dass bestimmte
Teile der Abzugshaube beim Kochen heiß
werden.
●Mindestabstand zwischen Kochfeld und
Unterteil der Abzugshaube einhalten.
(Wird die Abzugshaube über einem
Gasherd angebracht, sollte der Abstand
mindestens 65 cm betragen.)
●Die Abluft darf nicht in einen Rauchfang
geleitet werden, der auch für die Abgase
einer Gas- oder Ölheizung verwendet wird.
Was Sie immer tun sollten:
● Wichtig! Trennen Sie das Gerät vor der
Installation und Wartung (Austausch einer
Glühbirne) immer von der
Stromversorgung.
●Die Abzugshaube muss gemäß der
Installationsanleitung aufgehängt und alle
Maße müssen eingehalten werden.
●Sämtliche Installationsarbeiten müssen
durch einen Fachmann oder qualifizierten
Elektriker vorgenommen werden.
●Verpackungsmaterial ordentlich entsorgen.
Es kann für Kinder gefährlich werden.
● Bei der Installation und Reinigung auf
scharfe Kanten im Inneren der
Abzugshaube achten.
●Wird die Abzugshaube über einem
Gasherd angebracht, muss der
Mindestabstand zwischen Kochtöpfen und
Unterteil der Abzugshaube wie folgt sein:
Gasherd: 75 cm
Elektroherd: 65 cm
Mit Kohle oder Öl befeuerte Herde: 75 cm
●Darauf achten, dass der Abluftkanal keine
Knicke hat, die 90 Grad überschreiten, da
dies die Effizienz der Abzugshaube
reduziert.
●Warnung: Werden Schrauben nicht richtig
festgezogen oder wird das Gerät nicht
gemäß dieser Anleitung eingebaut,
können Gefahren durch elektrischen
Strom entstehen.
●Warnung: Bevor mögliche Anschlüsse
zugänglich werden, müssen sämtliche
Stromzuleitungen getrennt werden.

15
Was Sie immer tun sollten:
●Töpfe und Pfannen beim Kochen auf
einem Gasherd immer mit einem Deckel
schließen.
●Ist die Abzugshaube eingeschaltet, wird
die Raumluft abgesaugt. Achten Sie
darauf, dass für eine ausreichende
Belüftung gesorgt ist. Die Abzugshaube
saugt Gerüche ab, aber keinen
Wasserdampf.
●Die Abzugshaube ist ausschließlich für
den Hausgebrauch bestimmt.
●Falls das Netzkabel beschädigt ist,
wenden Sie sich bitte an den Hersteller,
seinen Kundendienst oder ähnlich
qualifizierte Personen, um es zu ersetzen
und eine Gefährdung zu vermeiden.
●Dieses Gerät kann von Kindern ab 8
Jahren und Personen mit eingeschränkten
körperlichen, sensorischen oder geistigen
Fähigkeiten oder mangelnder Erfahrung
und mangelndem Wissen benutzt werden,
wenn diese in die sichere Bedienung des
Geräts eingewiesen wurden oder
beaufsichtigt werden. Kinder dürfen nicht
mit dem Gerät spielen. Reinigung und
Pflege darf nicht von Kindern ohne
Aufsicht erfolgen.
●Warnung: Bevor mögliche Anschlüsse
zugänglich werden, müssen sämtliche
Stromzuleitungen getrennt werden.
Was Sie immer tun sollten:
●Achtung: Das Gerät und zugängliche Teile
können während des Betriebs heiß
werden. Seien Sie daher vorsichtig, wenn
Sie diese Teile berühren müssen. Kinder
unter acht Jahren sollten vom Gerät
ferngehalten werden, es sei denn, sie
werden permanent beaufsichtigt.
● Für ausreichende Belüftung sorgen, wenn
die Abzugshaube zusammen mit Geräten
betrieben wird, die Gas oder Benzin
verbrennen.
●Es besteht ein Brandrisiko, wenn die
Reinigung nicht entsprechend dieser
Anweisungen durchgeführt wird.
●Vorschriften zur Abluft müssen befolgt
werden.
●Reinigen Sie das Gerät regelmäßig
entsprechend der Anweisungen im Kapitel
WARTUNG.
●Verwenden Sie aus Sicherheitsgründen für
die Montage nur Schrauben in der Größe,
die in diesem Handbuch empfohlen wird.
●Eine detaillierte Anweisung zur Reinigung
und deren Häufigkeit finden Sie im
Abschnitt „Wartung und Reinigung“ im
Bedienungshandbuch.
●Die Reinigung und Wartung des Gerätes
darf von Kindern nicht ohne Aufsicht
durchgeführt werden.
●
Wird die Abzugshaube zusammen mit
Geräten betrieben, die nicht durch Strom,
sondern durch andere Energiequellen
versorgt werden, darf der Unterdruck im
Raum 4 Pa (4 x 10⁻⁵ bar) nicht
übersteigen.
●
WARNUNG: Feuergefahr: Keine
Gegenstände auf Kochfeldern ablegen.
● Keinen Dampfreiniger verwenden.
●Löschen Sie ein Feuer NIEMALS mit
Wasser, sondern schalten Sie das Gerät
aus und decken die Flammen dann ab, z.
B. mit einem Deckel oder einer
Löschdecke.

16
INSTALLATION (ABLUFT NACH DRAUSSEN)
MONTAGE DER V-KLAPPE
Wenn die V-Klappe „1“ nicht an der Abzugshaube montiert ist, montieren Sie die
Hälften am Korpus. Die Abbildungen dienen lediglich der Veranschaulichung der
Montage einer V-Klappe. Der Auslass kann abhängig vom Modell und der
Konfiguration variieren.
Vorgehensweise für die Montage der V-Klappe 1:
• Montieren Sie die beiden Teile „2“ am Korpus „6“.
• Der Stift „3“ muss nach oben zeigen.
• Die Achse „4“ wird in die Öffnungen „5“ am Korpus eingeführt.
• Wiederholen Sie die Schritte für die zweite Hälfte
INSTALLATION
Wenn eine Maueröffnung nach draußen vorhanden ist, kann die Abzugshaube wie
unten gezeigt über einen Abluftkanal (Emaille, Aluminium, flexibles Rohr aus
unbrennbarem Material mit einem Innendurchmesser von 150 mm) an diese
angeschlossen werden
1. Schalten Sie vor der Installation das Gerät aus und ziehen Sie den Netzstecker.
2. Die Abzugshaube sollte für eine optimale Leistung 65-75 cm über der Kochfläche
aufgehängt werden.

17
3. Bohren Sie eine Öffnung in den Schrank, Öffnungsbreite 49 x 265 mm für 52CM
und 715 x 265 mm für 75CM. Ziehen Sie die vorstehende Abbildung hinzu. Die
Distanz zwischen dem Rand der Öffnung und dem Schrankrand muss mindestens
35 mm betragen.
4. Nehmen Sie den Aluminiumfilter heraus und lösen Sie die beiden Schrauben von
der Frontblende.
5. Sichern Sie die acht (8) ST4x18-Schrauben mithilfe eines Schraubendrehers und
befestigen Sie den Korpus der Haube am Schrank.
6. Befestigen Sie die Frontblende mit den beiden Schrauben und setzen Sie den
Filter ein.
Hinweis: Das Verlängerungsrohr ist nicht im Umfang des Produktes enthalten.
WARNUNG:
Verwenden Sie aus Sicherheitsgründen für die
Montage nur Schrauben in der Größe, die in
diesem Handbuch empfohlen wird.
Werden Schrauben nicht richtig festgezogen
oder wird das Gerät nicht gemäß dieser
Anleitung eingebaut, können Gefahren durch
elektrischen Strom entstehen.

18
Inbetriebnahme der Abzugshaube
Wechselschalter
Es gibt einen Schalter für die drei Lüftergeschwindigkeiten und einen zum Ein- und
Ausschalten der Lampe.
1. Lampe - Licht ein-/ausschalten
“O” – Licht ausschalten
“I” – Licht einschalten
Strom - Schublade herausziehen, einschalten, Schublade einschieben, ausschalten.
2. Geschwindigkeit - Geschwindigkeitsauswahl passend zum Garvorgang
“O” – Motor ausschalten
Schwach (I) - schwaches Braten/Kochen
Mittel (II) - Braten, Garen im Wok, starkes Kochen
Hoch (III) - Grillen, intensives Braten und Garen im Wok
Strom - Schublade herausziehen, einschalten, Schublade einschieben, ausschalten.
FEHLERBEHEBUNG
FEHLER Mögliche Ursachen Lösung
Licht an, aber
Motor läuft nicht.
Ventilator ist ausgeschaltet.
Lüftergeschwindigkeit
auswählen.
Lüfterschalter defekt.
Kundendienstzentrum
kontaktieren.
Motor läuft nicht.
Kundendienstzentrum
kontaktieren.
Licht und Motor
funktionieren nicht.
Stromsicherung ist
durchgebrannt.
Sicherungen wieder
einschalten/austauschen.
Stromkabel ist lose oder nicht
angeschlossen.
Kabel wieder in die Steckdose
stecken.
Stromversorgung einschalten.
Es tritt Öl aus.
Rückschlagventil und Auslass
sind nicht dicht.
Rückschlagventil abnehmen und
mit Dichtmaterial abdichten.
Verbindung zwischen Abzug
und Abzugshaube ist undicht.
Abzug abnehmen und abdichten.
Licht funktioniert
nicht.
Defekte/fehlerhafte Glühbirnen
Glühbirnen gemäß dieser
Anweisung austauschen.
Absaugen nicht
stark genug.
Abstand zwischen
Abzugshaube und Kochfeld ist
zu groß.
Abzugshaube erneut mit dem
richtigen Abstand anbringen.

19
Abzugshaube
hängt herunter.
Befestigungsschraube ist nicht
fest.
Schraube anziehen, sodass die
Abzugshaube wieder gerade
hängt.
HINWEIS:
Alle elektrischen Reparaturen dieses Geräts müssen der geltenden regionalen
und bundesweiten Gesetzgebung entsprechen. Wenn Sie Zweifel haben,
kontaktieren Sie den Kundendienst, bevor sie die oben stehenden Maßnahmen
durchführen. Gerät immer zuerst von der Stromversorgung trennen, bevor das
Gehäuse geöffnet wird.
WARTUNG UND REINIGUNG
Vorsicht:
• Vor der Wartung oder Reinigung die Abzugshaube von der
Stromversorgung trennen. Überprüfen Sie, ob die Abzugshaube
ausgeschaltet ist und ob der Stecker aus der Steckdose gezogen
ist.
• Da die äußeren Oberflächen empfindlich für Kratzer sind, befolgen Sie diese
Reinigungshinweise für ein optimales Ergebnis ohne Beschädigungen.
ALLGEMEINES
Die Reinigung und Wartung sollte erfolgen, wenn das Gerät abgekühlt ist. Keine
Alkali- oder säurehaltigen Mittel (Zitronensaft, Essig usw.) auf der Oberfläche
hinterlassen.
EDELSTAHL
Die Oberfläche aus Edelstahl muss regelmäßig (z. B. wöchentlich) gereinigt werden,
damit sie lange hält. Mit einem weichen Tuch abtrocknen. Es kann ein spezieller
Edelstahlreiniger verwendet werden.
HINWEIS:
Wischen Sie immer in der Richtung der Körnung des Edelstahls, sodass keine
unschönen Kratzmuster entstehen.
OBERFLÄCHE DES BEDIENFELDS
Das eingelassene Bedienfeld kann mit warmem Seifenwasser gereinigt werden. Das
saubere Tuch vor dem Reinigen gut ausdrücken. Restliche Feuchtigkeit mit einem
weichen trockenen Tuch abreiben.
Wichtig
Verwenden Sie neutrale Reinigungsmittelund keine aggressiven Chemikalien oder
Scheuermittel, da diese das Aussehen des Geräts verändern und Aufdrucke entfernen
A página está carregando ...
A página está carregando ...
A página está carregando ...
A página está carregando ...
A página está carregando ...
A página está carregando ...
A página está carregando ...
A página está carregando ...
A página está carregando ...
A página está carregando ...
A página está carregando ...
A página está carregando ...
A página está carregando ...
A página está carregando ...
A página está carregando ...
A página está carregando ...
A página está carregando ...
A página está carregando ...
A página está carregando ...
A página está carregando ...
A página está carregando ...
A página está carregando ...
A página está carregando ...
A página está carregando ...
A página está carregando ...
A página está carregando ...
A página está carregando ...
A página está carregando ...
A página está carregando ...
A página está carregando ...
A página está carregando ...
A página está carregando ...
A página está carregando ...
A página está carregando ...
A página está carregando ...
A página está carregando ...
-
 1
1
-
 2
2
-
 3
3
-
 4
4
-
 5
5
-
 6
6
-
 7
7
-
 8
8
-
 9
9
-
 10
10
-
 11
11
-
 12
12
-
 13
13
-
 14
14
-
 15
15
-
 16
16
-
 17
17
-
 18
18
-
 19
19
-
 20
20
-
 21
21
-
 22
22
-
 23
23
-
 24
24
-
 25
25
-
 26
26
-
 27
27
-
 28
28
-
 29
29
-
 30
30
-
 31
31
-
 32
32
-
 33
33
-
 34
34
-
 35
35
-
 36
36
-
 37
37
-
 38
38
-
 39
39
-
 40
40
-
 41
41
-
 42
42
-
 43
43
-
 44
44
-
 45
45
-
 46
46
-
 47
47
-
 48
48
-
 49
49
-
 50
50
-
 51
51
-
 52
52
-
 53
53
-
 54
54
-
 55
55
-
 56
56


Hoover HBG750X Manual do usuário
- Categoria
- Exaustores
- Tipo
- Manual do usuário
- Este manual também é adequado para
em outros idiomas
- français: Hoover HBG750X Manuel utilisateur
- English: Hoover HBG750X User manual
- Nederlands: Hoover HBG750X Handleiding
- Deutsch: Hoover HBG750X Benutzerhandbuch
Artigos relacionados
Outros documentos
-
Candy CBT625/2X/1/4U Manual do usuário
-
-
-
Valberg CH 60 2M W 302C Manual do usuário
-
Brandt DHD365XP1 Manual do proprietário
-
Candy CVMI900X Manual do usuário
-
Belling 90 DCH Manual do proprietário
-
 Elin EWH60 Manual do proprietário
-
 De Dietrich DHD1177X Manual do proprietário
-
 De Dietrich 4CFB-90X Manual do proprietário


