Yamaha AVANT GRAND N-2 Manual do usuário
- Categoria
- Pianos digitais
- Tipo
- Manual do usuário

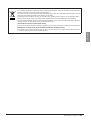
Before using this instrument, be sure to read “PRECAUTIONS”
on pages 6 – 7.
N3: When assembling or transporting the unit, consult a
qualified AvantGrand dealer. (Refer to page 41 for the assembly
instructions.)
Achten Sie darauf, vor Einsatz dieses Instruments die
„VORSICHTSMASSNAHMEN“ auf Seiten 6-7 durchzulesen.
N3: Wenden Sie sich bezüglich Zusammenbau und Transport
des Gerätes an einen qualifizierten AvantGrand-Händler. (Lesen
Sie auf Seite 41 für Anweisungen zur Montage.)
Avant d'utiliser cet instrument, lisez attentivement la section
« PRÉCAUTIONS D'USAGE » aux pages 6-7.
N3: Lors de l'assemblage ou du transport de l'unité, consultez un
revendeur qualifié AvantGrand. (Reportez-vous à la page 41
pour obtenir des instructions sur le montage.)
Antes de utilizar el instrumento, lea la sección
“PRECAUCIONES”, en las páginas 6-7.
N3: Al montar o transportar la unidad, consulte a un distribuidor
cualificado de AvantGrand. (Consulte las instrucciones de
montaje en la página 41.)
ES
FR
DE
EN
Owner’s Manual
Bedienungsanleitung
Mode d’emploi
Manual de instrucciones
ENGLISHDEUTSCH
FRANÇAIS
ESPAÑOL

2 • N3/N2 Owner’s Manual
SPECIAL MESSAGE SECTION
PRODUCT SAFETY MARKINGS: Yamaha electronic
products may have either labels similar to the graphics
shown below or molded/stamped facsimiles of these graph-
ics on the enclosure. The explanation of these graphics
appears on this page. Please observe all cautions indicated
on this page and those indicated in the safety instruction sec-
tion.
See bottom of Keyboard enclosure for graphic symbol markings.
The exclamation point within the equi-
lateral triangle is intended to alert the
user to the presence of important operat-
ing and maintenance (servicing) instruc-
tions in the literature accompanying the
product.
The lightning flash with arrowhead sym-
bol, within the equilateral triangle, is
intended to alert the user to the presence
of uninsulated “dangerous voltage”
within the product’s enclosure that may
be of sufficient magnitude to constitute a
risk of electrical shock.
IMPORTANT NOTICE: All Yamaha electronic products
are tested and approved by an independent safety testing
laboratory in order that you may be sure that when it is prop-
erly installed and used in its normal and customary manner,
all foreseeable risks have been eliminated. DO NOT modify
this unit or commission others to do so unless specifically
authorized by Yamaha. Product performance and/or safety
standards may be diminished. Claims filed under the
expressed warranty may be denied if the unit is/has been
modified. Implied warranties may also be affected.
SPECIFICATIONS SUBJECT TO CHANGE: The
information contained in this manual is believed to be cor-
rect at the time of printing. However, Yamaha reserves the
right to change or modify any of the specifications without
notice or obligation to update existing units.
ENVIRONMENTAL ISSUES: Yamaha strives to produce
products that are both user safe and environmentally
friendly. We sincerely believe that our products and the pro-
duction methods used to produce them, meet these goals. In
keeping with both the letter and the spirit of the law, we
want you to be aware of the following:
Battery Notice: This product MAY contain a small non-
rechargeable battery which (if applicable) is soldered in
place. The average life span of this type of battery is approx-
imately five years. When replacement becomes necessary,
contact a qualified service representative to perform the
replacement.
Warning: Do not attempt to recharge, disassemble, or incin-
erate this type of battery. Keep all batteries away from chil-
dren. Dispose of used batteries promptly and as regulated by
applicable laws. Note: In some areas, the servicer is required
by law to return the defective parts. However, you do have the
option of having the servicer dispose of these parts for you.
Disposal Notice: Should this product become damaged
beyond repair, or for some reason its useful life is consid-
ered to be at an end, please observe all local, state, and fed-
eral regulations that relate to the disposal of products that
contain lead, batteries, plastics, etc.
NOTICE: Service charges incurred due to lack of knowl-
edge relating to how a function or effect works (when the
unit is operating as designed) are not covered by the manu-
facturer’s warranty, and are therefore the owners responsi-
bility. Please study this manual carefully and consult your
dealer before requesting service.
NAME PLATE LOCATION: The graphic below indicates
the location of the name plate. The model number, serial
number, power requirements, etc., are located on this plate.
You should record the model number, serial number, and the
date of purchase in the spaces provided below and retain this
manual as a permanent record of your purchase.
Model
Serial No.
Purchase Date
CAUTION
RISK OF ELECTRIC SHOCK
DO NOT OPEN
CAUTION: TO REDUCE THE RISK OF ELECTRIC SHOCK.
DO NOT REMOVE COVER (OR BACK).
NO USER-SERVICEABLE PARTS INSIDE.
REFER SERVICING TO QUALIFIED SERVICE PERSONNEL.
N3 N2
92-469- ➀ (bottom)

N3/N2 Owner’s Manual • 3
The above warning is located on the bottom of the unit.
Explanation of Graphical Symbols
The lightning flash with arrowhead symbol
within an equilateral triangle is intended to alert
the user to the presence of uninsulated
“dangerous voltage” within the product’s
enclosure that may be of sufficient magnitude to
constitute a risk of electric shock to persons.
The exclamation point within an equilateral
triangle is intended to alert the user to the
presence of important operating and
maintenance (servicing) instructions in the
literature accompanying the product.
IMPORTANT SAFETY INSTRUCTIONS
1 Read these instructions.
2Keep these instructions.
3 Heed all warnings.
4 Follow all instructions.
5 Do not use this apparatus near water.
6 Clean only with dry cloth.
7 Do not block any ventilation openings. Install in
accordance with the manufacturer’s instructions.
8 Do not install near any heat sources such as radiators,
heat registers, stoves, or other apparatus (including
amplifiers) that produce heat.
9 Do not defeat the safety purpose of the polarized or
grounding-type plug. A polarized plug has two blades
with one wider than the other. A grounding type plug
has two blades and a third grounding prong. The wide
blade or the third prong are provided for your safety. If
the provided plug does not fit into your outlet, consult
an electrician for replacement of the obsolete outlet.
10 Protect the power cord from being walked on or pinched
particularly at plugs, convenience receptacles, and the
point where they exit from the apparatus.
11 Only use attachments/accessories specified by the
manufacturer.
12 Use only with the cart, stand,
tripod, bracket, or table specified
by the manufacturer, or sold with
the apparatus. When a cart is
used, use caution when moving
the cart/apparatus combination
to avoid injury from tip-over.
13 Unplug this apparatus during
lightning storms or when unused for long periods of
time.
14 Refer all servicing to qualified service personnel.
Servicing is required when the apparatus has been
damaged in any way, such as power-supply cord or plug
is damaged, liquid has been spilled or objects have
fallen into the apparatus, the apparatus has been
exposed to rain or moisture, does not operate normally,
or has been dropped.
(UL60065_03)
CAUTION: TO REDUCE THE RISK OF
ELECTRIC SHOCK, DO NOT REMOVE
COVER (OR BACK). NO USER-SERVICEABLE
PARTS INSIDE. REFER SERVICING TO
QUALIFIED SERVICE PERSONNEL.
CAUTION
RISK OF ELECTRIC SHOCK
DO NOT OPEN
WARNING
TO REDUCE THE RISK OF FIRE OR ELECTRIC SHOCK, DO NOT EXPOSE THIS APPARATUS TO RAIN OR MOISTURE.
IMPORTANT NOTICE FOR THE UNITED KINGDOM
Connecting the Plug and Cord
IMPORTANT. The wires in this mains lead are coloured in accordance with the fol-
lowing code:
BLUE : NEUTRAL
BROWN : LIVE
As the colours of the wires in the mains lead of this apparatus may not correspond
with the coloured makings identifying the terminals in your plug proceed as follows:
The wire which is coloured BLUE must be connected to the terminal which is marked
with the letter N or coloured BLACK.
The wire which is coloured BROWN must be connected to the terminal which is
marked with the letter L or coloured RED.
Making sure that neither core is connected to the earth terminal of the three pin plug.
• This applies only to products distributed by Yamaha Music U.K. Ltd. (2 wires)
1

4 • N3/N2 Owner’s Manual
ENGLISH
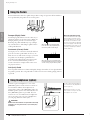
Hybrid Piano
Combining over one hundred years of superb piano
craftsmanship with the latest advanced technologies,
Yamaha is proud to introduce a true hybrid acoustic/
digital piano that meets the demands of contemporary
musicians.
Authentic Acoustic Piano Touch with Special Grand Piano Action and Piano Keyboard
This brand new, innovative keyboard delivers the rich expressive quality of an actual grand piano, thanks to its finely
nuanced touch and exceptional response. Drawing on our many decades of expertise in crafting grand pianos, Yamaha
has created a unique and yet wholly traditional piano action mechanism for the Avant Grand—employing an action in
which the hammers hit the strings from underneath, just as on an actual grand piano. The action of the hammers and
the balance of each hammer weight have been meticulously adjusted to give this revolutionary keyboard an exception-
ally natural and consistent feel. The keyboard also uses real-wood keys, just as on a real grand piano, and the white keys
are made from the special material “Ivorite,” developed specifically by Yamaha to recreate the natural feel of ivory.
The result is an amazingly expressive keyboard that lets your fingers dance lightly over the keys when playing rapid pas-
sages, and provides firm response when playing slow passages—for an authentic touch and feel that goes far beyond any
existing digital piano.
The Realistic Ambience of Grand Piano Voice
The N3/N2 features Yamaha’s original brand new four-channel Multi Sampling tone-generation sampling technology
for the grand piano voices. The voices are recorded at the left, right, center and rear positions of a grand piano, giving
performers the rich resonance and sonic power heretofore only available on an actual grand piano.
The instrument also utilizes a new four-channel Multi Speaker System, in which each speaker is equipped with its own
dedicated amplifier. This is essential for preserving the sonic integrity of each frequency range and making sure that
every musical part and all of its nuances are reproduced naturally with absolute clarity. In addition, the N3 is equipped
with a special flat resonator inside the instrument to enhance the expressive response of the sound, providing a realistic
response especially for the high notes.
True Grand Piano Resonance
The Avant Grand features a special TRS (Tactile Response System), which realistically reproduces the resonance of the
instrument, or the vibration that you feel from the keys or the pedals when you play an actual grand piano. You can
switch the function on/off, and the strength of vibration can be adjusted in three levels.
Flexible Volume Control
Unlike acoustic pianos, the Avant Grand gives you full control over the instrument volume, letting you adjust the level
just as desired. Also, you can play or listen in total privacy through one or two pairs of headphones. The innovative TRS
system enables you to feel the natural vibration of real acoustic grand piano even when using headphones.
2

N3/N2 Owner’s Manual • 5
ENGLISH
Table of Contents
PRECAUTIONS ..........................................................6
Introduction
Panel Controls and Terminals ......................................8
Playing the Keyboard ................................................10
Using the Pedals...................................................14
Using Headphones (option) .................................14
Music Rest ...........................................................15
Reference
Listening to the Preset Songs .....................................16
Basic Operations and More........................................18
Selecting Voices....................................................18
Listening to the Voice Demo Songs......................19
Using the Metronome ..........................................20
Adjusting the Keyboard Touch
(Touch Sensitivity)............................................22
Adjusting the Strength of Vibration (TRS)...........23
Adding Variations to the Sound — Reverb ..........23
Transposition .......................................................24
Fine-tuning the Pitch ...........................................25
Scale Tuning ........................................................26
Recording your Performance .....................................27
Playing Back the Song Recorded
to the Instrument ..............................................28
Saving Your Recorded Performance
to USB Flash Memory.......................................29
Listening to songs in USB Flash Memory..................31
Formatting USB Flash Memory.................................33
Backing up Data and Initializing the Settings ...........34
Backup data in internal memory...........................34
Initializing the data...............................................34
Connections...............................................................35
Connectors...........................................................35
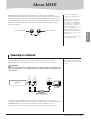
About MIDI ..............................................................37
Connecting to a Computer...................................37
Local Control On/Off ..........................................38
Appendix
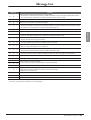
Message List...............................................................39
Troubleshooting.........................................................40
N3: Assembling the Unit ...........................................41
Specifications.............................................................43
Index..........................................................................44
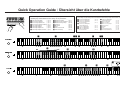
Quick Operation Guide.............................................47
* The illustrations and displays as shown in this manual are for instructional purposes only, and may appear somewhat different from
those on your instrument.
* The panel illustrations shown in this manual are taken from the N3.
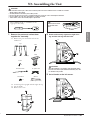
Accessories
Owner’s Manual
AC Power Cord
Cord Holders (3 pcs.)
Felt Key Cover
Bench*
* Included or optional depending on locale.
My Yamaha Product User Registration*
* The PRODUCT ID on the sheet will be needed when you fill
out the User Registration form.
Data List
You can download various MIDI-related reference materials, such as the MIDI Data Format and MIDI Implementation
Chart, from the Yamaha Manual Library.
Connect to the Internet, visit the following website, type the model name of your instrument (such as “N3”) in the
Model Name text box, then click the Search button.
Yamaha Manual Library
http://www.yamaha.co.jp/manual/
Getting started playing your new Avant Grand!
This section explains how to make detailed settings for the
instrument’s various functions.
This section includes a list of display messages, Quick
Operation Guide and other information.
3

6 • N3/N2 Owner’s Manual
ENGLISH
PRECAUTIONS
PLEASE READ CAREFULLY BEFORE PROCEEDING
* Please keep this manual in a safe place for future reference.
WARNING
Always follow the basic precautions listed below to avoid the possibility of serious injury or even death from electrical
shock, short-circuiting, damages, fire or other hazards. These precautions include, but are not limited to, the following:
• Only use the voltage specified as correct for the instrument. The required
voltage is printed on the name plate of the instrument.
• Check the electric plug periodically and remove any dirt or dust which may have
accumulated on it.
• Use only the supplied power cord/plug.
• Do not place the power cord near heat sources such as heaters or radiators, and
do not excessively bend or otherwise damage the cord, place heavy objects on
it, or place it in a position where anyone could walk on, trip over, or roll anything
over it.
• Do not open the instrument or attempt to disassemble the internal parts or
modify them in any way. The instrument contains no user-serviceable parts. If it
should appear to be malfunctioning, discontinue use immediately and have it
inspected by qualified Yamaha service personnel.
• Do not expose the instrument to rain, use it near water or in damp or wet
conditions, or place containers on it containing liquids which might spill into
any openings. If any liquid such as water seeps into the instrument, turn off the
power immediately and unplug the power cord from the AC outlet. Then have
the instrument inspected by qualified Yamaha service personnel.
• Never insert or remove an electric plug with wet hands.
• Do not put burning items, such as candles, on the unit.
A burning item may fall over and cause a fire.
• If the power cord or plug becomes frayed or damaged, or if there is a sudden
loss of sound during use of the instrument, or if any unusual smells or smoke
should appear to be caused by it, immediately turn off the power switch,
disconnect the electric plug from the outlet, and have the instrument inspected
by qualified Yamaha service personnel.
CAUTION
Always follow the basic precautions listed below to avoid the possibility of physical injury to you or others, or damage
to the instrument or other property. These precautions include, but are not limited to, the following:
• When removing the electric plug from the instrument or an outlet, always hold
the plug itself and not the cord. Pulling by the cord can damage it.
• Remove the electric plug from the outlet when the instrument is not to be used
for extended periods of time, or during electrical storms.
• Do not connect the instrument to an electrical outlet using a multiple-connector.
Doing so can result in lower sound quality, or possibly cause overheating in the
outlet.
• Read carefully the attached documentation explaining the assembly process.
Failure to assemble the instrument in the proper sequence might result in
damage to the instrument or even injury.
• Do not expose the instrument to excessive dust or vibrations, or extreme cold or
heat (such as in direct sunlight, near a heater, or in a car during the day) to
prevent the possibility of panel disfiguration or damage to the internal
components.
• Do not use the instrument in the vicinity of a TV, radio, stereo equipment,
mobile phone, or other electric devices. Otherwise, the instrument, TV, or radio
may generate noise.
• Do not place the instrument in an unstable position where it might accidentally
fall over.
• Before moving the instrument, remove all connected cables.
• When setting up the product, make sure that the AC outlet you are using is
easily accessible. If some trouble or malfunction occurs, immediately turn off
the power switch and disconnect the plug from the outlet. Even when the power
switch is turned off, electricity is still flowing to the product at the minimum
level. When you are not using the product for a long time, make sure to unplug
the power cord from the wall AC outlet.
• Before connecting the instrument to other electronic components, turn off the
power for all components. Before turning the power on or off for all
components, set all volume levels to minimum. Also, be sure to set the volumes
of all components at their minimum levels and gradually raise the volume
controls while playing the instrument to set the desired listening level.
• In the case of a model with a polished finish, gently remove dust and dirt with a
soft cloth. Do not wipe too hard since small particles of dirt can scratch the
instrument’s finish.
• When cleaning the instrument, use a soft, dry or slightly damp cloth. Do not use
paint thinners, solvents, cleaning fluids, or chemical-impregnated wiping
cloths.
• During extreme changes in temperature or humidity, condensation may occur
and water may collect on the surface of the instrument. If water is left, the
wooden parts may absorb the water and be damaged. Make sure to wipe any
water off immediately with a soft cloth.
Power supply/Power cord
Do not open
Water warning
Fire warning
If you notice any abnormality
Power supply/Power cord
Assembly (N3)
Location
Connections
Maintenance
(1)B-13 1/2
4

N3/N2 Owner’s Manual • 7
ENGLISH
•Take care that the key cover does not pinch your fingers, and do not insert a
finger or hand in any gaps on the fallboard or instrument.
• Never insert or drop paper, metallic, or other objects into the gaps on the
fallboard, panel or keyboard. If this happens, turn off the power immediately and
unplug the power cord from the AC outlet. Then have the instrument inspected
by qualified Yamaha service personnel.
• Do not place vinyl, plastic or rubber objects on the instrument, since this might
discolor the panel or keyboard.
• In the case of a model with a polished finish, bumping the surface of the
instrument with metal, porcelain, or other hard objects can cause the finish to
crack or peel. Use caution.
• Do not rest your weight on, or place heavy objects on the instrument, and do not
use excessive force on the buttons, switches or connectors.
• Do not use the instrument/device or headphones for a long period of time at a
high or uncomfortable volume level, since this can cause permanent hearing
loss. If you experience any hearing loss or ringing in the ears, consult a
physician.
• Do not place the bench in an unstable position where it might accidentally fall
over.
• Do not play carelessly with or stand on the bench. Using it as a tool or step-
ladder or for any other purpose might result in accident or injury.
• Only one person should sit on the bench at a time, in order to prevent the
possibility of accident or injury.
• Do not attempt to adjust the bench height while sitting on the bench, since this
can cause excessive force to be imposed on the adjustment mechanism,
possibly resulting in damage to the mechanism or even injury.
• If the bench screws become loose due to extensive long-term use, tighten them
periodically using the included tool.
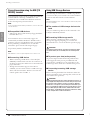
Saving and backing up your data
• The song data saved to internal memory of this instrument is retained even
when the power is turned off. However, the data could be lost due to malfunction
or incorrect operation. Save important data to a USB storage device (page 29).
Backing up the USB storage device
•To protect against data loss through media damage, we recommend that you
save your important data onto two USB storage devices.
Always turn the power off when the instrument is not in use.
• Copying of the commercially available musical data including but not limited to MIDI data and/or audio data is strictly prohibited except for your personal use.
Tuning
Unlike an acoustic piano, the instrument does not need to be tuned. It always stays perfectly in tune.
However, if you feel something wrong concerning the keyboard touch, contact your Yamaha dealer.
Handling caution Using the bench (If included)
Saving data
Yamaha cannot be held responsible for damage caused by improper use or modifications to the instrument, or data that is lost or destroyed.
This product incorporates and bundles computer programs and contents in which Yamaha owns copyrights or with respect to which it has license to use others’
copyrights. Such copyrighted materials include, without limitation, all computer software, style files, MIDI files, WAVE data, musical scores and sound recordings. Any
unauthorized use of such programs and contents outside of personal use is not permitted under relevant laws. Any violation of copyright has legal consequences. DON’T
MAKE, DISTRIBUTE OR USE ILLEGAL COPIES.
IMPORTANT – Check your power supply –
Make sure that your local AC mains voltage matches the voltage specified on the name plate on the bottom panel. In some areas a voltage selector may be provided on the
bottom of the main keyboard unit near the power cord. Make sure that the voltage selector is set for the voltage in your area. The voltage selector is set at 240V when the
unit is initially shipped. To change the setting use a “minus” screwdriver to rotate the selector dial so that the correct voltage appears next to the pointer on the panel.
Transporting / Placing
If you move to another location, transport the instrument horizon-
tally. Do not lean it up against a wall or stand it up side down. Do not
subject the instrument to excessive vibration or shock.
When moving the instrument, always hold the bottom of the main unit.
Be sure not to hold the control panel located on the bottom left. Improper handling
can result in damage to the instrument or personal injury
N3: To enhance the safety and to protect the floor, we recommend to put the instru-
ment on caster cups.
N2: Place the instrument away from the wall so that you can open or close the lid.
(Rear: at least 15 cm, Side: at least 10 cm)
If you find the instrument shaky or unstable after installing, insert the included felt
strips. For details, refer to the instructions supplied with the felt strips.
Do not hold here.
Hold here.
Do not hold the control panel.
CAUTION
(1)B-13 2/2
5

8 • N3/N2 Owner’s Manual
ENGLISH
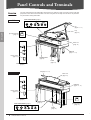
Panel Controls and Terminals
Overview
N3
Jacks and Terminals (page 9)
Power switch
(page 12)
Control panel
(page 9)
Pedals
(page 14)
Music rest
(page 15)
Lid
(pages 11, 13)
Stay
(page 11)
Fallboard
(pages 11, 13)
[AC IN] connector
(page 10)
Jacks and Terminals
(page 9)
N2
Music rest
(page 15)
Lid (pages 12, 13)
Power switch
(page 12)
Control panel
(page 9)
[AC IN] connector
(page 10)
Pedals
(page 14)
Jacks and Terminals (page 9)
Fallboard
(pages 11, 13)
Jacks and Terminals
(page 9)
Introduction
The jacks and terminals on the underside of the instrument as shown here may seem to be in reverse from your
perspective in front of the instrument. Make sure when using these to carefully check the names as printed on
the panel before making connections.
6

N3/N2 Owner’s Manual • 9
Panel Controls and Terminals
ENGLISH
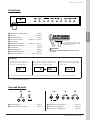
Control Panel
q [MASTER VOLUME] control ....................... page 12
w Display ................................................... See below.
e [RECORD] button.........................................page 27
r [PLAY/STOP] button.................pages 16, 19, 28, 31
t [+]/[-] button
y [DEMO/SONG] button..............pages 16, 19, 28, 31
u [PIANO/VOICE] button .................................page 18
i [TRS] button .................................................page 23
o [REVERB] button .........................................page 23
!0 [METRONOME] button.................................page 20
!1 [FUNCTION] button........................pages 24, 26, 38
*Song : In this manual, performance data is called a “Song.” This means preset songs (page 16), voice demos (page 19), user songs (page
28) and USB songs (page 31).
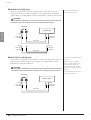
Jacks and Terminals
!2 [PHONES] jacks...........................................page 14
!3 USB [TO DEVICE] terminal..........................page 35
!4 MIDI [IN] [OUT] connectors..........................page 37
!5 AUX IN [L/L+R] [R] jacks..............................page 36
!6 AUX OUT [L/L+R] [R] jacks..........................page 36
q
w
er t yuio!0 !1
The control panel is located at the
bottom left of the instrument. Slide
the panel out to use it.
Do not pull on the [MASTER VOLUME] control to slide out the
control panel.
CAUTION
● Display
Normally indicates the currently
selected song* number. (When no song
is selected, nothing is displayed.)
As you change the settings of each function,
the parameter value appears briefly before
returning to the song number display.
The TRS or reverb setting value is dis-
played while the [TRS] or [REVERB]
button is held.
For more information, refer to the instructions on each function. The message list (page 39) is also available for your reference.
d01
(Song number)
0 d01
(Parameter value) (Song number) (TRS or reverb value)
t02
!2 !3 !4 !5 !6
7

10 • N3/N2 Owner’s Manual
ENGLISH
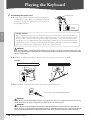
Playing the Keyboard
1
Connecting the power cord
1-1
Set the voltage selector and insert the power cord plug to
the [AC IN] connector. Refer to the “Panel Controls and
Terminals” on page 8 for information on the location of
the [AC IN] connector.
1-2 Attach the included cord holders to the instrument, then clip the power cord into the holder.
1-3 Insert the plug on the other end of the power cord to a standard AC outlet.
Voltage
Selector
[AC IN] connector
Voltage Selector
Before connecting the AC power cord, check the setting of the voltage selector which is provided in some
areas. To set the selector for 110V, 127V, 220V or 240V main voltages, use a “minus” screwdriver to rotate
the selector dial so that the correct voltage for your region appears next to the pointer on the panel. The
voltage selector is set at 240V when the unit is initially shipped. After the proper voltage has been selected,
connect the AC power cord to the AC IN and an AC wall outlet. A plug adaptor may be also provided in
some areas to match the pin configuration of the AC wall outlets in your area.
Make sure your instrument is rated for the AC voltage supplied in the area in which it is to be used. (The voltage rating appears on the
name plate on the bottom panel). Connecting the unit to an inappropriate AC supply can seriously damage the internal circuitry and may
even pose a shock hazard!
WARNING
Use only the AC power cord supplied with the instrument. If the supplied power cord is lost or damaged and needs to be replaced, con-
tact your Yamaha dealer. The use of an inappropriate replacement can pose a fire and shock hazard!
The type of AC power cord provided with the instrument may be different depending on the country in which the instrument was pur-
chased. (In some areas a plug adaptor may be provided to match the pin configuration of the AC wall outlets in your area.) Do NOT mod-
ify the plug provided with the instrument. If the plug will not fit the outlet, have a proper outlet installed by a qualified electrician.
N3 N2
Example
(The shape of the plug differs depending on locale.)
WARNING
WARNING
8

N3/N2 Owner’s Manual • 11
Playing the Keyboard
ENGLISH
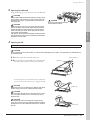
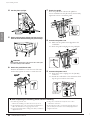
2
Opening the fallboard
Using the hand grip on the front, lift open the fallboard.
3
Opening the lid
One long stay and one short stay are provided on the lid. Use one of them to open the lid to the desired angle.
3-1 Hold the right side of the lid and raise it.
3-2 Raise the lid stay and carefully lower the lid so that
the end of the stay fits into the recess in the lid.
For the longer stay, use the inner recess, and for the
shorter stay, use the outer recess to support the lid.
Hold the fallboard with both hands when opening or closing it. Do not
release it until it is fully opened or closed. Be careful to avoid catch-
ing fingers (yours or others, especially children’s) between the fall-
board and the unit.
Do not place objects such as a piece of metal or paper on top of the
fallboard. Small objects placed on the fallboard may fall inside the
unit when the fallboard is opened and may be nearly impossible to
remove. This could cause electric shock, short circuit, fire or other
serious damage to the instrument.
If this happens, turn off the power immediately and unplug the power
cord from the AC outlet. Then have the instrument inspected by quali-
fied Yamaha service personnel.
Be careful to avoid catching your fingers
when opening the fallboard.
CAUTION
CAUTION
CAUTION
N3
Do not let children open or close the lid. Also, be careful to avoid catching fingers (yours or others, and especially those of children) when rais-
ing or lowering the lid.
CAUTION
Do not hold here.
Hold here.
Do not use the outer recess for the longer stay. Doing so makes the lid
unstable and may cause it to fall, resulting in damage or injury.
Make sure that the end of the stay fits securely in the lid recess. If the
stay is not properly seated in the recess, the lid may fall, causing
damage or injury.
Be careful that you or others do not bump the stay while the lid is
raised. Also, make sure to close the lid when moving the instrument.
If bumped, the stay may be dislodged out of the lid recess causing the
lid to fall.
Shorter stay
Longer stay
CAUTION
CAUTION
CAUTION
9

12 • N3/N2 Owner’s Manual
Playing the Keyboard
ENGLISH
3-1 Raise the music rest (page 15).
3-2 Open the lid up as far as it will go.
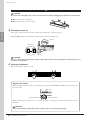
4
Turning the power on
Turn on the switch located on the bottom left of the keyboard to turn the power on.
↓
The [POWER] indicator located below the left end of the keyboard lights up.
5
Playing the keyboard
Play the keyboard to produce sound.
N2
Be careful to avoid catching fingers (yours or others, and especially those of children) in folding portion or between the cover and main unit.
Do not press any keys until the instrument has completely started up (approx. eight seconds after turning on the switch). Doing so may cause
some keys to not sound normally.
CAUTION
lights up
power switch
on
off
CAUTION
Adjusting the volume
While playing the keyboard, adjust the volume level by using the [MASTER VOLUME] control located at the
left of the panel.
When the TRS (page 23) function is on, sound can be heard to some degree even when the volume is set to the
minimum.
Do not use this instrument at a high volume level for a long period of time, or your hearing may be damaged.
The level decreases. The level increases.
CAUTION
10

N3/N2 Owner’s Manual • 13
Playing the Keyboard
ENGLISH
6
Turning the power off
Turn the switch off.
↓
The [POWER] indicator turns off.
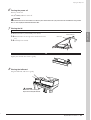
7
Closing the lid
7-1
Hold the lid stay and carefully raise the lid.
7-2 Hold the lid in its raised position and lower the lid
stay.
7-3 Carefully lower the lid.
Slightly raise the lid, then lower it gently.
8
Closing the fallboard
Grip the fallboard, and close it gently.
A small amount of electrical current remains even after the power switch is turned off. If you plan not to use the instrument for a long period of
time, be sure to unplug the instrument from the AC outlet.
CAUTION
N3
N2
Do not hold here.
Hold here.
Be careful to avoid catching your
fingers when closing the fallboard.
CAUTION
11

14 • N3/N2 Owner’s Manual
Playing the Keyboard
ENGLISH
The instrument has three foot pedals that produce a range of expressive effects similar to
those produced by the pedals on an acoustic piano.
Damper (Right) Pedal
The damper pedal functions in the same way as
a damper pedal on an acoustic piano. When the
damper pedal is pressed, notes sustain longer.
Releasing the pedal immediately stops (damps)
any sustained notes. The damper pedal features
a half-pedal function.
Sostenuto (Center) Pedal
If you play a note or chord on the keyboard and
press the sostenuto pedal while the note(s) are
held, those notes will sustain as long as you hold
the pedal (as if the damper pedal had been
pressed) but all subsequently played notes will
not be sustained. This makes it possible to
sustain a chord, for example, while other notes
are played “staccato.”
Soft (Left) Pedal
The soft pedal reduces the volume and slightly changes the timbre of notes played while
the pedal is pressed. The soft pedal will not affect notes that are already playing when it
is pressed.
Connect a pair of headphones to one of the
[PHONES] jacks located on the bottom left of
the instrument. When the headphones are
plugged into either of the [PHONES] jacks, the
internal speaker system is automatically shut off.
Two [PHONES] jacks are provided. You can
connect two sets of standard stereo headphones.
(If you are using only one pair of headphones,
you can plug them into either jack.)
Using the Pedals
What is the half-pedal function?
This function allows the sustain length to
vary depending on how far the pedal is
pressed. The farther you press the pedal,
the more the sound sustains. For exam-
ple, if you press the damper pedal and all
notes you are playing sound a bit murky
and loud with too much sustain, you can
release the pedal half way to subdue the
sustain (murkiness).
When you press the damper pedal
here, the notes you play before you
release the pedal sustain longer.
When you press the sostenuto pedal
here while holding the note, the note will
sustain as long as you hold the pedal.
Using Headphones (option)
The TRS is turned off when headphones
are connected. Press the [TRS] button to
turn it on (page 23).
When the TRS (page 23) is on, sound
can be heard to some degree even when
the headphones are connected.
Do not listen to the instrument at a high volume level through
headphones for a long period of time, or your hearing may
be damaged.
Standard stereo
phone plug
CAUTION
12

N3/N2 Owner’s Manual • 15
Playing the Keyboard
ENGLISH
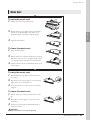
To raise the music rest:
1
Gently open the front portion of lid.
2
Pull the music rest up and toward yourself until it
remains at the desired angle. The music rest is
latched at angles of 35 degrees and 70 degrees.
3
Open the music brace.
To lower the music rest:
1
Close the music brace.
2
Pull the music rest toward yourself as far as it will go.
When the music rest is at a 35 degree angle, raise it
to a 70 degree angle, then pull it toward yourself.
3
Gently lower the music rest backward until it is all
the way down.
To raise the music rest:
1
Pull the music rest up and toward yourself as far
as it will go.
2
Flip down the two metal supports at the left and
right on the rear of the music rest.
3
Lower the music rest so that it rests on the metal
supports.
To lower the music rest:
1
Pull the music rest toward yourself as far as it will
go.
2
Raise the two metal supports (at the rear of the
music rest).
3
Gently lower the music rest backward until it is
all the way down.
Do not try to use the music rest in a half-raised position.
Music Rest
N3
N2
CAUTION
13

16 • N3/N2 Owner’s Manual
ENGLISH
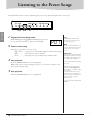
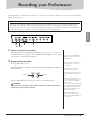
Listening to the Preset Songs
This instrument features a variety of built-in piano preset songs. You can simply listen to these songs.
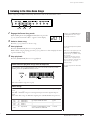
1
Engage the Preset Song mode.
While holding down the [DEMO/SONG] button, press the
[+] or [-] button until “
P01
” appears on the display.
2
Select a preset song.
Press the [+] or [-] button to select a song.
•
P01
–
P10
....... Select a preset song number and play only the selected song.
•
P.AL
................. Play all preset songs in sequence.
•
P.rd
................. Play all preset songs continuously in random order.
3
Start playback.
Press the [PLAY/STOP] button to start playback.
While a piano preset song is playing, press the [+] or [-] button to change to the
next or previous piano song.
4
Stop playback.
Press the [PLAY/STOP] button to stop playback.
11,
23,
4
Song:
In this manual, performance data is
called a “Song.” This includes preset
songs and demo songs.
Mode:
A mode is a status under which you can
execute a certain function. In the Preset
Song mode, you can select a preset
song.
Random order:
The songs are selected and played back
randomly by the instrument—similar to
the shuffling of a deck of cards—when
pressing the [PLAY/ STOP] button.
P01
You can play the keyboard along with the
preset song.
While a piano preset song is playing,
hold down the [METRONOME] button
and press the [+] or [-] button to change
the song tempo.
If you are using the metronome (page
20) during preset song playback, press
the [+] or [-] button to change the song
tempo. You can also press keys to
change the tempo.
The preset songs will not be transmitted
via MIDI.
Reference
14

N3/N2 Owner’s Manual • 17
Listening to the Preset Songs
ENGLISH
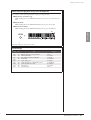
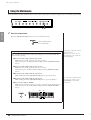
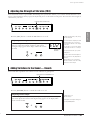
Select and start playback songs from the keyboard
You can also select and start playback songs by pressing the keys.
● Play back a particular song:
While holding down the [DEMO/SONG] button, press one of the C2–A2
keys.
● Play back all:
While holding down the [DEMO/SONG] button, press the A3 key.
● Play back randomly:
While holding down the [DEMO/SONG] button, press the A#3 key.
↓
The selected preset song starts to play.
Preset Songs
C2 A2 A3
A#3
Display Key Title Composer
P01
C2 Nocturne, op.9-1 F. F. Chopin
P02
C#2 Mädchens Wünsch, 6 Chants polonaise F. Liszt
P03
D2 Fantaisie-Impromptu F. F. Chopin
P04
D#2 Aria, Goldberg-Variationen, BWV.988 J. S. Bach
P05
E2 Clair de lune C. A. Debussy
P06
F2 Sonate, K.380, L.23 D. Scarlatti
P07
F#2 Sonate für Klavier Nr.14 “Mondschein”, op.27-2 L. v. Beethoven
P08
G2 Sonate für Klavier Nr.5, K.283 W. A. Mozart
P09
G#2Valse, op.69-2 F. F. Chopin
P10
A2 Consolation No.3 F. Liszt
15

18 • N3/N2 Owner’s Manual
ENGLISH
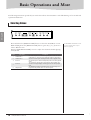
Basic Operations and More
The following instructions provide all you need to know about the instrument to take full advantage of its versatile and
sophisticated functions.
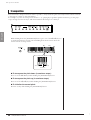
Press and release the [PIANO/VOICE] button to select the Grand Piano 1 voice.
While holding down the [PIANO/VOICE] button, press the [+] or [-] button to
select a different voice.
Turn the [MASTER VOLUME] control to adjust the volume level while playing
the keyboard.
Selecting Voices
To understand the characteristics of vari-
ous voices, listen to demo songs for
each voice (page 19).
Display Voice Name Description
1
Grand Piano 1
Recorded samples from a full concert grand piano. Perfect for classical
compositions as well as any other style that requires acoustic piano.
2
Grand Piano 2 Spacious and clear piano with bright reverb. Good for popular music.
3
E.Piano 1
An electronic piano sound created by FM synthesis. Good for popular
music.
4
E.Piano 2
The sound of an electric piano using hammer-struck metallic “tines.”
Soft tone when played lightly, and an aggressive tone when played
hard.
5
Harpsichord
The definitive instrument for baroque music. Since the strings of a
harpsichord are plucked, there is no touch response.
16

N3/N2 Owner’s Manual • 19
Basic Operations and More
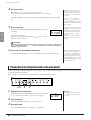
ENGLISH
Demo songs are provided that effectively demonstrate each of this instrument’s voices.
1
Engage the Demo Song mode.
While holding down the [DEMO/SONG] button, press the
[+] or [-] button until the “
d01
” appears on the display.
2
Select a demo song.
Press the [+] or [-] button to select a song.
3
Start playback.
Press the [PLAY/STOP] button to start playback.
While a demo song is playing, press the [+] or [-] button to select and play the next
or previous demo song.
4
Stop playback.
Press the [PLAY/STOP] button to stop playback.
Listening to the Voice Demo Songs
11,
23,
4
Simply press the [DEMO/SONG] button
to start playback of the demo song for
the currently selected voice.
d01
You can play the keyboard along with the
demo song.
While a demo song is playing, press and
hold down the [METRONOME] button
and press the [+] or [-] button to change
the song tempo.
If you are using the metronome (page
20) during demo song playback, press
the [+] or [-] button to change the song
tempo. You can also press keys to
change the tempo.
The demo songs will not be transmitted
via MIDI.
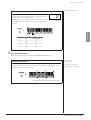
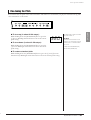
Select and start playback songs from the keyboard
If you wish to select a particular demo song, press one of the C1–E1 keys while
holding down the [DEMO/SONG] button.
↓
The selected demo song starts to play.
Demo Songs
Each of the voices features its own demo song that showcases the corresponding
voice.
The
d01
and
d05
songs are re-arranged excerpts from the original composi-
tions.
The other demo songs are Yamaha’s original pieces (©2009 Yamaha Corporation).
C1 E1
Display Key Voice Name Title Composer
d01
C1 Grand Piano 1 Un sospiro, 3 Études de concert F. Liszt
d02
C#1 Grand Piano 2 — —
d03
D1 E.Piano 1 — —
d04
D#1 E.Piano 2 — —
d05
E1 Harpsichord
Concerto a cembalo obbligato, 2 violini,
viola e continuo No.7, BWV.1058
J. S. Bach
17

20 • N3/N2 Owner’s Manual
Basic Operations and More
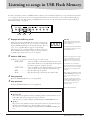
ENGLISH
This instrument features a built-in metronome (a device that keeps an accurate tempo) that is convenient for practicing.
1
Start the metronome.
Press the [METRONOME] button to turn on the metronome.
Using the Metronome
1,
2
The beat indicator flashes
at the current tempo.
Setting range: 5 to 500 beats per minute
Normal setting: 120
When the song is selected, it becomes
the default tempo of the song automati-
cally during playback.
To reset the tempo to default value while
the metronome is stopped, press the
[METRONOME], [+] and [-] buttons
simultaneously.
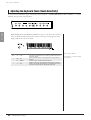
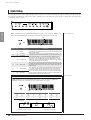
Adjusting the tempo
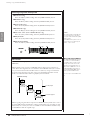
You can adjust the metronome tempo by pressing the [+] or [-] button while the
metronome is playing.
● To increase the tempo value in steps of one:
While the metronome is playing, press the [+] button.
Alternatively, press the C#5 key while holding down the [METRONOME]
button.
● To decrease the tempo value in steps of one:
While the metronome is playing, press the [-] button.
Alternatively, press the B4 key while holding down the [METRONOME]
button.
● To increase the tempo value in steps of ten:
While holding down the [METRONOME] button, press the D5 key.
● To decrease the tempo value in steps of ten:
While holding down the [METRONOME] button, press the A#4 key.
● To reset the tempo to default:
While the metronome is playing, press the [+] and [-] buttons simultaneously.
Alternatively, press the C5 key while holding down the [METRONOME]
button.
C5 D5B4
C#5
A#4
18
A página está carregando...
A página está carregando...
A página está carregando...
A página está carregando...
A página está carregando...
A página está carregando...
A página está carregando...
A página está carregando...
A página está carregando...
A página está carregando...
A página está carregando...
A página está carregando...
A página está carregando...
A página está carregando...
A página está carregando...
A página está carregando...
A página está carregando...
A página está carregando...
A página está carregando...
A página está carregando...
A página está carregando...
A página está carregando...
A página está carregando...
A página está carregando...
A página está carregando...
A página está carregando...
A página está carregando...
A página está carregando...
A página está carregando...
-
 1
1
-
 2
2
-
 3
3
-
 4
4
-
 5
5
-
 6
6
-
 7
7
-
 8
8
-
 9
9
-
 10
10
-
 11
11
-
 12
12
-
 13
13
-
 14
14
-
 15
15
-
 16
16
-
 17
17
-
 18
18
-
 19
19
-
 20
20
-
 21
21
-
 22
22
-
 23
23
-
 24
24
-
 25
25
-
 26
26
-
 27
27
-
 28
28
-
 29
29
-
 30
30
-
 31
31
-
 32
32
-
 33
33
-
 34
34
-
 35
35
-
 36
36
-
 37
37
-
 38
38
-
 39
39
-
 40
40
-
 41
41
-
 42
42
-
 43
43
-
 44
44
-
 45
45
-
 46
46
-
 47
47
-
 48
48
-
 49
49


Yamaha AVANT GRAND N-2 Manual do usuário
- Categoria
- Pianos digitais
- Tipo
- Manual do usuário
em outras línguas
- español: Yamaha AVANT GRAND N-2 Manual de usuario
- français: Yamaha AVANT GRAND N-2 Manuel utilisateur
- italiano: Yamaha AVANT GRAND N-2 Manuale utente
- English: Yamaha AVANT GRAND N-2 User manual
- русский: Yamaha AVANT GRAND N-2 Руководство пользователя
- Nederlands: Yamaha AVANT GRAND N-2 Handleiding
- Deutsch: Yamaha AVANT GRAND N-2 Benutzerhandbuch
- dansk: Yamaha AVANT GRAND N-2 Brugermanual
- čeština: Yamaha AVANT GRAND N-2 Uživatelský manuál
- svenska: Yamaha AVANT GRAND N-2 Användarmanual
- polski: Yamaha AVANT GRAND N-2 Instrukcja obsługi
- Türkçe: Yamaha AVANT GRAND N-2 Kullanım kılavuzu
- suomi: Yamaha AVANT GRAND N-2 Ohjekirja
- română: Yamaha AVANT GRAND N-2 Manual de utilizare
Artigos relacionados
-
Yamaha AvantGard N1 Manual do proprietário
-
-
-
-
-
Yamaha CLP-565GP Manual do proprietário
-
-
-
-