
ESPAÑOL – GUÍA DE UTILIZACIÓN
FRANÇAIS - GUIDE D’UTILISATION
ENGLISH - START-UP GUIDE
.
PORTUGUÊS - MANUAL DE UTILIZAÇÃO
ITALIANO – GUIDA ALL’USO
DEUTSCH - BEDIENUNGSANLEITUNG
NEDERLANDS - GEBRUIKSAANWIJZING
ΕΛΛΗΝΙΚΑ - οδηγΙες ΧΡΗΣΗΣ
ENGLISH - INSTRUCTIONS
CRB300/CRLP300IM front
210 x 297mm
Instala las pilas en el interior de su correspondiente compartimento, observando la polaridad indicada en el fondo del mismo.
1. Encaja el cabezal del proyector sobre la parte superior del brazo.
2. Encaja firmemente el brazo sobre su base.
3. Pulsa el botón “ON/OFF” para encender o apagar el proyector.
4. Una vez el proyector encendido, selecciona una de los discos de diapositivas de dibujo. Insértalo en la ranura situada en el cabezal del proyector, asegurándote de orientarlo en la dirección indicada
por la fecha estampada sobre el disco.
5. Ajusta el anillo del objetivo hasta que la imagen obtenida sea lo suficientemente nítida.
Gira el disco de diapositivas de dibujo a izquierda o derecha hasta que se proyecte la imagen que deseas dibujar. Dibuja la imagen proyectada sobre una hoja de papel utilizando el lápiz, los
rotuladores y los botes de pinturas que se suministran, o bien sobre la pizarra de rotular utilizando el rotulador especial de color negro (NOTA IMPORTANTE: No colorees el dibujo trazado sobre la
pizarra de rotular utilizando rotuladores, lápices de colores o pinturas no adecuados).
6. Todos los accesorios incluidos pueden guardarse en el amplio cajón proporcionado a tal efecto.
Para sustituir la bombilla, proceda como sigue:
Apague el proyector y déjelo que se enfríe durante 5 minutos antes de proceder a sustituir la bombilla. Retire el tornillo que sujeta la tapa del compartimento de la bombilla situado en el cabezal del
proyector y retira la tapa. Tire del capuchón de protección y, a continuación, retire la bombilla. Coloque una nueva bombilla (de una potencia máxima de 2,7 W) y, a continuación, vuelva colocar
capuchón en su sitio. Coloque de nuevo la tapa y apriete el tornillo.
Instale as pilhas no devido compartimento, respeitando o sentido das polaridades indicado no fundo do compartimento.
1. Fixe a cabeça do projector na parte superior do braço.
2. Fixe bem o braço na base.
3. Prima o botão ON/OFF para ligar ou desligar o projector.
4. Quando o projector estiver ligado, escolha uma roda de desenho. Faça-a deslizar para a ranhura na cabeça do projector, seguindo a direcção da seta na roda.
5. Ajuste o anel de ajuste até que a imagem obtida seja nítida.
Rode a roda de desenho para a direita ou para a esquerda, até que a imagem que deseja desenhar apareça. Desenhe a imagem projectada numa folha de papel com os lápis de cor, canetas de
feltro e tintas fornecidas, ou no quadro de feltro, com a ajuda do feltro preto especial (IMPORTANTE: Não pinte o desenho desenhado em cima do quadro de feltro com canetas de feltro, lápis de cor
ou tintas que não sejam adaptadas).
6. Todos os acessórios incluídos podem ser guardados na gaveta grande prevista para este efeito.
Para substituir a lâmpada
Desligue o projector e deixe-o arrefecer durante 5 minutos antes de substituir a lâmpada. Desaperte o compartimento da lâmpada, que se encontra na cabeça do projector e retire a cobertura. Puxe a
tampa de protecção e depois retire a lâmpada. Coloque uma lâmpada nova (com uma potência máxima de 2,7W) e depois volte a colocar a tampa. Volte a colocar a cobertura no devido lugar e aperte
o parafuso.
Inserisci le batterie nel vano batterie rispettando la polarità indicata sul fondo del vano.
1. Fissa la testa del proiettore sulla parte alta del braccio.
2. Fissa il braccio fermamente nella base.
3. Spingi il pulsante ON/OFF per accendere o spegnere il proiettore.
4. Una volta acceso il proiettore, scegli un disco con i disegni. Inseriscilo nell’apposita fessura sulla testa del proiettore seguendo la direzione della freccia sul disco.
5. Regola l’anello di messa a fuoco finché l’immagine ottenuta è ben definita.
Fai girare il disco con i disegni a destra o a sinistra fino a quando compare l’immagine che desideri disegnare. Disegna l’immagine proiettata su un foglio di carta con matita, pennarelli e tempere in
dotazione o sulla lavagna bianca con il pennarello nero speciale (IMPORTANTE: Non colorare il disegno disegnato sulla lavagna bianca con pennarelli, pastelli o tempere non adatti).
6. Tutti gli accessori in dotazione possono sistemati nel grande cassetto destinato a tale scopo.
Per sostituire la lampadina
Spegnere il proiettore e lasciarlo raffreddare per 5 minuti prima di sostituire la lampadina. Svitare il vano lampadina sulla testa del proiettore e togliere il coperchio. Togliere il cappuccio protettivo poi
togliere la lampadina. Inserire una nuova lampadina (di potenza massima 2,7 W) poi riposizionare il cappuccio. Rimettere il coperchio e serrare la vite.
Lege die Batterien unter Beachtung der korrekten Polarität, wie sie am Boden des Fachs angezeigt wird, in das Batteriefach ein.
1. Befestige den Projektorkopf am oberen Teil des Haltearms.
2. Stecke den Haltearm fest in die Basis.
3. Drücke die ON/OFF-Taste, um den Projektor ein- oder auszuschalten.
4. Wenn der Projektor eingeschaltet ist, wähle eine Vorlage zum Nachzeichnen aus. Schiebe sie der Richtung des Pfeils folgend in den Schlitz im Projektorkopf.
5. Drehe den Fokussierring, bis das projizierte Bild scharf ist.
Rotiere die Motiv-Vorlage nach rechts oder links, bis das Bild, dass du zeichnen möchtest, angezeigt wird. Zeichne das projizierte Bild mit Hilfe der mitgelieferten Bleistifte, Filzstifte und Farbtöpfe auf
ein Blatt Papier oder auf die Tafel mit einem schwarzen Spezial-Filzmarker (WICHTIG : Male die Zeichnung auf der Tafel nicht mit dafür ungeeigneten Filzstiften, Malstiften oder Farben aus).
6. Das gesamte zum Lieferumfang gehörende Zubehör kann in das dafür vorgesehene große Schubfach eingeräumt werden.
Auswechseln der Glühbirne
Schalte den Projektor aus und lasse ihn für 5 Minuten abkühlen, bevor du die Glühbirne auswechselst. Schraube das Glühbirnen-Fach am Projektorkopf auf und nimm die Fachtür ab. Ziehe die
Schutzkappe ab und nimm dann die Glühbirne heraus. Setze eine neue Glühbirne ein (mit einer maximalen Leistung von 2,7W), setze dann die Schutzkappe wieder ein. Setze die Fachtür wieder an
ihren Platz und ziehe die Schraube fest.
Plaats de batterijen in het batterijvakje door de aangegeven polariteit na te leven.
1. Bevestig de kop van de projector aan de bovenkant van de arm.
2. Bevestig de arm stevig aan het voetstuk.
3. Druk op de ON/OFF knop om de projector aan- of uit te zetten.
4. Eén keer de projector aangezet is, kiest u een patroonwiel. Schuif die in de gleuf van de projectorkop door de richting van de pijl te volgen die aangeduid staat op het wieltje.
5. Pas de afstellingknop aan totdat de afbeelding duidelijk weergegeven wordt.
Draai het patroonwiel naar rechts of naar links totdat de afbeelding die je wenst te tekenen, weergegeven wordt. Teken de geprojecteerde afbeelding op een stuk papier met behulp van een potlood,
viltstiften en de verfpotjes die meegeleverd werden of op een stiftbord met behulp van een speciale zwarte stift (BELANGRIJK : de getekende tekening op het stiftbord niet inkleuren met viltstiften,
potloden en/of onaangepaste verf).
6. Alle meegeleverde accessoires kunnen opgeborgen worden in de daarvoor voorziene grote lade.
Om het lampje te vervangen
Zet de projector af en laat hem gedurende 5 minuten afkoelen alvorens de lamp te vervangen. Schroef het lampencompartiment los dat zich op de bovenkant van de projector bevindt en neem de klep
ervan. Trek aan de beschermingsdop en vervolgens haalt u de lamp eruit. Plaats een nieuwe lamp (van een maximaal vermogen van 2,7W) en plaats vervolgens de dop terug. Plaats ook de klep terug
op zijn plaats en draai de schroef strakker aan.
Βάλε τις μπαταρίες μέσα στον χώρο των μπαταριών, με τη σωστή κατεύθυνση πολικότητας, όπως φαίνεται στο βάθος του χώρου.
1. Στερέωσε την κεφαλή της μηχανής προβολής στο πάνω μέρος του βραχίονα.
2. Στερέωσε τον βραχίονα καλά μέσα στη βάση.
3. Πίεσε το κουμπί ON/OFF για ν' ανάψεις ή να σβήσεις τη μηχανή προβολής.
4. Όταν ανάψει η μηχανή προβολής, διάλεξε έναν δίσκο σχεδίων. Κάνε τον να γλιστρήσει μέσα στη σχισμή της κεφαλής της μηχανής προβολής προς την κατεύθυνση του βέλους που υπάρχει πάνω
στον δίσκο.
5. Ρύθμισε τον δακτύλιο εστίασης μέχρις ότου η εικόνα να φαίνεται τελείως καθαρά.
Γύρισε τον δίσκο σχεδίων προς τα δεξιά ή αριστερά, μέχρι να εμφανιστεί η εικόνα που θέλεις να σχεδιάσεις. Ζωγράφισε την εικόνα που προβάλλεται πάνω σε ένα φύλλο χαρτιού, χρησιμοποιώντας το
μολύβι, τους μαρκαδόρους και τις μπογιές που παρέχονται ή πάνω στην πινακίδα για μαρκαδόρο, χρησιμοποιώντας τον ειδικό μαύρο μαρκαδόρο (ΣΗΜΑΝΤΙΚΟ: Μη χρωματίσεις το σχέδιο πάνω στην
πινακίδα στην πινακίδα με μαρκαδόρους, μολύβια ή/και μπογιές που είναι ακατάλληλα).
6. Όλα τα αξεσουάρ που παρέχονται μπορούν να φυλαχτούν μέσα στο μεγάλο συρτάρι που υπάρχει γι' αυτό τον σκοπό.
Αντικατάσταση της λάμπας
Πριν αντικαταστήσετε τη λάμπα, σβήστε τη μηχανή προβολής και αφήστε τη να κρυώσει για 5 λεπτά. Ξεβιδώστε το στήριγμα της λάμπας που βρίσκεται στην κεφαλή της μηχανής προβολής και βγάλτε
το καπάκι. Τραβήξτε το κάλυμμα προστασίας και βγάλε τη λάμπα. Βάλτε μέσα μια καινούργια λάμπα (μέγ. ισχύς 2,7 Watt), και μετά επανατοποθετήστε το κάλυμμα. Βάλτε το καπάκι πίσω στη θέση του
και σφίξτε τη βίδα.
Installe les piles dans le compartiment à piles en respectant le sens des polarités indiqué au fond du compartiment.
1. Fixe la tête du projecteur sur le haut du bras.
2. Fixe le bras solidement dans la base.
3. Pousse le bouton ON/OFF pour allumer ou éteindre le projecteur.
4. Une fois le projecteur allumé, choisis une roue à dessin. Glisse-la dans la fente sur la tête du projecteur en suivant la direction de la flèche sur la roue.
5. Ajuste la bague de mise au point jusqu’à ce que l’image obtenue soit bien nette.
Fais tourner la roue à dessin à droite ou à gauche jusqu’à ce que l’image que tu souhaites dessiner s’affiche. Dessine l’image projetée sur une feuille de papier à l’aide du crayon à papier, des feutres
et pots de peinture fournis ou sur le tableau à feutre à l’aide du feutre noir spécial (IMPORTANT : Ne pas colorier le dessin dessiné sur le tableau à feutres avec des feutres, crayons et ou peintures
non adaptés).
6. Tous les accessoires inclus peuvent être rangés dans le grand tiroir prévu à cet effet.
Pour remplacer l’ampoule
Eteindre le projecteur et le laisser refroidir pendant 5 minutes avant de remplacer l’ampoule. Dévisser le compartiment de l’ampoule situé sur la tête du projecteur et retirer le couvercle. Tirer sur le
capuchon de protection puis retirer l’ampoule. Insérer une ampoule neuve (d’une puissance maximale de 2,7W) puis replacer le capuchon. Remettre le couvercle en place et resserrer la vis.
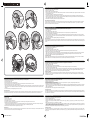
Insert the batteries into the battery chamber, making sure that the minus (-) end contacts the minus (-) symbol and the positive (+) end contacts the positive (+) symbol marked on the
bottom of the chamber.
1. Fit the projector to the top of the arm.
2. Fit the arm securely onto the base.
3. Press the ON/OFF to light up or turn off the projector.
4. Once the projector is switched on, choose a drawing wheel. Slide it into the slot on the head of the projector according to the arrow marked on the wheel.
5. Twist the adjusting ring until the image becomes clear and sharp.
Turn the drawing wheel right and left to select the image you want. Use the projected image to draw on a piece of paper using drawing pencils, felt-tips or paint, or directly onto the drawing board
using the special black felt-tip provided. (IMPORTANT: Do not draw directly onto the board using regular, non-suitable felt-tips, pencils or paints).
6. All the accessories can be neatly stored in the drawer, designed especially for this purpose.
Replacing the bulb
Switch the projector off and leave to cool for 5 minutes before replacing the bulb. Unscrew and remove the bulb compartment cover on the head of the projector. Take off the protection cap and remove
the bulb. Insert a new bulb (maxim 2.7W) and then replace the cover and tighten the screw.
1 2
3
4
6
7
5
-
 1
1

em outras línguas
- español: Lexibook CRLPS300 El manual del propietario
- français: Lexibook CRLPS300 Le manuel du propriétaire
- italiano: Lexibook CRLPS300 Manuale del proprietario
- English: Lexibook CRLPS300 Owner's manual
- Nederlands: Lexibook CRLPS300 de handleiding
- Deutsch: Lexibook CRLPS300 Bedienungsanleitung