Krups XP320050 Manual do usuário
- Categoria
- Cafeteiras
- Tipo
- Manual do usuário

XP3200
www.krups.com
EN
FR
ES
www.krups.com
8000828507-02
EN . . . . . . . . . . . . . . . . . p.5
FR . . . . . . . . . . . . . . . p. 23
ES . . . . . . . . . . . . . . . p. 41
Réalisation : Espace Graphique
IFU_KR_COFFEE_MAKER_XP3200_Mise en page 1 06/06/11 13:42 PageC1

K
R
U
P
S
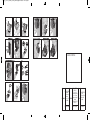
Fig.1 Fig.2 Fig.3
Fig.4 Fig.5 Fig.6
Fig.7 Fig.8 Fig.9
Fig.10 Fig.11 Fig.12
K
R
U
P
S
K
R
U
P
S
U
P
S
U
P
S
K
R
U
P
S
K
R
U
P
S
K
R
U
P
S
K
R
U
P
S
Fig.13 Fig.14 Fig.15
Fig.16 Fig.17 Fig.18
FECHA DE COMPRA :
CANADA
GROUPE SEB
CANADA
345 Passmore
Avenue
Toronto, ON
M1V 3N8
MEXICO
GROUPE SEB
MEXICO
S.A. de C.V.
Goldsmith 38 Desp.
401 Col. Polanco
Delegacion Miguel
Hildalgo
11 560 Mexico D.F.
MEXICO
U.S.A.
GROUPE SEB
USA
2121 Eden Road
Millville, NJ
08332
1-800-418-3325
01800 1128325
800-526-5377
IFU_KR_COFFEE_MAKER_XP3200_Mise en page 1 06/06/11 13:42 PageC4

English
TABLE OF CONTENTS
1. DESCRIPTION . . . . . . . . . . . . . . . . . . . . . . . . . . . . . . . . . . p. 9
2. TECHNICAL INFORMATION . . . . . . . . . . . . . . . . . . . . . . p. 9
3. TIPS . . . . . . . . . . . . . . . . . . . . . . . . . . . . . . . . . . . . . . . . . . . p. 10
4. BEFORE FIRST USE. . . . . . . . . . . . . . . . . . . . . . . . . . . . . p. 10
5. MAKING AN ESPRESSO. . . . . . . . . . . . . . . . . . . . . . . . . p. 11
6. MILK FROTHING FUNCTION . . . . . . . . . . . . . . . . . . . . . p. 12
7. CLEANING AND MAINTENANCE . . . . . . . . . . . . . . . . . . p. 14
8. DESCALING . . . . . . . . . . . . . . . . . . . . . . . . . . . . . . . . . . . . p. 15
9. PROBLEMS, PROBABLE CAUSES
AND CORRECTIVE ACTIONS. . . . . . . . . . . . . . . . . . . . . p. 16
10. DISPOSING OF YOUR MACHINE. . . . . . . . . . . . . . . . p. 19
11. KRUPS MANUFACTURER WARRANTY . . . . . . . . . . . p. 20
5
IFU_KR_COFFEE_MAKER_XP3200_Mise en page 1 06/06/11 13:35 Page5

English
6
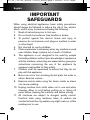
IMPORTANT
SAFEGUARDS
When using electrical appliances, basic safety precautions
should always be followed to reduce the risk of fire, electric
shock, and/or injury to persons including the following :
1. Read all instructions prior to first use.
2. Do not touch hot surfaces. Use handles or knobs.
3. To protect against fire, electric shock and injury to
persons, do not immerse cord, plugs or machine in water
or other liquid.
4. Not intented for use by children.
5. Close supervision is necessary when any machine is used
near children. Keep machine out of reach of children.
6. This appliance is not designed to be used by people
(including children) without prior knowledge or experience
with the machine, unless they are supervised or given prior
instructions concerning the use of the appliance by
someone responsible for their safety.
7. Children must be supervised to ensure that they do not
play with the appliance.
8. Burns can occur from touching the hot plate, hot water or
steam. Exercise caution.
9. Exercise caution when using the steam nozzle as steam
can cause scalding.
10. Unplug machine from outlet when not in use and when
cleaning. Allow to cool before putting on or taking off
parts, before cleaning the machine, and before storing.
11. All machines are subject to stringent quality control.
Practical tests using machines taken at random are
conducted and this may explain any slight marks or coffee
residue prior to use.
IFU_KR_COFFEE_MAKER_XP3200_Mise en page 1 06/06/11 13:35 Page6

English
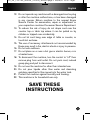
12. Do not operate any machine with a damaged cord or plug
or after the machine malfunctions, or has been damaged
in any manner. Return machine to the nearest Krups
Service Center for examination, repair or adjustment or
your respective countries Consumer Service Department.
13. To reduce the risk of injury do not drape cord over the
counter top or table top where it can be pulled on by
children or tripped over accidentally.
14. Do not let cord hang over edge of table or counter, or
touch hot surfaces.
15. The use of accessory attachments not recommended by
Krups may result in fire, electric shock or injury to persons.
16. Do not use outdoors.
17. Do not place on or near a hot gas or electric burner, or in
a heated oven.
18. To disconnect the machine, turn the control to “off” then
remove plug from wall outlet. Do not yank cord, instead
grasp plug and pull to disconnect.
19. Do not use the machine for other than intended use.
20. Do not pour liquids other than water and descaling
solutions specified in this manual into the water tank.
21. Protect the machine against humidity and freezing.
22. This machine is for household use only.
SAVE THESE
INSTRUCTIONS
7
IFU_KR_COFFEE_MAKER_XP3200_Mise en page 1 06/06/11 13:35 Page7

English
8
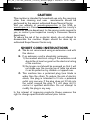
CAUTION
This machine is intended for household use only. Any servicing
other than cleaning and user maintenance should be
performed by the nearest authorized Krups Service Center.
Visit our website at www.krupsusa.com in the USA or
www.krups.ca in Canada or contact your respective country's
Consumer Service department for the service center nearest to
you, or contact your respective country’s Consumer Service
department.
To reduce the risk of fire or electric shock, do not attempt to
disassemble the machine. Repair should be done by an
authorized Krups Service Center only.
SHORT CORD INSTRUCTIONS
A. We do not recommend using an extension cord with
this device.
B. If an extension cord is absolutely necessary,
1) the marked electrical rating of the extension cord
should be at least as great as the electrical rating
of the machine,
2) the longer cord should be arranged so that it will
not drape over the counter top or table top where
it can be pulled on by children or tripped over.
C. This machine has a polarized plug (one blade is
wider than the other). To reduce the risk of electric
shock, this plug is intended to fit into a polarized
outlet only one way. If the plug does not fit fully into
the outlet, reverse the plug. If it still does not fit,
contact a qualified electrician. Do not attempt to
modify the plug in any way.
In the interest of improving products, Krups reserves the
right to change specifications without prior notice.
IFU_KR_COFFEE_MAKER_XP3200_Mise en page 1 06/06/11 13:35 Page8

English
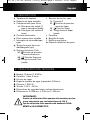
1. DESCRIPTION
2. TECHNICAL CHARACTERISTICS
n Pump: 15 bars
n Filter holder 1 cup, 2 cups.
n Steam function
n Removable water tank (capacity: 0,8 litres)
n Power: 1250 W
n Voltage:120 V – 60 Hz
n Anti overheating safety mechanisms
n Dimensions: H 11.2 in., L 8.1 in., W 15.9 in.
IMPORTANT!
Operating voltage: This device is designed to work only at
alternating current 120V.
Type of use: This machine is designed EXCLUSIVELY for
household use only. Any non-residential use including
commercial purposes will void the warranty.
9
a. Water compartment lid
b. Detachable water compartment
c. Filter storage
c1. Filter for ground coffee
(1 cup) and soft pod.
c2. Filter for ground coffee
(2 cups)
d. Measuring spoon
e. Cup tray
f. On/off switch
g. On / off indicator light (red)
h. Coffee function switch
h1. Espresso reheating
position
h2. Espresso position
h3. Coffee indicator light
(green)
i. Steam function selector switch
i1. Position O
i2. Steam reheating
position
i3. Steam position
i4. Steam indicator light
(green)
j. Filter holder
k. Steam nozzle
l. Drip tray grid
m. Drip tray
IFU_KR_COFFEE_MAKER_XP3200_Mise en page 1 06/06/11 13:35 Page9

English
10
3. TIPS
n To extract the fullest flavor from your beans, we recommend using
whole coffee beans that have been freshly ground each time espresso
is prepared. Take care to make sure your coffee is ground to the proper
size for espresso. Too fine a grind will result in espresso that is over-
extracted and bitter. Too coarse a grind will result in espresso that is
under-extracted and weak in flavor. The perfect espresso grind will feel
like fine grains that do not clump when pressed together.
n Store your espresso grounds in an airtight container, and in a cool, dry
place to retain the flavor. Grounds should not be kept for long periods
of time as the flavor will be reduced over time.
n Do not fill your filter holder to the brim. Using the measuring spoon
included, use 1 level spoon of grounds per shot of espresso.
n If you do not use the machine for more than 5 consecutive days, rinse
and drain the water tank.
n Before removing the water tank to fill or empty it, always turn the
machine off.
n Always place the unit on a flat, stable, heat-resistant work surface.
n To obtain an espresso at exactly the right temperature, we recommend
that you preheat your cups.
IMPORTANT!
Before using for the first time, after a prolonged period
of inactivity or after descaling, the machine must be
cleaned as described in Section 4: “BEFORE FIRST
USE”.
4. BEFORE USING FOR THE FIRST TIME
Before using your espresso machine for the first time, clean all the
accessories in soapy water and dry them.
Rinse them as follows:
n Open the lid (a) and remove the water tank using the handle (fig. 1).
n Fill the tank (b) with cold water and place it firmly on the machine,
making sure it is firmly in place, and close the lid (fig. 2 and 3).
n Insert and turn the filter holder to the right (fig 7).
n Place a container of sufficient volume under the filter holder.
n Plug the appliance in and turn it on (fig. 4).
n Wait for the green light to turn on (h3).
IFU_KR_COFFEE_MAKER_XP3200_Mise en page 1 06/06/11 13:35 Page10

English
n Turn the Coffee function selector (h) to the position (h2) and let
all the water in the tank drain out (Fig. 5). During this first use, the
system must fill up and the water does not flow immediately.
n If necessary, to empty the water from the container, you can interrupt
the flow by turning the coffee function selector switch (h) to the
position (h1). Once all of the water from the tank has emptied into
the container, turn the coffee function selector to the (h1) position.
5. MAKING AN ESPRESSO
IMPORTANT : Always check before starting a cycle to see
that there is sufficient water in the water tank. Avoid
allowing the tank to run dry when operating the machine.
WITH ESPRESSO GROUND COFFEE:
n Fill the tank with cold water and place it firmly on the machine,
making sure it is firmly in place, (fig. 1, 2 and 3).
n Place the filter (c.1) for 1 cup or the filter (c.2) for 2 cups in the filter
holder (j) (fig. 6).
n using the measuring spoon (d), fill the filter with ground coffee.
(1 dose = 1 cup, 2 doses = 2 cups) in the filter. (fig 8, 9)
n Remove the coffee which remains around the filter.
n Insert and turn the filter holder to the right (fig 7).
n Place one or two espresso cups under the filter holder.
As soon as the device reaches the required temperature, the green light
(h3) will turn on.
n Turn the coffee function selector switch (h) to the position (h2).
n When the cups are filled to your liking, turn the switch to the
position (h1).
n Remove the filter holder by turning it to the left .
n To eject the spent coffee, turn the filter holder over, holding the filter
by the tab so that the spent coffee falls out (fig 11).
For the best results, we recommend that you preheat the accessories
(filter holder, filter and cups) following the steps above without using
ground coffee.
Warning! Do not remove the Filter holder when the Cof-
fee function selector switch (h) is in the position (h2),
and the coffee is flowing.
11
IFU_KR_COFFEE_MAKER_XP3200_Mise en page 1 06/06/11 13:35 Page11

English
12
WITH SOFT PODS:
Besides coffee, this machine can also work with espresso ground cof-
fee pods.
n Place the espresso pod in the filter (c1).
n Be sure to place all the paper inside the filter holder, to avoid
leaks and get a good result in the cup.
n Insert and turn the filter holder to the right (fig.7).
n Then follow the procedure for preparing an espresso with espresso
ground coffee.
6. MILK FROTHING FUNCTION
n Steam can be used to froth milk for cappuccinos and latte.
n As the machine produces steam, the operating pump will make a
sound.
n After using the steam function, the machine purges
automatically and cools down by pumping cold water through the
heating system. During the purging cycles of cold water, the excess
steam in the heating system is released with hot water into the drip
tray.
n The steam and noise that accompany this phase is important for
cooling the machine.
Caution: During and after using the steam wand, the
metal parts of the steam wand can become very hot.
Take care when handling the steam wand to avoid injury.
SYSTEMATIC PURGE OF THE STEAM CIRCUIT:
Each time before you make frothy milk, you must purge the steam
circuit:
n Place an empty container under the steam nozzle (k).
n Turn the steam function selector switch (i) to the position (i2)
(fig. 12). The steam light (i4) lights up.
n Turn the steam function selector switch (i) to the position (i3)
(fig. 13) in order to purge the circuit.
n When all the water inside the circuit has been emitted, turn the steam
function selector switch (i) back to the to the position (i2). (fig. 12)
(i2).
IFU_KR_COFFEE_MAKER_XP3200_Mise en page 1 06/06/11 13:35 Page12

English
n Remove and empty the container.
n Your device is ready to froth milk.
USING THE STEAM NOZZLE TO FROTH MILK
n Fill the water tank with fresh cold water to the maximum line and turn
the machine on (fig.1, 2, 3 and 4).
n Turn the dial (i) to the (i2) position (fig. 12). The steam light (i4)
turns on.
n Position the steam nozzle so that it points away from the machine.
n Pour 2 to 3 oz (1/4 – 1/3 cup) of fresh milk in a small container that
is short enough to fit under the steam nozzle. Both the milk and the
container should be cold for optimum results.
n Pasteurised or UHT milk is recommended. Whole, lowfat, or skim
milk can all be frothed.
n As soon as the preheating indicator light stops blinking, plunge the
steam nozzle into the milk.
n Turn the dial to the position (fig.13).
n For optimal results, froth from the bottom of the container and slowly
move upwards. Hold the nozzle towards the bottom of the container
without touching the bottom for about 25 seconds. Then gradually
lower the container so that the steam nozzle moves up towards the
surface of the milk (fig.14). Do not allow the nozzle to come
completely out of the milk.
n Once the frothing is complete, turn the dial to the
O (i1) position
(fig. 15). The machine will then begin 3 pumping cycles to
automatically cool the system. Once cooling is complete, another
espresso can be made.
Important: To prevent clogging of the steam nozzle,
make sure the milk foam does not cover the black
plastic ring at the top of the steam nozzle.
It is important to clean the steam nozzle after each use to prevent milk
from hardening and drying inside the nozzle.
n To clean the nozzle, place the steam nozzle in a small container filled
with water.
n Turn the dial to the position.
n Turn the dial to the position to remove any remaining milk. Run in
the steam position for at least 30 seconds.
13
IFU_KR_COFFEE_MAKER_XP3200_Mise en page 1 06/06/11 13:35 Page13

English
14
n Then turn the dial to the O (i1) (fig. 15) position and wipe the
outside of the steam nozzle with a clean cloth.
For thorough cleaning of the steam nozzle, see Section 7, “Cleaning of
the steam Nozzle”.
7. CLEANING AND MAINTENANCE
OF THE APPLIANCE:
n Make sure the coffee machine is unplugged and completely cooled
down before you begin to clean it.
n The removable parts can be cleaned using a cloth and gentle
washing-up liquid and water.
n Do not immerse the coffee machine in water or any other liquid.
OF THE FILTER HOLDER HOUSING:
n Using a damp cloth, regularly clean the filter holder housing in order to
remove any coffee residue which may be stuck there.
n To prolong the life of the percolation head gasket seal, do not put the
filter holder back into place if the coffee machine is not to be used for
a long time.
OF THE STEAM NOZZLE:
n Regularly remove the plastic accessory of the steam nozzle (k)
(Fig. 16) and rinse it.
n To unblock the hole in the steam nozzle outlet, you may use a needle.
OF THE DRIP TRAY:
n The drip tray must be emptied after each time the appliance is used.
n If multiple espressos are prepared one after another, it should be
emptied from time to time (every 6 cups of espressos approximately)
(fig.17).
n The presence of water is normal and is not the sign of a leak. If
necessary, clean the drip tray (m) and its grid (l) with water and a
little gentle washing-up liquid, rinse and dry.
n Make sure the drip tray is put back into place properly (fig. 18).
Caution! Do not put any of these parts into the dishwasher.
IFU_KR_COFFEE_MAKER_XP3200_Mise en page 1 06/06/11 13:35 Page14

English
8. DESCALING
The warranty does not cover machines which have become faulty be-
cause descaling was not periodically performed. Descale your espresso
machine regularly using Krups descaling kits (model F054) available in
Krups authorized service centres (to Krupsonlinestore.ca for Canadian
residents only). In addition to two packets of descaling powder, the kit
also includes a water hardness tester to help you determine the proper
schedule for descaling your machine in normal use. The amount of scale
that develops depends on the hardness of the water used, but also the
level of use. The schedule indicated by the water hardness tester is a
general guideline only. Keep in mind that you may have to descale more
frequently than indicated.
If in doubt, it is recommended to descale every month.
DESCALING THE MACHINE
n Empty the tank and replace.
n Follow the instructions for using the Krups descaling powder inside
the kit.
n Then insert the filter holder (without espresso grounds) and lock into
place by turning to the right.
n Place a container under the steam wand to catch the water.
n Press the “on/off” button to turn the machine on, and then immediately
turn the dial to the position, without stopping at the (i2))position.
n Let the mixture run through the nozzle until steam appears.
n Then turn the dial back to the
O (i1) (fig. 15) position.
n Place the container under the filter holder.
n Once the coffee light turns on, turn the dial to the (h2) (fig. 5)
and run half of the remaining water through.
n Turn the machine by pressing the “on/off” button and leave the dial
at the (h2) position. Empty the container under the filter holder
and replace under the filter holder.
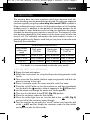
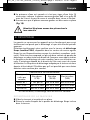
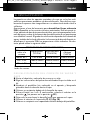
DESCALING FREQUENCY
Ave. number
coffees per
week
Soft water
(<19°th)
Hard water
(19-30°th)
Very hard water
(>30°th)
Less than 7 Once a year Every 8 months Every 6 months
From 7 to 20 Every 4 months Every 3 months Every 2 months
Over 20 Every 3 months Every 2 months Every month
15
IFU_KR_COFFEE_MAKER_XP3200_Mise en page 1 06/06/11 13:35 Page15

English
16
n After 15 minutes, turn the machine back on.
n Let the rest of the water run through until the water tank is empty.
n Then turn the dial to the (h1). position.
RINSING
IMPORTANT!
After descaling, rinse 2-3 times with clean water as des-
cribed in Section 4 “BEFORE FIRST USE”. Then rinse
the steam nozzle by following the instructions below:
n Fill the water tank with clean water. Then place a container under the
steam nozzle.
n Press the “on/off” button to turn the machine on, and then
immediately turn the dial to the (i3) (fig. 13)position, without
stopping at the (i2)position.
n Let the water run through the nozzle until steam appears.
n Turn the dial back to the
O (i1) (fig. 15) position.
The machine is now descaled and ready to be used again.
IFU_KR_COFFEE_MAKER_XP3200_Mise en page 1 06/06/11 13:35 Page16

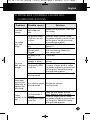
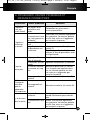
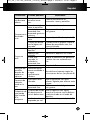
The water
does not run
through.
No water in the
tank.
The tank is not
properly in place.
The filter is clogged.
The ground coffee
is too fine.
Your machine needs
to be descaled.
Fill the tank.
Replace the tank in the correct
position.
Clean the filter holder (see Section
7) and try a larger grind of coffee.
The perfect espresso grind will feel
like fine grains that do not clump
when pressed together.
Descale the machine (see Section 8).
Water leaks
from the filter
holder after an
espresso has
been made.
Your machine needs
to be descaled.
Descale the machine
(see Section 8).
Coffee
grounds in the
cup.
The filter holder is
clogged.
The espresso grind
is too fine.
Clean the filter holder with hot
water. Shake to drain the water.
Choose a larger grind of coffee.
The perfect espresso grind will feel
like fine grains that do not clump
when pressed together.
English
17
9. PROBLEMS, PROBABLE CAUSES AND
CORRECTIVE ACTIONS
Problems Possible causes Solutions
The espresso
is not hot
enough.
The cups and the
filter holder are
cold.
Preheat the accessories: cups and
filter holder.
The coffee
flows too
slowly.
The ground coffee
is too fine, too oily
or floury.
The filter holder is
dirty.
The water drip-
through grid is
clogged.
Choose a larger grind of coffee.
The perfect espresso grind will feel
like fine grains that do not clump
when pressed together.
Clean your filter holder (see
Section 7).
When the machine has cooled,
clean the brewing head with a
clean damp cloth.
IFU_KR_COFFEE_MAKER_XP3200_Mise en page 1 06/06/11 13:35 Page17

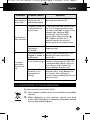
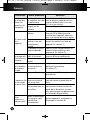
English
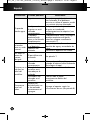
18
Problems Possible causes Solutions
The water tank
leaks when it
is carried.
The valve at the
bottom of the tank
is dirty or defective.
The valve is blocked
by lime scale.
Wash the water tank and push on
the valve at the bottom of the tank
to make sure it is not stuck.
Descale the machine
(see Section 8).
Water leaks
under the
machine.
Internal leak.
Drip tray is not in
the correct position.
Drip tray has
overflowed.
Check the position of the tank. If
the fault persists, do not use the
machine, contact an approved
service centre.
Check that the drip tray is pushed
completely into the machine (see
section 7).
Carefully empty and rinse the drip
tray, then replace in the machine
(see Section 7).
The pump is
unusually
noisy.
No water in the
tank.
The tank is not
properly positioned.
Stop the machine. Fill the water
tank, replace in the correct position,
and turn the machine back on.
Replace the tank in the correct
position.
The cups are
not filled
equally.
The filter holder is
clogged.
Clean the filter holder
(see section 7).
Leaking filter
holder.
Leaking filter holder.
The filter holder is
not properly
positioned.
The edges of the
filter holder are
clogged with excess
ground coffee.
Pod improperly
positioned in the
filter.
Lock the filter holder firmly in place.
Take care when filling the filter to
brush excess coffee off the edges
before locking the filter holder in
place.
Check that the pod is properly
centered in the filter, with excess
paper removed from E.S.E. pods,
and that none of the paper is
hanging over the edges of the filter.
IFU_KR_COFFEE_MAKER_XP3200_Mise en page 1 06/06/11 13:36 Page18

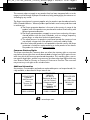
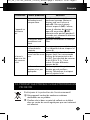
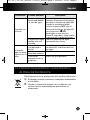
English
19
Problems Possible causes Solutions
Your espresso
tastes bad.
After descaling, the
rinsing was not
performed properly.
Rinse the machine carefully after
descaling (see Section 8).
The machine
does not work
The pump could not
be primed due to
lack of water.
The water tank is
not properly
positioned.
Fill the water tank and switch on the
unit. Put an empty container under
the steam nozzle (k), as soon as the
indicator light espresso (h3)
switches on, turn the function
selector (i) to steam position
(i3), hold this position for 2
seconds then put the function
selector back to the initial position.
Replace the water tank in the
proper position.
The steam
wand does
not froth the
milk.
The steam nozzle is
clogged or needs to
be descaled.
The milk is not cold
or not fresh enough.
The shape of the
container is not
appropriate for
frothing.
Carefully clean (see Section 7) or
descale the steam wand (see
Section 8).
Use fresh, cold milk in a cold
container. Pasteurised or UHT milk
is recommended. Whole, lowfat, or
skim milk can all be frothed. Try
using a different brand of milk.
Use a small pitcher-shaped
container with a small diameter for
best results. Also, chilling the
container before adding the milk will
improve results.
10. DISPOSING OF YOUR MACHINE
Environmental protection first!
Your machine contains a lot of recoverable or recyclable
material.
When disposing of your machine, consult your local
waste collection agency to determine the proper method
of recycling and/or disposal.
IFU_KR_COFFEE_MAKER_XP3200_Mise en page 1 06/06/11 13:36 Page19

English
20
KRUPS MANUFACTURER'S WARRANTY
: www.krups.com
With a strong commitment to the environment, most of Krups products
are repairable during and after the warranty period. Before returning any
defective products to the point of purchase, please call Krups consumer
service directly at the phone number below for repair options.
Your help to sustain the environment is appreciated!
The Warranty
This product is guaranteed by Krups for a period of 2 years against any manufac-
turing defect in materials or workmanship, starting from the initial date of purchase.
The manufacturer's warranty by Krups is an extra benefit which does not affect
consumer's Statutory Rights.
The Krups warranty covers all costs related to restoring the proven defective product
so that it conforms to its original specifications, through the repair or replacement of
any defective part and the necessary labor. A replacement product may be provided
instead of repairing a defective product. Krups’s sole obligation and your exclusive
resolution under this warranty are limited to such repair or replacement.
Conditions & Exclusions
The Krups warranty only applies within USA, Canada & Mexico, and is valid only on
presentation of a proof of purchase. The product can be taken directly in person to
an authorized service centre or must be adequately packaged and returned, by
recorded delivery (or equivalent method of postage), to a Krups authorized service
centre. Full address details for each country’s authorized service centre are listed on
the Krups website (www.krups.com
) or by calling the appropriate telephone number
listed below to request the appropriate postal address.
Krups shall not be obliged to repair or replace any product which is not accompa-
nied by a valid proof of purchase.
This warranty will not cover any damage which could occur as a result of misuse, ne-
gligence, failure to follow Krups instructions, use on current or voltage other than as
stamped on the product, or a modification or unauthorized repair of the product. It
also does not cover normal tear and wear, maintenance or replacement of consu-
mable parts, and the following:
- -using the wrong type of water
-scaling (any de-scaling must be carried out according to the instructions
for use);
-ingress of water, dust or insects into the product;
-mechanical damages, overloading
-damages or bad results due to wrong voltage or frequency
-accidents including fire, flood, lightning, etc
-professional or commercial use
-damage to any glass or porcelain ware in the product
IFU_KR_COFFEE_MAKER_XP3200_Mise en page 1 06/06/11 13:36 Page20

English
This warranty does not apply to any product that has been tampered with, or to da-
mages incurred through improper use and care, faulty packaging by the owner or mi-
shandling by any carrier.
The Krups manufacturer's warranty applies only for products purchased and used in
USA, Canada & Mexico. Where a product purchased in one country and then used
in another one:
a) The Krups guarantee duration is the one in the country of usage of the
product, even if the product was purchased in another listed country with
different guarantee duration.
b) The Krups guarantee does not apply in case of non conformity of the pur-
chased product with the local standards, such as voltage, frequency,
power plugs, or other local technical specifications.
c) The repair process for products purchased outside the country of use
may require a longer time if the product is not locally sold by Krups
d) In cases where the product is not repairable in the new country, the Krups
guarantee is limited to a replacement by a similar product or an alterna-
tive product at similar cost, where possible.
Consumer Statutory Rights
This Krups manufacturer's warranty does not affect the statutory rights a consumer
may have or those rights that cannot be excluded or limited, nor rights against the re-
tailer from which the consumer purchased the product. This warranty gives a consu-
mer specific legal rights, and the consumer may also have other legal rights which vary
from State to State or Country to Country or Province to Province. The consumer
may assert any such rights at his sole discretion.
Additional information
Accessories, Consumables and end-user replaceable parts can be purchased, if lo-
cally available, as described in Krups internet site.
: www.krups.com
21
CANADA
GROUPE SEB
CANADA
345 Passmore
Avenue
Toronto, ON
M1V 3N8
MEXICO
GROUPE SEB
MEXICO
S.A. de C.V.
Goldsmith 38 Desp.
401 Col. Polanco
Delegacion Miguel
Hildalgo
11 560 Mexico D.F.
MEXICO
U.S.A.
GROUPE SEB
USA
2121 Eden Road
Millville, NJ
08332
1-800-418-3325
01800 1128325
800-526-5377
IFU_KR_COFFEE_MAKER_XP3200_Mise en page 1 06/06/11 13:36 Page21

Français
22
IFU_KR_COFFEE_MAKER_XP3200_Mise en page 1 06/06/11 13:36 Page22
A página está carregando...
A página está carregando...
A página está carregando...
A página está carregando...
A página está carregando...
A página está carregando...
A página está carregando...
A página está carregando...
A página está carregando...
A página está carregando...
A página está carregando...
A página está carregando...
A página está carregando...
A página está carregando...
A página está carregando...
A página está carregando...
A página está carregando...
A página está carregando...
A página está carregando...
A página está carregando...
A página está carregando...
A página está carregando...
A página está carregando...
A página está carregando...
A página está carregando...
A página está carregando...
A página está carregando...
A página está carregando...
A página está carregando...
A página está carregando...
A página está carregando...
A página está carregando...
A página está carregando...
A página está carregando...
A página está carregando...
A página está carregando...
A página está carregando...
A página está carregando...
-
 1
1
-
 2
2
-
 3
3
-
 4
4
-
 5
5
-
 6
6
-
 7
7
-
 8
8
-
 9
9
-
 10
10
-
 11
11
-
 12
12
-
 13
13
-
 14
14
-
 15
15
-
 16
16
-
 17
17
-
 18
18
-
 19
19
-
 20
20
-
 21
21
-
 22
22
-
 23
23
-
 24
24
-
 25
25
-
 26
26
-
 27
27
-
 28
28
-
 29
29
-
 30
30
-
 31
31
-
 32
32
-
 33
33
-
 34
34
-
 35
35
-
 36
36
-
 37
37
-
 38
38
-
 39
39
-
 40
40
-
 41
41
-
 42
42
-
 43
43
-
 44
44
-
 45
45
-
 46
46
-
 47
47
-
 48
48
-
 49
49
-
 50
50
-
 51
51
-
 52
52
-
 53
53
-
 54
54
-
 55
55
-
 56
56
-
 57
57
-
 58
58


Krups XP320050 Manual do usuário
- Categoria
- Cafeteiras
- Tipo
- Manual do usuário
em outras línguas
- español: Krups XP320050 Manual de usuario
- français: Krups XP320050 Manuel utilisateur
- English: Krups XP320050 User manual
Artigos relacionados
-
Krups CALVI STEAM XP344010 Manual do proprietário
-
Krups XP442 Manual do usuário
-
Krups YY8201FD Manual do proprietário
-
Krups Opio XP320840 Pump Espresso Coffee Machine – Manual do usuário
-
-
-
-
-
Outros documentos
-
Black & Decker BXCO1200E Manual do usuário
-
Rowenta ES4210 Combi Manual do proprietário
-
Gaggia Milano RI9403 Classic Manual do usuário
-
Gaggia RI9303 / 01 CLASSIC MANUELLE Manual do usuário
-
-
-
-
-
-