Yamaha CVP-509 Guia de usuario

Categoria
Roteadores
Tipo
Guia de usuario

Este manual também é adequado para

Internet Connection Guide 1
Internet Connection Guide
CVP-509/505/503/501
PSR-S910/S710
Internet Connection Guide
Enjoy your instrument with Internet Direct Connection
This instrument can be directly connected to the Internet, conveniently letting you
display and access the special website from the instrument’s display and enjoy the
various contents.
This guide provides detailed instructions on connecting. You can also refer to the
Internet-related terms at the end of this guide.
For the latest services of the Internet Direct Connection function, refer to the
Yamaha website:
http://services.music.yamaha.com/
Only the special website can be opened when the instrument is directly connected to the Internet.
v1.10
v1.10
NOTE
* The illustrations and screens as shown in this guide are for instructional purposes only, and may appear somewhat different from
those on your instrument.
* Clicking on the Internet-related terms (blue characters) in this guide jumps to the “Glossary of Terms” at the end.
* The LCD screens shown in this guide are taken from the CVP-509.
Contents
Selection of the Connection Environment ................................................ 2
Connection ........................................................................................................ 3
LAN Cable Connection .................................................................................... 3
Wireless LAN Connection Using USB LAN Adaptor ....................................... 6
Wireless LAN Connection Using Wireless Game Adaptor ............................ 12
Using Static IP Address or Proxy Server ....................................................... 15
Connection Help............................................................................................. 19
Initialization of the Setup ............................................................................. 20
Glossary of Terms.......................................................................................... 21
Internet Connection Guide 2
To connect the instrument to the Internet, a full-time online connection (ADSL, optical fiber, cable Internet, etc.) using a
broadband router or a modem equipped with a router is necessary.
Since no broadband router or modem settings can be made by the instrument itself, use a computer to make the settings before connecting to the instru-
ment.
Since this instrument does not support PPPoE communication, it is not possible to directly connect to the modem without a router.
Dial-up and ISDN connections cannot be used.
Depending on the Internet connection, the number of connectable devices may be limited. This may mean that your
instrument cannot be connected to the Internet. If in doubt, check your contract or contact your provider.
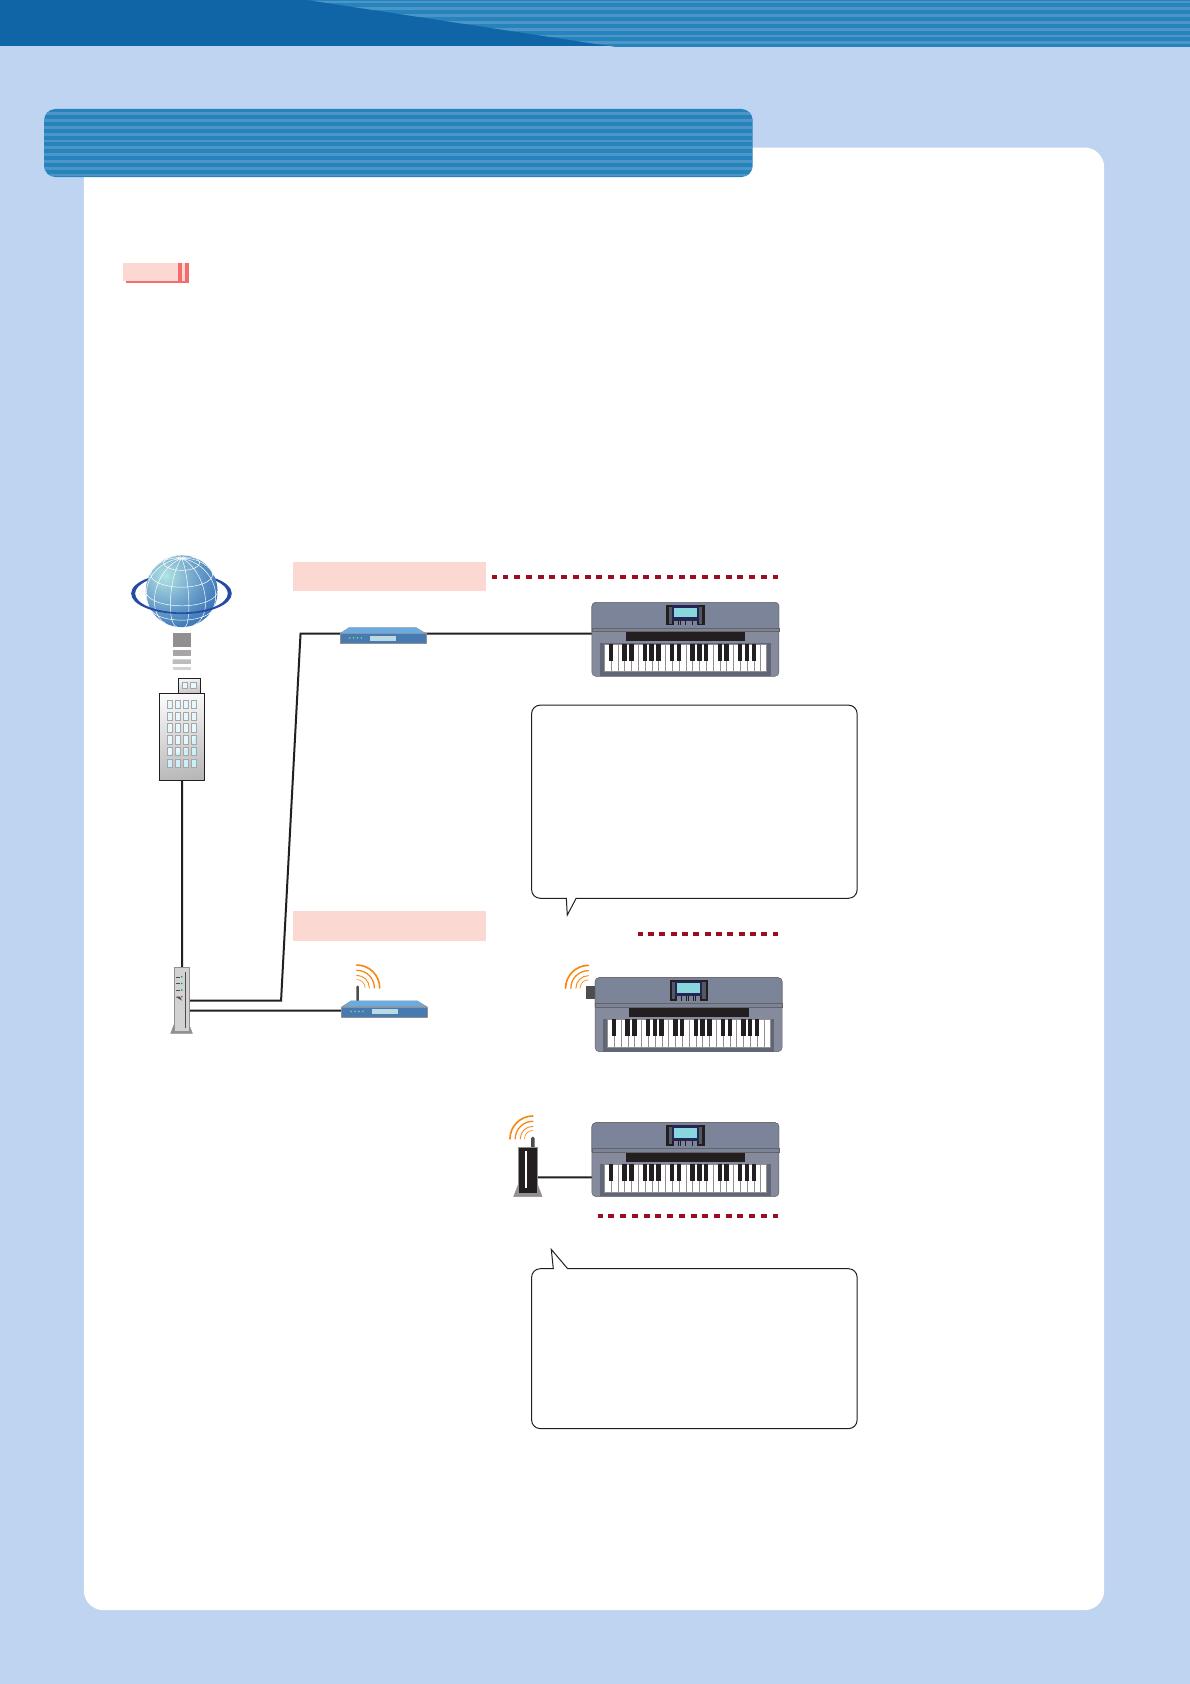
Select the connection environment of your home from the following.
Selection of the Connection Environment
NOTE
For details on connection operations,
refer to page 3.
LAN
terminal
For details on operations for connections using static IP address or proxy server, refer to page 15.
For details on connection operations,
refer to page 12.
For details on connection operations,
refer to page 6.
USB wireless
LAN adaptor
Wireless game
adaptor
Enables setting of a strong security format,
such as WPA2 format, etc.
Wireless connection of several Internet devices
is possible.
•For a list of wireless game adaptors whose
compatibility has been confirmed by Yamaha,
refer to the website:
http://music.yamaha.com/download/
Set the instrument within 10–20 m
from the access point. If the signal
is weak, the loading of web pages
will become slow and the connec-
tion will be unstable. The signal will
not be received if there is an obsta-
cle blocking reception.
It is comparatively inexpensive.
Electric power source is unnecessary.
Enables setting of a strong security format,
such as WPA2 format, etc.
•For a list of USB wireless LAN adaptors whose
compatibility has been confirmed by Yamaha,
refer to the website:
http://music.yamaha.com/download/
*A USB wireless LAN adaptor which is not on the list
cannot be used.
An ADSL modem, optical
network unit (ONU) or
cable modem
* Some modems have a
built-in router.
To use the Inter-
net connection,
you will first need
to subscribe to
an Internet ser-
vice or provider.
LAN
terminal
USB TO
DEVICE
terminal
router
Internet
LAN cable connection
Provider
LAN cable
Wireless LAN Connection
Access point
with router
Modem
Internet Connection Guide 3
1
Connect the devices according to the example.
First turn the power of the instrument off, then connect the devices as shown in the illustration below, and finally
turn the power on again.
•For an illustration of the location of the LAN terminal, refer to the Owner’s Manual.
2
Press the [INTERNET] button.
When the special website appears
Since the instrument is connected to the special website, you do not need to make Internet settings. About the operations in
the special website, refer to the Owner’s Manual.
The special website screen above is taken from the CVP-509.
The contents of the service as appearing here are current as of March, 2010. The available contents of the service are subject to change.
When the special website does not appear
Proceed to step 3.
Required Devices
LAN cable
Router (This is unnecessary if your modem has router capability.)
Modem (ADSL modem, optical network unit or cable modem)
Before installing a new router, check that the router performs normally by connecting via a computer.
Connection
LAN Cable Connection
NOTE
LAN cable
LAN
terminal
Router Modem
Internet
NOTE
NOTE
NEXT PAGE
Connection
Internet Connection Guide 4
3
Use the [DATA ENTRY] dial to select “Set the Internet connection, then press the [ENTER]
button to execute.
4
Use the [A]/[B] buttons to select “SETUP WIZARD.
5
Press the [B] button to select “LAN cable, then press the [G] button to proceed to “NEXT.
6
Make sure that the devices are connected as shown in the illustration of the display, then
press the [G] button to proceed to “NEXT.
NEXT PAGE
Connection
Internet Connection Guide 5
7
Press the [G](CONNECTION) button to check the connection to the special website.
The settings are saved by checking the connection.
Because the settings are lost when you turn off the power of the instrument, be sure to save the settings and changes you made.
8
Press the [G](DONE) button to connect to the special website.
When the special website appears, the network settings to the Internet are complete.
When the special website does not appear, refer to “Connection Help” on page 19.
For more details on the operations in the special website, refer to the Owner’s Manual.
NOTE
Connection
Internet Connection Guide 6
1
Connect the devices according to the example.
First turn the power of the instrument off, then connect the devices as shown in the illustration below, and finally
turn the power on again.
•For an illustration of the location of the USB TO DEVICE terminal, refer to the Owner’s Manual.
2
Press the [INTERNET] button.
3
Use the [DATA ENTRY] dial to select “Set the Internet connection, then press the [ENTER]
button to execute.
Required Devices
USB wireless LAN adaptor
For a list of USB wireless LAN adaptors whose compatibility has been confirmed by Yamaha, refer to the
website:
http://music.yamaha.com/download/
* A USB wireless LAN adaptor which is not on the list cannot be used.
Access point with router (The router capability here is unnecessary if your modem has router capability.)
Modem (ADSL modem, optical network unit or cable modem)
About the confirmation and changes in the setting of the access point with router side, read the owner’s manual for the product you are
using.
Before installing a new router, check that the router performs normally by connecting via a computer.
Wireless LAN Connection Using USB LAN Adaptor
NOTE
USB wireless
LAN adaptor
USB TO
DEVICE
terminal
Access point
with router
Modem
Internet
Set the instrument within 10–20 m from the
access point. The signal will not be received if
there is an obstacle blocking reception.
NOTE
NEXT PAGE
Connection
Internet Connection Guide 7
4
Use the [A]/[B] buttons to select “SETUP WIZARD.
5
Press the [C] button to select “Wireless LAN using USB LAN adaptor, then press the [G] but-
ton to proceed to “NEXT.
6
Make sure that the devices are connected as shown in the illustration of the display, then
press the [G] button to proceed to “NEXT.
NEXT PAGE
Connection
Internet Connection Guide 8
7
Use the [B]/[C] buttons to select the desired setup of the wireless network.
Setup by WPS (push button)
You can make the setting for the wireless network by simply pressing the WPS button of the access point with router. The
security is automatically set, you don’t need to make any other settings, such as key input, etc.
•You need to make sure that your USB wireless LAN adaptor and access point with router support WPS. Check whether your USB wireless
LAN adaptor supports WPS by accessing the URL of “Required Devices” on page 6.
Press the [B] button to select “Setup by WPS (push button),” then press the [G] button to proceed to “NEXT.
Proceed to step 8.
Setup after searching for wireless networks
When the list of the access points near the instrument is displayed, select the access point to be used. The SSID, channel
and security format of the selected access point are automatically set. When the security is set, input the key.
Press the [C] button to select “Setup after searching for wireless networks,” then press the [G] button to proceed to “NEXT.
Proceed to step 9.
NOTE
NEXT PAGE
Connection
Internet Connection Guide 9
8
Press the [F](YES) button, then within 2 minutes hold down the WPS button of the access
point with router.
For details about the operations in the setting of the access point on the router side, read the owner’s manual
for the product you are using.
Proceed to step 13.
9
Use the [DATA ENTRY] dial to select the desired access point, then press the [G] button to
proceed to “NEXT.
The SSID, channel and security format of the selected access point are automatically set. An access point that
is security-enabled is displayed with a padlock icon , Input the key. Make sure that the settings are the
same as those for the access point on the router side.
•For details on confirmation and changes in the setting of the access point on the router side, refer to the owner’s manual for the product you
are using.
With padlock icon
Since the security is set to your access point with router, proceed to step 10, then input the key.
No padlock icon
If your access point with router has not been security-enabled, you don’t need to make a setting for the wireless LAN. Pro-
ceed to step 13 on page 11. If you want to set the security to the access point, change this in the settings of your access point
with router.
NOTE
The signal strength may not be displayed
depending on the particular USB wireless
LAN adaptor you are using.
Signal
strength
NEXT PAGE
Connection
Internet Connection Guide 10
10
Press the [D](KEY) button to call up the character-entry display to input the key.
11
Input the key.
Refer to the Owner’s Manual for character-entry details.
To cancel the key input, press the [8t](CANCEL) button.
12
Press the [G](NEXT) button to set the key input.
When you set the key input, the characters are hidden and displayed as “******.
Make a written note of the settings, in case you have to enter them again.
Access point
SSID
Channel
Security setting YES NO
Security format
Key
NEXT PAGE
Connection
Internet Connection Guide 11
13
Press the [G](CONNECTION) button to check the connection to the special website.
The settings are saved by checking the connection.
Because the settings are lost when you turn off the power of the instrument, be sure to save the settings and changes you made.
14
Press the [G](DONE) button to connect to the special website.
When the special website appears, the network settings to the Internet are complete.
When the special website does not appear, refer to “Connection Help” on page 19.
For details on operations in the special website, refer to the Owner’s Manual.
NOTE
Connection
Internet Connection Guide 12
1
Connect the devices according to the example.
First turn the power of the instrument off, then connect the devices as shown in the illustration below, and finally
turn the power on again.
•For an illustration of the location of the LAN terminal, refer to the Owner’s Manual.
Required Devices
LAN cable
Wireless game adaptor
For a list of wireless game adaptors whose compatibility has been confirmed by Yamaha, refer to the web-
site:
http://music.yamaha.com/download/
Access point with router (The router capability here is unnecessary if your modem has router capability.)
Modem (ADSL modem, optical network unit or cable modem)
The wireless game adaptor requires connection to the AC outlet. For details on changes in the settings of the wireless game adaptor,
read the owner’s manual for the product you are using.
About confirmation and changes in the setting of the access point on the router side, read the owner’s manual for the product you are
using.
Before installing a new router, check that the router performs normally by connecting via a computer.
Wireless LAN Connection Using Wireless Game Adaptor
NOTE
LAN cable
LAN
terminal
Access point
with router
Modem
Internet
Wireless
game adaptor
Set the instrument within 10–20 m from the
access point. The signal will not be received if
there is an obstacle blocking reception.
NOTE
NEXT PAGE
Connection
Internet Connection Guide 13
2
Press the [INTERNET] button.
When the special website appears
Since the instrument is connected to the special website, you do not need to make Internet settings. For details on operations
in the special website, refer to the Owner’s Manual.
The special website screen above is taken from the CVP-509.
The contents of the service as appearing here are current as of March, 2010. The available contents of the service are subject to change.
When the special website does not appear
Proceed to step 3.
3
Use the [DATA ENTRY] dial to select “Set the Internet connection, then press the [ENTER]
button to execute.
4
Use the [A]/[B] buttons to select “SETUP WIZARD.
NOTE
NEXT PAGE
Connection
Internet Connection Guide 14
5
Press the [D] button to select “Wireless LAN using Wireless Game Adaptor, then press the
[G] button to proceed to “NEXT.
6
Make sure that the devices are connected as shown in the illustration of the display, then
press the [G] button to proceed to “NEXT.
7
Press the [G](CONNECTION) button to check the connection to the special website.
The settings are saved by checking the connection.
Because the settings are lost when you turn off the power of the instrument, be sure to save the settings and changes you made.
8
Press the [G](DONE) button to connect to the special website.
When the special website appears, the network settings to the Internet are complete.
When the special website does not appear, refer to “Connection Help” on page 19.
For details on operations in the special website, refer to the Owner’s Manual.
NOTE
Connection
Internet Connection Guide 15
Some cases may require detailed knowledge of the network settings.
1
Turn the power of the instrument on, then press the [INTERNET] button.
2
Use the [DATA ENTRY] dial to select “Set the Internet connection, then press the [ENTER]
button to execute.
3
Press the [C] button to select “ADVANCED SETTINGS.
4
Use the TAB [<][>] buttons to call up the desired page.
Using Static IP Address or Proxy Server
NEXT PAGE
Connection
Internet Connection Guide 16
5
Use the [A]–[J] buttons to select the desired parameter.
For details on each parameter, refer to page 18.
6
Select the setting or change the value.
Selecting the setting
Use the [2 st]/[3 st] buttons to select the setting, then use the [4 st](OK) button to execute.
Changing the value
Enter the value, then press the [8 s](OK) button to execute.
Refer to the Owner’s Manual for character-entry details.
NEXT PAGE
Connection
Internet Connection Guide 17
7
Use the [7 st] buttons to select “OK.
8
Press the [G](YES) button to save the settings.
Because the settings are lost when you turn off the power of the instrument, be sure to save the settings and changes you made.
9
Connect the devices.
First turn the power of the instrument off, then connect the devices, and finally turn the power on again.
10
Press the [INTERNET] button to connect to the special website.
When the special website appears, the network settings to the Internet are complete.
When the special website does not appear, refer to “Connection Help” on page 19.
For details on operations in the special website, refer to the Owner’s Manual.
NOTE
Connection
Internet Connection Guide 18
Parameters
IP INFORMATION
PROXY SERVER
WIRELESS LAN
DHCP Determines the DHCP ON/ON (SET DNS MANUALLY)/OFF settings.
IP ADDRESS/SUBNET MASK/
GATEWAY
Determines the IP ADDRESS/SUBNET MASK/GATEWAY settings. These settings must be made
when DHCP above is set to “OFF.
DNS SERVER 1/2 These settings must be made when DHCP above is set to “ON (SET DNS MANUALLY)” or “OFF.
PROXY SERVER/PROXY PORT Determines the proxy server name and port number.
SSID Determines the SSID setting.
CHANNEL Determines the channel.
SECURITY
Determines the security setting: OFF/WEP/WPA-PSK (TKIP)/WPA-PSK (AES)/WPA2-PSK (TKIP)/
WPA2-PSK(AES).
KEY Input the key when SECURITY above is set to something other than OFF.
WPS (PIN CODE) Used when inputting the PIN code for the setup.
Internet Connection Guide 19
If the instrument is not connected to the Internet, sometimes the [HELP] button appears on the display. You can view the
solutions by selecting “HELP.
1
Press the [G] button to select “HELP.
2
Use the [DATA ENTRY] dial to select a solution (Details), then press the [ENTER] button to view
the details.
3
Solve the problem with the displayed solutions.
Connection Help
Error code
For details about each code,
refer to the following URL:
http://services.music.
yamaha.com/idc/faq.html
Use the [DATA ENTRY]
dial to select the link, then
press the [ENTER] button
to see the comments.
Check the part where the
Check mark is displayed.
Internet Connection Guide 20
CAUTION
This restores the network settings to the default settings.
1
Press the [INTERNET] button.
2
Use the [DATA ENTRY] dial to select “Set the Internet connection, then press the [ENTER] but-
ton to execute.
3
Press the [E] button to select “INITIALIZE SETUP.
4
Press the [G](YES) button to initialize the settings.
Initialization of the Setup
  • Page 1 1
  • Page 2 2
  • Page 3 3
  • Page 4 4
  • Page 5 5
  • Page 6 6
  • Page 7 7
  • Page 8 8
  • Page 9 9
  • Page 10 10
  • Page 11 11
  • Page 12 12
  • Page 13 13
  • Page 14 14
  • Page 15 15
  • Page 16 16
  • Page 17 17
  • Page 18 18
  • Page 19 19
  • Page 20 20
  • Page 21 21
  • Page 22 22

Yamaha CVP-509 Guia de usuario

Categoria
Roteadores
Tipo
Guia de usuario
Este manual também é adequado para