Philips Hair Clippers HQC482 Manual do usuário
- Categoria
- Aparadores de cabelo
- Tipo
- Manual do usuário
Este manual também é adequado para


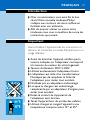
Introduction
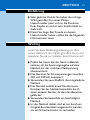
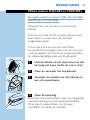
◗ Dear customer, you have made the right
choice! Your new Philips hair clipper adapts to
the contours of the head and enables
comfortable use.
◗ To enjoy using the hair clipper for a long time,
we advise you to read the following
information.
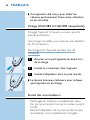
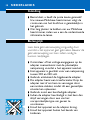
Important
Read these instructions for use carefully before
using the appliance and save them for future
reference.
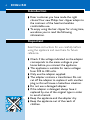
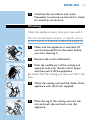
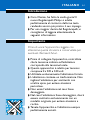
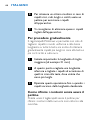
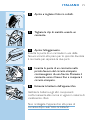
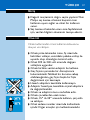
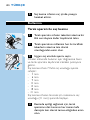
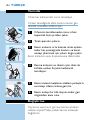
◗ Check if the voltage indicated on the adapter
corresponds to the mains voltage in your
home before you connect the appliance.
◗ This appliance is suitable for mains voltages
from 220 to 240 volts.
◗ Only use the adapter supplied.
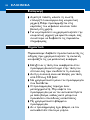
◗ The adapter contains a transformer. Do not
cut off the adapter to replace it with another
plug, as this will cause a hazardous situation.
◗ Do not use a damaged adapter.
◗ If the adapter is damaged, always have it
replaced by one of the original type in order
to avoid a hazard.
C
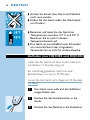
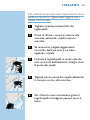
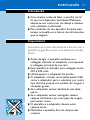
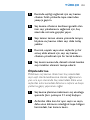
◗ Keep the appliance and the adapter dry.
◗ Keep the appliance out of the reach of
children.
ENGLISH4

C
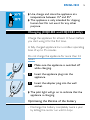
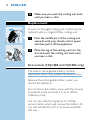
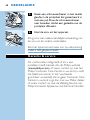
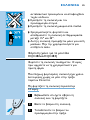
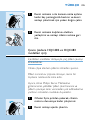
◗ Use, charge and store the appliance at a
temperature between 15c and 35c.
◗ This appliance is only intended for clipping
human hair. Do not use it for any other
purpose.
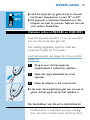
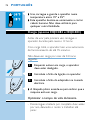
Charging (HQC482 and HQC483 only)
Charge the appliance for at least 12 hours before
you start using it for the first time.
A fully charged appliance has a cordless operating
time of up to 35 minutes.
Do not charge the appliance for more than 24
hours.
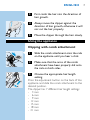
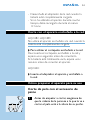
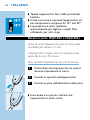
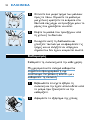
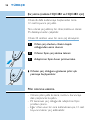
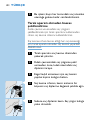
1 Make sure the appliance is switched off
while charging.
C
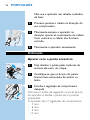
2 Insert the appliance plug into the
appliance.
3 Insert the adapter plug into the wall
socket.
C
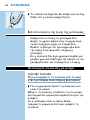
◗ The pilot light will go on to indicate that the
appliance is charging.
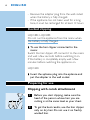
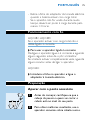
Optimising the lifetime of the battery
- Discharge the battery completely twice a year
by letting the motor run until it stops.
ENGLISH 5

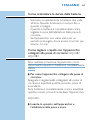
- Remove the adapter plug from the wall socket
when the battery is fully charged.
- If the appliance has not been used for a long
time, it must be recharged for at least 12 hours.
Corded clipping
HQC482, HQC483:
Do not run the appliance from the mains when
the battery is fully charged.
◗ To use the hair clipper connected to the
mains:
Switch the hair clipper off, connect it to the mains
and wait a few seconds before switching it on.
If the battery is completely empty, wait a few
minutes before switching the appliance on.
HQC440:
◗ Insert the apliance plug into the apliance and
put the adapter in the wall socket.
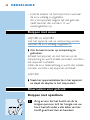
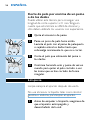
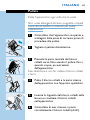
Preparing for use
Clipping with comb attachment
C
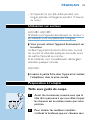
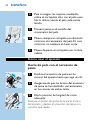
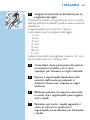
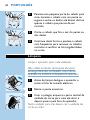
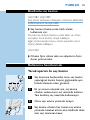
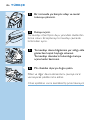
1 Before you start clipping, make sure the
head of the person whose hair you are
cutting is at the same level as your chest.
2 To get the best results, use the hair clipper
only on dry hair. Do not use it on freshly
washed hair.
ENGLISH6

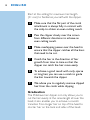
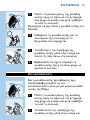
3 First comb the hair into the direction of
hair growth.
C
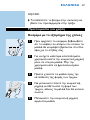
4 Always move the clipper against the
direction of hair growth, otherwise it will
not cut the hair properly.
5 Move the clipper through the hair slowly.
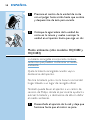
Using the appliance
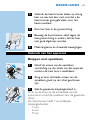
Clipping with comb attachment
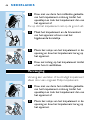
C
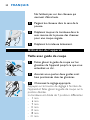
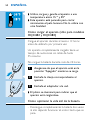
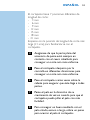
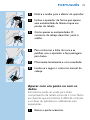
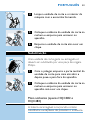
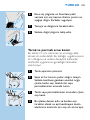
1 Slide the comb attachment onto the rails
on the appliance until you hear a click.
2 Make sure that the arms of the comb
attachment have been properly slid onto
the rails on both sides.
C
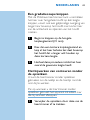
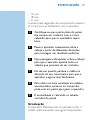
3 Choose the appropriate hair length
setting.
Press the adjustment button on the back of the
appliance and slide the comb attachment to the
desired position.
The clipper has 7 different hair length settings:
-3 mm
-6 mm
-9 mm
- 12 mm
- 15 mm
- 18 mm
- 21 mm
ENGLISH 7

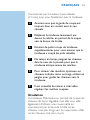
Start at the setting for maximum hair length
(21 mm) to familiarise yourself with the clipper.
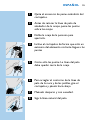
4 Make sure that the flat part of the comb
attachment is always fully in contact with
the scalp to obtain an even cutting result.
5 Pass the clipper slowly over the crown
from different directions to achieve an
even cutting result.
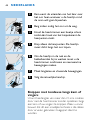
6 Make overlapping passes over the head to
ensure that the clipper catches all the hairs
that need to be cut.
7 Comb the hair in the direction of hair
growth from time to time so that the
clipper can catch the hair more easily.
8 To achieve a good result with curly, sparse
or long hair, you can use a comb to guide
the hair towards the clipper.
9 We advise you to regularly remove clipped
hair from the comb while clipping.
Graduation
The Philishave hair clipper not only allows you to
cut the hair evenly at the same length all over the
head, it also enables you to achieve a smooth
transition from longer hair on top of the head to
shorter hair on the back and sides of the head.
ENGLISH8

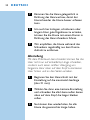
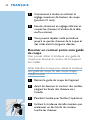
1 Start clipping at the setting for maximum
hair length (i.e. position 21 mm).
2 Then choose a shorter setting and cut the
hair on all parts of the head except the
top, where you want the hair to be longer.
3 You can repeat this procedure until the
hair on every part of the head has the
desired length.
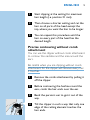
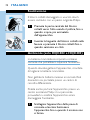
Precise contouring without comb
attachment
You can use the clipper without comb attachment
to contour the neckline and the area around the
ears.
Be careful when you are clipping without comb
attachment, for the clipper will remove every hair
it touches.
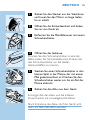
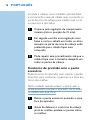
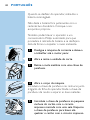
1 Remove the comb attachment by pulling it
off the clipper.
2 Before contouring the hairline round the
ears, comb the hair ends over the ear.
3 Bend the person's ear to get it out of the
way.
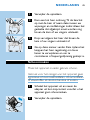
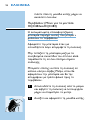
C
4 Tilt the clipper in such a way that only one
edge of the cutting element touches the
hair ends.
ENGLISH 9

C
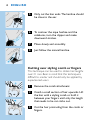
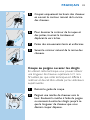
5 Only cut the hair ends.The hairline should
be close to the ear.
C
6 To contour the nape hairline and the
sideburns, turn the clipper and make
downward strokes.
7 Move slowly and smoothly.
C
8 Just follow the natural hairline.
Cutting over styling comb or fingers
This technique can be used to obtain hair lengths
over 21 mm. Bear in mind that this technique is
difficult to master and should only be applied by
experienced users.
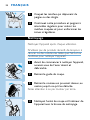
1 Remove the comb attachment.
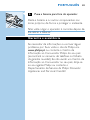
C
2 Comb a small section of hair upwards. Lift
the hair with a styling comb or hold it
between your fingers until only the length
that needs to be cut sticks out.
C
3 Cut the hair protruding from the comb or
fingers.
ENGLISH10

4 Continue this procedure and comb
frequently to remove cut hair and to check
for unevenly cut sections.
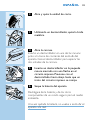
Cleaning
Clean the appliance every time you have used it.
Do not use abrasives, scourers or liquids such as
alcohol, petrol or acetone to clean the appliance.
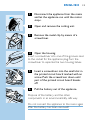
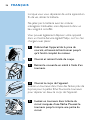
1 Make sure the appliance is switched off
and disconnected from the mains before
you start cleaning it.
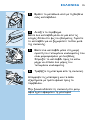
C
2 Remove the comb attachment.
C
3 Push the middle part of the cutting unit
upwards with your thumb until it opens
and then pull it off the appliance.
Be careful that the cutting unit does not fall to the
floor.
C
4 Clean the cutting unit and the inside of the
appliance with the brush supplied.
C
5 Place the lug of the cutting unit into the
slot and push the unit back onto the
appliance.
ENGLISH 11

6 Make sure you push the cutting unit back
until you hear a click.
Replacement
A worn or damaged cutting unit should only be
replaced with an original Philips cutting unit.
C
1 Push the middle part of the cutting unit
upwards with your thumb until it opens
and then pull it off the appliance.
C
2 Place the lug of the cutting unit into the
slot and push the cutting unit back until
you hear a click.
Environment (HQC482 and HQC483 only)
The built-in rechargeable battery contains
substances which may pollute the environment.
Remove the rechargeable battery when you
discard the appliance.
Do not throw the battery away with the normal
household waste but hand it in at an official
collection point.
You can also take the appliance to a Philips
service centre, which will remove the battery for
you and will dispose of it in an environmentally
safe way.
ENGLISH12

1 Disconnect the appliance from the mains
and let the appliance run until the motor
stops.
C
2 Open and remove the cutting unit.
C
3 Remove the metal clip by means of a
screwdriver.
C
4 Open the housing.
Insert a screwdriver into one of the grooves next
to the socket for the appliance plug.Turn the
screwdriver to separate the two housing halves.
C
5 Insert a screwdriver into the small slot in
the printed circuit board marked with an
arrow. Push the screwdriver down until
part of the printed circuit board breaks
off.
C
6 Pull the battery out of the appliance.
Dispose of the battery and the other
components in an environmentally safe way.
Do not connect the appliance to the mains again
after the battery has been removed!
ENGLISH 13

Guarantee & service
If you need information or if you have a problem,
please visit the Philips website at www.philips.com
or contact the Philips Customer Care Centre in
your country (you will find its phone number in
the worldwide guarantee leaflet). If there is no
Customer Care Centre in your country, turn to
your local Philips dealer or contact the Service
Department of Philips Domestic Appliances and
Personal Care BV.
ENGLISH14

Einführung
◗ Sehr geehrter Kunde, Sie haben die richtige
Wahl getroffen! Ihr neuer Philips
Haarschneider passt sich an die Konturen
Ihres Kopfes an und ist sehr komfortabel im
Gebrauch.
◗ Damit Sie lange Zeit Freude an diesem
Haarschneider haben, sollten Sie die folgenden
Informationen lesen.
Wichtig
Lesen Sie diese Bedienungsanleitung vor dem
ersten Gebrauch des Geräts gründlich durch und
bewahren Sie sie zur späteren Einsichtnahme auf.
◗ Prüfen Sie, bevor Sie das Gerät in Betrieb
nehmen, ob die Spannungsangabe auf dem
Netzteil mit der örtlichen Netzspannung
übereinstimmt.
◗ Das Gerät ist für Stromspannungen zwischen
220 und 240 Volt konzipiert.
◗ Verwenden Sie ausschließlich das mitgelieferte
Netzteil.
◗ Das Netzteil enthält einen Transformator.
Ersetzen Sie das Netzteil keinesfalls durch
einen anderen Stecker, da dies den Benutzer
gefährdet.
◗ Verwenden Sie keinesfalls ein beschädigtes
Netzteil.
◗ Ist das Netzteil defekt, darf es nur durch ein
Original-Ersatznetzteil ausgetauscht werden,
um ein Sicherheitsrisiko zu vermeiden.
DEUTSCH 15

C
◗ Achten Sie darauf, dass Gerät und Netzteil
nicht nass werden.
◗ Halten Sie das Gerät außer der Reichweite
von Kindern.
C
◗ Benutzen und laden Sie das Gerät bei
Temperaturen zwischen 15c C und 35c C.
Bewahren Sie es auch in diesem
Temperaturbereich auf.
◗ Das Gerät ist ausschließlich zum Schneiden
von menschlichem Haar vorgesehen.
Verwenden Sie es nicht für andere Zwecke.
Aufladen (nur HQC482 und HQC483)
Laden Sie das Gerät vor dem ersten Gebrauch
mindestens 12 Stunden lang auf.
Ein vollständig geladenes Gerät hat eine
Betriebsdauer von bis zu 35 Minuten.
Lassen Sie das Gerät nicht länger als 24 Stunden
am Netz.
1 Das Gerät muss während des Aufladens
ausgeschaltet sein.
C
2 Stecken Sie den Gerätestecker in das
Gerät.
3 Stecken Sie das Netzteil in die Steckdose.
DEUTSCH16

C
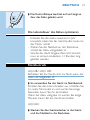
◗ Die Kontrolllampe leuchtet auf und zeigt an,
dass der Akku geladen wird.
Die Lebensdauer des Akkus optimieren
- Entladen Sie den Akku zweimal pro Jahr
komplett, indem Sie das Gerät laufen lassen, bis
der Motor anhält.
- Ziehen Sie das Netzteil aus der Steckdose,
sobald der Akku voll geladen ist.
- Wurde das Gerät längere Zeit nicht benutzt,
muss es erneut mindestens 12 Stunden lang
geladen werden.
Netzbetrieb
HQC482, HQC 483:
Betreiben Sie das Gerät nicht am Netz, wenn der
Akku voll aufgeladen ist.
◗ So verwenden Sie das Gerät im Netzbetrieb:
Schalten Sie den Haarschneider aus, schließen Sie
ihn andas Stromnetz an und warten Sie einige
Sekunden, bevor Sie ihn einschalten.
Wenn der Akku völlig leer ist, warten Sie einige
Minuten, bevor Sie das Gerät einschalten.
HQC440:
◗ Stecken Sie den Gerätestecker in das Gerät
und das Netzteil in die Steckdose.
DEUTSCH 17

Vorbereitung zum Gebrauch
Haare mit dem Kamm-Aufsatz
schneiden
C
1 Die Person, deren Haare Sie schneiden
wollen, sollte sich auf Brusthöhe vor Ihnen
befinden.
2 Beste Ergebnisse erzielen Sie bei
trockenem Haar.Verwenden Sie den
Haarschneider nicht bei frisch
gewaschenem Haar.
3 Kämmen Sie das Haar zunächst in
Richtung des Haarwuchses.
C
4 Führen Sie den Haarschneider immer
entgegen der Haarwuchsrichtung, damit
alle Haare ordentlich geschnitten werden.
5 Bewegen Sie den Haarschneider langsam
durch das Haar.
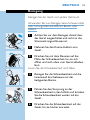
Der Haarschnitt
Haare mit dem Kamm-Aufsatz
schneiden
C
1 Schieben Sie den Kamm-Aufsatz auf die
Führungen am Gerät, bis er hörbar
einrastet.
DEUTSCH18

2 Vergewissern Sie sich, dass die Schienen
am Kamm-Aufsatz richtig in den
Führungen am Gerät sitzen.
C
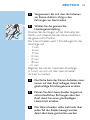
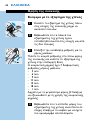
3 Wählen Sie die gewünschte
Haarlängeneinstellung.
Drücken Sie den Regler auf der Rückseite des
Geräts, und schieben Sie den Kamm-Aufsatz in
die gewünschte Position.
Der Haarschneider weist 7 Einstellungen für die
Haarlänge auf:
-3 mm
-6 mm
-9 mm
- 12 mm
- 15 mm
- 18 mm
- 21 mm
Beginnen Sie mit der maximalen Haarlänge
(21 mm), um sich mit dem Haarschneider
vertraut zu machen.
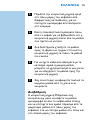
4 Die flache Seite des Kamm-Aufsatzes muss
immer auf dem Kopf aufliegen, damit Sie
gleichmäßige Schnittergebnisse erzielen.
5 Führen Sie den Haarschneider langsam in
unterschiedlichen Richtungen über den
Kopf, damit Sie einen gleichmäßigen
Haarschnitt erhalten.
6 Der Haarschneider sollte mehrmals über
jeden Teil des Kopfes bewegt werden,
damit alle Haare geschnitten werden.
DEUTSCH 19

7 Kämmen Sie die Haare gelegentlich in
Richtung des Haarwuchses, damit der
Haarschneider die Haare besser erfassen
kann.
8 Um auch bei lockigem, schütterem oder
langem Haar gute Ergebnisse zu erzielen,
können Sie die Haare mit einem Kamm in
Richtung des Haarschneiders führen.
9 Wir empfehlen, die Haare während des
Schneidens regelmäßig aus dem Kamm-
Aufsatz zu entfernen.
Abstufung
Mit dem Philishave Haarschneider können Sie das
Haar nicht nur auf einheitliche Länge schneiden,
sondern auch einen sanften Übergang von
längerem Haar oben auf dem Kopf zu kürzerem
Haar hinten und an den Seiten erzielen.
1 Beginnen Sie den Haarschnitt mit der
Einstellung auf die maximale Haarlänge
(also 21 mm).
2 Wählen Sie dann eine kürzere Einstellung
und schneiden Sie alle Haare außer denen
oben auf dem Kopf, die länger bleiben
sollen.
3 Sie können dies wiederholen, bis alle
Haare die gewünschte Länge haben.
DEUTSCH20

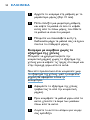
Präzise Konturen ohne Kamm-
Aufsatz
Sie können den Haarschneider ohne Kamm-
Aufsatz verwenden, um die Konturen im Nacken
und an den Ohren zu definieren.
Seien Sie vorsichtig, wenn Sie ohne den Kamm
Aufsatz arbeiten, da die Schneideeinheit sofort
alle Haare schneidet, mit denen sie in Berührung
kommt.
1 Ziehen Sie den Kamm-Aufsatz vom
Haarschneider.
2 Kämmen Sie das Haar über die Ohren,
bevor Sie die Kontur schneiden.
3 Knicken Sie das Ohr, um besser an die
Haare zu gelangen.
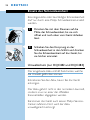
C
4 Neigen Sie den Haarschneider so, dass nur
eine Ecke der Schneideeinheit die
Haarspitzen berührt.
C
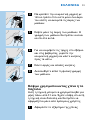
5 Schneiden Sie nur die Spitzen. Die Haare
sollten dicht am Ohr enden.
C
6 Drehen Sie den Haarschneider und führen
Sie ihn nach unten, um die Konturen im
Nacken und an den Koteletten zu
schneiden.
DEUTSCH 21

7 Bewegen Sie das Gerät langsam und
gleichmäßig.
C
8 Folgen Sie einfach der natürlichen
Haarlinie.
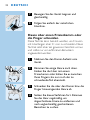
Haare über einen Frisierkamm oder
die Finger schneiden
Diese Technik kann benutzt werden, um Frisuren
mit Haarlängen über 21 mm zu schneiden. Diese
Technik setzt aber ein gewissses Geschick voraus
und sollte nur von erfahrenen Benutzern
angewendet werden.
1 Nehmen Sie den Kamm-Aufsatz vom
Gerät.
C
2 Kämmen Sie einige Haare nach oben.
Heben Sie das Haar mit einem
Frisierkamm oder halten Sie es zwischen
Ihren Fingern, bis nur noch der zu
schneidende Teil übersteht.
C
3 Schneiden Sie die über den Kamm bzw. die
Finger hinausragenden Haare ab.
4 Setzen Sie dieses Verfahren fort. Kämmen
Sie das Haar regelmäßig, um
abgeschnittene Haare zu entfernen und
nach ungleichmäßig geschnittenen
Bereichen zu suchen.
DEUTSCH22
A página está carregando...
A página está carregando...
A página está carregando...
A página está carregando...
A página está carregando...
A página está carregando...
A página está carregando...
A página está carregando...
A página está carregando...
A página está carregando...
A página está carregando...
A página está carregando...
A página está carregando...
A página está carregando...
A página está carregando...
A página está carregando...
A página está carregando...
A página está carregando...
A página está carregando...
A página está carregando...
A página está carregando...
A página está carregando...
A página está carregando...
A página está carregando...
A página está carregando...
A página está carregando...
A página está carregando...
A página está carregando...
A página está carregando...
A página está carregando...
A página está carregando...
A página está carregando...
A página está carregando...
A página está carregando...
A página está carregando...
A página está carregando...
A página está carregando...
A página está carregando...
A página está carregando...
A página está carregando...
A página está carregando...
A página está carregando...
A página está carregando...
A página está carregando...
A página está carregando...
A página está carregando...
A página está carregando...
A página está carregando...
A página está carregando...
A página está carregando...
A página está carregando...
A página está carregando...
A página está carregando...
A página está carregando...
A página está carregando...
A página está carregando...
A página está carregando...
A página está carregando...
A página está carregando...
A página está carregando...
A página está carregando...
A página está carregando...
A página está carregando...
A página está carregando...
A página está carregando...
A página está carregando...
A página está carregando...
A página está carregando...
A página está carregando...
A página está carregando...
A página está carregando...
A página está carregando...
A página está carregando...
A página está carregando...
A página está carregando...
A página está carregando...
A página está carregando...
A página está carregando...
A página está carregando...
A página está carregando...
A página está carregando...
A página está carregando...
A página está carregando...
A página está carregando...
A página está carregando...
A página está carregando...
A página está carregando...
A página está carregando...
-
 1
1
-
 2
2
-
 3
3
-
 4
4
-
 5
5
-
 6
6
-
 7
7
-
 8
8
-
 9
9
-
 10
10
-
 11
11
-
 12
12
-
 13
13
-
 14
14
-
 15
15
-
 16
16
-
 17
17
-
 18
18
-
 19
19
-
 20
20
-
 21
21
-
 22
22
-
 23
23
-
 24
24
-
 25
25
-
 26
26
-
 27
27
-
 28
28
-
 29
29
-
 30
30
-
 31
31
-
 32
32
-
 33
33
-
 34
34
-
 35
35
-
 36
36
-
 37
37
-
 38
38
-
 39
39
-
 40
40
-
 41
41
-
 42
42
-
 43
43
-
 44
44
-
 45
45
-
 46
46
-
 47
47
-
 48
48
-
 49
49
-
 50
50
-
 51
51
-
 52
52
-
 53
53
-
 54
54
-
 55
55
-
 56
56
-
 57
57
-
 58
58
-
 59
59
-
 60
60
-
 61
61
-
 62
62
-
 63
63
-
 64
64
-
 65
65
-
 66
66
-
 67
67
-
 68
68
-
 69
69
-
 70
70
-
 71
71
-
 72
72
-
 73
73
-
 74
74
-
 75
75
-
 76
76
-
 77
77
-
 78
78
-
 79
79
-
 80
80
-
 81
81
-
 82
82
-
 83
83
-
 84
84
-
 85
85
-
 86
86
-
 87
87
-
 88
88
-
 89
89
-
 90
90
-
 91
91
-
 92
92
-
 93
93
-
 94
94
-
 95
95
-
 96
96
-
 97
97
-
 98
98
-
 99
99
-
 100
100
-
 101
101
-
 102
102
-
 103
103
-
 104
104
-
 105
105
-
 106
106
-
 107
107
-
 108
108


Philips Hair Clippers HQC482 Manual do usuário
- Categoria
- Aparadores de cabelo
- Tipo
- Manual do usuário
- Este manual também é adequado para
em outras línguas
- español: Philips Hair Clippers HQC482 Manual de usuario
- français: Philips Hair Clippers HQC482 Manuel utilisateur
- italiano: Philips Hair Clippers HQC482 Manuale utente
- Nederlands: Philips Hair Clippers HQC482 Handleiding
- Deutsch: Philips Hair Clippers HQC482 Benutzerhandbuch
- Türkçe: Philips Hair Clippers HQC482 Kullanım kılavuzu
Artigos relacionados
-
Philips Hair Clippers QC5040 Manual do usuário
-
-
-
-
-
Philips QC5005/30 Manual do usuário
-
Philips QC5070/00 Manual do usuário
-
-
-
Philips QC5002 Manual do usuário