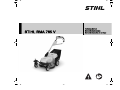
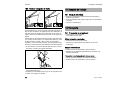
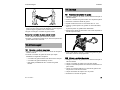
STIHL RMA 765.0 V Manual do usuário
- Categoria
- Cortadores de grama
- Tipo
- Manual do usuário

STIHL RMA 765 V
Instruction Manual
Manual de instrucciones
Manual de instruções de serviços


Translation of Original Instruction
Manual
Printed on chlorine-free paper
Printing inks contain vegetable oils, paper can be recycled.
© STIHL Tirol GmbH 2020
0478-131-9838-A. I20. Ess. 45630052-00010.
0000008817_004_GB
0478-131-9838-A
English
1
This instruction manual is protected by copyright. All rights reserved, especially the rights to reproduce, translate and process
with electronic systems.
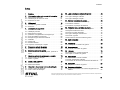
Contents
1 Introduction
. . . . . . . . . . . . . . . . . . . . . . . . . . . . . . . . . . . . . . . . .
2
2 Guide to Using this Manual
. . . . . . . . . . . . . . . . . . . . . . . . . .
2
2.1 Applicable Documents
. . . . . . . . . . . . . . . . . . . . . . . . . . . . . . .
2
2.2 Warning Notices in Text
. . . . . . . . . . . . . . . . . . . . . . . . . . . . .
3
2.3 Symbols in Text
. . . . . . . . . . . . . . . . . . . . . . . . . . . . . . . . . . . . .
3
3 Overview
. . . . . . . . . . . . . . . . . . . . . . . . . . . . . . . . . . . . . . . . . . . .
3
3.1 Lawn Mower and Battery
. . . . . . . . . . . . . . . . . . . . . . . . . . . .
3
3.2 Symbols
. . . . . . . . . . . . . . . . . . . . . . . . . . . . . . . . . . . . . . . . . . . .
4
4 Safety Precautions
. . . . . . . . . . . . . . . . . . . . . . . . . . . . . . . . . .
5
4.1 Warning Symbols
. . . . . . . . . . . . . . . . . . . . . . . . . . . . . . . . . . .
5
4.2 Intended Use
. . . . . . . . . . . . . . . . . . . . . . . . . . . . . . . . . . . . . . . .
5
4.3 Requirements for the User
. . . . . . . . . . . . . . . . . . . . . . . . . .
6
4.4 Clothing and Equipment
. . . . . . . . . . . . . . . . . . . . . . . . . . . . .
6
4.5 Working Area and Surroundings
. . . . . . . . . . . . . . . . . . . . .
7
4.6 Safe Condition
. . . . . . . . . . . . . . . . . . . . . . . . . . . . . . . . . . . . . .
7
4.7 Working
. . . . . . . . . . . . . . . . . . . . . . . . . . . . . . . . . . . . . . . . . . . . .
8
4.8 Transporting
. . . . . . . . . . . . . . . . . . . . . . . . . . . . . . . . . . . . . . . .
9
4.9 Storage
. . . . . . . . . . . . . . . . . . . . . . . . . . . . . . . . . . . . . . . . . . . .
10
4.10 Cleaning, Maintenance and Repair
. . . . . . . . . . . . . . . . .
10
5 Preparing the Lawn Mower for Operation
. . . . . . . . . . .
11
5.1 Preparing the Lawn Mower for Operation
. . . . . . . . . . .
11
6 Assembling the Lawn Mower
. . . . . . . . . . . . . . . . . . . . . . .
11
6.1 Assembling, Attaching and Detaching the Grass
Catcher Box
. . . . . . . . . . . . . . . . . . . . . . . . . . . . . . . . . . . . . . . .
11
7 Adjusting the Lawn Mower for the User
. . . . . . . . . . . . .
12
7.1 Adjusting the Handlebar
. . . . . . . . . . . . . . . . . . . . . . . . . . . .
12
7.2 Folding the Handlebar
. . . . . . . . . . . . . . . . . . . . . . . . . . . . . .
12
8 Removing and Fitting the Battery
. . . . . . . . . . . . . . . . . . .
12
8.1 Fitting the Battery
. . . . . . . . . . . . . . . . . . . . . . . . . . . . . . . . . .
12
8.2 Removing the Battery
. . . . . . . . . . . . . . . . . . . . . . . . . . . . . .
12
9 Inserting and Removing the Activation Key
. . . . . . . . .
13
9.1 Inserting the Activation Key
. . . . . . . . . . . . . . . . . . . . . . . .
13
9.2 Removing the Activation Key
. . . . . . . . . . . . . . . . . . . . . . .
13
10 Switching the Lawn Mower On and Off
. . . . . . . . . . . . .
13
10.1 Switching the Lawn Mower On
. . . . . . . . . . . . . . . . . . . . .
13
10.2 Activating and Deactivating the Blade
. . . . . . . . . . . . . .
13
10.3 Switching the Drive On and Off
. . . . . . . . . . . . . . . . . . . .
14
11 Checking the Lawn Mower
. . . . . . . . . . . . . . . . . . . . . . . . .
14
11.1 Checking the Controls
. . . . . . . . . . . . . . . . . . . . . . . . . . . . .
14
11.2 Checking the Blade
. . . . . . . . . . . . . . . . . . . . . . . . . . . . . . . .
15
11.3 Checking the Blade Position
. . . . . . . . . . . . . . . . . . . . . . .
16
12 Operating the Lawn Mower
. . . . . . . . . . . . . . . . . . . . . . . . .
16
12.1 Holding and Guiding the Lawn Mower
. . . . . . . . . . . . . .
16
12.2 Setting the Cutting Height
. . . . . . . . . . . . . . . . . . . . . . . . . .
16
12.3 Locking the Front Wheels
. . . . . . . . . . . . . . . . . . . . . . . . . .
17
12.4 Activating and Deactivating ECO Mode
. . . . . . . . . . . .
17
12.5 Mowing
. . . . . . . . . . . . . . . . . . . . . . . . . . . . . . . . . . . . . . . . . . . .
18
12.6 Emptying the Grass Catcher Box
. . . . . . . . . . . . . . . . . . .
18
13 After Finishing Work
. . . . . . . . . . . . . . . . . . . . . . . . . . . . . . .
19
13.1 After Finishing Work
. . . . . . . . . . . . . . . . . . . . . . . . . . . . . . .
19
14 Transporting
. . . . . . . . . . . . . . . . . . . . . . . . . . . . . . . . . . . . . . .
19
14.1 Transporting the Lawn Mower
. . . . . . . . . . . . . . . . . . . . . .
19
15 Storing
. . . . . . . . . . . . . . . . . . . . . . . . . . . . . . . . . . . . . . . . . . . . .
20
15.1 Storing the Lawn Mower
. . . . . . . . . . . . . . . . . . . . . . . . . . .
20
16 Cleaning
. . . . . . . . . . . . . . . . . . . . . . . . . . . . . . . . . . . . . . . . . . .
20
16.1 Placing the Lawn Mower in the Cleaning Position
. . .
20
16.2 Cleaning the Lawn Mower
. . . . . . . . . . . . . . . . . . . . . . . . .
20
17 Maintenance
. . . . . . . . . . . . . . . . . . . . . . . . . . . . . . . . . . . . . . .
20
17.1 Removing and Attaching the Blade
. . . . . . . . . . . . . . . . .
20
17.2 Sharpening and Balancing the Blade
. . . . . . . . . . . . . . .
21
17.3 Checking the Belt Tension of the Blade Drive
. . . . . .
22
18 Repairing
. . . . . . . . . . . . . . . . . . . . . . . . . . . . . . . . . . . . . . . . . .
22
18.1 Repairing the Lawn Mower
. . . . . . . . . . . . . . . . . . . . . . . . .
22
19 Troubleshooting
. . . . . . . . . . . . . . . . . . . . . . . . . . . . . . . . . . . .
23
19.1 Remedying Lawn Mower or Battery Faults
. . . . . . . . .
23

0478-131-9838-A
2
English
1 Introduction
Dear Customer,
Thank you for choosing STIHL. We develop and
manufacture our quality products to meet our customers’
requirements. The products are designed for reliability even
under extreme conditions.
STIHL also stands for premium service quality. Our
specialist dealers guarantee competent advice and
instruction as well as comprehensive service support.
We thank you for your confidence in us and hope you will
enjoy working with your STIHL product.
Dr. Nikolas Stihl
IMPORTANT: READ BEFORE USE AND KEEP IN A SAFE
PLACE.
2.1 Applicable Documents
Local safety regulations apply.
► In addition to this instruction manual, read, understand
and keep the following documents:
– STIHL AR L battery instruction manual
– ADA 700 instruction manual
– STIHL AL 101, 300, 500 charger instruction manual
– STIHL AP battery safety information
– Safety information for STIHL batteries and products
with built-in battery: www.stihl.com/safety-data-sheets
20 Specifications
. . . . . . . . . . . . . . . . . . . . . . . . . . . . . . . . . . . . . .
26
20.1 Lawn Mower STIHL RMA 765.0 V
. . . . . . . . . . . . . . . . . .
26
20.2 Blades
. . . . . . . . . . . . . . . . . . . . . . . . . . . . . . . . . . . . . . . . . . . . .
26
20.3 Sound Values and Vibration Values
. . . . . . . . . . . . . . . .
26
20.4 REACH
. . . . . . . . . . . . . . . . . . . . . . . . . . . . . . . . . . . . . . . . . . . .
26
21 Spare Parts and Accessories
. . . . . . . . . . . . . . . . . . . . . . .
27
21.1 Spare Parts and Accessories
. . . . . . . . . . . . . . . . . . . . . . .
27
22 Disposal
. . . . . . . . . . . . . . . . . . . . . . . . . . . . . . . . . . . . . . . . . . .
27
22.1 Disposing of the Lawn Mower
. . . . . . . . . . . . . . . . . . . . . .
27
23 Safety Information for Lawn Mowers
. . . . . . . . . . . . . . . .
27
23.1 Introduction
. . . . . . . . . . . . . . . . . . . . . . . . . . . . . . . . . . . . . . . .
27
23.2 Training
. . . . . . . . . . . . . . . . . . . . . . . . . . . . . . . . . . . . . . . . . . . .
27
23.3 Preparatory Measures
. . . . . . . . . . . . . . . . . . . . . . . . . . . . .
27
23.4 Handling
. . . . . . . . . . . . . . . . . . . . . . . . . . . . . . . . . . . . . . . . . . .
27
23.5 Maintenance and Storage
. . . . . . . . . . . . . . . . . . . . . . . . . .
28
1 Introduction
2 Guide to Using this Manual

0478-131-9838-A
3
English
3 Overview
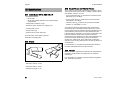
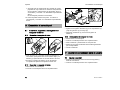
2.2 Warning Notices in Text
DANGER
This notice refers to risks which result in serious or fatal
injury.
► Serious or fatal injuries can be avoided by taking the
precautions mentioned.
WARNING
This notice refers to risks which can result in serious or fatal
injury.
► Serious or fatal injuries can be avoided by taking the
precautions mentioned.
NOTICE
This notice refers to risks which can result in damage to
property.
► Damage to property can be avoided by taking the
precautions mentioned.
2.3 Symbols in Text
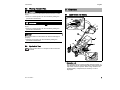
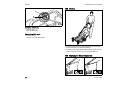
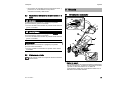
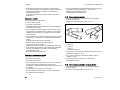
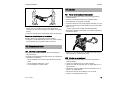
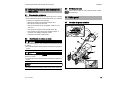
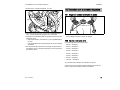
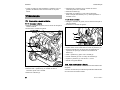
3.1 Lawn Mower and Battery
1 Operating unit
The operating unit is used to switch the lawn mower on,
activate ECO mode, read off the battery charge state and
adjust the maximum speed. When using the ADA 700
double-battery compartment, the battery in use is
displayed.
This symbol refers to a chapter in this instruction
manual.
3Overview

0478-131-9838-A
4
English
3 Overview
2 Control bar for mowing
The control bar for mowing switches the blades on and
off together with the ON button.
3 Control bar for self-propulsion
The control bar for self-propulsion activates and
deactivates drive system.
4 Grass catcher box
The grass catcher box collects the mown grass.
5 Discharge flap
The discharge flap closes off the discharge chute.
6Lever
The lever is used to set the cutting height of the rear
wheels.
7Lever
The lever is used to set the cutting height and to lock and
release the front wheels.
8Flap
The flap covers the battery and the activation key.
9Lever
The lever is used to adjust and fold down the handlebar.
10 Handlebar
The handlebar is used to hold, guide and transport the
lawn mower.
11 Rotary wheel
The rotary wheel is used to set the maximum speed.
12 ON button
The ON button switches the lawn mower on and,
together with the control lever for mowing, activates the
blades.
13 ECO switch
The ECO switches activates and deactivates ECO mode.
14 Charge state indicator
The LEDs indicate the charge state and battery faults
when the ON button is pressed.
15 Warning triangle
The warning triangle indicates faults in the lawn mower.
16 Indicator for ADA 700 double-battery compartment
The LEDs indicate the battery currently in use.
17 Activation key
The activation key activates the lawn mower.
# Rating plate with machine number
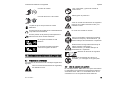
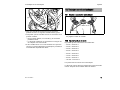
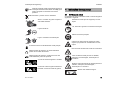
3.2 Symbols
The symbols can be on the lawn mower or battery and have
the following meaning:
This symbol identifies the activation key.
This symbol identifies the ECO switch.
The symbol indicates the lawn mower weight.
Guaranteed sound power level in accordance
with Directive 2000/14/EC in dB(A) for the
purpose of comparing the sound emissions of
products.
Do not dispose of the product with domestic waste.
Switch the lawn mower on and set
maximum speed.
Activate the mowing blade.
ECOECO
XX
L
WA

0478-131-9838-A
5
English
4 Safety Precautions
4.1 Warning Symbols
The warning symbols on the lawn mower have the following
meaning:
4.2 Intended Use
The STIHL RMA 765 V lawn mower is used to mow grass.
The lawn mower is supplied with energy by a STIHL AR L
battery or a STIHL AP battery together with the ADA 700
double-battery compartment.
Engage self-propulsion.
The lever locks the front wheels in this position.
The front wheels are freely movable when the lever is
in this position.
The cutting height of the front wheels can be set when
the lever is in this position.
The grass catcher bag is being filled.
The grass catcher box is full. Empty the
grass catcher box.
4 Safety Precautions
Follow the safety instructions and their
measures.
Read, understand and keep the instruction
manual.
Wear safety glasses.
Observe the safety instructions on high-velocity
objects and their measures.
Do not touch a turning blade.
Remove the battery during work stoppages,
transport, storage, maintenance or repair.
Pull out the activation key during work
stoppages, transport, storage, maintenance or
repair.
Maintain a safety distance.
Protect the lawn mower from rain and moisture.
Do not immerse in liquids.

0478-131-9838-A
6
English
4 Safety Precautions
WARNING
■ Batteries not approved by STIHL for the lawn mower may
cause fires and explosions. This may result in serious or
fatal injury to people and damage to property.
► Use the lawn mower with a STIHL AR L battery or a
STIHL AP battery together with the ADA 700 double-
battery compartment.
■ Failure to use the lawn mower or battery as intended may
result in serious or fatal injury to people and damage to
property.
► Use the lawn mower as described in this instruction
manual.
► Use the battery as described in the instruction manual
for the STIHL AR L battery or the instruction manual for
the ADA 700 double-battery compartment.
4.3 Requirements for the User
WARNING
■ Uninstructed users cannot recognise or evaluate the
dangers posed by the lawn mower. This may result in
serious or fatal injury to the user or other people.
► If passing on the lawn mower to another person: provide
them with the instruction manual also.
► Make sure that the user meets the following conditions:
– The user is rested.
– The user is physically, sensorily and mentally capable
of operating the lawn mower and working with it. If the
user is physically, sensorily or mentally impaired, the
lawn mower must only be used under supervision or
following instruction by a responsible person.
– The user can recognise and evaluate the dangers
posed by the lawn mower.
– The user is aware that they are responsible for
accidents and damage.
– The user is of legal age or the user is being trained
under supervision in a profession in accordance with
national regulations.
– The user has received instruction from a STIHL
specialist dealer or a competent person before using
the lawn mower for the first time.
– The user is not impaired by alcohol, medicines or
drugs.
► If anything is unclear: consult a STIHL specialist dealer.
4.4 Clothing and Equipment
WARNING
■ Objects may be thrown up at high velocity while working.
This may result in injury to the user.
► Wear long trousers made from resistant material.
■ Dust may be stirred up while working. Breathing in dust
may be harmful to health and cause allergic reactions.
► If dust is stirred up: wear a dust mask.
■ Unsuitable clothing may get caught on wood, brambles
and in the lawn mower. This may result in serious injury to
the user.
► Wear close-fitting clothing.
► Remove scarves and jewellery.
► Read, understand and keep the instruction
manual.

0478-131-9838-A
7
English
4 Safety Precautions
■ The user may come into contact with the blade during
cleaning, maintenance or transport. This may result in
injury to the user.
► Wear work gloves made from resistant material.
■ Wearing unsuitable footwear may cause the user to slip.
This may result in injury to the user.
► Wear sturdy, closed-toed footwear with high-grip soles.
■ Material particles may be expelled when sharpening the
blade. This may result in injury to the user.
► Wear close-fitting safety glasses. Suitable safety
glasses are tested in accordance with EN 166 or
national regulations and available commercially with the
corresponding marking.
► Wear work gloves made from resistant material.
4.5 Working Area and Surroundings
WARNING
■ Bystanding people, children and animals cannot
recognise or evaluate the dangers posed by the lawn
mower and high-velocity objects. This may result in
serious injury to bystanding people, children and animals
and damage to property.
► Maintain a distance of 5 m from objects.
► Do not leave the lawn mower unattended.
► Make sure that children cannot play with the lawn
mower.
■ Electrical components of the lawn mower may produce
sparks. Sparks may cause fires and explosions in highly
flammable or explosive environments. Persons may be
seriously or fatally injured and property may be damaged.
► Do not work in a highly flammable or explosive
environment.
4.6 Safe Condition
4.6.1 Lawn Mower
The lawn mower is in safe condition when the following
conditions are met:
– The lawn mower is not damaged.
– The lawn mower is clean.
– The controls are working and have not been modified.
– If mowing and the mown grass is to be collected in the
grass catcher box: the grass catcher box is correctly
attached.
– If mowing and the mown grass is to be ejected to the rear:
the grass catcher box is detached and the discharge flap
is closed.
– The blade is correctly attached.
– Only genuine STIHL accessories for this lawn mower are
attached.
– The accessories are correctly attached.
WARNING
■ If not in safe condition, components may no longer
operate correctly and safety devices may be disabled.
This may result in serous or fatal injury to people.
► Use an undamaged lawn mower.
► If the lawn mower is dirty: clean the lawn mower.
► Do not modify the lawn mower.
► If the controls are not working: do not use the lawn
mower.
► If mowing and the mown grass is to be collected in the
grass catcher box: attach the grass catcher box as
described in this instruction manual.
► Only attach genuine STIHL accessories for this lawn
mower.
► Attach the blade as described in this instruction manual.
► Attach accessories as described in this instruction
manual or in the instruction manual for the accessories.
► Keep bystanding people, children
and animals outside a radius of 5 m
around the working area.

0478-131-9838-A
8
English
4 Safety Precautions
► Do not insert objects into the apertures in the lawn
mower.
► Never connect the key receptacle terminals to metallic
objects and cause a short circuit.
► Replace worn or damaged warning signs.
► If anything is unclear: consult a STIHL specialist dealer.
4.6.2 Blades
The blades are in safe condition when the following
conditions are met:
– The blades and attachments are not damaged.
– The blades are not deformed.
– The blades are correctly attached.
– The blades are at a 90° angle to each other, @ 11.3.
– The blades are correctly sharpened.
– The blades are burr-free.
– The blades are correctly balanced.
– The minimum thickness and minimum width of the blades
are not fallen below, @ 20.2.
– The sharpening angle is observed, @ 20.2.
WARNING
■ In unsafe condition, blade parts may come loose and be
expelled. This may result in serious injury to people.
► Use undamaged blades and attachments.
► Attach the blades correctly.
► Sharpen the blades correctly.
► If the minimum thickness or minimum width are fallen
below: replace the blades.
► Have the blades balanced by a STIHL specialist dealer.
► If anything is unclear: consult a STIHL specialist dealer.
4.7 Working
WARNING
■ In certain situations, the user may no longer be able to
concentrate on their work. This may result in the user
stumbling, falling and becoming seriously injured.
► Work calmly and carefully.
► If the light and visibility conditions are poor: do not use
the lawn mower.
► Operate the lawn mower alone.
► Watch out for obstacles.
► Do not tilt the lawn mower.
► Work standing on the ground and maintain balance.
► If signs of fatigue occur: take a break.
► If mowing on a slope: mow across the slope.
► Do not mow on steep slopes.
■ The turning blade may cut the user. This may result in
serious injury to the user.
► Do not touch a turning blade.
► If the blade is blocked by an object: switch
the lawn mower off, pull out the activation
key and remove the battery. Only then
remove the object.

0478-131-9838-A
9
English
4 Safety Precautions
■ If working without self-propulsion when mowing, self-
propulsion may unintentionally be engaged and the lawn
mower may start moving. This may result in serious injury
to people and damage to property.
► Only press the control bar for self-propulsion if self-
propulsion is to be engaged.
■ If the lawn mower changes or starts to behave differently
when working, it may not be in safe condition. This may
result in serious injury to people and damage to property.
► Stop working, pull out the activation key, remove the
battery and consult a STIHL specialist dealer.
■ The lawn mower may cause vibrations when working.
► Wear gloves.
► Take breaks.
► If signs of a circulatory disturbance occur: consult a
doctor.
■ If the blade hits a foreign object when working, the blade
or parts of it may be damaged or thrown up at high
velocity. This may result in injury to people and damage to
property.
► Remove foreign objects from the work area.
■ When the control bar for mowing is released, the blade
continues to turn for a short time. This may result in
serious injury to people.
► Wait until the blade is no longer turning.
■ Sparks may be produced if the turning blade hits a hard
object. Sparks may cause fires in highly flammable
environments. This may result in serious or fatal injury to
people and damage to property.
► Do not work in a highly flammable environment.
■ If the blades hit a foreign object when working, the blades
may be damaged or the blade position may be changed.
► If the blades hit an object, switch the lawn mower off and
check the lawn mower and blades.
DANGER
■ If working near live wires, the blade may come into contact
with the live wires and damage them. This may result in
serious or fatal injury to the user.
► Do not work near live wires.
■ The user may be struck by lighting if working during a
thunderstorm. This may result in serious or fatal injury to
the user.
► Do not work during thunderstorms.
4.8 Transporting
WARNING
■ The lawn mower may tip over or move during transport.
This may result in injury to people and damage to
property.
► Pull out the activation key.
► Remove the battery.
► Secure the lawn mower with lashing straps, belts or a
net so that it cannot tip over and move.
■ If the activation key and battery are inserted during
transport with self-propulsion disengaged, self-propulsion
may unintentionally be engaged and the lawn mower may
start moving. This may result in serious injury to people
and damage to property.
► Pull out the activation key.
► Remove the battery.
■ The lawn mower is heavy. Attempting to carry the lawn
mower without assistance may result in injury to the user.
► The lawn mower must be carried by two people.

0478-131-9838-A
10
English
4 Safety Precautions
4.9 Storage
WARNING
■ Children cannot recognise or evaluate the dangers posed
by the lawn mower. This may result in serious injury to
children.
► Pull out the activation key.
► Remove the battery.
► Keep the lawn mower out of the reach of children.
■ Moisture may cause corrosion of the electrical contacts on
the lawn mower and metal components. This may result in
damage to the lawn mower.
► Pull out the activation key.
► Remove the battery.
► Keep the lawn mower clean and dry.
■ If the activation key and battery are inserted during
storage, self-propulsion may unintentionally be engaged
and the lawn mower may start moving. This may result in
serious injury to people and damage to property.
► Pull out the activation key.
► Remove the battery.
4.10 Cleaning, Maintenance and Repair
WARNING
■ If the activation key and battery are inserted during
cleaning, maintenance or repair, the blades may
unintentionally be activated. This may result in serious
injury to people and damage to property.
► Pull out the activation key.
► Remove the battery.
■ If the activation key and battery are inserted during
cleaning, maintenance and repair, self-propulsion may
unintentionally be engaged and the lawn mower may start
moving. This may result in serious injury to people and
damage to property.
► Pull out the activation key.
► Remove the battery.
■ Abrasive cleaning agents, using a water jet for cleaning or
sharp objects may result in damage to the lawn mower or
blade. If the lawn mower or the blade is not cleaned
correctly, components may no longer operate correctly
and safety devices may be disabled. This may result in
serious injury to people.
► Clean the lawn mower and blade as described in this
instruction manual.
■ If the lawn mower or blade is not maintained or repaired
correctly, components may no longer operate correctly
and safety devices may be disabled. This may result in
serous or fatal injury to people.
► Do not maintain or repair the lawn mower yourself.
► If the lawn mower needs to be maintained or repaired:
consult a STIHL specialist dealer.
► Maintain the blade as described in this instruction
manual.
■ The blades may move during blade cleaning,
maintenance or repair. The movement of one blade will
cause the second blade to turn. This may result in injury
to the user as a result of cutting themselves on sharp
cutting edges.
► Wear work gloves made from resistant material.
■ The blade may become hot during sharpening. This may
result in the user burning themselves.
► Wait until the blade has cooled down.
► Wear work gloves made from resistant material.

0478-131-9838-A
11
English
5 Preparing the Lawn Mower for Operation
5.1 Preparing the Lawn Mower for Operation
The following steps must be performed before commencing
work:
► Ensure that the following components are in safe
condition:
– Lawn mower, @ 4.6.1.
– Blade, @ 4.6.2.
– Battery, as described in the instruction manual for the
STIHL AR L battery or the instruction manual for the
ADA 700 double-battery compartment and the safety
instructions for the STIHL AP battery.
► Check the battery as described in the instruction manual
for the STIHL AR L battery or the instruction manual for
the ADA 700 double-battery compartment and the safety
instructions for the STIHL AP battery.
► Charge the battery fully as described in the instruction
manual for the STIHL AL 101, 300, 500 charger.
► Clean the lawn mower, @ 16.2.
► Check the blade, @ 11.2.
► Fold up and adjust the handlebar, @ 7.1.
► If mowing and the mown grass is to be collected in the
grass catcher box: attach the grass catcher box, @ 6.1.2.
► If mowing and the mown grass is to be ejected to the rear:
detach the grass catcher box, @ 6.1.3.
► Set the cutting height, @ 12.2.
► Check the controls, @ 11.1.
► If the warning triangle on the operating unit flashes red
during the check of the controls: pull out the activation
key, remove the battery and consult a STIHL specialist
dealer.
There is a fault in the lawn mower.
► If the steps cannot be performed: do not use the lawn
mower and consult a STIHL specialist dealer.
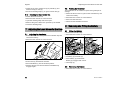
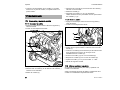
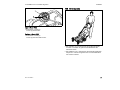
6.1 Assembling, Attaching and Detaching the Grass
Catcher Box
6.1.1 Assembling the Grass Catcher Box
► Pull fabric (1) over frame (2) so that the base plate is on
the bottom and handle (3) is on the outside of the fabric.
► Press plastic profiles (4) onto the frame.
The plastic profiles engage with a click.
6.1.2 Attaching the Grass Catcher Box
► Switch the lawn mower off.
► Place the lawn mower on a level surface.
► Open discharge flap (1) and hold it open.
5 Preparing the Lawn Mower for
Operation
6 Assembling the Lawn Mower

0478-131-9838-A
12
English
7 Adjusting the Lawn Mower for the User
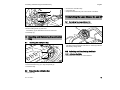
► Take hold of grass catcher box (2) by handle (3) and
attach hook (4) to axle (5).
► Set down discharge flap (1) on grass catcher box (2).
6.1.3 Detaching the Grass Catcher Box
► Switch the lawn mower off.
► Place the lawn mower on a level surface.
► Open the discharge flap and hold it open.
► Remove the grass catcher box upwards by the handle.
► Close the discharge flap.
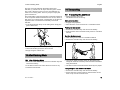
7.1 Adjusting the Handlebar
► Switch the lawn mower off, pull out the activation key and
remove the battery.
► Place the lawn mower on a level surface.
► Hold handlebar (1).
► Press lever (2) downwards and hold.
► Move handlebar (1) into the desired position.
► Release lever(2) and ensure that the handlebar fully
engages again.
7.2 Folding the Handlebar
The handlebar can be folded for space-saving transport or
storage.
► Switch the lawn mower off, pull out the activation key and
remove the battery.
► Place the lawn mower on a level surface.
► Press and hold the lever.
► Fold down the handlebar forwards.
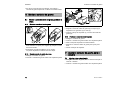
8.1 Fitting the Battery
► Pull out the activation key.
► Place the lawn mower on a level surface.
► Open flap (1).
► Fit battery (2) in holder (3).
► Press battery (2) downwards.
Battery (2) engages with a click.
► Close flap (1).
8.2 Removing the Battery
► Place the lawn mower on a level surface.
7 Adjusting the Lawn Mower for the User
8 Removing and Fitting the Battery

0478-131-9838-A
13
English
9 Inserting and Removing the Activation Key
► Open flap (1).
► Press locking lever (3) and hold.
The battery (2) is released and can be removed.
► Close flap (1).
9.1 Inserting the Activation Key
► Open the flap.
► Insert activation key (1) in key receptacle (2).
► Close the flap.
9.2 Removing the Activation Key
► Open the flap.
► Pull out the activation key.
► Close the flap.
► Keep the activation key out of the reach of children.
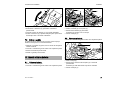
10.1 Switching the Lawn Mower On
► Place the lawn mower on a level surface.
► Press ON button (1).
The lawn mower has been switched on. LEDs (2) indicate
the battery charge state.
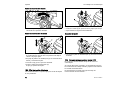
10.2 Activating and Deactivating the Blade
10.2.1 Activating the Blade
► Place the lawn mower on a level surface.
9 Inserting and Removing the Activation
Key
10 Switching the Lawn Mower On and Off

0478-131-9838-A
14
English
11 Checking the Lawn Mower
► Press ON button (1) with the left hand and hold.
► Pull control bar for mowing (2) with the right hand fully in
the direction of handlebar (3) and hold so that the thumb
encloses handlebar (3).
The blade turns.
► Release ON button (1).
► Hold handlebar (3) and control bar for mowing (2) with the
right hand so that the thumb encloses handlebar (3).
10.2.2 Deactivating the Blade
► Release the control bar for mowing.
► Wait until the blade is no longer turning.
► If the blade continues to turn: pull out the activation key,
remove the battery and consult a STIHL specialist dealer.
The lawn mower is defective.
10.3 Switching the Drive On and Off
10.3.1 Engaging Self-propulsion
The rotary wheel can be used to set the maximum speed in
five stages. Level 5 is maximum speed. Self-propulsion is
disengaged in Level 0.
The control bar for self-propulsion can be used to infinitely
regulate the speed up to the set maximum speed. The
further the control bar for self-propulsion is pulled towards
the handlebar, the higher the speed.
The set speed influences the battery life. The lower the
speed, the longer the battery life.
► Place the lawn mower on a level surface.
► Set the desired maximum speed with rotary wheel (1).
► Pull control bar for self-propulsion (2) with the left hand in
the direction of handlebar (3) and hold so that the thumb
encloses handlebar (3).
The lawn mower starts moving.
10.3.2 Deactivating Drive System
► Release the control bar for self-propulsion.
► Wait until the mower comes to a standstill.
► If the mower does not stop: Pull out the activation key,
remove the battery and consult a STIHL specialist dealer
for assistance.
There is a malfunction in the mower.
11.1 Checking the Controls
Control bar for mowing
► Pull out the activation key.
► Remove the battery.
► Pull the control bar for mowing fully in the direction of the
handlebar and release again.
11 Checking the Lawn Mower

0478-131-9838-A
15
English
11 Checking the Lawn Mower
► If the control bar for mowing is stiff or does not spring back
into the initial position: do not use the lawn mower and
consult a STIHL specialist dealer.
The control bar for mowing is defective.
Control bar for self-propulsion
► Pull out the activation key.
► Remove the battery.
► Pull the control bar for self-propulsion fully in the direction
of the handlebar and release again.
► If the control bar for self-propulsion is stiff or does not
spring back into the initial position: do not use the lawn
mower and consult a STIHL specialist dealer.
The control bar for self-propulsion is defective.
Activating the blade
► Insert the activation key.
► Fit the battery.
► Switch the lawn mower on.
► Press the ON button with the left hand and hold.
► Pull the control bar for mowing with the right hand fully in
the direction of the handlebar and hold so that the thumb
encloses the handlebar.
The blade turns.
► If the blade does not turn: pull out the activation key,
remove the battery and consult a STIHL specialist dealer.
There is a fault in the lawn mower.
► Release the ON button and the control bar for mowing.
The blade stops turning after a short time.
► If the blade continues to turn: pull out the activation key,
remove the battery and consult a STIHL specialist dealer.
The lawn mower is defective.
Engaging self-propulsion
► Insert the activation key.
► Fit the battery.
► Switch the lawn mower on.
► Pull the control bar for self-propulsion with the left hand
fully in the direction of the handlebar and hold so that the
thumb encloses the handlebar.
The lawn mower starts moving.
► Release the control bar for self-propulsion.
The lawn mower comes to a standstill.
► If the lawn mower continues moving: pull out the activation
key, remove the battery and consult a STIHL specialist
dealer.
The lawn mower is defective.
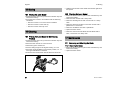
11.2 Checking the Blade
► Switch the lawn mower off, pull out the activation key and
remove the battery.
► Upend the lawn mower, @ 16.1.
► Measure the following:
– Thickness a
–Widthb
–Widthc
– Sharpening angle d
► If the minimum thickness or minimum width are fallen
below: replace the blade, @ 20.2.
► If the sharpening angle is not observed: sharpen the
blade, @ 20.2.
► If anything is unclear: consult a STIHL specialist dealer.

0478-131-9838-A
16
English
12 Operating the Lawn Mower
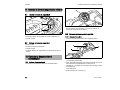
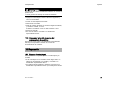
11.3 Checking the Blade Position
► Switch the lawn mower off, pull out the activation key and
remove the battery.
► Upend the lawn mower, @ 16.1.
► Turn one blade so that it is parallel to the ground. The
second blade turns also.
► Check the blades for correct position relative to each other
– In the basic position, one blade (1) is parallel to the
ground.
– The second blade (2) is at a 90° angle to the first blade.
► If the blades are not in the correct position relative to each
other: cease using the lawn mower and consult a STIHL
specialist dealer.
12.1 Holding and Guiding the Lawn Mower
► Hold the handlebar with both hands so that the thumbs
enclose the handlebar.
12.2 Setting the Cutting Height
Eight cutting heights can be set:
– 25 mm = position 1
– 35 mm = position 2
– 45 mm = position 3
– 55 mm = position 4
– 65 mm = position 5
– 75 mm = position 6
– 90 mm = position 7
– 100 mm = position 8
The positions are indicated on the lawn mower.
The cutting height is set individually at all wheels. The
setting must be the same for all wheels.
12 Operating the Lawn Mower

0478-131-9838-A
17
English
12 Operating the Lawn Mower
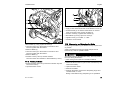
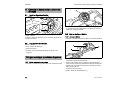
Setting the rear cutting height
► Pull lever (1) from the notch and moved to the desired
position.
Setting the front cutting height
► Hold wheel fork (1) with the hand.
The lawn mower cannot drop into the lowest position
under its own weight.
► Press release lever (2) in the direction of the arrow and
hold.
► Move axle (3) into the desired position.
► Release release lever (2).
Axle (3) engages.
12.3 Locking the Front Wheels
The front wheels can be locked for mowing on slopes.
► Press button (1).
► Straighten front wheel (2) and allow to engage.
► Lock the second front wheel too.
Releasing the lock
► Push release lever (1) in the direction of the arrow.
12.4 Activating and Deactivating ECO Mode
ECO mode is activated after the lawn mower is switched on.
When ECO mode is activated, the lawn mower detects the
current working conditions and adjusts the blade speed
automatically.
This may extend the battery life.

0478-131-9838-A
18
English
12 Operating the Lawn Mower
Activating ECO mode
► Press button (1).
LED (2) illuminates.
Deactivating ECO mode
► Press button (1).
LED (2) no longer illuminates.
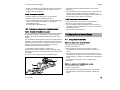
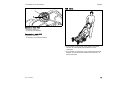
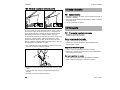
12.5 Mowing
► If working with self-propulsion engaged: drive the lawn
mower forwards in a controlled manner.
► If working with self-propulsion disengaged: push the lawn
mower forwards slowly and in a controlled manner.
12.6 Emptying the Grass Catcher Box
A página está carregando ...
A página está carregando ...
A página está carregando ...
A página está carregando ...
A página está carregando ...
A página está carregando ...
A página está carregando ...
A página está carregando ...
A página está carregando ...
A página está carregando ...
A página está carregando ...
A página está carregando ...
A página está carregando ...
A página está carregando ...
A página está carregando ...
A página está carregando ...
A página está carregando ...
A página está carregando ...
A página está carregando ...
A página está carregando ...
A página está carregando ...
A página está carregando ...
A página está carregando ...
A página está carregando ...
A página está carregando ...
A página está carregando ...
A página está carregando ...
A página está carregando ...
A página está carregando ...
A página está carregando ...
A página está carregando ...
A página está carregando ...
A página está carregando ...
A página está carregando ...
A página está carregando ...
A página está carregando ...
A página está carregando ...
A página está carregando ...
A página está carregando ...
A página está carregando ...
A página está carregando ...
A página está carregando ...
A página está carregando ...
A página está carregando ...
A página está carregando ...
A página está carregando ...
A página está carregando ...
A página está carregando ...
A página está carregando ...
A página está carregando ...
A página está carregando ...
A página está carregando ...
A página está carregando ...
A página está carregando ...
A página está carregando ...
A página está carregando ...
A página está carregando ...
A página está carregando ...
A página está carregando ...
A página está carregando ...
A página está carregando ...
A página está carregando ...
A página está carregando ...
A página está carregando ...
A página está carregando ...
A página está carregando ...
A página está carregando ...
A página está carregando ...
A página está carregando ...
A página está carregando ...
A página está carregando ...
A página está carregando ...
-
 1
1
-
 2
2
-
 3
3
-
 4
4
-
 5
5
-
 6
6
-
 7
7
-
 8
8
-
 9
9
-
 10
10
-
 11
11
-
 12
12
-
 13
13
-
 14
14
-
 15
15
-
 16
16
-
 17
17
-
 18
18
-
 19
19
-
 20
20
-
 21
21
-
 22
22
-
 23
23
-
 24
24
-
 25
25
-
 26
26
-
 27
27
-
 28
28
-
 29
29
-
 30
30
-
 31
31
-
 32
32
-
 33
33
-
 34
34
-
 35
35
-
 36
36
-
 37
37
-
 38
38
-
 39
39
-
 40
40
-
 41
41
-
 42
42
-
 43
43
-
 44
44
-
 45
45
-
 46
46
-
 47
47
-
 48
48
-
 49
49
-
 50
50
-
 51
51
-
 52
52
-
 53
53
-
 54
54
-
 55
55
-
 56
56
-
 57
57
-
 58
58
-
 59
59
-
 60
60
-
 61
61
-
 62
62
-
 63
63
-
 64
64
-
 65
65
-
 66
66
-
 67
67
-
 68
68
-
 69
69
-
 70
70
-
 71
71
-
 72
72
-
 73
73
-
 74
74
-
 75
75
-
 76
76
-
 77
77
-
 78
78
-
 79
79
-
 80
80
-
 81
81
-
 82
82
-
 83
83
-
 84
84
-
 85
85
-
 86
86
-
 87
87
-
 88
88
-
 89
89
-
 90
90
-
 91
91
-
 92
92


STIHL RMA 765.0 V Manual do usuário
- Categoria
- Cortadores de grama
- Tipo
- Manual do usuário
em outros idiomas
- español: STIHL RMA 765.0 V Manual de usuario
- English: STIHL RMA 765.0 V User manual
Artigos relacionados
-
STIHL RMA 235.0 Manual do usuário
-
-
STIHL RMA 510 V Manual do proprietário
-
-
-
-
-
-
-
Outros documentos
-
Black & Decker BDMOW1200 Manual do usuário
-
Black & Decker BDMOW1400 Manual do usuário
-
Oregon 591079 Manual do usuário
-
 Oregon Scientific LM400 Manual do usuário
-
-
Dolmar AM3743 Manual do proprietário
-
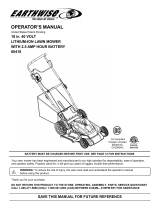 EarthWise 60418 Manual do proprietário
-
Toro eHoverPro 450 Manual do usuário

