Asus Xonar DGX Guia rápido

Categoria
Placas de áudio
Tipo
Guia rápido
First Edition
Jan. 2012
Copyright © 2012 ASUSTeK Computer
Inc.
All Rights Reserved
Xonar DGX
PCIE 5.1 & Headphone Amp Audio Card
Quick Start Guide
U7083
Table of content
English ..................................................................................................................... 1
Français ..................................................................................................................... 5
Deutsch ..................................................................................................................... 9
Italiano ...................................................................................................................13
Español ...................................................................................................................17
Português ................................................................................................................21
Pyccкий
..................................................................................................................25
Türkçe ...................................................................................................................29
Hrvatski ...................................................................................................................33
First Edition
Jan. 2012
Copyright © 2012 ASUSTeK Computer Inc.
All Rights Reserved
Xonar DGX
PCIE 5.1 & Headphone Amp Audio Card
Quick Start Guide
English
2ASUS Xonar DGX Quick Start Guide
English
1. Package contents
Check your ASUS Xonar DGX audio card package for the following items:
ASUS Xonar DGX PCIE audio card
• LowProleBracketx1
• SupportCDx1
• QuickStartGuidex1
2. System requirements
To ensure a successful installation of the Xonar DGX card, your computer must
meet the following requirements:
One PCIE 1.0 (or higher) compatible slot for the audio card
Microsoft® Windows® 7 (32/64bit) / Vista (32/64bit) / XP (32/64bit) / MCE2005
Intel® Pentium® 4 1.4 GHz or AMD® Athlon 1400 CPU or faster CPU
• 256MB(orabove)DRAMsystemmemory
• 60MBavailableHDDspacefordriverinstallationpackage
CD-ROM drive (or DVD-ROM drive) for software installation
High-quality headphones or powered analog speakers to enjoy the ultra-high
delitysoundofthecard
3. Hardware introduction
3.1 Xonar DGX card layout
1
2
3
4
5
67 8
3
ASUS Xonar DGX Quick Start Guide
English
No Item Description
1
Microphone In port ConnectyourexternalPCmicrophonetothis3.5mmportfor
voiceinput.Built-inhigh-qualityMicrophonepre-amplier.
Line In port
Connect analog devices like MP3 players, CD players,
music synthesizers and other line-level sound sources to this
3.5mm port for audio recording or processing.
2Headphone/Front
Out port
Connect your headphones or 2/2.1 channel speakers to this
3.5mm port. For multi-channel speaker systems, connects to
the front left/right input on the powered speakers.
3Side Surround Out
port
Connects to the surround channel input on 4/4.1/5.1 powered
analog speakers.
4Center/Subwoofer
Out port
Connects to the center/subwoofer input on 5.1 powered
analog speakers.
5 S/PDIF Out port
OpticalTOSLINKdigitaloutputport.Connectstoexternal
digital decoder or digital speaker systems, Home Theater
systems, AV receivers for outputting digital audio including
PCM, DTS Digital, DTS, WMA-Pro, etc.
6Front panel audio
header
9-pinIntelAC’97/HDAfront-panelwhichsupportsaudio
jack-detection and audio FP Headphone selection for Analog
Out on the Audio Center.
7 Aux Input Header
4-pin header. Usually connects to the Analog Audio output of
TV tuner card or other sound source inside your PC system.
(TomonitoryourTVtunercard’saudiofromthisAux-In,you
mustenablethe“monitor”functionforAux-InintheXonar
DGXAudioCenter’srecordingmixer.)
8 S/PDIF Out header Connects to the supported graphics card with HDMI.
4ASUS Xonar DGX Quick Start Guide
English
4. Driver installation
Installing the Xonar DGX card driver
1. After you have installed the Xonar DGX card, turn on your computer.
Windows® automatically detects the audio card and searches for device
drivers. When prompted for the drivers, click Cancel.
2. Insert the support CD into the optical drive. If Autorun is enabled in your
system, the setup starts automatically. If not, run setup.exe from your
support CD.
3. Followtheonscreeninstructionstonishtheinstallation.
The version and content of the support CD are subject to change without notice.
3.2 Card installation
Beforeyouproceedwiththefollowinginstallationsteps,it’srecommendedthat
youdisableyouronboardaudiodeviceinyourBIOSsettings,oruninstallany
otheraudiocardsonyourPC.(ForBIOSsettingoruninstallationofothersound
cards, refer to the user manuals of your motherboard and audio card.)
Installing the Xonar DGX card
1. Power OFF the computer, the monitor, and
all other peripheral devices connected to
your computer.
2. Unplug the computer power cord from your
computer and power outlet.
3. Touch the metal back or side panel of the
computer to avoid static electricity.
4. Remove the chassis cover.
5. Remove the metal bracket from an available PCIE slot for the Xonar DGX
audio card.
6. Carefully insert the audio card into the PCIE slot. Ensure the audio card sits
properly in place.
7. Secure the audio card with screws and the metal bracket.
8. Put back the chassis cover.
9. Reconnect all cables.
10. Plug the power cord to the computer and to a power outlet.
11. Power ON the computer.
12
5
ASUS Xonar DGX - Guide de démarrage rapide
Français
Xonar DGX
Carte son PCIE 5.1 & ampli casque
Guide de démarrage rapide
Première édition
Janvier 2012
Copyright © 2012 ASUSTeK Computer Inc.
Tous droits réservés
6ASUS Xonar DGX - Guide de démarrage rapide
Français
1. Contenu de la boîte
VériezquelaboîtedevotrecartesonASUSXonarDGXcontientbienleséléments
suivants :
Carte son PCIE ASUS Xonar DGX
• Supportdemi-hauteurx1
CD de support
Guide de démarrage rapide
2. Pré-requis système
Avantd’installerlacartesonXonarDGX,assurez-vousquevotreordinateur
puissesatisfaireauxcritèressuivants:
Un slot PCIE 1.0 (ou supérieur) pour la carte son
Microsoft® Windows® 7/ Vista (32/64bits) / XP (32/64bits) / MCE2005
Un processeur Intel® Pentium® 4 1.4GHz ou AMD Athlon 1400 ou supérieur
Mémoire DRAM de 256 Mo (ou plus)
• 60Mod’espacedisquedisponiblepourl’installationdupilote
• UnlecteurdeCD-ROM(ouDVD-ROM)pourl’installationdeslogiciels
• Desécouteursdehautequalité,deshaut-parleursanalogiquespourproter
pleinement de la qualité audio délivrée par la carte son
3. Introduction au matériel
3.1 Diagramme de la carte Xonar DGX
1
2
3
4
5
67 8
7
ASUS Xonar DGX - Guide de démarrage rapide
Français
N° Élément Description
1
Port d’entrée
microphone ConnectezleportmicrophoneexternedevotrePCsurce
jack3.5mm.Intègreunpréamplicateurdemicrophonede
haute qualité.
Port d’entrée audio Connectez des périphériques analogiques (lecteur MP3,
lecteur CD, etc) ou autres sources audio sur ce jack 3.5mm.
(Via un convertisseur numérique-analogique avec un rapport
signal/bruitde118dB)
2 Port casque/sortie de
signal avant Connectez le câble audio droit (rouge) de votre système de
haut-parleurs 2/2.1 sur ce port. Pour les système de haut-
parleursmulti-canaux,seconnecteauportd’entréedesignal
avant droit/gauche.
3 Port de sortie
Surround latéral Seconnecteauportd’entréeSurrounddessystèmesde
haut-parleurs analogiques alimentés 4/4.1/5.1.
4 Port de sortie centre/
caisson de basse Seconnecteauportd’entréecentre/caissondebassedes
systèmes de haut-parleurs analogiques alimentés 5.1.
5 Port de sortie S/PDIF Port de sortie numérique TOSLINK. Se connecte à un
décodeurnumériqueexterne,unhomecinéma,unsystème
de haut-parleurs numériques ou un récepteur pour la
transmissiond’unsignalaudionumériquesupportantles
technologies PCM, DTS Digital, DTS, WMA-Pro, etc.
6 En-tête audio pour
panneau avant
(9 broches)
CompatibleIntelHDA/AC’97, supporte la détection desAC’97,supporte la détection dessupporte la détection des
ports audio et intègre une prise casque pour une sortie
analogiquesurvotresystèmed’enceintes.
7En-tête d’entrée
auxiliaire
(4 broches)
Se connecte généralement au port de sortie audio
analogiqued’unecartetunerTVoutoutautresourceaudio
interneduPC.(Poursurveillerlessignauxaudiodevotre
carte tuner TV depuis ce port, vous devrez activer la fonction
desurveillanceduport“Aux-In”àpartirdel’utilitaireaudio
Xonar DGX Audio Center.)
8 En-tête sortie S/PDIF Se connecte à une carte graphique avec support HDMI.
8ASUS Xonar DGX - Guide de démarrage rapide
Français
4. Installation du piloteInstallation du pilote
Installer le pilote de la carte Xonar DGX Xonar DGX
1. Une fois la carte son installée, allumez votre PC. WindowsUne fois la carte son installée, allumez votre PC. Windows son installée, allumez votre PC. Windowsinstallée, allumez votre PC. Windows® détectera
automatiquement la carte son et lancera la recherche du pilote approprié.
Lorsquelafenêtred’installationdupiloteapparaît,cliquezsurAnnuler.
2. Insérez le CD de support dans votre lecteur optique. Si l’�xécutionInsérezleCDdesupportdansvotrelecteuroptique.Sil’�xécution
automatiqueestactivée,leprocessusdecongurationdémarre
automatiquement.Sicen’estpaslecas,cliquezsurlechiersetup.exe
contenu dans le CD de support.
3. Suivezlesinstructionsàl’écranpourterminerl’installation.
LaversionetlecontenuduCDdesupportpeuventêtremodiéssansavis
préalable.
3.2 Installation de la carteInstallation de la carte
Avant de continuer, il est recommandé de désactiver le chipset audio embarqué
dansleBIOSoudedésinstallerlesautrescartesaudiodevotresystème.(Pour
lesoptionsduBIOSouladésinstallationd’autrescartesson,référez-vousaux
manuelsd’utilisationdelacartemèreetdelacarteaudio)
Installer la carte son Xonar DGX Xonar DGX
1. Éteignezl’ordinateur,lemoniteurettous
les périphériques connectés au PC.
2. Débranchezlecordond’alimentationde
l’ordinateuretdelapriseélectrique.
3. Touchezl’arrièremétalliqueoulepanneau
latéralduchâssisdel’ordinateurpourvous
déchargerdel’électricitéstatique.
4. Retirez le panneau latéral du châssis.
5. Retirezlescachesmétalliquesd’unslotPCI� pour pouvoir installer la carte pour pouvoir installer la cartepour pouvoir installer la carte
Xonar DGX.
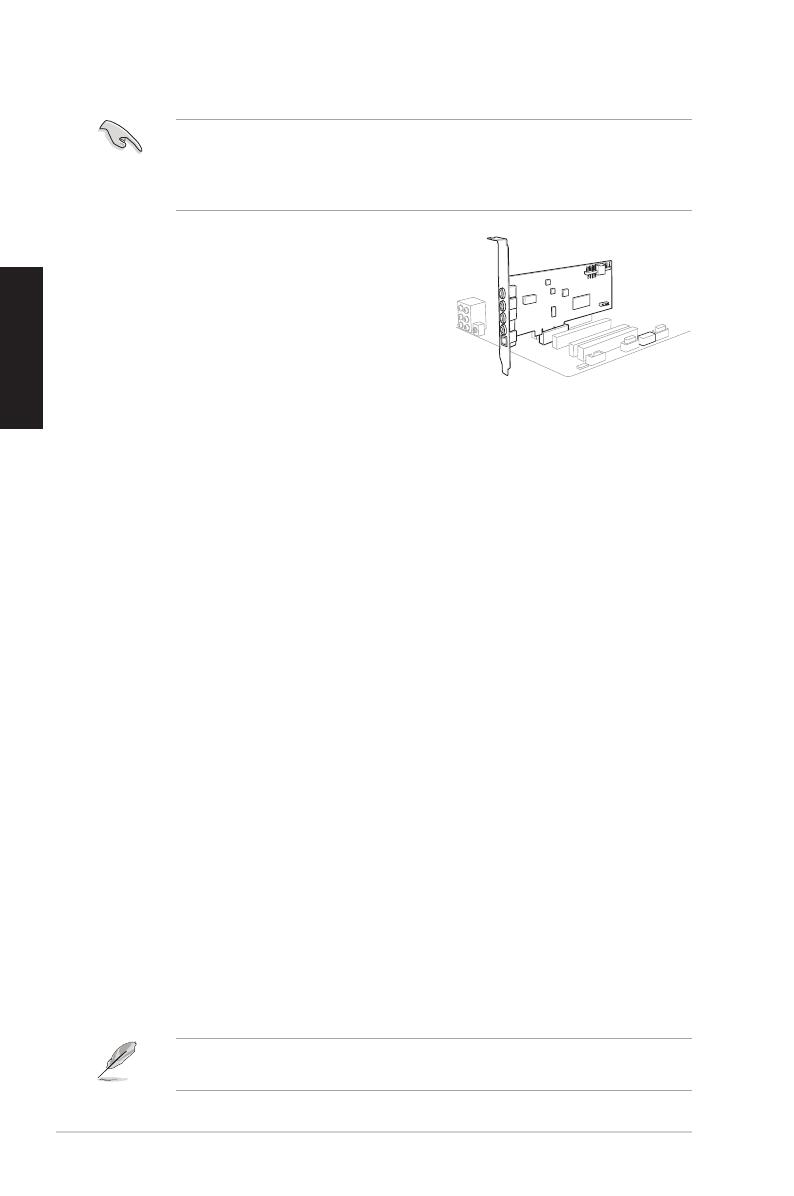
6. Insérez délicatement la carte son sur le slot PCIE. Assurez-vous que la carteInsérez délicatement la carte son sur le slot PCIE. Assurez-vous que la carte PCIE. Assurez-vous que la carteAssurez-vous que la carte
est bien en place.
7. Sécurisezlacarteàl’aidedevisoudescachesmétalliques.
8. Replacez le panneau latéral du châssis.Replacez le panneau latéral du châssis.
9. Reconnectez tous les câbles.Reconnectez tous les câbles.
10. Reliez le cordon d’alimentation à l’ordinateur et à une prise électrique.Reliezlecordond’alimentationàl’ordinateuretàunepriseélectrique.
11. Allumezl’ordinateur.
12
9
ASUS Xonar DGX-Schnellstartanleitung
Deutsch
Xonar DGX
PCIE 5.1 & Kopfhörer
Audio-Karte
Schnellstartanleitung
Erste Ausgabe
Januar 2012
Copyright © 2012 ASUSTeK Computer Inc.
Alle Rechte vorbehalten
10 ASUS Xonar DGX-Schnellstartanleitung
Deutsch
1. Verpackungsinhalt
Überprüfen Sie Ihre ASUS Xonar DGX Audio-Kartenverpackung auf folgenden Inhalt:
ASUS Xonar DGX PCIE Audio-Karte
• 1xacheKlemme
Support-CD
Schnellstartanleitung
2. Systemanforderungen
Um eine erfolgreiche Installation der Xonar DGX-Karte sicherzustellen, muss Ihr Xonar DGX-Karte sicherzustellen, muss Ihrsicherzustellen, muss Ihr
Computer folgende Anforderungen erfüllen:
Ein PCIE 1.0 (oder höher) -kompatibler Steckplatz für die Audio-Karte
• Microsoft®Windows®7(32/64Bit)/Microsoft® Windows®Vista(32/64Bit)/XP
(32/64Bit)/MC�2005
Intel® Pentium® 4 1,4 GHz oder AMD® Athlon 1400-Prozessor oder höher
• 256MB(odermehr)DRAM-Systemspeicher
• 60MBfreierFestplattenspeicherfürdieTreiberinstallation
CD-ROM-Laufwerk (oder DVD-ROM-Laufwerk) für die Software-Installation
Hochwertige Kopfhörer oder aktive Analoglautsprecher, um den HiFi-Sound
der Karte zu genießen
3. Hardware-Erklärung
3.1 Xonar DGX-Kartenansicht
1
2
3
4
5
67 8
11
ASUS Xonar DGX-Schnellstartanleitung
Deutsch
Nr. Element Beschreibung
1
Mikrofoneingang SchließenSieIhrexternesPC-MikrofonzurSpracheingabe
an diesem Anschluss an. Eingebauter Mikrofonvorverstärker.
Line In-Port AnschlussfüranalogeGeräte,z.B.MP3-Player,CD-Player,
Musiksynthesizer und andere Line-Tonwiedergabegeräte, um
Tonaufnahmen oder Tonberechnung durchzuführen.
2 Kopfhörer-/Front-
Ausgang Verbinden Sie Ihren Kopfhörer oder Ihre 2/2.1-Kanal-
Lautsprechermitdiesem3,5mm-Anschluss.BeiBei
Mehrkanalsystemen verbinden Sie diesen Ausgang mit
den linken/rechten Frontlautsprecheranschluss der aktiven
Lauftsprechers..
3 Seiten-Surround-
Ausgang Anschluss für den Surround-Kanal-Eingang an aktiven
4/4.1/5.1-Analoglautsprechern.
4 Center/Subwoofer-
Ausgang Anschluss für den Center/Subwoofer-Eingang an aktiven
5.1-Amaloglautsprechern.
5S/PDIF-Ausgang Optischer TOSLINK-Digitalausgang. Anschluss für einen
externenDigitaldekoderoder-Lautsprechersystem,
Heimkinosystem, AV-Receiver zur Ausgabe von digitalen
Audio, eingeschlossen PCM, DTS Digital, DTS, WMA-Pro,
usw.
6 Frontpanel-Blenden-
Anschluss Intel HDA Frontpanel-konform und unterstützt HP-
Buchsenerkennungundschaltetautomatischdie
Audio-Ausgabe von den rückseitigen Anschlüssen zum
Frontpanel um. Unterstützt Frontpanel und Sound-Karten-
Mikrofoneingangsmixer.
7 Aux-
Eingangsanschluss Normalerweise der Anschluss für den analogen Tonausgang
der TV-Tunerkarte oder anderen Tonausgabegeräten in
Ihrem PC-System. (Um den Ton Ihrer TV-Tunerkarte von
diesemAnschlusszuüberwachen,müssenSiefürAux-In
die Funktion „Überwachen“ im Xonar DGX Audio Center-
Aufnahme-Mixeraktivieren.)
8 S/PDIF-
Ausgangsanschluss VerbindetdenGrakkartenausgangmitderHDMI-
Unterstützung
12 ASUS Xonar DGX-Schnellstartanleitung
Deutsch
4. reiberinstallationreiberinstallation
Installieren der Xonar DGX-Kartentreiber
1. Nachdem Sie die Xonar DGX-Karte installiert haben, schalten Sie Ihren
Computer ein. Windows® erkennt die Audio-Karte automatisch und sucht
nach den Gerätetreibern. Wenn Sie nach den Treibern gefragt werden,
klicken Sie auf Abbrechen.
2. Legen Sie die Support-CD in das optische Laufwerk. Wenn Autorun in Ihren
Computer aktiviert ist, startet die Installation automatisch, wenn nicht, dann
führen Sie auf der Support-CD die Datei setup.exe aus.
3. FolgenSiedenBildschirmanweisungen,umdieInstallationabzuschließen.
Die Version und der Inhalt der Support-CD können ohne vorherige Ankündigung
geändert werden.
3.2 Karte Installieren
BevorSiemitdenfolgendenInstallationsschrittenfortfahren,empfehlen
wirIhnen,dassSieIhrOnboard-Audio-GerätindenBIOS-�instellungen
deaktivieren oder jede andere Audio-Karte in Ihrem PC deinstallieren. (Für die
BIOS-�instellungenoderdieDeinstallationandererAudio-KartenbeziehenSie
sichbitteaufdieBenutzerhandbücherdesMotherboardsoderderAudio-Karte)
Installieren der Xonar DGX-Karte
1. Schalten Sie den Computer, den
Monitor und alle anderen am Computer
angeschlossenen Peripheriegeräte aus.
2. Ziehen Sie das Netzkabel des Computers
aus der Steckdose heraus.
3. BerührenSiedasMetallgehäuseoderden
Metallrahmen,umstatischeAuadungenzuvermeiden.
4. Entfernen Sie die Gehäuseabdeckung.
5. Entfernen Sie die Metallklemme von einem freien PCIE-Steckplatz für die
Xonar DGX-Audio-Karte.
6. Stecken Sie die Karte vorsichtig in den PCIE-Steckplatz. Vergewissern Sie
sich, dass die Karte richtig im Steckplatz eingesteckt ist.
7. Sichern Sie die Karte mit Schrauben und der Metallklemme.
8. BringenSiedieGehäuseabdeckungwiederan.
9. Schließen Sie alle Kabel wieder an.
10. Stecken Sie das Netzkabel in eine Steckdose.
11. Schalten Sie den Computer wieder ein.
12
13
ASUS Xonar DGX - Guida Rapida
Italiano
Prima Edizione
Gennaio 2012
Copyright © 2012 ASUSTeK Computer Inc.
Tutti i Diritti Riservati
Xonar DGX
Scheda Audio PCIE 5.1 con
 AmplicatoreCufe
Guida Rapida
14 ASUS Xonar DGX - Guida Rapida
Italiano
1. Contenuto della Confezione
Controllare che nella confezione della scheda audio Xonar DGX ASUS siano contenuti
i seguenti articoli:
Scheda Audio Xonar DGX PCIE ASUS
• 1xStaffaaBassoProlo
CD di Supporto
Guida Rapida
2. Requisiti di Sistema
Per garantire una corretta installazione della scheda Xonar DGX, il computer deve
soddisfare i seguenti requisiti:
• Uno slot compatibile PCIE 2.2 (o superiore) per la scheda audio.
• Microsoft® Windows® 7/ Vista (32/64bit) / XP (32/64bit) / MCE2005
CPU Intel® Pentium® 4 1.4 GHz o AMD® Athlon 1400 CPU più potente.
• MemoriadisistemaDRAMda256MB(osuperiore).
• SpazioliberosuHDDda60MBperilpacchettoinstallazionedriver.
Drive CD-ROM (o DVD-ROM) per installazione software.
• Cufedialtaqualità,altoparlantianalogicialimentati,odecodicatoreDolby
Digital o DTS decoder, per una riproduzione audio ad altissima fedeltà.
3. Descrizione Hardware
3.1 Layout Scheda Xonar DGX
1
2
3
4
5
67 8
15
ASUS Xonar DGX - Guida Rapida
Italiano
No Item Descrizione
1
Porta Ingresso
Microfono
Collegare il microfono esterno del PC a questa porta da 3.5mm
perl’ingressovocale.Pre-amplicatoreintegratodialtaqualità
per microfono.
Porta Linea d’
ingresso
Collegare dispositivi analogici, come lettori MP3, lettori di CD,
sintetizzatori musicali e altre sorgenti audio a livello di linea a
questa porta da 3.5mm per registrazioni o elaborazioni audio
2Porta Uscita Cufe/
Frontale
Collegarelecufeoaltoparlantia2/2.1canaliaquestaporta
da3.5mm.Persistemidialtoparlantimulticanale,collegaall’
ingresso di destra/sinistra e frontale su altoparlanti alimentati.
3Porta Uscita Surround
Laterale
Collegaall’ingressodelcanalesurroundsualtoparlanti
analogici alimentati 4/4.1/5.1.
4Porta Uscita Centro/
Subwoofer
Collegal’ingressocentro/subwoofersualtoparlantianalogici
alimentati 5.1.
5 Porta Uscita S/PDIF
PortauscitadigitaleotticaTOSLINK.Collegaadundecodicatore
digitale esterno o a impianti di altoparlanti digitali, sistemi Home
Theater,ricevitoriAVperl’uscitaaudiodigitale,fra cuiPCM,
DTS Digital, DTS, WMA-Pro, etc.
6Header audio pannello
frontale
PannellofrontaleIntelAC’97/HDAa9-pinconsupporto
rilevazionejackaudioeselezionecufeFPaudioperuscita
analogica sul Centro Audio.
7 Header Input Aux
Disolito,collegaall’uscitaAudioAnalogicadellascheda
disintonizzazioneTVoadaltrasorgenteaudioall’interno
delsistemadelPC(permonitorarel’audiodellaschedadi
sintonizzazioneTVdall’ingressoAudio,sideveattivarela
funzione“monitor”perAux-Innelmixerdaregistrazionedel
Centro Audio Xonar DGX).
8 Header S/PDIF Out CollegaallaschedagracaconsupportoHDMI.
16 ASUS Xonar DGX - Guida Rapida
Italiano
4. Installazione Driver
Installazione Driver della Scheda Xonar DGX
1. Dopo aver installato la scheda Xonar DGX, accendere il computer. Windows®
rileva automaticamente la scheda audio ed inizia la ricerca dei driver del
dispositivo. Alla richiesta dei driver, cliccare Cancel (Annulla).
2. InserireilCDdisupportonell’unitàottica.Senelsistemaèattivatalafunzione
diesecuzioneautomatica,l’installazionehainizioautomaticamente.Incaso
contrario, eseguire setup.exe dal CD di supporto.
3. Seguireleistruzionisulloschermopercompletarel’installazione.
La versione e il contenuto del CD di supporto sono soggetti a variazioni senza
obbligo di preavviso.
3.2 Installazione della Scheda
Primadiiniziarel’installazione,siconsigliadidisattivareildispositivoaudiosulla
schedamadre,nelleimpostazionidelBIOS,odidisinstallaretuttelealtreschede
audiosulPC(PerleimpostazionidelBIOSoladisinstallazionedialtreschede
audio, consultare il manuale utente della scheda madre e della scheda audio).
Procedura di Installazione della Scheda
Xonar DGX
1. SPEGNERE computer, monitor e tutte le
altre periferiche collegate al computer.
2. Disinserire il cavo di alimentazione del
computer dal computer e dalla presa di
corrente.
3. Toccare il pannello laterale o posteriore in metallo del computer per evitare
elettricità statica.
4. Rimuovere la copertura del telaio.
5. Rimuovere la staffa metallica da uno slot libero PCIE per la scheda audio Xonar
DGX.
6. Inserire delicatamente la scheda audio nello slot PCIE. Assicurarsi che la scheda
audio sia correttamente installata.
7. Fissare la scheda audio con le viti e la staffa di metallo.
8. Rimontare la copertura del telaio.
9. Ricollegare tutti i cavi.
10. Inserire il cavo di alimentazione al computer e ad una presa a muro
11. ACCENDERE il computer.
12
17
ASUS Xonar DGX - Guía de inicio rápido
Español
Xonar DGX
Tarjeta de sonido PCIE 5.1 y
Amplicadorauricular
Guía de instalación rápida
Primera Edición
Enero 2012
Copyright © 2012 ASUSTeK Computer Inc.
Todos los derechos reservados
18 ASUS Xonar DGX - Guía de inicio rápido
Español
1. Contenido del paquete
Revise el paquete de la tarjeta de audio ASUS Xonar DGX para comprobar que
contiene los siguientes elementos:
Tarjeta de Audio PCIE ASUS Xonar DGX
• SoportedeBajoPerlx1
CD de soporte x1
Guía de inicio rápido x1
2. Requisitos del sistema
Para garantizar la instalación correcta de la tarjeta Xonar DGX, su PC debe
cumplir los siguientes requisitos:
Tener una ranura compatible con PCIE 1.0 (o superior) para la tarjeta de audio
Microsoft® Windows® 7/ Vista (32/64bit) / XP (32/64bit) / MCE2005
Procesador Intel® Pentium® 4 a 1,4 GHz o AMD Athlon 1400, o un procesador
más rápido
• MemoriadesistemaDRAMde256MBcomomínimo
• �spacioendiscodurode,almenos,60MBparaelpaquetedeinstalacióndel
controlador
Unidad de CD-ROM (o DVD-ROM) para instalar el software
• Auricularesdemáximacalidadoaltavocesanalógicosconalimentaciónpara
disfrutardelsonidodeultraaltadelidaddelatarjeta
3. Introducción al hardware
3.1 Diseño de la tarjeta Xonar DGX
1
2
3
4
67 8
  • Page 1 1
  • Page 2 2
  • Page 3 3
  • Page 4 4
  • Page 5 5
  • Page 6 6
  • Page 7 7
  • Page 8 8
  • Page 9 9
  • Page 10 10
  • Page 11 11
  • Page 12 12
  • Page 13 13
  • Page 14 14
  • Page 15 15
  • Page 16 16
  • Page 17 17
  • Page 18 18
  • Page 19 19
  • Page 20 20
  • Page 21 21
  • Page 22 22
  • Page 23 23
  • Page 24 24
  • Page 25 25
  • Page 26 26
  • Page 27 27
  • Page 28 28
  • Page 29 29
  • Page 30 30
  • Page 31 31
  • Page 32 32
  • Page 33 33
  • Page 34 34
  • Page 35 35
  • Page 36 36
  • Page 37 37
  • Page 38 38

Asus Xonar DGX Guia rápido

Categoria
Placas de áudio
Tipo
Guia rápido