Jole stages™ FX Manual do usuário
- Categoria
- Assentos de carro
- Tipo
- Manual do usuário

stagesTM fx
ECE R44.04:
Group 0+/1 /2(0–25kg)
child restraint
ECE R44.04: B1
ECE R44.04: ISOFIX
Navodila za uporabo
SL

2
GB Congratulations
You have purchased a high quality﹐ fully certified child
safety child restraint. This product is suitable for the use
of children weighing UNDER 25kg (approximately 7 years
old or under).
Carefully read this Instruction Manual and follow the
installing steps because this is the ONLY way to protect
your child from serious injury or death in case of an
accident﹐ and to provide comfort to your child while
using this product.
Keep this instruction manual for future reference.
Please Confirm
Make sure that your vehicle is equipped with 3-point
retractor safety-belt.
Seat belts may be different in design and length
according to maker﹐ manufacturing date﹐ and type of the
vehicle. This child restraint is only suitable for use in the
listed vehicles fitted with 3-point retractor safety-belts﹐
approved to UN ECE regulation 16 or other equivalent
standards. This child restraint is approved to UN ECE
regulation 44﹐ 04 series of amendments.
For warranty information﹐ please visit our website at joi-
ebaby.com
! Please keep the instruction manual in the storage
compartment of the rear cover for future reference.
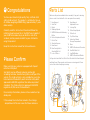
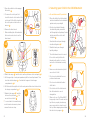
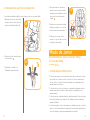
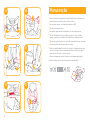
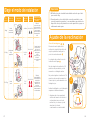
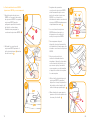
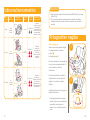
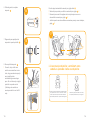
Parts List
Make sure all parts are available before assembly. If any part is missing,
please contact local retailer. No tools are required for assembly.
Soft goods include Seat Pad, Crotch Pad, Shoulder Pad, Head Support
and Infant Insert. Please make sure there are no missing parts. Please
contact the retailer if anything is missing.
1 Head Support
2 Seat Pad
3 Buckle
4 Webbing Adjuster
5 ISOFIX Attachments Releasing
Button
6 Recline Adjustment Handle
7 Crotch Pad
8 Shoulder Harness
9 Infant Insert
10 Rear-Facing Vehicle
Shoulder Belt Slot
11 Lock-off Device
12 Head Support
Adjustment Lever
13 Locking Clip
14 Tether Strap Adjuster
15 Tether Hook
16 Top Tether Strap
17 Instruction Manual
Storage Compartment
18 Base
19 ISOFIX Attachments Connector
20 Seat Belt Back Slot
21 Lap Belt Guiding
22 ISOFIX Attachments Guides
1
2
3
4
7
8
9
518
20
21
11
10
12
16
17
15
14
22
19
6
13

34
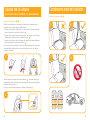
WARNING
! NO child restraint can guarantee full protection from injury in an acci-
dent. However﹐ proper use of this child restraint will reduce the risk of
serious injury or death to your child.
! This child restraint is designed ONLY for child weighing under 25kg
(approximately 7 years old or under).
! DO NOT use forward facing mode before the child’s weight exceeds
9kg.
! Any straps holding the restraint to the vehicle should be tight﹐ that any
straps restraining the child should be adjusted to the child's body﹐ and
that straps should not be twisted.
! DO NOT use or install this child restraint until you read and understand
the instructions in this manual and in your vehicle owner's manual.
! Concern the danger of making any alterations or additions to the
device without the approval of the Type Approval Authority﹐ and a
danger of not following closely the installation instructions provided by
the child restraint manufacturer.
! DO NOT make any modification to this child restraint or use it along
with component parts from other manufacturers.
! DO NOT use this child restraint if it has damaged or missing parts.
! DO NOT have your child in unfitted clothes when use this child restraint
in rearward facing or forward facing mode﹐ because this may prevent
your child from being properly and securely fastened by the shoulder
harnesses and the harnesses between thighs.
! When use this child restraint in rearward facing or forward facing mode﹐ the
safety belt must be used correctly﹐ and ensure that any lap strap is worn
low down﹐ so that the pelvis is firmly engaged.
! DO NOT leave this child restraint unbelted or unsecured in your vehicle
because unsecured child restraint can be thrown around and may
injure occupants in a sharp turn﹐ sudden stop﹐ or collision. Remove it if
not in regular use.
! Child is not left in the child restraint system unattended.
! Do not place the child restraint in seating positions where an active
frontal airbag is installed if your child is still in rear facing mode.
WARNING
! NEVER use a second-hand child restraint or a child restraint whose
history you do not know because they may have structural damage
that endangers your child's safety.
! Please keep this child restraint away from sunlight﹐ otherwise it may
be too hot for the child's skin.
! NEVER use ropes or any other substitutes in place of seat belts in
case of injuries from restraint.
! DO NOT use this child restraint as a regular chair as it tends to fall
down and injure the child.
! The child restraint shall not be used without the soft goods.
! The soft goods should not be replaced with any other than the one
recommended by the manufacturer﹐ because the soft goods
constiutes an integral part of the restraint performance.
! DO NOT put anything other than the recommended inner cushions in
this child restraint.
! DO NOT carry this child restraint with a child in it.
! Any luggage or other objects liable to cause injuries in the event of a
collision shall be properly secured.
! Do not allow the child restraint harness or buckles to become trapped
or caught in the vehicle seat or door.
! The device should be changed when it has been subject to violent
stresses in an accident.
! Remove this child restraint from the vehicle seat when it is not in use
for a long period of time.
! To avoid suffocation﹐ remove plastic bag and packaging materials
before using this product. The plastic bag and packaging materials
should then be kept away from babies and children.
! Consult the distributor for issues concerning maintenance﹐ repair
and part replacement.
! DO NOT use any load bearing contact points other than those
described in the instructions and marked in the child restraint.
! Frequently check the ISOFIX attachments guides for dirt and clean
them if necessary. Reliability can be effected by ingress of dirt﹐ dust﹐
food particles etc.

56
WARNING
! DO NOT install this child restraint under the following conditions:
1. Vehicle seats with 2-point safety belts.
2. Vehicle seats facing sideward or rearward with respect to the
running direction of the vehicle.
3. Vehicle seats unstable during installation.
Emergency
In case of emergency or accidents﹐ it is most important to have your child
taken care of with first aid and medical treatment immediately.
Product Information
For Installation with 3-point-belt or with ISOFIX (ISOFIX attachments
and top tether)
1. This is a ‘Universal’ child restraint. It is approved to UN ECE regulation
44, 04 series of amendments, for general use in vehicles and it will fit most,
but not all, car seats.
2. A correct fit is likely if the vehicle manufacturer has declared in the vehicle
handbook that the vehicle is capable of accepting a ‘Universal’ child
restraint for this age group.
3. This child restraint has been classified as ‘Universal’ under more stringent
conditions than those which applied to earlier designs which do not carry
this notice.
4. If in doubt, please consult the child restraint manufacturer or the retailer.
For Installation with ISOFIX (ISOFIX attachments and top tether)
1. This is an ISOFIX CHILD RESTRAINT SYSTEM. It is approved to
Regulation No. 44, 04 series of amendments for general use in vehicles
fitted with ISOFIX anchorages systems. It is suitable for fixing into the
seat positions of most cars.
2. It will fit vehicles with positions approved as ISOFIX positions (as detailed
in the vehicle handbook), depending on the category of the child restraint
and of the fixture.
3. Seat positions in other cars may also be suitable to accept the child
restraint. If in doubt, consult either the child restraint manufacturer or
vehicle manufacturer.
4. The ISOFIX size class for which this device is intended is B1.
For Installation with ISOFIX attachments and 3-point-belt
1.The child restraint is classified for “Semi-Universal” use.
2. Seat positions in other cars may also be suitable to accept the child
restraint. If in doubt, consult either the child restraint manufacturer or
vehicle manufacturer.
Product Child Restraint
Model C1719
Suitable for
Child weighing 0 - 25kg (approximately 0 - 7 years)
Mass Group 0+/1/2
Materials Plastics, metal, fabrics
Patent No. Patents pending

78
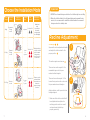
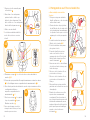
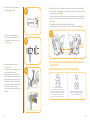
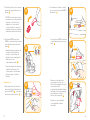
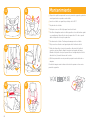
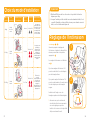
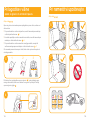
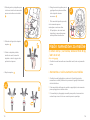
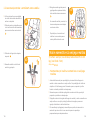
Choose the Installation Mode
When installing
the child restraint
In the forward
facing mode,
do not use the
infant insert.
Remove crotch
pad and infant
insert and store
harness in
proper storage
locations
Child's
Weig ht
Installation
Mode
Figure for
Installation
Reference
Age
Seat Infant Insert
Position Instructions
<18kg
9 - 18 kg
15 - 25 kg
Rearward
Facing
mode
Forward
Facing
mode
Booster
mode
<4 years
1 year
to
4 years
3 years
to
7 years
3
Position 1 -4
Position 5-6
5
2
1
Infant insert
must
be used from
0-9 months
to help restrain
the child tightly
4
Position 1 -4
3
2
1
4
6
Important
1. DO NOT use forward facing mode before the child's weight exceeds 9kg.
2. When the child is suitable for both forward facing and rearward facing
modes﹐ it is recommended to install this child restraint in the rearward
facing mode as it is relatively safer.
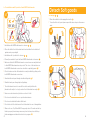
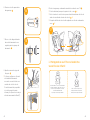
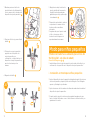
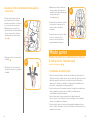
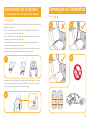
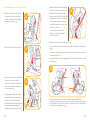
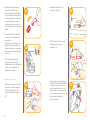
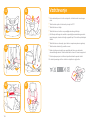
Recline Adjustment
see images 1 - 2
Squeeze the recline adjustment handle,
and adjust the child restraint to the
proper position. 1
The recline angles are shown as 2
There are two recline angles 5-6 for
rearward facing mode, they are
marked as blue triangles.
There are four recline angles 1-4 for
forward facing mode and booster mode,
they are marked as red triangles.
Angle indication: with top and bottom
triangles aligned.
! Make sure that vehicle seat belt will
be retightend when adjusted in
reclining position and vice versa if
seat was already buckled up
properly previously.
1
2
1
2
33
22
11
66
44
55

910
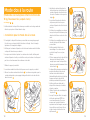
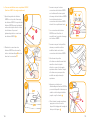
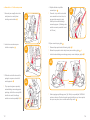
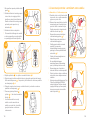
Height Adjustment
for Head Support and Shoulder Harnesses
see images 3 - 4
Please adjust the head support and shoulder harnesses to proper height
according to the child's height.
! When used in rearward facing mode, the shoulder harness height must be
even with child’s shoulders. 3 -1
! When used in forward facing mode, the shoulder harness height must be
even with child’s shoulders. 3 -2
! When used in booster mode, the shoulder belt guides must be even with
child’s shoulders. 3 -3
If the shoulder harnesses are not at proper height, the child may be thrown
from the child restraint when there is an accident.
Squeeze the head support adjustment lever 4 -1 meanwhile pull up or push
down the head support until it snaps into one of the 5 positions.
The head support positions are shown as 4
3
123
41
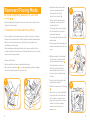
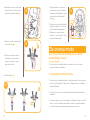
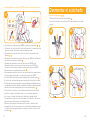
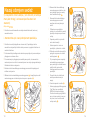
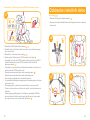
Concerns on Installation
see images 5 - 8
5 6
1
24
3
57
6
1
24
3
57
6
A
I
R
B
A
G
8
7

11 12
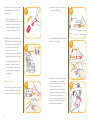
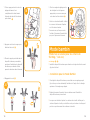
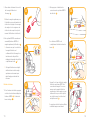
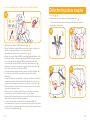
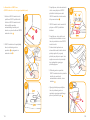
Rearward Facing Mode
(for Child under 18kg /Newborn–4 years old)
see images 9 - 21
! Please install the child restraint on the rear vehicle seat, and then put the
child in the child restraint.
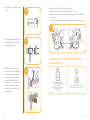
i. Installation for Rearward Facing Mode
! Please adjust the child restraint to proper angle (2 positions for rearward
facing mode). Angle indication: With top triangle and blue triangle aligned.
! Make sure the shoulder harness is adjusted to proper height before
installing this child restraint.
! When installing and adjusting the safety belts, make sure that both the
shoulder belt and the waist belt are not twisted and will not stop the safety
belts from functioning properly.
1. Remove infant insert.
! Vehicle waist belt must pass underneath infant insert.
2. Pass the vehicle waist belt 9 -1 over lap belt guidings, and then engage
the vehicle buckle tongue into the buckle. 10
10
9
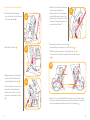
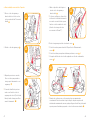
3. Install the vehicle shoulder belt
in the two rear-facing vehicle
shoulder belt slots at the
back of the seat shell. 11
! Vehicle shoulder belt must pass
through the rear-facing vehicle
shoulder belt slots.
! The locking clip is used only when
the child restraint is used in the
rearward facing mode.
! The locking clip will make the child
restraint safer.
! Please replace the locking clip and
string in the bag when they are not
in use.
4. While pressing the child restraint,
pull the belts to fasten the child
restraint tightly and securely. 12
! The child restraint can not be
used if the vehicle safety belt
buckle (female buckle end) is too
long to anchor the child restraint
securely.
! Please check by moving the child
restraint back and forth.
5. Take the locking clip out of the bag.
13
! When not in use, Top Tether MUST
be properly stored. To make sure
the top tether is properly stored
away, remove any slack in strap to
avoid the top tether swinging
around when the vehicle is in
progress. 38
11
22
11
12
2
1
13

13 14
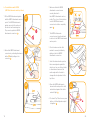
Correctly assembled vehicle belt is shown as 17
! Waist belt passes through the lap belt guidings , as 17 -1
! Shoulder belt must passes through the rear-facing vehicle shoulder belt
slot, as 17 -2
! The vehicle buckle tongue is engaged with the buckle correctly, as 17 -3
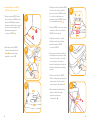
ii. Securing your Child in the Child Restraint
Use Infant Insert
33
22
11
17
Detach the snaps on the head support to
remove the head portion of the insert.
We recommend using the full
infant insert
while the baby
is 0-9 months or until they
outgrow the insert. The
infant insert
increases side impact
protection.
15
16
6. Press button to open the locking
clip. 14
7. Thread the diagonal belt through
the locking clip, and then fasten
the locking clip. 15
8. Refasten the locking clip. 16
! Please check if child restraint is
installed tightly by moving the
child restraint back and forth at
the vehicle belt path. Please
reference vehicle owner's manual
for more information. (Child
restraint should not move more
than 25mm/1").
13
14

15 16
5. Pull down the adjustment webbing
and adjust it to the proper length to
make sure your child is snugly
secured. 21
! After the child is seated, recheck
whether the shoulder harnesses are
at the proper height.
! Make sure the space between the
child and the shoulder harness is
about the thickness of one hand.
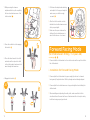
Forward Facing Mode
(for Child between 9-18kg / 1–4 years old)
see images 22 - 41
! Please install the child restraint on the vehicle seat, and then put the child in
the child restraint.
i. Installation for Forward Facing Mode
! Please adjust the child restraint to proper angle (4 positions for forward
facing mode). Angle indication: With top triangle and red triangle aligned.
! Please adjust the shoulder harnesses to proper height before installing the
child restraint.
! When installing and adjusting the safety belts, make sure that both the
shoulder belt and the waist belt are not twisted and will not keep the safety
belts from being properly positioned.
21
1. While pressing the harness
adjustment button, pull completely
the two shoulder harnesses of the
child restraint. 18
2. Press the red button to disengage
the buckle. 19
3. Place the infant insert in the child
restraint, and then place the child
in the child restraint and pass both
arms through the harnesses.
4. Engage the buckle. 20
18
19
20

17 18
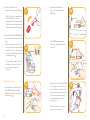
4. Open the lock-off device and insert
the safety belt through it. 25
! Please check if the child restraint is
installed tightly by moving the child
restraint back and forth at the vehicle
belt path. (child restraint should not
move more than 25mm/1").
The assembled safety belt is shown as 26
! Shoulder belt passes through Lock-off Device, as 26 -1
! Waist belt passes through the seat belt back slots, as 26 -2
! The vehicle buckle tongue is engaged with the buckle correctly,
as 26 -3
! When not in use, Top Tether MUST be properly stored. To make sure the
top tether is properly stored away, remove any slack in strap to avoid the
top tether swinging around when the vehicle is in progress. 38
26
11
22
33
a. For installation with 3-point-belt
1. Thread the safety belt through
two seat belt back slots at the back
of the child restraint. 22
2. Buckle the safety belt. 23
3. While pressing the child restraint,
pull the belts to fasten the child
restraint tightly and securely. 24
! The child restraint can not be used
if the vehicle safety belt buckle
(female buckle end) is too long to
anchor the child restraint securely.
24 -1
22
25
23
24
11

19 20
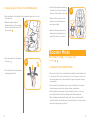
b. For installation with ISOFIX
(ISOFIX attachments and top tether)
1. Fit the ISOFIX attachments guides
with the ISOFIX attachments anchor
points. The ISOFIX attachments
guides can protect the surface of
the vehicle seat from being torn.
They can also guide the ISOFIX
attachments connectors. 27
2. Extend the ISOFIX attachment
connectors by activating the release
button 28 whilst pulling on the
connector 29
! Make sure that both ISOFIX
attachments connectors are
securely attached to
their ISOFIX attachments anchor
points. The colors of the indicators
on both ISOFIX attachments
connectors should be completely
green. 30
! The ISOFIX attachments
connectors must be attached and
locked onto the ISOFIX attachments
anchor points.
! Check to make sure the child
restraint is securely installed by
pulling on the both ISOFIX
attachments connectors.
! Select the desired recline position
before moving back against the
vehicle seat, as once the top tether
is attached and tensioned, the
recline angle will not be able to
change without adjustment to the
top tether.
ecurely installed by p
3. Press the ISOFIX attachments
release button and push the child
restraint back against the vehicle
seat until tight. 31
4. To extend Top Tether for use, press
button on Tether Adjuster and pull
to lengthen. 32
29
30 1
27
28 31
32
1
2

21 22
2. Then press and release the
connectors from the vehicle’s
ISOFIX. 36
! The ISOFIX attachments are
retracted completely back into
base. 37
! When not in use, Top Tether MUST
be properly stored. To make sure
the top tether is properly stored
away, remove any slack in strap to
avoid the top tether swinging
around when the vehicle is in
progress. 38
! When the pocket is not used,
please store it properly.
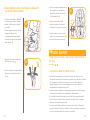
5. Connect the tether hook
securely to the anchorage fitting. 33
!
USE Top Tether for forward facing
mode
installation if vehicle is
equipped with a Tether anchorage
fitting and vehicle requirements are
met (see vehicle owner's manual).
6. Correctly assembled ISOFIX (ISOFIX
attachments and top tether) is shown
as 34
! Make sure that the tether hook is
securely attached to the anchorage
fitting. The colors of the indicators
on tether strap adjuster should be
completely green. 34 -1
! If recline angle is adjusted, check
the tension on the top tether, or
loosen to adjust angle then
re-tension.
Removing the base
1. To remove from the vehicle press
the ISOFIX attachments release
button 35 -1 and pull the base back
from the seat. 35 -2
37
1
2
2
33
38
34 1
36
1
2
35
2
1

23 24
ii. Securing your Child in the Child Restraint
! When installing the child restraint in the forward facing mode, do not use
the infant insert.
1. While pressing the harness
adjustment button, pull completely
the two shoulder harnesses of the
child restraint. 39
2. Press the red button to disengage
the buckle. 40
3. Place the child in the child restraint
and engage the buckle.
4. Pull down the adjustment webbing
and adjust it to the proper length so
that your child is snugly secured. 41
! After the child is seated, recheck
whether the shoulder harnesses
are at proper height.
! Make sure the space between the
child and the shoulder harness is
about the thickness of one hand.
40
41
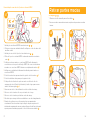
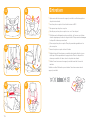
Booster Mode
( for Child 15–25kg / 3–7 years old)
see images 42 - 47
i. Installation for Booster Mode
! Please use only the vehicle seat belt when installing the child restraint in the
booster mode. Do not use the infant insert or 5 point harness. Please store
the shoulder harnesses, buckle and buckle tongues in respective storage
compartments.
! Please adjust the shoulder harnesses to proper length before storing the
shoulder harnesses and buckle in their storage compartments.
! Please adjust the child restraint to proper angle (4 positions for booster
mode). Angle indication: With top triangle and red triangle aligned.
! When installing and adjusting the safety belts, make sure that both the
shoulder belt and the waist belt are not twisted and will not keep the safety
belts from being properly positioned.
39

25 26
1. Press the red button to disengage
the buckle. 40
2. To remove the crotch pad, first
locate the elastic on the inside of the
crotch pad. Pull both the elastic and
the crotch pad over the buckle to
remove. 42
3. Remove the infant insert.
! When installing the child restraint in
the booster mode, do not use the
infant insert.
7. Reattach the snaps 43 -1 and the
hook and loop fastener 43 -2 to
recover the seat shell. 44
! To convert back to forward facing
mode from booster mode, please
reverse the above steps.
ii. Securing your Child in the Child Restraint
a. For installation with 3-point-belt
1. Place the child in the child restraint
and check whether the shoulder belt
guides are at proper height.
2. Position shoulder belt through
shoulder belt guide, pass waist
belt through lap belt guidings. Fasten
buckle and pull the vehicle belt
to tighten. 45
! Shoulder belt must pass through
shoulder belt guide. 46 -1
! Waist belt must pass through
lap belt guidings.
! The child restraint can not be used
if the vehicle safety belt buckle
(female buckle end) is too long to
anchor the child restraint securely.
45 -1
! Never use a vehicle waist-only belt
across front of child.
! Do not use shoulder belt loose or
positioned under arm.
! Do not use shoulder belt behind
child’s back.
! Do not allow child to slide down in
the child restraint in case of
strangulation.
! When not in use, Top Tether MUST
be properly stored. To make sure the
top tether is properly stored away,
remove any slack in strap to avoid
the top tether swinging around when
the vehicle is in progress. 38
4. Detach the snaps 43 -1 and the hook and loop fastener on the seat pad. 43 -2
5. Lift the upper flap of seat pad upward and pull the lower flap forward. Then
store the shoulder straps 43 -3 and buckle tongues in their storage
compartments. 43 -4
6. Pull the buckle through the slot in the seat pad and then store the buckle in
its storage compartment. 43 -5
43
1
2
3
44
45
1
45
46
1
2
42

27 28
b. For installation with 3-point-belt and ISOFIX attachments
1. Installation with ISOFIX attachments is show as 27 - 31
2. Place the child in the child restraint and check whether the shoulder belt
guides are at proper height.
3. Installation with 3-point-belt is show as 45 - 46
4. Correctly assembled 3-point-belt and ISOFIX attachments is shown as 47
! Make sure that both ISOFIX attachments connectors are securely attached
to their ISOFIX attachments anchor points. The colors of the indicators on
both ISOFIX attachments connectors should be completely green. 47 -1
! Check to make sure the child restraint is securely installed by pulling on the
both ISOFIX attachments connectors.
! Shoulder belt must pass through shoulder belt guide. 47 -3
! Waist belt must pass through lap belt guidings.
! The child restraint can not be used if the vehicle safety belt buckle
(female buckle end) is too long to anchor the child restraint securely. 47 -2
! Never use a vehicle waist-only belt across front of child.
! Do not use shoulder belt loose or positioned under arm.
! Do not use shoulder belt behind child’s back.
! Do not allow child to slide down in the child restraint in case of strangulation.
! When not in use, Top Tether MUST be properly stored. To make sure the top
tether is properly stored away, remove any slack in strap to avoid the top
tether swinging around when the vehicle is in progress. 38
47
1
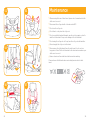
Detach Soft goods
see images 48 - 57
1. Press the red button to disengage the buckle. 48
! To re-attach the soft goods please repeat the above steps in the reverse
order.
49
3
248
50 51

29 30
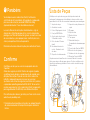
Maintenance
! After removing the foam of infant insert, please store it somewhere that the
child can not access it.
! Please wash the soft goods with cold water under 30°C.
! Do not iron the soft goods.
! Do not bleach or dry clean the soft goods.
! Do not use undiluted neutral detergent, gasoline or other organic solvent to
wash the child restraint. It may cause damage to the child restraint.
! Do not wring the soft goods out. It may leave the soft goods with wrinkles.
! Please hang dry the soft goods in the shade.
! Please remove the child restraint from the vehicle seat if not in use for a
long period of time. Put the child restraint in the shade and somewhere your
child can not access it.
! Remove foam insert from infant insert before machine washing.
Please reference the Illustration when re-inserting foam insert into infant
insert.
55
56 57
52 53
54

31
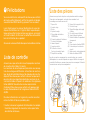
Lista de Peças
Certifique-se de que todas as peças estão disponíveis antes da
montagem. Se alguma peça estiver faltando, entre em contato com o
representante local. Não são necessárias ferramentas para a montagem.
As partes macias incluem Encosto do assento, Gancho do assento,
Apoio para cabeça e Encaixe para crianças. Por favor, certifique-se de
que não há nenhuma peça faltando. Favor contate o vendedor se algo
estiver faltando.
1 Suporte de cabeça
2 Almofada do assento
3 Fivela. 4 Regulagem do tecido
5 Fixações ISOFIX Botão
6 Alça de ajuste de reclinação
7 Almofada de virilha
8 Cinto de ombro 9 Encaixe
infantil
10 Revestimento traseiro do
veículo - Ranhura do cinto
de ombro
11 Dispositivo de destravamento
12 Suporte de cabeça Alavanca de
ajuste
13 O grampo
14 Ajuste de tiras
15 Gancho de tiras
16 Tira superior
17 Manual de Instruções
Compartimento de armazenagem
18 Base
19 Conector das Fixações ISOFIX
20 Guia do cinto de segurança
21 Abertura do cinto de segurança
22 Guias das Fixações ISOFIX
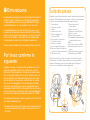
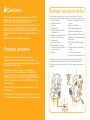
PT Parabéns
Você adquiriu uma cadeirinha infantil﹐ totalmente
certificada de alta qualidade. Este produto é adequado
para o uso de crianças pesando MENOS de 25kg
(aproximadamente 7 anos de idade ou menos).
Leia este Manual de instruções atentamente e siga as
etapas de instalação porque esta é a única maneira de
proteger seu filho de ferimentos graves ou morte no caso
de um acidente﹐ e para proporcionar conforto para sua
criança enquanto utilizar este produto:
Mantenha este manual de instruções para referência futura.
Confirme
Certifique-se de que seu veículo é equipado com de
3 pontos.
Cintos de segurança retrátil Cintos de segurança pode
ser diferente em design e comprimento de acordo com
data﹐ de fabricação e tipo de veículo. Esta cadeirinha
infantil é adequada apenas para uso nos veículos
ajustados com cintos de segurança retráteis de 3 pontos
e aprovados pelo Regulamento ECE UN Nº 16 ou outras
normas equivalentes. Esta cadeirinha infantil é aprovada
pelo regulamento UN ECE 44﹐ série 04 de alterações.
Para informações sobre a garantia﹐ por favor visite nosso
website em joiebaby.com
! Mantenha este manual de instruções no compartimento
de armazenamento da tampa traseira para referência
futura.
1
2
3
4
7
8
9
518
20
21
11
10
12
16
17
15
14
22
19
6
13

33 34
ALERTA
! NENHUMA cadeirinha infantil pode garantir proteção total contra lesões
em um acidente. No entanto﹐ o bom uso deste sistema de Assento para
crianças vai reduzir o risco de ferimentos graves ou morte para o seu filho.
! Esta cadeirinha infantil é projetada APENAS para crianças pesando
menos de 25kg (aproximadamente 7 anos de idade ou menos).
! NÃO utilize o modo virado para frente antes que a criança atinja o peso de
9 kg.
! Qualquer tira segurando a cadeirinha no veículo deve ser apertada﹐
qualquer cinto retendo a criança deve ser ajustado ao corpo da criança e
não devem ser torcido.
! NÃO utilize ou instale esta cadeirinha infantil até que você tenha lido e
entendido as instruções neste manual e no manual do proprietário de seu
veículo.
! Observe o perigo de fazer quaisquer modificações ou adições ao
dispositivo sem a aprovação da autoridade homologadora e um perigo de
não seguir atentamente as instruções de instalação fornecidas pelo
fabricante do dispositivo de Assento.
! NÃO faça qualquer alteração nesta cadeirinha infantil nem a use
juntamente com componentes de outros fabricantes.
! NÃO utilize esta cadeirinha infantil se houver peças danificadas ou faltando.
! NÃO deixe o seu filho em roupas não ajustadas quando estiver usando
esta cadeirinha infantil em modo bebê ou criança﹐ pois isso pode impedir
que o seu filho seja correta e firmemente preso pelo cintos de ombro e
entre as coxas
! Quando usar esta cadeirinha infantil no modo bebê ou criança﹐ o cinto de
criança deve ser utilizado corretamente para garantir que qualquer correia
de colo seja usada para baixo de modo que a pélvis fique firmemente
presa.
! NÃO deixe esta cadeirinha infantil solta em seu veículo porque uma
cadeirinha solta pode ser jogada ao redor e pode ferir os ocupantes em
uma curva fechada﹐ parada súbita ou colisão. Remova-a se não estiver
em uso regular.
! Criança não é deixada na cadeirinha para crianças desacompanhada.
! NÃO coloque este assento infantil em posições de assento onde um
airbag frontal ativo estiver instalado se seu filho ainda estiver no modo
virado para frente.
ALERTA
! NUNCA utilize uma cadeirinha infantil de segunda mão ou uma
cadeirinha cuja história você não conhece﹐ visto que pode haver
dano estrutural que compromete a segurança de seu filho.
! Por favor﹐ mantenha seu assento infantil afastado da luz do sol﹐ de
outro modo ele pode ficar quente para a pele da criança.
! NUNCA utilize cordas ou quaisquer outros substitutos ao invés de
cintos de segurança no caso de lesões da restrição.
! NÃO utilize esta cadeirinha infantil para crianças como uma cadeira
normal﹐ pois ela tende a cair e machucar a criança.
! O dispositivo de Assento não deve ser usado sem as partes macias.
! As partes macias não devem ser substituídas por qualquer uma além
daquelas recomendadas pelo fabricante﹐ pois as partes macias
constituem uma parte integral do desempenho do assento.
! NÃO coloque nada além das almofadas internas recomendadas nesta
cadeirinha infantil.
! NÃO carregue esta cadeirinha infantil com uma criança nela.
! Qualquer bagagem ou outros objetos susceptíveis de causar
ferimentos em caso de colisão devem ser devidamente
acondicionados.
! Não deixe que os cintos ou fivelas da cadeirinha infantil fiquem
emperrados ou presos no assento do veículo ou porta.
! O dispositivo deve ser trocado quando sujeito a tensões violentas em
um acidente.
! Remova a cadeirinha infantil do assento do veículo quando não
estiver usando-o por um longo período.
! Para evitar asfixia﹐ retire o saco de plástico e materiais de embalagem
antes de usar este produto. O saco plástico e materiais de embalagem
devem﹐ então﹐ ser mantidos afastados de bebês e crianças.
! Consulte o distribuidor para assuntos relacionados a manutenção﹐
reparos e substituição de peças.
! NÃO utilize qualquer ponto de contato de sustentação de carga além
daqueles descritos nas instruções e marcados na cadeirinha infantil.
! Verifique com frequência as guias ISOFIX para sujeira e limpe-as﹐ se
necessário. A confiabilidade pode ser efetuada pela entrada de
sujeira﹐ poeira﹐ partículas de alimento etc.

35 36
ALERTA
! NÃO instale esta cadeirinha infantil sob as seguintes condições:
1. Assentos de veículos com cintos de segurança de 2 pontos.
2. Assentos de veículos virados para a lateral ou para trás com
relação à direção de curso do veículo.
3. Assentos de veículos instáveis durante a instalação.
Emergência
Em caso de emergência ou acidentes﹐ é importante aplicar primeiros-
socorros ao seu filho e buscar tratamento médico imediatamente.
Informações sobre o
Produto
Para instalação com cinto de 3 pontos (Anexo ISOFIX e sistema ISOFIX)
1. Este é um sistema de segurança infantil ‘Universal’. Ele foi aprovado
pelo regulamento 44 da UN ECE , série de alterações 04, para uso geral
em veículos e se ajustará em praticamente em todos os assentos de
veículos.
2.
Um ajuste correto é provável se o fabricante do veículo tiver declarado
no manual do veículo que este é capaz de aceitar uma cadeirinha
‘Universal’ para este grupo de idade.
3.
Esta cadeirinha infantil foi classificada como ‘Universal’, sob condições
mais restritas do que aquelas aplicadas aos projetos anteriores que não
portam esta notificação.
4. Em dúvida, consulte o fabricante de cadeirinhas infantis ou o vendedor.
Para a Instalação com anexos ISOFIX (ISOFIX e tira superior)
1. Este é um SISTEMA DE Assento PARA CRIANÇAS ISOFIX. É aprovado
pela Regulamentação N.º 44, 04 e séries de emendas, para o uso geral em
veículos com sistemas de ancoragem ISOFIX. É adequado para a fixação
nas posições no assento da maioria dos carros.
2. Se encaixará aos veículos com as posições aprovadas como posições
ISOFIX (conforme detalhado no manual de instruções do veículo),
dependendo da categoria do sistema de Assento para crianças e o
encaixe.
3. As posições do banco em outros carros também podem ser adequadas
para aceitar este sistema de Assento para crianças. Em dúvida, consulte o
fabricante de cadeirinhas infantis ou o vendedor.
4. A classe de tamanho ISOFIX para este dispositivo é B1.
Para a Instalação com sistema ISOFIX e com de cinto de 3 pontos
1. O dispositivo é classificado para uso "Semi-Universal".
2. As posições do banco em outros carros também podem ser adequadas
para aceitar este sistema de Assento para crianças. Em dúvida, consulte o
fabricante de cadeirinhas infantis ou o vendedor.
Produto Cadeirinha Infantil
Modelo C1719
Adequado para
crianças com peso de 0 - 25kg
(aproximadamente 0 - 7 anos)
Grupo de massa 0+/1/2
Materiais Plásticos, metal, tecido
N.º de Patente Patentes pendentes

37 38
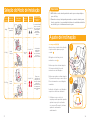
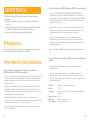
Seleção do Modo de Instalação
<18kg
9 - 18 kg
15 - 25kg
3
Posição 1 -4
Posição 5-6
5
2
1
4
Posição 1 -4
3
2
1
4
6
Modo virado
para trás < 4 anos
1 ano a 4
anos
3 a 7
anos
Modo
Criança
Modo
Junior
O encaixe infantil
deve ser usado
de 0 a 9 meses
para ajudar a
prender a
criança firme-
mente
Ao instalar a
cadeirinha
infantil no
modo criança,
não use o
encaixe infantil.
Remova a
almofada de
entrepino e a
inserção infantil
e guarde o
arnês em locais
de armazena-
mento adequa-
dos
Peso da
Criança
Modo de
Instalação
Figura para
Instalação
Idade de
Referência
Posição do
Assento
Instruções para
inserção da
criança
Importante
1. NÃO utilize o modo virado para frente antes que a criança atinja o
peso de 9 kg.
2. Quando a criança é adequada para ambos os modos virados para
frente e para trás﹐ é recomendável instalar esta cadeirinha infantil no
modo bebê﹐ pois é relativamente mais seguro.
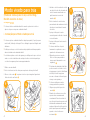
Ajuste de Inclinação
ver imagens 1 - 2
Aperte a alça de ajuste de inclinação,
e ajuste assento para a posição
correta. 1
Os ângulos de inclinação são
mostrados como 2
Existem que dois reclinam ângulos
5-6 para modo bebê, eles são
marcados em azul tiângulos.
Existem que quatro reclinam ângulos
1-4 para modo criança e modo junior
Eles são marcados como triângulos
vermelhos.
Indicação do ângulo: com triângulos
superiores e inferiores alinhados.
!
Cerifique-se que o cinto de
segurança será reapertado quando
ajustado na posição reclinada e
vice versa se O assento já estava
apertado corretamente
anteriormente.
1
2
1
2
33
22
11
66
44
55
A página está carregando...
A página está carregando...
A página está carregando...
A página está carregando...
A página está carregando...
A página está carregando...
A página está carregando...
A página está carregando...
A página está carregando...
A página está carregando...
A página está carregando...
A página está carregando...
A página está carregando...
A página está carregando...
A página está carregando...
A página está carregando...
A página está carregando...
A página está carregando...
A página está carregando...
A página está carregando...
A página está carregando...
A página está carregando...
A página está carregando...
A página está carregando...
A página está carregando...
A página está carregando...
A página está carregando...
A página está carregando...
A página está carregando...
A página está carregando...
A página está carregando...
A página está carregando...
A página está carregando...
A página está carregando...
A página está carregando...
A página está carregando...
A página está carregando...
A página está carregando...
A página está carregando...
A página está carregando...
A página está carregando...
A página está carregando...
A página está carregando...
A página está carregando...
A página está carregando...
A página está carregando...
A página está carregando...
A página está carregando...
A página está carregando...
A página está carregando...
A página está carregando...
A página está carregando...
A página está carregando...
A página está carregando...
A página está carregando...
A página está carregando...
A página está carregando...
-
 1
1
-
 2
2
-
 3
3
-
 4
4
-
 5
5
-
 6
6
-
 7
7
-
 8
8
-
 9
9
-
 10
10
-
 11
11
-
 12
12
-
 13
13
-
 14
14
-
 15
15
-
 16
16
-
 17
17
-
 18
18
-
 19
19
-
 20
20
-
 21
21
-
 22
22
-
 23
23
-
 24
24
-
 25
25
-
 26
26
-
 27
27
-
 28
28
-
 29
29
-
 30
30
-
 31
31
-
 32
32
-
 33
33
-
 34
34
-
 35
35
-
 36
36
-
 37
37
-
 38
38
-
 39
39
-
 40
40
-
 41
41
-
 42
42
-
 43
43
-
 44
44
-
 45
45
-
 46
46
-
 47
47
-
 48
48
-
 49
49
-
 50
50
-
 51
51
-
 52
52
-
 53
53
-
 54
54
-
 55
55
-
 56
56
-
 57
57
-
 58
58
-
 59
59
-
 60
60
-
 61
61
-
 62
62
-
 63
63
-
 64
64
-
 65
65
-
 66
66
-
 67
67
-
 68
68
-
 69
69
-
 70
70
-
 71
71
-
 72
72
-
 73
73
-
 74
74
-
 75
75
-
 76
76
-
 77
77


Jole stages™ FX Manual do usuário
- Categoria
- Assentos de carro
- Tipo
- Manual do usuário
em outras línguas
- español: Jole stages™ FX Manual de usuario
- français: Jole stages™ FX Manuel utilisateur
Artigos relacionados

Outros documentos
-
Graco EXTEND Manual do proprietário
-
Joie EVERYSTAGE FX Manual do usuário
-
Joie i-Venture Group 0+/1 Car Seat Manual do usuário
-
Joie Signature i-Plenti Manual do usuário
-
Joie ECE R129-03 i-Spin Safe Enhanced Child Restraint Manual do usuário
-
mothercare Joie Juva group 0+ 0720185 Guia de usuario
-
Graco GC2117ABIRO000 Manual do usuário
-
Joie i-Spin Grow Signature Enhanced Child Restraint Manual do usuário