Hamilton Beach 70735 Guia de usuario
- Categoria
- Processadores de alimentos
- Tipo
- Guia de usuario

Spiralizing Food
Processor
Robot culinaire
avec spiraleur
Procesador de
alimentos para
cortar en espiral
English ...................... 2
Français ................... 17
Español ................... 32
READ BEFORE USE
LIRE AVANT UTILISATION
LEA ANTES DE USAR
hamiltonbeach.com
For recipes, tips and product
information.
hamiltonbeach.ca
Pour des recettes, des conseils et
des renseignements sur le produit.
hamiltonbeach.com.mx
Para recetas, consejos, y información
del producto.
ENTER TO WIN $100
TO SPEND ON WEBSITE
Scan code or visit:
register.hamiltonbeach.com
PARTICIPEZ POUR COURIR LA CHANCE DE
GAGNER UN MONTANT DE 100 $
À DÉPENSER SUR NOTRE SITE WEB
Balayez le code ou visitez le
register.hamiltonbeach.com
INGRESE PARA TENER LA OPORTUNIDAD
DE GANAR $100 PARA GASTAR EN
NUESTRO SITIO WEB
Escanee el código o visite
register.hamiltonbeach.com
Open to US customers only • Ce concours
s’adresse aux clients des États-Unis seulement
• Este concurso está disponible sólo a clientes
de los Estados Unidos
Le invitamos a leer cuidadosamente este
instructivo antes de usar su aparato.

2
IMPORTANT SAFEGUARDS
1. Read all instructions.
2. This appliance is not intended for use by persons with
reduced physical, sensory, or mental capabilities, or lack of
experience and knowledge, unless they are closely supervised
and instructed concerning use of the appliance by a person
responsible for their safety.
3. This appliance shall not be used by children. Keep the appliance
and its cord out of reach of children.
4. Close supervision is necessary when any appliance is used near
children. Children should be supervised to ensure that they do
not play with the appliance.
5. To protect against risk of electrical shock, do not put cord, plug,
base, or motor in water or other liquid.
6. Turn the appliance OFF ( ), then unplug from outlet when
not in use, before putting on or taking off parts, and before
cleaning. To unplug, grasp the plug and pull from the outlet.
Never pull from the power cord.
7. Avoid contacting moving parts. Keep fingers out of feed chute.
8. Keep hands and utensils away from moving blade and disc
while processing food to reduce the risk of severe personal
injury and/ or damage to the food processor. A rubber scraper
may be used but must be used ONLY when the food processor
is not running.
9. Blades are sharp. Handle cutting blades carefully when inserting
or removing, emptying the bowl, and during cleaning. Store out
of reach of children.
10. To reduce the risk of injury, be sure to insert or remove blade
and disc using hubs provided for this purpose. Use caution
when removing blade and disc from the bowl, when emptying
the bowl, and when cleaning.
11. Do not operate any appliance with a damaged supply cord or
plug, or after the appliance malfunctions or has been dropped
or damaged in any manner. Supply cord replacement and
repairs must be conducted by the manufacturer, its service
agent, or similarly qualified persons in order to avoid a hazard.
Visit hamiltonbeach.com for information on examination, repair,
or adjustment. Contact Customer Service for information on
examination, repair, or adjustment as set forth in the Limited
Warranty.
12. The use of attachments not recommended or sold by the
appliance manufacturer may cause fire, electric shock, or injury.
13. Do not use your food processor if any part is broken.
14. Do not use outdoors.
15. Do not let cord hang over edge of table or counter or touch hot
surfaces, including stove.
16. Do not place on or near a hot gas or electric burner, or in a
heated oven.
17. Check that the appliance is OFF ( ) before plugging cord into
wall outlet. To disconnect, turn the control to OFF ( ); then
remove plug from wall outlet. To unplug, grasp the plug and
pull from the outlet. Never pull from the power cord.
18. Be sure to turn switch to OFF ( ) position after each use.
Always use the pushers to clear the food chute. When
this method is not possible, unplug cord from outlet and
disassemble unit to remove the remaining food.
19. Be certain lid is securely locked in place before operating
appliance.
20. Never feed food into food chute by hand. Always use the food
pushers.
21. Do not attempt to defeat any interlock mechanism.
22. To reduce the risk of injury, never place cutting blade or disc on
When using electrical appliances, basic safety precautions should always be followed to reduce the risk of fire, electric shock, and/or
injury to persons, including the following:

3
SAVE THESE INSTRUCTIONS
Other Consumer Safety Information
This appliance is intended for household use only.
w WARNING Electrical Shock Hazard: This appliance is provided
with a polarized plug (one wide blade) to reduce the risk of electric
shock. The plug fits only one way into a polarized outlet. Do not
defeat the safety purpose of the plug by modifying the plug in any
way or by using an adapter. If the plug does not fit fully into the
outlet, reverse the plug. If it still does not fit, have an electrician
replace the outlet.
The length of the cord used on this appliance was selected to
reduce the hazards of becoming tangled in or tripping over a longer
cord. If a longer cord is necessary, an approved extension cord
may be used. The electrical rating of the extension cord must be
equal to or greater than the rating of the appliance. Care must be
taken to arrange the extension cord so that it will not drape over
the countertop or tabletop where it can be pulled on by children or
accidentally tripped over.
To avoid an electrical circuit overload, do not use another
high-wattage appliance on the same circuit with this appliance.
base without first putting bowl properly in place.
23. Make sure the blade or disc has come to a full stop before
removing lid.
24. Do not use appliance for other than intended purpose.
25. The appliance is not intended for commercial, professional, or
industrial use. It is designed and built exclusively for household
use only.
26. Never use appliance for a longer period or with a larger amount
of ingredients other than that recommended by appliance
manufacturer.
27. Be careful if hot liquid is poured into the food processor bowl
as it can be ejected out of the appliance due to a sudden
steaming.
28. Do not fill the bowl above the marked maximum fill line (or
rated capacity) to avoid risk of injury due to damage to the
cover or bowl.
29. CAUTION! In order to avoid a hazard due to inadvertent
resetting of the thermal cut-out, this appliance must not be
supplied through an external switching device, such as a timer,
or connected to a circuit that is regularly switched on and off by
the utility.
30. The maximum rating of this unit is based on using the
chopping/mixing blade. Using the slicing/shredding disc or
spiral slicer may draw significantly less power.

4
13
6
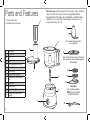
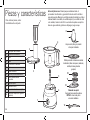
Parts and Features
Use to shred or to slice a variety of foods (such
as cheese, carrots, onions, tomatoes, peppers,
and cucumbers).
Use to coarsely chop, grate, mince,
mix, or puree food.
4
Before first use: Carefully unpack Food Processor, saving cardboard
sleeve from Disc for storage. Handle Chopping/Mixing Blade,
Reversible Slicing/Shredding Disc, Spiral Blade, and Ribbon Blade
carefully; they are very sharp. Wash all parts except base in hot,
soapy water. Rinse; then dry.
To order parts, visit:
hamiltonbeach.com/parts 1
1Food Pusher
2Food Chute
3Lid
4Bowl
5Nonremovable Motor Shaft
6Base
7Control Knob
8Chopping/Mixing Blade
9Reversible Slicing/Shredding
Disc
10 Spiral Blade
11 Ribbon Blade
12 Spiral Slicing Plate
13 Cleaning Brush (with select
models)
3
12
10
11
Spiral Slicer
Use to spiralize vegetables.
NOTE: Do not use with other
attachments installed.
2
5
7
8
9

5
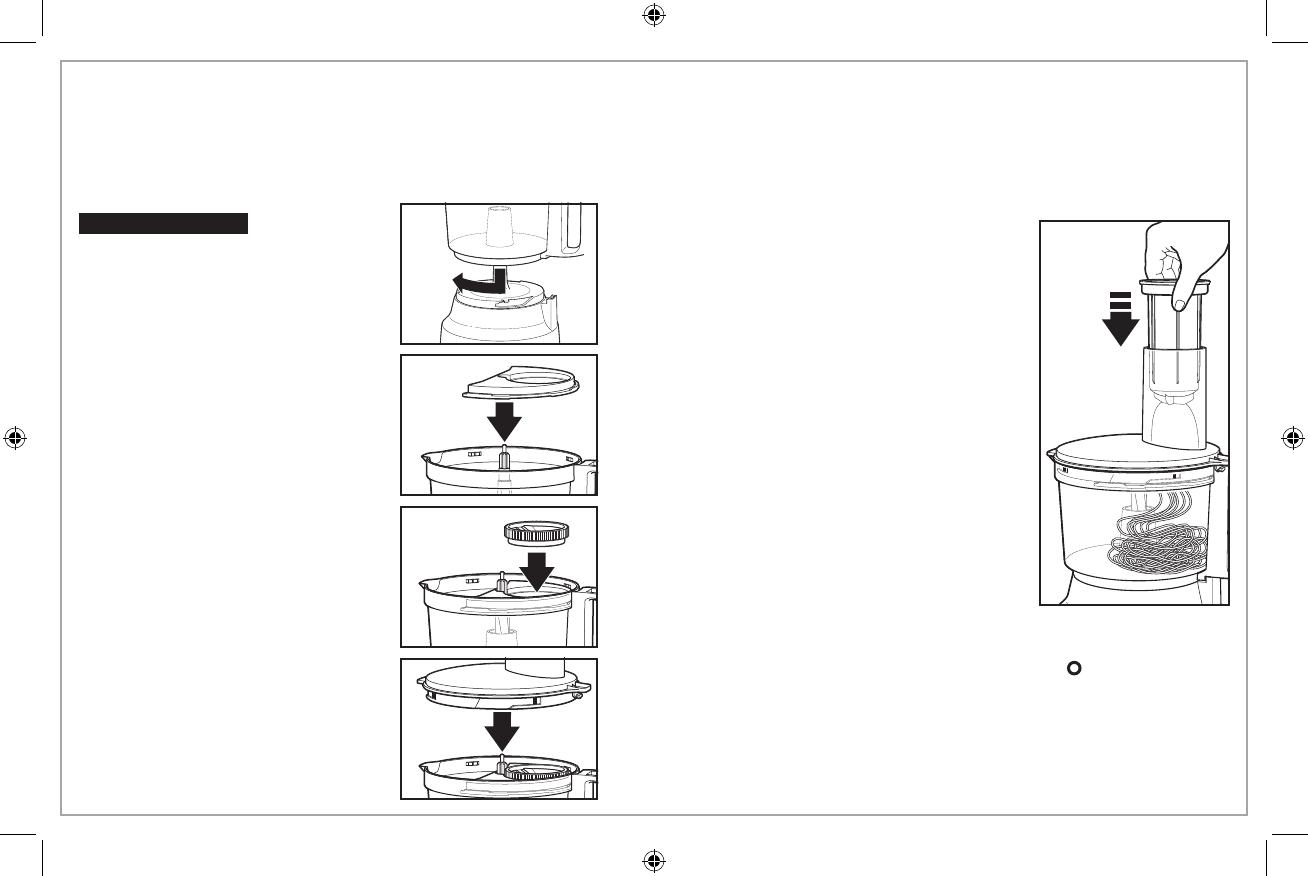
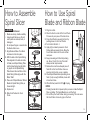
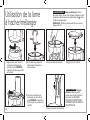
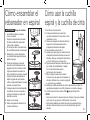
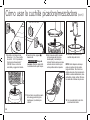
w WARNING Cut Hazard.
• Blades are sharp; handle carefully.
• Inspect parts before use. Do not
use if parts are cracked, bent, or
damaged.
• Do not place fingers or utensils into
the blade while in use.
1. Align Bowl and Base. Turn Bowl
clockwise to lock into place.
2. With the tabs on the Spiral Slicing
Plate aligned to the tabs on inside
of Bowl, insert Spiral Slicing Plate
into the Bowl facing handle. Refer
to graphic on the Spiral Slicing
Plate. Ensure the small hole on the
Spiral Slicing Plate aligns with the
Motor Shaft.
3. Place end of Spiral Blade or Ribbon
Blade into Spiral Slicing Plate, as
shown at right.
4. Replace Lid.
5. Slide Food Pusher into Food
Chute.
How to Assemble
Spiral Slicer How to Use Spiral
Blade and Ribbon Blade
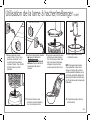
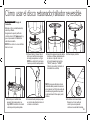
1. Plug into outlet.
2. Place the food in center of the Food Chute.
Process only one piece of food at a time.
3. Press Food Pusher securely into food by
pushing down on the Food Pusher.
4. Turn Control Knob to 1.
5. Apply light, constant pressure to Food
Pusher while processing food. Allow the
Food Pusher and motor to work at their
own pace.
6. Keep processing until food stops being
cut. About 1 inch (2.5 cm) of food will
always remain unprocessed.
7. Remove the small cone-shaped piece of
food left on the Food Pusher. Use as a
snack or add to stock, soup, or salads.
8. Check Spiral Blade before spiralizing more
food. If pulp is caught in Blade, clean with
a brush and rinse.
9. When finished, switch to OFF ( ). Unplug.
NOTES:
• Pressing harder will not speed up the process or make the Spiral
Slicer cut better. The Spiral Blade turns, not the food.
• Do not lift up the Food Pusher during processing. This can cause
the Food Pusher to lose its grip on the food.

6
Successful Spiralizing
• Start by choosing the best foods for spiralizing. Here is a general rule: Think about what foods will work well on a manual food grater. If
you can grate a food, it should spiralize well.
• Solid fruits or vegetables work better than those that have seeds. Seeds get caught in the Blade and will not make uniform spirals. For
vegetables such as butternut squash, use the solid part and save the end with seeds for another use.
• Size does matter. The best foods for spiralizing are the ones that most closely fit the size of the Food Chute.
• When making ribbons, symmetrical foods (like zucchini or cucumbers) will produce better results. Large foods can be cut to fit the Food
Chute but ribbons may not be as uniform or pretty.
• Scrub or peel your fruits and vegetables before spiralizing. When practical, you should peel the food. Peels add to the pulp that can get
caught in the Blade. Zucchini, yellow squash, cucumbers, and apples are examples that you could leave unpeeled.
• Center the item in the Spiral Slicer for more even cutting. Foods that are held vertically with the Food Pusher will give the best results.
• Apples, pears, and potatoes are examples of foods that turn brown quickly when cut. To avoid browning, sprinkle fruit with lemon juice
and place potatoes in water until ready to use. Be sure to pat dry thoroughly with paper towels.
• Spiralized fruits and vegetables can be eaten raw or cooked. Most noodles can be stored 2 to 3 days in the refrigerator in covered
containers.
• Dry the noodles with paper towels before serving or, if desired, blanch them in water to avoid watery sauces. Reduce sauces before
topping noodles to prevent thinned-down sauces.
• Spiralized fruits and vegetables will be processed in very long strands. Use a knife or scissors to cut the produce into
serving-sized pieces.
• Use tongs or a pasta fork to serve the noodles.
• The 1-inch (2.5 cm) leftover piece from processing can be eaten as a snack or saved to use in stock, soups, or salads.
• When spiralizing long food items, guide the item to keep it centered in the Food Chute.

7
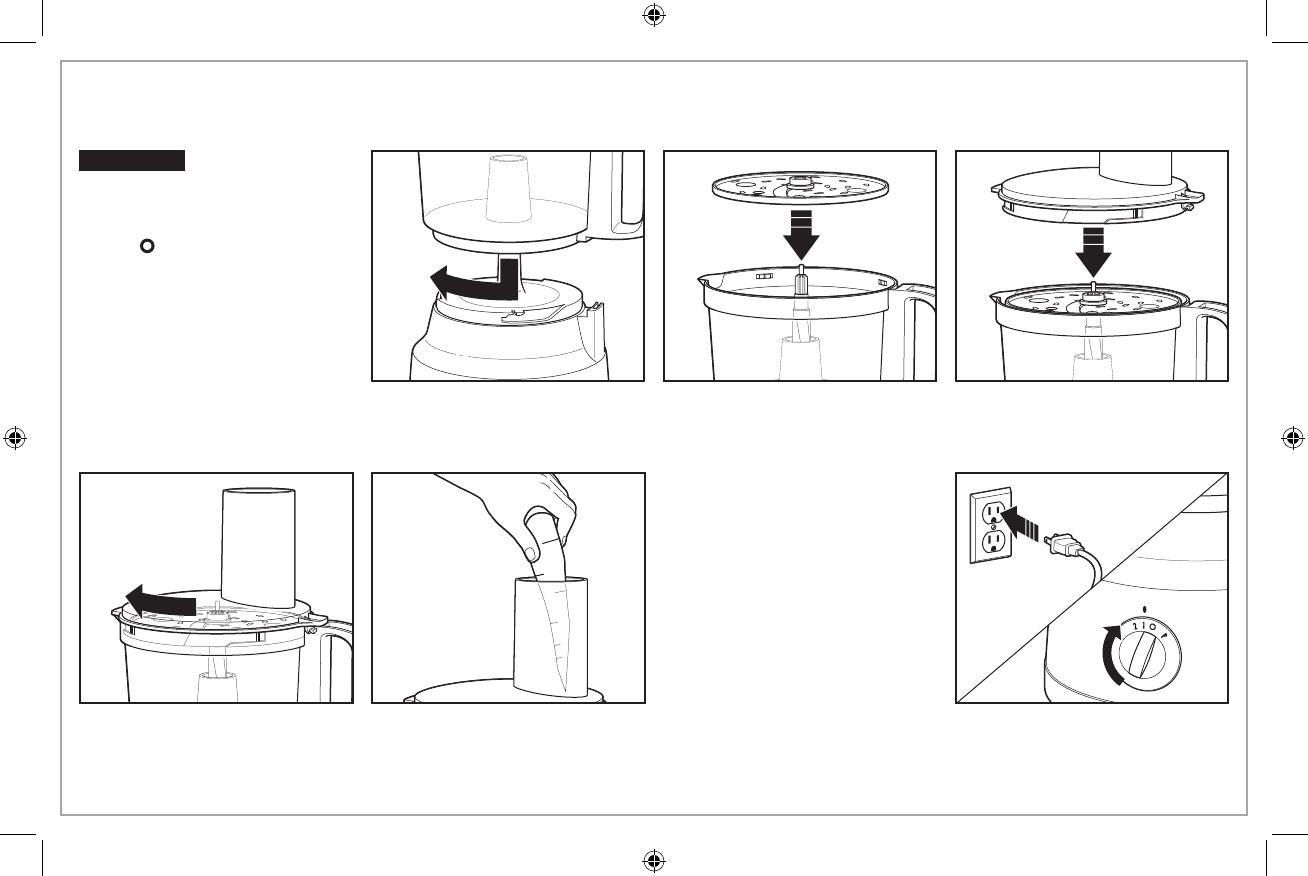
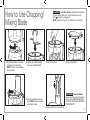
How to Use Chopping/
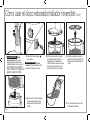
Mixing Blade
w WARNING Laceration Hazard. Handle blade carefully;
it is very sharp. Make sure control knob is turned to
OFF ( ) and unit is unplugged.
NOTE: Operate using only one blade or disc at a time.
2. Carefully place Blade straight
down onto the Motor Shaft. 3. Add food to Bowl. 4. Align Lid and Bowl.1. Align Bowl and Base. Turn Bowl
clockwise to lock into place.
NOTE: Unit will not work unless
Bowl is locked.
5. Turn Lid clockwise to lock into
place. NOTE: Unit will not work
unless Lid is locked. 6. Place Food Pusher in Food Chute.
w WARNING
Laceration Hazard.
Always use food pusher to feed food
into the chute. NEVER PUSH FOOD
THROUGH CHUTE WITH HANDS OR
OTHER OBJECTS.

8
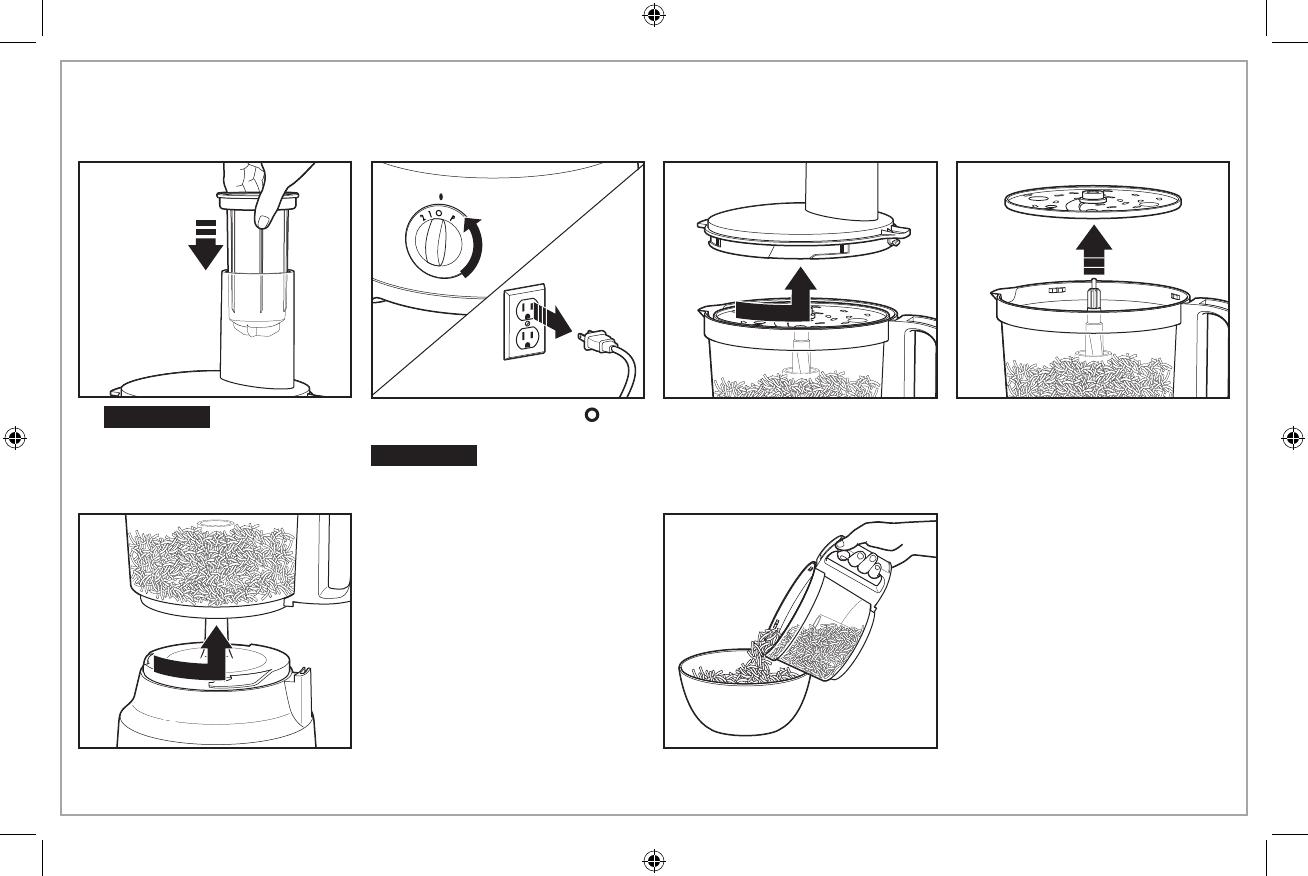
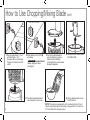
How to Use Chopping/Mixing Blade (cont.)
8. When finished, turn to OFF ( )
and unplug.
w WARNING
Laceration Hazard.
Always unplug unit before
removing lid.
9. Turn Lid counterclockwise to
unlock and pull up to remove.
Always remove Lid before
removing Bowl to avoid possible
damage to appliance.
10. Carefully lift up to remove Blade
from Motor Shaft.
7. Plug into outlet. Select 1, 2, or P
on Control Knob. 1 or 2:
Processor will run continuously.
P (pulse): For instant on and off
control.
11. Turn Bowl counterclockwise to
unlock and pull up to remove. 12. Using a rubber spatula, remove
food from Bowl.
NOTE:
This machine is equipped with motor overload protection. If motor
stops during operation due to overheating, unplug and allow it to cool down
for 15 minutes before resuming process.
9
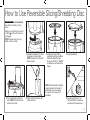
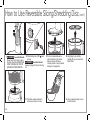
How to Use Reversible Slicing/Shredding Disc
w WARNING
Laceration Hazard.
Handle disc carefully; it is very
sharp.
Make sure Control Knob is turned
to OFF ( ) and Food Processor is
unplugged.
NOTE: Operate using only one
Blade or Disc at a time.
2. Using finger holes of Disc,
carefully place Disc onto Motor
Shaft with desired function
facing up. (“SLICE” or “SHRED”
is stamped on each side of the
Blade.)
3. Align Lid and Bowl.
4. Turn Lid clockwise to lock into
place. NOTE: Unit will not work
unless Lid is locked.
1. Align Bowl and Base. Turn Bowl
clockwise to lock into place.
NOTE: Unit will not work unless
Bowl is locked.
5. Cut food to fit Food Chute. Fill
Chute with food.
NOTE: Soft cheese like mozzarella
must be placed in the freezer for
30 minutes prior to processing
to ensure it is firm enough for
shredding.
6. Plug into outlet. Select 1 on
the Control Dial for continuous
operation at the lowest speed.
10
How to Use Reversible Slicing/Shredding Disc
(cont.)
7.
w WARNING
Laceration Hazard.
Always use food pusher to feed
food into the chute. NEVER PUSH
FOOD THROUGH CHUTE WITH
HANDS OR OTHER OBJECTS.
9. Turn Lid counterclockwise to
unlock and pull up to remove.
Always remove Lid before
removing Bowl to avoid possible
damage to the appliance.
10. Using finger holes on Disc,
carefully lift up to remove from
Motor Shaft.
8. When finished, turn OFF ( ) and
unplug.
w WARNING
Laceration Hazard.
Always unplug unit before removing
lid.
11. Turn Bowl counterclockwise to
unlock and pull up to remove. 12. Using a rubber spatula, remove
food from Bowl.

11
Tips and Techniques
• For a more uniform
consistency,
start with pieces
of food that are similar in size.
Cut food into 1-inch (2.5-cm)
pieces before processing with
Chopping/Mixing Blade and
leave room in Bowl for food to
be tossed around.
• This Food Processor is
excellent to chop, mix, slice,
or shred most foods.
However, to maintain peak
performance, do not use
Food Processor to grind grain,
coffee beans, or spices; slice
frozen meats; knead dough;
or crush ice.
• When chopping foods, pulsing
on and off will produce best
results and control to attain
desired size pieces.
• Operating time will depend
on quantity of food being
processed. Most foods can be
sliced, chopped, or shredded
in seconds. If unit is operated
continuously for an extended
period of time, let Processor
rest about 4 minutes before
continuing.
• Do not puree or mash starchy
vegetables like potatoes as
they are easily overprocessed
and will become gummy.
• To slice or shred cheese, use
only firm cheese like Cheddar
or Swiss that has been chilled
for at least 30 minutes.
Cheese should be processed
immediately after being
removed from the refrigerator.
Soft cheese like mozzarella
must be placed in the freezer
for 30 minutes prior to
processing to ensure it is firm
enough for shredding.
• The Reversible Slicing/
Shredding Disc has a
slicing blade on one side
and shredding teeth on the
other. The name stamped on
the blade, facing up, is the
function selected. Place on
motor shaft with desired
cutting edge facing up.
Processing Charts
Disc attachment is reversible and labeled. The label should face up
for the desired function. When using Disc, do not process past the
MAX LEVEL on the Bowl.
For best results do not exceed the following amounts when
chopping, mincing, or pureeing with the Chopping/Mixing Blade.
ATTACHMENT FOOD
Chopping/Mixing Blade Chop: nuts, meat, garlic, onions, peppers,
celery, herbs, bread (for crumbs), crackers
Mince/Puree: vegetables, fruit
Mix: salad dressings
Puree: soups, sauces
Grate: cheese, such as Parmesan (chilled)
Slicing Disc
(SLICE facing up) Cucumbers, apples, mushrooms, carrots,
potatoes, cabbage, tomatoes, pepperoni,
peppers, radishes, firm cheeses (chilled)
Shredding Disc
(SHRED facing up) Cabbage, potatoes, carrots, cheese (chilled)
FOOD MAXIMUM AMOUNT
Fruits and Vegetables 2 to 3 cups (500 to 750 ml)
(cut into 1-in. [2.5-cm] cubes)
Meats 0.7 lb. (350 g) (cut into 1-in. [2.5-cm] cubes)
Parmesan or Romano 5 ounces (140 g) (cut into 1-in. [2.5-cm] cubes)
Cheddar, Jack,
Mozzarella 8 ounces (226 g) (cut into 1-in. [2.5-cm] cubes)
Crackers 10 cups (2.3 L) (can fill bowl and lid up into chute)

12
Care and Cleaning
Storage
w WARNING Laceration Hazard. Store slicing/shredding disc with slicing side down. Handle blades carefully.
w WARNING Electrical Shock Hazard. Disconnect power before cleaning. Do not immerse cord, plug, or base in any liquid.
w WARNING Cut Hazard. Blades are sharp; handle blades with care.
1. Wipe Base, Controls, and cord with a damp cloth or sponge. If necessary, use a mild nonabrasive cleanser. Never place in water or rinse
under running water or other liquid.
2. Wash Bowl, Lid, Food Pusher, Blade, Disc, Spiral Blade, Ribbon Blade, and Spiral Slicing Plate in hot, soapy water or place in dishwasher.
Rinse and dry.
3. DO NOT use the “SANI” setting when washing in the dishwasher, top-rack only. “SANI” cycle temperatures could damage your product.
All removable parts may also be cleaned in the sink with hot, soapy water. Use caution when washing Chopping/Mixing Blade and Slicing/
Shredding Disc.
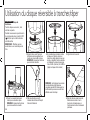
2. Turn Lid clockwise to lock into
place with Food Chute aligned
to Bowl handle. Place Food
Pusher in Food Chute.
3. Place saved cardboard
sleeve on Disc and store next
to Food Processor.
w WARNING Laceration
Hazard. Store slicing/
shredding disc with slicing
side down. Handle carefully.
1. Place Chopping/Mixing
Blade onto Motor Shaft.
Then install the Spiral Slicer
Plate into Bowl. Place Spiral
Blade in Spiral Slicing Plate.
Loosely place Ribbon Blade
inside Bowl.

13
Troubleshooting
Unit does not operate on any speed or Pulse.
• The unit is not plugged in or outlet does not work.
• The Bowl and Lid are not locked in place. See “How to Use”
sections.
• This machine is equipped with motor overload protection. If motor
stops during operation due to overheating, unplug and allow it to
cool down for 15 minutes before resuming process.
Food is not sliced or shredded uniformly.
• Packing too much food in the Food Chute or pushing too hard on
the Food Pusher may cause processed food to be irregularly sliced
or shredded. Refer to “Processing Charts” for recommended sizes
and quantities.
• For smaller, thinner foods, like carrots, cut in half and load pieces
side by side in the Food Chute in an upright position to prevent the
food from falling over. This will result in more uniform slices.
Unit stops and will not come back on.
• The Bowl and Lid are not locked in place. They may have moved
slightly during processing. See “How to Use” sections.
• The outlet is not working. Check it by plugging in a working lamp or
other appliance. You may have overloaded the circuit and blown a
fuse or tripped the circuit breaker.
Unit has a burning smell.
• There may be a residue left on motor from the manufacturing
process, causing a slight odor during initial use. This will go
away. If a strong odor or any visible smoke appears, unplug unit
IMMEDIATELY and visit hamiltonbeach.com.
Motor seems weak.
• The recommended food size and quantity to be processed have
not been used. Refer to “Processing Charts” for recommended food
sizes and speeds.
Cheese is not shredding well.
• Cheese should be processed immediately after being removed
from the refrigerator. Soft cheese like mozzarella must be placed
in the freezer for 30 minutes prior to processing to ensure it is firm
enough for shredding.
Vegetables are not shredding, spiralizing, or slicing.
• Store vegetables with high water content in refrigerator prior to
processing. Room-temperature vegetables are less firm and do not
perform as well.
Vegetables are not spiralizing consistently.
• Remove and clean any food debris from the Blade. Reinstall the
Spiral Slicer and continue use.
Food won't spiralize. Food mashes or breaks apart.
• Some soft or overripe foods may not be suitable for spiralizing.
Choose firm foods. A success tip is to think of foods that can
be grated on a manual food grater. If a food can be grated, it is
appropriate for spiralizing.
• Not pressing hard enough or pressing too hard. Apply light,
constant pressure to Food Pusher while spiralizing. Allow the Spiral
Slicer to work at its own pace. NOTE: Pressing harder will not
speed up the process or make the Spiral Slicer cut better.
• Food is not centered in the Food Chute. Stop the motor. Cut a flat
edge on the food and try again. Best results occur when the food
most closely fits the size of the Food Chute and when it is held
vertically with the Food Pusher securely inserted in the end, not
allowing the food to fall over on its side.

14
Recipes
Pimento Cheese
8 ounces (227 g) Vermont sharp
white cheddar cheese
4 ounces (113 g) sharp cheddar
cheese
3/4 cup (177 ml) mayonnaise
1 jar (4 oz. [113 g]) chopped
pimentos, drained
1/2 teaspoon (2.5 ml) salt
1/ 4 teaspoon (1.2 ml) black
pepper
Directions:
1. Using Shredding Disc with Food Processor running, add cheeses
through Food Chute until shredded.
2. In a large bowl, stir mayonnaise, pimentos, salt, and pepper until
combined.
3. Stir in cheeses until well blended.
4. Cover and refrigerate overnight.
Serves: 8 to 10
Roasted Red Pepper Hummus
2 cloves garlic
2 green onions, white portion
and half of green tops
2 cans (15 oz. [425 g] each)
garbanzo beans (chickpeas),
drained
1 jar (14 oz. [397 g]) roasted red
peppers, drained
1/4 cup tahini (sesame paste)
stirred
2 tablespoons (30 ml) lemon
juice
2 teaspoons (10 ml) olive oil
1/4 teaspoon (1.3 ml) ground
cumin
Dash cayenne pepper
Salt and pepper to taste
Dash paprika
Pita chips or cut vegetables
Directions:
1. Assemble Food Processor with Chopping/Mixing Blade. With
Processor running, drop garlic cloves and onion into Food Chute.
2. Add garbanzo beans, roasted red peppers, tahini, lemon juice,
olive oil, cumin, cayenne, salt and pepper. Continue to process
until smooth.
3. Place in serving bowl and garnish with paprika. Serve with pita
chips and/or vegetables. Refrigerate to store.
Serves: 4 to 6

15
Lemon Garlic Shrimp and Veggie Pasta
2 large zucchini
2 large yellow squash
2 large thick carrots, peeled
3/4 cup (177 ml) butter
4 cloves garlic, minced
1 tablespoon (15 ml) cornstarch
1/2 cup (118 ml) chicken broth
plus 2 tablespoons (30 ml),
divided
1 pound (454 g) (20 to 24 count)
peeled and deveined shrimp
1/4 cup (59 ml) lemon juice
1 teaspoon (5 ml) salt
1/2 teaspoon (2.5 ml) coarse
black pepper
2 tablespoons (30 ml) drained
capers
1 teaspoon (5 ml) lemon zest
Chopped fresh parsley
Directions:
1. Using Spiral Slicer, make spirals of zucchini, yellow squash and
carrots.
2. Fill a large saucepan two-thirds full of water. Over high heat, boil
water. Add zucchini, yellow squash and carrot spirals. Cook until
tender, about 15 seconds. Drain and cover to keep warm.
3. In a large skillet over medium-high heat, melt butter. Add garlic
and cook until tender, 1 to 2 minutes.
4. In a small bowl, dissolve cornstarch in 2 tablespoons (30 ml)
chicken broth. Add to skillet with shrimp, remaining chicken broth,
lemon juice, salt and black pepper. Cook until shrimp are opaque
throughout and sauce is thickened, about 2 minutes.
5. Stir in capers and lemon zest. Serve over veggie pasta.
6. Sprinkle with parsley before serving.
Serves: 4–6
Beets With Orange and Goat Cheese Salad
2 pounds (907 g) fresh beets
(about 6 medium), peeled
3 teaspoons (15 ml) salt, divided
6 tablespoons (89 ml) fresh
orange juice
1/2 cup (118 ml) vegetable oil
2 tablespoons (30 ml) rice
vinegar
2 tablespoons (30 ml) honey
1 tablespoon (15 ml) fresh thyme
leaves
1 clove garlic
1/2 teaspoon (2.5 ml) coarse
black pepper
Salad greens
2 medium oranges, sectioned
1/2 cup (118 ml) crumbled goat
cheese
1/2 cup (118 ml) chopped
walnuts, toasted
Directions:
1. Using Spiral Slicer, make ribbons of beets.
2. Fill a large saucepan two-thirds full of water and 2 teaspoons
(10 ml) salt. Over high heat, boil water. Add beets and cook until
tender, 1 to 2 minutes.
3. Chill in an ice bath. Drain and dry ribbons with paper towels.
4. To make dressing, assemble Food Processor with Chopping/Mixing
Blade. Add orange juice, oil, vinegar, honey, thyme leaves, garlic,
1 teaspoon (5 ml) salt and coarse black pepper to Food Processor.
Process until slightly thickened.
5. On a salad plate, arrange fresh greens, beets and orange segments.
Top with goat cheese and toasted walnuts.
Serves: 8
Recipes (cont.)

16
Limited Warranty
This warranty applies to products purchased and used in the U.S. and Canada. This is the only express warranty for this product and
is in lieu of any other warranty or condition.
This product is warranted to be free from defects in material and workmanship for a period of five (5) years from the date of original
purchase in Canada and one (1) year from the date of original purchase in the U.S. During this period, your exclusive remedy is
replacement of this product or any component found to be defective, at our option; however, you are responsible for all costs
associated with returning a product or component under this warranty to you. If the product or component is unavailable, we will
replace with a similar one of equal or greater value.
This warranty does not cover glass, filters, wear from normal use, use not in conformity with the printed directions, or damage to
the product resulting from accident, alteration, abuse, or misuse. This warranty extends only to the original consumer purchaser or
gift recipient. Keep the original sales receipt, as proof of purchase is required to make a warranty claim. This warranty is void if the
product is used for other than single-family household use or subjected to any voltage and waveform other than as specified on the
rating label (e.g., 120 V ~ 60 Hz).
We exclude all claims for special, incidental, and consequential damages caused by breach of express or implied warranty. All
liability is limited to the amount of the purchase price. Every implied warranty, including any statutory warranty or condition
of merchantability or fitness for a particular purpose, is disclaimed except to the extent prohibited by law, in which case such
warranty or condition is limited to the duration of this written warranty. This warranty gives you specific legal rights. You may have
other legal rights that vary depending on where you live. Some states or provinces do not allow limitations on implied warranties or
special, incidental, or consequential damages, so the foregoing limitations may not apply to you.
To make a warranty claim, do not return this appliance to the store. Please write Hamilton Beach Brands, Inc. 4421 Waterfront Dr.,
Glen Allen, VA 23060, or visit hamiltonbeach.com/customer-service in the U.S. or hamiltonbeach.ca/customer-service in Canada. For
faster service, locate the model, type, and series numbers on your appliance.

17
PRÉCAUTIONS IMPORTANTES
1. Lire toutes les instructions.
2. Cet appareil n’est pas destiné à être utilisé par des personnes dont
les capacités physiques, sensorielles ou mentales sont réduites,
ou manquant d’expérience et de connaissance, sauf si elles sont
étroitement surveillées et instruites sur l’utilisation de l’appareil par
une personne responsable de leur sécurité.
3. Cet appareil ne devrait pas être utilisé par des enfants. Garder
l’appareil et son cordon hors de la portée des enfants.
4. Une surveillance étroite est requise pour tout appareil utilisé
près des enfants. Surveiller que les enfants ne jouent pas avec
l’appareil.
5. Pour éviter les risques d’électrocution, ne pas immerger le cordon,
la fiche, la base ou le moteur dans l’eau ou tout autre liquide.
6. Fermer l’appareil ( ), puis le débrancher de la prise lorsqu’il n’est
pas utilisé, avant d’assembler ou de désassembler des pièces ou
avant de le nettoyer. Pour le débrancher, tenir la fiche et la retirer
de la prise. Ne jamais tirer sur le cordon.
7. Éviter le contact avec les pièces mobiles. Veiller à ne pas mettre
les doigts dans la trémie.
8. Tenir les mains et les ustensiles éloignés de la lame et du disque
en mouvement pendant la transformation des aliments pour
éviter les blessures graves et les dommages au robot culinaire. Un
racloir en plastique peut être utilisé, mais UNIQUEMENT pendant
l’arrêt du robot culinaire.
9. Les lames sont tranchantes. Manipuler les lames de coupe avec
soins pendant l’insertion ou le retrait, lors du vidage du bol et
pendant le nettoyage. Ranger hors de la portée des enfants.
10. Pour éviter les risques de blessures, s’assurer d’installer ou de
retirer la lame et le disque en utilisant les embouts fournis à cet
effet. Faire preuve de prudence au moment de retirer la lame ou
le disque du récipient, pendant le vidage du récipient et lors du
nettoyage.
11. Ne pas faire fonctionner un appareil électroménager avec un
cordon ou une fiche endommagée, ou lorsque l’appareil ne
fonctionne pas bien ou a été échappé ou endommagé d’une
manière quelconque. Le remplacement et la réparation du cordon
d’alimentation doivent être faits par le fabricant, son agent de
service ou toute personne qualifiée de façon à éviter tout danger.
Visiter hamiltonbeach.ca pour des renseignements concernant
l’examen, la réparation ou l’ajustement. Veuillez communiquer
avec le service à la clientèle pour obtenir de l’information
concernant l’inspection, la réparation ou le réglage, comme
précisé dans la garantie limitée.
12. L’utilisation d’accessoires non recommandés ou vendus par
le fabricant de l’appareil peut provoquer un incendie, un choc
électrique ou blesser quelqu’un.
13. Ne pas utiliser votre robot culinaire si des pièces sont brisées.
14. Ne pas utiliser à l’extérieur.
15. Ne pas laisser pendre le cordon de la table ou du comptoir et
éviter tout contact entre le cordon et les surfaces chaudes incluant
la cuisinière.
16. Ne placer jamais votre appareil électroménager à proximité ou sur
un brûleur électrique ou à gaz chaud ou dans un four chaud.
17. S’assurer que l’appareil est OFF ( /arrêt) avant de brancher
la fiche dans la prise de courant. Pour débrancher, tourner la
commande à OFF ( /arrêt) puis débrancher la fiche de la prise de
courant. Pour débrancher, saisir la fiche et la retirer de la prise. Ne
pas tirer sur le cordon d’alimentation.
18. S’assurer que le commutateur est en position OFF ( /arrêt) après
chaque utilisation. Toujours utiliser les poussoirs pour désobstruer
l’entonnoir. Lorsque cette méthode est impossible, débrancher le
cordon de la prise et démonter le récipient pour retirer les aliments
coincés.
19. S’assurer que le couvercle est en place et verrouillé correctement
Pour utiliser un appareil électroménager, vous devez toujours prendre des mesures élémentaires de sécurité pour réduire le risque
d’incendie, d’électrocution et/ou de blessure corporelle, en particulier les mesures suivantes :

18
CONSERVER CES INSTRUCTIONS
Autres consignes de sécurité pour le consommateur
Cet appareil est destiné à un usage domestique uniquement.
w AVERTISSEMENT Risque de choc électrique : Cet appareil
électroménager possède une fiche polarisée (une broche large)
qui réduit le risque d’électrocution. Cette fiche n’entre que dans un
seul sens dans une prise polarisée. Ne contrecarrez pas l’objectif
sécuritaire de cette fiche en la modifiant de quelque manière que
ce soit ou en utilisant un adaptateur. Si vous ne pouvez pas insérer
complètement la fiche dans la prise, inversez la fiche. Si elle refuse
toujours de s’insérer, faire remplacer la prise par un électricien.
La longueur du cordon installé sur cet appareil a été sélectionnée
afin de réduire les risques d’enchevêtrement ou de faux pas
causés par un fil trop long. L’utilisation d’une rallonge approuvée
est permise si le cordon est trop court. Les caractéristiques
électriques de la rallonge doivent être équivalentes ou supérieures
aux caractéristiques de l’appareil. Prendre toutes les précautions
nécessaires pour installer la rallonge de manière à ne pas la faire
courir sur le comptoir ou sur une table pour éviter qu’un enfant ne
tire sur le cordon ou trébuche accidentellement.
Pour éviter la surcharge du circuit électrique, ne pas utiliser un autre
appareil à haute puissance sur le même circuit que cet appareil.
avant de faire fonctionner l’appareil.
20. Ne jamais introduire d’aliments dans l’entonnoir avec les mains.
Toujours utiliser les poussoirs.
21. Ne pas tenter de modifier aucun mécanisme de verrouillage par
enclenchement.
22. Pour éviter les risques de blessures, ne jamais placer la lame de
coupe ou un disque sur le socle sans avoir préalablement installé
le récipient correctement.
23. S’assurer que la lame ou le disque cesse de fonctionner avant de
retirer le couvercle.
24. N’utiliser cet appareil que pour les fonctions auxquelles il est
destiné.
25. Cet appareil n’est pas conçu pour une utilisation commerciale,
professionnelle ou industrielle. Cet appareil est conçu uniquement
pour une utilisation domestique.
26. Ne jamais prolonger le temps de fonctionnement de cet
appareil ou utiliser des quantités d’aliments supérieures aux
recommandations du fabricant.
27. Soyez prudent lorsque vous versez un liquide chaud dans le bol
du robot culinaire, car il peut éclabousser hors de l’appareil en
raison de la production d’une vapeur soudaine.
28. Ne pas remplir le bol au-delà de la marque de remplissage
maximum (ou de la capacité indiquée) pour éviter les risques de
blessure causée par des dommages occasionnée au couvercle ou
au bol.
29. ATTENTION ! Afin d’éviter un danger découlant d’une
réinitialisation accidentelle du rupteur thermique, se dispositif ne
doit pas être alimenté par l’entremise d’un appareil de connexion
externe, comme une minuterie, ou connecté à un circuit qui est
régulièrement mis sous et hors tension par le service public.
30. La valeur nominale de cet appareil repose uniquement sur
l’utilisation de la lame à hacher/mélanger. L’utilisation des
disques pour trancher ou râper ou du spiraleur peut consommer
beaucoup moins d’énergie (puissance électrique).

19
13
6
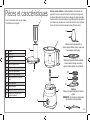
Pièces et caractéristiques
Utiliser pour râper ou trancher des aliments
variés (comme le fromage, les carottes,
oignons, tomates, piments et concombres).
Utiliser pour hacher grossièrement les
aliments, pour les effilocher, pour les ciseler, pour
les mélanger ou pour les purer.
4
Avant la première utilisation : Veuillez déballer le robot culinaire avec
précaution, tout en conservant les inserts en carton pour le rangement
du disque. Manipuler la lame à hacher et mélanger, le disque réversible à
trancher et râper, la lame du spiraleur pour spirales et la lame du spiraleur
pour rubans avec précaution, car ils sont très tranchants. Laver toutes les
pièces, sauf le socle, à l’eau chaude savonneuse. Rincer et sécher.
Pour commander des pièces, visiter:
hamiltonbeach.ca/parts 1
1Poussoir
2Entonnoir
3Couvercle
4Bol
5Arbre du moteur fixe
6Base
7Bouton de commande
8Lame à hacher/mélanger
9Disque réversible à trancher/
râper
10 Disque spiraleur
11 Lame à lanières
12 Plaque de coupe du spiraleur
13 Brosse pour nettoyer (avec
certains modèles)
3
12
10
11
Spiraleur
Utiliser pour couper les légumes en forme de
spirales.
REMARQUE : Ne pas utiliser en même temps
que d’autres accessoires installés.
2
5
7
8
9
20
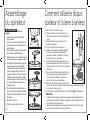
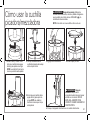
w AVERTISSEMENT
Risque de
coupures.
• Les lames sont coupantes, manipuler
avec précaution.
• Inspecter les pièces avant l’utilisation. Ne
pas utiliser de pièces fissurées, pliées ou
endommagées.
• Ne pas placer les doigts ou des ustensiles
dans les lames pendant l’utilisation.
1. Aligner le bol au socle. Tourner le bol dans
le sens horaire pour le verrouiller en place.
2. En alignant les languettes de la plaque de
coupe du spiraleur avec les languettes
à l’intérieur du bol, insérer la plaque de
coupe du spiraleur dans le bol, face à la
poignée. Veuillez vous référer à l’image de
la plaque de coupe du spiraleur. Veuillez
vous assurer que le petit trou de la plaque
de coupe du spiraleur soit aligné avec
l’arbre du moteur.
3. Placer l’extrémité du disque spiraleur ou
de la lame à lanières comme illustré dans
l’image à droite, dans la plaque de coupe
du spiraleur.
4. Remettre le couvercle.
5. Glisser le poussoir dans l’entonnoir.
Assemblage
du spiraleur
Comment utiliser le disque
spiraleur et la lame à lanières
1. Brancher dans la prise de courant.
2. Placer les aliments au centre de l’entonnoir.
Transformer seulement un morceau d’aliment à
la fois.
3. Appuyer fermement sur le poussoir pour
pousser les aliments.
4. Tourner le bouton de commande à 1.
5. Appliquer constamment une légère pression
sur le poussoir pendant la transformation
des aliments. Laisser le poussoir et le moteur
fonctionner à leur propre rythme.
6. Continuer la transformation jusqu’à ce que la
coupe des aliments soit terminée. Un morceau
d’aliment d’environ 2,5 cm (1 po) ne sera jamais
transformé.
7. Retirer le petit morceau d’aliment en forme de
cône qui est resté sur le poussoir. Utiliser ce
morceau comme collation ou l’ajouter à du
bouillon, de la soupe ou des salades.
8. Retirer le petit morceau d’aliment en forme de
cône qui est resté sur le poussoir. Nettoyer toute pulpe accumulée dans les
lames avec la brosse et rincer.
9. Lorsque terminé, mettre l’interrupteur en position OFF ( /arrêt). Débrancher.
REMARQUES :
• L’application d’une pression plus ferme n’accélèrera pas la transformation et
n’améliorera pas la qualité de coupe du spiraleur. Le disque spiraleur tourne,
mais les aliments ne tournent pas.
• Ne pas soulever l’adaptateur de coupe pendant la transformation. Ceci peut
causer le relâchement de sa prise sur les aliments.
A página está carregando...
A página está carregando...
A página está carregando...
A página está carregando...
A página está carregando...
A página está carregando...
A página está carregando...
A página está carregando...
A página está carregando...
A página está carregando...
A página está carregando...
A página está carregando...
A página está carregando...
A página está carregando...
A página está carregando...
A página está carregando...
A página está carregando...
A página está carregando...
A página está carregando...
A página está carregando...
A página está carregando...
A página está carregando...
A página está carregando...
A página está carregando...
A página está carregando...
A página está carregando...
A página está carregando...
A página está carregando...
-
 1
1
-
 2
2
-
 3
3
-
 4
4
-
 5
5
-
 6
6
-
 7
7
-
 8
8
-
 9
9
-
 10
10
-
 11
11
-
 12
12
-
 13
13
-
 14
14
-
 15
15
-
 16
16
-
 17
17
-
 18
18
-
 19
19
-
 20
20
-
 21
21
-
 22
22
-
 23
23
-
 24
24
-
 25
25
-
 26
26
-
 27
27
-
 28
28
-
 29
29
-
 30
30
-
 31
31
-
 32
32
-
 33
33
-
 34
34
-
 35
35
-
 36
36
-
 37
37
-
 38
38
-
 39
39
-
 40
40
-
 41
41
-
 42
42
-
 43
43
-
 44
44
-
 45
45
-
 46
46
-
 47
47
-
 48
48


Hamilton Beach 70735 Guia de usuario
- Categoria
- Processadores de alimentos
- Tipo
- Guia de usuario
em outras línguas
- español: Hamilton Beach 70735 Guía del usuario
- français: Hamilton Beach 70735 Mode d'emploi
- English: Hamilton Beach 70735 User guide
Artigos relacionados
-
Hamilton Beach Professional 70815 Guia de usuario
-
Hamilton Beach 70730 Guia de usuario
-
Hamilton Beach 70725 Guia de usuario
-
-
-
-
Hamilton Beach 70727 Guia de usuario
-
Hamilton Beach 70760 Guia de usuario
-
-
Hamilton Beach 70740 Guia de usuario