Sage BJE520 Guia de usuario
- Categoria
- Fabricantes de suco
- Tipo
- Guia de usuario

BJE520/SJE520
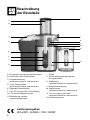
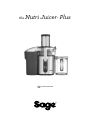
the Nutri Juicer® Plus
EN QUICK GUIDE DE KURZANLEITUNG
FR GUIDE RAPIDE NL SNELSTARTGIDS
ES GUÍA RÁPIDA
IT GUIDA RAPIDA
PT MANUAL RÁPIDO

2
2 Sage® Recommends Safety First
5 Components
7 Assembly
10 Care & Cleaning
11 Troubleshooting
12 Guarantee
Contents
SAGE®
RECOMMENDS
SAFETY FIRST
At Sage® we are very safety
conscious. We design and
manufacture consumer
products with the safety of
you, our valued customer,
foremost in mind. In
addition we ask that you
exercise a degree of care
when using any electrical
appliance and adhere to the
following precautions.
IMPORTANT
SAFEGUARDS
READ ALL INSTRUCTIONS
BEFORE USE AND SAVE
FOR FUTURE REFERENCE
• A downloadable version of this
document is also available at
sageappliances.com
• Before using for the rst
time ensure your electricity
supply is the same as shown
on the label on the underside
of the appliance.
• Remove and safely discard
any packaging materials before
rst use.
• To eliminate a choking hazard
for young children, safely
discard the protective cover
tted to the power plug.
• This appliance is for household
use only. Do not use the
appliance for anything other
than its intended use. Do not
use in moving vehicles or boats.
Do not use outdoors. Misuse
may cause injury.
• Fully unwind the power cord
before operating.
• Position the appliance on
a stable, heat resistant, level,
dry surface away from the edge
and do not operate on or near
a heat source such as a hot
plate, oven or gas hob.
• Vibration during operation may
cause the appliance to move.

3
EN
• Do not let the power cord hang
over the edge of a bench or
table, touch hot surfaces or
become knotted.
• Always ensure the appliance
is turned OFF, unplugged at
the power outlet and has been
allowed to cool before cleaning,
attempting to move or storing.
• Always turn the appliance to
the OFF position, switch o at
the power outlet and unplug
at the power outlet when the
appliance is not in use.
• Do not use the appliance if the
power cord, plug, or appliance
becomes damaged in any way.
If damaged or maintenance
other than cleaning is
required, please contact Sage
Customer Service or go to
sageappliances.com
• Any maintenance other than
cleaning should be performed
by an authorised Sage®
service centre.
• Children should not play with
the appliance.
• Cleaning of the appliance
should not be carried out by
children unless they are 8 years
or older and supervised.
• The appliance and its cord
should be kept out of reach
of children aged 8 years
and younger.
• The installation of a residual
current safety switch is
recommended to provide
additional safety when using
all electrical appliances.
Safety switches with a rated
operating current not more
than 30mA are recommended.
Consult an electrician for
professional advice.
• Always ensure the appliance is
properly assembled before use.
The appliance will not operate
unless properly assembled.
• Do not use the appliance
on a sink drain board.
• Keep hands, ngers, hair,
clothing as well as spatulas
and other utensils away from
moving or rotating parts
during operation.
• Do not use the appliance
for anything other than food
and/or beverage preparation.
• In order to avoid the possible
hazard of the appliance starting
by itself due to inadvertent
resetting of the overload
protection, do not attach an
external switching device
(such as a timer) or connect
the appliance to a circuit
that can regularly switch
the appliance on and o.
• Carefully read all instructions
before operation and save for
future reference.
• The appliance can be used by
persons with reduced physical
or mental capabilities or a lack
of experience and knowledge,
only if they have been given
supervision or instruction
concerning use of the appliance

4
SAVE THESE INSTRUCTIONS
in a safe way and understand
the hazards involved.
• This appliance shall not be
used by children.
• Do not leave the appliance
unattended when in use.
• Do not push food into the feed
chute with your ngers or other
utensils. Always use the food
pusher provided. Do not place
hand or ngers into the food
chute when it is attached to
the appliance.
• Do not juice stone fruit unless
seeds and/or stones have
been removed.
• Make sure the stainless steel
lter basket has stopped
rotating and the motor has
completely stopped before
releasing the safety locking
arm and/or attempting to
move the appliance, when
the juicer is not in use, and
before disassembling,
cleaning and storing.
• Any signicant spillage onto
the surface under or around the
appliance, or onto the appliance
itself, should be cleaned and
dried before continuing to use
the appliance.
• Be careful when handling the
stainless steel lter basket as
the small cutting blades at the
base of the lter basket are
very sharp. Mishandling may
cause injury.
• Remove rind from all citrus
fruit before juicing.
• Do not use the appliance
if the rotating sieve (lter
basket) or lid is damaged.
• Always make sure juicer cover
is clamped securely in place
before motor is turned on.
Do not unfasten interlock arm
while juicer is in operation.
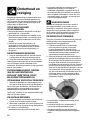
The symbol shown
indicates that this appliance
should not be disposed of
in normal household waste.
It should be taken to a local
authority waste collection centre
designated for this purpose or to
a dealer providing this service.
For more information, please
contact your local council oce.
To protect against electric
shock, do not immerse
the power plug, cord or appliance
in water or any liquid.

5
EN
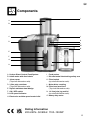
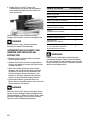
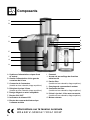
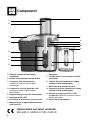
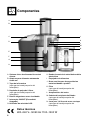
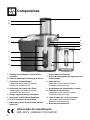
Components
A. Unique Direct Central Feed System
B. 84mm extra wide feed chute
C. Juicer cover
(Top shelf dishwasher safe).
D. 3 litre pulp container
(Top shelf dishwasher safe).
E. Stylish stainless steel design
F. ON / OFF switch
G. LCD speed indicator
H. Electronic variable speed control dial
I. Food pusher
J. Die-cast metal interlocking safety arm
K. Filter basket
(top shelf dishwasher safe).
L. Motor drive coupling
M. Filter bowl surround
(Top shelf dishwasher safe).
N. 1.2 litre juice jug and lid
(top shelf dishwasher safe).
O. Heavy duty motor
A
B
C
D
E
F
G
H
I
J
K
L
M
N
O
Rating Information
220-240V~ 50/60Hz 1100–1300W

6
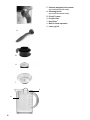
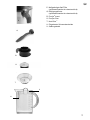
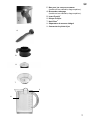
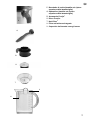
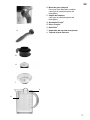
P. Custom designed juice nozzle
(top shelf dishwasher safe).
Q. Cleaning Brush
(top shelf dishwasher safe).
R. Froojie® Insert
S. Froojie® Disc
T. Nutri Disc™
U. Built in froth separator
V. Juice jug lid
Q
P
S
T
U
V
R

7
EN
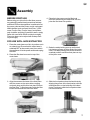
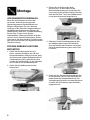
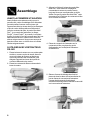
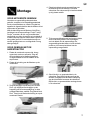
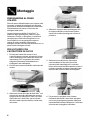
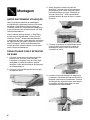
Assembly
BEFORE FIRST USE
Before using your juicer for the rst time, remove
any packaging material and promotional stickers
and labels. Ensure the appliance is switched o at
the power outlet and the power cord is unplugged.
Wash the lter bowl surround, Nutri Disc™, juicer
cover, Froojie® Disc, Froojie® Insert, food pusher,
pulp container and juice jug and lid in warm, soapy
water with a soft cloth. Rinse and dry thoroughly.
The motor base can be wiped with a damp cloth.
Dry thoroughly.
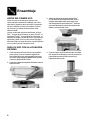
FOR USE WITH JUICE EXTRACTOR
1. Place the motor base on a at, dry surface such
as a bench top. Ensure that the motor base is
switched OFF at the control panel, then switch
the appliance o at the power outlet and unplug
the cord.
2. Place the lter bowl surround on top of the
motor base.
3. Align the arrows at the base of the Nutri Disc™
with the arrows on the motor drive coupling
and push down until it clicks into place. Ensure
the Nutri Disc™ is tted securely inside the lter
bowl surround and onto the motor base.
4. Place the juicer cover over the lter bowl
surround, positioning the feed chute over the
juice disc and lower into position.
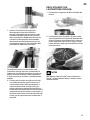
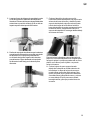
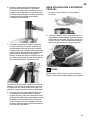
5. Raise the safety locking arm up and locate it
into the two grooves on either side of the juicer
cover. The safety locking arm should now be in
a vertical position and locked into place on top
of the juicer cover.
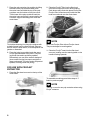
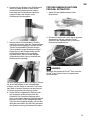
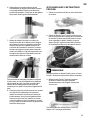
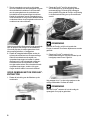
6. Slide the food pusher down the feed chute by
aligning the groove of the food pusher, with the
small protrusion on the inside top of the feed
chute. Continue to slide the food pusher down
into the feed chute.

8
7. Place the pulp container into position by tilting
the base of the pulp container away from
the motor base and slide the top of the pulp
container over the bottom of the juice cover.
Tilt the base of the pulp container back into
the motor base ensuring it is supported by the
container support extending from under the
motor base.
To minimise cleaning, line the pulp container with
a plastic freezer bag to collect the pulp. Pulp can
then be used in other dishes, or as compost for the
garden or discarded.
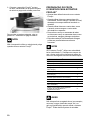
8. Place the juice jug provided under the spout
on the right-hand side of the juicer. The juice
jug lid can be used to avoid any splatter.
Alternatively you can t the custom-designed
juice nozzle over the juice spout and place a
glass underneath. The juice nozzle will prevent
splatter, ensuring mess free juicing.
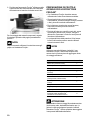
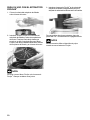
FOR USE WITH FROOJIE®
EXTRACTOR
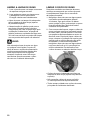
1. Place the lter bowl surround on the top of the
motor base.
2. Place the Froojie® Disc into the lter bowl
surround and onto the motor drive coupling.
Push down until it clicks into place. Ensure the
Froojie® Disc is tted securely inside the lter
bowl surround and onto the motor base.
NOTE
Never use Froojie® Disc without Froojie® Insert.
They must always be used together.
3. Place the Froojie® Insert into the lter bowl
surround, making sure the warning label on the
handle is facing upwards.
To assemble remaining parts follow steps 4–7
listed on previous page.
NOTE
There is no need to use pulp container when using
Froojie® extractor.

9
EN
PREPARATION OF FRUIT
AND VEGETABLES FOR
FROOJIE® EXTRACTOR
• Only soft fruits should be used with the
Froojie® extractor.
• When using fruits with hard inedible skins, such
as mangoes, pineapple or kiwi fruit, always peel
before juicing.
• When using fruits with a hard core such as
pineapple, always remove this before juicing.
• All fruits with pits, hard seeds or stones such as
nectarines, peaches, mangoes and apricots must
be pitted or deseeded before juicing.
• Passionfruit pulp, peeled kiwi fruit and berries can
be processed without removing seeds.
NOTE
When using the Froojie® extractor, use low speed
(speed 1). Always ensure motor is running before
adding fruit and/or vegetables to feed tube.
FROOJIE® EXTRACTOR SPEED
Apricots (stone removed) 1
Bananas (peeled) 1
Kiwi fruit (peeled) 1
Mangoes (peeled, stone removed) 1
Melons (peeled) 1
Pears soft (stalk and core removed) 1
Pineapple (peeled and cored) 1
Raspberries 1
Strawberries (stalks removed) 1
Watermelon (peeled, seeds
removed) 1
Use speed 2 to push out any
remaining fruit pulp in juice collector 2
WARNING
Do not put hard fruit and vegetables (i.e. Carrots,
apples, fresh beetroot, etc.) or ice through juicer
when using Froojie® extractor. This could damage
parts of the unit.
PREPARATION OF FRUIT
AND VEGETABLES FOR
JUICE EXTRACTOR SPEED
SELECTOR TABLE
FRUIT / VEGETABLES SUGGESTED
SPEED
Apples 5
Apricots (stone removed) 2
Beetroot (cleaned, trimmed) 5
Blueberries 1
Broccoli 4
Brussel Sprouts (trimmed) 5
Cabbage 4
Carrots (cleaned) 5
Cauliower 4
Celery 5
Cucumber (peeled) 2
Cucumber – soft skinned 4
Fennel 5
Grapes (seedless) 1
Kiwi fruit (peeled) 2
Mangoes (peeled, stone removed) 2
Melons (peeled) 1
Nectarines (stone removed) 2
Oranges (peeled) 3
Peaches (stone removed 2
Pears – hard (stalks removed) 5
Pears – soft (stalks removed) 2
Pineapple (peeled) 5
Plums (stone removed) 2
Raspberries 1
Tomatoes 1
Watermelon 1

10
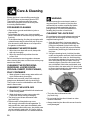
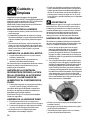
Care & Cleaning
Ensure the juicer is turned o by pressing the
ON / OFF button on the control panel to OFF.
Then switch the appliance o at the power
outlet and unplug the cord. Ensure the juicer
is correctly disassembled.
FOR EASIER CLEANING
• Clean as you go and avoid dried on juice or
pulp residue.
• Immediately after each use, rinse removable
parts in hot water to remove wet pulp. Allow parts
to air dry.
• To minimise cleaning, line the pulp container with
a plastic freezer bag to collect the pulp. Pulp can
then be used in other dishes or as compost for
the garden or discarded.
CLEANING THE MOTOR BASE
1. Wipe the motor base with a soft, damp cloth
then dry thoroughly.
2. Wipe any excess food particles from the
power cord.
Do not use abrasive scouring pads or cleaners
when cleaning the parts or motor base as they may
scratch the surface.
CLEANING THE FILTER BOWL
SURROUND, JUICER COVER,
FROOJIE® INSERT, FOOD PUSHER,
PULP CONTAINER
1. Wash all parts in warm soapy water with a soft
cloth. Rinse and dry thoroughly.
The lter bowl surround, juicer cover and pulp
container are dishwasher safe (top shelf only).
The Froojie® Insert is not dishwasher safe. Please
wash in warm water.
CLEANING THE JUICE JUG
1. Rinse the juice jug and lid with froth attachment
under running water.
2. Wash both parts in warm soapy water with
a soft cloth. Rinse and dry thoroughly.
• The juice jug and lid are dishwasher safe
(top shelf only).
• Discolouration of the plastic may occur
with strongly coloured fruit and vegetables. To
help prevent this, wash parts immediately after
use. If discolouration does occur, the plastic parts
can be soaked in water with 10% lemon juice or
they can be cleaned with a non abrasive cleaner.
WARNING
Do not immerse the motor base in water or
any other liquid. The centre of the juice disc
and feed chute contains small sharp blades
to process fruit and vegetables during the
juicing function. Do not touch blades when
handling the juice disc or feed chute.
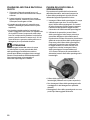
CLEANING THE JUICE DISC
For consistent juicing results always ensure that
the juice disc is thoroughly cleaned using the
supplied cleaning brush.
1. Soak the juice disc in hot soapy water for
approximately 10 minutes immediately after
juicing is completed. If pulp is left to dry on
the lter it may clog the ne pores of the lter
mesh thereby lessening the eectiveness of
the juicer.
2. Using the cleaning brush, hold the juice disc
under running water and brush from the inside
of the basket to the outer rim. Avoid touching
the small sharp blades in the centre of the juice
disc. After cleaning the juice disc, hold it up
towards a light to ensure the ne mesh holes
are not blocked. If the holes are blocked, soak
the juice disc in hot water with 10% lemon juice
to loosen the blocked holes. Alternatively, wash
the juice disc in the dishwasher.
• The juice disc is dishwasher safe
(top shelf only).
• Do not soak the juice disc in bleach or other
abrasive cleansers.
• Always treat the juice disc with care as it can be
easily damaged.

11
EN
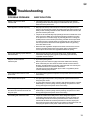
Troubleshooting
POSSIBLE PROBLEM EASY SOLUTION
Machine will not work when
switched ON • The safety locking arm may not be correctly engaged in the vertical
operating position with the locking arm located into the two grooves on
either side of the juicer cover.
Motor appears to stall when juicing • Wet pulp can build up under the juicer cover if the juicing action is too
vigorous. Try slower juicing action by pushing the food pusher down more
slowly. Follow cleaning instructions and clean the lter bowl surround, the
juice disc and the juicer cover.
• The juicer will automatically stop operating if the motor is stalled for more
than 10 seconds. Either too much food is being processed at one time
or the pieces are not small enough. Try trimming the food or cutting into
smaller pieces of even size and processing a smaller amount per batch.
To continue juicing, reset the juicer by pressing the ON / OFF switch on
the control panel to OFF then turn the appliance back on by pressing
ON / OFF switch to ON.
• Hard fruits and vegetables will put excess strain onto the motor if a low
speed is selected. Please refer to the juicing guide to determine the
correct speed for the fruits and vegetables selected for juicing.
Excess pulp building up the Stainless
Steel Filter Disc • Stop the juicing process, remove the juicer cover, scrape o pulp,
reassemble and begin juicing again. Try alternating (soft and hard)
vegetable and fruit varieties.
Pulp too wet and reduced
extracted juice • Try a slower juicing action.
• Remove juice disc and thoroughly clean mesh walls with a cleaning
brush. Rinse the juice disc under hot water. If the ne mesh holes are
blocked, soak the basket in a solution of hot water with 10% lemon juice
to unblock the holes or wash in the dishwasher.
This will remove excess bre build up (from fruit or vegetables) which
could be inhibiting the juice ow.
Juice leaks between the rim of the
juicer cover • Try a slower juicing speed and push the food pusher down the feed chute
more slowly.
Juice sprays out from spout • Use juice jug and lid provided, or if juicing into a glass use the custom
designed juice nozzle.
• Try using fruits with more water content to help ush through the contents.
Additionally, try a slower juicing action by feeding one piece in at a time
and by pushing the food pusher down more slowly.
When using the Froojie® extractor, the
lter bowl surround becomes full and
clogs its spout
• Try using fruits with more water content to help ush through the contents.
Additionally, try a slower juicing action by feeding one piece in at a time
and by pushing the food pusher down more slowly.
Overheating with excessive loads. • The juicer is tted with a safety device which safeguards against
overheating with excessive loads. If overheating occurs, the juicer will
automatically activate the overload protection device and the unit will
switch itself o. When the overload protection is activated, unplug the
juicer from the power outlet for at least 15 minutes to allow the unit to cool.
Then plug the juicer into the power outlet and use as normal.

12
2 YEAR LIMITED GUARANTEE
AND 5 YEAR LIMITED MOTOR
GUARANTEE
Sage Appliances guarantees this product for
domestic use in specied territories for 2 years for
all parts of the product and 5 years for the product’s
motor from the date of purchase against defects
caused by faulty workmanship and materials.
During this guarantee period Sage Appliances will
repair, replace, or refund any defective product (at
the sole discretion of Sage Appliances).
All legal warranty rights under applicable national
legislation will be respected and will not be
impaired by our guarantee. For full terms and
conditions on the guarantee, as well as instructions
on how to make a claim, please visit
www.sageappliances.com.
Guarantee

DE KURZANLEITUNG
the Nutri Juicer® Plus

2
WICHTIGE
VORSICHTS-
MASSNAHMEN
BITTE ALLE ANWEISUNGEN
VOR DEM GEBRAUCH
LESEN UND ZUR
SPÄTEREN BEZUGNAHME
AUFBEWAHREN.
• Dieses Informationsbuch
steht zum Download unter
www.sageappliances.com
zur Verfügung.
• Vor dem ersten Gebrauch
prüfen, dass Ihre Netzspannung
mit der auf dem Etikett an
der Unterseite des Geräts
übereinstimmt.
• Vor dem ersten Gebrauch
alle Verpackungsmaterialien
abnehmen und sicher
entsorgen.
• Schutzhülle am Netzstecker
sicher entsorgen, da
sie für Kleinkinder eine
Erstickungsgefahr
darstellen könnte.
• Dieses Gerät ist nur für den
Haushaltsgebrauch bestimmt.
Gerät nur bestimmungsgemäß
verwenden. Nicht in fahrenden
Fahrzeugen oder Booten
verwenden. Nicht im Freien
verwenden. Missbrauch kann
Verletzungen nach sich ziehen.
• Netzkabel vor dem Gebrauch
vollständig entrollen.
• Gerät in sicherem Abstand
Inhalte
2 Sage® Empehlt: Sicherheit Geht Vor
6 Beschreibung der Einzelteile
8 Montage
11 Pege & Reinigung
13 Fehlerbehebung
14 Garantie
SAGE® EMPFIEHLT:
SICHERHEIT
GEHT VOR
Wir bei Sage® sind sehr
sicherheitsbewusst.
Beim Design und bei der
Herstellung unserer Geräte
denken wir zu allererst
an Ihre Sicherheit. Darüber
hinaus bitten wir Sie, bei
der Verwendung jedes
Elektrogeräts angemessene
Sorgfalt anzuwenden und
sich an die folgenden
Vorsichtsmaßnahmen
zu halten.

3
DE
von Kanten auf eine stabile,
hitzebeständige, ebene und
trockene Fläche stellen.
Nicht auf oder neben einer
Wärmequelle wie einem Gas-
oder Elektroherd oder einem
heißen Ofen betreiben.
• Das Gerät kann während
des Betriebs aufgrund von
Vibrationen verrutschen.
• Netzkabel nicht über
Arbeitsplatten oder Tischkanten
hängen lassen, von heißen
Oberächen fern halten,
Kabelgewirr vermeiden.
• Gerät immer AUSschalten,
Netzstecker ziehen und
abkühlen lassen, ehe Sie es
bewegen, reinigen oder lagern.
• Gerät immer ausschalten,
sofern möglich auch an der
Steckdose, und Netzstecker
ziehen, wenn es nicht in
Gebrauch ist.
• Gerät nicht verwenden,
wenn das Netzkabel, der
Netzstecker oder das Gerät
selbst in irgendeiner Weise
beschädigt ist. Wenden Sie
sich bei Schäden oder zur
Wartung (außer Reinigung) bitte
an den Sage-Kundendienst
oder besuchen Sie
sageappliances.com
• Alle Wartungsarbeiten
außer der Reinigung
nur von autorisierten
Sage-Kundendienststellen
vornehmen lassen.
• Kinder nicht mit dem Gerät
spielen lassen.
• Reinigung des Geräts nicht
von Kindern unter 8 Jahren
und nur unter Aufsicht
vornehmen lassen.
• Gerät und Netzkabel für Kinder
bis zu 8 Jahren unzugänglich
aufbewahren.
• Die Installation eines Schutz-
oder Sicherheitsschalters
wird bei der Verwendung
von Elektrogeräten als
zusätzliche Schutzmaßnahme
empfohlen. Es wird ein
Sicherheitsschalter mit
maximal 30 mA Nennleistung
empfohlen. Fachgerechte
Beratung erhalten Sie von
Ihrem Elektriker.
• Gerät nur nutzen, wenn es
richtig zusammengesetzt ist.
Das Gerät funktioniert nur, wenn
es richtig zusammengesetzt ist.
• Gerät nicht auf der
Abtropäche Ihrer Spüle
verwenden.
• Hände, Finger, Haare und
Bekleidung, Schaber und
andere Utensilien während des
Betriebs von beweglichen oder
rotierenden Teilen fern halten.
• Gerät nur bestimmungsgemäß
zur Zubereitung von Speisen
und/oder Getränken
verwenden.
• Zur Vermeidung des
Risikos, dass sich das
Gerät aufgrund einer

4
unbeabsichtigt zurückgesetzten
Überlastsicherung selbst in
Betrieb setzt, keine externen
Schalter (z. B. eine Zeituhr)
anschließen und das Gerät
nicht an einen Stromkreis
anschließen, der das
Gerät regelmäßig aus- und
einschalten kann.
• Alle Anweisungen vor dem
Gebrauch sorgfältig lesen und
zur späteren Bezugnahme
aufbewahren.
• Dieses Gerät kann von
Personen mit eingeschränkten
körperlichen, sensorischen
oder geistigen Fähigkeiten
oder mit mangelnder Erfahrung
und fehlenden Kenntnissen
genutzt werden, sofern sie
beaufsichtigt werden oder in
den sicheren Gebrauch des
Geräts eingewiesen wurden
und sich der entsprechenden
Risiken bewusst sind.
• Gerät nicht von Kindern
bedienen lassen.
• Gerät während des Betriebs
nicht unbeaufsichtigt lassen.
• Motor nach jedem Betrieb
1 Minute lang ruhen lassen.
• Zutaten nie mit den Fingern
oder anderen Utensilien als
dem mitgelieferten Stopfer in
den Einfüllschacht pressen.
Hand oder Finger nie in den
Einfüllschacht stecken, wenn
dieser am Gerät angebracht ist.
• Steinobst nur entsteint
entsaften.
• Vor der Freigabe des
Sicherheitsriegels und/oder vor
jedem Transport des Geräts, bei
Nichtgebrauch sowie vor dem
Auseinandernehmen, Reinigen
und Lagern stets sicherstellen,
dass sich der Edelstahl-
Siebkorb nicht mehr dreht und
der Motor völlig zum Stillstand
gekommen ist.
• Auf, unter oder neben
das Gerät verschüttete
größere Flüssigkeitsmengen
sollten aufgewischt und die
Oberächen getrocknet
werden, ehe das Gerät weiter
benutzt wird.
• Edelstahl-Siebkorb vorsichtig
handhaben, da die kleinen
Messer unten am Siebkorb sehr
scharf sind. Eine Fehlbedienung
kann Verletzungen nach
sich ziehen.
• Zitrusfrüchte vor dem Entsaften
stets schälen.
• Gerät nicht mit beschädigtem
Drehsieb (Siebkorb) oder
Deckel betreiben.
• Vor dem Einschalten des
Motors stets sicherstellen,
dass der Entsafterdeckel sicher
eingerastet ist. Sperrriegel
während des Entsaftens
nicht önen.

5
DE
• Bei Verwendung der Froojie®-
Scheibe und des Einsatzes
stets mit Geschwindigkeit
1 arbeiten und Obst vor der
Verarbeitung entsteinen,
entkernen und schälen
(Maracuja-, Beeren- und
Kiwifruchtsamen sind
akzeptabel).
• Bei Verwendung des Froojie®-
Extraktors kein Eis oder hartes
Obst oder Gemüse wie rohe
rote Beete oder Karotten
verwenden.
DIESE ANLEITUNG AUFBEWAHREN
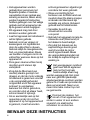
Dieses Symbol zeigt,
dass das Gerät nicht im
normalen Hausmüll
entsorgt werden sollte.
Es sollte stattdessen bei einem
entsprechenden kommunalen
Wertstohof oder Fachhändler
zur Entsorgung abgegeben
werden. Weitere Einzelheiten
erfahren Sie von Ihrer
Kommunalbehörde.
Zum Schutz gegen
Stromschlag Netzstecker,
Netzkabel oder Gerät nicht in
Wasser oder sonstige
Flüssigkeiten tauchen.

6
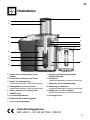
Beschreibung
der Einzelteile
A. Einzigartiges zentrales Direktzuführsystem
B. 84mm extra weiter Einfüllschacht
C. Entsafterabdeckung
(spülmaschinenfest im obersten Korb)
D. 3 Liter Tresterbehälter
(spülmaschinenfest im obersten Korb)
E. Elegantes Edelstahldesign
F. ON / OFF-Schalter (EIN / AUS-Schalter)
G. LCD Geschwindigkeitsanzeiger
H. Elektronischer variabler
Geschwindigkeitsregler
I. Stopfer
J. Sicherheitsverriegelungsbügel aus
Druckguss-Metall
K. Saftlterkorb
(spülmaschinenfest im obersten Korb)
L. Motorantriebskupplung
M. Saftlterschale
(spülmaschinenfest im obersten Korb
N. 1.2 Liter Saftkrug und Deckel
(spülmaschinenfest im obersten Korb)
O. Hochleistungsmotor
A
B
C
D
E
F
G
H
I
J
K
L
M
N
O
Leistungsangaben
220-240V~ 50/60Hz 1100–1300W

7
DE
P. Maßgefertigte Saft-Tülle
(spülmaschinenfest im obersten Korb)
Q. Reinigungsbürste
(spülmaschinenfest im obersten Korb)
R. Froojie® Insert
S. Froojie® Disc
T. Nutri Disc™
U. Eingebauter Schaumabscheider
V. Saftkrugdeckel
Q
P
S
T
U
V
R

8
Montage
VOR DEM ERSTEN GEBRAUCH
Bevor Sie den Entsafter zum ersten Mal
verwenden, entfernen Sie das gesamte
Verpackungsmaterial, Werbeaufkleber und
Etiketten. Vergewissern Sie sich, dass das
Gerät ggf. an der Steckdose ausgeschaltet und
der Netzstecker abgezogen ist. Waschen Sie
Saftlterschale, Nutri Disc™, Entsafterabdeckung,
Froojie® Disc, Froojie® Insert, Stopfer,
Tresterbehälter, Saftkrug und Deckel mit einem
weichen Tuch in warmem Seifenwasser. Spülen
und trocknen Sie alles gründlich. Der Motorsockel
kann mit einem feuchten Tuch abgewischt werden.
Gründlich trocknen.
FÜR DEN GEBRAUCH MIT DEM
ENTSAFTER
1. Stellen Sie den Motorsockel auf eine
ebene, trockene Oberäche wie z.B. eine
Küchenarbeitsäche. Stellen Sie sicher, dass
der Motorsockel auf dem Bedienfeld auf AUS
(Schalterstellung OFF) geschaltet ist, dann
schalten Sie das Gerät ggf. an der Steckdose
aus und ziehen Sie den Netzstecker ab.
2. Stellen Sie die Saftlterschale auf den
Motorsockel.
3. Richten Sie die Pfeile auf der Basis
der Nutri Disc™ an den Pfeilen auf der
Motorantriebskupplung aus und drücken Sie
nach unten, bis sie einrastet. Stellen Sie sicher,
dass die Nutri Disc™ fest in der Saftlterschale
und an dem Motorsockel angebracht ist.
4. Platzieren Sie die Entsafterabdeckung über
die Saftlterschale mit dem Einfüllschacht
über der Scheibe des Entsafters, und bringen
Sie die Entsafterabdeckung dann nach unten
in Position.
5. Heben Sie den Sicherheitsverriegelungsbügel
an und klemmen Sie ihn in die zwei Rillen auf
beiden Seiten der Entsafterabdeckung. Der
Verriegelungsbügel sollte nun senkrecht stehen
und oben auf der Abdeckung des Entsafters
eingerastet sein.
A página está carregando...
A página está carregando...
A página está carregando...
A página está carregando...
A página está carregando...
A página está carregando...
A página está carregando...
A página está carregando...
A página está carregando...
A página está carregando...
A página está carregando...
A página está carregando...
A página está carregando...
A página está carregando...
A página está carregando...
A página está carregando...
A página está carregando...
A página está carregando...
A página está carregando...
A página está carregando...
A página está carregando...
A página está carregando...
A página está carregando...
A página está carregando...
A página está carregando...
A página está carregando...
A página está carregando...
A página está carregando...
A página está carregando...
A página está carregando...
A página está carregando...
A página está carregando...
A página está carregando...
A página está carregando...
A página está carregando...
A página está carregando...
A página está carregando...
A página está carregando...
A página está carregando...
A página está carregando...
A página está carregando...
A página está carregando...
A página está carregando...
A página está carregando...
A página está carregando...
A página está carregando...
A página está carregando...
A página está carregando...
A página está carregando...
A página está carregando...
A página está carregando...
A página está carregando...
A página está carregando...
A página está carregando...
A página está carregando...
A página está carregando...
A página está carregando...
A página está carregando...
A página está carregando...
A página está carregando...
A página está carregando...
A página está carregando...
A página está carregando...
A página está carregando...
A página está carregando...
A página está carregando...
A página está carregando...
A página está carregando...
A página está carregando...
A página está carregando...
A página está carregando...
A página está carregando...
A página está carregando...
A página está carregando...
A página está carregando...
A página está carregando...
-
 1
1
-
 2
2
-
 3
3
-
 4
4
-
 5
5
-
 6
6
-
 7
7
-
 8
8
-
 9
9
-
 10
10
-
 11
11
-
 12
12
-
 13
13
-
 14
14
-
 15
15
-
 16
16
-
 17
17
-
 18
18
-
 19
19
-
 20
20
-
 21
21
-
 22
22
-
 23
23
-
 24
24
-
 25
25
-
 26
26
-
 27
27
-
 28
28
-
 29
29
-
 30
30
-
 31
31
-
 32
32
-
 33
33
-
 34
34
-
 35
35
-
 36
36
-
 37
37
-
 38
38
-
 39
39
-
 40
40
-
 41
41
-
 42
42
-
 43
43
-
 44
44
-
 45
45
-
 46
46
-
 47
47
-
 48
48
-
 49
49
-
 50
50
-
 51
51
-
 52
52
-
 53
53
-
 54
54
-
 55
55
-
 56
56
-
 57
57
-
 58
58
-
 59
59
-
 60
60
-
 61
61
-
 62
62
-
 63
63
-
 64
64
-
 65
65
-
 66
66
-
 67
67
-
 68
68
-
 69
69
-
 70
70
-
 71
71
-
 72
72
-
 73
73
-
 74
74
-
 75
75
-
 76
76
-
 77
77
-
 78
78
-
 79
79
-
 80
80
-
 81
81
-
 82
82
-
 83
83
-
 84
84
-
 85
85
-
 86
86
-
 87
87
-
 88
88
-
 89
89
-
 90
90
-
 91
91
-
 92
92
-
 93
93
-
 94
94
-
 95
95
-
 96
96


Sage BJE520 Guia de usuario
- Categoria
- Fabricantes de suco
- Tipo
- Guia de usuario
em outras línguas
- español: Sage BJE520 Guía del usuario
- français: Sage BJE520 Mode d'emploi
- italiano: Sage BJE520 Guida utente
- Nederlands: Sage BJE520 Gebruikershandleiding
- Deutsch: Sage BJE520 Benutzerhandbuch
Artigos relacionados
Outros documentos
-
Moulinex ZU150127 Manual do usuário
-
Hamilton Beach 67970 Instruções de operação
-
Hamilton Beach 67602A Guia de usuario
-
-
-
-
Oster Juice Extractor 3157 Manual do usuário
-
-
Adler AD 4106 Manual do proprietário