
D1.1.3_KD010719000
Screen Printer User Manual | Gebrauchsanleitung für
Siebdrucker | Manual del usuario de la impresora de pantalla |
Manuel d'utilisation de la machine de sérigraphie | Manuale
utente per la stampante serigrafica | Handleiding zeefdrukker
| Manual do utilizador da impressora de ecrã | スクリーン プリンタ
ー取扱説明書 | 스크린�프린터�사용�설명서 | 網版印刷機使用手冊 | 丝网印
刷机用户手册

Dear xTooler:
Official website: xtool.com
Support center: support.xtool.com
Technical support: [email protected]om
Thank you for choosing xTool Screen Printer. We are so grateful for your
recognition, and sincerely hope you will enjoy this product!
xTool Screen Printer is the world's first screen printer that achieves indus-
try-level precision and works with laser machines. Whether you are a
novice or an expert, whether you use it at home or for business purposes,
xTool Screen Printer is ready to give you the best screen printing experi-
ence.
Our mission is to make it easier for everyone to create with our machine.
We attach great importance to product experience and user suggestions.
Please let us know if you have any questions anytime. We are always here
to help.
By visiting our online store, you can also find our latest accessories and
various materials to maximize the magic of xTool Screen Printer.
Thanks again for your support, and we will consistently provide quality
products and services in the future.
Sincerely,
CEO

1
EN 1
DE 15
ES 29
FR 43
IT 57
NL 71
PT 85
JA 99
KO 113
ZH-TW 127
ZH 141
EN
List of items 2
Meet your xTool Screen Printer 5
Use your xTool Screen Printer 6
Maintenance 14
After-sales services 14
EN
Statement 2

2 3
EN
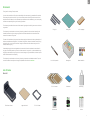
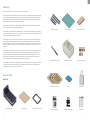
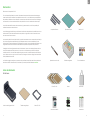
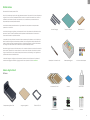
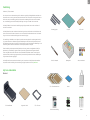
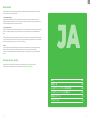
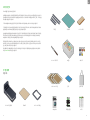
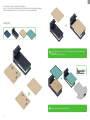
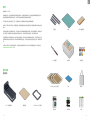
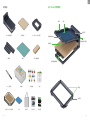
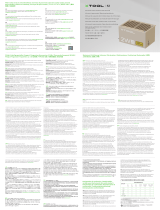
Fixing pin Cutting mat 9'' x 5'' squeegee
8'' x 0.8'' ink spatula Storage box Water-based ink
11.5'' x 16'' screen Cardboard Canvas bag
User manual FAQs Sticker
Statement
List of items
Thank you for choosing xTool products!
If you use the product for the first time, read carefully all the accompanying materials of the product
to improve your experience with it. If you do not use the product according to the instructions and
requirements of the Manual, or mis-operate the product due to misunderstanding, etc., the Company
shall bear no responsibility for any loss resulting therefrom.
The Company has collated the content of the Manual rigorously and carefully, but errors or omissions
may remain.
The Company is committed to continuously improving product functions and service quality, and
therefore reserves the right to change any product or software described in the Manual and the
content of the Manual at any time.
The Manual is intended to help you use the product properly and does not include any description of
hardware and software configuration. For product configuration, refer to the related contract (if any)
and packing list, or consult your distributor. Images in the Manual are for reference only and the
actual product may vary.
Protected by copyright laws and regulations, the Manual shall not be reproduced or transcribed in
any way, or be transmitted on any wired or wireless network in any manner, or be translated into any
language, or be modified in any way, such as content, image, or layout modification, without the prior
written authorization of the Company.
The Company is committed to continuously improving the product and related materials. The prod-
uct and the Manual are subject to change, and updates can be found at xtool.com.
xTool Screen Printer Magnetic board 11.5'' x 16'' frame
Basic kit

4 5
EN
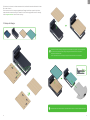
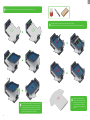
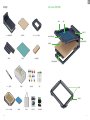
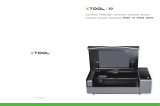
Meet your xTool Screen Printer
Frame Screen
Magnetic dock
for the squeegee
Magnetic board
Magnetic board
position fine-tuning
knob
Handle
toggle lock
Screen position
lock knob
Fixing pin
Handle toggle lock
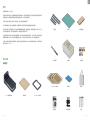
Multi-color kit
xTool Screen Printer 11.5'' x 16'' frame
Fixing pin Cutting mat 9'' x 5'' squeegee
Magnetic board
8'' x 0.8'' ink spatula Storage box Water-based ink
11.5'' x 16'' screen Cardboard Canvas bag User manual FAQs
Sticker

6 7
EN
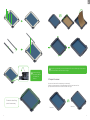
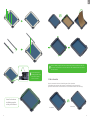
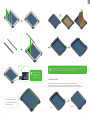
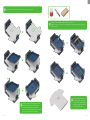
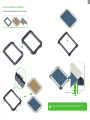
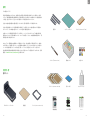
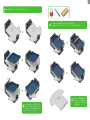
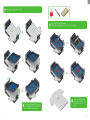
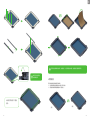
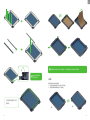
Ensure that the corrugated board is placed fully into the frame and the screen is on top of
the frame. Do not press the screen when mounting it.
Screen
Corrugated
board
Frame
Use your xTool Screen Printer
1. Mount the screen on the frame

8 9
EN
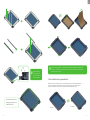
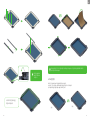
Position the fixing
pin properly before
you rotate it to
secure it.
Fit the other three fixing
pins in the same way.
≈ 45°
If any fixing pin falls after you turn the frame over, fit it into the frame again. If the screen is
not mounted flat on the frame, mount it again.
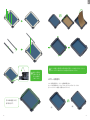
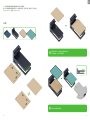
2. Prepare the screen
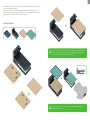
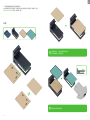
You can use a laser machine to prepare your screen easily.
(1) Design or import a pattern on the software that works with your laser machine.
(2) Flip the frame and screen over so the back side is facing up.
Front side Back side

10 11
EN
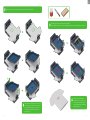
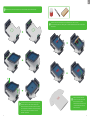
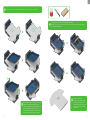
3. Print your design
(3) Place the screen, that has been mounted on the frame, in the processing area of the laser machine
to engrave your design on it.
For some xTool machines, fixing pieces are designed to help you place the frame and thus achieve
better engraving results and higher efficiency. For details, visit support.xtool.com and search for
"screen printing".
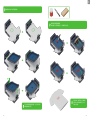
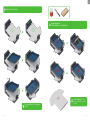
You can determine whether to use the cutting mat based on the texture of your material.
After you mount the magnetic board on the screen printer, you can fine-tune the position
of the magnetic board by using the three position fine-tuning knobs.
You can also make a magnetic board by yourself as needed.

13
12
EN
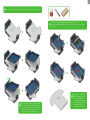
Ensure that the area to be printed on the material is flat without wrinkles.
You can turn the screen position lock knob
clockwise to lock the position of the screen
for printing. Alternatively, you can press
the frame on an edge and hold it down
during printing.
Ensure that the ink is enough to cover the pattern.
When squeezing out the ink, slide the squeegee quickly to avoid transferring too much ink.
After printing, wait about 10
minutes for the ink to air-dry. If
your material is a textile fabric,
you are advised to wait 48 hours
before you wash it.

14 15
DE
Maintenance
After-sales services
After completing the printing, you can clean the screen and keep it for subsequent use. Clean it
based on the type of ink you've used.
· Water-based ink
Rinse the screen to remove the ink. You can use a soft brush to remove the ink gently. If the ink is dry
and hard to remove, soak the screen in water overnight or use some non-corrosive detergent to clean
it.
· Oil-based ink
Use solvent such as acetone to dissolve the ink, or use a soft brush to remove the ink gently. Ensure
that you use the solvent in a well-ventilated place away from fire.
Before using detergent or solvent to clean the screen, test it in a small area of the screen to see
whether it damages the screen. After cleaning, rinse the screen to remove the remaining detergent
or solvent, and then air-dry the screen or dry it with compressed air.
Warnings:
· Before you use any detergent or solvent, be sure to read its user manual carefully and follow all the
safety instructions. Ensure that you use it in a well-ventilated place.
· Do not use a hard or sharp tool to scrape the ink from the screen, or damage may be caused to the
screen.
For technical support, contact us at [email protected].
For more information about after-sales services, visit support.xtool.com.
Liste der Teile 16
xTool Siebdrucker kennenlernen 19
xTool Siebdrucker verwenden 20
Wartung 28
Kundendienst 28
DE
Erklärung 16

16 17
DE
Erklärung
Liste der Teile
Vielen Dank, dass Sie sich für xTool-Produkte entschieden haben!
Wenn Sie das Produkt zum ersten Mal benutzen, lesen Sie bitte sorgfältig das gesamte Begleitmate-
rial des Produkts durch. Wenn Sie das Produkt nicht gemäß den Anweisungen und Anforderungen
des Handbuchs verwenden oder das Produkt fehlerhaft betreiben, übernimmt das Unternehmen
keine Verantwortung für daraus resultierende Schäden.
Das Unternehmen hat den Inhalt des Handbuchs sorgfältig und gewissenhaft zusammengestellt,
aber es können Fehler oder Auslassungen bestehen.
Das Unternehmen ist bestrebt, die Produktfunktionen und die Servicequalität ständig zu verbessern,
und behält sich daher das Recht vor, die im Handbuch beschriebenen Produkte oder Software sowie
den Inhalt des Handbuchs jederzeit zu ändern.
Das Handbuch soll Ihnen helfen, das Produkt richtig zu benutzen und enthält keine Beschreibung
der Hardware- und Softwarekonfiguration. Für die Produktkonfiguration lesen Sie bitte den zuge-
hörigen Vertrag (falls vorhanden) und die Packliste oder wenden Sie sich an Ihren Händler. Die Abbil-
dungen in diesem Handbuch dienen nur als Referenz und das tatsächliche Produkt kann davon
abweichen.
Die Anleitung ist urheberrechtlich geschützt. Ohne vorherige schriftliche Genehmigung seitens des
Unternehmens darf die Anleitung weder auf irgendeine Weise reproduziert, umgeschrieben, auf
irgendeine Weise über ein kabelgebundenes oder kabelloses Netzwerk übertragen oder in irgen-
deine Sprache übersetzt werden, noch dürfen irgendwelche Änderungen daran vorgenommen
werden, beispielsweise in Bezug auf Inhalt, Abbildungen oder Layout.
Das Unternehmen hat es sich zur Aufgabe gemacht, das Produkt und die damit verbundenen Mate-
rialien stetig zu verbessern. Das Produkt und die Gebrauchsanleitung können verändert werden.
Aktualisierungen sind unter xtool.com zu finden.
xTool Siebdrucker Magnettafel Rahmen 11,5 Zoll x 16 Zoll
Basissatz
Befestigungsstift Schneidematte Rakel 9 Zoll x 5 Zoll
Farbspatel 8 Zoll x 0,8 Zoll Aufbewahrungskiste Farbe auf Wasserbasis
Sieb 11,5 Zoll x 16 Zoll Karton Leinentasche
Benutzerhandbuch Häufig gestellte Fragen Aufkleber

18 19
DE
xTool Siebdrucker kennenlernen
Rahmen Sieb
Magnet-Dock
für den Rakel
Magnettafel
Feineinstellknopf
für die Position
der Magnettafel
Verriegelungsknopf
für die Siebposition
Befestigungsstift
Griffeinstellverriegelung
Mehrfarbiger Satz
xTool Siebdrucker Rahmen 11,5 Zoll x 16 Zoll
Befestigungsstift Schneidemattet Rakel 9 Zoll x 5 Zoll
Magnettafel
Farbspatel 8 Zoll x 0,8 Zoll Aufbewahrungskiste AufkleberFarbe auf Wasserbasis
Sieb 11,5 Zoll x 16 Zoll Karton Leinentasche Benutzerhandbuch
Häufig
gestellte
Fragen
Griffeinstell-
verriegelung

21
20
DE
Achten Sie darauf, dass die Wellpappe vollständig in den Rahmen eingesetzt wird und
die Leinwand oben auf dem Rahmen liegt. Drücken Sie nicht auf die Leinwand, wenn Sie
sie montieren.
Sieb
Wellpappe
Rahmen
xTool Siebdrucker verwenden
1. Montieren Sie das Sieb auf dem Rahmen

23
22
DE
Positionieren Sie den
Befestigungsstift richtig,
bevor Sie ihn drehen,
um ihn zu sichern.
Setzen Sie die anderen
drei Befestigungsstifte
auf die gleiche Weise ein.
≈ 45°
Sollte ein Befestigungsstift nach dem Umdrehen des Rahmens herausfallen, setzen Sie
ihn erneut in den Rahmen ein. Wenn das Sieb nicht flach auf dem Rahmen sitzt, montie-
ren Sie es erneut.
2. Sieb vorbereiten
Mit einer Lasermaschine können Sie das Sieb ganz einfach vorbereiten.
(1) Entwerfen oder importieren Sie ein Muster in der Software für Ihre Lasermaschine.
(2) Drehen Sie den Rahmen und den Bildschirm um, so dass die Rückseite nach oben zeigt.
Vorderseite Hintere Seite

25
24
DE
3. Entwurf drucken
(3) Platzieren Sie das auf dem Rahmen montierte Sieb im Bearbeitungsbereich der Lasermaschine,
um Ihren Entwurf dort einzugravieren.
Bei einigen xTool-Maschinen erleichtern Befestigungsteile das Platzieren des Rahmens, um so
bessere Gravurergebnisse und eine höhere Effizienz zu erzielen. Weitere Informationen finden Sie
unter support.xtool.com. Suchen Sie dort nach "screen printing".
Anhand der Beschaffenheit Ihres Materials können Sie entscheiden, ob Sie die Schnei-
dematte verwenden möchten.
Nachdem Sie die Magnettafel auf dem Siebdrucker montiert haben, können Sie die Posi-
tion der Magnettafel mithilfe der drei Feineinstellknöpfe für die Position feineinstellen.
Sie können bei Bedarf auch selbst eine Magnettafel herstellen.

27
26
DE
Achten Sie darauf, dass die auf dem Material zu bedruckende Fläche flach und faltenfrei ist.
Sie können den Verriegelungsknopf für die Siebpo-
sition im Uhrzeigersinn drehen, um die Siebposition
für den Druck zu verriegeln. Alternativ können Sie
auch an einer Kante auf den Rahmen drücken und
ihn während des Druckens gedrückt halten.
Achten Sie darauf, dass Sie ausreichend Farbe für das Muster verwenden.
Bewegen Sie die Rakel beim Ausdrücken der Tinte schnell, damit nicht zu viel Tinte über-
tragen wird.
Warten Sie nach dem Drucken
etwa 10 Minuten, bis die Farbe
an der Luft getrocknet ist.
Wenn es sich bei Ihrem Material
um Textilgewebe handelt, wird
empfohlen, 48 Stunden zu
warten, bevor Sie es waschen.

29
28
ES
Wartung
Kundendienst
Nach Beendigung des Druckvorgangs können Sie das Sieb reinigen und für eine spätere Verwend-
ung aufbewahren. Reinigen Sie es entsprechend der verwendeten Farbenart.
· Farbe auf Wasserbasis
Spülen Sie das Sieb ab, um die Farbe zu entfernen. Mit einer weichen Bürste können Sie die Farbe
vorsichtig entfernen. Wenn die Farbe trocken und schwer zu entfernen ist, weichen Sie das Sieb über
Nacht in Wasser ein oder reinigen Sie es mit einem nicht ätzenden Reinigungsmittel.
· Farbe auf Ölbasis
Verwenden Sie Lösungsmittel wie Aceton, um die Farbe zu lösen, oder verwenden Sie eine weiche
Bürste, um die Farbe vorsichtig zu entfernen. Achten Sie darauf, dass Sie das Lösungsmittel an einem
gut belüfteten Ort und fern von offenem Feuer verwenden.
Bevor Sie Reinigungs- oder Lösungsmittel zum Reinigen des Siebs verwenden, testen Sie es an einer
kleinen Stelle des Siebs, um festzustellen, ob es das Sieb beschädigt. Spülen Sie das Sieb nach der
Reinigung ab, um das restliche Reinigungs- oder Lösungsmittel zu entfernen, und trocknen Sie das
Sieb anschließend an der Luft oder mit Druckluft.
Warnhinweise:
· Bevor Sie ein Reinigungs- oder Lösungsmittel verwenden, lesen Sie unbedingt die entsprechende
Gebrauchsanleitung sorgfältig durch und befolgen Sie alle Sicherheitshinweise. Achten Sie darauf,
dass Sie es an einem gut belüfteten Ort verwenden.
· Verwenden Sie kein hartes oder scharfes Werkzeug, um die Farbe vom Sieb abzukratzen, da das
Sieb sonst beschädigt werden kann.
Für technische Unterstützung kontaktieren Sie uns bitte unter [email protected].
Weitere Informationen über Kundendienstleistungen finden Sie unter support.xtool.com.
Lista de artículos 30
Conozca su impresora de pantalla xTool 33
Utilice su impresora de pantalla xTool 34
Mantenimiento 42
Servicio de posventa 42
ES
Declaración 30

31
30
ES
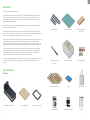
Pasador de fijación Alfombra de corte Escobilla de goma de
22,9 x 12,7 cm
Espátula para tinta de
20 x 2 cm
Caja de almacenaje Tinta a base de agua
Pantalla de 29,2 x 40,6 cm Cartón Bolsa de lona
Manual de Usuario Preguntas frecuentes
Declaración
Lista de artículos
¡Bienvenido al uso de los productos xTool!
Si está utilizando este producto por primera vez, lea cuidadosamente todo el material que lo acom-
paña para mejorar la experiencia con el producto. Si no utiliza este producto de acuerdo con las
instrucciones y requisitos del Manual u opera el producto de manera errónea, etc., la empresa no se
hará responsable de ningún daño.
La empresa ha cotejado el contenido del manual de manera rigurosa; sin embargo, pueden llegar a
quedar algunos errores u omisiones.
La empresa se compromete a seguir mejorando las funciones de sus productos y la calidad de sus
servicios y, por lo tanto, se reserva el derecho de cambiar cualquier producto o software descrito en el
Manual, así como también el contenido del Manual en cualquier momento.
La función de este Manual es la de ayudarlo a utilizar este producto de manera apropiada y no incluye
ninguna descripción de la configuración del hardware o software. Para ver la configuración del
producto, revise el contrato relacionado (si existe) y la lista de embalaje, o consulte al distribuidor. Las
imágenes en el Manual son únicamente de referencia y pueden variar con respecto al producto real.
El manual está protegido por las leyes y reglamentos sobre derechos de autor y no podrá reprodu-
cirse ni transcribirse en ningún modo, ni transmitirse por ninguna red alámbrica o inalámbrica de
ninguna forma, ni traducirse a ningún idioma, ni modificarse en modo alguno en su contenido,
imagen o maquetación, sin la autorización previa por escrito de la empresa.
La empresa se compromete a mejorar de forma continua el producto y los materiales relacionados. El
producto y el manual están sujetos a modificaciones, y las actualizaciones están disponibles en
xtool.com.
Impresora de pantalla xTool Tablero magnético Marco de 29,2 x 40,6 cm
Kit básico
Pegatina

33
32
ES
Conozca su impresora de pantalla xTool
Marco Pantalla
Base magnética
para la escobilla
de goma
Tablero magnético
Mandos de ajuste de
la posición del
tablero magnético
Palanca de
bloqueo
Mando de bloqueo
de posición de
la pantalla
Pasador de fijación
Palanca de bloqueo
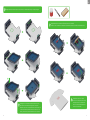
Kit multicolor
Impresora de pantalla xTool Marco de 29,2 x 40,6 cm
Pasador de fijación Alfombra de corte Escobilla de goma de
22,9 x 12,7 cm
Tablero magnético
Espátula para tinta de
20 x 2 cm
Caja de almacenaje Tinta a base de agua Pegatina
Pantalla de 29,2 x 40,6 cm Cartón Bolsa de lona Manual de
Usuario
Preguntas
frecuentes

35
34
ES
Asegúrese de que el cartón ondulado esté completamente colocado en el marco y que la
pantalla esté encima del marco. No presione la pantalla al montarla.
Pantalla
Cartón
corrugado
Marco
Utilice su impresora de pantalla xTool
1. Monte la pantalla en el marco
A página está carregando...
A página está carregando...
A página está carregando...
A página está carregando...
A página está carregando...
A página está carregando...
A página está carregando...
A página está carregando...
A página está carregando...
A página está carregando...
A página está carregando...
A página está carregando...
A página está carregando...
A página está carregando...
A página está carregando...
A página está carregando...
A página está carregando...
A página está carregando...
A página está carregando...
A página está carregando...
A página está carregando...
A página está carregando...
A página está carregando...
A página está carregando...
A página está carregando...
A página está carregando...
A página está carregando...
A página está carregando...
A página está carregando...
A página está carregando...
A página está carregando...
A página está carregando...
A página está carregando...
A página está carregando...
A página está carregando...
A página está carregando...
A página está carregando...
A página está carregando...
A página está carregando...
A página está carregando...
A página está carregando...
A página está carregando...
A página está carregando...
A página está carregando...
A página está carregando...
A página está carregando...
A página está carregando...
A página está carregando...
A página está carregando...
A página está carregando...
A página está carregando...
A página está carregando...
A página está carregando...
A página está carregando...
A página está carregando...
A página está carregando...
A página está carregando...
A página está carregando...
A página está carregando...
A página está carregando...
-
 1
1
-
 2
2
-
 3
3
-
 4
4
-
 5
5
-
 6
6
-
 7
7
-
 8
8
-
 9
9
-
 10
10
-
 11
11
-
 12
12
-
 13
13
-
 14
14
-
 15
15
-
 16
16
-
 17
17
-
 18
18
-
 19
19
-
 20
20
-
 21
21
-
 22
22
-
 23
23
-
 24
24
-
 25
25
-
 26
26
-
 27
27
-
 28
28
-
 29
29
-
 30
30
-
 31
31
-
 32
32
-
 33
33
-
 34
34
-
 35
35
-
 36
36
-
 37
37
-
 38
38
-
 39
39
-
 40
40
-
 41
41
-
 42
42
-
 43
43
-
 44
44
-
 45
45
-
 46
46
-
 47
47
-
 48
48
-
 49
49
-
 50
50
-
 51
51
-
 52
52
-
 53
53
-
 54
54
-
 55
55
-
 56
56
-
 57
57
-
 58
58
-
 59
59
-
 60
60
-
 61
61
-
 62
62
-
 63
63
-
 64
64
-
 65
65
-
 66
66
-
 67
67
-
 68
68
-
 69
69
-
 70
70
-
 71
71
-
 72
72
-
 73
73
-
 74
74
-
 75
75
-
 76
76
-
 77
77
-
 78
78
-
 79
79
-
 80
80


em outras línguas
- español: XTOOL Screen Printer Manual de usuario
- français: XTOOL Screen Printer Manuel utilisateur
- italiano: XTOOL Screen Printer Manuale utente
- Nederlands: XTOOL Screen Printer Handleiding
- Deutsch: XTOOL Screen Printer Benutzerhandbuch
- 日本語: XTOOL Screen Printer ユーザーマニュアル
Artigos relacionados
-
 XTOOL Accessory Kit of RA2 Manual do usuário
-
 XTOOL Infrared Laser Module Manual do usuário
-
XTOOL F1 Manual do usuário
-
 XTOOL Air Assist Set Manual do usuário
-
 XTOOL Fire Safety Set Manual do usuário
-
 XTOOL P2 Instruções de operação
-
-
 XTOOL Inline Duct Fan Manual do usuário
-
 XTOOL Air Assist Set Guia de usuario


Outros documentos
-
Epson WorkForce WF-2510WF Manual do proprietário
-
HP DesignJet Z9+ PostScript Printer series Instruções de operação
-
-
HP DesignJet Z6 PostScript Printer series Instruções de operação
-
HP Z6 Pro Design Jet in Printers Manual do usuário
-