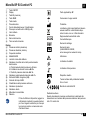
Microlife BPB3 Manual do usuário
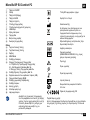
- Categoria
- Unidades de pressão arterial
- Tipo
- Manual do usuário

IB BP B3 Comfort PC S-V11 2223
Revision Date: 2023-05-09
BPB3 Comfort PC
Blood Pressure Monitor
EN
ES
1
9
FR
IT
18
27
DE
TR
36
45
PT
NL
53
62
GR
AR
71
81
FA 88
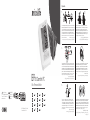
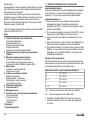
Preparation
Sit on a back-supported chair and keep your legs uncrossed. / Siéntese en una silla con
respaldo y mantenga las piernas descritas. / Asseyez-vous sur une chaise (avec dossier)
et ne croisez pas les jambes. / Sedere su una sedia con schienale e non accavallare le
gambe. / Setzen Sie sich auf einen Stuhl mit Rückenlehnen und kreuzen Sie die Beine
nicht. / Arkası destekli bir sandalyeye oturunuz ve bacak bacak üzerine atmayınız. /
Sente-se numa cadeira com encosto e não cruze as pernas. /
Ga op een stoel zitten
met rugleuning en kruis uw benen niet. / Καθίστε σε καρέκλα με πλάτη και
μην σταυρώνετε τα πόδια σας. /
1.
3.
5.
2.
4.
6.
Fit the cuff closely, but not too tight. / Ajuste el brazalete de cerca, pero no demasiado
apretado. / Ajustez le brassard mais ne pas trop serrer. / Indossare il bracciale e
stringerlo, ma non troppo. / Legen Sie die Manschette eng aber nicht zu stramm an.
/ Manşonu yakın bir şekilde kapatınız ancak çok sıkmayınız. / Aperte corretamente
a braçadeira, mas não demasiado.
/ Breng de manchet aan rondom uw arm,
maar niet te strak. / Τοποθετήστε την περιχειρίδα εφαρμοστά αλλά όχι πολύ
σφιχτά. /
Avoid thick or close-fitting garments on the upper arm. / Evite prendas gruesas o
ajustadas en la parte superior del brazo. / Évitez les vêtements épais ou ajustés sur
le haut du bras. / Evitare di indossare abiti pesanti o aderenti intorno al braccio. /
Vermeiden Sie dicke oder eng anliegende Kleidungsstücke am Oberarm. / Kolun üst
kısmında sıkan ve dar giysilerden uzak durunuz. / Evite usar roupa grossa ou justa no
braço. / Vermijd dikke of strak zittende kleding aan uw bovenarm.
/ Αποφύγετε να
φοράτε χοντρά ή στενά ενδύματα στο μπράτσο σας. /
Place the artery-mark on the cuff over your artery. / Coloque la marca de la arteria en
el brazalete sobre su arteria. / Placez le repère d'artère du brassard au niveau de votre
artère. / Posizionare l’indicatore giallo dell’arteria posto sul bracciale in corrispondenza
dell’arteria del braccio./ Platzieren Sie die Arterienmarkierung auf der Manschette über
Ihrer Arterie. / Manşonun üzerindeki arter işaretinini, kolunuzun üzerindeki artere denk
getiriniz. / Coloque a marca existente na braçadeira sobre a artéria do braço
. / Plaats
de manchet met arteriemarkering op uw arterie. / Τοποθετήστε την ένδειξη
αρτηρίας που βρίσκεται στην περιχειρίδα πάνω από την αρτηρία σας. /
Position the cuff 1-2 cm above your elbow. / Coloque el brazalete 1-2 cm por
encima del codo. / Installez le brassard 1 à 2 cm au dessus de la pliure du coude.
/ Posizionare il bracciale 1-2 cm sopra il gomito. / Positionieren Sie die Manschette
1-2 cm über Ihrem Ellbogen. / Manşonu dirseğinizden 1-2 cm yukarıya yerleştirin. /
Coloque a braçadeira 1-2 cm acima do cotovelo
. / Positioneer de manchet
1-2
cm boven uw elleboog. / Τοποθετήστε την περιχειρίδα
1-2
εκατοστά πάνω
από τον αγκώνα σας. /
Keep your arm still and do not speak during the measurement. / Mantenga su brazo quieto
y no hable durante la medición. / Ne pas parler et ne pas bouger votre bras pendant la
prise de mesure. / Tenere il braccio fermo e non parlare durante la misurazione. / Halten Sie
Ihren Arm ruhig und sprechen Sie während der Messung nicht. / Kolunuzu sabit tutunuz ve
ölçüm sırasında konuşmayınız. / Mantenha o braço imóvel e não fale durante a medição.
/ Houd uw arm stil en spreek niet tijdens de meting. / Κρατήστε το χέρι σας
ακίνητο και μην μιλάτε κατά τη διάρκεια της μέτρησης. /
/
1-2
-
Microlife Corporation
9F, 431, RuiGuang Road, NeiHu
Taipei 11492, Taiwan, China
www.microlife.com
Microlife UAB
P. Lukšio g. 32
08222 Vilnius
Lithuania

B3 Comfort
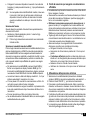
Microlife BP B3 Comfort PC Microlife BP B3 Comfort PCMicrolife BP B3 Comfort PC Guarantee CardBefore each measurement
1.
2.
3.
Avoid eating, bathing, smoking or caffeine (approx. 30 min).
Evite comer, bañarse, fumar o cafeína (aproximadamente 30 minutos).
Évitez de manger, de vous baigner, de fumer ou do consommer des produits contenant de
la caféine pendant environ 30 minutes.
Evitare di mangiare, fare il bagno, fumare o bere caffè (almeno 30 min.)
Vermeiden Sie essen, baden, rauchen oder Koffein (ca. 30 min).
Yeme, içme, duş alma, sigarak içme ve kefeinden uzak durunuz (yaklaşık 30 dak.)
Evite comer, tomar banho, fumar ou ingerir cafeína (cerca de 30 min).
Vermijd eten, baden, roken of het nuttigen van caffeine (ca. 30 minuten).
Αποφύγετε τη κατανάλωση φαγητού, το μπάνιο, το κάπνισμα ή την καφεΐνη (περίπου 30
λεπτά)
30
Avoid activity and relax for 5-10 min.
Evite la actividad y relájese durante 5-10 min.
Évitez toute activité et détendez-vous pendant 5 à 10 min
Evitare di fare attività fisica e rilassarsi per 5-10 minuti.
Vermeiden Sie Bewegung und entspannen Sie sich für 5-10 Min.
Spordan kaçınınız ve 5-10 dakika dinlenmiş olunuz.
Evite a atividade física e relaxe 5-10 min.
Vermijd beweging en ontspan voor 5-10 minuten.
Αποφύγετε τη σωματική δραστηριότητα και χαλαρώστε για 5-10 λεπτά
5-10
Measure before medication intake.
Mida antes de tomar medicamentos.
Ne pas prendre de médicament avant de mesurer votre tension.
Effettuare la misurazione prima di assumere farmaci.
Messen Sie bevor Sie Medikamente einnehmen.
İlaç alımından önce ölçüm yapınız.
Proceda à medição antes de tomar medicação.
Meet alvorens u medicatie inneemt.
Πραγματοποιήστε τη μέτρηση πριν από τη λήψη φαρμάκων
Name of Purchaser / Nombre del comprador/
Nom de l'acheteur / Nome del rivenditore / Name
des Käufers / Alıcının adı / Nome do comprador /
Naam koper / Ονοματεπώνυμο αγοραστή /
/
Serial Number / Número de serie/ Numéro
de série / Numero di serie / Serien-Nr. / Seri
numarası / Número de série / Serienummer /
Αριθμός σειράς / /
Date of Purchase / Fecha de compra/ Date
d'achat / Data d’acquisto / Kaufdatum / Satın
alma tarihi / Data da compra / Datum van
aankoop / Ημερομηνία αγοράς / /
Specialist Dealer / Distribuidor especializado/
Revendeur / Categoria rivenditore / Fachhändler /
Uzman satıcı / Revendedor autorizado / Specialist
Dealer / Εξειδικευμένος αντιπρόσωποςa /
/
BP W100 ١٢ AR
ﺔﻟﺎﻔﻜﻟا ﺔﻗﺎﻄﺑ
(ﻲﻔﻠﺨﻟا ءﺎﻄﻐﻟا ﺮﻈﻧا) ﺔﻟﺎﻔﻜﻟا ﺔﻗﺎﻄﺑ
:يﺮﺘﺸﻤﻟا ﻢﺳا
:ﻞﻳدﻮﻤﻟا
:ﻞﺴﻠﺴﺘﻟا ﻢﻗر
:ءاﺮﺸﻟا ﺦﻳرﺎﺗ
:ﺺﺘﺨﻤﻟا ﺮﺟﺎﺘﻟا
FA
BP W100 ١٢ AR
ﺔﻟﺎﻔﻜﻟا ﺔﻗﺎﻄﺑ
(ﻲﻔﻠﺨﻟا ءﺎﻄﻐﻟا ﺮﻈﻧا) ﺔﻟﺎﻔﻜﻟا ﺔﻗﺎﻄﺑ
:يﺮﺘﺸﻤﻟا ﻢﺳا
:ﻞﻳدﻮﻤﻟا
:ﻞﺴﻠﺴﺘﻟا ﻢﻗر
:ءاﺮﺸﻟا ﺦﻳرﺎﺗ
:ﺺﺘﺨﻤﻟا ﺮﺟﺎﺘﻟا
BP W100 ١٢ AR
ﺔﻟﺎﻔﻜﻟا ﺔﻗﺎﻄﺑ
(ﻲﻔﻠﺨﻟا ءﺎﻄﻐﻟا ﺮﻈﻧا) ﺔﻟﺎﻔﻜﻟا ﺔﻗﺎﻄﺑ
:يﺮﺘﺸﻤﻟا ﻢﺳا
:ﻞﻳدﻮﻤﻟا
:ﻞﺴﻠﺴﺘﻟا ﻢﻗر
:ءاﺮﺸﻟا ﺦﻳرﺎﺗ
:ﺺﺘﺨﻤﻟا ﺮﺟﺎﺘﻟا
BP W100 ١٢ AR
ﺔﻟﺎﻔﻜﻟا ﺔﻗﺎﻄﺑ
(ﻲﻔﻠﺨﻟا ءﺎﻄﻐﻟا ﺮﻈﻧا) ﺔﻟﺎﻔﻜﻟا ﺔﻗﺎﻄﺑ
:يﺮﺘﺸﻤﻟا ﻢﺳا
:ﻞﻳدﻮﻤﻟا
:ﻞﺴﻠﺴﺘﻟا ﻢﻗر
:ءاﺮﺸﻟا ﺦﻳرﺎﺗ
:ﺺﺘﺨﻤﻟا ﺮﺟﺎﺘﻟا

1Microlife BP B3 Comfort PC EN
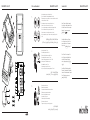
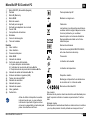
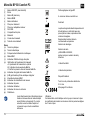
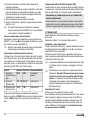
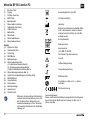
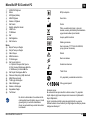
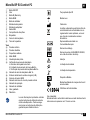
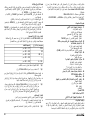
Display
Intended use:
This oscillometric blood pressure monitor is intended for
measuring non-invasive blood pressure in people aged 12 years
or older.
Microlife BP B3 Comfort PC EN
1ON/OFF button
2Display
3M-button (memory)
4MAM button
5User Button
6Cuff socket
7Mains Adapter Socket
8USB Port
9Battery compartment
AT Cuff
AK Cuff connector
AL Cuff tube
AM Systolic value
AN Diastolic value
AO Pulse rate
AP MAM Mode
AQ Battery display
AR Cuff fit check
-A: Suboptimal cuff fit
-B: Arm movement indicator «Err 2»
-C: Cuff pressure check «Err 3»
AS Cuff signal indicator «Err 1»
BT Irregular heartbeat (IHB) symbol
BK MAM Interval time
BL Traffic light indicator
BM Pulse indicator
BN User indicator
BO Stored value
BP Date/Time
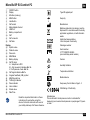
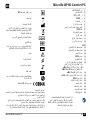
Read the important information in these
instructions for use before using this
device. Follow the instructions for use for
your safety and keep it for future reference.
Type BF applied part
Keep dry
Manufacturer
Batteries and electronic devices must be
disposed of in accordance with the locally
applicable regulations, not with domestic
waste.
Authorized representative
in the European Community
Catalogue number
Serial number
(YYYY-MM-DD-SSSSS;
year-month-day-serial number)
Caution
Humidity limitation
Temperature limitation
Medical device
Keep away from children of age 0 - 3
CE Marking of Conformity
S
NN

2
Dear Customer,
This device was developed in collaboration with physicians and
clinical tests carried out prove its measurement accuracy to be of
a very high standard.*
If you have any questions, problems or want to order spare parts
please contact your local Microlife-Customer Service. Your dealer
or pharmacy will be able to give you the address of the Microlife
dealer in your country. Alternatively, visit the internet at
www.microlife.com where you will find a wealth of invaluable infor-
mation on our products.
Stay healthy – Microlife AG!
* This device is tested according to the ESH protocol and
ISO81060-2:2013.
Table of contents
1. Using the device for the first time
Inserting the batteries
Setting the date and time
Selecting the correct cuff
Selecting the user
Selecting standard or MAM mode
2. Checklist for taking a reliable measurement
3. Taking a blood pressure measurement
How not to store a reading
How do I evaluate my blood pressure
Appearance of the irregular heartbeat (IHB) symbol
4. Data memory
Viewing the stored values
Clearing all values
5. Battery indicator and battery change
Low battery
Flat battery - replacement
Which batteries and which procedure?
Using rechargeable batteries
6. Using a mains adapter
7. PC-Link functions
8. Error Messages
9. Safety, care, accuracy test and disposal
Device care
Cleaning the cuff
Accuracy test
Disposal
10. Guarantee
11. Technical Specifications
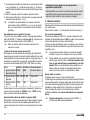
1. Using the device for the first time
Inserting the batteries
After you have unpacked your device, first insert the batteries.
The battery compartment 9 is on the bottom of the device.
Insert the batteries (4 x 1.5 V, size AA), thereby observing the
indicated polarity.
Setting the date and time
1. After the new batteries are fitted, the year number flashes in the
display. You can set the year by pressing the M-button 3. To
confirm and then set the month, press the MAM button 4.
2. Press the M-button to set the month. Press the MAM button to
confirm and then set the day.
3. Follow the instructions above to set the day, hour and minutes.
4. Once you have set the minutes and pressed the MAM button,
the date and time are set and the time is displayed.
5. If you want to change the date and time, press and hold the
MAM button for approx. 3 seconds until the year number starts
to flash. Now you can enter the new values as described above.
Selecting the correct cuff
Microlife offers different cuff sizes. Select the cuff size to match the
circumference of your upper arms (measured by close fitting in the
centre of the upper arm).
Contact your local Microlife Service if the enclosed cuff AT
does not fit.
Connect the cuff to the device by inserting the cuff connector AK
into the cuff socket 6 as far as it will go.
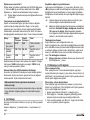
Cuff size for circumference of upper arm
S 17 - 22 cm
M 22 - 32 cm
M - L 22 - 42 cm
L 32 - 42 cm
L - XL 32 - 52 cm
Pre-shaped cuffs are optionally available.
Only use Microlife cuffs.

3Microlife BP B3 Comfort PC EN
Selecting the user
This device allows to store the results for 2 individual users.
Select the intended user (user 1 or user 2 BN) by pressing the
user button 5.
Selecting standard or MAM mode
Before each measurement, select standard (single measurement)
or MAM mode (automatic triple measurement). In MAM mode,
3 measurements are automatically taken in succession and the
result is then automatically analysed and displayed. Because the
blood pressure constantly fluctuates, a result obtained in this way
is more reliable than when a single measurement is performed.
To select MAM mode, press the MAM button 4 until the MAM-
symbol AP appears on the display. To change to standard mode
(single measurement), press the MAM-button again, until the
MAM-symbol disappears.
The bottom, right hand section of the display shows a 1, 2 or 3
to indicate which of the 3 measurements is currently being
taken.
There is a break of 15 seconds between the measurements.
A count down indicates the remaining time.
The individual results are not displayed. Your blood pressure
will only be displayed after all 3 measurements are taken.
Do not remove the cuff between measurements.
If one of the individual measurements was questionable, a
fourth one is automatically taken.
2. Checklist for taking a reliable measurement
Avoid activity, eating or smoking immediately before the
measurement.
Sit down on a back-supported chair and relax for 5 minutes.
Keep your feet flat on the floor and do not cross your legs.
Always measure on the same arm (normally left). It is recom-
mended that doctors perform double arm measurements on a
patients first visit in order to determine which arm to measure in
the future. The arm with the higher blood pressure should be
measured.
Remove close-fitting garments from the upper arm. To avoid
constriction, shirt sleeves should not be rolled up - they do not
interfere with the cuff if they are laid flat.
Always ensure that the correct cuff size is used
(marking on the cuff).
Fit the cuff closely, but not too tight.
Make sure that the cuff is positioned 1-2 cm above the
elbow.
The artery mark on the cuff (ca.3 cm long bar) must lie over
the artery which runs down the inner side of the arm.
Support your arm so it is relaxed.
Ensure that the cuff is at the same height as your heart.
3. Taking a blood pressure measurement
1. Select standard (single measurement) or MAM mode (auto-
matic triple measurement): see details in chapter 1.»
2. Press the ON/OFF button 1 to start the measurement.
3. The cuff will now pump up automatically. Relax, do not move
and do not tense your arm muscles until the measurement
result is displayed. Breathe normally and do not talk.
4. The cuff fit check AR on the display indicates that the cuff is
perfectly placed. If the icon AR-A appears, the cuff is fitted
suboptimally, but it is still ok to measure.
5. The measurement is performed during the inflation. The infla-
tion speed may vary, this is a normal occurence.
6. During the measurement, the pulse indicator BM flashes in the
display.
7. The result, comprising the systolic AM and the diastolic AN blood
pressure and the pulse rate AO are displayed. Note also the
explanations on further display symbols in this booklet.
8. When the device has finished measuring, remove the cuff.
9. Switch off the device. (The monitor does switch off automati-
cally after approx. 1 min.).
How not to store a reading
As soon as the reading is displayed press and hold the ON/OFF
button 1 until «M» BO is flashing. Confirm to delete the reading by
pressing the MAM button 4.
If you buy a spare Microlife cuff, please remove the cuff
connector AK from the cuff tube AL from the cuff supplied
with the original device and insert this cuff connector into
the tube of the spare cuff (valid for all cuff sizes).
Before each measurement, ensure that the correct user is
selected.
You can stop the measurement at any time by pressing the
ON/OFF button (e.g. if you feel uneasy or an unpleasant
pressure sensation).

4
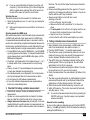
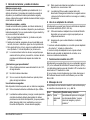
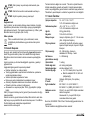
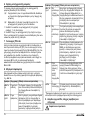
How do I evaluate my blood pressure
The triangle on the left-hand edge of the display BL points at the
range within which the measured blood pressure value lies. The
value is either within the optimum (green), elevated (yellow) or
high (red) range. The classification corresponds to the following
ranges defined by international guidelines (ESH, ESC, JSH). Data
in mmHg.
The higher value is the one that determines the evaluation.
Example: a blood pressure value of 140/80 mmHg or a value of
130/90 mmHg indicates «blood pressure too high».
Appearance of the irregular heartbeat (IHB) symbol
This symbol BT indicates that an irregular heartbeat was detected.
In this case, the measured blood pressure may deviate from your
actual blood pressure values. It is recommended to repeat the
measurement.
4. Data memory
This device automatically stores up to 99 measurement values for
each of the 2 users.
Select either user 1 or 2 by pressing the user button 5.
Viewing the stored values
Press the M-button 3 briefly, when the device is switched off. The
display first shows «M» BO, and «A»which stands for the average
of all stored values.
Pressing the M-button again displays the previous value. Pressing
the M-button repeatedly enables you to move from one stored
value to another.
Clearing all values
Make sure the correct user is activated.
If you are sure that you want to permanently remove all stored
values, hold down the M-button (the device must have been
switched off beforehand) until «CL ALL» appears and then
release the button. To permanently clear the memory, press the
MAM button while «CL ALL» is flashing. Individual values
cannot be cleared.
5. Battery indicator and battery change
Low battery
When the batteries are approximately ¾ empty the battery symbol
AQ will flash as soon as the device is switched on (partly filled
battery displayed). Although the device will continue to measure
reliably, you should obtain replacement batteries.
Flat battery - replacement
When the batteries are flat, the battery symbol AQ will flash as soon
as the device is switched on (flat battery displayed). You cannot
take any further measurements and must replace the batteries.
1. Open the battery compartment 9 at the back of the device.
2. Replace the batteries – ensure correct polarity as shown by the
symbols in the compartment.
3. To set date and time, follow the procedure described in Section
«1. Using the device for the first time».
«CL» is displayed when the reading is deleted from the
memory successfully.
Range Systolic Diastolic Recommendation
1. blood pressure
too high
≥135 ≥85 Seek medical
advice
2. blood pressure
elevated
130 - 134 80 - 84 Self-check
3. blood pressure
normal
<130 <80 Self-check
Information for the doctor in case of repeated appearance of
the IHB symbol:
This device is an oscillometric blood pressure monitor that also
measures the pulse during blood pressure measurement and
indicates when the heart rate is irregular.
Blood pressure readings with suboptimal cuff fit AR-A are
not considered in the average value.
Pay attention that the maximum memory capacity of 99
memories is not exceeded. When the 99 memory is full,
the oldest value is automatically overwritten with the
100 value. Values should be evaluated by a doctor before
the memory capacity is reached – otherwise data will be
lost.
Cancel deletion: press ON/OFF button 1 while «CL
ALL» is flashing.

5Microlife BP B3 Comfort PC EN
Which batteries and which procedure?
Using rechargeable batteries
You can also operate this device using rechargeable batteries.
6. Using a mains adapter
You can operate this device using the Microlife mains adapter (DC
6V, 600 mA).
1. Plug the adapter cable into the mains adapter socket 7 in the
blood pressure monitor.
2. Plug the adapter plug into the wall socket.
When the mains adapter is connected, no battery current is
consumed.
7. PC-Link functions
This device can be used in conjunction with a personal computer
(PC) running the Microlife Blood Pressure Analyzer+ (BPA+) soft-
ware. The memory data can be transferred to the PC by
connecting the monitor via a cable.
If no download-voucher and cable is included download the BPA+
software from www.microlife.com/software and use a Micro-USB
cable.
8. Error Messages
If an error occurs during the measurement, the measurement is
interrupted and an error message, e.g. «Err 3», is displayed.
The memory retains all values although date and time must
be reset – the year number therefore flashes automatically
after the batteries are replaced.
Use 4 new, long-life 1.5 V, size AA alkaline batteries.
Do not use batteries beyond their date of expiry.
Remove batteries if the device is not going to be used for a
prolonged period.
Only use «NiMH» type reusable batteries.
Batteries must be removed and recharged when the flat
battery symbol appears. They should not remain inside the
device as they may become damaged (total discharge as a
result of low use of the device, even when switched off).
Always remove the rechargeable batteries if you do not
intend to use the device for a week or more.
Batteries cannot be charged in the blood pressure monitor.
Recharge batteries in an external charger and observe the
information regarding charging, care and durability.
Only use the Microlife mains adapter available as an orig-
inal accessory appropriate for your supply voltage.
Ensure that neither the mains adapter nor the cable are
damaged.
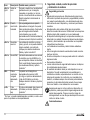
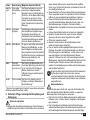
Error Description Potential cause and remedy
«Err 1»
AS
Signal too
weak
The pulse signals on the cuff are too
weak. Re-position the cuff and repeat
the measurement.*
«Err 2»
AR-B
Error signal During the measurement, error signals
were detected by the cuff, caused for
instance by movement or muscle
tension. Repeat the measurement,
keeping your arm still.
«Err 3»
AR-C
Abnormal
cuff pressure
An adequate pressure cannot be
generated in the cuff. A leak may have
occurred. Check that the cuff is
correctly connected and is not too
loose. Replace the batteries if neces-
sary. Repeat the measurement.
«Err 5» Abnormal
result
The measuring signals are inaccurate
and no result can therefore be
displayed. Read through the checklist
for taking a reliable measurement and
then repeat the measurement.*
«Err 6» MAM Mode There were too many errors during the
measurement in MAM mode, making it
impossible to obtain a final result. Read
through the checklist for taking a reli-
able measurement and then repeat the
measurement.*
«HI» Pulse or cuff
pressure too
high
The pressure in the cuff is too high
(over 299 mmHg) OR the pulse is too
high (over 200 beats per minute).
Relax for 5 minutes and repeat the
measurement.*

6
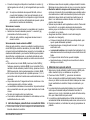
* Please immediately consult your doctor, if this or any other
problem occurs repeatedly.
9. Safety, care, accuracy test and disposal
Follow instructions for use. This document provides important
product operation and safety information regarding this device.
Please read this document thoroughly before using the device
and keep for future reference.
This device may only be used for the purposes described in
these instructions. The manufacturer cannot be held liable for
damage caused by incorrect application.
This device comprises sensitive components and must be
treated with caution. Observe the storage and operating condi-
tions described in the «Technical Specifications» section.
The cuffs are sensitive and must be handled with care.
Only pump up the cuff once fitted.
Do not use this device if you think it is damaged or notice
anything unusual.
Never open this device.
Read the additional safety information provided within the indi-
vidual sections of this instruction manual.
The measurement results given by this device is not a diag-
nosis. It is not replacing the need for the consultation of a physi-
cian, especially if not matching the patient’s symptoms. Do not
rely on the measurement result only, always consider other
potentially occurring symptoms and the patient’s feedback.
Calling a doctor or an ambulance is advised if needed.
Do not use this device if the patient’s condition meets the following
contra-indications, to avoid inaccurate measurements or injuries.
The device is not intended for measuring blood pressure in
pediatric patients of age younger than 12 years old (children,
infant, or neonates).
Presence of significant cardiac arrhythmia during measurement
may interfere with blood pressure measurement and affect the
reliability of blood pressure readings. Consult with your doctor
about whether the device is suitable for use in this case.
The device measures blood pressure using a pressured cuff. If
the measuring limb suffers from injuries (for example open
wounds) or under conditions or treatments (for example intrave-
nous drip) making it unsuitable for surface contact or pressur-
ization, do not use the device, to avoid worsening of the injuries
or conditions.
Patient motions during measurement may interfere with the
measurement process and influence results.
Avoid taking measurements of patients with conditions,
diseases, and susceptible to environment conditions that lead
to incontrollable motions (e.g. trembling or shivering) and
inability to communicate clearly (for example children and
unconscious patients).
The device uses oscillometric method to determine blood pres-
sure. The arm being measure should have normal perfusion.
The device is not intended to be used on a limb with restricted
or impaired blood circulation. If you suffer with perfusion or
blood disorders, consult your doctor before using the device.
Avoid taking measurement on the arm on the side of a mastec-
tomy or lymph node clearance.
Do not use this device in a moving vehicle (for example in a car
or on an aircraft).
Indicates a potentially hazardous situation, which if not avoided,
could result in death or serious injury.
This device may only be used for the intended uses described
in this Instructions for Use. The manufacturer cannot be held
liable for damage caused by incorrect application.
Do not change the patient medication and treatment based the
result of one or multiple measurements. Treatment and medica-
tion changes should be prescribed only by a medical profes-
sional.
«LO» Pulse too low The pulse is too low (less than 40 beats
per minute). Repeat the measure-
ment.*
Safety and protection
Ensure that children do not use this device unsupervised;
some parts are small enough to be swallowed. Be aware of
the risk of strangulation in case this device is supplied with
cables or tubes.
Contra-indications
Error Description Potential cause and remedy
WARNING

7Microlife BP B3 Comfort PC EN
Inspect the device, cuff, and other parts for damage. DO NOT
USE the device, cuff or parts if they appear damaged or oper-
ating abnormally.
Blood flow of the arm is temporarily interrupted during measure-
ment. Extended interruption of blood flow reduces peripheral circu-
lation and may cause tissue injury. Beware of signs (for example
tissue discoloration) of impeded peripheral circulation if taking
measurements continuously or for an extended period of time.
Prolonged exposure to cuff pressure will reduce peripheral
perfusion and may lead to injury. Avoid situations of extended
cuff pressurization beyond normal measurements. In the case
of abnormally long pressurization, abort the measurement or
loose the cuff to depressurize the cuff.
Do not use this device in oxygen rich environment or near flam-
mable gas.
The device is not water resistant or water proof. Do not spill or
immerse the device in water or other liquids.
Do not dissemble or attempt to service the device, accessory
and parts, during use or in storage. Access to the device
internal hardware and software is prohibited. Unauthorized
access and servicing of the device, during use or in storage,
may compromise the safety and performance of the device.
Keep the device away from children and people incapable of
operating the device. Beware of the risks of accidental ingestion
of small parts and of strangulation with the cables and tubes of
this device and accessories.
Indicates a potentially hazardous situation which, if not avoided,
may result in minor or moderate injury to the user or patient, or
cause damage to the device or other property.
The device is intended only for measuring blood pressure at
upper arm. Do not measure other sites because the reading
does not reflect your blood pressure accurately.
After a measurement is completed, loosen the cuff and rest for
> 5 minutes to restore limb perfusion, before taking another
measurement.
Do not use this device with other medical electrical (ME) equip-
ment simultaneously. This may cause device malfunction or
measurement inaccuracies.
Do not use this device in proximity of high frequency (HF)
surgical equipment, magnetic resonance imaging (MRI) equip-
ment, and computerized tomography (CT) scanners. This may
cause device malfunction and measurement inaccuracies.
Use and store the device, cuff and parts in temperature and
humidity conditions specified in the «Technical Specifications».
Usage and storage of the device, cuff and parts in conditions
outside ranges given in the «Technical Specifications» may
results in device malfunction and the safety of usage.
Protect the device and accessories from the following to avoid
damaging the device:
water, other liquids, and moisture
extreme temperatures
impacts and vibrations
direct sunlight
contamination and dust
This device has 2 user settings. Please ensure it is cleaned and
disinfected between users to prevent any cross contamination.
Stop using this device and cuff and consult with your doctor if
you experience skin irritation or discomfort.
Electromagnetic Compatibility Information
This device is compliant with EN60601-1-2: 2015 Electromagnetic
Disturbances standard.
This device is not certified to be used in vicinity of High Frequency
(HF) medical equipment.
Do not use this device close to strong electromagnetic fields and
portable radio frequency communication devices (for example
microwave oven and mobile devices). Keep a minimum distance
of 0.3 m from such devices when using this device.
Device care
Clean the device only with a soft, dry cloth.
Cleaning the cuff
The cuff delivered with this device is washable.
1. Remove the cuff connector AK from the cuff tube AL and care-
fully pull the bladder through the opening at the edge of the cuff
cover.
2. Hand wash the cuff cover in soapsuds: not hotter than 30 °C.
3. Completely dry the cuff cover by linen drying.
4. Loop the cuff tube back through its opening and carefully place
the bladder flat in the cuff cover.
5. Reattach the cuff connector on the cuff tube.
CAUTION
The bladder must lay straight in the cuff cover, not folded.

8
Accuracy test
We recommend this device is tested for accuracy every 2 years or
after mechanical impact (e.g. being dropped). Please contact your
local Microlife-Service to arrange the test (see foreword).
Disposal
10.Guarantee
This device is covered by a 5 year guarantee from the date of
purchase. During this guarantee period, at our discretion, Microlife
will repair or replace the defective product free of charge.
Opening or altering the device invalidates the guarantee.
The following items are excluded from the guarantee:
Transport costs and risks of transport.
Damage caused by incorrect application or non-compliance
with the instructions for use.
Damage caused by leaking batteries.
Damage caused by accident or misuse.
Packaging/storage material and instructions for use.
Regular checks and maintenance (calibration).
Accessories and wearing parts: Batteries, power adapter
(optional).
The cuff is covered by a functional guarantee (bladder tightness)
for 2 years.
Should guarantee service be required, please contact the dealer
from where the product was purchased, or your local Microlife
service. You may contact your local Microlife service through our
website: www.microlife.com/support
Compensation is limited to the value of the product. The guarantee
will be granted if the complete product is returned with the original
invoice. Repair or replacement within guarantee does not prolong
or renew the guarantee period. The legal claims and rights of
consumers are not limited by this guarantee.
11.Technical Specifications
This device complies with the requirements of the Medical Device
Directive 93/42/EEC.
Technical alterations reserved.
Do not use fabric softener.
WARNING: Do not wash the cuff in a washing machine or
dishwasher!
WARNING: Do not dry the cuff cover in a tumble dryer!
WARNING: Under no circumstances may you wash the
inner bladder!
Batteries and electronic devices must be disposed of in
accordance with the locally applicable regulations, not with
domestic waste.
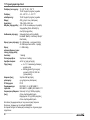
Operating
conditions:
10 - 40 °C / 50 - 104 °F
15 - 90 % relative maximum humidity
Storage conditions: -20 - +55 °C / -4 - +131 °F
15 - 90 % relative maximum humidity
Weight: 402 g (including batteries)
Dimensions: 138 x 94.5 x 62.5 mm
Cuff size: from 17 - 52 cm according to the cuff
sizes (see «Selecting the correct cuff»)
Measuring
procedure:
oscillometric, corresponding to Korotkoff
method: Phase I systolic, Phase V
diastolic
Measurement range: 20 - 280 mmHg – blood pressure
40-199 beats per minute – pulse
Cuff pressure
display range:
0 - 299 mmHg
Resolution: 1 mmHg
Static accuracy: within ± 3 mmHg
Pulse accuracy: ± 5 % of the readout value
Voltage source: 4 x 1.5 V alkaline batteries; size AA
Mains adapter DC 6V, 600 mA
(optional)
Battery lifetime: approx. 580 measurements
(using new batteries)
IP Class: IP 20
Reference to
standards:
EN 1060-1 /-3 /-4; IEC 60601-1;
IEC 60601-1-2 (EMC); IEC 60601-1-11
Expected service life: Device: 5 years or 10000 measurements,
whichever comes first
Accessories: 2 years or 5000 measure-
ments, whichever comes first

9Microlife BP B3 Comfort PC ES
Pantalla
Uso previsto:
Este monitor de presión arterial oscilométrico está diseñado para
medir la presión arterial no invasiva en personas de 12 años o
más.
Estimado cliente,
Este dispositivo ha sido desarrollado en colaboración con médicos
y su muy alta precisión ha sido probada en ensayos clínicos.*
Microlife BP B3 Comfort PC ES
1Botón ON/OFF (Encendido/Apagado)
2Pantalla
3Botón M (Memoria)
4Botón MAM
8Botón de usuario
6Enchufe para manguito
7Enchufe para adaptador de corriente
8Puerto USB
9Compartimento de baterías
AT Brazalete
AK Conector del manguito
AL Tubo de brazalete
AM Valor sistólico
AN Valor diastólico
AO Frecuencia del pulso
AP Modo MAM
AQ Indicador de batería
AR Control de ajuste del brazalete
-A: Ajuste subóptimo del brazalete
-B: Indicador de movimiento del brazo «Err 2»
-C:Comprobación de la presión del brazalete «Err 3»
AS Indicador de señal del brazalete «Err 1»
BT Símbolo de latidos irregulares (IHB)
BK Tiempo de intervalo MAM
BL Indicador de semáforo
BM Indicador del pulso
BN Indicador de usuario
BO Valor guardado
BP Fecha/Hora
Antes de utilizar el dispositivo lea estas
instrucciones de uso, ya que contienen
información importante. Siga las instruc-
ciones por su seguridad y consérvelas para
poder consultarlas en el futuro.
Pieza aplicada tipo BF
Mantener en lugar seco
Fabricante
Las baterías y los dispositivos electrónicos
se deben eliminar según indique la norma-
tiva local pertinente y no se deben
desechar junto con la basura doméstica.
Representante autorizado en la Comu-
nidad Europea
Número de referencia
Número de serie(AAAA-MM-DD-SSSSS;
año-mes-día-número de serie)
Precaución
Limitación de humedad
Limitación de temperatura
Dispositivo médico
Mantenga el dispositivo fuera del alcance
de los niños de 0 a 3 años de edad.
Marca de conformidad CE
S
NN

10
Si tiene cualquier pregunta o problema o si desea pedir piezas de
recambio, no dude en contactar con su servicio de atención al
cliente de Microlife local. Su distribuidor o farmacia podrá indicarle
la dirección del distribuidor de Microlife en su país. También puede
visitarnos en Internet en www.microlife.com donde encontrará
información útil sobre nuestros productos.
¡Cuide su salud con Microlife AG!
* Este dispositivo ha sido clínicamente validado de acuerdo a la
Sociedad Europea de hipertensión ESH y ISO81060-2:2013.
Índice
1. Uso del dispositivo por primera vez
Colocar las baterías
Ajuste de fecha y hora
Elegir el manguito correcto
Seleccionar el usuario
Seleccionando el modo estándar o MAM
2. Lista de chequeo para efectuar una medición fiable
3. Medición de la presión arterial
Procedimiento para no guardar la lectura
¿Cómo he de evaluar mi presión arterial?
Apariencia del símbolo de latidos irregulares (IHB)
4. Memoria de datos
Ver los valores guardados
Borrar todos los valores
5. Indicador de baterías y cambio de baterías
Baterías con poca carga
Baterías descargadas – cambio
¿Qué baterías y qué procedimiento?
Uso de baterías recargables
6. Uso de un adaptador de corriente
7. Funciones de conexión con el PC
8. Mensajes de error
9. Seguridad, cuidado, control de precisión y eliminación de
residuos
Cuidado del dispositivo
Limpieza del brazalete
Control de precisión
Eliminación de residuos
10. Garantía
11. Especificaciones técnicas
1. Uso del dispositivo por primera vez
Colocar las baterías
Después de desembalar el dispositivo, en primer lugar, inserte las
baterías. El compartimento de las baterías 9 está en la parte infe-
rior del dispositivo. Inserte las baterías (4 x 1,5 V, tamaño AA) de
acuerdo con las marcas de polaridad indicadas.
Ajuste de fecha y hora
1. Una vez activadas las baterías, el número del año parpadea en
la pantalla. Ajuste el año pulsando el botón M 3. Para confir-
marlo y ajustar a continuación el mes, pulse el botón MAM 4.
2. Ahora puede ajustar el mes usando el botón M. Pulse el botón
MAM para confirmar y, a continuación, ajuste el día.
3. Por favor, siga las instrucciones anteriores para ajustar el día,
la hora y los minutos.
4. Una vez que haya ajustado los minutos y pulsado el botón
MAM, la fecha y la hora quedan establecidas y se visualiza la
hora.
5. Si desea cambiar la fecha y la hora, pulse y mantenga pulsado
el botón MAM durante aprox. 3 segundos hasta que comience
a parpadear el número del año. Ahora, podrá introducir los
nuevos valores tal como se ha descrito anteriormente.
Elegir el manguito correcto
Microlife ofrece diferentes tamaños de manguitos. Elija el tamaño
de manguito adecuado según la circunferencia de su brazo
(medida de forma ajustada en el centro del brazo).
Contacte su servicio al cliente de Microlife local, si el manguito
AT incluido no es el adecuado para usted.
Tamaño de manguito para una circunferencia del brazo
S 17 - 22 cm
M 22 - 32 cm
M - L 22 - 42 cm
L 32 - 42 cm
L - XL 32 - 52 cm
Como opción existen manguitos preformados.
Use únicamente manguitos Microlife.

11Microlife BP B3 Comfort PC ES
Conecte el manguito al dispositivo insertando el conector AK
del manguito en el enchufe 6 del manguito hasta que no entre
más.
Seleccionar el usuario
Este dispositivo permite almacenar los resultados de 2 usuarios.
Seleccione el usuario deseado (usuario 1 o usuario 2 BN)
presionando el botón de usuario 5.
Seleccionando el modo estándar o MAM
Antes de cada medición, seleccione estándar (medición única) o
modo MAM (triple medición automática). En modo MAM, 3 medi-
ciones se toman automáticamente en sucesión y la el resultado se
analiza automáticamente y se muestra. Debido a que la presión
arterial fluctúa constantemente, un resultado obtenido de esta
manera es más confiable que cuando se realiza una única medi-
ción.
Para seleccionar el modo MAM, presione el botón MAM 4
hasta que aparezca el símbolo MAM AP en la pantalla. Para
cambiar al modo estándar (medición única), presione el botón
MAM nuevamente, hasta que desaparezca el símbolo MAM.
En la parte inferior izquierda de la pantalla aparecen 1, 2 o 3
para indicar cuál de las 3 mediciones se está realizando en ese
momento.
Hay un descanso de 15 segundos entre las mediciones. Una
cuenta regresiva indica el tiempo restante.
Los resultados individuales no se visualizan. Su presión arterial
sólo se visualizará una vez que se hayan efectuado las 3 medi-
ciones.
No retire el manguito entre las mediciones.
Si una de las mediciones individuales ha sido dudosa, se toma
automáticamente una cuarta.
2. Lista de chequeo para efectuar una medición fiable
Evite comer o fumar, así como cualquier otra actividad inmedia-
tamente antes de la medición.
Siéntese en una silla con respaldo y relájese durante 5 minutos.
Mantenga los pies planos sobre el piso y no cruce las piernas.
Efectúe la medición siempre en el mismo brazo (normal-
mente en el izquierdo). Es recomendable que su médico realice
dos mediciones en cada brazo durante la primera visita para
determinar de qué brazo se tomarán las mediciones en el
futuro. Las mediciones se deben efectuar en el brazo con
presión arterial más alta.
Quítese las prendas de vestir ajustadas a su brazo. Para evitar
la constricción, no se deben arremangar las mangas de
camisa, ya que no interfieren con el manguito si se encuentran
en contacto con el brazo.
Asegúrese de utilizar el tamaño correcto del manguito
(marcado en el manguito).
Coloque el manguito de tal forma que esté ajustado, pero
que no quede demasiado apretado.
Asegúrese de que el manguito esté colocado 1-2 cm por
encima del codo.
La marca de la arteria en el manguito (barra larga de 3 cm)
debe descansar sobre la arteria que va en el lado interior del
brazo.
Coloque el brazo de tal forma que esté relajado.
Asegúrese de que el manguito se encuentre a la misma
altura que su corazón.
3. Medición de la presión arterial
1. Seleccione el modo estándar (medición única) o MAM (auto-
mático medición triple): ver detalles en el capítulo 1.».
2. Presione el botón ON/OFF 1 para iniciar la medición.
3. Ahora, el manguito se inflará automáticamente. Relájese, no se
mueva y no tense los músculos del brazo hasta que se visua-
lice el resultado de la medición. Respire normalmente y no
hable.
4. La comprobación de ajuste del brazalete AR en la pantalla
indica que el brazalete está perfectamente colocado. Si
aparece el icono AR-A, el brazalete se ajusta de forma subóp-
tima, pero todavía está bien para medir.
5. La medición es efectuada durante el inflado del brazalete. La
velocidad del inflado del brazalete puede variar, esto es normal.
6. Durante la medición, el indicador de pulso BM parpadea en la
pantalla.
Si compra un brazalete de repuesto Microlife, retire el
conector del brazalete AK del tubo del brazalete AL del
brazalete suministrado con el dispositivo original e inserte
este conector en el tubo del brazalete de repuesto (válido
para todos los tamaños de brazaletes).
Antes de cada medición, asegúrese de seleccionar el
usuario correcto.

12
7. Se visualiza el resultado compuesto por la presión arterial sistó-
lica AM, diastólica AN, y la frecuencia del pulso AO. Tenga en
cuenta también las explicaciones de otras indicaciones en este
manual.
8. Retire el manguito cuando la medición haya terminado.
9. Desconecte el dispositivo. (El tensiómetro se apaga automáti-
camente al cabo de aprox. 1 min).
Procedimiento para no guardar la lectura
Tan pronto como se muestre la lectura, mantenga presionado el
botón de ON/OFF 1 hasta que parpadee «M» BO. Confirme para
eliminar la lectura presionando el botón MAM 4.
¿Cómo he de evaluar mi presión arterial?
El triángulo en el lado izquierdo de la pantalla BL indica dentro
dequé rango se encuentra la presión arterial medida. El valor está
dentro del óptimo (verde), elevado (amarillo) o rango alto (rojo). La
clasificación corresponde a la siguiente rangos definidos por las
directrices internacionales (ESH, ESC, JSH). Datos en mmHg.
El valor superior es el que determina la evaluación. Ejemplo: un
valor de la presión arterial de 140/80 mm Hg o 130/90 mm Hg
indica «presión arterial demasiado alta».
Apariencia del símbolo de latidos irregulares (IHB)
Este símbolo AN indica que se detectó un latido cardíaco irregular.
En este caso, la presión arterial medida puede diferir de sus
valores reales de presión arterial. Se recomienda repetir la medi-
ción.
4. Memoria de datos
Este dispositivo almacena automáticamente hasta 99 mediciones
por cada usuario.
Seleccione el usuario 1 o 2 presionando el botón de usuario 5.
Ver los valores guardados
Presione brevemente el botón M 3 cuando el dispositivo esté
apagado. En la pantalla aparecerá «M» BO y «A», cual representa
el promedio de todos los valores almacenados.
Al volver a pulsar el botón M se vuelve a visualizar el valor anterior.
Pulsando el botón M repetidamente se puede cambiar de un valor
guardado a otro.
Borrar todos los valores
Asegúrese que el usuario correcto está activado.
Si está seguro de que desea eliminar permanentemente todos los
valores almacenados, mantenga presionado el botón M (el dispo-
sitivo debe haberse apagado previamente) hasta que aparezca
«CL ALL» y luego suelte el botón. Para borrar la memoria de
forma permanente, presione el botón de tiempo mientras
parpadea «CL ALL». Los valores individuales no se pueden
borrar.
La medición se puede detener en cualquier momento
presionando el botón ON/OFF (p. ej., si no se encuentra
bien o en caso de tener una sensación de presión desa-
gradable).
«CL» se muestra cuando la lectura se elimina de la
memoria con éxito.
Nivel Sistólico Diastólico Recomendación
1. presión arterial
demasiado alta
≥135 ≥85 Acudir al médico
2. presión arterial
elevada
130 - 134 80 - 84 Autocontrol
3. presión arterial
normal
<130 <80 Autocontrol
Información para su doctor en caso de aparición
repetida del símbolo IHB
Este dispositivo es un monitor oscilométrico de presión arterial
que también mide el pulso durante la medición de la presión
arterial e indica cuándo el ritmo cardiaco es irregular.
Las lecturas de presión arterial con ajuste de manguito
subóptimo AR-A no se consideran en el valor promedio.
Tenga cuidado de no exceder la capacidad máxima de la
memoria que es de 99 valores. Cuando la memoria está
llena, el valor más antiguo es reemplazado por el valor
número 100. Los valores deberán ser evaluados por un
médico antes de alcanzar la capacidad máxima de la
memoria; en caso contrario, se perderán los datos.
Cancelar eliminación: presione el botón ON/OFF 1
mientras «CL ALL» está parpadeando.

13Microlife BP B3 Comfort PC ES
5. Indicador de baterías y cambio de baterías
Baterías con poca carga
Cuando las baterías están gastadas aproximadamente ¾, el
símbolo de baterías AQ parpadea al momento de encender el
dispositivo (se visualiza una batería parcialmente cargada).
Aunque el dispositivo seguirá midiendo de manera fiable, tenga a
mano baterías de recambio.
Baterías descargadas – cambio
Cuando las baterías están gastadas, el símbolo de baterías AQ
parpadea al momento de encender el dispositivo (se visualiza una
batería descargada). Ya no se puede realizar ninguna medición y
es preciso cambiar las baterías.
1. Abra el compartimento de baterías 9 situado en la parte
posterior del dispositivo.
2. Sustituya las baterías; asegúrese de que la polaridad sea la
correcta, tal como lo indican los signos en el compartimiento.
3. Para ajustar la fecha y la hora, siga el procedimiento descrito
en el Apartado «1. Uso del dispositivo por primera vez».
¿Qué baterías y qué procedimiento?
Uso de baterías recargables
Este dispositivo también se puede usar con baterías recargables.
6. Uso de un adaptador de corriente
Este dispositivo se puede hacer funcionar utilizando el adaptador
de corriente de Microlife (DC 6V, 600 mA).
1. Inserte el cable del adaptador en el enchufe para el adaptador
de corriente 7 situado en el dispositivo.
2. Inserte la clavija del adaptador en una caja de enchufe.
Mientras esté conectado el adaptador de corriente, no se
consume corriente de las baterías.
7. Funciones de conexión con el PC
Este dispositivo se puede utilizar junto con un ordenador personal
(PC) con el software Microlife Blood Pressure Analyzer+ (BPA+).
Los datos almacenados se pueden transferir al PC conectando el
tensiómetro al PC mediante un cable.
Si no se incluye el cupón de descarga ni el cable, descargue el
BPA software de www.microlife.com/software y use un cable
Micro-USB.
8. Mensajes de error
Si se produce un error durante la medición, esta se interrumpe y
se visualiza un mensaje de error, p. ej., «Err 3».
La memoria retiene todos los valores, aunque haya que
resetear la fecha y la hora; para este fin, el número del año
parpadea automáticamente después de cambiar las
baterías.
Utilice 4 baterías alcalinas nuevas de tamaño AA, de 1,5 V,
de larga duración.
No utilice baterías caducadas.
Si no va a usar el dispositivo durante un período prolon-
gado, extraiga las baterías.
Utilice únicamente baterías reutilizables del tipo «NiMH».
Las baterías se deben extraer y recargar, cuando aparezca
el símbolo de batería (batería descargada). No deben
permanecer en el interior del dispositivo, ya que se pueden
dañar (descarga total como resultado de un uso poco
frecuente del dispositivo, incluso estando apagado).
Retire siempre las baterías recargables si no va a usar el
dispositivo en una semana o más.
¡Las baterías NO se pueden recargar dentro del
tensiómetro! Recargue las baterías en un cargador externo
y observe la información relativa a la recarga, el cuidado y
a la duración.
Utilice únicamente el adaptador de corriente de Microlife
disponible como accesorio original, apropiado para su
voltaje de alimentación.
Asegúrese de que no estén dañados ni el adaptador
ni el cable.
Error Descripción Posible causa y solución
«Err 1»
AS
Señal
demasiado
débil
Las señales del pulso en el manguito
son demasiado débiles. Vuelva a
colocar el manguito y repita la
medición.*

14
* Por favor, consulte inmediatamente a su médico, si este o cual-
quier otro problema ocurre repetidamente.
9. Seguridad, cuidado, control de precisión
y eliminación de residuos
Siga las instrucciones de uso. Este documento proporciona
información importante de operación y seguridad del producto
con respecto a este dispositivo. Lea atentamente este docu-
mento antes de usar el dispositivo y consérvelo para futuras
consultas.
Este dispositivo sólo se debe utilizar para los propósitos
descritos en estas instrucciones. El fabricante no se responsa-
biliza de ningún daño causado por un uso inadecuado.
El dispositivo está integrado por componentes sensibles y se
debe tratar con cuidado. Respete las indicaciones de almace-
namiento y funcionamiento que se describen en el apartado
«Especificaciones técnicas».
Los brazaletes son sensibles y deben tratarse cuidadosa-
mente.
Infle el manguito únicamente cuando está colocado correcta-
mente en el brazo.
No utilice el dispositivo si cree que puede estar roto o detecta
alguna anomalía.
Nunca abra el dispositivo.
Lea las instrucciones de seguridad adicionales en los disposi-
tivos individuales de este manual.
El resultado de medición dado por este dispositivo no es un
diagnóstico. No está reemplazando la necesidad para la
consulta de un médico, especialmente si no coincide con los
síntomas del paciente. No confíe sólo en el resultado de la
medición, considere siempre otros síntomas potencialmente
presentes y la retroalimentación del paciente. Se aconseja
llamar a un médico o una ambulancia si es necesario.
«Err 2»
AR-B
Señal de
error
Durante la medición se han detectado
señales de error por el manguito,
causadas, por ejemplo, por el movi-
miento o la contracción de un músculo.
Repita la medición manteniendo el
brazo quieto.
«Err 3»
AR-C
Presión
anormal de
brazalete
No se puede generar una presión
adecuada en el manguito. Se puede
haber producido una fuga. Compruebe
que el manguito esté conectado
correctamente y que no esté
demasiado suelto. Cambie las baterías
si fuese necesario. Repita la medición.
«Err 5» Resultado
anormal
Las señales de medición son impre-
cisas y, por ello, no se puede visualizar
ningún resultado. Lea la lista de
chequeo para efectuar mediciones
fiables y repita la medición.*
«Err 6» Modo MAM Ha habido demasiados errores durante
la medición en el modo MAM, por lo
que es imposible obtener un resultado
final. Lea la lista de chequeo para efec-
tuar mediciones fiables y repita la
medición.*
«HI» Pulso o
presión de
manguito
demasiado
alto
La presión en el manguito es
demasiado alta (superior a 299
mm Hg) o el pulso es demasiado alto
(más de 200 latidos por minuto).
Relájese durante 5 minutos y repita la
medición.*
«LO» Pulso
demasiado
bajo
El pulso es demasiado bajo (menos de
40 latidos por minuto). Repita la
medición.*
Error Descripción Posible causa y solución
Seguridad y protección
Asegúrese de que los niños no utilicen el dispositivo sin
supervisión, puesto que podrían tragarse algunas de las
piezas más pequeñas. Tenga en cuenta el riesgo de
estrangulamiento en caso de que este dispositivo se sumi-
nistre con cables o tubos.
Contraindicaciones

15Microlife BP B3 Comfort PC ES
A fin de evitar mediciones imprecisas o lesiones, no utilice este
dispositivo si el estado del paciente coincide con las contraindica-
ciones siguientes.
El dispositivo no está indicado para tomar la presión de
pacientes pediátricos de menos de 12 años de edad (niños,
niños pequeños o neonatos).
La presencia de una arritmia cardiaca elevada durante el
proceso puede interferir en la medición de la presión arterial y
afectar a la fiabilidad de los resultados. Consulte a su médico
si puede utilizar el dispositivo en este caso.
El dispositivo mide la presión arterial mediante un manguito de
presión. Si el miembro donde se va a tomar la presión presenta
una lesión (por ejemplo heridas abiertas), alteraciones o está
sometido a tratamiento (por ejemplo con una vía intravenosa)
que desaconsejen el contacto de superficie o la presurización,
no utilice el dispositivo para evitar que empeoren las lesiones o
la situación.
Los movimientos del paciente durante la medición pueden
interferir en el proceso e influir en los resultados.
Evite tomar la presión a pacientes cuyo estado, enfermedad o
susceptibilidad a las condiciones del entorno den lugar a movi-
mientos incontrolados (por ejemplo temblores o estremeci-
mientos) y sean incapaces de comunicarse con claridad (por
ejemplo niños y pacientes inconscientes).
El dispositivo utiliza el método oscilométrico para determinar la
presión arterial. El brazo en el que se está tomando la presión
debe tener una perfusión normal. El dispositivo no se debe
utilizar en extremidades con la circulación sanguínea limitada o
afectada. Si padece perfusión o trastornos sanguíneos,
consulte al médico antes de utilizar el dispositivo.
Evite tomar la presión en el brazo que esté en el lado de una
mastectomía o una extirpación de ganglio linfático.
No utilice el dispositivo en un vehículo en movimiento (por
ejemplo un coche o un avión).
Indica una situación potencialmente peligrosa que si no se evita
podría ocasionar la muerte o lesiones graves.
Este dispositivo solo se puede destinar a los usos que se
describen en este manual de instrucciones. El fabricante no
será responsable de los daños provocados por el uso inco-
rrecto.
No cambie la medicación ni el tratamiento del paciente basán-
dose en el resultado de una o múltiples mediciones. Los
cambios de tratamiento y de medicación solo los puede pres-
cribir un profesional médico.
Revise el dispositivo, el manguito y los demás componentes
para detectar posibles daños. NO UTILICE el dispositivo, el
manguito o los componentes si están dañados o no funcionan
con normalidad.
El flujo sanguíneo del brazo se detiene temporalmente durante
la medición. Si la interrupción del flujo sanguíneo se alarga la
circulación periférica se reduce, lo que puede causar lesiones
en los tejidos. Esté pendiente de los signos de obstrucción de
la circulación periférica (por ejemplo el cambio de color de los
tejidos) si toma la presión de forma continuada o durante un
largo periodo de tiempo.
La exposición prolongada a la presión del manguito reducirá la
perfusión periférica y puede dar lugar a lesiones. Evite
prolongar la presurización del manguito más allá del tiempo de
medición normal. En caso de presurización anormalmente
larga interrumpa la medición o afloje el manguito para que baje
la presión.
No utilice el dispositivo en un entorno rico en oxígeno o cerca
de gases inflamables.
El dispositivo no es resistente al agua. No salpique ni sumerja
el dispositivo en agua u otros líquidos.
No desmonte o intente reparar el dispositivo, los accesorios y
los componentes cuando esté en uso o guardado. Se prohíbe
acceder al hardware y el software internos del dispositivo. El
acceso y la reparación no autorizados del dispositivo cuando
está en uso o guardado pueden poner en riesgo la seguridad y
el buen funcionamiento del mismo.
Mantenga el dispositivo fuera del alcance de los niños y las
personas que no sean capaces de utilizarlo. No olvide que con
este dispositivo y sus accesorios existe riesgo de ingestión
accidental por las piezas pequeñas y de estrangulamiento por
los cables y tubos.
Indica una situación potencialmente peligrosa que si no se evita
podría ocasionar lesiones leves o moderadas al usuario o
paciente o bien daños al dispositivo u otros objetos.
ADVERTENCIA
PRECAUCIÓN

16
El dispositivo está destinado únicamente a la toma de la
presión sanguínea en el brazo. No mida la presión arterial en
otros sitios porque la lectura no sería precisa.
Una vez realizada la medición afloje el manguito y espere > 5
minutos a que se restablezca la perfusión del brazo antes de
realizar una nueva medición.
No utilice este dispositivo y otros dispositivos médicos (DM)
eléctricos a la vez, ya que podría provocar anomalías en el
dispositivo o mediciones imprecisas.
No utilice el dispositivo cerca de equipos quirúrgicos de alta
frecuencia (AF), dispositivos de resonancia magnética (RM) y
escáneres de tomografía computarizada (TC) porque podría
provocar anomalías en el dispositivo o mediciones imprecisas.
Utilice y guarde el dispositivo, el manguito y los componentes
en las condiciones de temperatura y humedad indicadas en las
«Especificaciones técnicas». Si el dispositivo, el manguito y los
demás componentes se utilizan o guardan en condiciones
distintas de las «Especificaciones técnicas» podrían producirse
anomalías en el funcionamiento y riesgos para la seguridad.
Proteja el dispositivo y los accesorios de lo siguiente para evitar
que se dañen:
agua, otros líquidos y humedad
Temperaturas extremas.
impactos y vibraciones
Luz directa del sol.
Contaminación y polvo.
Este dispositivo ofrece 2 configuraciones de usuario.
Compruebe que se ha limpiado y desinfectado después de
cada uso para evitar la contaminación cruzada entre usuarios.
Deje de utilizar el dispositivo y el manguito y consulte a su
médico si experimenta irritación cutánea o molestias.
Información de compatibilidad electromagnética
Este dispositivo cumple con la norma EN 60601-1-2: 2015 sobre
perturbaciones electromagnéticas.
Este dispositivo no está certificado para utilizarse cerca de
aparatos médicos de alta frecuencia (AF).
No utilice el dispositivo cerca de campos electromagnéticos
fuertes y equipos de comunicación por radio portátiles (por
ejemplo hornos microondas o dispositivos móviles). Mantenga
una distancia mínima de 0.3 m respecto a esos aparatos cuando
utilice el dispositivo.
Cuidado del dispositivo
Limpie el dispositivo únicamente con un paño suave y seco.
Limpieza del brazalete
El brazalete entregado con este dispositivo es lavable.
1. Retire el conector del brazalete AK del tubo del brazalete AT y
tire con cuidado de la vejiga a través de la abertura en el borde
de la tapa del brazalete.
2. Lave la cubierta del brazalete a mano en jabones: no más
caliente que 30 °C.
3. Secar completamente la tapa del brazalete secando la ropa.
4. Coloque el tubo del brazalete a través de su abertura y coloque
con cuidado la vejiga en la cubierta del brazalete.
5. Vuelva a colocar el conector del brazalete en el tubo del braza-
lete.
Control de precisión
Recomendamos someter este dispositivo a un control de precisión
cada 2 años o después de un impacto mecánico (p. ej., si se ha
caído). Por favor, contacte su servicio al cliente Microlife local para
concertar la revisión (ver introducción).
Eliminación de residuos
10.Garantía
Este dispositivo tiene una garantía de 5 años a partir de la fecha
de compra. Durante este período de garantía, a nuestra discre-
ción, Microlife reparará o reemplazará el producto defectuoso de
forma gratuita.
La garantía no será válida si abre o manipula el dispositivo.
La vejiga debe quedar recta en la funda del brazalete, no
doblada.
No utilizar suavizante.
ATENCIÓN: ¡No lave el brazalete en la lavadora!
ATENCIÓN: ¡No seque la cubierta del brazalete en una
secadora!
ATENCIÓN: ¡No debe lavarse, en ningún caso, la cámara
de aire localizada en el interior!
Las baterías y los dispositivos electrónicos se deben elim-
inar según indique la normativa local pertinente y no se
deben desechar junto con la basura doméstica.

17Microlife BP B3 Comfort PC ES
Los siguientes artículos están excluidos de la garantía:
Costos de transporte y riesgos del transporte.
Daños causados por la aplicación incorrecta o el incumpli-
miento de las instrucciones de uso.
Daño causado por fugas de baterías.
Daño causado por accidente o mal uso.
Material de embalaje / almacenamiento e instrucciones de uso.
Comprobaciones periódicas y mantenimiento (calibración).
Accesorios y piezas de desgaste: Baterías, adaptador de
corriente (opcional).
El brazalete está cubierto por una garantía funcional (estan-
queidad de la vejiga) durante 2 años.
En caso de que se requiera un servicio de garantía, comuníquese
con el distribuidor donde adquirió el producto o con su servicio
local de Microlife. Puede ponerse en contacto con su servicio local
Microlife a través de nuestro sitio web: www.microlife.com/
support.
La compensación se limita al valor del producto. La garantía se
otorgará si el producto completo se devuelve con la factura
original. La reparación o el reemplazo dentro de la garantía no
prolonga ni renueva el período de garantía. Los reclamos y dere-
chos legales de los consumidores no están limitados por esta
garantía.
11.Especificaciones técnicas
Este dispositivo esta en conformidad con los requerimientos de la
Directiva 93/42/CEE relativa a productos sanitarios.
Reservado el derecho a realizar modificaciones técnicas.
Condiciones de
funcionamiento:
10 - 40 °C / 50 - 104 °F
15 - 90% de humedad relativa máxima
Condiciones de
almacenamiento:
-20 - +55 °C / -4 - +131 °F
15 - 90% de humedad relativa máxima
Peso: 402 g (incluyendo baterías)
Tamaño: 138 x 94.5 x 62.5 mm
Tamaño de brazalete: de 17 - 52 cm según los tamaños de
brazalete (ver «Elegir el manguito
correcto»)
Procedimiento de
medición:
oscilométrico, según el método Korotkoff:
Fase I sistólica, fase V diastólica
Nivel de medición: 20 - 280 mm Hg – presión arterial
40-199 latidos por minuto – pulso
Intervalo de
indicación de la
presión del
manguito:
0 - 299 mm Hg
Resolución: 1 mm Hg
Precisión estática: dentro de ± 3 mm Hg
Precisión del pulso: ± 5% del valor medido
Fuente de corriente: 4 baterías alcalinas 1,5 V; tamaño
AA
Adaptador de voltaje c.a. 6V,
600 mA (opcional)
Duración de la
batería:
aprox. 580 mediciones (usando baterías
nuevas)
Clase IP: IP 20
Referencia a los
estándares:
EN 1060-1 /-3 /-4; IEC 60601-1;
IEC 60601-1-2 (EMC); IEC 60601-1-11
Vida útil esperada: Dispositivo: 5 años o 10000 mediciones,
lo que ocurra primero.
Accesorios: 2 años o 5000 mediciones, lo
que ocurra primero.

18
Écran
Utilisation:
Ce tensiomètre oscillométrique est conçu pour mesurer la pres-
sion artérielle de manière non invasive chez les personnes âgées
de 12 ans et plus.
Microlife BP B3 Comfort PC FR
1Bouton ON/OFF (marche/arrêt)
2Écran
3Bouton M (mémoire)
4Bouton MAM
8Bouton utilisateur
6Prise pour brassard
7Prise pour adaptateur secteur
8Port USB
9Compartiment à piles
AT Brassard
AK Connecteur brassard
AL Tube de raccordement
AM Tension systolique
AN Tension diastolique
AO Fréquence des battements cardiaques
AP Mode MAM
AQ Indicateur d'état de charge des piles
AR Vérification de l'ajustement du brassard
-A: Ajustement du brassard non optimal
-B: Indicateur de mouvement «Err 2»
-C:Verifier la pression dans le brassard «Err 3»
AS Indicateur de signal de brassard «Err 1»
BT (IHB) symbole de rythme cardiaque irrégulier
BK Intervalle de temps MAM
BL Indicateur de classification de mesure
BM Indicateur de pouls
BN Indicateur utilisateur
BO Indicateur de mise en mémoire
BP Date/Heure
Lisez attentivement les informations impor-
tantes contenues dans le mode d’emploi
avant d’utiliser cet appareil. Pour votre
sécurité, suivez le mode d’emploi et
conservez-le pour toute consultation
ultérieure.
Partie appliquée du type BF
A conserver dans un endroit sec
Fabricant
Les piles et appareils électroniques doivent
être éliminés en conformité avec les
prescriptions locales, séparément des
ordures ménagères.
Représentant autorisé dans la
communauté européenne
Numéro de catalogue
Numéro de série
(AAAA-MM-JJ-SSSSS ;
année-mois-jour-numéro de série)
Attention
Limite d‘humidité
Limite de température
Dispositif médical
Tenir hors de portée des enfants de
0 à 3 ans
Marquage CE conforme
S
NN
A página está carregando ...
A página está carregando ...
A página está carregando ...
A página está carregando ...
A página está carregando ...
A página está carregando ...
A página está carregando ...
A página está carregando ...
A página está carregando ...
A página está carregando ...
A página está carregando ...
A página está carregando ...
A página está carregando ...
A página está carregando ...
A página está carregando ...
A página está carregando ...
A página está carregando ...
A página está carregando ...
A página está carregando ...
A página está carregando ...
A página está carregando ...
A página está carregando ...
A página está carregando ...
A página está carregando ...
A página está carregando ...
A página está carregando ...
A página está carregando ...
A página está carregando ...
A página está carregando ...
A página está carregando ...
A página está carregando ...
A página está carregando ...
A página está carregando ...
A página está carregando ...
A página está carregando ...
A página está carregando ...
A página está carregando ...
A página está carregando ...
A página está carregando ...
A página está carregando ...
A página está carregando ...
A página está carregando ...
A página está carregando ...
A página está carregando ...
A página está carregando ...
A página está carregando ...
A página está carregando ...
A página está carregando ...
A página está carregando ...
A página está carregando ...
A página está carregando ...
A página está carregando ...
A página está carregando ...
A página está carregando ...
A página está carregando ...
A página está carregando ...
A página está carregando ...
A página está carregando ...
A página está carregando ...
A página está carregando ...
A página está carregando ...
A página está carregando ...
A página está carregando ...
A página está carregando ...
A página está carregando ...
A página está carregando ...
A página está carregando ...
A página está carregando ...
A página está carregando ...
A página está carregando ...
A página está carregando ...
A página está carregando ...
A página está carregando ...
A página está carregando ...
A página está carregando ...
A página está carregando ...
A página está carregando ...
-
 1
1
-
 2
2
-
 3
3
-
 4
4
-
 5
5
-
 6
6
-
 7
7
-
 8
8
-
 9
9
-
 10
10
-
 11
11
-
 12
12
-
 13
13
-
 14
14
-
 15
15
-
 16
16
-
 17
17
-
 18
18
-
 19
19
-
 20
20
-
 21
21
-
 22
22
-
 23
23
-
 24
24
-
 25
25
-
 26
26
-
 27
27
-
 28
28
-
 29
29
-
 30
30
-
 31
31
-
 32
32
-
 33
33
-
 34
34
-
 35
35
-
 36
36
-
 37
37
-
 38
38
-
 39
39
-
 40
40
-
 41
41
-
 42
42
-
 43
43
-
 44
44
-
 45
45
-
 46
46
-
 47
47
-
 48
48
-
 49
49
-
 50
50
-
 51
51
-
 52
52
-
 53
53
-
 54
54
-
 55
55
-
 56
56
-
 57
57
-
 58
58
-
 59
59
-
 60
60
-
 61
61
-
 62
62
-
 63
63
-
 64
64
-
 65
65
-
 66
66
-
 67
67
-
 68
68
-
 69
69
-
 70
70
-
 71
71
-
 72
72
-
 73
73
-
 74
74
-
 75
75
-
 76
76
-
 77
77
-
 78
78
-
 79
79
-
 80
80
-
 81
81
-
 82
82
-
 83
83
-
 84
84
-
 85
85
-
 86
86
-
 87
87
-
 88
88
-
 89
89
-
 90
90
-
 91
91
-
 92
92
-
 93
93
-
 94
94
-
 95
95
-
 96
96
-
 97
97


Microlife BPB3 Manual do usuário
- Categoria
- Unidades de pressão arterial
- Tipo
- Manual do usuário
em outros idiomas
- español: Microlife BPB3 Manual de usuario
- français: Microlife BPB3 Manuel utilisateur
- italiano: Microlife BPB3 Manuale utente
- Türkçe: Microlife BPB3 Kullanım kılavuzu
Artigos relacionados
-
Microlife BP B3 Comfort PC Manual do usuário
-
-
Microlife BP A3L Comfort Manual do usuário
-
Microlife BP B3 AFIB Manual do usuário
-
-
Microlife BP B6 Connect Manual do usuário
-
-