
1
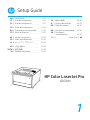
Setup Guide
|TH 42-51
Hướng dẫn thiết lậpVI | 42-51
Ghid de instalare|RO 42-51
ES
PT Guia de configuração|2-11
Guía de configuración|2-11
FR
RU
TR
Guide de configuration|12-21
Руководство по настройке|12-21
Kurulum Kılavuzu|12-21
KK Реттеу нұсқаулығы|22-31
SR Vodič za podešavanje|22-31
JA セットアップ ガイド
|22-31
KO
ZHTW
ID
설정 설명서
|32-41
設定指南
|32-41
Panduan Penyiapan|32-41
Priručnik za postavljanjeHR | 52-61
Посібник із
налаштування
|UK
52-61
| AR52-61
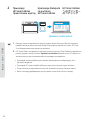
EN Setup Guide|2-11
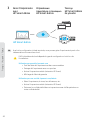
HP Color LaserJet Pro
4203dn

2
English | Português | Español
hp.com/support/colorlj4201-4203
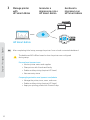
Get help with setup
Find setup information
and videos online.
Obtenha ajuda para
configuração
Encontre informações
de configuração
e vídeos online.
Obtenga ayuda para
la configuración
Encuentre información
sobre la configuración y
vídeos en línea.
Preparar
a impressora
Escolher opção de
configuração
Preparación de la
impresora
Elección del tipo de
configuración
Visão geral de
conguração
Descripción general
de la conguración
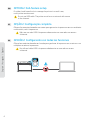
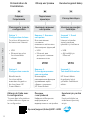
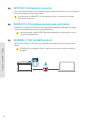
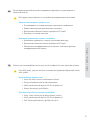
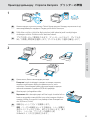
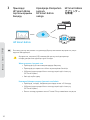
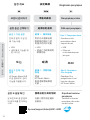
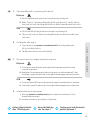
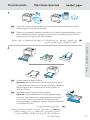
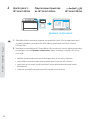
Setup overview
Prepare printer
Choose setup option
OR
Use for basic printing
without Internet
• USB
• Ethernet
for network
capability
Option 1:
Basic setup
Option 2:
Full-feature setup
OU
Use para impressão
básica sem Internet
• USB
• Ethernet para
capacidade de
rede
Opção 1:
Configuração básica
Opção 2:
Configuração completa
Get advanced
cloud management
features with
HP Smart Admin.
Tenha recursos
avançados de
gerenciamento de
nuvem com
o HP Smart Admin.
Obtenga funciones
avanzadas de gestión
en la nube con HP
Smart Admin.
O bien
Uso para la impresión
básica sin Internet
• USB
• Ethernet para
la capacidad de
la red
Opción 1:
Configuración básica
Opción 2: Configuración
con todas las funciones
EN PT ES

3
English | Português | Español
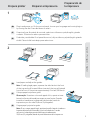
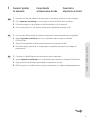
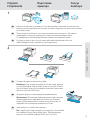
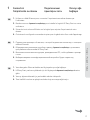
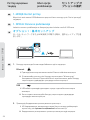
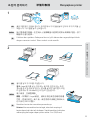
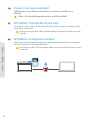
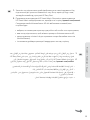
EN Load paper and adjust the guides.
Note: If loading legal paper, squeeze the side latch at the front
of the tray and pull forward. When inserted, the tray will extend
from the front of the printer approximately 2 inches (50.8mm).
PT Coloque papel e ajuste as guias.
Observação: Se estiver colocando papel ofício, aperte a trava
lateral na frente da bandeja e empurre para frente. Quando
inserida, a bandeja vai se estender da parte da frente da
impressora por cerca de 50,8mm (2 polegadas).
ES Cargue papel y ajuste las guías.
Nota: Si va a cargar papel legal, apriete el pestillo lateral situado en
la parte delantera de la bandeja y tire hacia delante. Cuando
se inserte, la bandeja se extenderá aproximadamente
50,8 mm (2 pulgadas) desde la parte delantera de la impresora.
2
1
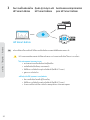
EN Plug in and power on. On the control panel, choose your language and country/region
by turning the dial. Press dial down to select.
PT Conecte e ligue. No painel de controle, selecione o idioma e o país/a região, girando
o seletor. Pressione o seletor para escolher.
ES Conéctela y enciéndala. En el panel de control, elija su idioma y el país/región girando
el dial. Pulse el dial hacia abajo para seleccionar.
Prepare printer Preparar a impressora
Preparación de
la impresora

4
English | Português | Español
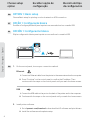
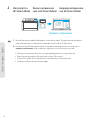
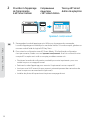
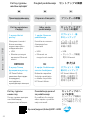
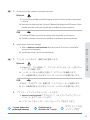
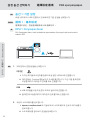
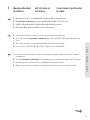
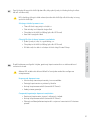
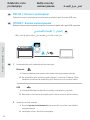
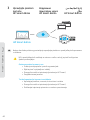
EN OPTION 1: Basic setup
Choose Basic setup for printing on a local network or USB connection.
PT OPÇÃO 1: Conguração básica
Escolha a Configuração básica para imprimir em uma rede local ou conexão USB.
ES OPCIÓN1: Conguración básica
Elija la configuración básica para imprimir en una red local o conexión USB.
1
2
2. Install printer software.
i. Go to hpsmart.com/download to download the HP software and print drivers.
ii. Install the software and complete setup.
1. On the control panel, choose your connection method:
EN
i. Connect an Ethernet cable from the printer to the same network as the computer.
ii. Press “Continue” on the control panel to confirm the IP address. Then
continue with the steps on the control panel until you reach the home screen.
Ethernet
ii. Continue with the steps on the control panel until you reach the home screen.
i. Connect the USB cable to the port on the back of the printer and to the computer.
USB
Choose setup
option
Escolher opção de
conguração
Elección del tipo
de conguración

5
English | Português | Español
2. Instalación del software de la impresora.
i. Vaya a hpsmart.com/download para descargar el software y los controla-
dores de impresión de HP.
ii. Instale el software y complete la configuración.
1. Elija su método de conexión en el panel de control:
ES
i. Conecte un cable Ethernet desde la impresora a la misma red que el ordenador.
ii. Pulse “Continuar” en el panel de control para confirmar la dirección IP. Luego continúe
con los pasos en el panel de control hasta que llegue a la pantalla de inicio.
Ethernet
ii. Continúe con los pasos en el panel de control hasta que llegue a la pantalla de
inicio.
i. Conecte el cable USB al puerto situado en la parte posterior de la impresora y al
ordenador.
USB
2. Instale o software da impressora.
i. Acesse hpsmart.com/download para baixar o software HP e os drivers de
impressão.
ii. Instale o software e complete a configuração.
1. No painel de controle, escolha seu método de conexão:
PT
i. Use um cabo Ethernet para conectar a impressora à mesma rede do computador.
ii. Pressione "Continuar", no painel de controle, para confirmar o endereço IP.
Depois, siga as instruções no painel de controle até você chegar à tela inicial.
Ethernet
ii. Siga as instruções no painel de controle até você chegar à tela inicial.
i. Conecte o cabo USB à porta correspondente na parte de trás da impressora e ao
computador.
USB
Setup Complete
for Option 1
Configuração completa
para a Opção 1
Configuración de la
Opción 1 completada

6
English | Português | Español
1
2
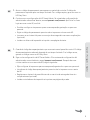
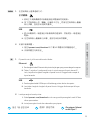
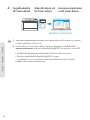
Do not use USB cable. The printer must be on a network with access
to the Internet.
Provides cloud-based tools to manage the printer in a multi-user,
multi-printer environment.
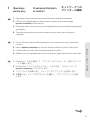
OPTION 2: Full-feature setup
EN
Não use um cabo USB. A impressora deve estar em uma rede com acesso
à Internet.
Oferece ferramentas baseadas na nuvem para gerenciar a impressora em um ambiente
multiusuário, multi-impressora.
OPÇÃO 2: Conguração completa
PT
No utilice el cable USB. La impresora debe estar en una red con acceso
a Internet.
Ofrece herramientas basadas en la nube para gestionar la impresora en un entorno con
múltiples usuarios e impresoras.
OPCIÓN 2: Conguración con todas las funciones
ES

7
English | Português | Español
1. Use um cabo Ethernet para conectar a impressora à mesma rede do computador.
2. Acesse hpsmart.com/setup, em um computador, para instalar o software
HP Easy Start.
3. Siga as instruções do software para adicionar a impressora à rede.
4. Escolha a opção para fazer a configuração completa e para gerar um código de
pareamento.
PT
1. Conecte un cable Ethernet a la misma red que el ordenador.
2. Vaya a hpsmart.com/setup en un ordenador para instalar el software HP Easy Start.
3. Siga los pasos del software para añadir la impresora a la red.
4. Elija la opción con todas las funciones y para generar un código de emparejamiento.
ES
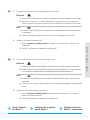
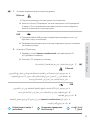
1. Connect an Ethernet cable from the printer to the same network as the computer.
2. Go to hpsmart.com/setup on a computer to install HP Easy Start software.
3. Follow the steps in the software to add the printer to your network.
4. Choose the option for full-feature setup and to generate a pairing code.
EN
1Connect printer
to network
Conectando
a impressora à rede
Conecte la
impresora a la red

8
English | Português | Español
• Choose to set up the printer for a company/organization or for personal use.
• Enter the pairing code to link the printer to your HP account.
• Sign up for Instant Ink for hassle-free, toner delivery service (optional).
• Install print drivers and print a test page.
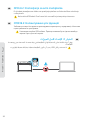
1. Record the pairing code that displays on the control panel. The pairing code will expire
after a limited time. If code expires, generate a new code in HP Easy Start.
2. Continue with HP Smart Admin setup. If the admin setup window is not open, go to
hpsmart.com/connect. After creating or signing in to an HP account, you will:
EN
hpsmart.com/connect
1
2
2Pair printer to
HP Smart Admin
Parear a impressora
com o HP Smart Admin
Empareje la impresora
con HP Smart Admin

9
English | Português | Español
• Escolher configurar a impressora para uma empresa/organização ou para uso
pessoal.
• Digite o código de pareamento para vincular a impressora à sua conta HP.
• Inscrever-se no Instant Ink para um serviço de entrega de toner sem complicações
(opcional).
• Instalar os drivers de impressão e imprimir uma página de teste.
1. Anote o código de pareamento que aparece no painel de controle. O código de
pareamento expirará após um tempo limitado. Se o código expirar, gere um novo no
HP Easy Start.
2. Continue com a configuração do HP Smart Admin. Se a janela de configuração do
administrador não estiver aberta, acesse hpsmart.com/connect. Após criar ou fazer
login em uma conta HP, você irá:
PT
• Elija configurar la impresora para una empresa/organización o para uso personal.
• Introduzca el código de emparejamiento para vincular la impresora a su cuenta
de HP.
• Regístrese en Instant Ink para disfrutar de un servicio de entrega de tóner sin
complicaciones (opcional).
• Instale controladores de impresión e imprima una página de prueba.
1. Guarde el código de emparejamiento que se muestra en el panel de control. El código
de emparejamiento caducará después de un tiempo limitado. Si el código vence,
genere un código nuevo en HP Easy Start.
2. Siga con la configuración de HP Smart Admin. Si la ventana de configuración del
administrador no está abierta, vaya a hpsmart.com/connect. Después de crear
o iniciar sesión en una cuenta de HP, haga lo siguiente:
ES

10
English | Português | Español
HP Smart
1
2
1
2
HP Smart Admin
3Manage printer
with
HP Smart Admin
Gerenciar a
impressora com o
HP Smart Admin
Gestione la
impresora con
HP Smart Admin
Personal use: hpsmart.com
• Monitor printer status and supplies
• Share printer with friends and family
• Enable mobile printing (requires HP Smart)
• View warranty status
Company/organization use: hpsmart.com/admin
• Manage the printer, toner, users, and more
• Enable mobile printing (requires HP Smart)
• Keep your printing private with Private Pickup
After completing initial setup, manage the printer from a cloud-connected dashboard.
EN
The dashboard URL differs based on how the printer was configured
during setup:

11
English | Português | Español
Após concluir a configuração inicial, gerencie a impressora usando um painel conectado à
nuvem.
PT
Uso pessoal: hpsmart.com
• Monitore o status e os suprimentos da impressora
• Compartilhe a impressora com amigos e familiares
• Habilite a impressão móvel (exige o HP Smart)
• Visualize o status da garantia
Companhia/empresa use: hpsmart.com/admin
• Gerencie impressora, toner, usuários e muito mais
• Habilite a impressão móvel (exige o HP Smart)
• Mantenha suas impressões particulares, com a Coleta confidencial
O URL do painel difere com base no modo como a impressora foi configurada
durante a configuração:
Tras completar la configuración inicial, gestione la impresora desde un panel conectado a
la nube.
ES
Para uso personal: hpsmart.com
• Supervise el estado de la impresora y los suministros.
• Comparta la impresora con amigos y familiares
• Habilite la impresión móvil (requiere HP Smart).
• Vea el estado de la garantía.
Uso para una empresa/organización: hpsmart.com/admin
• Gestione la impresora, el tóner, los usuarios y mucho más.
• Habilite la impresión móvil (requiere HP Smart).
• Mantenga su impresión privada con Private Pickup.
La URL del panel varía en función de la configuración de la impresora:

12
Français | Русский | Türkçe
hp.com/support/colorlj4201-4203
Obtenir de l’aide avec
la configuration
Trouvez des informations
et des vidéos en ligne sur
la configuration.
Помощь
с настройкой
Найдите в Интернете
информацию и
видеоролики о настройке.
Kurulum için yardım
alın
Kurulum bilgileri ve
videolarına çevrimiçi
erişin.
Подготовка
принтера
Выберите вариант
настройки
Yazıcıyı hazırlayın
Kurulum seçeneğini
belirleyin
Обзор настройки Kuruluma genel bakışPrésentation de
l’installation
Préparez
l’imprimante
Choisissez le type de
configuration
Bénéficiez de
fonctionnalités
avancées de gestion
de cloud avec HP
Smart Admin.
OU
Fonctions d’impression
de base sans Internet
Option 1:
Configuration de base
Option 2:
Configuration avancée
Используйте
расширенные функции
управления через
облако с помощью
HP Smart Admin.
ИЛИ
Использование
основных
возможностей печати
без интернет-функций
Вариант 1. Базовая
настройка
Вариант 2.
Полнофункциональ
ная настройка
HP Smart Admin
ile gelişmiş bulut
yönetimi özelliklerini
edinin.
VEYA
İnternet olmadan
temel yazdırma
işlemleri için kullanım
• USB
• Ethernet pour les
fonctionnalités
réseau
• USB
• Ethernet для
доступа к сетевым
возможностям
• USB
• Ağ özelliği için
Ethernet
Seçenek 1: Temel
kurulum
Seçenek 2:
Tam özellikli kurulum
FR RU TR

13
Français | Русский | Türkçe
FR Chargez du papier et ajustez les guides.
Remarque: Pour charger du papier au format Legal, appuyez
sur le loquet latéral situé à l’avant du bac et tirez vers l’avant.
Une fois inséré, le bac s’étirera depuis l’avant de l’imprimante
d’environ 2pouces (50,8mm).
RU Загрузите бумагу и отрегулируйте направляющие.
Примечание. При загрузке бумаги формата Legal сожмите
боковой фиксатор в передней части лотка и потяните
вперед. Во вставленном состоянии лоток выступает из
передней части принтера примерно на 50 мм.
TR Kağıt yerleştirin ve kılavuzları ayarlayın.
Not: Legal boyutlu kağıt yerleştirirseniz tepsinin ön kısmındaki
yan mandalı sıkıştırıp ileriye doğru çekin. Takıldığında tepsi,
yazıcının ön kısmından yaklaşık 50,8 mm (2 inç) uzar.
1
2
FR Branchez et allumez l’imprimante. Sur le panneau de commande, choisissez votre
langue et votre pays/région en tournant la molette. Appuyez vers le bas sur le cadran
pour sélectionner.
RU Подключите устройство к сети электропитания и включите его. На панели
управления с помощью поворотного переключателя выберите язык
и страну/регион. Для выбора нажмите поворотный переключатель.
TR Fişi takın ve yazıcıyı açın. Kontrol panelinde kadranı döndürerek dilinizi ve
ülkenizi/bölgenizi seçin. Seçmek için çevirmeye basın.
Préparez
l’imprimante
Подготовка
принтера
Yazıcıyı
hazırlayın

14
Français | Русский | Türkçe
FR OPTION 1: Conguration de base
Choisissez la configuration de base si vous souhaitez utiliser le réseau local ou une
connexion USB pour imprimer.
RU ВАРИАНТ1. Базовая настройка
Выберите базовую настройку, чтобы печатать с устройств, подключенных
к локальной сети или через интерфейс USB.
TR SEÇENEK 1: Temel kurulum
Yerel bir ağ ya da USB bağlantısı üzerinden yazdırmak için Temel kurulum öğesini seçin.
1
2
2. Installation du logiciel de l’imprimante.
i. Rendez-vous sur hpsmart.com/download pour télécharger le logiciel et les
pilotes d’impression HP.
ii. Installez le logiciel et terminez la configuration.
1. Sur le panneau de commande, choisissez votre mode de connexion:
FR
i. Utilisez un câble Ethernet pour connecter l’imprimante au même réseau que
l’ordinateur.
ii. Appuyez le bouton “Continuer” du panneau de commande pour confirmer
l’adresse IP. Suivez ensuite les instructions affichées sur le panneau de
commande jusqu’à ce que vous atteigniez l’écran d’accueil.
Ethernet
ii. Suivez ensuite les instructions affichées sur le panneau de commande jusqu’à
ce que vous atteigniez l’écran d’accueil.
i. Branchez le câble USB sur le port situé à l’arrière de l’imprimante et connectez-le à
l’ordinateur.
USB
Choisissez le type
de conguration
Выберите вариант
настройки
Kurulum seçeneğini
belirleyin

15
Français | Русский | Türkçe
2. Yazıcı yazılımını yükleyin.
i. HP yazılımını ve yazıcı sürücülerini indirmek için hpsmart.com/download
adresine gidin.
ii. Yazılımı yükleyin ve kurulumu tamamlayın.
1. Kontrol panelinde bağlantı yönteminizi seçin:
TR
i. Yazıcıdan gelen Ethernet kablosunu bilgisayarla aynı ağa bağlayın.
ii. IP adresini doğrulamak için kontrol panelinde “Devam” öğesine basın.
Ardından ana ekrana ulaşana kadar kontrol panelindeki adımlarla devam edin.
Ethernet
ii. Ana ekrana ulaşana kadar kontrol panelindeki adımlarla devam edin.
i. USB kablosunu yazıcının arkasındaki bağlantı noktasına ve bilgisayara bağlayın.
USB
2. Установите программное обеспечение принтера.
i. Загрузите программное обеспечение и драйверы печати HP со страницы
hpsmart.com/download.
ii. Установите их и завершите настройку.
1. На панели управления выберите способ подключения.
RU
i. Подключите принтер к той же сети, к которой подключен компьютер, с
помощью кабеля Ethernet.
ii. На панели управления нажмите “Продолжить”, чтобы подтвердить
IP-адрес. Выполняйте пошаговые инструкции на панели управления, пока
не дойдете до главного экрана.
Ethernet
ii. Выполняйте пошаговые инструкции на панели управления, пока не
дойдете до главного экрана.
i. Подсоедините кабель USB к порту на задней стороне принтера, затем
подключите этот кабель к компьютеру.
USB
Configuration
terminée pour l’option 1
Настройка по
варианту 1 завершена
Seçenek 1 için Kurulum
Tamamlandı

16
Français | Русский | Türkçe
1
2
N’utilisez pas de câble USB. L’imprimante doit être connectée à un réseau
avec accès à Internet.
Fournit des outils basés sur le cloud pour gérer l’imprimante dans un environnement
multi-utilisateurs et multi-imprimantes.
OPTION 2: Conguration avancée
FR
Не используйте кабель USB. Принтер должен быть подключен к сети
с доступом в Интернет.
Позволяет с помощью облачных инструментов управлять принтером в среде
с несколькими принтерами или пользователями.
ВАРИАНТ 2. Полнофункциональная настройка
RU
USB kablosu kullanmayın. Yazıcı, İnternet erişimi olan bir ağ üzerinde yer
almalıdır.
Yazıcıyı çok kullanıcılı, çok yazıcılı bir ortamda yönetmek için bulut tabanlı araçlar
sağlar.
SEÇENEK 2: Tam özellikli kurulum
TR

17
Français | Русский | Türkçe
1. Подключите принтер к той же сети, к которой подключен компьютер, с помощью
кабеля Ethernet.
2. В браузере на компьютере откройте страницу hpsmart.com/setup и установите
программное обеспечение HP Easy Start.
3. Выполните пошаговые инструкции, приведенные в ПО, чтобы добавить принтер
к сети.
4. Выберите вариант полнофункциональной настройки. Будет создан код
сопряжения.
RU
1. Yazıcıdan gelen Ethernet kablosunu bilgisayarla aynı ağa bağlayın.
2. HP Easy Start yazılımını yüklemek için bir bilgisayarda hpsmart.com/setup adresine
gidin.
3. Yazıcıyı ağınıza eklemek için yazılımdaki adımları takip edin.
4. Tam özellikli kurulum ve eşleştirme kodu oluşturma seçeneğini seçin.
TR
1. Utilisez un câble Ethernet pour connecter l’imprimante au même réseau que
l’ordinateur.
2. Rendez-vous sur hpsmart.com/setup pour installer le logiciel HP Easy Start sur votre
ordinateur.
3. Suivez les instructions affichées sur le logiciel pour ajouter l’imprimante à votre
réseau.
4. Choisissez la configuration avancée et optez pour la génération d’un code d’appairage.
FR
1Connectez
l’imprimante au réseau
Подключение
принтера к сети
Yazıcıyı ağa
bağlayın

18
Français | Русский | Türkçe
• Choisissez le mode de configuration souhaité pour votre imprimante: pour une
société ou pour un usage personnel.
• Saisissez le code d’appairage pour associer l’imprimante à votre compte HP.
• Inscrivez-vous à HP Instant Ink pour recevoir automatiquement des cartouches de
toner lorsque vous en avez besoin (optionnel).
• Installez les pilotes d’impression et imprimez une page de test.
1. Sauvegardez le code d’appairage qui s’affiche sur le panneau de commande.
Le code d’appairage est valable pour une durée limitée. Si le code a expiré, générez un
nouveau code à l’aide du logiciel HP Easy Start.
2. Poursuivez la configuration avec HP Smart Admin. Si la fenêtre de configuration
n’est pas ouverte, rendez-vous sur hpsmart.com/connect. Une fois connecté à votre
compte HP ou après avoir créé un compte, procédez comme suit:
FR
hpsmart.com/connect
1
2
2Procédez à l’appairage
de l’imprimante
à HP Smart Admin
Сопряжение
принтера
с HP Smart Admin
Yazıcıyı HP Smart
Admin ile eşleştirin

19
Français | Русский | Türkçe
• Выберите способ настройки принтера: для компании/организации или для
личного использования.
• Введите код сопряжения, чтобы привязать принтер к учетной записи HP.
• Оформите подписку на сервис доставки тонера Instant Ink (необязательно).
• Установите драйверы печати и напечатайте тестовую страницу.
1. Запишите код сопряжения, показанный на экране панели управления. Срок
действия кода сопряжения истекает через заданное время. Если он истечет,
создайте новый код в HP Easy Start.
2. Продолжите настройку в HP Smart Admin. Если окно административной
настройки не открыто, перейдите на страницу hpsmart.com/connect. После
создания учетной записи HP или входа в нее выполните следующие действия.
RU
• Yazıcıyı bir şirket/kuruluş için ya da kişisel kullanım için kurmayı seçin.
• Yazıcıyı HP hesabınıza bağlamak için eşleştirme kodunu girin.
• Sorunsuz toner teslimat hizmeti için Instant Ink’e kaydolun (isteğe bağlı).
• Baskı sürücülerini yükleyin ve bir test sayfası yazdırın.
1. Kontrol panelinde görüntülenen eşleştirme kodunu kaydedin. Eşleştirme kodunun
süresi kısa bir süre sonra sona erecektir. Kodun süresinin dolması halinde, HP Easy
Start üzerinde yeni bir kod oluşturun.
2. HP Smart Admin kurulumuna devam edin. Yönetici kurulumu penceresi açık değilse
hpsmart.com/connect adresine gidin. Bir HP hesabı oluşturduktan veya HP hesabında
oturum açtıktan sonra:
TR

20
Français | Русский | Türkçe
HP Smart
1
2
1
2
HP Smart Admin
3Gérer l’imprimante
avec
HP Smart Admin
Управление
принтером с помощью
HP Smart Admin
Yazıcıyı
HP Smart Admin
ile yönetin
Une fois la configuration initiale terminée, vous pouvez gérer l’imprimante à partir d’un
tableau de bord connecté au cloud.
FR
Utilisation personnelle: hpsmart.com
• Suivi de l’état de l’imprimante et des consommables
• Partage de l’imprimante avec vos proches
• Activer l’impression mobile (nécessite HP Smart)
• Affichage de l’état de garantie
Utilisation par une société: hpsmart.com/admin
• Gérer l’imprimante, le toner, les utilisateurs, etc.
• Activer l’impression mobile (nécessite HP Smart)
• Préserver la confidentialité de vos impressions avec la Récupération en
toute confidentialité
L’URL du tableau de bord dépend du type de configuration choisi lors de
l’installation:
A página está carregando...
A página está carregando...
A página está carregando...
A página está carregando...
A página está carregando...
A página está carregando...
A página está carregando...
A página está carregando...
A página está carregando...
A página está carregando...
A página está carregando...
A página está carregando...
A página está carregando...
A página está carregando...
A página está carregando...
A página está carregando...
A página está carregando...
A página está carregando...
A página está carregando...
A página está carregando...
A página está carregando...
A página está carregando...
A página está carregando...
A página está carregando...
A página está carregando...
A página está carregando...
A página está carregando...
A página está carregando...
A página está carregando...
A página está carregando...
A página está carregando...
A página está carregando...
A página está carregando...
A página está carregando...
A página está carregando...
A página está carregando...
A página está carregando...
A página está carregando...
A página está carregando...
A página está carregando...
A página está carregando...
A página está carregando...
A página está carregando...
A página está carregando...
-
 1
1
-
 2
2
-
 3
3
-
 4
4
-
 5
5
-
 6
6
-
 7
7
-
 8
8
-
 9
9
-
 10
10
-
 11
11
-
 12
12
-
 13
13
-
 14
14
-
 15
15
-
 16
16
-
 17
17
-
 18
18
-
 19
19
-
 20
20
-
 21
21
-
 22
22
-
 23
23
-
 24
24
-
 25
25
-
 26
26
-
 27
27
-
 28
28
-
 29
29
-
 30
30
-
 31
31
-
 32
32
-
 33
33
-
 34
34
-
 35
35
-
 36
36
-
 37
37
-
 38
38
-
 39
39
-
 40
40
-
 41
41
-
 42
42
-
 43
43
-
 44
44
-
 45
45
-
 46
46
-
 47
47
-
 48
48
-
 49
49
-
 50
50
-
 51
51
-
 52
52
-
 53
53
-
 54
54
-
 55
55
-
 56
56
-
 57
57
-
 58
58
-
 59
59
-
 60
60
-
 61
61
-
 62
62
-
 63
63
-
 64
64


em outras línguas
- 日本語: HP 4203dn ユーザーガイド
- Türkçe: HP 4203dn Kullanici rehberi
- română: HP 4203dn Manualul utilizatorului
Artigos relacionados
-
HP 4203dw Guia de usuario
-
HP Color LaserJet Pro MFP 4303dw Printer Guia de usuario
-
HP 9120b series Guia de usuario
-
-
-
-
-
HP PageWide Enterprise Color MFP 785 Printer series Guia de instalação
-
HP PageWide Managed Color MFP P77960 Printer series Guia de instalação
-
HP PageWide Enterprise Color MFP 780 Printer series Guia de instalação