DOP490*
L
e guide d’utilisation de votre four
User Manual for Your Oven
Betriebsanleitung des Backofens
De gebruikshandleiding van uw oven
Brugervejledning til ovnen
G
uía de utilización del horno
O guia de utilização do seu forno
FR
GB
DE
NL
DK
ES
PT
99633843_ML_A 15 juin.qxd 15/06/2005 17:06 Page 1

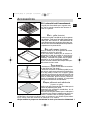
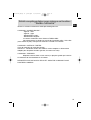
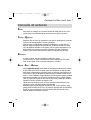
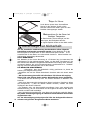
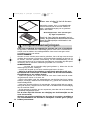
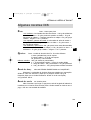
Tout au long de la notice,
vous signale les consignes de sécurité,
vous signale les conseils et les astuces
Edito P.3
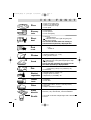
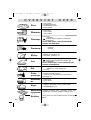
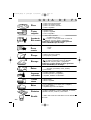
Comment se présente votre four ?
Descriptif de l’appareil P.4
Accessoires P.5
Conseils de sécurité P.6
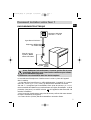
Comment installer votre four ?
Raccordement électrique P.7
Changement du câble d’alimentation P.8
Dimensions utiles pour encastrer votre four P.9
Comment utiliser votre four ?
1. Le détail de votre programmateur P.10
Le détail de l’afficheur P.10
2. Comment mettre à l’heure et la date du four ? P.11
3. Comment réaliser une cuisson ? P.12
4. Comment utiliser les différents modes de cuisson ? P.12
a) La fonction “CHEF” P.12-19
b) La fonction “GUIDE CULINAIRE” P.20-23
c) La fonction “ICS” P.24-31
d) La fonction “BASSE TEMPERATURE” P.32-33
5. Accès aux différents réglages du four
a) Réglage du Son émis lors de l’utilisation des touches P.34
b) Réglage du Contraste de l’écran et Mise en veille P.34
c) Réglage d’Eolyse P.34
d) Réglage de de Consommation d’électricité P.35
e) Réglage de la Langue P.35
f) De Dietrich Services P.36
6. La fonction “Minuterie” P.36
Comment nettoyer la cavité de votre four ?
1. La fonction Nettoyage P.37
2. Quand faire une pyrolyse ? P.37
3. Comment effectuer un cycle de pyrolyse ? P.38-39
4. Verrouillage des commandes? P.39
Comment changer l’ampoule ? P.40
Que faire en cas d’anomalies de fonctionnement P.40
Qui contacter ?
P.41
2
Sommaire
99633843_ML_A 15 juin.qxd 15/06/2005 17:06 Page 2
A página está carregando...

4
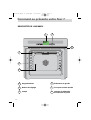
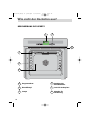
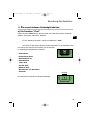
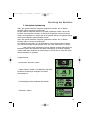
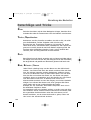
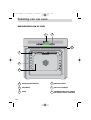
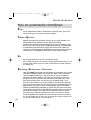
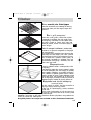
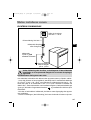
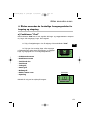
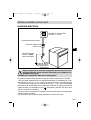
C
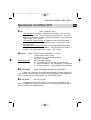
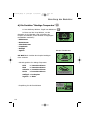
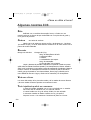
omment se présente votre four ?
1
3
5
Bonjour !Bonjour !
1 2
3
4
6
5
1
2
5
6
3
4
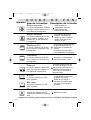
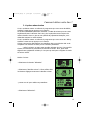
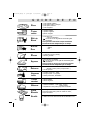
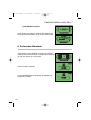
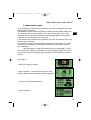
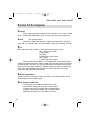
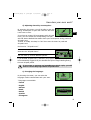
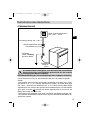
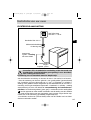
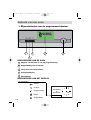
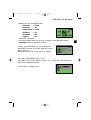
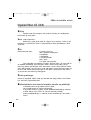
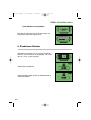
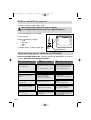
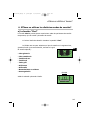
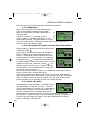
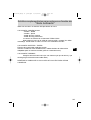
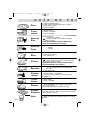
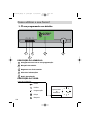
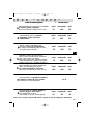
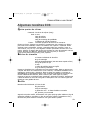
Programmateur
Bouton de réglage
Lampe
Indicateur de gradin
Trou pour tourne broche
Contact de détection
d’ouverture de porte
DESCRIPTIF DE L’APPAREIL
99633843_ML_A 15 juin.qxd 15/06/2005 17:06 Page 4
A página está carregando...
A página está carregando...
A página está carregando...
A página está carregando...
A página está carregando...

10
Bonjour !
Bonjour !
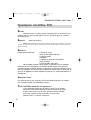
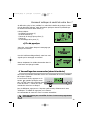
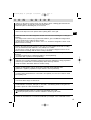
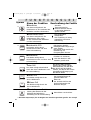
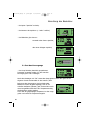
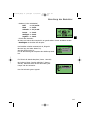
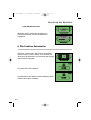
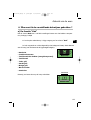
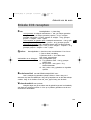
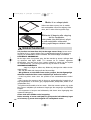
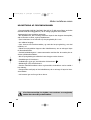
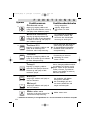
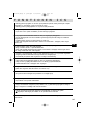
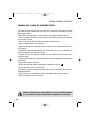
Comment utiliser votre four ?
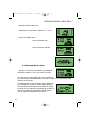
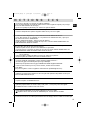
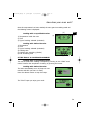
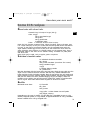
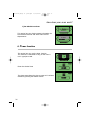
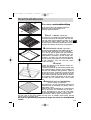
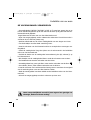
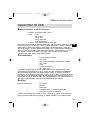
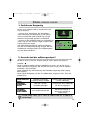
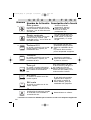
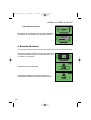
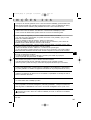
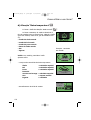
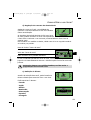
1. Le détail de votre programmateur
2
1
4
3
5
1
3
4
5
2
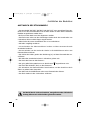
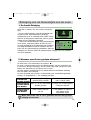
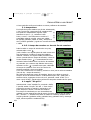
Arrêt du four ou de votre programmation
Verrouillage du clavier
Retour au niveau précédent
Afficheur des informations
Bouton de sélection
DESCRIPTIF DE L’ APPAREIL
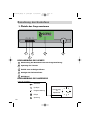
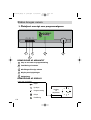
Jeudi
19
Septembre
Réglages
+
-
DESCRIPTIF DE L’ AFFICHEUR
Liste des indications :
Clé
Pyrolyse
Programmation
Eolyse
Verrouillage
99633843_ML_A 15 juin.qxd 15/06/2005 17:06 Page 10
A página está carregando...
A página está carregando...
A página está carregando...
A página está carregando...

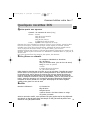
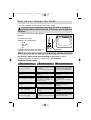
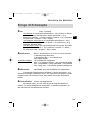
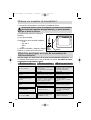
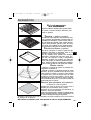
Recommandé pour les quiches, tour-
tes, tartes aux fruits juteux.
Recommandé pour griller les
côtelettes, saucisses, tranches de
pain, gambas posées sur la grille.
Recommandé pour faire lever les
pâtes à pain, à brioche, kouglof...en
ne dépassant pas 40°C (chauffe-assiet-
tes, décongélation).
Recommandations
Recommandé pour garder le moelleux des
viandes blanches, poissons, légumes
Pour les cuissons multiples jusqu’à 3
niveaux.
Nota : toutes les cuissons se font sans
préchauffage.
(Le temps de cuisson peut être parfois
légèrement supérieur)
Recommandé poursaisir et cuire à coeur
viandes rouges et blanches.
Pour cuire doucement les volailles jusqu’à
2 kg
Préco T°
mini
préco
maxi
35
180
235
mini
préco
maxi
35
205
275
mini
préco
maxi
180
200
230
mini
préco
maxi
35
200
275
mini
préco
maxi
35
80
100
1 à 4
on
ément à la norme européenne EN 50304 et selon la directive Européenne 2002/40/CE.
Recommandé pour les cuissons lentes et
délicates : gibiers moelleux...
Saisir les viandes rouges
Pour mijoter en cocotte fermée les plats
préalablement démarrés sur table de cuis-
son (coq au vin, civet...)
mini
préco
maxi
35
225°
275
15
FR
CTIONS “CHEF”
99633843_ML_A 15 juin.qxd 15/06/2005 17:07 Page 15
A página está carregando...
A página está carregando...

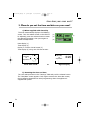
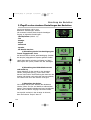
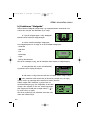
Comment utiliser votre four ?
18
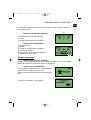
- allez dans l’option “Mémoires”,
- sélectionnez le numéro de la mémoire 1, 2 , ou 3)
- l'écran vous indique alors :
soit une mémoire vide,
soit une mémoire occupée,
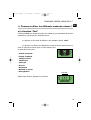
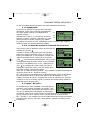
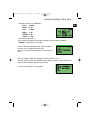
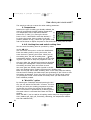
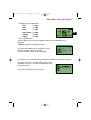
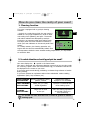
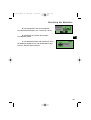
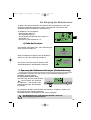
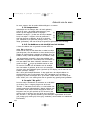
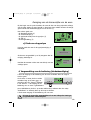
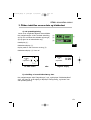
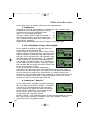
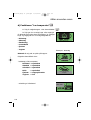
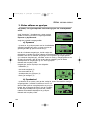
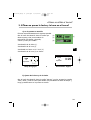
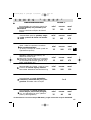
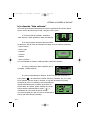
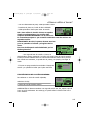
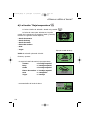
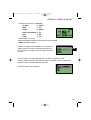
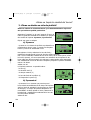
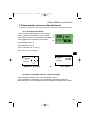
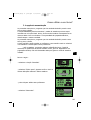
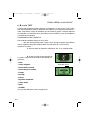
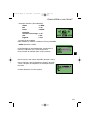
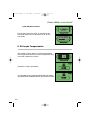
8. Démarrage de la cuisson
- appuyez sur le bouton pour afficher les paramètres
mémorisés, validez sur “OK” pour lancer la cuisson.
Une fois que vous avez validé “OK”, votre programme
de cuisson démarre immédiatement ou se met en veille si vous avez différé votre
heure de fin de cuisson.
Au démarrage de la cuisson l’écran suivant s’affiche et
vous indique qu’il se met en chauffe rapide (Booster).
Vous pouvez suivre l’évolution de la montée en tempé-
rature du four au travers du remplissage de la flèche. A
gauche est indiquée la température actuelle dans le
four, et à droite la température de consigne.
1
20 min
20 min
200
200
°C
OK
OK
20 min
20 min
200
200
°C
Remplacer
Remplacer
15:30
15:30
20 min
20 min
200
200
°C
OK
OK
15:30
15:30
120 C
120 C
200 C
200 C
99633843_ML_A 15 juin.qxd 15/06/2005 17:07 Page 18
A página está carregando...
A página está carregando...
A página está carregando...
A página está carregando...
A página está carregando...
A página está carregando...
A página está carregando...

GUIDE DE FO
Pizza
• pizza traiteur fraîches
• pizza pâtes prêtes à l’emploi
• pizza pâtes “maison”
• pizza surgelées
• Tartes fraîches
• Tartes surgelées
• Poissons entiers
(dorade, colinot,truites, maquereaux...)
• rôti de poisson
• Rôtis de boeuf
(cuisson saignante)
• Posez le rôti sur la grille de l’ensemble grille
+ lèchefrite.
Vous pouvez le retourner lorsque les flèches
tournantes seront remplacées par un temps.
Tartes
sucrées
Poissons
Rôti de
Boeuf
• Rôtis de porc
- échine
- filet
Rôti de
Porc
Tartes
salées
• quiches fraîches
• quiches surgelées
•paniers surgelés
• Petits gâteaux individuels : cookies, financiers,
croissants,petits pains, pains au raisins en boîte,
croque-monsieur.
Petits
Biscuits
Agneau
• Gigot de 1kg à 2,500kg
• Posez le gigot sur la grille de l’ensemble grille
+ lèchefrite.
Vous pouvez le retourner lorsque les flèches
tournantes seront remplacées par un temps.
Légumes
farcis
• tomates, poivrons... farcis
• lasagnes (frais ou surgelés)
• hachis parmentier, brandade...
S
oufflé
• utilisez un moule haut à bords droits diamètre 21cm
• poulets de 1 kg à 1,700 kg
• canette, pintade...
Poulet
• Gâteaux familiaux : cake (salés, sucrés),
quatre quarts
• Préparations toutes prêtes proposées en sachets.
Gâteaux
26
99633843_ML_A 15 juin.qxd 15/06/2005 17:07 Page 26
A página está carregando...
A página está carregando...

Quelques recettes ICS
Pizza Base: 1 pâte pour pizza
*aux légumes:
6 cuillerées à soupe de sauce tomate + 100 g de cour
gettes coupées en dès + 50 g de poivrons coupés en dés + 50 g d’au
bergines en rondelles +2 petites tomates en rondelles + 50 g de gruyère
râpé + origan + sel + poivre.
*au r
oquefort, poitrine fumée: 6 cuillerées à soupe de sauce tomate +
100 g de poitrine + 100 g de roquefort en dés + 50 g de noix + 60 g
de gruyère râpé.
*aux saucisses, f
romage blanc: 200 g de fromage blanc égoutté étalé
sur la pâte + 4 saucisses en rondelles + 150 g de jambon en lanières +
5 olives + 50 g de gruyère râpé + origan + sel + poivre.
Quiches : Base: 1 moule aluminium diamètre 27 à 30 cm
1 pâte brisée prête à l’emploi
3 oeufs battus + 50 cl de crème épaisse
sel, poivre, muscade.
Garnitures variées: 200 g de lardons précuits,
ou - 1 kg d’endives cuites + 200 g de gouda râpé
ou - 200 g de brocolis + 100 g de lardons + 50 g de bleu
ou - 200 g de saumon + 100 g d’épinards cuits égouttés
Rôti de boeuf Sauce SAUTERNES PERSILLEE au ROQUEFORT :
Faites suer 2 cuillers à soupe d’échalotes ciselées au beurre. Ajoutez 10
cl de Sauternes, laissez évaporer. Ajoutez 100 g de Roquefort, faites fondre dou-
cement. Ajoutez 20 cl de crème liquide, sel, poivre. Faites bouillir.
Rôti de porc
Porc au pruneaux
Demandez au boucher de faire un trou sur toute la longueur du rôti,
glissez un vingtaine de pruneaux à l’intérieur. Servez coupé en tranches avec le
jus ou froid avec une salade d’endives.
29
FR
Comment utiliser votre four ?
99633843_ML_A 15 juin.qxd 15/06/2005 17:07 Page 29
A página está carregando...
A página está carregando...
A página está carregando...

- durée de cuisson (non modifiable)
Veau -> 4h30
Boeuf -> 3h
Porc -> 4h30
Gigot -> 3h
Volaille -> 6h
Yaourt -> 3H
- heure de fin de cuisson.
Vous pouvez la modifier en tournant le bouton jusqu’à l’heure souhaitée.
- Validez en appuyant sur le bouton.
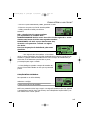
Le four s'éteint automatiquement, sonne pendant 2
minutes et vous indique que c'est prêt.
Appuyez sur le bouton de sélection pour arrêter les
bips.
Pour les viandes, phase de maintien au chaud (durée 1 heure)
Pour les yaourts, phase de “refroidissement rapide” (durée 1 heure). Arrêt de la
lampe et de l’animation pendant cette phase.
Le chef vous souhaite un bon appétit!
Bon app
Bon app
étit !
tit !
C'est pr
C'est pr
êt !
t !
19:45
19:45
Comment utiliser votre four ?
33
15:30
15:30
19:45
19:45
4 :15
4 :15
3 :00
3 :00
FR
99633843_ML_A 15 juin.qxd 15/06/2005 17:07 Page 33
A página está carregando...
A página está carregando...

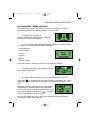
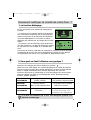
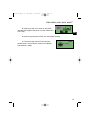
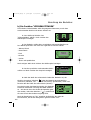
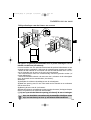
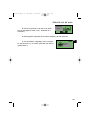
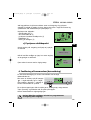
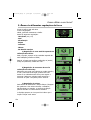
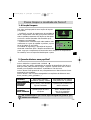
f) De Dietrich services
Cette option vous permet d'obtenir les coordonnées
du Service consommateur et du service après-vente.
Services
0 825
06 16 04
France
Service
Service
consommateur
consommateur
Minuterie
00:20
15:30
15:30
00:00
15:30
15:30
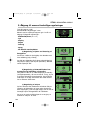
Cette option permet d’utiliser la fonction minuterie.
Cette fonction est accessible en dehors de l’utilisation
du four en cuisson ou en pyrolyse.
Entrez le temps souhaité
La minuterie décompte le temps dès la validation par
l’appui sur le bouton.
36
Comment utiliser votre four ?
6. La fonction Minuterie
99633843_ML_A 15 juin.qxd 15/06/2005 17:07 Page 36
A página está carregando...
A página está carregando...
A página está carregando...
A página está carregando...
A página está carregando...

Throughout the manual,
indicates safety recommendations,
indicates advice and tips
Introduction P.43
What does your oven look like?
Description of the appliance P.44
Accessories P.45-46
Safety Recommendations P.47
How do you install your oven?
Electrical connection P.48
Changing the power cable P.49
Useful dimensions for installing your oven P.50
How does your oven work?
1. Close-up of your programmer P.51
Close-up of the display P.51
2. How do you set the time and date on the oven? P.52
3. How do you program a cooking cycle? P.53
4. How do you use the various cooking modes? P.53
a) “CHEF” function P.53-59
b) “COOKING GUIDE” function P.60-63
c) “ICS” function P.64-71
d) “LOW TEMPERATURE” function P.72-73
5. Access to the various oven settings
a)
Adjusting the Sound emitted when the touch controls are used
P.74
b) Adjusting the Screen contrast and Standby P.74
c) Adjusting Eolysis settings P.74
d) Adjusting Energy Consumption P.75
e) Adjusting the language P.75
f) De Dietrich Services P.76
6. “Timer” function P.76
How do you clean the cavity of your oven?
1. Cleaning function P.77
2. When do you use a pyrolysis cycle? P.77
3. How do you program a pyrolysis cycle? P.78-79
4. How do you lock the control panel? P.79
How do you change the bulb? P.80
What do you do in case of operating malfunctions? P.80
42
Table of Contents
99633843_ML_A 15 juin.qxd 15/06/2005 17:07 Page 42
A página está carregando...

44
W
hat does your oven look like?
1
2
5
6
3
4
Programmer
Setting button
Light
Shelf support indicator
Hole for rotisserie
Contact for open door
detector
DESCRIPTION OF THE APPLIANCE
1
3
5
Bonjour !Bonjour !
1 2
3
4
6
5
Hello!
99633843_ML_A 15 juin.qxd 15/06/2005 17:07 Page 44
A página está carregando...

46
Pan reserved exclusively for low
temperature cooking.
Place meat (except for poultry) directly on
the grid with the enamelled dish under-
neath.
Place yoghurt containers directly in the dish.
Sliding system
Thanks to this system, you can completely
remove your enamelled dish and easily
access your preparations while they are
cooking.
99633843_ML_A 15 juin.qxd 15/06/2005 17:07 Page 46
A página está carregando...
A página está carregando...
A página está carregando...
A página está carregando...

51
GB
Bonjour !
Bonjour !
How do you use your oven?
1. C
lose-up of your programmer
2
1
4
3
5
1
3
4
5
2
Turn off oven or your cooking programme
Control panel lock
Back to the previous level
Information display
Selector button
DESCRIPTION OF THE APPLIANCE
Jeudi
19
Septembre
Réglages
+
-
DESCRIPTION OF THE DISPLAY
List of symbols:
Key
Pyrolysis
Programming
Eolysis
Locked
Thursday
19
September
Hello!
99633843_ML_A 15 juin.qxd 15/06/2005 17:07 Page 51

52
How does your oven work?
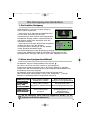
a) When supplied with electricity
The oven automatically displays the following
screen. Turn the selector button to the field to
be adjusted, press the selector button to enter
the desired information, then press again to
record the adjustment.
Date display (1).
Time display (2).
Display in 12:00 or 24:00 format (3).
Time display (4) using one of these formats:
b) Resetting the date and time
Turn the selector button to the “Settings” field and push the selector button.
The “time/date” screen appears. Push again to access the time data screen,
then proceed as described for initial programming when the appliance is
supplied with power.
2. How do you set the time and date on your oven?
Aiguilles
12 H
(2)
(3)
(4)
Jeudi
Jeudi
19
19
Septembre
Septembre
Jeudi
19
Septembre
3:20
Clock with hands or Digital display
Thursday
19
September
Thursday
19
September
Hands
(1)
99633843_ML_A 15 juin.qxd 15/06/2005 17:07 Page 52
A página está carregando...
A página está carregando...

Recommended for quiches, potpies
and juicy fruit tarts.
Recommended for letting dough rise
for bread, buns, cakes, etc.
without exceeding 40°C (plate warming,
defrosting).
Recommendations
Recommended for preserving tenderness
in white meats, fish, vegetables
For cooking multiple items on up to three
levels.
Note: All cooking is done without
preheating.
(Sometimes the cooking time may be
slightly longer)
Recommended for sealing and thoroughly
cooking red and white meat.
To slowly cook poultry weighing up
to 2 kg.
Recomm. Temp.
mini
recomm.
maxi
35
180
235
mini
recomm.
maxi
35
205
275
mini
recomm.
maxi
180
200
230
mini
recomm.
maxi
35
200
275
mini
recomm.
maxi
35
80
100
Recommended for slow, gentle cooking:
tender game meat, etc.
Sealing red meats
To simmer in a covered stew pan dishes
that were begun on the hob (coq au vin,
stew, etc.)
mini
recomm.
maxi
35
225°
275
55
Recommended for grilling chops,
sausages, toast, prawns
placed on the grid.
1 to 4
ode
with European standard EN 50304 and in accordance with European Directive 2002/40/CE.
IONS GUIDE
GB
99633843_ML_A 15 juin.qxd 15/06/2005 17:08 Page 55
A página está carregando...
A página está carregando...

How does your oven work?
58
- Go to the “Memory” option
- Select the number of the memory cell (1, 2 or 3)
- The screen then indicates:
either an empty memory cell
or a memory cell in use
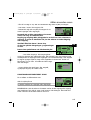
8. Starting a cooking programme
- Press the button to display the memorised parameters,
press “OK” to accept and start cooking.
Once you have pressed “OK”, your cooking programme
starts immediately or goes into standby if you chose to delay the end of cooking
time.
When cooking begins, the following screen is dis-
played, telling you that the oven is in rapid heating
mode (Booster). You can monitor the progress of the
rising temperature in the oven by watching the shad-
ing in the arrow. The current oven temperature is indi-
cated on the left and the recommended temperature is
displayed on the right.
1
20 min
20 min
200
200
°C
OK
OK
20 min
20 min
200
200
°C
Remplacer
Remplacer
15:30
15:30
20 min
20 min
200
200
°C
OK
OK
15:30
15:30
120 C
120 C
200 C
200 C
Memory
Replace
Settings
memorised!
BOOSTER
99633843_ML_A 15 juin.qxd 15/06/2005 17:08 Page 58

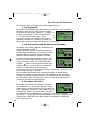
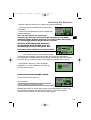
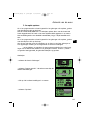
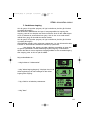
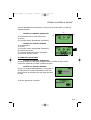
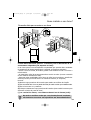
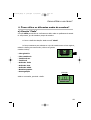
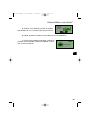
How does your oven work?
Once this temperature has been reached, the oven goes into cooking mode and
the following screen is displayed:
Cooking with no specified duration
1) Temperature inside the oven
2) Time
3) Type of cooking selected (animation)
Cooking with defined duration
1) Temperature
2) Time
3) Type of cooking selected (animation)
4) Cooking time
5) Cooking time remaining (flashes)
6) End of cooking time
AT THE END OF A COOKING PROGRAMME:
Cooking with no specified duration:
Turn off the oven when cooking is complete by pressing on the “STOP” touch
control. Confirm the completion of cooking by pressing the button.
Cooking with defined duration:
The oven automatically turns off, beeps for two
minutes and tells you that it is ready.
Press the selector button to stop the beeps.
The “Chef” hopes you enjoy your meal!
200˚C
15:30
15:30
20 min
20 min
15:50
15:50
12 min
12 min
200˚C
15:30
15:30
C'est prêt !
15:50
15:50
Bon app
Bon app
étit !
(1)
(2)
(3)
(4) (5)
(6)
59
It's
ready!
Enjoy your meal!
GB
99633843_ML_A 15 juin.qxd 15/06/2005 17:08 Page 59
A página está carregando...

5. Place your dish in the oven on the recom-
mended shelf support level (from 1 at the bottom to 5
at the top).
6. Enter by pressing the button; the oven begins heating
7. The oven beeps and turns off when the
cooking time is over and your screen then indicates
that the dish is ready.
C'est prêt !
15:49
15:49
niveau
How does your oven work?
61
GB
Insert the
dish on
level 1
It's ready!
99633843_ML_A 15 juin.qxd 15/06/2005 17:08 Page 61
A página está carregando...
A página está carregando...
A página está carregando...
A página está carregando...

ICS FUNCT
Pizza
• Fresh store-bought pizza
• Ready-to-use pizza dough
• Home-made pizza dough
• Frozen pizza
• Fresh tarts
• Frozen tarts
• Whole fish
(sea bream, pollock, trout, mackerel, etc.)
• Roasted fish
• Roast beef
(prepared rare)
• Place the roast on the grid using the grid +
drip tray assembly.
You can turn the meat when the rotating ar-
rows have been replaced by a displayed time.
Sweet
tarts
Fish
Roast
beef
• Pork roasts
- Loin
- Tenderloin
Pork
roast
Savoury
tarts
• Fresh quiches
• Frozen quiches
• Frozen mini-pastry
• Small individual pastry: biscuits, wafers,
croissants, rolls, raisin breads, toasted sandwiches.
Small
biscuits
Lamb
• Leg of lamb weighing 1 to 2.5 kg
• Place the leg on the grid using the grid + drip
tray assembly.
You can turn the meat when the rotating arrows
have been replaced by a displayed time.
Stuffed
vegetables
• Stuffed tomatoes, peppers, etc.
• Lasagne (fresh or frozen)
• Shepherd's pie, brandade, etc.
S
oufflé
• Use a tall mould with straight edges and a diameter
of 21 cm
• Chickens weighing 1 to 1.7 kg
• Duck, guinea fowl, etc.
Chicken
• Home-style cakes: sweet or savoury loaves,
pound cake
• Ready-to-mix batters in packets.
Cakes
66
99633843_ML_A 15 juin.qxd 15/06/2005 17:08 Page 66
A página está carregando...
A página está carregando...
A página está carregando...
A página está carregando...
A página está carregando...
A página está carregando...
A página está carregando...
A página está carregando...
A página está carregando...
A página está carregando...
A página está carregando...
A página está carregando...
A página está carregando...
A página está carregando...
A página está carregando...
A página está carregando...
A página está carregando...
A página está carregando...
A página está carregando...
A página está carregando...
A página está carregando...
A página está carregando...
A página está carregando...
A página está carregando...
A página está carregando...
A página está carregando...
A página está carregando...
A página está carregando...
A página está carregando...
A página está carregando...
A página está carregando...
A página está carregando...
A página está carregando...
A página está carregando...
A página está carregando...
A página está carregando...
A página está carregando...
A página está carregando...
A página está carregando...
A página está carregando...
A página está carregando...
A página está carregando...
A página está carregando...
A página está carregando...
A página está carregando...
A página está carregando...
A página está carregando...
A página está carregando...
A página está carregando...
A página está carregando...
A página está carregando...
A página está carregando...
A página está carregando...
A página está carregando...
A página está carregando...
A página está carregando...
A página está carregando...
A página está carregando...
A página está carregando...
A página está carregando...
A página está carregando...
A página está carregando...
A página está carregando...
A página está carregando...
A página está carregando...
A página está carregando...
A página está carregando...
A página está carregando...
A página está carregando...
A página está carregando...
A página está carregando...
A página está carregando...
A página está carregando...
A página está carregando...
A página está carregando...
A página está carregando...
A página está carregando...
A página está carregando...
A página está carregando...
A página está carregando...
A página está carregando...
A página está carregando...
A página está carregando...
A página está carregando...
A página está carregando...
A página está carregando...
A página está carregando...
A página está carregando...
A página está carregando...
A página está carregando...
A página está carregando...
A página está carregando...
A página está carregando...
A página está carregando...
A página está carregando...
A página está carregando...
A página está carregando...
A página está carregando...
A página está carregando...
A página está carregando...
A página está carregando...
A página está carregando...
A página está carregando...
A página está carregando...
A página está carregando...
A página está carregando...
A página está carregando...
A página está carregando...
A página está carregando...
A página está carregando...
A página está carregando...
A página está carregando...
A página está carregando...
A página está carregando...
A página está carregando...
A página está carregando...
A página está carregando...
A página está carregando...
A página está carregando...
A página está carregando...
A página está carregando...
A página está carregando...
A página está carregando...
A página está carregando...
A página está carregando...
A página está carregando...
A página está carregando...
A página está carregando...
A página está carregando...
A página está carregando...
A página está carregando...
A página está carregando...
A página está carregando...
A página está carregando...
A página está carregando...
A página está carregando...
A página está carregando...
A página está carregando...
A página está carregando...
A página está carregando...
A página está carregando...
A página está carregando...
A página está carregando...
A página está carregando...
A página está carregando...
A página está carregando...
A página está carregando...
A página está carregando...
A página está carregando...
A página está carregando...
A página está carregando...
A página está carregando...
A página está carregando...
A página está carregando...
A página está carregando...
A página está carregando...
A página está carregando...
A página está carregando...
A página está carregando...
A página está carregando...
A página está carregando...
A página está carregando...
A página está carregando...
A página está carregando...
A página está carregando...
A página está carregando...
A página está carregando...
A página está carregando...
A página está carregando...
A página está carregando...
A página está carregando...
A página está carregando...
A página está carregando...
A página está carregando...
A página está carregando...
A página está carregando...
A página está carregando...
A página está carregando...
A página está carregando...
A página está carregando...
A página está carregando...
A página está carregando...
A página está carregando...
A página está carregando...
A página está carregando...
A página está carregando...
A página está carregando...
A página está carregando...
A página está carregando...
A página está carregando...
A página está carregando...
A página está carregando...
A página está carregando...
A página está carregando...
A página está carregando...
A página está carregando...
A página está carregando...
A página está carregando...
A página está carregando...
A página está carregando...
A página está carregando...
A página está carregando...
A página está carregando...
A página está carregando...
A página está carregando...
A página está carregando...
A página está carregando...
A página está carregando...
A página está carregando...
A página está carregando...
A página está carregando...
A página está carregando...
A página está carregando...
A página está carregando...
-
 1
1
-
 2
2
-
 3
3
-
 4
4
-
 5
5
-
 6
6
-
 7
7
-
 8
8
-
 9
9
-
 10
10
-
 11
11
-
 12
12
-
 13
13
-
 14
14
-
 15
15
-
 16
16
-
 17
17
-
 18
18
-
 19
19
-
 20
20
-
 21
21
-
 22
22
-
 23
23
-
 24
24
-
 25
25
-
 26
26
-
 27
27
-
 28
28
-
 29
29
-
 30
30
-
 31
31
-
 32
32
-
 33
33
-
 34
34
-
 35
35
-
 36
36
-
 37
37
-
 38
38
-
 39
39
-
 40
40
-
 41
41
-
 42
42
-
 43
43
-
 44
44
-
 45
45
-
 46
46
-
 47
47
-
 48
48
-
 49
49
-
 50
50
-
 51
51
-
 52
52
-
 53
53
-
 54
54
-
 55
55
-
 56
56
-
 57
57
-
 58
58
-
 59
59
-
 60
60
-
 61
61
-
 62
62
-
 63
63
-
 64
64
-
 65
65
-
 66
66
-
 67
67
-
 68
68
-
 69
69
-
 70
70
-
 71
71
-
 72
72
-
 73
73
-
 74
74
-
 75
75
-
 76
76
-
 77
77
-
 78
78
-
 79
79
-
 80
80
-
 81
81
-
 82
82
-
 83
83
-
 84
84
-
 85
85
-
 86
86
-
 87
87
-
 88
88
-
 89
89
-
 90
90
-
 91
91
-
 92
92
-
 93
93
-
 94
94
-
 95
95
-
 96
96
-
 97
97
-
 98
98
-
 99
99
-
 100
100
-
 101
101
-
 102
102
-
 103
103
-
 104
104
-
 105
105
-
 106
106
-
 107
107
-
 108
108
-
 109
109
-
 110
110
-
 111
111
-
 112
112
-
 113
113
-
 114
114
-
 115
115
-
 116
116
-
 117
117
-
 118
118
-
 119
119
-
 120
120
-
 121
121
-
 122
122
-
 123
123
-
 124
124
-
 125
125
-
 126
126
-
 127
127
-
 128
128
-
 129
129
-
 130
130
-
 131
131
-
 132
132
-
 133
133
-
 134
134
-
 135
135
-
 136
136
-
 137
137
-
 138
138
-
 139
139
-
 140
140
-
 141
141
-
 142
142
-
 143
143
-
 144
144
-
 145
145
-
 146
146
-
 147
147
-
 148
148
-
 149
149
-
 150
150
-
 151
151
-
 152
152
-
 153
153
-
 154
154
-
 155
155
-
 156
156
-
 157
157
-
 158
158
-
 159
159
-
 160
160
-
 161
161
-
 162
162
-
 163
163
-
 164
164
-
 165
165
-
 166
166
-
 167
167
-
 168
168
-
 169
169
-
 170
170
-
 171
171
-
 172
172
-
 173
173
-
 174
174
-
 175
175
-
 176
176
-
 177
177
-
 178
178
-
 179
179
-
 180
180
-
 181
181
-
 182
182
-
 183
183
-
 184
184
-
 185
185
-
 186
186
-
 187
187
-
 188
188
-
 189
189
-
 190
190
-
 191
191
-
 192
192
-
 193
193
-
 194
194
-
 195
195
-
 196
196
-
 197
197
-
 198
198
-
 199
199
-
 200
200
-
 201
201
-
 202
202
-
 203
203
-
 204
204
-
 205
205
-
 206
206
-
 207
207
-
 208
208
-
 209
209
-
 210
210
-
 211
211
-
 212
212
-
 213
213
-
 214
214
-
 215
215
-
 216
216
-
 217
217
-
 218
218
-
 219
219
-
 220
220
-
 221
221
-
 222
222
-
 223
223
-
 224
224
-
 225
225
-
 226
226
-
 227
227
-
 228
228
-
 229
229
-
 230
230
-
 231
231
-
 232
232
-
 233
233
-
 234
234
-
 235
235
-
 236
236
-
 237
237
-
 238
238
-
 239
239
-
 240
240
-
 241
241
-
 242
242
-
 243
243
-
 244
244
-
 245
245
-
 246
246
-
 247
247
-
 248
248
-
 249
249
-
 250
250
-
 251
251
-
 252
252
-
 253
253
-
 254
254
-
 255
255
-
 256
256
-
 257
257
-
 258
258
-
 259
259
-
 260
260
-
 261
261
-
 262
262
-
 263
263
-
 264
264
-
 265
265
-
 266
266
-
 267
267
-
 268
268
-
 269
269
-
 270
270
-
 271
271
-
 272
272
-
 273
273
-
 274
274
-
 275
275
-
 276
276
-
 277
277
-
 278
278
-
 279
279
-
 280
280


De Dietrich DOP490BE1 Manual do proprietário
- Categoria
- Fornos
- Tipo
- Manual do proprietário
em outras línguas
- español: De Dietrich DOP490BE1 El manual del propietario
- français: De Dietrich DOP490BE1 Le manuel du propriétaire
- English: De Dietrich DOP490BE1 Owner's manual
- Nederlands: De Dietrich DOP490BE1 de handleiding
- Deutsch: De Dietrich DOP490BE1 Bedienungsanleitung
- dansk: De Dietrich DOP490BE1 Brugervejledning