Samsung MX-FS9000 Manual do usuário
- Categoria
- Tocadores de CD
- Tipo
- Manual do usuário
Este manual também é adequado para

the possibilities
Thank you for purchasing this Samsung product.
To receive more complete serwce.
D_easeregister your product at
www. samsung,com/register

Safety Warnings
TOREDUCETHERISKOFELECTRICSHOCK,DONOTREMOVETHECOVER(ORBACK).
NOUSER-SERVICEABLEPARTSAREINSIDE.REFERSERVICINGTO QUALIFIEDSERVICEPERSONNEL.
Thissymbolindicates"dangerousvoyage"inside CAUTION : TOPREVENTELECTRICSHOCK, Thissymbolhdicatesimportantinstructions
theproductthatpresentsa riskd electricshockor MATCHWIDEBLADEOFPLUGTOWIDESLOT,FULLYaccompanyingthe product.
personalir/jury. INSERT,
WARNING
• To reduce the risk of fire or electdc shock, do not
expose this appliance to rain or moisture.
CAUTION
• Apparatus shall not beexposed to dripping or splashing
and no objects filled with liquids, such as vases, shall be
placed on the apparatus.
• The Mains pDg is used as a disconnect de\4ceand shall
stayreadilyoperable at any time.
• Use onlya properly grounded plug and receptacle.
- An improperground may cause electricshock or
equipment damage. (ClassI Equipment only.)
• CLASS 3B VISIBLEAND INVISIBLELASERRADIATION
WHEN OPEN.AVOIDEXPOSURETOTHE BEAM (IEC
60825-1)
• THIS PRODUCTUTILIZESA LASER. USEOF
CONTROLSOR ADJUSTMENTSOR PERFORMANCE
OF PROCEDURESOTHERTHAN THOSE SPECIFIED
HEREINMAY RESULTINHAZARDOUS RADIATION
EXPOSURE.DO NOT OPENCOVERAND DO NOT
REPAIRYOURSELRREFERSERVICINGTO QUALIFIED
PERSONNEL.
CLASS 1 LASER PRODUCT
This Compact Disc player is classified as a CLASS 1
LASER product.
Use of controls, adjustments or performance of
procedures other than those specified herein may result in
hazardous radiation exposure.
DANGER :
* Complies with 21CFR 1040.10except fordeviations
pursuant to LaserNotice No. 50, dated ,June24, 2007
* VISIBLEAND INVISIBLELASER RADIATIONWHEN
OPEN. AVOID DIRECTEXPOSURETO BEAM. (FDA21
CFR)
o The amount of such administration charge will be advised to you before any work or home visit is carried out,
2 English

ImportantInformationon Use
• Ensure that the AC power supply in your house complies
with the identification sticker located on the back of your
product.
• Installyour product horizontally,on a suitable base (furniture),
with enough space around itfor ventilation (7.5~10cm).
• Do not place the product on amplifiers or other equipment
which may become hot. Make sure the ventilation slots are
not covered.
• Do not stack anything on top of the product.
• Before moving the product, ensure the Disc Insert Hole is
empty.
• In order to disconnect the product completely from the
power supply, remove the AC plug from the wall outlet,
especiallywhen ]eftunused for a long period of time.
• During thunderstorms, disconnect the AC plug from the wall
outlet. Voltage peaks due to lightning could damage the
product.
• Do not expose the product to direct sunlight or other heat
sourees. This could lead to overheating and malfunction of
the product.
• Protect the product from moisture, and excess heat or
equipment creating strong magnetic or electric fields (i.e.
speakers.).
• Disconnect the power cable from the AC supply if the
product malfunctions. Your product is not intended for
industrialuse.
• Use of this product is for personal use only.
• Condensation may occur ifyour product or disc has been
stored in cold temperatures. If transporting the product
during the winter, wait approximately 2 hours until the
product has reached room temperature before using.
• The batteriesused with this product contain chemicals
that are harmfulto the environment. Do not dispose of
batteries in the generalhousehold trash.
• Maintain an open space ofapproximately 6 inches (15 ore)
on the sides and rear ofthe system, for ventilationpurposes.
• Placethe loudspeakers at a reasonable distance on either
sideof the system to ensure good stereo sound.
• Direct the loudspeakers towards the listening area.
Small scratches on the disc may reduce sound and picture
quality or cause skipping.
Be especially careful not to scratch discs when handling
them.
Holding D!scs ...............................
• Do not touch the playback sideof the disc.
• Hold the disc by the edges sothat fingerprints will not get
on the surface.
• Do not stick paper or tape on the disc.
Disc Storage
* Donot keep in direct sunlight.
* Keepin acool ventilated area.
* Keepin aclean Protectionjacket.
Storevertically.
, Do not allowthe discs to become contaminatedwith dirt,
, Do not loadcracked or scratcheddiscs,
Handling and Storing Discs ......
If you get fingerprints or dirt on the disc, clean itwith a
mild detergent diluted in water and wipe with a soft cloth.
• When cleaning,wipe gentlyfrom the inside to the outside of
the disc
• Condensation may form ifwarm air comes into contact
with cold parts inside the produd. When condensation
forms inside the product, it may not operate correctly. Ifthis
occurs, removethe disc and let the product stand for I or
2 hours with the power on,
ThisproductdoesnotsupportSecure(DRM)Mediafiles.
CD-R Discs
* SomeCD-R discs may not be playabledepending on
the disc recording device (CD-Recorder or PC) and the
condition ofthe disc.
* Usea 650MB/74 minute CD-R disc.
Do not use CD-R discs over 700MB/80 minutes as they
may not be played back.
* SomeCD-RW (RewritabD)media,may not be playable.
* OnlyCD-Rs that are properly "closed" can befully played. If
the session isclosed but the disc is leftopen, you may not
be able to fully playthe disc.
CD-R MP3/WMA Discs
* OnlyCD-R discs with MP3 files in iSO9660 or ,Jolietformat
can be played.
* MP3 filenamesshould contain no blank spaces or special
characters (./ = +),
* Usediscs recorded with a compression/decompression
data rate greaterthan 128Kbps.
o Onlyfiles with the ".rap3" and ".wma" extensions can be
played.
* Onlya consecutively written multisessiondisc can be
played. Ifthere isa blank segment in the Multisession disc,
the disc can be played onlyup to the blank segment,
* Ifthe disc is not closed, it will take longer to begin playback
and not allof the recorded files may be played.
* Forfiles encoded in VariableBit Rate (VBR)format, i.e.files
encoded in both low bit rate and high bit rate (e.g., 32Kbps
320Kbps), the sound may skip during playback.
* A maximum of 999 files can be played per CD.
* Supported Audio Formats(Bit Rate):WMA56-128kbps,
MP3 80~320kbps
English 3

Contents
Thank you for buying this SAMSUNG Hi-Fi Component system,
Please take time to read these instructions.
They will allow you to operate your system with ease and take full advantage of its features,
Safety Warnings ................................................. 2
Important Information On Use .......................... 3
Precautions .................................................... 3
Cautions On Handling And Storing Discs
...................................................................... 3
Disc Types And Disc Format .......................... 3
Accessories ........................................................ 4
Description ......................................................... 5
Front Panel .................................................... 5
Rear Panel ..................................................... 6
Remote Control ............................................. 7
Installing Batteries InThe Remote
Control .................................................... 7
Connecting the Speakers .............................. 8
Attacking the speaker foot ............................. 8
Basic Functions ................................................. 9
Display Function ............................................ 9
Playing CD ..................................................... 9
Loading Compact Disc............................ 9
CD/MP3/WMA-CD Playback .................. 9
Selecting a Track................................... 10
Searching a TracWFolder Quickly .......... 10
Searching For Specific Music Passage
onaOD ................................................. 10
Repeat one or All Tracks on the CD....... 10
A-B Repeat Playback ............................ 10
CD Programming .................................. 10
Checking or Editing the Programmed
Track ..................................................... 11
Playing USB................................................. 11
Before You Begin!.................................. 11
To Select a File from USB Device .......... 11
To Use High Speed Search ................... 11
To Delete a File ...................................... 11
To Skip Next 10 Files............................. 12
Move FOLDER ...................................... 12
How to safelyremovethe USBdevice...... 12
Before Using the USB Storage .............. 12
Bluetooth ..................................................... 12
What is Bluetooth? ................................ 12
To connect the Hi-Fi Component to a
Bluetooth device .................................... 12
To disconnect the Bluetooth device from
Hi-Fi Component ................................... 13
To disconnect Hi-Fi Component from
the Bluetooth device.............................. 13
Using My Karaoke ....................................... 13
10 Skip Function .......................................... 14
Auto Change Function ................................. 14
Listening a Radio ......................................... 14
To Store the Stations You Want ............. 14
Selecting a Stored Station ..................... 14
Advanced Functions ........................................ 15
Timer Function ............................................. 15
Setting the Clock ................................... 15
Settii_g the Timel ................................... 15
Cancelling the Timer .............................. 16
Recording Function...................................... 16
Basic Recording .................................... 16
Recording Speed .................................. 17
Special Sound Effect.................................... 17
Selecting EQ Mode ............................... 17
Using the FOOTBALL Mode .................. 17
GIGA SOUND Function ......................... 17
BEAT WAVING Function ........................ 18
DJ BEAT Function ................................. 18
Booting Sound Function........................ 18
Troubleshooting ............................................... 19
Specifications .................................................. 20
Symbols Important (_ Le_ Note _'-
Check forthe supplied accessories below.
• Figures and illustrations in this User's Manual are provided for reference only and may differ from actual product
appearance.
4 English

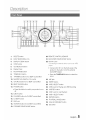
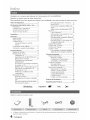
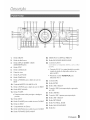
Description
1, DELETE button
2, EASYSEARCHING JOG
3, DISPLAY/DEMO button
4. STOP button
5. CD/Bluetooth button
6. Display Panel
7, PLAY/PAUSE button
8, TUNER/AUX button
9, +PANNING button for DJ BEATsound effect
10, MASTER VOLUME/DJ JOG control
11, CHORUS button for DJ BEAT sound effect
12. BEATWAVING button
13. POWER button
Pressthis button to switch your product on or
off,
14. EJECT button
15, FLANGER button for DJ BEAT sound effect
16, DJ BEAT button
17, DISCslot
18, WAHWAH button for DJ BEATsound effect
19, FORWARD SEARCH/SKIP button
20, REMOTE CONTROL SENSOR
21, BACKWARD SEARCH/SKIP button
22. AUX IN 1jack
Connecting an externaldevice such as an MPS
player.
o Connect AUX IN 1on the front panel of the
product to the Audio Out of the external
device/MP3 player.
o Pressthe TUNER/AUX button to select the
AUX1,
23, MIC jack
24, ENTER button
25, USB 2 SELECT button
26, USB 2 jack for Playingand USB Recording
27. USB REC button
28, USB 1jack for only Playback
29. USB 1SELECT button
30, RETURN button
31. FOOTBALL MODE button
32, GIGA SOUND BEATbutton
33. EQ button
English 5

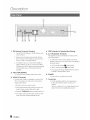
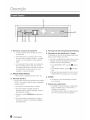
Description
1. FM Antenna Connector Terminal
1. Connect the FM antenna to the FM antenna con-
nector terminal.
2. Slowly move the antenna wire around untilyou
find a location where reception is good, then fas-
ten it to a wall or other rigid surface.
3. If reception is poor, you may need to install an
outdoor antenna. To do so, connect an outdoor
FM antenna to the FM antenna connector terminal
of the product using a 75-Qcoaxial cane (not
supplied).
2, ONLY FOR SERVICE
This jack is just for testing, please don't use it.
3. AUX IN 2 Terminals
1. Use the Audio Cable (not supplied) to connect AUX
IN 2 on the product to Audio Out on the external
analog output device.
Be sure to match connector colors.
Ifthe external analog output device has only one
Audio Out jack, connect either left or right.
Press the TUNER/AUX button to select the AUX 2.
Ifno button actions for more than 8 hours in AUX
mode, the power will automatically turn off.
4. LED Terminals for Speaker Beat Waving.
5. 2.2 OH Speaker Terminals
The speakers connector terminals are located on the
rear of the product.
1. Toachieve the correct sound qual_y, insert those
speaker connectors to the same color of the speaker
terminals system.
LEFT channel (marked O, White/Purple).
RIGHT channel (marked O, Red/Purple).
Don't plug in the Purple SUBWOOFER connector
to White or Red terminal by force.
6. POWER
Insertonlythe providedpowercable.
7. Cooling fan
The fan operates while the unit is powered on.
If set to the minimum volume, the fan won't
operate.
Secure a minimum 10 cm of clear space from all
sides of the fan when installing the product.
6 English

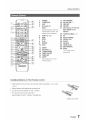
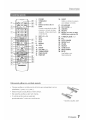
i.T-
TUNERJAUXUSB CDJm_e_o_h
REPEAT
SnMSUNG
1. POWER 17. MY KARAOKE
2. TUNER/AUX 18. MIC VOLUME -, +
3. USB 19. USB REC
4. Number(0~9) 20. DELETE
button 21. Mono/Stereo for FM, CD
During playback, press the REC SPEED for CD
desired track number. The Ripping
selected track is played, 22. TUNING/ALBUM A,V
5. SKIP(-10, +10) 23. EQ
6. SKIP 24. AUTO CHANGE
7. STOP 25. REPEAT A-B
8, PLAY 26. PAUSE
9. REPEAT 27. SEARCH
10. GIGA 28. CD/Bluetooth
2g. BEAT WAVING
11. ENTER 30. MUTE
12. VOLUME(-,+) Turn off the sound
13. TUNING MODE temporarily,
14. TIMER ON/OFF
15. TIMER SET
16. SLEEP
Set a sleep time to shut
off the product,
installing Batteries In The Remote Control
,,, Place batteriesin the remotecontrolso they matchthe polarity:(+)to (+)and
(-)to(-),
,,, Always replaceboth batteriesatthesame time.
,,, Do notexpose the batteriesto heat ora flame.
,,, The remotecontrol can be usedup to
approximately23feet (7meters)in astraight line.
•_ iiiiiil
* Battery size:AAA
English 7

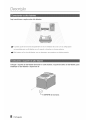
Description
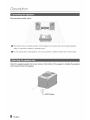
Recommended speaker setup.
(_'- The product may not operate properly if not installed in accordance with recommended speaker
setup, or exposed to shaking or external shocks.
(_'- Do not extend wires of the speakers, and do not pressed or peeled off them with a heavy object.
Attach the supplied speaker foot at rear corner on the bottom of the speaker to stabilize the speakers
and to prevent them from slipping.
0""
_T_ FOOT Rubber
8 English

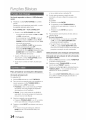
Basic Functions
You can view all functions available on the dis-
play, adjust the brightness of the display and
select the Display/LED either on or off.
Each time you press the DISPLAY/DEMO button
on the display mode will change as following:
÷ The Dimmer function
The Dimmer function is selected and the display dark-
ens.
÷ LED OFF
The LED is turned off while the dimmer function iswork-
ing.
÷ Clock ON
The Clock you set is displayed.
÷ Display/LED ON
All display and LED turned on.
The DEMO Music function
Press DISPLAY/DEMO button for 5 seconds to play
demo music.
When you press the DISPLAY/DEMO button, the
function operates as follows:
DIMMER _ LED Off (unit/speaker) _ --:-- [time dis-
play] _ LED On (unit/speaker)
- Tocancel the Demo Music mode
Press the DISPLAY/DEMO button for 5 seconds.
The current mode is canceled and the product is
turned off.
Press TUNER/AUX. CD/Bluetooth or USB button.
The current mode is canceled and the mode is
changed to the mode you selected.
- While playing DEMO Music. all buttons will not work
except _ [Power], VOL, _ [MUTE] and buttons
mentioned above.
Loading Compact Disc
You can play 12 cm compact compact disc that
requires no adapter.
1. Insert a disc gently into the disc slot with the disc's
label facing up and then disc will be played
automatically.
You can load or unload compact discs when the
radio, USB or auxiliary source function is selected,
and when you press the EJECT button, allof the
other functions will be changed to the CD mode.
If no buttons are pressed on the product or remote
control for more than 3 minutes when the product is
in Pause mode, itwill be changed to Stop mode.
Ifno buttons are pressed on the product or remote
control for more than 25 minutes when the product
is in Stop mode. the power will automatically turn off.
CD/M P3/WMA-CD P!ayback .......................................................................
(_ This product is designed to play an audio CD, CD-R,
CD-RW, MP3/WMA-CD.
1.
2.
Insert a disc gently into the disc slot with the disc's
label facing up.
The disc will be played automatically.
* ForMP3/WMA-CD audio, it may take several minutes
to complete scanning the disc tracks.
* Ifyou playa file with an English nameor a MP3/
WMA-CD medium in an English title,the songtitle will
be shown in the display.(Other languages besides
Englishmay not be indicated.)
. An English4itled track containing a special character
will not show the title in the display.
_;I,;IH;I,;I_:::!!!;;,'-- Playtimeindicator
3. Adjust the volume according to needs with the
following procedures.
Turn the VOLUME centrel on the product.
Pressthe VOL + or VOL - button of the remote
control.
The volume levelcan be adjust in 31 steps(VOLUME
MIN. VOLUME01- VOLUME 29, and VOLUME MAX).
4. Main Unit
To pause playback temporarily, press the I_11button,
Press I_11again to continue playing the disc.
Remote control
To pause playback temporarily, press the PAUSE(II) but-
ton.
Press PLAY(_') button to continue playingthe disc.
5. To end playing, press the STOP (11)button.
* If thereis not a CD inserted itis indicated as "NO DISC".
The quality of MP3/WMA-CD playback may wiry
depending on the condition of the disc containing the
music filesor the condition of the recorder with which the
disc was created.
If different types of filesor unnecessaryfolders are on the
same disc. you will have problems with playback.
Gently insert a CD into the disc slot and do not apply
excessive force.
o Do not put force or place a heaW object on the
product.
o Do not insert an out-of-spec, shape of CD such as a
heart or octangle shaped CD. Otherwise, the product
may be damaged.
o Care must be taken about maintenance of the compact
discs.
English

Basic Functions
Selecting a Track
You can select a desired track while the disc is
being played.
PresstheI_ buttonwithin3 secondsafterthe current
track startedplaying.
PresstheI_ buttontwiceat least3 secondsafterthe
currenttrackstartedplaying.
To_ the next track
Pressthe _1 button.
To_ the current track
PresstheI_ button3 secondslaterafterthecurrent
track startedplaying.
Pressthe 144or _,_1buttonto moveto adesiredtrack.
• Youcanalsouse the number (0-9) button onthe
remotecontrol to select a track,
Searching a TracWFolder Quickly
You can select a tracWfolder directly without
the I_, _-I button.
CDDA/MP3-OD/WMA-CD
1. Turn the EASY SEARCHING JOG control on the
product to the left or right to select a desired track.
• Youcan move to the selected track directly.
2. When the searching is done, the trackwill
automatically start playing.
Searching for a Specific Music Passage on
a CD
When listening to a compact disc, you can quickly
search for a specific music passage on a track.
ForwardSearch............................
BackwardSearch.........................
You can also press and holdthe 144,_l button on
the product to automaticallyscan for atrack,
Repeat One or All Tracks on the CD
You can repeat playing CD unlimitedly:
o CD containing a specific track.
o Whole tracks of a CD.
1.
2.
Press the REPEAT button on the remote
control.
Each time you press the REPEAT button, the
repeat mode will change as following:
MP3: OFF_ TRACK_ DIR_ ALL_ RANDOM
CD: OFF_ TRACK_ ALL_ RANDOM
When you wish to stop the repeat function,
press the REPEAT button until "OFF" is
displayed,
OFF: Cancelsrepeat playback
TRACK: Repeatedlyplays the selectedtrack
DLR(DIRECTORY):Repeatedly playsalltracks
inthe seJecteddirectory,
ALL: Repeatedlyplaysthe entire disc,
RANDOM: Playstracks in randomorder,
A-B Repeat Playback
You can repeatedly play back a designated
section of a CD.
1. Press the REPEAT A-B button at the beginning
of desired part,
• 'RPT A' will bedisplayed
2. Press the REPEAT A-B button at the ending of
desired part.
• 'RPT AB' will bedisplayed,
3. To cancel REPEAT A-B function, press the
REPEAT A-B button again.
'OFF' will bedisplayed,
REPEATA-B function is availablewithin a track,
CD Programming
This function is not available during playback of an
MP3iWMA-CD.
You can program the playback order of upto 24
tracks ofyour choice
However,you must stop playingthe CD before
selectingtracks,
1. While inCD playback mode, press the
STOP(m) button to stop playing the CD.
2. Press the ENTER ( _ ) button to display the
message below:
_- Qi 'E_
(01= program number, .... track number)
_ English

Basic functions
3. Usethe m_ or _,_mbutton to move to a desired
track.
• Press 1,4,_to move to the previous track.
• Press _1 to move to the next track.
4. Pressthe ENTER ((2_) button to confirm your
selection, the selection is stored and
_ iC is displayed.
5.
6.
7.
To select a different track, following the steps 3
to 4 above.
Pressthe PLAY(D,)button to playthe
programmed tracks.
Pressthe STOP(m) button to stop playing the
programmed tracks, Press the STOP (u) button
again to cancel playing the programmed tracks.
• Ifyou eject the disc or turn off the product
or change other function mode, your
programming will be canceled.
Checking or Editing the Programmed
Track
You can check a list of programmed tracks and
edit them as you want.
1. Ifa programmed track isbeing played, press
the STOP(U) button once.
2. Pressthe ENTER (C_) button twice to display
the message below:
.Tf-{LEi:::i£:[J 2_!'/::_C£ X}-_
(01- programnumber,002- tracknumber)
3. Repeat pressing the ENTER ( C_ ) button until
the desired track is displayed.
4. Pressthe 144or _,_1button to select a different
track.
5. Pressthe ENTER (_) button to confirm your
selection.
6. To play the programmed tracks, press the Play
(D,)button.
Connect an external storage device such as USB
flash memory or external HDD (Hard Disk Drive) to
the product. Youcan play files in MP3/WMA format.
Before you begin!
1. ConnecttheexternalUSBstoragedeviceto your
product.
3.
4.
Select the USB mode by pressing the USB 1 or USB 2
button on the product or the USB button on the remote
control.
The first file of the first directory plays automatbally.
To stop playing
Pressthe STOP (m )button to stop playing.
To remove the USB device
if you press the STOP ( [] ) button once
again, you can remove the USB device safe-
ly.
(qF" Do not connect a USB recharger to the USB
port of this product. Otherwise, the product may
be damaged.
To Select a File from USB Device
You can select an MP3 file during the play.
If you want to move the next/previous(fib), press the
144,_1 buttons shortly.
,, It moves the next/previous fib within the directory.
,, If you press the I_._,_-t bL_tons more times than the
number ofthe files in the directory, it will move over to
the next directory.
1. PresstheREPEATbutton.
Eachtimeyou presstheREPEATbutton,therepeat
modewillchangeasfollowing:
OFF_ TRACK_ DIR_ ALL_ RANDOM
2,
When you wish to stop the repeat function, press the
REPEAT button until "OFF" is displayed.
,, OFF: Cancels repeat playback.
,, TRACK: Repeatedly plays the selected file.
,, DIR(DIRECTORY): Repeatedly plays allfiles in the
selected bider.
,, ALL: Repeatedly plays allfiles.
,, RANDOM: Plays fibs in random order.
To Use High Speed Search
You can search the desired section quickly during
the play.
1. Pressthe_,_ button.
• Eachtimeyoupressthebutton, youwillmove
forward/backwardfast.
(qr' The sound will not output in high speed search.
To Delete a File
You can delete a file in your USB device.
1. Selecta fileyouwanttodelete.
2. PresstheDELETEbutton.
3. PressI_,lJ_.lbuttonsontheproductandremotecontrol
toselectYES.
,, Tocanceltheselection,presstheRETURNbuttonon
theproduct.
English ii

Basic Functions
4. Press the ENTER button on the remote control.
The selected file will be deleted.
(qr' Tile NTFS file system is not supported.
To Skip Next 10 Files
1. Pressthe+10or-10 buttonwhileinplaybackmode.
Thiswillskipthefliesas manyas10or -10fromthe
currentfile.
Move FOLDER
Presstheremotecontrol'sTUNING/ALBUMA,V button
to movefromthebackfolderto thefrontfolder.
How to safely remove the USB device
1. Pressthe(m)buttontwicewhiletheUSBisplayingand
pressthe(I) buttononcewhenit isat ablockstate.
2. IfaREMOVEmessageappearsonscreen,removethe
USBdevice.
Before Using the USB Storage
• SomeUSBdevicesmaynotworkproperEywiththis
product.
• ThisproductsupportsonlyanexternalHDDthatis
formattedin FATfilesystem.
• USB2.0HDDshouldbeconnectedtoaseparatepower
source.Otherwise,theUSB2.0HDDwillnotworkatall.
• IfanUSBexternalstorageisconnectedto multipledevices,
onlytheMP3filesinthefirstHDDwillbeplayed.
• DRM-appliedfilesarenotsupported.DigitalRight
Management:Thiswillrestrictunauthorizedaccesstoa
DRMfilesothatthecopyrightofthefileisprotectedfrom
piracy.
• Eveniftheextensionofthefileis.rap3,thefilecannotbe
playedif itisformattedinMPEGlayer1or 2.
• DonotuseanunrecognizedUSBhub.
• Onlythefirst150haractersofaMP3/WMAfileare
displayed.
• OnlyremovaUeHDDswithlessthan160GBaresupported.
Dependingonthedevice,a160GB-ormoreremovable
HDDmaynotbesupported.
• Itwilltakeseveralminutestorecognizethefilesinthe
selectedUSBdevice.
• TheUSBdevice(USBHDD,inparticular)maycausea
delayto movetothenextfile.
• TheUSBstoragesupportingonlyUSBVER1.1mayperform
aslowaccessormaynotrecognizethefileproperties.
o ThemaximumcurrentsupportedbyanexternalUSB
deviceviaeachUSBportis0.5A (basedon DC5V).
ifthereisnoUSBconnectionor STOPmodelastsfor
morethan25 minutes,theproductwillautomatically
turnoff.
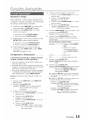
You can use a Bluetooth device to enjoy music with
high quality stereo sound, all without wires!
What is Bluetooth?
Bluetooth is a technology that enables Bluetooth
compliant devices to interconnect easily with each
other using a short wireless connection.
• ABluetoothdevicemaycausenoiseormalfunction,
dependingonusage,when:
- Apartofyourbodyisincontactwiththereceiving/
transmittingsystemoftheBluetoothdeviceortheHi-Fi
Component.
- Itissubjectto electricalvariationfromobstructionscaused
byawall,corner,or officepartitioning.
- Itisexposedtoelectricalinterferencefromsamefrequency-
banddevicesincludingmedicalequipment,microwave
ovens,andwirelessLANs.
• PairtheHi-FiComponentwiththeBuetoothdevicewhile
theyareclosetogether.
• ThefurtherthedistanceisbetweenHi-FiComponentand
Buetoothdevice,theworsethequalityis.Ifthedistance
exceedstheBluetoothoperationalrange,theconnectionis
lost.
• Inpoorreception-sensitivityareas,theBluetoothconnection
maynotworkproperly.
• TheBluetoothconnectiononlyworkswhenit iscloseto
theset.Theconnectionwillbeautomaticallycut offifthe
distanceisoutofthisrange.Evenwithinthisrange,the
soundqualitymaybedegradedbyobstaclessuchaswails
ordoors.
• Thiswirelessdevicemaycauseelectricinterferenceduring
itsoperation.
To connect the Hi-Fi Component to a
Bluetooth device
Check ifthe Bluetooth device supports the Blue-
tooth compliant stereo headset function.
1. PresstheCD/BluetoothbuttonoftheHi-FiComponent
todisplaytheBLUETOOTHmessage.
YouwillseeWAITforawhileandthenREADYonthe
frontdisplayoftheHi-FiComponent.
2. SelecttheBluetoothmenuontheBluetoothdeviceyou
wanttoconnect.(RefertotheBluetoothdevice'suser
manual.)
3. SelecttheStereoheadsetmenuontheBluetoothdevice.
Youwillseealistofscanneddevices.
4. Select"[Samsung]HI-FIXXXXXX"fromthelist.
WhentheComponentisconnectedtotheBuetooth
device,itwilldisplayCONNECTED-, BLUETOOTH
onthefrontdisplay.
12 English

Basic functions
• Ifthe Bluetooth device has failedpair with the
Component, delete the previous "[Samsung]HI-Fi
XXX,VUd''found bythe Bluetooth device and make it
searchfor the component again.
5. Play music on the connected device.
• You can listento the music playingon the connected
Bluetooth device over the Hi-Fi Component system.
• In Bluetooth mode, some model's Play/Repeat/Stop/
Next/Back functions are not available.
Tile product only supports Middle Quality SBC data (up
to 237kbps@48kHz), and does not support High Quality
SBC data ([email protected]).
• TheAVRCP feature is not supported.
• Connect onlyto a Bluetooth device that supports the
A2DP (AV}function.
• You cannot connect to a Bluetooth device that
supports only the HF (Hands Free)function.
• Only one Bluetooth device can be paired at a time.
• Once you haveturned off Hi-FiComponent and the
pairing isdisconnected, the pairingwill not be restored
automatbally. Toreconnect, you must pairthe devbe
again.
• Searchor connection may not be performed properly
by Hi-Fi Component in the following cases.
- Ifthere isa strong electrical fieldaround Hi-Fi
Component.
- Ifseveral Bluetooth devices are simultaneously paired
with Hi-FiComponent.
- Ifthe Bluetooth device is turned off, not in place,or
malfunctions.
- Note that such devices as microwave ovens, wireless
LAN adaptors, fluorescent lights, and gas stoves use
the same frequency range as the Bluetooth device,
which can causeelectric interference.
To disconnect the Bluetooth device from
Hi-Fi Component
You can disconnect the Bluetooth device from Hi-
Fi Component. For instructions, see the Bluetooth
device's user manual.
• Hi-FiComponent will be disconnected.
• When Hi-FiComponent isdisconnected from the Bluetooth
device,Hi-Fi Component will display DISCONNECTED ...*
READY on the front display.
To disconnect HI-FIComponent from
the Bluetooth device
Press the CD/Bluetooth button on the front panel
of Hi-Fi Component to switch from Bluetooth mode
to another mode or turn off Hi-Fi Component.
• The connected Bluetooth device will wait a certaintime for
a response from HI-FiComponent beforeterminating the
connection.(Disconnection time may differ,depending on
the Bluetooth device)
• The currently connected device will be disconnected.
In Bluetooth connection mode, the Bluetooth connection
will be lost ifthe distance between the Hi-Fi Component
and the Bluetooth device exceeds (5 meters).
_, If the Bluetooth device coraes back into the effective
range and then again connect afterdisconnecting, you
can restartto restore the pairingwith the Bluetooth
device.
_, Hi-Fi Coraponent autoraaticallyturns off after 25
minutes in the Ready state.
You can use MY Karaoke function to sing along
with your favorite CDs and USB,
1. Connectthemicrophoneto theMICjack onthefront
oftheproduct.
,,_ Ifyourmicrophonejackislargerthan3.5(0)MIC
jack,youneeda Connector-Adaptor(option@to
completetheconnection.
First,connecttheConnector-AdaptortotheMICjackon
thefrontoftheproduct,
Second,connectthemicrophone(withlargerjack)to
theConnector-Adaptor.
2. Pressthe MIC VOL-, + button onthe remote
controlto adjustthevolume ofthe microphone.
3, PresstheMY KARAOKEbuttonontheremote
controlto suppressthevocalif youneed.Eachtime
thebuttonispressed,thesebctionischangedas
follows:
MY KARAOKEON ...*MY KARAOKEOFF
,,_ Ifyou hear strange noises (squealing or howling)
while using the Karaoke feature, move the
microphone away from the speakers. Turning down
the microphone's volume or the speaker volume is
also effective. Do not set the MICROPHONE towards
the SPEAKER.
,,_ The microphone does not operate in the AUX and
TUNER mode.
,,_ Ifyou connect with the Microphone, GIGA SOUND
will automatically turn off. Even ifyou remove the
microphone, itwill not turn on.
English 13

Basic Functions
,,_ WhenMyKaraokeison, EQ/GIGASOUNDand
FOOTBALLMODEdoes notwork.
,,_ Afterthestopoperation,thesettingof mykaraoke
willdisappear.
,,_ Onlywhenconnectedwitha Microphone,themy
karaokefunctionisavailable.
Press the +!0 or -10 button on the remote control
while in playback mode. This will skip the tracks
as many as 10 or -10 from the current track.
You can circularly play between the disc and the
USB.
1. Press the AUTO CHANGE button on the remote.
Each time press this button, the mode will switch
as following:
AUTO CHANGE ON _, AUTO CHANGE OFF
* When the AUTO CHANGE mode is "ON",
the music will be played on DISC _ USB1
USB2 continuously.
if you press the POWER button, function change
button or the EJECT button, the AUTO CHANGE
function automaticallyswitches to "OFF" mode.
the recordingcan't work.
the REPEAT, SLEEP function can't work and
automatically changes to OFF.
the CD REC SPEED, USB REC, NUMBER KEY
and DELETEfunction can't work.
* When USB is playing, if youdisconnected the USB,
the AUTO CHANGE function automatically switches
to "OFF" mode.
* Ifthere's no USB1, it willjump to USB2.
To Store the Stations You Want
You can store up to:
15 FM stations.
1. Select FM by pressing the TUNER/AUX button.
2. To search for a station by the preset mode or the
manual mode, press the TUNNING MODE button on
the remote contrd or the STOP button on the product.
* Preset :Once or more times until PRESETis
displayed. You can searchthe stored
frequencies in the preset mode.
* Manual : Once or more times until MANUAL is
displayed. You can search the frequendes
one by one in the Manual mode.
3. Select the station to be stored by:
Pressing the TUNING/ALBUM A or V button on
the remote control to select the preset station.
4. Press the MO/ST button to switch between stereo and
mono.
Ina poor reception area, select MONO for a
clear, interference-free broadcast.
This applies only when listening to an FM station.
5. Ifyou do not want to store the radio station found,
revert to Step 3 and search for another station.
Otherwise:
a. Press the ENTER button.
b. Or, press the TUNING/ALBUM button on the
remote control to select a program number.
c. Press the ENTER button to save the preset.
6. To store any other radio frequencies required, repeat
Steps 3 to 4.
In Tuner mode
Inthe Manual mode, you can use I_ or I_,_1button
or the EASY SEARCHING JOG control.
Inthe Preset mode, you can use I_ or I_,_1button or
the EASY SEARCHING JOG control on the product
to search a stored radio station.
Selecting a Stored Station
You can listen to a stored radio station as following:
1. Select FM by pressing the TUNER/AUX button on
the product and remote control.
2. Press the TUNING MODE button on the remote
control until "PRESET" is displayed.
3. Press 1_,_,€4button on the main unit or TUNING/
ALBUM A, V on the remote control to select a
desired preset number.
or
Turn the EASY SEARCHING JOG control leftor right on
the main unit to select the stored station.
14' English

Advanced Functions
Setting the Clock
For each step, you have a few seconds to set the
required options. If you exceed this time, you must
start again.
1. Press the TIMER SET button on the remote
control twice, "CLOCK SET" is displayed,
2. Press the ENTER (_) button on the remote
control, the hour flashes,
o Increase the hours: A
Decrease the hours: V
3_
4,_
When the correct hour is displayed, press the
ENTER (C2_) button and then the minutes flashes
Increase the minutes: A
Decrease the minutes: V
When the correct minute is displayed, press the
ENTER (_) button and then "TIMER PLAY
SET" appears in the display.
Setting the Timer
The timer enables you to switch the product on or
off at specific times automatically.
Before setting the timer, check that the current time
is correct,
For each step, you have a few seconds to set the
required options, If you exceed this time, you must
start again.
If you no longer want the product to be switched
on or off automatically, you must cancel the timer
by pressing the TIMER ON/OFF button,
Example: You wish to wake up to music every morn-
ing,
1. Pressthe TIMER SET button untilTIMER PLAY SET is
displayed.
2. Pressthe ENTER (C_) button.
Result: ON TIME is displayed for a few seconds, you
can set the timer switch-on time.
3. Setthe timer switch-on time.
a Press the TUNING/ALBUM A or V button to
set the hours.
b Pressthe ENTER ((2},) button.
Result: The minutes flash.
c Press the TUNING/ALBUM A or V button to
set the minutes.
d Pressthe ENTER (@J) button.
Result: OFF TIME isdisplayed for a few seconds,
you can now setthe timer switch-off time.
4. Set the timer switch-off time.
a Pressthe TUNING/ALBUM A or V button to
setthe hours.
b Press the ENTER ((:9') button.
Result: The minutes flash.
c Pressthe TUNING/ALBUM A or V button to set
the minutes.
d Press the ENTER (C5_) button.
Result: VOLUME XX is displayed, where XX corre-
spends to the volume already set.
5. Press the TUNING/ALBUM A or V button to adiust the
volume leveland press the ENTER (C_') button.
Result: The source to be selected isdisplayed.
6. Press the TUNING/ALBUM A or V button to select the
desired source to be played when the product switches
on.
If you select... You must also...
FM (radio).................... a Press the ENTER (Eg')
button.
b Select a preset station by
pressing the TUNING/
ALBUM A or V button.
CD (corapact disc) .....Load a corapact disc.
USB ............................ Connect the USB device.
7. Press the ENTER (_) button.
Result:TIMER REC SET(Do youwant to record?)is
displayed.
8. Press the ENTER (C_) button.
Result: REC SET YES/NO is displayed, you can press
the TUNING/ALBUM A or V button to select
the REC YES or REC NO, and then press
ENTER button.
1) Ifyou select the REC NO, it will cancel tuner tiraer
recording even ifyou have already set the tuner timer
recording.
2) Ifyou select the REC YES, you can set the tuner timer
recording.
a. Press the ENTER (C_ ) button.
Result: ON TIME is displayed for a few seconds,
you can set the tuner timer recording switch-
on time.
b. Press the ENTER (C_ ) button.
Result: OFF TIME is displayed for a few seconds,
you can set the tuner timer recording switch-
off time.
English 1-5

Advanced Functions
• The maximum time of tuner and aux timer recordingis
5 hours.
• Ifthe timer switch on and off times are identical, the
word ERROR is displayed.
• You may use I_._, _,_1buttons on the product instead of
the TUNING/ALBUM A or V button to adjust in step
3to8.
• Ifthe switch-on or -offtime isthe same as the timer
recording time, onlythe switch-on or -offtime is
effective,and the timer recording is not applied.
• Ifthe auto timer isturned on,the CD or USB function
may require an additional step to be activated
depending on the disc(ordevice). So itis better foryou
to select the tuner function instead.
• Ifyou select CD or USB mode when there is no disc or
no USB in the product, it will automaticallychange to
TUNER.
Cancelling the Timer
After having set the timer, it will start automatically
as shown by the TIMER ON message on the dis-
play. If you no longer wish to use the timer, you
must cancel it.
To cancel the timer, Press the TIMER ON/OFF button
once.
To restart the timer, Press the TIMER ON/OFF button
once again.
• Whenyou select the TIMER OFFmode, the TIMER
RECORDINGand TIMEfunction are not available.
Basic Recording
You can record sound of the CD, USB, the Radio
Broadcasting, and the external source into the
USB storage device.
1. Connect the external USB storage device you want
to record to the USB (,_=-__F.r_)on your product,
Music does not play back during file copy.
2. Play a disc or USB, adjust the radio frequency or
connect the external source to your product,
CD
,, Press the CD on the product to select the CD
function.
,, Insert a CD gently into the disc slot.
,, Use the CD selection ( I_ or _,_1)buttons to selectthe
desiredsong.
TUNER
* SelectFM by pressing the TUNER/AUX button.
* Adjust the Radio frequency you want to record.
USB 1
_' Connect the USB device including original files USB
device to USB 1jack.
,, Pressthe USB button to select USB 1.
_, Play a songfrom the USB 1.
External Source
,, Connect an ExternaldevicdMP3 playerto the
product.
,, Pressthe TUNER/AUX button to select <AUXIN 1 or
AUX IN2>.
,, Playa songfrom the external device.
3. Pressthe USB REC button on the remote control to
start recording.
CD
* Track recording message isdisplayed and CD
recording starts.
o Ifyou want to record the alltracks ofdisc, press and
hold the USB REC button. Then, Full CD recording
message will be displayed.
RADIO
* Tuner recording message is displayed and recording
starts.
CD-ROM/USB
* "FILECOPY" is displayed and recording starts.
* You can alsocopy a folder including MP3/WMA files
to USB2 device, ifyou press and hold the USB REC
button while the system playan MP3 or WMA file in
the folder, your system may show "FOLDERCOPY".
o Ifyou playthe MP3 or WMA file, the filewill be copied
into the USB device. Your system may show "FILE
COPY".
When the recording is done, "STOP" will be displayed.
* Ifthere is the same file namewhen you copy, "EXIST
FILE"is displayed, and the function is canceled.
o When a microphone is connected to the product if
you press the USB REC button, it activates the MP3
Recording not Copy function.
* When shortly pressing a USB RECbutton, the file
copy starts and when shortly pressing a USB REC
button for seconds, the foldercopy starts.
External Source
* AUX recording message is displayed and recording
starts.
CD/USBI(MP3) & MIC
* MP3 recording message is displayed and recording
starts.
4. To stop recording, press the STOP (m) button and
then automatically create and save as the MP3 file.
5. After the recording, a directory named
"RECORDING"(CD-DA), "CD COPY"(CD-ROM/
USB(WMA/MP3)), "TUNER RECORDING", "AUX
RECORDING" or "MP3 RECORDING" will be created
in your device.
_ English

Advanced functions
" TheWMA/MP2 fib just can be copied notrecorded.
,, Do not disconnect the USBor theAC Cord dunngthe
recordingasthis maycausefib damage.
,, If you disconnectedUSBdevicedunng the recording,
the productwill be power off andyou maynot deletethe
recordedfib, Inthb case, pleaseconnectthe USB device
to the PCand backupthe USB data onthe PCfirst and
then formatthe USBdevbe.
,, When theUSB memory isnot enough, itwillbe displayed
"NOTENOUGHMEMORY".
,, Therecordingworks ifthe USB deviceor the HDDis
formatted inthe FATfile system.(TheNTFSfile systemis
not supported.)
,, When you useCD high speedsearchfunction, the CD
recordingcan't work.
,, Sometimes,the recordingtimemay be longerwith some
USB devices.
• Inthe program mode, you can't use the CD recording
function.
• When alJrecording, the EQand GIGASOUND fundions
can not work and automaticallychange to OFE
• When the CD recording, the REPEATfunction can not
work andautomaticallychanges to OFE
• If you use the MICfunction during the CD recording,the
voicefrom the microphone will be recorded.
• You can not record the radiowhen searchingor no
availablefrequenciesin the Tuner mode.
• Note that setting the inputleveltoo loudwhen recording
music from an external devicethrough the AUXand USB
channelmay introduce noiseinto the recording. Inthat
case, lower the externaldevice's volume level.
Recording Speed
Each time you press the CD RED SPEED button
on the remote control, the recording speed will
change as following:
RECORD SPEED x 1 "* RECORD SPEED x 4
Whilethe tuner or external source is recording, the recording
speed does not supported.
When you select RECORDSPEED x 4, the audio sound
will not be output.
Ifyou connected the microphone,you just haveonerecording
speedmode: RECORDSPEEDx 1.
Duringrecording,ifyou dieconnectthe microphone,the
recordingwill stop,evenifyou reconnectthe microphone,it
will stillstop.
Selecting EQ Mode
Your product supports the predefined equalizer
settings between high and low frequencies to be
in harmonious with the current music genre.
1, PresstheEQbutton.
EachtimeyoupressthisbLOtCh,thesoundmodewill
switchasfollowing:
OFF-* FLAT.-,GENG E-.,BONGO..', RHUMBA.-*ESKP
STA-AFROPOP1 ._AFROPOP2- PARTY-*POP._H
IP HOP-,ROCK-', JAZZ..',CLASSIC.-* ELECTRONIC-,
MP3 ENHANCER"-, VIRTUAL SOUND-USER EQ
If you want to set the USER EQ mode, sebct the
USER EQ, then press the ENTER button. You can
set the BASS, MID(Middb) and TREB£rebb)level.
Result: The BASS bvel(bft numeric) flash.
Press the TUNING/ALBUM A or V button to
select from -06 to 06.
Press the ENTER button.
Result: The MIDDLE bvel(middb numeric) flash.
Press the TUNING/ALBUM A or V button to
select from -06 to 06.
Press the ENTER button.
Result: The TREBLE level(right numeric) flash.
Press the TUNING/ALBUM A or V button to
select from -06 to 06.
Press the ENTER button.
Result: setting is compbted.
• Whenallrecording,theEQfunctioncan'tworkandtheEO
automatballyswitchesto"OFF"mode.
• Ifno buttonsispressedwithin8seconds,yoursettingswill
automaticallybe cancelledandthe previoussettingswillbe
saved.
• TheEQmodemaybed_erentdependingon yourregion.
Using the FOOTBALL Mode
You can directly select the football mode for lis-
tening a sports broadcasting in realism,
1. Press the FOOTBALL MODE button on the product.
Each time you press the button, the sound mode will
switch as following:
FOOTBALL OFF - FOOTBALL MODE 1 "_
FOOTBALL MODE 2
° TheFOOTBALLmodemaybedifferentdependingon your
region.
GIGA SOUND Function
Your product is equipped with the function of
GIGA SOUND mode.
The function of GIGA SOUND mode amplifies bass
and improves high key or bass twice as much for
you to appreciate powerful real sound,
t. Press the GIGA SOUND BEAT button on the main
unit or the GIGA button on the remote control.
Each time press this button, the sound will switch as
following:
GIGA SOUND BEAT "_ GIGA SOUND OFF
2. To cancel this function, press the GIGA SOUND
BEAT button until the "OFF" is displayed.
,, The GIGA SOUND mode may be different depending
on your region.
English 1-7

Advanced Functions
BEAT WAVING Function
You can switch the Speaker LED mode to your
preference.
1. Each time you press the BEAT WAVING button on the
product, the Speaker LED display mode will change as
follovdng:
PARTY 1 "* PARTY 2 ", FUN 1 "* FUN 2 "* PURE "*
FRESH -, LOVE "* JOY -'* SUNSET -' SUNRISE "*
NATURE 1 "* NATURE 2 "* WAVE 1 "* WAVE 2 "*
AURORA -_ OFF
• Ifyou select the BEATWAVING OFF, all ofthe speaker
LED Lightings will turn off.
DJ BEAT Function
It sets FLANGER, PANNING, CHORUS, WAHWAH
sound effect and the level of each effect is adjust-
able.
(qr' The set scope is [-15 ~ +15] and the initial set up
value are all 0.
FLANGER : It creates avibration that is equal to the jet's rise/
fall.
PANNING : Itincreass the left/right speaker's output by turn
and makes itsound likeit is moving from sideto
side.
WAHWAH : It sounds like'Wah-- Wah--'.
CHORUS : It creates a vibration likea singinga chorus.
1. To set the desired effect, press one of the
FLANGER, PANNING, CHORUS, WAHWAH
button of the product.
• The blue LEDturns on around the relevantbutton and
the DJ BEAT button.
• Youcan controlthe levelof effect that was set to
Volume Jog.
Inorderto controlthe volume, press the product's DJ
BEAT button.
• Tocancel the seteffect, press the relevant button once
more.
• Tochange the set effect, press the desired effect
button.
• The PANNING effectcan be set with the FLANGER,
CHORUS, WAHWAH effect in duplicate.
• Toset the PANNING effect in duplicate, press the
PANNING button when another effect is set up or
press another effect button when the PANNING effect
has been applied.
• UseVelume JOG to control the level ofeffect that was
setup atthe end.
_,Tocontrel the levelof effect that was previouslyset,
press the button of effect that was setup at the end
and cancel the lasteffect first.
Booting Sound Function
If you set the booting sound, you can feel the
magnificent audio output of the product while it
boots up.
1. Press the product's GIGA SOUND BEAT button or
the remote control's GIGA button for a long time.
_,The BOOTING SOUND menuappears on the display
panel.
2. Press the product's GIGA SOUND BEAT button or
the remote control's GIGA button for a long time to
turn ON or OFF the BOOTING SOUND.
1-8 English

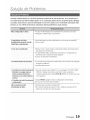
Troubleshooting
Refer to the chart below when this product does not function properly. If the problem you are
experiencing is not listed below or if the instruction below does not help, turn off the product,
disconnect the power cord, and contact the nearest authorized dealer or Samsung Electronics Service
Center.
Icannot eject the disc, • Isthe power cord plugged securelyinto the outlet?
Playback does not start
immediately when the
Play/Pause button is pressed.
Soune is not produced.
The remote control does not
work.
• The product is not working.
(Example: The power goes out or
the front panel key doesn't work
or astrange noise is heard.)
• The product is not working
normally.
• Turn offthe power andthen turn it back on,
• Are you using adeformed disc or a disc with scratches on the surface?
• Wipe the disc clean
• No sound is heardduring fast playback, slow playback, and step
motion playback,
• Are the speakers connected properly? Isthe speaker setup correctly
customized?
• Isthe disc severelydamaged?
• Isthe remote control beingoperated within its operation range of angle
anddistance?
• Are the batteriesdrained?
While "NO DISC"messageappears onthe displayofthe product, press
and holdthe STOP (.m)button onthe product for longerthan 5 seconds
with nodisc (RESETfunction),
Usingthe RESETfunction willerase allstored settings
Do not usethis unlessnecessary,
Can't receive radio broadcast. • Isthe antennaconnected properly?
• Ifthe antenna's input signalisweak, installanexternalFM antennain an
areawith good reception,
English 19

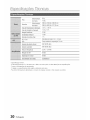
Specifications
Mainunil
Welgm
SpeaKer
Mainunil
Geaeral Dimensions SpeaKer
OperatingTemperatureRange
OperatingHumidityRange
8 Kg
70Kg
588(W)X238 (H)X388(D)
588(W)X882 (H)X577(D)
+5°C-+35°0
10%to75%
Signal/Noiseratio
usable sensl[IVl[V
rotanarmonlcUls[or1:lon
CD:12cm COMPACTDISC,
Frontspeakeroutpu[
Subwooferoutpul
Amplifier Frequencyrange
S!NRatio
Channelseparatlor
Inputsensitivity
55dB
10dB
1%
ReadingSpeed:4.8- 5.6m/sec.
MaximumPlayTime:74 min.
640W/CH(4,L))
640W/CH(4,L))
22Hz-20KHz
65 dB
60 dB
(AUX)8OOmV
*: Nominal specification
Samsung Electronics Co., Ltd reserves the right to change the specifications without notice.
Weight and dimensions are approximate.
Design and specifications are subject to change without prior notice.
For information on the power supply and power consumption, refer to the label attached to the product.
20 English
A página está carregando...
A página está carregando...
A página está carregando...
A página está carregando...
A página está carregando...
A página está carregando...
A página está carregando...
A página está carregando...
A página está carregando...
A página está carregando...
A página está carregando...
A página está carregando...
A página está carregando...
A página está carregando...
A página está carregando...
A página está carregando...
A página está carregando...
A página está carregando...
A página está carregando...
A página está carregando...
A página está carregando...
A página está carregando...
-
 1
1
-
 2
2
-
 3
3
-
 4
4
-
 5
5
-
 6
6
-
 7
7
-
 8
8
-
 9
9
-
 10
10
-
 11
11
-
 12
12
-
 13
13
-
 14
14
-
 15
15
-
 16
16
-
 17
17
-
 18
18
-
 19
19
-
 20
20
-
 21
21
-
 22
22
-
 23
23
-
 24
24
-
 25
25
-
 26
26
-
 27
27
-
 28
28
-
 29
29
-
 30
30
-
 31
31
-
 32
32
-
 33
33
-
 34
34
-
 35
35
-
 36
36
-
 37
37
-
 38
38
-
 39
39
-
 40
40
-
 41
41
-
 42
42


Samsung MX-FS9000 Manual do usuário
- Categoria
- Tocadores de CD
- Tipo
- Manual do usuário
- Este manual também é adequado para
em outras línguas
- English: Samsung MX-FS9000 User manual
Artigos relacionados
Outros documentos
-
Aiwa MSBTU-300 Manual do usuário
-
AudioSonic CD-1588 Manual do proprietário
-
Panasonic SLSX430 Manual do proprietário
-
Yamaha YST-C10 Manual do proprietário
-
-
Pioneer DEH-P4050UB Manual do usuário
-
LG FFH-V386A Manual do proprietário
-
-