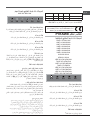
Ariston HNP 6.5 CM X Guia de usuario
- Categoria
- Exaustores
- Tipo
- Guia de usuario
Este manual também é adequado para

HNP 9.8 AM X
HNP 6.5 CM X
HNP 9.5 CM X
English
Operating Instructions
COOKER HOOD
Français
Mode d’emploi
HOTTE DE CUISINE
Español
Manual de instrucciones
CAMPANA
Portuges
Instruções para a utilização
EXAUSTOR
Contents
Operating Instructions,1
Warnings,8
Assistance,16
Installation,17
PYRAMID controls,18
Maintenance and care,19
Troubleshooting,20
Sommaire
Mode d’emploi,1
Avertissements,9
Assistance,16
Installation,21
Commandes PYRAMID,22
Entretien et soin,23
Anomalies et remèdes,24
Sumario
Manual de instrucciones,1
Advertencias,10
Asistencia,16
Instalación,25
Mandos PYRAMID,26
Mantenimiento y cuidados,27
Anomalías y soluciones,28
Índice
Instruções para a utilização,1
Advertências,12
Assistência,16
Instalação,29
Comandos PYRAMID,30
Manutenção e cuidado,31
Anomalias e soluções,32
ﻲﺑﺭﻋ
ﻝﻳﻐﺷﺗﻟﺍ ﺕﺎﻣﻳﻠﻌﺗ
COOKER HOOD
ﺕﺎﻳﻭﺗﺣﻣﻟﺍ
1 ،ﻝﻳﻐﺷﺗﻟﺍ ﺕﺎﻣﻳﻠﻌﺗ
13 ،ﺕﺍﺭﻳﺫﺣﺗ
16 ،ﺓﺩﻋﺎﺳﻣﻟﺍ
36 ،ﺏﻳﻛﺭﺗﻟﺍ
35 ،ﻡﻛﺣﺗ ﺭﺻﺎﻧﻋ PYRAMID
34،ﺔﻳﺎﻧﻌﻟﺍﻭ ﺔﻧﺎﻳﺻﻟﺍ
33 ،ﺎﻬﻠﺣﻭ ﻝﻛﺎﺷﻣﻟﺍ ﻑﺎﺷﻛﺗﺳﺍ

CN
中文
操作说明
抽油烟机
目录
操作说明,2
警告,14
帮助,16
安装,37
PYRAMID
(金字塔)控制器,38
维护与保养,39
故障排除,40

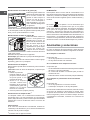
3
6x 直径 / Ø 8 x 40
6x 直径 / Ø 5 x 45
1x
2x
1x
ø 150-125mm ø 150mm
1x
2x
4x 直径 / Ø 3,5 x 9,5
2
3
4
5
直径 直径毫米 毫米

4
32 cm
min.
1A
Ø150mm
1B
Ø150mm
Ø120mm
Ø120
Ø150
Ø120mm
Ø120
Ø150
Ø150mm
直径 直径
直径
毫米 毫米
毫米
直径 直径毫米 毫米

5
4
6
3
7
5
2
=
=
=
=
650
mm
550
mm
x6
Ø 8 mm
x6
x6
x2
5 mm

6
1110
x2
ø 150 ø 120
12 13
8 9
1
2
3
x2

7
16
17 18
B
A
14
ø 150
ø 3,5 x 9,5
x2
15

8
Warnings
! Keep this manual for reference. If you
sell, transfer or move the unit to another
location, make sure to keep the manual
with the product.
! Read the instructions carefully - they
contain important installation, user and
safety information.
! Do not tamper with the electrical or
mechanical equipment of the product or
its exhaust ducts.
General safety information
• The distance between the cookware
support surface on top of the cooking
appliance and the lowest part of the
cooker hood must be at least:
65 cm if the hood is installed over a gas
cooktop
55 cm if the hood is installed over an
electric cooktop.
If the installation instruction manual for
the gas cooking appliance specifi es a
greater distance, this measurement
should be taken into account.
• The cooker hood comes with anchor
plugs which are suitable for use with
most walls/ceilings.
However, you must contact a qualifi ed
technician to check the suitability of the
materials in relation to the type of wall/
ceiling, which must be strong enough
to support the weight of the unit.
• Caution! Do not hook the unit up to
its electrical power supply until the
installation has been completed.
• Before cleaning or servicing the unit,
disconnect it from the mains by pulling
the power plug or disconnecting the
main circuit breaker.
• Always wear work gloves when installing
and servicing the unit.
• It is not intended for use by children
or persons with sensory or mental
disability and lack of experience or
familiarity, except under the supervision
or instruction of a person responsible
for their safety.
• Make sure children do not play with the
unit.
• Never operate the unit without its
grease fi lter installed!
• NEVER use the hood as a support,
unless expressly instructed to do so.
• The room must be adequately ventilated
if the hood is used at the same time with
other equipment burning gas or other
fuels.
• Extracted air must not be conveyed into
a duct used for exhausting combustion
fumes from gas or other fuel-fired
equipment.
• Observe all regulations in relation to air
extraction.
• NEVER cook food with an open fl ame
under the hood; open flames will
damage the fi lters and may cause fi res.
Never do this.
• Always supervise frying to make sure
the heated oil does not catch fi re.

9
• Strictly observe all local regulations
in relation to the technical and safety
measures to be employed in fumes
extraction.
• Clean the product frequently, inside
and out (AT LEAST ONCE A MONTH,
and in observance of the maintenance
instruction given in this manual).
• Failure to observe the hood cleaning and
fi lter cleaning/replacement instructions
can result in fi res.
• Never use the hood without its bulbs
properly installed - electrocution hazard.
• The manufacturer is not liable for any
inconvenience, damage or fi re caused
by the unit as a result of failure to
observe the instructions given in this
manual.
• Caution! The unit's accessible parts can
get very hot when used with cooking
equipment.
Avertissements
! Il est important de conserver ce manuel
afin de pouvoir le consulter à tout
moment. En cas de vente, cession ou
déménagement, assurez-vous qu'il
accompagne toujours le produit.
! Veuillez lire attentivement les
instructions : elles contiennent des
informations importantes sur l'installation,
l'utilisation et la sécurité.
! N'apportez pas de modifications
électriques ou mécaniques sur le produit
ou sur les conduits d'évacuation.
Sécurité générale
• La distance minimale entre la surface
où sont posés les récipients de cuisson
et la partie la plus basse de la hotte de
cuisine doit être d’au moins :
65 cm si la hotte est installée au-dessus
d'une table de cuisson à gaz
55 cm si la hotte est installée au-dessus
d'une table de cuisson électrique.
Si la notice d'installation de la table de
cuisson à gaz préconise une distance
plus grande, veuillez en tenir compte.
• La hotte est équipée de chevilles de
fi xation adaptées à la plupart des murs
ou plafonds. Il est toutefois nécessaire
de s'adresser à un technicien afi n de
s'assurer que le matériel est adapté au
type de mur ou plafond, lequel doit être
suffi samment résistant pour supporter
le poids de la hotte.
• Attention ! Ne raccordez pas l'appareil au
réseau électrique tant que l'installation
n'est pas totalement terminée.
• Avant toute opération de nettoyage ou
d'entretien, déconnectez la hotte du
réseau électrique en retirant la prise
ou en coupant l'interrupteur général de
l'habitation.
• Pour toutes les opérations d'installation
et d'entretien, utilisez des gants de
travail.
• L’appareil n'est pas destiné à être utilisé
par des enfants ou des personnes aux
capacités physiques, sensorielles ou
mentales limitées et qui ne possèdent
pas l'expérience et les connaissances
nécessaires, à moins qu'ils ne soient
sous la surveillance d'une personne
responsable de leur sécurité ou que
cette personne leur ait appris comment
utiliser l'appareil.

10
• Les enfants doivent être surveillés afi n
d'éviter qu'ils ne jouent avec l'appareil.
• N'utilisez jamais l'appareil sans fi ltre
anti-graisse correctement monté !
• La hotte ne doit JAMAIS être utilisée
en guise de plan d'appui, à moins que
cela ait été expressément indiqué.
• La pièce où elle est installée doit disposer
d'une ventilation suffi sante lorsque la
hotte est utilisée en même temps que
d'autres appareils à combustion utilisant
du gaz ou d'autres combustibles.
• L’air aspiré ne doit pas être acheminé
dans un conduit utilisé pour l'évacuation
des fumées produites par d'autres
appareils de combustion utilisant du
gaz ou d'autres combustibles.
• Veuillez respecter toutes les normes
relatives à l'évacuation de l'air.
• Il est strictement interdit de cuisiner
des aliments fl ambés sous la hotte ;
l'utilisation de fl ammes libres pourrait
endommager les fi ltres et provoquer
des incendies, c'est pourquoi cela est
interdit dans tous les cas.
• Il est conseillé de surveiller la cuisson
des aliments lorsque l'on a recours à la
friture, afi n d'éviter que l'huile chauffée
à trop haute température ne prenne feu.
• En ce qui concerne les mesures
techniques et de sécurité à adopter
pour l'évacuation des fumées, s'en
tenir étroitement aux dispositions des
autorités locales compétentes.
• Il est conseillé de nettoyer fréquemment
l'appareil, aussi bien à l'intérieur qu'à
l'intérieur (AU MOINS UNE FOIS PAR
MOIS, en respectant dans tous les cas
ce qui est expressément indiqué dans
les instructions d'entretien présentes
dans ce manuel).
• Le non-respect des règles de nettoyage
de la hotte et de remplacement et
nettoyage des fi ltres peut être à l'origine
de risques d'incendie.
• N'utilisez et ne laissez pas la hotte sans
ampoules correctement installées, sous
peine de vous exposer à un risque de
secousse électrique.
• Nous déclinons toute responsabilité
en cas d'éventuels inconvénients,
dommages ou incendies subis par
l'appareil et dérivant du non-respect
des instructions présentes dans ce
mode d'emploi.
• Attention ! Les parties accessibles
peuvent devenir très chaudes en cas
d'utilisation avec des appareils de
cuisson.
Advertencias
! Es importante conservar este manual
para poder consultarlo en cualquier
momento. En caso de venta, cesión o
traslado, el manual debe permanecer
junto al aparato.
! Lea atentamente las instrucciones:
contienen información importante sobre
la instalación, el uso y la seguridad.
! No realizar variaciones eléctricas
o mecánicas en el aparato ni en los
conductos de evacuación.

11
Seguridad general
• La distancia mínima entre la superfi cie
de apoyo de los recipientes en la placa
de cocción y la parte inferior de la
campana debe ser de al menos:
65 cm si la campana se instala sobre
una placa de gas;
55 cm si la campana se instala sobre
una placa eléctrica.
Si las instrucciones de instalación de la
placa de gas especifi can una distancia
mayor, es necesario respetarla.
• La campana está dotada de tacos de
fi jación adecuados para la mayoría de
las paredes y los techos.
No obstante, es necesario consultar a un
técnico especializado para comprobar
la idoneidad de los materiales de
acuerdo con el tipo de pared o techo,
que deberá ser sufi cientemente sólido
para sostener el peso de la campana.
• ¡Atención! No conectar el aparato
a la red eléctrica hasta no terminar
totalmente la instalación.
• Antes de realizar cualquier operación de
limpieza o mantenimiento, desconectar
la campana de la red eléctrica mediante
la clavija o el interruptor general de la
vivienda.
• Todas las operaciones de instalación
y mantenimiento se deben realizar
utilizando guantes de trabajo.
• El aparato no ha sido diseñado para el
uso por parte de niños ni de personas
con capacidades físicas, sensoriales
o mentales reducidas, o carentes de
la experiencia y los conocimientos
necesarios para utilizarlo, salvo
que lo hagan bajo la vigilancia o
las instrucciones de una persona
responsable de su seguridad.
• No dejar que los niños jueguen con el
aparato.
• No utilizar el aparato sin el fi ltro de
grasas instalado correctamente.
• La campana NUNCA se deberá utilizar
como plano de apoyo, a no ser que esto
sea expresamente indicado.
• El local debe disponer de suficiente
ventilación cuando la campana se utiliza
simultáneamente con otros aparatos
que empleen gas u otros combustibles.
• El aire extraído no debe salir por un
conducto utilizado para los humos
generados por otros aparatos que
empleen gas u otros combustibles.
• Respetar todas las normas relativas a
la evacuación del aire.
• Está estrictamente prohibido cocinar
alimentos con llama libre debajo de la
campana; el empleo de llamas libres
es perjudicial para los fi ltros y puede
originar incendios; por lo tanto, se debe
evitar en cualquier circunstancia.
• Se recomienda mantener
constantemente bajo control la cocción
de alimentos por fritura, para evitar que
el aceite recalentado arda.
• En cuanto a las medidas técnicas y de
seguridad que se deben adoptar para
la evacuación de los humos, atenerse
estrictamente a los reglamentos
establecidos por las autoridades
competentes.
• Se recomienda limpiar el aparato con
frecuencia, tanto por dentro como
por fuera (AL MENOS UNA VEZ AL
MES, respetando las instrucciones
de mantenimiento contenidas en este
manual).

12
• El incumplimiento de las instrucciones
de limpieza de la campana y de
sustitución y limpieza de los filtros
implica riesgos de incendio.
• Asegurarse de que las bombillas
estén correctamente montadas. De
lo contrario, no utilizar la campana,
ya que podrían producirse descargas
eléctricas.
• El fabricante declina toda responsabilidad
en caso de inconvenientes, daños o
incendios derivados del incumplimiento
de las instrucciones contenidas en este
manual.
• ¡Atención! Las partes accesibles pueden
recalentarse considerablemente
durante el uso de la placa de cocción.
Advertências
! É importante guardar este manual
para poder consultá-lo a qualquer
momento. Em caso de venda, cessão ou
transferência, assegure-se de que este
permanece junto com o produto.
! Leia atentamente as instruções:
contêm informações importantes sobre
a instalação, o uso e a segurança.
! Não efectue alterações eléctricas ou
mecânicas no produto ou nas condutas
de descarga.
Segurança geral
• A distância mínima entre a superfície de
suporte dos recipientes no dispositivo
de cozedura e a parte mais baixa do
exaustor de cozinha não deve ser
inferior a:
65 cm se o exaustor for instalado sobre
uma placa de cozedura a gás
55 cm se o exaustor for instalado sobre
uma placa de cozedura eléctrica.
Se as instruções de instalação
do dispositivo de cozedura a gás
especificam um distância maior, é
necessário considerá-la.
• O exaustor dispõe de buchas de fi xação
adequadas à maioria das paredes/
tectos.
Ainda assim, é necessário contactar
um técnico qualifi cado para assegurar
a idoneidade dos materiais consoante
o tipo de parede/tecto, que deve ser
sufi cientemente robusto para suportar
o peso do exaustor.
• Atenção! Não ligue o aparelho à rede
eléctrica até que a instalação esteja
totalmente concluída.
• Antes de qualquer operação de limpeza
ou manutenção, desligue o exaustor
da rede eléctrica retirando a fi cha da
tomada ou desligando o interruptor
geral da casa.
• Para todas as operações de instalação
e manutenção, utilizar luvas de
protecção.
• O aparelho não se destina ao uso por
parte de crianças ou pessoas com
capacidades físicas sensoriais e/ou
mentais reduzidas ou sem experiência
e conhecimentos, a menos que se
encontrem sob a supervisão ou tenham
recebido instruções sobre o uso do
aparelho por parte de uma pessoa
responsável pela sua segurança.
• As crianças devem ser supervisionadas
para que não brinquem com o aparelho.
• Nunca utilizar o produto sem fi ltro de
gordura correctamente instalado!

13
• O exaustor NUNCA deve ser utilizado
como plano de apoio, salvo indicação
expressa em contrário.
• O local deve dispor de ventilação
sufi ciente quando o exaustor é utilizado
em simultâneo com outros aparelhos
que utilizem gás ou outros combustíveis.
• O ar aspirado não deve ser dirigido
para uma conduta usada para a
descarga de fumos produzidos por
aparelhos de combustão a gás ou
outros combustíveis.
• Respeite todas as normativas referentes
à descarga do ar.
• É severamente proibido cozinhar
alimentos em chama livre sob o
exaustor; a utilização de chamas
livres danifi ca os fi ltros e pode provocar
incêndios, como tal, deve ser evitada.
• É aconselhável manter sob controlo
constante a fritura de alimentos, para
evitar que o óleo aquecido entre em
combustão.
• Em relação às medidas técnicas e de
segurança a adoptar para a descarga
dos fumos, siga escrupulosamente os
regulamentos das autoridades locais
competentes.
• É aconselhável limpar frequentemente
o produto, quer interna quer
externamente (PELO MENOS UMA
VEZ POR MÊS; de qualquer forma,
respeite as instruções de manutenção
indicadas neste manual).
• O incumprimento das normas de
limpeza do exaustor e da substituição
e limpeza dos fi ltros implica risco de
incêndio.
• Não utilizar ou deixar o exaustor sem
lâmpadas correctamente montadas,
por possível risco de choque eléctrico.
• Declina-se qualquer responsabilidade
por eventuais inconvenientes, danos
ou incêndios provocados pelo aparelho
derivados do incumprimento das
instruções presentes neste manual.
• Atenção! As partes acessíveis podem
fi car muito quentes se utilizadas com
aparelhos de cozedura.
ﺕﺍﺭﻳﺫﺣﺗ
.ﺓﺭﻭﺭﺿﻟﺍ ﺩﻧﻋ ﻪﺗﻌﺟﺍﺭﻣﻟ ﺍﺫﻫ ﺕﺎﻣﻳﻠﻌﺗﻟﺍ ﻝﻳﻟﺩﺑ ﻅﻔﺗﺣﺍ !
ﻊﻗﻭﻣﻟ ﺎﻬﻠﻘﻧ ﻭﺃ ﺓﺩﺣﻭﻟﺍ ﺔﻳﻛﻠﻣ ﻝﻳﻭﺣﺗﺑ ﻭﺃ ﻊﻳﺑﺑ ﺕﻣﻗ ﺍﺫﺇ
.ﺞﺗﻧﻣﻟﺍ ﻊﻣ ﻝﻳﻟﺩﻟﺍ ﺍﺫﻫ ءﺎﻘﺑﺇ ﻥﻣ ﻕﻘﺣﺗﺗ ﻥﺃ ﺏﺟﻳ ،ﺭﺧﺁ
ﻰﻠﻋ ﻱﻭﺗﺣﺗ ﻲﻬﻓ ،ﺔﻳﺎﻧﻌﺑ ﺕﺎﻣﻳﻠﻌﺗﻟﺍ ﺓءﺍﺭﻗ ﺏﺟﻳ !
ﻡﺩﺧﺗﺳﻣﻠﻟ ﺕﺎﻣﻭﻠﻌﻣﻭ ﺏﻳﻛﺭﺗﻟﺍ ﻥﻋ ﺔﻣﺎﻫ ﺕﺎﻣﻭﻠﻌﻣ
.ﺯﺎﻬﺟﻟﺍ ﺔﻣﻼﺳ ﻝﻭﺣ ﺕﺎﻣﻭﻠﻌﻣ
ﺔﻳﻛﻳﻧﺎﻛﻳﻣﻟﺍ ﻭﺃ ﺔﻳﺋﺎﺑﺭﻬﻛﻟﺍ ﺕﺍﺩﻌﻣﻟﺎﺑ ﺙﺑﻌﻟﺎﺑ ﻡﻘﺗ ﻻ !
.ﻪﺑ ﺔﻘﺣﻠﻣﻟﺍ ﻡﺩﺎﻌﻟﺍ ﺏﻳﺑﺎﻧﺃ ﻥﻣ ﻱﺃ ﻭﺃ ،ﺞﺗﻧﻣﻟﺎﺑ ﺓﺩﻭﺟﻭﻣﻟﺍ
ﺔﻣﺎﻌﻟﺍ ﺔﻣﻼﺳﻟﺍ ﺕﺎﻣﻭﻠﻌﻣ
ﻰﻠﻋﺄﺑ ﻲﻬﻁﻟﺍ ﻲﻧﺍﻭﺃ ﻡﻋﺩ ﺢﻁﺳﻣ ﻥﻳﺑ ﺔﻓﺎﺳﻣﻟﺍ ﻥﺇ •
،ﻲﻬﻁﻟﺍ ﺩﻗﻭﻣ ءﺎﻁﻏ ﻥﻣ ءﺯﺟ ﻰﻧﺩﺃﻭ ،ﻲﻬﻁﻟﺍ ﺯﺎﻬﺟ
:ﻝﻗﻷﺍ ﻰﻠﻋ ﻥﻭﻛﻳ ﻥﺃ ﺏﺟﻳ
ﻲﻬﻁ ﺢﻁﺳ ﻕﻭﻓ ءﺎﻁﻐﻟﺍ ﺏﻳﻛﺭﺗ ﻡﺗ ﺎﻣ ﺍﺫﺇ ﻡﺳ 65
.ﺯﺎﻐﻟﺎﺑ ﻝﻣﻌﻳ
ﻲﻬﻁ ﺢﻁﺳ ﻕﻭﻓ ءﺎﻁﻐﻟﺍ ﺏﻳﻛﺭﺗ ﻡﺗ ﺎﻣ ﺍﺫﺇ ﻡﺳ 55
.ءﺎﺑﺭﻬﻛﻟﺎﺑ ﻝﻣﻌﻳ
ﺯﺎﻬﺟﺑ ﺹﺎﺧﻟﺍ
ﺏﻳﻛﺭﺗﻟﺍ ﺕﺎﻣﻳﻠﻌﺗ ﻝﻳﻟﺩ ﻥﺎﻛ ﺎﻣ ﺍﺫﺇ
ﻥﺈﻓ ،ﺭﺑﻛﺃ ﺔﻓﺎﺳﻣ ﺩﺩﺣﻳ ﺯﺎﻐﻟﺎﺑ ﻝﻣﻌﻳ ﻱﺫﻟﺍ ﻲﻬﻁﻟﺍ
.ﺭﺎﺑﺗﻋﻻﺍ ﻲﻓ ﺫﺧﺅﺗ ﻥﺃ ﺏﺟﻳ ﺔﻓﺎﺳﻣﻟﺍ ﻩﺫﻫ

14
ﺕﻳﺑﺛﺗ ﻙﺑﺎﺷﻣ ﻪﺑ ﻕﺣﻠﻣﻭ ﻲﻬﻁﻟﺍ ﺩﻗﻭﻣ ءﺎﻁﻏ ﻲﺗﺄﻳ •
ﻁﺋﺍﻭﺣﻟﺍ ﻉﺍﻭﻧﺃ ﻡﻅﻌﻣ ﻊﻣ ﻡﺍﺩﺧﺗﺳﻼﻟ ﺔﺑﺳﺎﻧﻣ
.ﻑﻘﺳﻷﺍﻭ
ﻥﻣ ﻕﻘﺣﺗﻠﻟ ﻝﻫﺅﻣ ﻲﻧﻔﺑ ﻝﺻﺗﺗ ﻥﺃ ﺏﺟﻳ ﻪﻧﺃ ﻻﺇ
،ﻑﻘﺳﻟﺍ ﻭﺃ ﻁﺋﺎﺣﻟﺍ ﻉﻭﻧﻟ ﺔﻣﺩﺧﺗﺳﻣﻟﺍ ﺩﺍﻭﻣﻟﺍ ﺔﻣءﻼﻣ
ﻥﺯﻭ ﻡﻋﺩﻳﻟ ﻑﺎﻛ ﺭﺩﻘﺑ
ً
ﺎﻳﻭﻗ ﻥﻭﻛﻳ ﻥﺃ ﺏﺟﻳ ﻱﺫﻟﺍﻭ
.ﺓﺩﺣﻭﻟﺍ
ﺎﻬﻠﻳﺻﻭﺗﻭ ﻰﻠﻋﻷ ﺓﺩﺣﻭﻟﺍ ﺕﻳﺑﺛﺗﺑ ﻡﻘﺗ ﻻ !ﺭﻳﺫﺣﺗ •
ﻥﻣ ءﺎﻬﺗﻧﻻﺍ ﻡﺗﻳ ﻰﺗﺣ ﻲﺑﺭﻬﻛﻟﺍ ﺭﺎﻳﺗﻟﺍ ﺭﺩﺻﻣﺑ
.ﺏﻳﻛﺭﺗﻟﺍ
ﻥﻋ ﺎﻬﻠﺻﻔﺑ ﻡﻗ ،ﺎﻬﺗﻧﺎﻳﺻ ﻭﺃ ﺓﺩﺣﻭﻟﺍ ﻑﻳﻅﻧﺗ ﻝﺑﻗ •
ﺱﺑﺎﻗ ﺏﺫﺟ ﻕﻳﺭﻁ ﻥﻋ ﻲﺳﻳﺋﺭﻟﺍ ﺔﻗﺎﻁﻟﺍ ﺭﺩﺻﻣ
.ﺭﺎﻳﺗﻟﺍ ﻊﻁﺎﻗ ﻥﻋ ﺓﺩﺣﻭﻟﺍ ﻝﺻﻓ ﻕﻳﺭﻁ ﻥﻋ ﻭﺃ ،ﺭﺎﻳﺗﻟﺍ
ﺓﺩﺣﻭﻟﺍ ﺏﻳﻛﺭﺗ ﺩﻧﻋ ﻝﻣﻌﻟﺍ ﺕﺍﺯﺎﻔﻗ ءﺍﺩﺗﺭﺍ
ً
ﺎﻣﺋﺍﺩ ﺏﺟﻳ •
.ﺎﻬﺗﻧﺎﻳﺻ ﺩﻧﻋ ﻭﺃ
ﻝﺎﻔﻁﻷﺍ ﺔﻁﺳﺍﻭﺑ ﻡﺍﺩﺧﺗﺳﻼﻟ ﺩﻌﻣ ﺭﻳﻏ ﺯﺎﻬﺟﻟﺍ
ﺍﺫﻫ •
،ﺔﻳﻠﻘﻌﻟﺍ ﻭﺃ ﺔﻳﺳﺣﻟﺍ ﺕﺎﻗﺎﻋﻹﺍ ﻱﻭﺫ ﺹﺎﺧﺷﻷﺍ ﻭﺃ
ﺍﺫﺇ ﻻﺇ ،ﺓﺩﻭﺩﺣﻣ ﺔﻓﺭﻌﻣ ﻭﺃ ﺔﺑﺭﺟﺗ ﻡﻬﻳﺩﻟ ﻥﻣﻣ ﻭﺃ
ﻝﻭﺅﺳﻣ ﺹﺧﺷ ﻪﻳﺟﻭﺗ ﻭﺃ ﻑﺍﺭﺷﺇ ﺕﺣﺗ ﺍﺫﻫ ﻥﺎﻛ
.ﻡﻬﺗﻣﻼﺳ ﻥﻋ
.ﺓﺩﺣﻭﻟﺎﺑ ﻝﺎﻔﻁﻷﺍ ﺙﺑﻋ ﻡﺩﻋ ﻥﻣ ﺩﻛﺄﺗ •
ﻥﻭﻫﺩﻟﺍ ﺭﺗﻠﻓ ﺏﻳﻛﺭﺗ ﻥﻭﺩ ﺓﺩﺣﻭﻟﺍ ﻝﻳﻐﺷﺗﺑ ﻡﻘﺗ ﻻ •
.ﺎﻬﺑ ﺹﺎﺧﻟﺍ
ﻙﻧﻣ ﺏﻠﻁﺗ ﻡﻟ ﺎﻣ ،ﺔﻣﺎﻋﺩﻛ
ً
ﺎﻘﻠﻁﻣ
ءﺎﻁﻐﻟﺍ ﻡﺩﺧﺗﺳﺗ ﻻ •
.ﻙﻟﺫﺑ ﻡﺎﻳﻘﻟﺍ ﺕﺎﻣﻳﻠﻌﺗﻟﺍ
ﻡﺍﺩﺧﺗﺳﺍ ﻡﺗ ﺍﺫﺇ ﺔﻳﻭﻬﺗﻟﺍ ﺓﺩﻳﺟ ﺔﻓﺭﻐﻟﺍ ﻥﻭﻛﺗ ﻥﺃ ﺏﺟﻳ •
ﻝﻣﻌﺗ ﻯﺭﺧﺃ ﺕﺍﺩﻌﻣ ﻊﻣ ﺕﻗﻭﻟﺍ ﺱﻔﻧ ﻲﻓ ءﺎﻁﻐﻟﺍ
.ﺩﻭﻗﻭﻟﺍ ﻉﺍﻭﻧﺃ ﻥﻣ ﻩﺭﻳﻏ ﻭﺃ ﺯﺎﻐﻟﺍ ﻕﺍﺭﺗﺣﺎﺑ
ﺏﻭﺑﻧﺃ ﻲﻓ ﺩﻭﺭﻁﻣﻟﺍ ءﺍﻭﻬﻟﺍ ﻪﻳﺟﻭﺗ ﻡﺩﻋ ﺏﺟﻳ •
ﺕﺍﺩﻌﻣ ﻥﻣ ﻕﺍﺭﺗﺣﻻﺍ ﺔﻧﺧﺩﺃ ﻑﻳﺭﺻﺗﻟ ﻡﺩﺧﺗﺳﻳ
.ﺩﻭﻗﻭﻟﺍ ﻕﺍﺭﺗﺣﺎﺑ ﻭﺃ ﺯﺎﻐﻟﺎﺑ ﻝﻣﻌﺗ ﻯﺭﺧﺃ
.ءﺍﻭﻬﻟﺍ ﺩﺭﻁﺑ ﺔﻘﻠﻌﺗﻣﻟﺍ ﺢﺋﺍﻭﻠﻟﺍ ﺔﻓﺎﻛ ﻉﺎﺑﺗﺍ ﺏﺟﻳ •
ﺕﺣﺗ ﺭﺣ ﺏﻬﻟ ﻡﺍﺩﺧﺗﺳﺎﺑ ﻡﺎﻌﻁﻟﺍ ﻲﻬﻁﺑ
ً
ﺎﻘﻠﻁﻣ ﻡﻘﺗ ﻻ •
ﺭﺗﻼﻔﻟﺍ ﻑﻼﺗﻹ ﺭﺣﻟﺍ ﺏﻬﻠﻟﺍ ﻱﺩﺅﻳ ﺙﻳﺣ ،ءﺎﻁﻐﻟﺍ
.ﺍﺩﺑﺃ ﻙﻟﺫﺑ ﻡﻘﺗ ﻻ .ﻕﻳﺭﺣ ﺏﻭﺷﻧﻟ ﻱﺩﺅﻳ ﺩﻗﻭ
ﻥﻣ ﻕﻘﺣﺗﻠﻟ ﻲﻠﻘﻟﺍ ﺔﻳﻠﻣﻋ ﺔﻌﺑﺎﺗﻣﺑ
ً
ﺎﻣﺋﺍﺩ ﻡﻭﻘﺗ ﻥﺃ ﺏﺟﻳ •
.ﺭﺎﻧﻟﺍ ﺱﻣﻼﻳ ﻻ ﻥﺧﺎﺳﻟﺍ ﺕﻳﺯﻟﺍ ﻥﺃ
ﺔﻳﻠﺣﻣﻟﺍ ﺔﻌﺑﺗﻣﻟﺍ
ﺢﺋﺍﻭﻠﻟﺍ ﻝﻛﺑ
ً
ﺎﻳﻓﺭﺣ ﻡﺯﺗﻠﺗ ﻥﺃ ﺏﺟﻳ •
ﻉﺎﺑﺗﺍ ﺏﺟﻳ ﻙﻟﺫﻛ ،ﺔﻳﻧﻔﻟﺍ ﺭﻳﻳﺎﻌﻣﻟﺎﺑ ﺔﻘﻠﻌﺗﻣﻟﺍﻭ
.ﺔﻧﺧﺩﻷﺍ ﻑﻳﺭﺻﺗﺑ ﺔﺻﺎﺧﻟﺍ ﺔﻣﻼﺳﻟﺍ ﺕﺎﻁﺎﻳﺗﺣﺍ
ﻝﺧﺍﺩﻟﺍ ﻥﻣ ،ﺭﺧﻵ ﺕﻗﻭ ﻥﻣ ﺞﺗﻧﻣﻟﺍ ﻑﻳﻅﻧﺗﺑ ﻡﻗ •
ﻉﺎﺑﺗﺍ ﻊﻣ ،ﻝﻗﻷﺍ ﻰﻠﻋ
ً
ﺎﻳﺭﻬﺷ ﺓﺩﺣﺍﻭ ﺓﺭﻣ) ﺝﺭﺎﺧﻟﺍﻭ
.(ﻝﻳﻟﺩﻟﺍ ﺍﺫﻫ ﻲﻓ ﺓﺩﺭﺍﻭﻟﺍ ﺔﻧﺎﻳﺻﻟﺍ ﺕﺎﻣﻳﻠﻌﺗ
ﺕﺎﻣﻳﻠﻌﺗﻭ ،ءﺎﻁﻐﻟﺍ ﻑﻳﻅﻧﺗﺑ ﻡﺍﺯﺗﻟﻻﺍ ﻲﻓ ﺭﻳﺻﻘﺗﻟﺍ ﻥﺇ •
.ﻕﻳﺭﺣ ﺏﻭﺷﻧﻟ
ﻱﺩﺅﻳ ﺩﻗ ،ﺭﺗﻼﻔﻟﺍ ﻝﺍﺩﺑﺗﺳﺍﻭ ﻑﻳﻅﻧﺗ
ﺔﺻﺎﺧﻟﺍ ﺢﻳﺑﺎﺻﻣﻟﺍ ﺏﻳﻛﺭﺗ ﻥﻭﺩ ءﺎﻁﻐﻟﺍ ﻡﺩﺧﺗﺳﺗ ﻻ •
ﺭﻁﺧﻟ ﺔﺿﺭﻋ ﻥﻭﻛﺗ ﺩﻘﻓ ﻻﺇﻭ ،ﺢﻳﺣﺻ ﻝﻛﺷﺑ ﻪﺑ
.ﻲﺋﺎﺑﺭﻬﻛﻟﺍ ﻕﻌﺻﻟﺍ
ﺔﻳﺃ ﻥﻋ ﺔﻳﻟﻭﺅﺳﻣ ﺔﻳﺃ ﻊﻳﻧﺻﺗﻟﺍ ﺔﻬﺟ ﻝﻣﺣﺗﺗ ﻥﻟ •
ﺔﺟﻳﺗﻧﻛ ﺓﺩﺣﻭﻟﺍ ﻥﻋ ﺄﺷﻧﺗ ﻕﺋﺍﺭﺣ ﻭﺃ ﺭﺭﺿ ﻭﺃ ﺔﻠﻛﺷﻣ
ﺍﺫﻫ ﻲﻓ ﺓﺩﺭﺍﻭﻟﺍ ﺕﺎﻣﻳﻠﻌﺗﻟﺎﺑ ﻡﺍﺯﺗﻟﻻﺍ ﻲﻓ ﺭﻳﺻﻘﺗﻠﻟ
.ﻝﻳﻟﺩﻟﺍ
ﺓﺩﺣﻭﻟﺍ ﻥﻣ
ﺔﻓﻭﺷﻛﻣﻟﺍ ءﺍﺯﺟﻷﺍ ﻥﻭﻛﺗ ﺩﻗ !ﺭﻳﺫﺣﺗ •
.ﻲﻬﻁﻟﺍ ﺕﺍﺩﻌﻣ ﻊﻣ ﺎﻬﻣﺍﺩﺧﺗﺳﺍ ﺩﻧﻋ ﺔﻳﺎﻐﻠﻟ ﺔﻧﺧﺎﺳ
警告
!请妥善保存本手册以供参考。如果将
本机出售、转让或移到别的位置,确保
让手册跟产品在一起。
!仔细阅读说明书——它们含有重要的
安装信息、用户信息和安全信息。
!不要乱动本产品的电气或机械设备或
者其排气管。
CN

15
一般安全信息
• 烹饪器具顶上的炊具支撑面与抽油烟机
的最低部分之间的距离必须为至少:
65 厘米(如果抽油烟机安装在燃气灶
正上方)
55 厘米(如果抽油烟机安装在电炉灶
正上方)。
如果燃气烹饪器具的安装说明书指定了
一个更大的距离,应将此测量尺寸考虑
在内。
• 抽油烟机配有锚塞,适用于大部分的墙
壁/天花板。
但是,您必须联系一名合格的技术人
员来检查墙壁/天花板类型,以确保其
必须是强大到足以支撑本机重量的适
用材料。
• 小心!直到已完成安装,才能将本机接
通电源。
• 在清洁或保养本机之前,通过拔掉电源
插头或断开主电路断路器来切断电源。
• 在安装和保养本机时,一定要戴上工作
手套。
• 它不适用于儿童、感官残疾、精神残
疾、缺乏经验或缺乏了解的人士,除非
是在对他们的安全负责的人士的监督或
指导之下使用。
• 确保孩子不玩本机。
• 在没有安装油脂过滤器的情况下,千万
不要操作本机!
• 切勿把抽油烟机当作支撑物使用,除非
有明确指示要求这样做。
• 如果抽油烟机在同一时间与燃烧燃气或
其他燃料的其他设备一起使用,那么室
内必须足够通风。
• 抽出的空气不得被输送进用于为燃气或
其他燃料设备排出燃烧烟雾的管道。
• 遵守与排气有关的所有规定。
• 切勿在抽油烟机下方用明火烹饪食物;
明火会损坏过滤器,而且可能会引起火
灾。千万别这么做。
• 始终监督油炸过程,以确保热油不
着火。
• 严格遵守与排烟所采用的安全技术措施
有关的所有地方法规。
• 经常从里到外的彻底清洁产品(至少每
月一次,并且遵守本手册中给出的维护
指示)。
• 不遵守抽油烟机清洁说明和过滤器清
洁/更换说明可能会导致火灾。
• 切勿使用未正确安装灯泡的抽油烟
机——有触电危险。
• 对于因不遵守本手册中的指示而对本机
造成的任何不便、损坏或火灾,制造商
不承担任何责任。
• 小心!在与烹饪设备一起使用时,本机
的可触及部件可能会变得很热。

16
Assistance
! Never use the services of an unauthorised technician.
Please have the following information to hand:
• The type of problem encountered.
• The appliance model (Mod.).
• The serial number (S/N).
The latter two pieces of information can be found on the
data plate located on the appliance.
Assistance
! Ne jamais faire appel à des techniciens non agréés.
Lui indiquer :
• le type d’anomalie;
• le modèle de l’appareil (Mod.)
• son numéro de série (S/N)
Ces informations figurent sur la plaque signalétique
apposée sur l’appareil
Asistencia
! No llame nunca a técnicos no autorizados.
Comunique:
• El tipo de anomalía;
• El modelo de la máquina (Mod.)
• El número de serie (S/N)
Esta información se encuentra en la placa de características
colocada en el aparato.
La siguiente información es válida solo para España.
Para otros países de habla hispana consulte a su
vendedor.
Ampliación de garantía
Llame al 902.363.539 y le informaremos sobre el fantástico
plan de ampliación de garantía hasta 5 años.
Consiga una cobertura total adicional de
• Piezas y componentes
• Mano de obra de los técnicos
• Desplazamiento a su domicilio de los técnicos
Y NO PAGUE AVERIAS NUNCA MAS
Servicio de asistencia técnica (SAT)
Llame al 902.133.133 y nuestros técnicos intervendrán con
rapidez y efi cacia, devolviendo el electrodoméstico a sus
condiciones óptimas de funcionamiento.
En el SAT encontrará recambios, accesorios y productos
específicos para la limpieza y mantenimiento de su
electrodoméstico a precios competitivos.
ESTAMOS A SU SERVICIO
Assistência
! Nunca recorra a técnicos não autorizados.
Comunique:
• o tipo de avaria;
• o modelo da máquina (Mod.);
• o número de série (S/N);
Estas últimas informações encontram-se na placa de
identifi cação situada no aparelho.
ﺓﺩﻋﺎﺳﻣﻟﺍ
.ﺍﺩﺑﺃ ﻝﻫﺅﻣ ﺭﻳﻏ ﻲ
ّ
ﻧﻓ ﺓﺩﻋﺎﺳﻣ ﺏﻠﻁﺗ ﻻ !
:ﺔﻳﻟﺎﺗﻟﺍ ﺕﺎﻣﻭﻠﻌﻣﻟﺍ ﺭﺎﺑﺗﻋﻻﺍ ﻥﻳﻌﺑ ﺫﺧ ءﺎﺟﺭﻟﺍ
.ﺎﻬﺗﻬﺟﺍﻭﻣ ﺕﻣﺗ ﻲﺗﻟﺍ ﺔﻠﻛﺷﻣﻟﺍ ﻉﻭﻧ •
.(Mod.) ﺯﺎﻬﺟﻟﺍ ﺯﺍﺭﻁ •
.(S/N) ﻲﻠﺳﻠﺳﺗﻟﺍ ﻡﻗﺭﻟﺍ •
ﺓﺩﻭﺟﻭﻣﻟﺍ ﺕﺎﻧﺎﻳﺑﻟﺍ ﺔﺣﻭﻟ ﻰﻠﻋ ﻥﻳﺗﺭﻳﺧﻷﺍ ﻥﻳﺗﻣﻭﻠﻌﻣﻟﺍ ﻰﻠﻋ ﺭﻭﺛﻌﻟﺍ ﻥﻛﻣﻳ
.ﺯﺎﻬﺟﻟﺍ ﻰﻠﻋ
CN
帮助
!切勿使用未经授权技术人员的服务。
请准备好以下信息:
• 遇到的问题类型。
• 该器具型号 (Mod.)。
• 序列号 (S/N)。
后两项信息可在该器具的数据板上找到。

GB
17
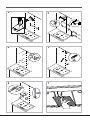
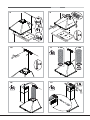
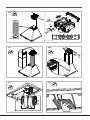
Installation
The installation procedure is illustrated in the fi rst pages
of this manual.
The installation must be done by a qualifi ed technician.
Electrical hook up
The mains voltage must match that given on the ratings
label inside the hood itself. If the hood has a power plug,
connect the hood to an easily accessible regulatory power
socket. If it does not (direct connection to the mains), or the
socket is not easily accessible, install a two-pole regulatory
switch to enable total disconnection from the mains in case
of category III overvoltage, as required by the installation
regulations.
Caution! Always check that the mains cable is hooked
up properly and check that it operates correctly before
reconnecting the hood to the mains.
Air exhaust (for ducted units)
Connect the hood to a duct and wall exhaust hole of a
diameter equal to that of the air outlet fl ange. Using a smaller
diameter tube and exhaust hole reduces the extraction
capacity of the hood and also increases its running noise.
The manufacturer is not liable for any consequences of
doing so.
! Use the shortest duct required to achieve the purpose.
! Use a duct with as few bends as possible
! Avoid suddenly changing the diameter of the duct.
! The duct must have as smooth an inner surface as
possible.
! The duct must be made of regulatory material.
! Do not connect the hood to fl ues carrying combustion
fumes from other equipment (boilers, chimneys, stoves,
etc.).
! Observe the instructions of the competent authorities in
relation to the air exhaust. The air being exhausted may not
be exhausted into a wall cavity unless the cavity in question
is specifi cally intended for this purpose.
! Equip the room with air intakes to prevent the hood creating
suction pressure in the interior (this must not exceed 0.04
mbar).
! The manufacturer is not liable for any consequences of
failure to observe these instructions.
Filter or ducted?
! Your hood is supplied as a ducted unit.
If you wish to use it as a fi lter unit, you must install the proper
ACCESSORY KIT.
Note: If supplied with the hood, the accessory active
charcoal fi lter unit may already be installed.
Instructions for transforming the hood from the ducted to the
fi lter version are given in this manual (see “Filter version”).
Ducted version
The hood purifi es the air and expels it outdoors via an exhaust
duct (dia. 150mm) connected to its outlet fl ange. The diameter
of the exhaust tube must be equal to that of the outlet fl ange.
Caution! The exhaust duct is not supplied and must be
purchased separately.
When routed horizontally, the tube must be angled slightly
upwards (around 10°) to enable the air to be conveyed
outdoors more easily. If the hood is fi tted with charcoal
fi lters, they must fi rst be removed.
Filter version
The hood purifi es the air and returns it to the room. This
version of the hood requires installation of an accessory
active charcoal fi lter unit.
This version requires an air defl ector, a reduction adapter
and the charcoal fi lter/s. The top tube must have its air
outlet slots uppermost.
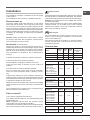
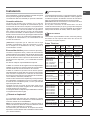
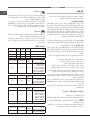
Technical data
Model
Height
(cm)
Width
(cm)
Depth
(cm)
dia. of
exhaust tube
(cm)
PYRAMID 60cm 61-82 59.8 50 15/12
PYRAMID 70cm 61-82 69.8 50 15/12
PYRAMID 90cm 61-82 89.9 50 15/12
Model code Bulb (V) Bulb draw (W) Total draw (W)
HNP 6.5 CM X/HA
HYM 60 IX/HA
HPM 61 IX/HA
7HHP 6 R (OW)/HA
7HHP 6 R AN/HA
HRP 6.5 CM (OW)/HA
HRP 6.5 CM (AN)/HA
Halogen 2 x 25 160
Model code Bulb (V) Bulb draw (W) Total draw (W)
HNP 6.5S CD X/HA
HPS 60 IX/HA
HRP 6.5S CM (OW)/HA
HRP 6.5S CM (AN)/HA
Halogen 2 x 25 195
Model code Bulb (V) Bulb draw (W) Total draw (W)
HNP 6.6 AM W/HA
HNP 9.6 AM W/HA
HNP 9.6 AM K/HA
HNP 9.6 AB X/HA
HNP 9.6 AM X/HA
HNP 6.6 AM K/HA
HNP 6.6 AM X/HA
Halogen 2 x 20 210
HRP 9.6 CM (OW)/HA Halogen 2 x 25 220
Model code Bulb (V) Bulb draw (W) Total draw (W)
HRP 9.8 CM (OW)/HA
HRP 9.8 CM (AN)/HA
Halogen 2 x 25 300

18
GB
Power Voltage Cap Dimensions
Halogen 25 W 2 x 25 W 230 V G9 L40xØ14
Halogen 20 W 2 x 20 W 12 V G4 L30xØ10
LED
*
Risk Group 1 according to Standard EN 62471
The hoods are conforming to the following EC
Directives:
• “Low voltage” Directive 2006/95/EC (12-12-2006)
• “EMC” Directive 2004/108/EC (15-12-2004)
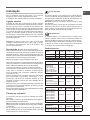
PYRAMID controls
Models with mechanical keypad
HNP 6.5 CM X/HA
HNP 6.6 AM W/HA
HNP 9.6 AM W/HA
HNP 9.6 AM K/HA
HNP 9.6 AM X/HA
HNP 6.6 AM K/HA
HNP 6.6 AM X/HA
HYM 60 IX/HA
HPM 61 IX/HA
HRP 9.8 CM (OW)/HA
7HHP 6 R (OW)/HA
HRP 9.8 CM (AN)/HA
7HHP 6 R AN/HA
HRP 6.5 CM (OW)/HA
HRP 6.5 CM (AN)/HA
HRP 9.6 CM (OW)/HA
HRP 6.5S CM (OW)/HA
HRP 6.5S CM (AN)/HA
T1 T2 T3 T4 T5
T1 Motor reset
Pressing the button while the hood is in operation turns it
OFF.
T2 Speed 1
Pressing the button sets the hood to speed 1.
T3 Speed 2
Pressing the button sets the hood to speed 2.
T4 Speed 3
Pressing the button sets the hood to speed 3.
T5 Lights ON/OFF
Models with soft button keypad
HNP 9.6 AB X/HA
T1 T2 T3 T4 T5
B
T6
T1 Motor reset
T2 Speed 1
Pressing the button sets the hood to speed 1.
T3 Speed 2
Pressing the button sets the hood to speed 2.
T4 Speed 3
Pressing the button sets the hood to speed 3.
T5 Booster
Pressing the button sets the hood to high speed. After 5
minutes, the hood returns to the previous speed; pressing
a speed button (T2, T3 or T4) quits booster mode and sets
the selected speed.
T6 Lights ON/OFF
Grease/odour fi lter warnings
The T2 icon fl ashes to indicate that the grease fi lter is
saturated, while T3 fl ashes to indicate that the odour fi lter
is saturated, and if both are fl ashing then both fi lters are
saturated. You must then clean/replace the grease fi lter (A)
or odour fi lter (B) or both, accordingly (see “Maintenance
and care”).
To reset the fi lter counter:
Hold down T5 for three seconds while the hood is on.
The warning led fl ashes three times, then returns to its
normal mode If both fi lter warnings are active at the same
time, you must reset each separately.
The fi rst sequence resets the grease fi lter, while the second
sequence resets the odour fi lter.
Hood confi guration:
To set the operating mode of the hood, hold down T5 for 6
seconds while the product is off. Icons T2 or T3 will light up
to show the type of installation: T2 ventilation, T3 fi ltering.
You can change the type of installation by pressing T4
cyclically.
To save the new confi guration press T1 individually.
*
Only available in certain models
Press the button with the hood off to set speed 1. Pressing
the button while the hood is in operation turns it OFF.

GB
19
Models with soft button keypad and display
HNP 6.5S CD X/HA
HPS 60 IX/HA
T1 T2 T3 T4 T5 T6
B
1 Motor ON/OFF
Press the button with the hood off to set speed 1. Pressing
the button while the hood is in operation turns it OFF.
T2 Speed -
Pressing the button returns the hood to the previous speed.
T3 Speed +
Pressing the button returns the hood to the next speed.
T4 Booster
Pressing this button sets the hood to high speed; the letter
"b" fl ashes slowly on the display. After 5 minutes, the hood
returns to its previous speed; this can also be done while
booster mode is on by pressing either speed button (T2
or T3).
T5 Timer
Pressing this button delays the hood turning off automatically
by 5 minutes. The timer counts down on the display in
minutes. The timer can only be set for manual speeds, not
for booster mode.
T6 Lights ON/OFF
Grease/odour fi lter warnings
The bar at the top left fl ashes to indicate
that the grease fi lter is saturated.
The bar at the top right fl ashes to indicate
that the odour fi lter is saturated.
If both bars are fl ashing, then both fi lters
are saturated.
You must then clean/replace the grease fi lter (A) or odour
fi lter (B) or both, accordingly (see “Maintenance and care”).
The latter only applies to the fi lter version.
To reset the fi lter counter:
Hold down T4 for three seconds while the hood is on.
If both fi lter warnings are active at the same time, you must
reset each separately.
The fi rst sequence resets the grease fi lter, while the second
sequence resets the odour fi lter.
Confi guring the hood
To set the operating mode of the hood, hold down T4 for
6 seconds while the product is off.. After a long beep, the
type of installation displays:
Ducted
(square at bottom left fl ashing).
Filter
(square at bottom right fl ashing).
You can change the type of installation by pressing T4. To
quit confi guration mode, press T1 once; this switches the
unit off and saves the last displayed setting.
Maintenance and care
Caution! Before cleaning or servicing the unit,
disconnect it from the mains by pulling the power plug
or disconnecting the main circuit breaker.
First cleaning
• Remove the protective fi lm
• Clean with a damp sponge and a little neutral soap
• Rinse off with a damp cloth
• Dry with a soft cloth; if the hood is stainless steel, dry
along the metal's grain
Periodic cleaning
The hood must be cleaned frequently (at least as often as
you service the grease fi lter), inside and out. Use a damp
cloth and a neutral liquid detergent with lukewarm water.
Do not use abrasive or corrosive products.
Warning: Failure to observe the hood cleaning and fi lter
cleaning/replacement instructions can result in fi res. Follow
the instructions carefully. The manufacturer is not liable for
any damage to the motor or fi res caused by incorrect care
or failure to follow the above instructions.

20
GB
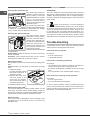
Servicing the grease fi lter (A)
A
The grease fi lter retains the
particles of grease produced
during cooking; it must be
cleaned at least once a month
with a non-aggressive
detergent, either by hand or
with a low temperature, short
dishwasher cycle.
To extract the grease fi lter,
pull the spring loaded handle.
If washed in a dishwasher, the metal fi lter may change
colour, but this does not affect its performance.
Servicing the charcoal fi lter (B)
B
The charcoal filter retains
unpleasant cooking odours.
The filter saturates after a
variable time, depending on
the type of cooking and how
often the grease filter is
cleaned. The cartridge must
be replaced at least once
every twenty months.
This fi lter can NOT be washed
or regenerated
Disassembly: Rotate the fi lter 90° to remove it from the
suction assembly.
Assembly: Fit the active-carbon fi lter into the suction
assembly and rotate it 90° to secure it in place.
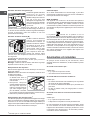
Replacing the bulbs
Disconnect the unit from the mains and remove the grease
fi lter.
Caution! Make sure the bulbs are cool before touching
them.
1. Extract the guard
by prising it out with a small
flat head screwdriver or
something similar.
2. Replace the faulty bulb.
Use only bulbs of the
same type (for details,
see the technical data in
the following manual).
3. Refi t the guard (push it in).
Replacing the lights LED
*
The hood is fi tted with a lighting system based on LED
technology. The LEDs ensure optimal lighting, longer life
and lower consumption compared with traditional lights. To
replace them please contact the assistance service.
Electrical cable
If the power cable is damaged, it can be replaced by the
manufacturer or his technical service, to prevent any
attendant risks.
SCRAPPING
The unit is marked for conformity with European Directive
2012/19/EC, Waste Electrical and Electronic Equipment
(WEEE). By ensuring that the unit is scrapped properly,
the user contributes to safeguarding the environment and
public health.
The
symbol on the product or on its accompanying
documents indicates that the product may not be treated
as domestic waste but must be handed over to a sorting
centre for electrical and electronic waste. Dispose of it
in accordance with local waste disposal regulations. For
further information on the handling, recovery and recycling
of this product, contact the local authority, domestic waste
disposal service or the reseller from whom you purchased it
Troubleshooting
If something does not work, make the following simple
checks before contacting Technical Service:
If the hood does not operate:
Check that:
• the unit is powered up.
• a speed has been set.
If the hood is not working effectively:
Check that:
• the selected motor speed is suffi cient to handle the
amount of smoke and steam being produced.
• the kitchen is adequately ventilated for the unit to take
air in.
• the charcoal fi lter is not exhausted (fi lter version).
If the hood turns off during normal operation:
Check that:
• the unit is powered up.
• the circuit breaker has not tripped.
In case of faulty operation, before contacting Technical
service, fi rst disconnect the machine from the mains for at
least 5 seconds by pulling its plug, then reconnect it. If the
fault persist, contact Technical Service.
* Only available in certain models
A página está carregando...
A página está carregando...
A página está carregando...
A página está carregando...
A página está carregando...
A página está carregando...
A página está carregando...
A página está carregando...
A página está carregando...
A página está carregando...
A página está carregando...
A página está carregando...
A página está carregando...
A página está carregando...
A página está carregando...
A página está carregando...
A página está carregando...
A página está carregando...
A página está carregando...
A página está carregando...
-
 1
1
-
 2
2
-
 3
3
-
 4
4
-
 5
5
-
 6
6
-
 7
7
-
 8
8
-
 9
9
-
 10
10
-
 11
11
-
 12
12
-
 13
13
-
 14
14
-
 15
15
-
 16
16
-
 17
17
-
 18
18
-
 19
19
-
 20
20
-
 21
21
-
 22
22
-
 23
23
-
 24
24
-
 25
25
-
 26
26
-
 27
27
-
 28
28
-
 29
29
-
 30
30
-
 31
31
-
 32
32
-
 33
33
-
 34
34
-
 35
35
-
 36
36
-
 37
37
-
 38
38
-
 39
39
-
 40
40


Ariston HNP 6.5 CM X Guia de usuario
- Categoria
- Exaustores
- Tipo
- Guia de usuario
- Este manual também é adequado para
em outras línguas
- español: Ariston HNP 6.5 CM X Guía del usuario
- français: Ariston HNP 6.5 CM X Mode d'emploi