
Checking the Components
Vérification des composants
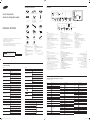
Reverse Side
Face arrière
[English]
1
Connects to MDC using an RS232C adapter.
2
Supplies power to the external sensor board or receives the light sensor signal.
3
Receives sound from a PC via an audio cable.
4
Connects to the audio of a source device.
5
Connect to a USB memory device.
6
USB (5V 1A): Connects to a USB device. Make sure the Touch is not in use.
TOUCH IN: This must be connected to the cable if the Touch is in use.
7
DVI IN: Connects to a source device using a DVI cable or HDMI-DVI cable.
MAGICINFO IN: Use the (dedicated) DP-DVI cable when connecting a network box
(sold separately).
8
Connects to a PC using a DP cable.
9
Connects to a source device using an HDMI cable.
0
Connects to the Tray, found on the front of the product, using the OCM cable.
!
Connects to a source device using a D-SUB cable.
@
Connects the Touch to a PC.
#
Connects to a source device using the AV/Component adapter.
$
Connects to MDC using a LAN cable.
[Français]
1
Connexion au MDC grâce à un adaptateur RS232C.
2
Permet d’alimenter la carte de capteur externe ou de recevoir le signal de capteur
lumineux.
3
Permet de recevoir le son d’un ordinateur via un câble audio.
4
Connexion au signal audio d’un périphérique source.
5
Permet de se connecter à un périphérique de mémoire USB.
6
USB (5V 1A): Permet de se connecter à un appareil USB.
Assurez-vous que la fonctionnalité Touch n’est pas en cours d’utilisation.
TOUCH IN: Ce port doit être connecté au câble si la fonctionnalité Touch est en
cours d’utilisation.
7
DVI IN: Connexion à un périphérique source à l’aide d’un câble DVI ou HDMI-DVI.
MAGICINFO IN: Utilisez le câble DP-DVI (dédié) lorsque vous connectez un boîtier
réseau (vendu séparément).
8
Permet de se connecter à un ordinateur via un câble DP.
9
Permet le branchement à un périphérique source via un câble HDMI.
0
À connecter au plateau, situé à l’avant du produit, à l’aide du câble OCM.
!
Permet de se connecter à un périphérique source via un câble D-SUB.
@
Connecte la fonctionnalité Touch à un PC.
#
Permet de se connecter à un périphérique source via l’adaptateur AV/composant.
$
Permet de se connecter à MDC via un câble LAN.
[Português]
1
Liga-se a um MDC utilizando um adaptador RS232C.
2
Fornece alimentação ao quadro do sensor externo ou recebe o sinal do sensor de luz.
3
Recebe o som de um PC através de um cabo de áudio.
4
Liga-se ao áudio de um dispositivo de entrada.
5
Ligue a um dispositivo de memória USB.
6
USB (5V 1A): Liga-se a um dispositivo USB.
Certifique-se de que o Touch não está a ser utilizado.
TOUCH IN: Tem de estar ligado ao cabo se o Touch estiver a ser utilizado.
7
DVI IN: Liga-se a um dispositivo de entrada utilizando um cabo DVI ou HDMI-DVI.
MAGICINFO IN: Utilize o cabo DP-DVI (dedicado) quando ligar uma caixa de rede
(vendido separadamente).
8
Liga-se a um PC através de um cabo DP.
9
Para ligar a um dispositivo de fonte utilizando um cabo HDMI.
0
Liga-se à barra hub, na parte frontal do produto, através do cabo OCM.
!
Liga-se a um dispositivo de entrada através de um cabo D-SUB.
@
Liga o Touch a um PC.
#
Liga-se a um dispositivo de entrada através do adaptador do componente/AV.
$
Liga-se ao MDC através de um cabo LAN.
1
2
3
4
5
6
(5V 1A):
7
8
9
0
!
@
#
$
[繁體中文]
1
使用 RS232C 轉接器連接至 MDC。
2
為外部感測器板提供電源,或接收燈光感測器訊號。
3
透過音訊纜線從電腦接收聲音。
4
連接至訊號源裝置的音訊。
5
連接至 USB 記憶裝置。
6
USB (5V 1A): 連接至 USB 裝置。 確保 Touch 未在使用中。
TOUCH IN: 若 Touch 在使用中則其必須連接至纜線。
7
DVI IN: 使用 DVI 纜線或 HDMI-DVI 纜線連接至訊號源裝置。
MAGICINFO IN: 請使用(專用)DP-DVI 纜線連接網路盒(單獨出售)。
8
使用 DP 纜線連接至電腦。
9
用 HDMI 纜線連接至訊號源裝置。
0
使用 OCM 纜線,連接至位於產品正面的托盤。
!
用 D-SUB 纜線連接至訊號源裝置。
@
將 Touch 連接至電腦。
#
使用 AV/元件配接器連接至訊號源裝置。
$
使用 LAN 纜線連接至 MDC。
1
2
3
4
5
Touch :USB (5V 1A)
6
. Touch :TOUCH IN
7
8
9
0
!
Touch
@
#
$
DM65E-BR / DM75E-BR
– The colour and the appearance may differ depending on the product, and the specifications are subject to
change without prior notice to improve the performance.
– Download the user manual from the website for further details.
http://www.samsung.com/displaysolutions
– La couleur et l’aspect du produit peuvent varier en fonction du modèle, et ses spécifications peuvent être
modifiées sans préavis pour des raisons d’amélioration des performances.
– Téléchargez le manuel utilisateur du site Web pour obtenir plus de détails.
The terms HDMI and HDMI High-Definition Multimedia
Interface, and the HDMI Logo are trademarks or
registered trademarks of HDMI Licensing LLC in the
United States and other countries.
[English]
– Contact the vendor where you purchased the product if
any components are missing.
– The appearance of the components may differ from the
images shown.
[Français]
– S'il manque le moindre composant, contactez le revendeur
auprès duquel vous avez acheté le produit.
–
Les composants peuvent être différents de ceux illustrés ici.
[Português]
– Contacte o vendedor onde adquiriu o produto caso haja
componentes em falta.
– O aspeto dos componentes pode ser diferente das
imagens apresentadas.
– Liên hệ với nhà cung cấp nơi bạn mua sản phẩm nếu có
thành phần nào bị thiếu.
–
[繁體中文]
– 如有任何元件遺漏,請聯絡您購買產品的供應商。
– 元件的外觀可能和所示的圖像有所不同。
–
–
RGB / DVI /
HDMI / AV /
COMPONENT
/ AUDIO IN
DVI IN /
MAGICINFO IN
HDMI IN 1
HDMI IN 2
DP IN
IR /
AMBIENT
SENSOR IN
TRAY IN RJ45RGB IN
COMPONENT IN
TOUCH
OUT
USB
(5V 1A) /
TOUCH IN
USB
Comment contacter Samsung dans le monde
Web site: http://www.samsung.com
[English]
Issues Solutions
The screen keeps switching on and off.
Check the cable connection between the product and PC, and ensure the
connection is secure.
No Signal is displayed on the screen.
Check that the product is connected correctly with a cable.
Check that the device connected to the product is powered on.
Not Optimum Mode is displayed.
This message is displayed when a signal from the graphics card exceeds the
product’s maximum resolution and frequency.
Refer to the Standard Signal Mode Table and set the maximum resolution
and frequency according to the product specifications.
There is no sound.
Check the connection of the audio cable or adjust the volume.
Check the volume.
[Français]
Problèmes Solutions
L’écran s’allume et s’éteint continuellement.
Vérifiez que le câble est connecté correctement entre l’appareil et
l’ordinateur.
Aucun signal s’affiche à l’écran.
Vérifiez que l’appareil est connecté correctement à l’aide d’un câble.
Assurez-vous que le périphérique connecté à l’appareil est sous tension.
Mode non optimal est affiché.
Ce message s’affiche lorsqu’un signal émis par la carte graphique est
supérieur à la fréquence et la résolution maximales de l’appareil.
Consultez le tableau des modes de signal standard et réglez la fréquence et
la résolution maximales conformément aux spécifications de l’appareil.
Il n'y a pas de son.
Vérifiez le branchement du câble audio ou réglez le volume.
Vérifiez le volume.
[Português]
Problemas Soluções
O ecrã está continuamente a ligar e a desligar.
Verifique a ligação do cabo entre o produto e o PC, e certifique-se de que a
ligação está bem efectuada.
A mensagem Sem sinal é apresentada no ecrã.
Verifique se o produto está ligado correctamente com um cabo.
Verifique se o dispositivo ligado ao produto está ligado.
A mensagem Modo inadequado é
apresentada.
Esta mensagem é apresentada quando um sinal da placa gráfica ultrapassa a
resolução e a frequência máximas do produto.
Consulte a Tabela do modo de sinal padrão e defina a resolução e a
frequência máximas de acordo com as especificações do produto.
Não existe som.
Verifique a ligação do cabo de áudio ou ajuste o volume.
Verifique o volume.
No Signal
Not Optimum Mode
[繁體中文]
問題 解決方案
螢幕不斷開啟和關閉。 檢查產品和 PC 間的纜線連接,並確定連接牢固。
螢幕上顯示無訊號。
檢查產品是否已經使用纜線正確連接。
檢查連接至產品的裝置是否已經開啟電源。
顯示非最佳化模式。
圖形卡所發出的訊號超過產品的最大解析度和頻率時,就會顯示此訊息。
請參閱「標準訊號模式表」,並根據產品規格設定最大解析度與頻率。
沒有音效。
檢查音源線是否接好或調整音量。
檢查音量。
Quick Setup Guide
Guide de configuration rapide
Warranty card (Not available in some locations)
Carte de garantie (Non disponible dans certains pays)
Regulatory guide
Guide réglementaire
Power cord
Cordon d’alimentation
Leclanche type dry cells
(x 2, for the remote control)
(Not available in some locations)
Piles sèches type Leclanche
(x 2, pour la télécommande)
(Non disponible dans certains pays)
Remote Control
Télécommande
RS232C(IN) adapter
Adaptateur RS232C(IN)
Tray
Plateau
Screw (M4L10, 11 EA)
Vis (M4L10, 11 EA)
OCM cable
Câble OCM
External sensor KIT
Kit de capteurs externe
USB cable
Câble USB
Cable grip
Chaussette de tirage
Wire holders
Porte-conducteurs
Touch Pen (1 EA)
Stylet tactile (1 EA)
Double-sided tape (6 EA)
Scotch double face (6 EA)
Holder-Ring (4 EA)
Anneau de maintien (4 EA)
Area Customer Care Centre
ALGERIA 3004
ANGOLA 940271635
AUSTRALIA 1300 362 603
BAHRAIN 8000-GSAM (8000-4726)
BANGLADESH
0961-2300300
0800-0300300 (Toll Free)
BOTSWANA 8007260000
BURUNDI 200
CAMEROON 67095-0077
COTE D’ IVOIRE 8000 0077
DRC 499999
EGYPT
08000-7267864
16580
GHANA 0800-100077
HONG KONG 3698 4698
INDIA
1800 3000 8282 (Toll Free)
1800 266 8282 (Toll Free)
1800110011 (Toll Free)
30308282
INDONESIA
021-56997777
08001128888
IRAN 021-8255 [CE]
Area Customer Care Centre
IRAQ
964 77 261 72220
964 75 118 92525
JORDAN
0800-22273
06 5777444
KENYA 0800 545 545
KUWAIT 183-CALL (183-2255)
LEBANON
961 1484 999
1299
MACAU 0800 333
MALAYSIA
1800-88-9999
603-77137477 (Overseas contact)
MAURITIUS 800 2550
MOROCCO 080 100 22 55
MOZAMBIQUE 847267864 / 827267864
MYANMAR +95-1-2399-888
NAMIBIA 08 197 267 864
NEW ZEALAND 0800 726 786
NIGERIA 0800-726-7864
OMAN 800-SAMSUNG (800 - 726 7864)
PAKISTAN 0800-Samsung (72678)
Area Customer Care Centre
PHILIPPINES
1-800-10-726-7864 [PLDT Toll Free]
1-800-8-726-7864 [Globe Landline and Mobile]
02- 422-2111 [Standard Landline]
QATAR 800-CALL (800-2255)
REUNION 0262 50 88 80
RWANDA 9999
SAUDI ARABIA 8002473457 (800 24/7 HELP)
SENEGAL 800-00-0077
SINGAPORE 1800-SAMSUNG (726-7864)
SOUTH AFRICA 0860 SAMSUNG (726 7864)
SRI LANKA 0115900000
SUDAN 1969
SYRIA 962 5777444
TAIWAN 0800-329999
TANZANIA 0800 780 089
THAILAND
0-2689-3232,
1800-29-3232
TUNISIA 80 1000 12
U.A.E 800-SAMSUNG (800 - 726 7864)
UGANDA 0800 300 300
VIETNAM 1800 588 889
ZAMBIA 0211 350370
DME65-BR_DME75-BR-QSG-MENA&ASIA_BN68-07270Q.indb 1 2016-08-18 오후 4:19:02

[English]
Specifications
Model Name DM65E-BR DM75E-BR
Panel
Size
65 CLASS (64.5 inches / 163.9 cm)
75 CLASS (74.5 inches / 189.3 cm)
Display area
1428.48 mm (H) x 803.52 mm (V)
1650.24 mm (H) x 928.26 mm (V)
Dimensions (W x H x D)
1535.3 x 910.4 x 76.6 mm
1756.1 x 1034.1 x 109.1 mm
(74.1 mm Without Handle)
Weight (without stand) 46.1 kg 59 kg
Audio Output 10 W + 10 W
Power Supply
AC 100 to 240 VAC (+/- 10%), 60 / 50 Hz ± 3 Hz
Refer to the label at the back of the product as the standard voltage can vary in
different countries.
Environmental
considerations
Operating
Temperature: 32 °F – 104 °F (0 °C – 40 °C), With PIM: 50 °F – 104 °F (10 °C – 40 °C)
Humidity: 10% – 80%, non-condensing
Storage
Temperature: -4 °F – 113 °F (-20 °C – 45 °C)
Humidity: 5% – 95%, non-condensing
– This device is a Class A digital apparatus.
PowerSaver
PowerSaver
Normal Operation
Power saving mode
(SOG Signal : Not Support the DPM Mode)
Power off
Rating Typical Max
Power Indicator Off Blinking Off
Power
Consumption
DM65E-BR 240 W 200 W 264 W 2 W
0.5 W
DM75E-BR 280 W 266 W 308 W 0.5 W
– The displayed power consumption level can vary in different operating conditions or when settings are changed.
[Français]
Nom du modèle DM65E-BR DM75E-BR
Panneau
Taille
Classe 65 (64,5 pouces / 163,9 cm) Classe 75 (74,5 pouces / 189,3 cm)
Surface d'affichage
1428,48 mm (H) x 803,52 mm (V)
1650,24 mm (H) x 928,26 mm (V)
Dimensions (L x H x P)
1535,3 x 910,4 x 76,6 mm
1756,1 x 1034,1 x 109,1 mm
(74,1mm Sans les poignées)
Poids (sans le socle) 46,1 kg 59 kg
Sortie audio 10 W + 10 W
Alimentation
CA 100 à 240 VAC (+/- 10%), 60 / 50 Hz ± 3 Hz
Reportez-vous à l'étiquette apposée au dos du produit, car la tension standard
peut varier en fonction du pays.
Considérations
environnementales
Fonctionnement
Température: 0 °C – 40 °C (32 °F – 104 °F)
, Avec PIM: 10 °C – 40 °C (50 °F – 104 °F)
Humidité: 10% à 80%, sans condensation
Stockage
Température: -20 °C – 45 °C (-4 °F – 113 °F)
Humidité: 5% à 95%, sans condensation
– Ce périphérique est un appareil numérique de Classe A.
Economiseur d’énergie
Economiseur d'énergie
Fonctionnement normal
Mode d'économie d'énergie
(signal SOG : mode DPM non pris en
charge)
Mise hors tension
Nominal
Type Max.
Indicateur d'alimentation Arrêt Clignotant Activé
Consommation
DM65E-BR 240 W 200 W 264 W 2 W
0,5 W
DM75E-BR 280 W 266 W 308 W 0,5 W
–
Le niveau de consommation affiché peut varier selon les conditions de fonctionnement ou lors de la modification des paramètres.
[Português]
Nome do modelo DM65E-BR DM75E-BR
Painel
Tamanho
Classe 65 (64,5 polegadas / 163,9 cm) Classe 75 (74,5 polegadas / 189,3 cm)
Área de visualização 1428,48 mm (H) x 803,52 mm
(V) 1650,24 mm (H) x 928,26 mm (V)
Dimensões (L x A x P) 1535,3 x 910,4 x 76,6 mm
1756,1 x 1034,1 x 109,1 mm
(74,1 mm Sem pega)
Peso (sem base) 46,1 kg 59 kg
Saída de Áudio 10 W + 10 W
Fonte de alimentação
CA 100 a 240 V CA (+/- 10%), 60/50 Hz ± 3 Hz
Consulte a etiqueta na parte posterior do produto, pois a tensão padrão pode variar
em países diferentes.
Características
ambientais
Funcionamento
Temperatura: 0 °C - 40 °C (32 °F - 104 °F), Com PIM: 10 °C – 40 °C (50 °F – 104 °F)
Humidade: 10% - 80%, sem condensação
Armazenamento
Temperatura: -20 °C - 45 °C (-4 °F - 113 °F)
Humidade: 5% - 95%, sem condensação
– Este dispositivo é um aparelho digital de classe A.
Poupança de energia
Poupança de energia
Funcionamento normal
Modo de poupança de energia
(Sinal SOG: não suportado no modo DPM)
Alimentação
desligada
Nominal
Típico Máx.
Indicador de corrente Desligar A piscar Ligar
Consumo de
energia
DM65E-BR 240 W 200 W 264 W 2 W
0,5 W
DM75E-BR 280 W 266 W 308 W 0,5 W
– O nível de consumo de energia apresentado pode variar consoante as condições de funcionamento, ou caso as definições sejam
alteradas.
–
–
[繁體中文]
規格
型號名稱 DM65E-BR DM75E-BR
指定型號名稱 LH65DME-BR LH75DME-BR
面板
大小(需沿屏幕表面测量对角)
64.5 英吋
(
163.9 公分) 74.5 英吋
(
189.3 公分)
可視面積(需沿屏幕表面测量)
1428.48 公釐(水平)x
803.52 公釐(垂直)
1650.24 公釐(水平)x
928.26 公釐(垂直)
尺寸(寬 x 高 x 深)
1535.3 x 910.4 x 76.6 公釐
1756.1 x 1034.1 x 109.1 公釐
(74.1 公釐 不含把手)
重量(不帶支架)
46.1 公斤 59 公斤
音訊輸出 10 W + 10 W
電源
AC 100 至 240 VAC (+/- 10%), 60/50 Hz ± 3 Hz
請參閱產品後方的標籤,不同國家地區的標準電壓不盡相同。
環境因素
工作
溫度: 0 C - 40 C (32 F - 104 F), 含 PIM: 10 C – 40 C (50
F – 104 F)
濕度: 10% - 80%,無冷凝
存放
溫度: -20 C - 45 C (-4 F - 113 F)
濕度: 5% - 95%,無冷凝
- 此裝置是 A 類數位設備。
PowerSaver
PowerSaver
正常作業
節能模式
(SOG 訊號:不支援 DPM 模式)
關機
額定 典型 最大
電源指示燈 關閉 閃爍 開啟
耗電量
DM65E-BR 240 W 200 W 264 W 2 W
0.5 W
DM75E-BR 280 W 266 W 308 W 0.5 W
– 在不同的操作條件下或設定變更時,顯示的耗電量也會有所不同。
) )
× ×
)
× ×
–
–
[English]
The appearance may differ depending on the product.
When attaching the Tray, use the screws that came with the package.
Do not fasten the screws with excessive force. The product may get damaged.
Make sure to connect the USB touch cable to the USB (5V 1A) / TOUCH IN port on the product.
To use the touch function with a computer or a Network box (sold separately) connected to the product, use a USB cable to connect
the TOUCH OUT port on the product to the port on the computer or Network box.
[Français]
L'aspect peut varier en fonction du produit.
Lors de la fixation du plateau, utilisez les vis fournies avec l’ensemble.
Ne serrez pas trop les vis. Le produit pourrait être endommagé.
Veillez à connecter le câble tactile USB au port USB (5V 1A) / TOUCH IN du produit.
Si vous souhaitez utiliser la fonction tactile avec un ordinateur ou un boîtier réseau (vendu séparément) connecté au produit, utilisez un
câble USB pour connecter le port TOUCH OUT du produit au port de l’ordinateur ou du boîtier réseau.
[Português]
O aspecto pode variar, consoante o produto.
Para fixar a barra hub, utilize os parafusos fornecidos na embalagem.
Não aperte os parafusos com demasiada força. O produto poderá ficar danificado.
Certifique-se de que liga o cabo USB Touch à porta USB (5V 1A) / TOUCH IN no produto.
Para utilizar a função tátil com um computador ou uma caixa de rede (vendida separadamente) ligada ao produto, utilize um cabo USB para ligar a
porta TOUCH OUT no produto à porta no computador ou na caixa de rede.
USB (5V 1A) / TOUCH IN
TOUCH OUT
[繁體中文]
外觀可能因產品而異。
安裝托盤時,請使用套件附隨的螺絲。
請勿過度用力擰緊螺絲。 產品可能因此損壞。
確保將 USB 觸控纜線連接至產品上的 USB (5V 1A) / TOUCH IN 連接埠。
要在與產品連接的電腦或網路盒(單獨出售)上使用觸控功能,請使用 USB 纜線將產品上的 TOUCH OUT 連接埠與電腦或網路
盒上的 連接埠連接。
USB (5V 1A) / TOUCH IN
TOUCH OUT
Plateau
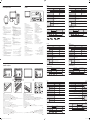
[English]
1
Light sensor
Automatically detects the intensity of ambient light
around a selected display and adjusts the screen
brightness.
2
Remote Control Sensor
Aim the remote control towards this spot on the LCD
Display.
- Using other display devices in the same space as the
remote control of this product can cause the other
display devices to be inadvertently controlled.
3
The power indicator
will turn off when the product is turned on. It will blink in
power-saving mode.
[Français]
1
Capteur optique
Détecte automatiquement l’intensité de la lumière
ambiante autour d’un écran déterminé et adapte la
luminosité de l’affichage.
2
Capteur de la télécommande
Orientez la télécommande en direction de ce point sur le
Moniteur.
- Si vous utilisez la télécommande de ce produit dans le
même espace que d'autres périphériques d'affichage,
il se peut que ces derniers soient commandés par
mégarde.
3
Indicateur d’alimentation
Le voyant d’alimentation s’éteint lorsque le produit est mis
sous tension. Il clignote en mode économie d’énergie.
[Português]
1
Sensor de luz
Detecta automaticamente a intensidade da luz ambiente à
volta de um monitor seleccionado e ajusta a luminosidade
do ecrã.
2
Sensor do telecomando
Aponte o telecomando para este ponto do visor LCD.
-
Se utilizar outros dispositivos de visualização no mesmo
espaço do telecomando deste produto poderá vir a
controlar estes outros dispositivos acidentalmente.
3
Indicador de corrente
O indicador de corrente apaga-se quando o produto é
ligado. Pisca no modo de poupança de energia.
1
2
3
[繁體中文]
1
光線感應器
自動偵測所選顯示器周圍光線的亮度,並調整螢幕
亮度。
2
遙控感測器
將遙控器對準 LCD 顯示器的這個位置。
-
在相同地點與本產品的遙控器一併使用其他顯示裝置,
可能會導致其他顯示裝置發生未能如預期受控制
。
3
電源指示燈
電源指示燈將在產品開啟時熄滅。在省電模式中閃爍。
1
2
3
[English]
1
Turns the Touch on or off.
2
View menus of the display device.
3
Turns the product on or off.
4
Connect to a USB memory device.
- Push up the upper part of the USB port cover.
5
Connects to a source device using an HDMI cable.
6
Connects the Touch to a PC.
7
Connect the OCM cable to the tray and the TRAY IN
port on the product.
8
Connect the IR Touch Control cable to the tray.
[Français]
1
Permet d’activer ou de désactiver la fonctionnalité Touch.
2
Affichez les menus du dispositif d’affichage.
3
Permet d’activer ou de désactiver le produit.
4
Permet de se connecter à un périphérique de
mémoire USB.
- Poussez la partie supérieure du couvercle du port USB.
5
Permet le branchement à un périphérique source via
un câble HDMI.
6
Connecte la fonctionnalité Touch à un PC.
7
Connectez le câble OCM au plateau et au port
TRAY IN du produit.
8
Connectez le câble de commande tactile infrarouge
au plateau.
[Português]
1
Liga e desliga o Touch.
2
Veja os menus do dispositivo de visualização.
3
Liga e desliga o produto.
4
Ligue a um dispositivo de memória USB.
- Empurre a parte superior da tampa da porta USB.
5
Para ligar a um dispositivo de fonte utilizando um
cabo HDMI.
6
Liga o Touch a um PC.
7
Ligue o cabo OCM à barra hub e à porta TRAY IN no produto.
8
Ligue o cabo IR Touch Control à barra hub.
1
2
3
4
5
6
7
Kết nối cáp OCM với máng và cổng TRAY IN trên
sản phẩm.
8
Kết nối cáp Điều khiển IR Touch với máng.
[繁體中文]
1
開啟或關閉 Touch。
2
檢視顯示裝置的功能表。
3
開啟或關閉產品。
4
連接至 USB 記憶裝置。
- 向上推 USB 連接埠蓋子的上部。
5
用 HDMI 纜線連接至訊號源裝置。
6
將 Touch 連接至電腦。
7
將 OCM 纜線連接至托盤和產品上的
TRAY IN
連接埠。
8
將 IR Touch Control 纜線連接至托盤。
Touch
1
2
3
4
5
Touch
6
TRAY IN
7
8
IR /
AMBIENT
SENSOR IN
DME65-BR_DME75-BR-QSG-MENA&ASIA_BN68-07270Q.indb 2 2016-08-18 오후 4:19:05
-
 1
1
-
 2
2


Samsung DM65E-BR Guia rápido
- Tipo
- Guia rápido
- Este manual também é adequado para
em outras línguas
- français: Samsung DM65E-BR Guide de démarrage rapide
- English: Samsung DM65E-BR Quick start guide