Philips Fan HD 3274/75 Manual do usuário
- Categoria
- Aquecedores de ambiente
- Tipo
- Manual do usuário
Este manual também é adequado para

HD 3274/75

2
English Page 4
• Keep page 3 open when reading these
operating instructions.
Français Page 7
• Dépliez la page 3 en lisant le mode d'emploi.
Deutsch Seite 10
• Schlagen Sie beim Lesen der Gebrauchs-
anweisung Seite 3 auf.
Nederlands Pagina 13
• Sla bij het lezen van de gebruiksaanwijzing
pagina 3 op.
Italiano Pagina 16
• Prima di usare l'apparecchio, aprite le pagina 3
e leggete attentamente le istruzioni per l'uso.
Español Página 19
• Desplegar la página 3 al leer las instrucciones
de manejo.
Português Página 22
• Durante a leitura do modo de emprêgo,
desdobre e verifique a pág. 3.
Dansk Side 25
• Hold side 3 opslået mens De læser
brugsanvisningen.
Norsk Side 28
• Slå opp på side 3 før De leser videre.
Svenska Sid 31
• Ha sidan 3 utvikt när ni läser bruksanvisningen.
Suomi Sivu 34
• Pidä sivu 3 auki samalla kun luet käyttöohjetta.
Ελληνικά Σελίδα 37
• Ανίτε την σελίδα 3 για τις δηγίες
ρήσεως.

3
Hotairsystem
ECO
B
EC D
F
G
A
1
HD 3274
HD 3275

4
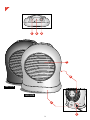
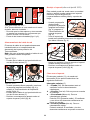
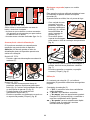
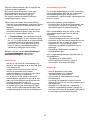
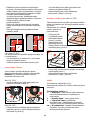
General description (fig. 1 on page 3)
A Air inlet grille
B Air outlet grille
C Selector switch
D Thermostat knob
E Pilot light
F Mains cord storage
G Stand / wall bracket (only type HD 3275)
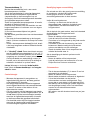
Safe positioning
• The heater must not be located immediately
below a socket outlet.
• Only use the fan heater when it is standing
(fig. 1) or mounted (only type HD 3275, fig. 4-8)
in an upright position.
• For your own safety and that of others: water
and electricity are a dangerous combination!
When using the heater in the free standing
mode do not place it in the immediate
surroundings of a bath, a shower or a
swimming pool.
Ensure that the appliance cannot fall into water
(bath, wash basin, shower cubicle, etc.).
• Do not use the heater in rooms with explosive
gas (e.g. petrol) or while using inflammable glue
or solvent (e.g. when glueing or varnishing
parquet floors, PVC etc.).
• Allow ample space around the heater.
A safe area to be left free is 50 cm / 20” at the
top and at the sides, and 120 cm / 47” at the
front.
• Prevent overheating of the appliance by
keeping the air inlet and outlet grilles free: do
not hang anything in front of it or above it -
otherwise there is a risk of fire.
Check the grilles from time to time for
accumulated dust.
If overheating should occur, the built-in
overheating safety device will switch off the
appliance.
• Keep the mains cord at a safe distance from the
air inlet and outlet grilles.
• Do not allow aerosols, inflammable substances
or materials sensitive to heat to be in the flow of
hot air.
• Do not use the heater on extremely deep-pile
carpets.
Important
• Before connecting the appliance check that the voltage indicated on the type plate
corresponds to the mains voltage in your home.
• Read these instructions carefully, in conjunction with the illustrations, before using the
appliance.
• The appliance is double insulated and need not be connected to an earthed mains outlet.
If you wish to use an extension cord, a 2-wire type is suitable. However, ensure that the
plugs and cord allow high power (16A-220V / 13A-240V AC).
If a reel type is employed, please unroll completely to prevent overheating.
• It may happen, especially if the heater operates on position 2 and another electrical device
is switched on as well, that a fuse or circuit breaker cuts off the mains power. In such a case,
the fuse or circuit breaker may not allow this high electrical power.
You may connect one of the involved appliances to another circuit (employing another fuse
or circuit breaker) or have the electrical installation revised by an authorized electrician.
• The heater is not designed for use as the main form of heating. Use the appliance only for
the intended use, i.e. extra heating in the house.
• To avoid the risk of fire and electrical shock select a safe place for the heater. (See section
“Safe positioning”.)
• Do not insert any objects into the heater.
• Ensure that children cannot play with the appliance.
• Attention: the front grille gets hot during use.
• Only touch the heater with dry hands.
English

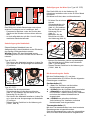
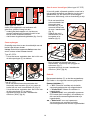
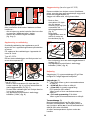
Only for type HD 3275:
If the heater is going to be used in the bathroom, it
must be installed...
- so that switches and other controls cannot be
touched by a person in the bath or shower;
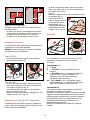
- outside the colour indicated areas (figs. 2
and 3).
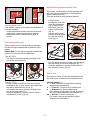
Storing the mains cord
Excess mains cord can be stored by pushing it
into the storage compartment at the back of the
heater.
Please Note: Do not use the appliance when the
mains cord is kept inside the appliance.
Type HD 3274:
- You can fix the mains cord by pressing it into
one of the three slots (F).
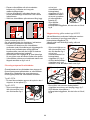
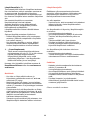
Type HD 3275:
- Using a small screwdriver push the small lip
downwards (fig. 4) and remove the heater from
the stand / wall bracket (G) (fig. 5).
- You can fix the mains cord by pressing it into
one of the three slots (F).
- Slide the appliance correctly onto the stand /
wall bracket (“Click!”) (fig. 8).
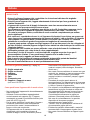
Wall-mounting (only for type HD 3275)
This model can be used as a free-standing unit,
but it can also be mounted to a wall using the
stand / wall bracket (G).
This wall should be solid, flat and fireproof.
- Using a small
screwdriver push the
small lip downwards
(fig. 4) and remove
the heater from the
stand / wall bracket
(fig. 5).
- Use the stand / wall
bracket as a template
to mark the drilling
holes (fig. 6).
- Drill the holes and fix the stand / wall bracket to
the wall using screws and rawlplugs (fig. 7).
- Slide the appliance correctly onto the stand /
wall bracket (“Click!”) (fig. 8).
How to use
The selector switch (C) and the thermostat knob
(D) enable you to select the following functions:
Selector switch (C)
O = "Off”. Both the fan and the two heating
elements are switched off.
> = “Cool air”. Only the fan is switched on.
1 = "Warm air"for gradual heating-up.
ECO positon (half power): the fan and one of
the two heating elements are switched on.
2 = "Hot air" for quick heating-up.
Full power: the fan and the two heating
elements are switched on.
5
3
60 cm
60 cm
6
60 cm
60 cm
2
5
4
8
7

6
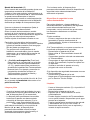
Thermostat knob (D)
With the thermostat knob you can set a constant
room temperature.
When the selector switch is set to position 1 or
position 2, the heater will automatically switch
on (using half power or full power respectively) as
soon as the room temperature falls below the set
temperature.
As soon as the set temperature is reached, the
heater will switch off.
Rotate the knob anti-clockwise to obtain a higher
temperature setting or clockwise for a lower
temperature setting.
You may adjust the thermostat during use.
To find the ideal thermostat setting:
- First set the knob to maximum position. (Rotate
anti-clockwise until the knob stops.)
- As soon as the temperature is comfortable, turn
the knob clockwise slowly until the heater goes
off.
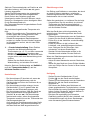
y = "Frost-free" position. This position
corresponds with the minimum thermostat
setting (i.e. approx. +5 °C / +41 °F) and can
be used to keep the immediate vicinity of the
heater free from frost. E.g. to prevent pipes
from freezing, position the heater close to the
pipe and select this position.
Please note: When using the cool air setting >,
the thermostat knob should be in its highest
position.
Pilot light
- When the appliance is connected to the mains
and switched on by selecting >, 1 or 2 the
pilot light (E) will come on.
- The light will stay on until the appliance is
switched off by setting the selector switch (C) to
position O or by disconnecting from the mains.
- To indicate that the heater is still connected and
in "switched-on" position (>, 1 or 2), the pilot
light will remain on when the set temperature is
reached and the thermostat switches the
appliance off.
For the same reason the pilot light will remain
on when the overheating safety device switches
the appliance off.
Overheating safety device
To prevent damage and risks due to overheating,
the built-in overheating safety device cuts off the
power as soon as the heating elements become
too hot.
If this should happen:
- First ensure that it was not the thermostat which
has switched off the heater. Set the thermostat
to maximum position.
If the heater does not switch on, the safety device
has been activated.
- Remove the mains plug from the wall socket.
- Let the heater cool down for 30 minutes.
- Check if the heater had been placed correctly.
- Check if anything is obstructing the air flow.
If necessary, clean the grilles with a vacuum
cleaner.
- Replace the plug into the wall socket and switch
the heater on again.
If the safety device again switches off the heater:
- Remove the mains plug from the wall socket.
- Have the heater inspected by a Philips Service
Centre or by your dealer.
Cleaning
- Set the selector switch (C) to position O to
switch off.
- Remove the mains plug from the wall socket.
- Wait for the heater to cool down sufficiently.
- You may clean the outside of the heater with a
damp cloth. Do not allow water to come into the
appliance.
- Clean the air inlet and outlet grilles regularly
(with normal use at least twice a year) with a
vacuum cleaner, using the brush attachment.

7
Description générale (fig. 1, page 3)
A Grille entrée d'air
B Grille sortie d'air
C Commutateur
D Thermostat
E Témoin lumineux
F Rangement du cordon
G Base / support mural (Type HD 3275
uniquement)
Positionnement de sécurité
• Positionnez l'appareil éloigné de la prise
murale.
• L'appareil ne doit être utilisé que debout (fig. 1)
ou monté en position verticale (uniquement
type HD 3275 ; fig. 4-8 ).
• Pour votre propre sécurité et celle des autres :
eau et électricité sont une combinaison
dangereuse !
Si l'appareil est utilisé en mode libre, ne le
placez pas à proximité d'une baignoire, d'une
douche ou d'une piscine.
Assurez-vous que l'appareil ne puisse pas
tomber dans l'eau.
• N'utilisez pas l'appareil dans des pièces où il y
aurait présence de gaz explosif (par ex.
essence) ou pendant l'utilisation de colle
inflammable ou de solvant (par ex. quand vous
collez ou vernissez des parquets, PVC, etc.).
• Laissez toujours un espace libre autour de
l'appareil, soit 50 cm au-dessus et sur les côtés,
et 120 cm en façade.
• Evitez toute surchauffe de l'appareil en
maintenant les entrée et sortie d'air libres : ne
suspendez rien devant, ni au-dessus (risque de
feu).
Retirez la poussière des grilles de temps en
temps.
En cas de surchauffe, le dispositif de sécurité
automatique intégré coupe l'appareil.
• Maintenez le cordon d'alimentation à une
distance suffisante des grilles d'entrée et de
sortie d'air.
• Ne laissez pas à proximité de l'appareil
d'aérosols, substances inflammables ou
matières sensibles à la chaleur.
• N'utilisez pas l'appareil sur des moquettes à
poils longs.
Important
• Avant de brancher l'appareil, assurez-vous que la tension spécifiée sur celui-ci correspond
bien à la tension du secteur de votre logement.
• Lisez les instructions en même temps que les illustrations avant toute utilisation pour la
première fois.
• L'appareil est à double isolation et n'a pas besoin d'être raccordé à une prise de terre.
Si vous désirez utiliser une rallonge, un modèle à 2 conducteurs est préférable. Cependant,
assurez-vous que les prises et la fiche permettent une puissance élevée (16A-220V /
13A-240V CA).
• Si un enrouleur de cordon est employé, déroulez-le complètement afin d'éviter toute
surchauffe.
Il peut arriver, surtout si l'appareil fonctionne sur la position
22
et qu'un autre appareil
électrique est en marche, qu'un fusible ou disjoncteur coupe le secteur. Dans un tel cas, le
fusible ou le disjoncteur ne permettent pas une puissance élevée.
Vous pouvez brancher l'un des appareils sur une autre prise (en employant un autre fusible
ou disjoncteur) ou faire réviser l'installation électrique par un professionnel.
• Le radiateur n'a pas été conçu en tant qu'appareil de chauffage principal. Utilisez le radiateur
uniquement comme chauffage d'appoint dans votre logement.
• Pour éviter tout risque de feu ou de choc électrique, placez le radiateur dans un endroit sûr.
(Voir chapitre "Positionnement de sécurité").
• Ne mettez jamais d'objets dans le radiateur.
• Surveillez les enfants. Ne les laissez pas jouer avec l'appareil.
• Attention : la grille devient chaude durant l'utilisation.
• Ne touchez le radiateur qu'avec des mains sèches.
Français

Type HD 3275 uniquement :
Si l'appareil est utilisé dans une salle de bains, il
doit être installé :
- de telle sorte que les commutateurs et autres
commandes ne puissent pas être touchés par
une personne dans le bain ou la douche ;
- en dehors des zones colorées (fig. 2 et 3).
Rangement du cordon
Le cordon peut être rangé dans le compartiment
rangement à l'arrière de l'appareil.
Attention : Ne laissez pas le cordon à l'intérieur
de l'appareil lors de l'utilisation.
Type HD 3274 :
- Vous pouvez fixer le cordon en le poussant
dans une des 3 fentes (F).
Type HD 3275 :
- A l'aide d'un petit tournevis, poussez la petite
lèvre vers le bas (fig. 4) et retirez l'appareil de
son support mural (G) (fig. 5).
- Vous pouvez fixer le cordon en le poussant
dans une des 3 fentes (F).
- Mettez en place correctement l'appareil sur son
support mural ("clic") (fig. 8).
Montage mural (Type HD 3275 uniquement)
L'appareil peut être utilisé comme un appareil à
poser, mais il peut également être fixé sur un mur
solide, plat et incombustible.
- A l'aide d'un petit tournevis, poussez la petite
lèvre vers le bas (fig. 4) et retirez l'appareil de
son support mural (G)
(fig. 5).
- Utilisez le support mural pour marquer les trous
de perçage (fig. 6).
- Percez les trous et
fixez le support au mur
en utilisant les vis et
les chevilles (fig. 7).
- Faites glisser l'appareil
correctement sur son
support ("clic") (fig. 8).
Utilisation
Le commutateur (C) et le thermostat (D) vous
permettent de sélectionner les fonctions
suivantes.
Commutateur (C)
O = "arrêt"
> = "air froid". Seul le ventilateur est en
marche.
1 = "Air tiède" pour un chauffage progressif.
Position "ECO" (demi puissance) : le
ventilateur et un des deux éléments
chauffants sont en marche.
2 = "Air chaud" pour un chauffage rapide.
Pleine puissance : le ventilateur et les deux
éléments chauffants sont en marche.
Thermostat (D)
Vous pouvez régler une température de pièce
constante à l'aide du thermostat.
Quand le commutateur est sur la position 1 ou 2
l'appareil se met automatiquement en marche (en
utilisant la demi-puissance ou le pleine puissance
respectivement) dès que la température de la
pièce descend descend en-dessous de la
température sélectionnée.
Dès que la température est atteinte, l'appareil
s'arrête.
8
3
60 cm
60 cm
6
60 cm
60 cm
2
5
4
8
7

9
Tournez le bouton dans le sens des aiguilles
d’une montre pour obtenir un réglage de
température plus faible ; tournez le bouton dans le
sens inverse des aiguilles d’une montre pour
obtenir un réglage de température plus fort.
Vous pouvez ajuster le thermostat en cours de
fonctionnement.
Pour trouver le règlage de thermostat idéal :
- Tournez d'abord le bouton jusqu'à la position
maximum. (Tournez dans le sens inverse des
aiguilles d’une montre jusqu'à blocage).
- Dès que la température est idéale, tournez le
bouton dans le sens des aiguilles d’une montre
jusqu'à ce que le radiateur s'arrête.
y = "Position hors gel". Cette position
correspond à un règlage du thermostat
minimum (soit environ 5°) et peut être utilisée
pour maintenir hors gel le voisinage immédiat
de l'appareil. Par exemple, pour éviter à des
tuyaux de geler, placez le radiateur à côté et
sélectionnez cette position.
Ventilation: Pour une utilisation en ventilation
froide > uniquement; placez le thermostat sur la
position la plus élevée.
Témoin lumineux
- Le témoin lumineux (E) s'allume quand
l'appareil est branché sur le secteur et en
marche en sélectionnant l'une des positions > ,
1 ou 2.
- Le témoin reste allumé jusqu'à ce que l'appareil
soit arrêté en plaçant le sélecteur ( C ) sur la
position O ou en le débranchant.
- Pour indiquer que l'appareil est encore branché
et en "position" marche (> , 1 ou 2), le témoin
lumineux reste allumé quand la température
désirée est atteinte et le thermostat coupe
l'alimentation de l'appareil.
Pour la même raison le témoin lumineux reste
allumé quand le dispositif de sécurité aura
coupé l'alimentation de l'appareil.
Dispositif de sécurité thermique
Pour prévenir les risques et dommages dus à la
surchauffe, le dispositif de sécurité thermique
interne coupe l'alimentation dès que les éléments
de chauffage deviennent trop chauds.
Si cela arrive :
- Assurez-vous d'abord que ce n'est pas le
thermostat qui a coupé le radiateur. Pour cela,
positonnez le thermostat au maximum.
Si le chauffage ne se met pas en marche, c'est
que le dispositif de sécurité a bien été sollicité.
- Retirez la fiche d'alimentation de la prise
murale.
- Laissez l'appareil refroidir pendant 30 minutes.
- Vérifiez le bon positionnement de l'appareil.
- Vérifiez qu'il n'y a pas de poussière ou autre
chose pouvant obstruer la circulation de l'air. Si
nécessaire, nettoyez les grilles avec un
aspirateur.
- Remettez la fiche dans la prise murale et
mettez en route l'appareil à nouveau.
Si la sécurité thermique coupe à nouveau
l'appareil :
- Retirez la fiche d'alimentation de la prise
murale.
- Rapportez votre appareil pour vérification chez
votre revendeur Philips ou à un Centre Service
Agréé.
Nettoyage
- Réglez le commutateur (C) sur la position
arrêt O.
- Retirez la fiche d'alimentation de la prise
murale.
- Attendez que l'appareil refroidisse
suffisamment.
- Vous pouvez nettoyer l'extérieur de l'appareil
avec un chiffon humide. Faites attention de ne
pas faire pénétrer d'eau dans l'appareil.
- Nettoyez les entrées et sorties d'air
régulièrement (2 fois par an au moins pour un
usage normal) avec un aspirateur, en utilisant
le suceur à poils.

10
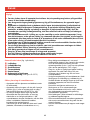
Allgemeine Beschreibung (Abb. 1 auf Seite 3)
A Lufteinlaß
B Luftauslaß, Frontgitter
C Geräteschalter
D Thermostatschalter
E Kontrollampe
F Kabelfach
G Halterung (nur Type HD 3275)
Sichere Aufstellung
• Stellen Sie das Gerät nie direkt unter einer
Steckdose auf.
• Verwenden Sie den Heizlüfter nur in aufrechter
Stellung (Vgl. Abb. 1) oder in aufrechter Stellung
montiert (nur Type HD 3275: Abb. 4 bis 8).
• Beachten Sie zur persönlichen und zu fremder
Personen Sicherheit, daß jede Kombination von
Wasser und Elektrizität gefährlich ist! Benutzen
Sie das Gerät niemals in einem Feuchtraum,
z.B. einem Badezimmer oder in der Nähe eines
Schwimmbeckens, wenn es nicht fest installiert
ist.
Stellen Sie sicher, daß ein nicht fest installiertes
Gerät nicht in Wasser fallen kann, z.B. in ein
Waschbecken, eine Badewanne oder eine
Duschkabine.
• Verwenden Sie den Heizlüfter nicht in einem
Raum, in dem sich explosive Gase entwickeln
könnten, auch nicht beim Gebrauch von
Benzin, von Lösungsmitteln und Klebern, etwa
beim Verlegen von Fußböden.
• Lassen Sie ausreichend Platz rund um den
Heizlüfter: 50 cm über und 120 cm vor dem
Gerät.
• Vermeiden Sie eine Überhitzung des Geräts.
Halten Sie Lufteinlaß und -auslaß frei, und
hängen Sie nichts davor bzw. darüber. Sonst
besteht Brandgefahr!
Prüfen Sie von Zeit zu Zeit, ob sich Staub in
den Öffnungen angesammelt hat.
Im Falle einer Überhitzung schaltet der
eingebaute Überhitzungsschutz das Gerät aus.
• Halten Sie das Netzkabel von Lufteinlaß und
-auslaß fern.
• Lassen Sie keine Sprays, keine
hitzeempfindlichen oder explosiven Dämpfe in
die eingesaugte oder die erhitzte Luft gelangen.
• Stellen Sie den Heizlüfter nicht auf sehr
langflorigen Teppich.
Wichtig
• Prüfen Sie vor Inbetriebnahme, ob die Spannungsangabe auf dem Typenschild mit der
örtlichen Netzspannung übereinstimmt.
• Lesen Sie die Gebrauchsanweisung sorgfältig durch, und sehen Sie sich dabei die
Abbildungen an, bevor Sie das Gerät zum ersten Mal benutzen.
• Das Gerät ist doppelt isoliert und braucht nicht unbedingt an eine Schuko-Steckdose
angeschlossen zu werden. Deshalb kann das Gerät auch über ein zweiadriges
Verlängerungskabel angeschlossen werden. Achten Sie aber darauf, daß es für höhere
Stromstärken (16 A bei 220 V) geeignet ist.
Wenn Sie eine Kabeltrommel verwenden, wickeln Sie das Kabel ganz ab, um Überhitzung zu
vermeiden!
• Es kann vorkommen, daß die Sicherung den Strom unterbricht, besonders wenn der
Heizlüfter auf Position 2 betrieben wird und ein weiteres Gerät an denselben Stromkreis
angeschlossen ist. Die Stromentnahme ist dann höher als zulässig.
Sie können in diesem Fall eines der Geräte ausschalten und über eine andere Sicherung an
einen anderen Stromkreis anschließen; oder Sie beauftragen einen geprüften Elektriker, die
Anlage entsprechend anzupassen.
• Der Heizlüfter ist nicht als Hauptheizquelle geeignet. Verwenden Sie ihn ausschließlich als
Zusatz- oder Ersatzheizung.
• Wählen Sie einen sicheren Platz für das Gerät, um Brandgefahr zu vermeiden. Vgl. den
Abschnitt "Sichere Aufstellung".
• Stecken Sie keinerlei Gegenstände in den Heizlüfter.
• Halten Sie Kinder von dem Gerät fern.
• Vorsicht! Das Frontgitter wird beim Betrieb heiß!
• Fassen Sie den Heizlüfter nur mit trockenen Händen an.
Deutsch

(Nur Type HD 3275:)
Das Gerät ist in einem Badezimmer oder einem
anderen Feuchtraum so zu installieren, daß ...
- Personen im Bad bzw. unter der Dusche das
Gerät und die Schalter nicht erreichen können
und
- es sich außerhalb der auf Abb. 2 und 3 farbig
markierten Bereiche befindet.
Unterbringung des Netzkabels
Überschüssiges Netzkabel kann zur
Aufbewahrung in das Kabelfach an der Rückseite
des Geräts zurückgeschoben werden.
Wichtig: Ziehen Sie aber Netzkabel immer
vollständig heraus, bevor Sie das Gerät in Betrieb
nehmen.
Type HD 3274:
- Sie können das Netzkabel arretieren, indem Sie
es in eine der drei Aussparungen am Kabelfach
(F) drücken.
Type HD 3275:
- Drücken Sie mit einem kleinen
Schraubendreher die Arretierung hinunter
(Abb. 4), und nehmen Sie das Gerät von der
Halterung (G) ab (Abb. 5).
- Sie können das Netzkabel arretieren, indem Sie
es in eine der drei Aussparungen am Kabelfach
(F) drücken.
- Setzen Sie das Gerät fest in die Halterung ein
("Klick", Abb. 8)
Befestigung an der Wand (nur Type HD 3275)
Das Gerät läßt sich in der Halterung (G)
freistehend aufstellen oder an der an einer Wand
montieren.
Die Wand muß fest, eben und feuerfest sein.
- Drücken Sie mit einem
kleinen
Schraubendreher die
Arretierung hinunter
(Abb. 4), und nehmen
Sie das Gerät von der
Halterung (G) ab
(Abb. 5).
- Markieren Sie die
Bohrlöcher mit Hilfe
der Halterung (Abb. 6).
- Bohren Sie die beiden Löcher und befestigen
Sie die Halterung mit Dübel und Schrauben
(Abb. 7) an der Wand.
- Setzen Sie das Gerät fest in die Halterung ein
("Klick", Abb. 8).
Die Anwendung des Geräts
Mit dem Geräteschalter (C), und dem
Thermostatschalter (D) können Sie die folgenden
Einstellungen vornehmen:
Geräteschalter (C)
O = Aus. Der Ventilator und die beiden
Heizelemente sind ausgeschaltet.
> = Kaltluft. Nur der Ventilator ist eingeschaltet.
1 = Warmluft zur allmählichen Erwärmung.
ECO-Position = halbe Leistung: Der Ventilator
und eines der beiden Heizelemente ist
eingeschaltet.
2 = Heißluft zum schnellen Aufheizen.
Volle Leistung: Der Ventilator und beide
Heizelemente sind eingeschaltet.
Thermostatschalter (D)
Mit dem Thermostatschalter kann eine konstante
Raumtemperatur eingestellt werden.
Sinkt die Raumtemperatur unter den eingestellten
Wert, wird das Gerät automatisch eingeschaltet.
11
3
60 cm
60 cm
6
60 cm
60 cm
2
5
4
8
7

12
Steht der Thermostatschalter auf Position 1, wird
die halbe Leistung, auf Position 2 die ganze
Leistung abgegeben.
Sobald die Raumtemperatur den eingestellten
Wert erreicht, wird das Gerät ausgeschaltet.
Durch Drehen des Schalters gegen den
Uhrzeigersinn stellen Sie einen höheren, durch
Drehen im Uhrzeigersinn einen niedrigeren Wert
für die Raumtemperatur ein.
Der Thermostat kann bei eingeschaltetem Gerät
bedient werden.
Sie erreichen die gewünschte Temperatur wie
folgt:
- Stellen Sie zunächst den Thermostaten durch
Drehen gegen den Uhrzeigersinn bis zum
Anschlag auf die höchste Temperatur.
- Sobald eine angenehme Raumtemperatur
erreicht ist, drehen Sie den Schalter langsam
im Uhrzeigersinn zurück, bis sich das Gerät
ausschaltet.
y = Frostschutzeinstellung. Diese Position
entspricht der Minimaleinstellung des
Thermostaten (ca. +5 °C) und kann verwendet
werden, die unmittelbare Umgebung des
Geräts frostfrei zu halten, z.B. wenn Sie dafür
sorgen wollen, daß eine Wasserleitung nicht
einfriert.
Stellen Sie das Gerät dicht an die
Wasserleitung, und schalten Sie es auf.
Hinweis: Steht der Geräteschalter auf Kaltluft >,
muß der Thermostatschalter (D) auf der
höchsten Position stehen!
Kontrollampe
- Die Kontrollampe (E) leuchtet auf, wenn das
Gerät am Netz angeschlossen und der
Geräteschalter auf einer der Positionen >, 1
oder 2 steht.
- Die Kontrollampe leuchtet solange, bis der
Geräteschalter (C) auf O gestellt oder der
Stecker aus der Steckdose gezogen wird.
- Die Kontrollampe zeigt an, daß das Gerät am
Netz angeschlossen und eingeschaltet ist
(Position >, 1 oder 2). Die Kontrollampe
leuchtet auch weiter, wenn die eingestellte
Temperatur erreicht ist und der Thermostat das
Gerät ausgeschaltet hat.
Auch wenn der Überhitzungsschutz das Gerät
ausgeschaltet hat, zeigt die Kontrollampe an,
daß das Gerät am Netz angeschlossen ist.
Überhitzungsschutz
Um Risiken und Schäden zu vermeiden, die durch
zu starke Erhitzung entstehen, schaltet der
Überhitzungsschutz das Gerät aus, sobald die
Heizelemente sich zu stark erhitzen.
Sollte dies geschehen, so verfahren Sie wie folgt:
- Vergewissern Sie sich zunächst, ob nicht der
Thermostat das Gerät ausgeschaltet hat.
Stellen Sie dazu den Thermostatschalter (D)
auf die höchste Position.
Wird das Gerät dann nicht eingeschaltet, hat
tatsächlich der Überhitzungsschutz das Gerät
ausgeschaltet.
- Ziehen Sie den Netzstecker aus der Steckdose.
- Lassen Sie das Gerät 30 Minuten abkühlen.
- Prüfen Sie, ob der Heizlüfter vorschriftsmäßig
aufgestellt ist.
- Prüfen Sie weiter, ob die Luft durch die
Lufteinlaß- und -auslaßöffnungen zirkulieren
kann. Reinigen Sie die Öffnungen, falls
erforderlich, mit einem Staubsauger.
- Stecken Sie den Netzstecker wieder in die
Steckdose und schalten Sie das Gerät ein.
Wenn der Überhitzungsschutz das Gerät dann
wieder ausschaltet, so ...
- ziehen Sie den Netzstecker aus der Steckdose,
und
- lassen Sie das Gerät von Ihrem Philips-Händler
oder vom Philips Service Centre in Ihrem Lande
überprüfen.
Reinigung
- Stellen Sie den Geräteschalter (C) auf
Position
OO
, um das Gerät auszuschalten.
- Ziehen Sie den Netzstecker aus der Steckdose.
- Warten Sie, bis das Gerät ausreichend
abgekühlt ist.
- Sie können das Äußere des Gehäuses mit
einem angefeuchteten Tuch abwischen, auf das
Sie bei Bedarf ein wenig Spülmittel aufgetragen
haben. Achten Sie darauf, daß kein Wasser in
das Innere des Geräts eindringt.
- Reinigen Sie regelmäßig (bei normalem
Gebrauch zweimal jährlich) die Lufteinlaß- und
Luftauslaßöffnungen mit einem Staubsauger,
unter Verwendung des Bürstenaufsatzes.

13
Algemene beschrijving (fig. 1 op pag. 3)
A Luchtinlaatrooster
B Luchtuitstroomrooster
C Schakelaar
D Thermostaatknop
E Controlelampje
F Snoeropbergmogelijkheid
G Voet / wandhouder (Alleen type HD 3275)
Veilig plaatsen
• De kachel mag niet direct onder een
stopcontact worden geplaatst.
• Gebruik de kachel alleen als deze rechtop
staat (fig. 1) of hangt (alleen type HD 3275,
fig. 4-8).
• Voor uw eigen veiligheid en die van anderen:
water en elektriciteit vormen een gevaarlijke
combinatie!
Als u het apparaat vrijstaand gebruikt, plaats
het dan niet in de onmiddellijke omgeving van
een bad, douche of zwembad.
Zorg ervoor dat het apparaat nooit in water kan
vallen (bad, douchebak, wasbak, enz.).
• Gebruik de kachel niet in ruimten waarin
explosieve gassen (bijv. benzine) kunnen
voorkomen, of tijdens het verwerken van
brandgevaarlijke lijmen en oplosmiddelen
(zoals bij het lijmen of lakken van parket,
PVC e.d.).
• Laat voldoende ruimte open rondom de kachel.
(Een veilige vrije ruimte rondom de kachel is
50 cm aan de bovenkant en aan de zijkanten
en 120 cm aan de voorzijde.)
• Voorkom oververhitting van de kachel.
Houd daarom de luchtroosters vrij: hang er dus
niets voor of overheen - dit kan brandgevaar
opleveren.
Controleer de roosters van tijd tot tijd om na te
gaan of er zich geen stof heeft verzameld.
Bij eventuele oververhitting van de kachel
schakelt de ingebouwde beveiliging het
apparaat uit.
• Houd het snoer op veilige afstand van het
luchtinlaatrooster en het luchtuitstroomrooster.
• Houd spuitbussen, brandbare stoffen en
materialen die gevoelig zijn voor warmte uit de
warme luchtstroom.
• Zet de kachel niet op zeer hoogpolige
vloerbedekking.
Belangrijk
• Controleer, voordat u het apparaat aansluit, of het voltage dat op het typeplaatje is vermeld,
overeenkomt met de netspanning in uw woning.
• Lees de gebruiksaanwijzing goed door en bekijk de tekeningen voordat u het apparaat in
gebruik neemt.
• Het apparaat is dubbel geïsoleerd, en hoeft dus niet op een geaard stopcontact te worden
aangesloten. Indien u een verlengsnoer wenst te gebruiken, kunt u een tweeaderig type
kiezen. Zorg er dan echter voor dat de stekker en contrastekker van het juiste type zijn, en
dat de belastbaarheid van het snoer voldoende is (16A-220V≈). Indien u een verlengsnoer op
kabelhaspel toepast, rol het snoer dan geheel uit om oververhitting te voorkomen.
• Het kan voorkomen, vooral wanneer het apparaat werkt op stand 2 en u nog een ander
elektrisch apparaat inschakelt, dat een zekering in de meterkast doorbrandt of uitschakelt.
De zekering is wellicht niet op grote stroomsterkte berekend. Sluit in zo'n geval één van
beide apparaten op een andere "groep" aan (via een andere zekering) of laat uw installatie
wijzigen door een erkend installateur.
• De kachel is niet ontworpen voor gebruik als hoofdverwarming. Gebruik het apparaat alleen
voor het doel waarvoor het werd ontworpen: als apparaat voor bijverwarming in huis.
• Vermijd brandgevaar en de kans op een elektrische schok: zet het apparaat alleen op een
veilige plaats. (Zie het gedeelte “Veilig plaatsen”.)
• Steek geen voorwerpen in de kachel.
• Zorg ervoor dat kinderen niet met de kachel kunnen spelen.
• Let op: het rooster aan de voorzijde wordt heet tijdens het gebruik.
• Raak het apparaat alleen met droge handen aan.
Nederlands

Alleen type HD 3275:
Indien u het apparaat in de badkamer wilt
gebruiken, plaats of hang het dan...
- zodanig dat de knoppen e.d. niet kunnen
worden bediend door iemand die zich in het
bad of onder de douche bevindt;
- niet binnen de gekleurde gebieden (fig. 2 en 3).
Snoer opbergen
Overtollig snoer kunt u aan de achterzijde van de
kachel naar binnen duwen.
Let op: Gebruik het apparaat niet wanneer het
snoer in deze ruimte bewaard wordt!
Type HD 3274:
- U kunt het snoer vastzetten door het in één van
de drie openingen (F) te drukken.
Type HD 3275:
- Druk met een kleine schroevedraaier het
klemmetje naar beneden (fig. 4) en neem de
kachel van de voet / wandhouder (G) (fig. 5).
- U kunt het snoer vastzetten door het in één van
de drie openingen (F) te drukken.
- Apparaat recht op de voet / wandhouder
schuiven ("Klik!") (fig. 8).
Aan de muur bevestigen (alleen type HD 3275)
U kunt dit model vrijstaand opstellen, maar het is
ook mogelijk de kachel met behulp van de voet /
wandhouder (G) aan een muur te bevestigen.
Deze muur dient stevig, vlak en brandveilig te zijn.
- Druk met een kleine
schroevedraaier het
klemmetje naar
beneden (fig. 4) en
neem de kachel van
de voet / wandhouder
(fig. 5).
- Gebruik de voet /
wandhouder om de
boorgaten af te
tekenen (fig. 6).
- Boor de gaten en bevestig de voet /
wandhouder met behulp van pluggen en
schroeven (fig. 7).
- Apparaat recht op de voet / wandhouder
schuiven ("Klik!") (fig. 8).
Gebruik
De keuzeschakelaar (C) en de thermostaatknop
(D) bieden u de volgende keuzemogelijkheden:
Keuzeschakelaar (C)
O = "Uit”. Zowel de ventilator als de beide
verwarmingselementen zijn uitgeschakeld.
> = “Koele lucht”. Alleen de ventilator is
ingeschakeld.
1 = "Warme lucht" voor geleidelijk opwarmen.
ECO-stand (half vermogen): de ventilator en
één van beide verwarmingselementen zijn
ingeschakeld.
2 = "Hete lucht" voor snel opwarmen.
Vol vermogen: de ventilator en beide
verwarmingselementen worden ingeschakeld.
14
3
60 cm
60 cm
6
60 cm
60 cm
2
5
4
8
7

15
Thermostaatknop (D)
Met de thermostaatknop kunt u een vaste
kamertemperatuur instellen.
Als de keuzeschakelaar in stand 1 of 2 staat,
wordt de kachel automatisch ingeschakeld
(respectievelijk op half vermogen of op vol
vermogen) zodra de kamertemperatuur beneden
de ingestelde temperatuur daalt.
Zodra de ingestelde kamertemperatuur is bereikt,
schakelt de kachel zichzelf uit.
Draai de knop linksom voor het instellen van een
hogere temperatuur of rechtsom voor een lagere
temperatuur.
U kunt de thermostaat tijdens het gebruik
bijregelen.
Om de meest geschikte stand van de thermostaat
te vinden:
- Zet eerst de thermostaatknop op de hoogste
stand. (Linksom draaien tot de knop niet verder
kan.)
- Zodra u de temperatuur behaaglijk vindt, draait
u de knop langzaam rechtsom totdat de kachel
uitschakelt.
y = "Vorstvrij"-stand. Deze stand komt overeen
met de laagste thermostaatstand, d.i. ca. +5 °C.
Deze stand kan worden gebruikt om de direkte
omgeving van de kachel vorstvrij te houden.
Om bijvoorbeeld een waterleiding vorstvrij te
houden, zet u de kachel dicht bij de leiding en
schakelt u de kachel in op deze stand.
Let op: Wanneer u de functie koele lucht >
kiest, dient de thermostaatknop in de hoogste
stand te staan.
Controlelampje
- Wanneer het apparaat is aangesloten en
ingeschakeld op stand >, 1 of 2, gaat het
controlelampje (E) branden.
- Het lampje blijft branden totdat het apparaat
wordt uitgeschakeld door de keuzeschakelaar
in stand O te zetten of de stekker uit het
stopcontact te nemen.
- Om aan te geven dat het apparaat nog steeds
is aangesloten en in stand "ingeschakeld" (>, 1
of 2) staat, blijft het controlelampje branden
wanneer de ingestelde temperatuur is bereikt
en de thermostaat het apparaat uitschakelt.
Om dezelfde reden blijft het lampje branden
wanneer de ingebouwde beveiliging tegen
oververhitting het apparaat uitschakelt.
Beveiliging tegen oververhitting
Om schade en risico als gevolg van oververhitting
te voorkomen, schakelt de ingebouwde
beveiliging de stroom uit zodra de
verwarmingselementen te heet worden.
Indien dit mocht gebeuren:
- Overtuig u er eerst van dat het niet de
thermostaat was, waardoor de kachel werd
uitgeschakeld. Zet de thermostaat in de
hoogste stand.
Als de kachel niet gaat werken, was het inderdaad
de beveiliging die het apparaat heeft
uitgeschakeld.
- Neem de stekker uit het stopcontact.
- Laat de kachel 30 minuten afkoelen.
- Controleer of u het apparaat op de juiste manier
hebt geplaatst.
- Controleer of iets de doorstroming van lucht
belemmert. Maak zonodig de luchtroosters
schoon met behulp van een stofzuiger.
- Steek de stekker weer in het stopcontact en
schakel de kachel weer in.
Als de beveiliging de kachel opnieuw mocht
uitschakelen:
- Neem de stekker uit het stopcontact.
- Laat de kachel door uw leverancier of in een
Philips Service Centrum controleren.
Schoonmaken
- Zet de keuzeschakelaar (C) in stand O om het
apparaat uit te schakelen.
- Neem de stekker uit het stopcontact.
- Wacht totdat de kachel voldoende is afgekoeld.
- U kunt de buitenkant van de kachel
schoonmaken met een vochtige doek. Zorg
ervoor dat er geen water in het apparaat komt.
- Met behulp van de stofzuiger (kleine zuigmond
met langharige borstel) kunt u het luchtinlaat-
rooster en het luchtuitstroomrooster
schoonmaken.
Wij raden u aan dit minstens twee keer per jaar
te doen.

16
Descrizione generale (vedere fig. 1 a pag. 3)
A Griglia entrata aria
B Griglia uscita aria
C Selettore
D Termostato
E Spia
F Scomparto cavo
G Supporto / Supporto a muro
(solo mod. HD 3275)
Come posizionare l’apparecchio in modo sicuro
• Non posizionate l’apparecchio immediatamente
sotto una presa.
• Utilizzate il termoventilatore appoggiandolo
esclusivamente sul supporto (fig. 1) oppure
montandolo a parete in posizione verticale (solo
mod. HD 3275, figg. 4-8).
• Per la vostra sicurezza e quella altrui: l’acqua e
l’elettricità costituiscono una combinazione
pericolosa! Non usate il termoventilatore in
bagno o vicino ad una piscina.
Se l'apparecchio non è montato a muro, non
sistematelo nelle immediate vicinanze di
vasche da bagno, doccia, lavandino o piscina.
Assicuratevi che l’apparecchio non possa
cadere in acqua (vasca da bagno, lavandino,
doccia ecc.)
• Non usate il termoventilatore in camere con gas
esplosivi (es. benzina) o mentre vengono usate
colle o solventi infiammabili (ad esempio
mentre incollate o verniciate il parquet, oggetti
in PVC ecc.)
• Prevedete un ampio spazio attorno al
termoventilatore. Un’adeguata area di sicurezza
dovrebbe prevedere circa 50 cm. in alto e ai lati
e 120 cm. davanti all’apparecchio.
• Per evitare il surriscaldamento dell’apparecchio,
tenete libere le griglie di entrata e uscita aria.
Non appendete nulla davanti o sopra il termo-
ventilatore per evitare il rischio di incendio.
Controllate periodicamente le griglie per
eliminare l’eventuale polvere accumulata.
Nel caso di surriscaldamento, lo speciale
dispositivo di sicurezza spegnerà
automaticamente l’apparecchio.
• Tenete il cavo di alimentazione a distanza di
sicurezza dalle griglie dell’aria.
• Evitate che sostanze infiammabili o materiali
termosensibili si frappongano al getto d’aria.
• Non usate il termoventilatore su tappeti a pelo
lungo.
IMPORTANTE
• Prima di collegare l'apparecchio, controllate che la tensione indicata sulla targhetta
corrisponda a quella della rete locale.
• Prima di usare l'apparecchio, leggete attentamente le istruzioni per l'uso guardando le
relative illustrazioni.
• L’apparecchio è provvisto di doppio isolamento e non deve necessariamente essere
collegato ad una presa provvista di messa a terra.
Se utilizzate una prolunga, sceglietene una del tipo a due fili. Controllate comunque che le
spine e il cavo siano in grado di sopportare l’alta tensione (16A-220V / 13A-240V AC).
Se usate la prolunga a bobina, controllate di averla srotolata completamente per evitare
surriscaldamenti.
• Può verificarsi, soprattutto nel caso in cui l’apparecchio funzioni in posizione 2 oppure nel
caso siano accesi contemporaneamente più apparecchi elettrici, che un fusibile o il salvavita
interrompano l’erogazione della corrente elettrica. In questo caso il fusibile o il salvavita
potrebbero non essere in grado di sopportare un’erogazione di corrente elevata.
A questo punto potete collegare uno degli apparecchi ad un altra presa (che sia collegata ad
un altro fusibile o salvavita) oppure rivolgervi ad un elettricista autorizzato per far revisionare
l’impianto elettrico.
• L’apparecchio non è adatto per essere utilizzato come principale forma di riscaldamento.
Utilizzatelo pertanto solo come fonte di calore supplementare.
• Per evitare il rischio di incendi o scariche elettriche, scegliete un posto sicuro per il
termoventilatore (Vedere “Come posizionare l’apparecchio in modo sicuro”).
• Non inserite nessun oggetto nel termoventilatore.
• Fate in modo che l’apparecchio venga posizionato lontano dalla portata dei bambini.
• Attenzione: la griglia anteriore diventerà bollente durante l’uso!
• Toccate il termoventilatore con la mani perfettamente asciutte!
Italiano

Solo per il mod. HD 3275:
Se avete intenzione di usare l'apparecchio in
bagno, ricordate di installarlo:
- in modo che gli interruttori e gli altri dispositivi di
controllo non possano essere raggiunti da
persone nella vasca da bagno o sotto la doccia;
- al di fuori delle zone colorate (figg. 2 e 3).
Come riporre il cavo
Il cavo in eccesso può essere riposto premendolo
nell'apposito scomparto posto nella parte
posteriore del termoventilatore.
NOTA: Non usate l'apparecchio senza prima aver
srotolato completamente il cavo.
Modello HD 3274:
- Potete fissare il cavo premendolo in una delle
tre fessure (F).
Modello HD 3275:
- Spingete la linguetta verso il basso (fig. 4)
utilizzando un piccolo cacciavite e togliete
l'apparecchio dal suo supporto / supporto a
muro (G) (fig. 5).
- Potete fissare il cavo premendolo in una delle
tre fessure (F).
- Posizionate l'apparecchio correttamente sul
supporto /supporto a muro ("Click!") (fig. 8).
Montaggio a parete (solo mod. HD 3275)
Questo modello può essere appoggiato
sull'apposito supporto oppure montato a muro,
utilizzando lo speciale supporto fornito (G).
Verificare che la parete sia solida, liscia e
resistente al fuoco.
- Spingete la linguetta
verso il basso (fig. 4)
utilizzando un piccolo
cacciavite e togliete
l'apparecchio dal suo
supporto / supporto a
muro (fig. 5).
- Utilizzate il supporto
come dima per
segnare i fori (fig. 6).
- Eseguite i fori e fissate il supporto alla parete
utilizzando le viti e i tasselli (fig. 7).
- Posizionate l'apparecchio correttamente sul
supporto ("Click!") (fig. 8).
Come usare l’apparecchio
Il selettore (C) e il termostato (D) vi permetteranno
di selezionare le seguenti funzioni:
Selettore (C)
O = “OFF” - Il ventilatore e le due resistenze
sono spenti.
> = “Aria fredda” - È acceso soltanto il
ventilatore.
1 = “Aria tiepida” per un riscaldamento
graduale. Posizione ECO (metà potenza):
sono accesi il ventilatore e una delle
resistenze.
2 = “Aria calda” per un riscaldamento rapido.
Piena potenza: sono accese le due resistenze
e il ventilatore.
Termostato (D)
Mediante il termostato è possibile impostare una
temperatura ambiente costante. Quando il
selettore è impostato in posizione 1 oppure 2, il
termoventilatore si accenderà automaticamente
(utilizzando rispettivamente la media o la piena
17
3
60 cm
60 cm
6
60 cm
60 cm
2
5
4
8
7

18
potenza) non appena la temperatura ambiente
scenderà al di sotto di quella impostata.
Non appena verrà raggiunta la temperatura
prevista, l’apparecchio si spegnerà
automaticamente.
Ruotate la manopola in senso antiorario per
impostare una temperatura superiore e in senso
orario per impostare una temperatura inferiore.
Durante l’uso, è inoltre possibile regolare il
termostato.
Per individuare l’impostazione ideale del
termostato:
Per prima cosa, mettete la manopola nella
posizione massima (ruotate in senso antiorario
fino a quando si blocca la manopola).
Non appena avrete raggiunto la temperatura
desiderata, ruotate la manopola in senso orario
fino a quando il termoventilatore non si spegnerà.
y = posizione “Frost-free”. Questa posizione
corrisponde all’impostazione minima prevista
per il termostato (circa + 5°C) e può essere
usata per non far gelare la zona posta nelle
immediate
vicinanze dell’apparecchio. Per
evitare che i tubi gelino, ad esempio, collocate
l’apparecchio accanto a questi ultimi e
selezionate questa posizione.
Nota: Se utilizzate la posizione > “Aria fredda”,
ricordate di impostare il termostato nella
posizione massima.
Spia
- Quando l’apparecchio è collegato alla presa di
corrente e acceso in posizione >, 1 oppure
2, si accenderà la spia (E).
- La spia rimarrà accesa fino a quando il
termoventilatore non verrà spento mettendo il
selettore (C) in posizione O oppure togliendo la
spina dalla presa.
- La spia rimarrà accesa anche quando verrà
raggiunta la temperatura impostata e il
termostato spegnerà l’apparecchio per indicare
che il termoventilatore è ancora collegato e in
posizione “acceso” (>, 1 oppure 2).
- Per lo stesso motivo, la spia rimarrà accesa
anche quando il dispositivo di sicurezza
interverrà spegnendo l’apparecchio.
Dispositivo di sicurezza contro il
surriscaldamento
Per evitare eventuali danni e rischi dovuti al
surriscaldamento, lo speciale dispositivo di
sicurezza interromperà l’erogazione di corrente
non appena le resistenze diventeranno troppo
calde.
In questo caso:
- controllate che non sia stato il termostato a
spegnere il termoventilatore. Impostate quindi il
termostato sulla posizione massima.
Se il termoventilatore non si accende, significa
che è stato attivato il dispositivo di sicurezza.
- Togliete la spina dalla presa di corrente.
- Lasciate raffreddare il termoventilatore per circa
30 minuti.
- Controllate che il termoventilatore sia stato
posizionato in modo corretto.
- Controllate che il flusso d’aria non sia ostruito.
Se necessario, pulite le griglie con un
aspirapolvere.
- Rimettete la spina nella presa e riaccendete
l’apparecchio.
Nel caso il dispositivo di sicurezza spenga
nuovamente l’apparecchio:
- Togliete la spina dalla presa di corrente.
- Fate controllare il termoventilatore presso un
Centro d’Assistenza Philips o un rivenditore
autorizzato.
Pulizia
- Mettete il selettore (C) in posizione O per
spegnere l’apparecchio.
- Togliete la spina dalla presa di corrente.
- Lasciate raffreddare il termoventilatore.
- Per pulire l’esterno dell’apparecchio, potete
utilizzare un panno umido. Fate in modo che
non entri dell’acqua all’interno dell’apparecchio.
- Pulite regolarmente le griglie di entrata e uscita
aria (con un uso normale almeno due volte
all’anno) con un aspirapolvere, su cui avrete
montato l’accessorio a spazzola.

19
Descripción general (fig. 1 de la pág. 3)
A Rejilla de entrada de aire
B Rejilla de salida de aire
C Interruptor selector.
D Mando del termostato
E Lámpara piloto
F Almacenaje del cable de red.
G Soporte de pared (sólo tipo HD 3275)
Colocación segura
• El calentador no debe situarse inmediatamente
debajo de una base de enchufe.
• Usen el Termoventilador solo en posición
vertical (fig. 1) o montado (sólo tipo HD 3275 ;
figs. 4 - 8) en posición vertical.
• Para su propia seguridad y la de los demás :
¡ El agua y la electricidad forman una
combinación peligrosa !
Cuando usen el Termoventilador como unidad
suelta, no lo coloquen cerca de una bañera,
ducha o piscina.
Asegúrense de que el aparato no pueda caerse
al agua (bañera, lavabo, plato de la ducha,
etc.).
• No usen el Termoventilador en habitaciones
con gases inflamables (por ejemplo, gasolina)
o mientras estén aplicando colas o disolventes
inflamables (por ejemplo, cuando encolen o
barnicen suelos de parquet, PVC, etc.).
• Dejen un amplio espacio alrededor del
Termoventilador.
Deben dejar libre un área de seguridad de
50 cm por encima y por los lados, y de 120 cm
por la parte frontal.
• Eviten el sobrecalentamiento del aparato,
manteniendo libres las rejillas de entrada y de
salida de aire, y no poniendo nada enfrente o
encima de él, ya que de otro modo habría
riesgo de incendio.
Comprueben de vez en cuando que no haya
acumulación de polvo en las rejillas. Si se
produce un sobrecalentamiento, el dispositivo
de seguridad contra sobrecalentamientos que
lleva incorporado desconectará el aparato.
• Mantengan el cable de red a una distancia segura
de las rejillas de entrada y de salida de aire.
• No permitan que hayan aerosoles, sustancias
inflamables o materiales sensibles al calor en el
flujo de aire caliente.
• No usen el Termoventilador sobre alfombras de
pelo muy largo.
Importante
• Antes de conectar el aparato, comprueben que el voltaje indicado en la placa de
características se corresponde con el de su hogar.
• Lean cuidadosamente estas instrucciones, conjuntamente con las ilustraciones, antes de
usar el aparato.
• El aparato es de doble aislamiento y no necesita conectarse a un enchufe con toma de tierra.
Si desean usarlo con un cable prolongador, pueden hacerlo con uno de 2 conductores. No
obstante, asegúrense de que las clavijas y el cable son adecuados para una alta potencia
(16 A a 220 V AC).
Si emplean un cable enrollado, desenróllenlo completamente para evitar el
sobrecalentamiento.
• Puede suceder, especialmente si el Termoventilador funciona en la posición 2 y además es
conectado otro aparato eléctrico, que un fusible o un disyuntor corten la corriente. En tal
caso, el fusible o disyuntor no permiten esta alta potencia eléctrica.
Para evitar que esto suceda. pueden conectar uno de los aparatos a otro circuito (que
emplee otro fusible o disyuntor) o hacer revisar la instalación eléctrica por un electricista
autorizado.
• El Termoventilador no ha sido diseñado para ser usado como elemento principal de
calefacción. Usen el Termoventilador sólo como calefacción adicional en el hogar.
• Para evitar el riesgo de incendio y choques eléctricos, seleccionen un lugar seguro para el
Termoventilador (ver la sección "Colocación segura").
• No introduzcan ningún objeto en el Termoventilador.
• Asegúrense de que los niños no puedan jugar con el aparato.
• Atención : La rejilla frontal se calienta durante el uso.
• Toquen el Termoventilador sólo con las manos secas.
Español

Solo para el tipo HD 3275 :
Si el Termoventilador va a ser usado en el cuarto
de baño, debe ser instalado ....
- De modo que los interruptores y otros mandos
no puedan ser tocados por una persona que
esté en el baño o en la ducha.
- Fuera de las áreas coloreadas (figs. 2 y 3).
Almacenamiento del cable de red
El exceso de cable de red puede almacenarse
introduciéndolo en el compartimento de
almacenaje de la parte posterior del
Termoventilador.
Nota : No usen el aparato cuando el cable de red
esté guardado dentro del aparato.
Tipo HD 3274 :
- Pueden fijar el cable de red presionándolo en
una de las tres ranuras (F).
Tipo HD 3275 :
- Usando un destornillador pequeño, presionen
la pequeña lengüeta hacia abajo (fig. 4) y
saquen el Termoventilador del soporte de
pared (G)(fig. 5).
- Pueden fijar el cable de red presionándolo en
una de las tres ranuras (F).
- Deslicen correctamente el aparato sobre el
soporte de pared ("click")(fig. 8).
Montaje a la pared (sólo en el tipo HD 3275)
Este modelo puede ser usado como una unidad
suelta, y también puede montarse en la pared
usando el soporte de pared (G).
La pared debe ser sólida, plana y a prueba de
fuego.
- Usando un pequeño
destornillador,
presionen la pequeña
lengüeta hacia abajo
(fig. 4) y saquen el
Termoventilador del
soporte de pared
(fig. 5).
- Usen el soporte de
pared como plantilla para marcar los agujeros
que deben hacerse (fig. 6).
- Hagan los agujeros y fijen el soporte a la pared
usando tacos y tornillos (fig. 7).
- Deslicen correctamente el aparato sobre el
soporte de pared ("click")(fig. 8).
Cómo usar el aparato
El interruptor selector (C) y el mando del
termostato (D) les permite seleccionar las
siguientes funciones :
Interruptor selector (C)
O = Parada (Off). Se desconectan tanto el
ventilador como los dos elementos
calefactores.
> = Aire frío (Cool air). Sólo se pone en marcha
el ventilador.
1 = Aire caliente (Warm air). Para un
calentamiento gradual.
Posición ECO (potencia media) : El ventilador
y uno de los dos elementos calefactores se
ponen en marcha.
2 = Aire muy caliente (Hot air). Para un
calentamiento rápido.
Potencia máxima: El ventilador y los dos
elementos calefactores se ponen en marcha.
20
3
60 cm
60 cm
6
60 cm
60 cm
2
5
4
8
7
A página está carregando...
A página está carregando...
A página está carregando...
A página está carregando...
A página está carregando...
A página está carregando...
A página está carregando...
A página está carregando...
A página está carregando...
A página está carregando...
A página está carregando...
A página está carregando...
A página está carregando...
A página está carregando...
A página está carregando...
A página está carregando...
A página está carregando...
A página está carregando...
A página está carregando...
A página está carregando...
-
 1
1
-
 2
2
-
 3
3
-
 4
4
-
 5
5
-
 6
6
-
 7
7
-
 8
8
-
 9
9
-
 10
10
-
 11
11
-
 12
12
-
 13
13
-
 14
14
-
 15
15
-
 16
16
-
 17
17
-
 18
18
-
 19
19
-
 20
20
-
 21
21
-
 22
22
-
 23
23
-
 24
24
-
 25
25
-
 26
26
-
 27
27
-
 28
28
-
 29
29
-
 30
30
-
 31
31
-
 32
32
-
 33
33
-
 34
34
-
 35
35
-
 36
36
-
 37
37
-
 38
38
-
 39
39
-
 40
40


Philips Fan HD 3274/75 Manual do usuário
- Categoria
- Aquecedores de ambiente
- Tipo
- Manual do usuário
- Este manual também é adequado para
em outras línguas
- español: Philips Fan HD 3274/75 Manual de usuario
- français: Philips Fan HD 3274/75 Manuel utilisateur
- italiano: Philips Fan HD 3274/75 Manuale utente
- Nederlands: Philips Fan HD 3274/75 Handleiding
- Deutsch: Philips Fan HD 3274/75 Benutzerhandbuch
- dansk: Philips Fan HD 3274/75 Brugermanual
- svenska: Philips Fan HD 3274/75 Användarmanual
Artigos relacionados
Outros documentos
-
Solac TH8323 Manual do proprietário
-
Tristar KA-5031 Manual do usuário
-
Solac TV 8430 Manual do proprietário
-
Honeywell CZ-2104E Manual do proprietário
-
Argo DORI ICE Manual do usuário
-
Silvercrest SOR 2600 A1 Manual do proprietário
-
Taurus Alpatec BAGNO 2Q Manual do proprietário
-
Bionaire BFH430 Manual do proprietário
-
Honeywell BH-777TFE Manual do usuário
-