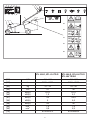
Mountfield NTL 434-R Instruções de operação
- Categoria
- Cortadores de grama
- Tipo
- Instruções de operação

IT
Rasaerba con operatore a piedi - MANUALE DI ISTRUZIONI
EN
Pedestrian controlled lawn mower - OPERATOR’S MANUAL
171505670/1 09/2013
NTL 434-R
NTL 434 TR-R
NTL 484-R
NTL 484 TR-R
NTL 484 TR/E-R

IT
IMPORTANTE: Leggere attentamente le prescrizioni contenute nel libretto del motore, prima di mettere in funzione il
motore per la prima volta. ATTENZIONE! Controllare il livello dell’olio prima dell’avviamento.
EN
IMPORTANT: Before starting the engine for the rst time, carefully read the instructions as set out in the engine
handbook. CAUTION! Check oil level before starting.

1
ITALIANO - Istruzioni Originali .............................................................................................
IT
ENGLISH - Translation of the original instruction ....................................................................
EN

2
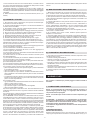
11 13 12
14 15
17 18 19
16
6 14
23 75
9 8
41
42
43
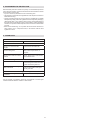
NTL 434-R, NTL 434 TR-R NTL 484-R, NTL 484 TR-R
NTL 484 TR/E-R
kW 1,5 - 2,7 1,5 - 2,7
min
-1
2800 - 2900 2800 - 2900
kg 31 - 33 33 - 44
cm 41 46
dB(A)
dB(A)
81,2
1,9
81,5
0,3
dB(A)
dB(A)
94
2
94,2
0,2
dB(A) 96 96
m/s
2
m/s
2
7,5
0,8
7,9
0,9
81004341/3 81004458/0
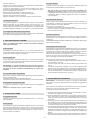
36
a
b
44
45
46

3
1 1
2
2
3
3
4
5 5
6 6
8
7
9
10
1.1
12 11
13
1515 1116
12
14
15
5-7 mm
16
1.2
1.3

4
21
4.1
1
1
1
2
3
3
1
2.1 2.2
1
2.3
3.1
3.2 3.3
3.5
2.4

5
4.2
1

6
IT
IMPORTANTE - LEGGERE ATTENTAMENTE PRIMA DI USARE LA MACCHINA. Conservare per ogni futura necessità
con prudenza. A tale scopo, sulla macchina sono stati posti dei pittogrammi,
spiegato qui di seguito. Vi raccomandiamo inoltre di leggere attentamente
le norme di sicurezza riportate nell’apposito capitolo del presente libretto.
41. Attenzione: Leggere il libretto di istruzioni prima di usare la macchina.
42. Rischio di espulsione. Tenere le persone al di fuori dell’area di la-
voro, durante l’uso.
43. Rischio di tagli. Lame in movimento. Non introdurre mani o piedi all’in-
terno dell’alloggiamento lama. Scollegare il cappuccio della candela
44. Solo per rasaerba con motore elettrico
45. Solo per rasaerba con motore elettrico
46. Rischio di tagli. Lame in movimento. Non introdurre mani o piedi
all’interno dell’alloggiamento lama.
Dati Tecnici (vedi pag. 2)
[61] Potenza nominale
[62] Velocità mass. di funzionamento motore
[63] Peso macchina
[64] Ampiezza di taglio
[65] Livello di pressione acustica misurato
[66] Incertezza di misura
[67] Livello di potenza acustica misurato
[68] Livello di potenza acustica garantito
[69] Livello di vibrazioni
[70] Codice lama
NORME DI SICUREZZA
da osservare scrupolosamente
A) ADDESTRAMENTO
1) Leggere attentamente le istruzioni. Prendere familiarità con i comandi
e con un uso appropriato del rasaerba. Imparare ad arrestare rapidamente
il motore.
2) Non permettere mai che il rasaerba venga utilizzato da bambini o da
persone che non abbiano la necessaria dimestichezza con le istruzioni. Le
3) Non utilizzare mai il rasaerba:
– con persone, in particolare bambini, o animali nelle vicinanze;
assunto farmaci, droghe alcool o sostanze nocive alle sue capacità di
B) OPERAZIONI PRELIMINARI
1) Durante il taglio, indossare sempre calzature da lavoro resistenti, an-
tiscivolo e pantaloni lunghi. Non azionare il rasaerba a piedi scalzi o con
sandali aperti.
2) Ispezionare a fondo tutta l’area di lavoro e togliere tutto ciò che potrebbe
venire espulso dalla macchina o danneggiare il gruppo di taglio e il motore
– conservare il carburante in appositi contenitori;
– rabboccare il carburante, utilizzando un imbuto, solo all’aperto e non
fumare durante questa l’operazione e ogni volta che si maneggia il car-
burante;
– rabboccare prima di avviare il motore; non aggiungere benzina o togliere
– se fuoriesce della benzina, non avviare il motore, ma allontanare il ra-
ed i vapori di benzina non si siano dissolti.
– rimettere sempre e serrare bene i tappi del serbatoio e del contenitore
della benzina;
4) Sostituire i silenziatori difettosi
in particolare:
CONOSCERE LA MACCHINA
DESCRIZIONE DELLA MACCHINA E CAMPO DI UTILIZZO
rasaerba con operatore a piedi.
La macchina si compone essenzialmente di un motore, che aziona una
grado di condurre la macchina e di azionare i comandi principali mantenen-
dosi sempre dietro al manico, e quindi a distanza di sicurezza dalla lama
rotante. L’allontanamento dell’operatore dalla macchina provoca l’arresto
del motore e della lama entro alcuni secondi.
Uso previsto
in giardini e aree erbose, di estensione rapportata alla capacità di taglio,
eseguita con la presenza di un operatore a piedi.
dell’erba tagliata, con deposizione dell’erba tagliata sul terreno.
Uso improprio
-
coloso e causare danni a persone e/o cose. Rientrano nell’uso improprio
(come esempio, ma non solo):
– trasportare sulla macchina persone, bambini o animali;
– farsi trasportare dalla macchina;
– usare la macchina per trainare o spingere carichi;
– usare la macchina per la raccolta di foglie o detriti;
– usare la macchina per regolarizzare siepi, o per il taglio di vegetazione
di tipo non erboso;
– utilizzare la macchina in più di una persona;
– azionare la lama nei tratti non erbosi.
ETICHETTA DI IDENTIFICAZIONE E COMPONENTI
DELLA MACCHINA (vedi gure a pag. 2)
1. Livello potenza acustica
2. Marchio di conformità
3. Anno di fabbricazione
4. Tipo di rasaerba
5. Numero di matricola
6. Nome e indirizzo del Costruttore
7. Codice Articolo
8. Potenza del motore e regime
9. Peso in kg
11. Chassis
12. Motore
13. Coltello (Lama)
14. Parasassi
15. Sacco di rac colta
16. Manico
17. Comando acceleratore
18. Leva freno motore
19. Leva innesto trazione
Immediatamente dopo l’acquisto della macchina, trascrivere i numeri di
L’esempio della dichiarazione di conformità si trova nella penultima pagina
del manuale.
DESCRIZIONE DEI SIMBOLI RIPORTATI SUI COMANDI
(dove previsti) (vedi gure a pag. 2)
21. Lento 22. Veloce 23. Starter
24. Arresto motore 25. Trazione inserita
26. Riposo 27. Avviamento motore
36. Segnalatore contenuto sacco: alzato (a) = vuoto / abbassato (b) = pieno
PRESCRIZIONI DI SICUREZZA - Il vostro rasaerba deve essere utilizzato

7
- la leva di sicurezza deve avere un movimento libero, non forzato e al rila-
scio deve tornare automaticamente e rapidamente nella posizione nautra
determinando l’arresto del dispositivo di taglio;
- dell’aspetto delle lame, e controllare che le viti e il gruppo di taglio non
siano usurati o danneggiati. Sostituire in blocco le lame e le viti danneggiate
o usurate per mantenere l’equilibratura. Sostituire le etichette danneggiate
o illeggibili.
6) Prima di iniziare il lavoro, montare le protezioni all’uscita (sacco o pa-
rasassi).
C) DURANTE L’UTILIZZO
1) Non azionare il motore in spazi chiusi, dove possono accumularsi peri-
colosi fumi di monossido di carbonio.
condizioni di buona visibilità.
3) Se possibile, evitare di lavorare nell’erba bagnata. Evitare di lavorare
sotto la pioggia e con rischio di temporali.
4) Accertarsi sempre del proprio punto d’appoggio sui terreni in pendenza.
5) Non correre mai, ma camminare; evitare di farsi tirare dal rasaerba.
6) Tagliare nel senso trasversale al pendio e mai su e giù.
7) Prestare la massima attenzione nel cambio di direzione sui pendii.
8) Non tagliare su terreni con pendenza superiore a 20°.
9) Prestare molta attenzione in prossimità di dirupi, fossi o argini.
10) Prestare estrema attenzione quando tirate il rasaerba verso di voi.
11) Fermare la lama se il rasaerba deve essere inclinato per il trasporto,
-
tato da o verso l’area che deve essere tagliata.
12) Non azionare mai il rasaerba se i ripari sono danneggiati, oppure senza
il sacco raccoglierba o il parasassi.
13) Non manomettere o disattivare i sistemi di sicurezza
motore un regime di giri eccessivo.
15) Nei modelli con trazione, disinnestare l’innesto della trasmissione alle
ruote, prima di avviare il motore.
16) Avviare il motore con cautela secondo le istruzioni e tenendo i piedi
ben distanti dalla lama.
18) Non avvicinare mani e piedi accanto o sotto le parti rotanti. State sem-
pre lontani dall’apertura di scarico.
21) Fermare il motore e staccare il cavo della candela:
– prima di qualsiasi intervento sotto il piatto di taglio o prima di disintasare
il convogliatore di scarico;
– prima di controllare, pulire o lavorare sul rasaerba;
-
la macchina;
– se il rasaerba comincia a vibrare in modo anomalo (Ricercare immedia-
presso un Centro Specializzato).
22) Fermare il motore:
– ogni qualvolta si lasci il rasaerba incustodito. Nei modelli con avviamento
elettrico, togliere anche la chiave;
– prima di fare rifornimento di carburante;
– ogni volta che si toglie o si rimonta il sacco raccoglierba;
– prima di regolare l’altezza di taglio.
23) Ridurre il gas prima di fermare il motore. Chiudere l’alimentazione del
carburante al termine del lavoro, seguendo le istruzioni fornite sul libretto
del motore.
24) Durante il lavoro, mantenere sempre la distanza di sicurezza dalla lama
rotante, data dalla lunghezza del manico.
25) ATTENZIONE - In caso di rotture o incidenti durante il lavoro, arrestare
immediatamente il motore e allontanare la macchina in modo da non pro-
vocare ulteriori danni; nel caso di incidenti con lesioni personali o a terzi,
attivare immediatamente le procedure di pronto soccorso più adeguate alla
situazione in atto e rivolgersi ad una Struttura Sanitaria per le cure neces-
sarie. Rimuovere accuratamente eventuali detriti che potrebbero arrecare
danni o lesioni a persone o animali qualora rimanessero inosservati.
26) ATTENZIONE - Il livello di rumorosità e di vibrazioni riportato nelle
presenti istruzioni, sono valori massimi di utilizzo della macchina. L’impiego
di un elemento di taglio sbilanciato, l’eccessiva velocità di movimento,
misure preventive atte ad eliminare possibili danni dovuti ad un rumore
elevato e alle sollecitazioni da vibrazioni; provvedere alla manutenzione
il lavoro.
D) MANUTENZIONE E MAGAZZINAGGIO
1) Mantenere serrati dadi e viti, per essere certi che la macchina sia sem-
pre in condizioni sicure di funzionamento. Una ma-nu-tenzione regolare
2) Non riporre il rasaerba con della benzina nel serbatoio in un locale dove
forte fonte di calore.
-
siasi ambiente.
4) Per ridurre il rischio d’incendio, mantenere il motore, il silenziatore di
scarico, l’alloggiamento della batteria e la zona di magazzinaggio della
benzina liberi da residui d’erba, foglie o grasso eccessivo. Non lasciare
contenitori con l’erba tagliata all’interno di un locale.
-
carne l’usura o il deterioramento.
all’aperto e a motore freddo.
7) Indossare guanti da lavoro per lo smontaggio e rimontaggio della lama.
-
-
petenza oltre all’impiego di apposite attrezzature; per ragioni di sicurezza,
occorre pertanto che siano sempre eseguiti presso un centro specializzato.
9) Non usare mai la macchina con parti usurate o danneggiate, per motivi
di sicurezza. I pezzi devono essere sostituiti e mai riparati. Usare ricambi
originali. I pezzi di qualità non equivalente possono danneggiare la mac-
china e nuocere alla vostra sicurezza.
E) TRASPORTO E MOVIMENTAZIONE
-
nare la macchina occorre:
– indossare robusti guanti da lavoro;
conto del peso e della sua ripartizione;
– impiegare un numero di persone adeguato al peso della macchina e alle
caratteristiche del mezzo di trasporto o del posto nel quale deve essere
collocata o prelevata.
– assicurarsi che la movimentazione della macchina non produca perdite
di benzina o causi danni o lesioni.
2) Durante il trasporto, assicurare adeguatamente la macchina mediante
funi o catene.
NORME D’USO
Per il motore e la batteria (se prevista) leggere i relativi manuali di
istruzioni.
1. COMPLETARE IL MONTAGGIO
NOTA - La corrispondenza fra i riferimenti contenuti nel testo e le
rispettive gure (poste alle pagg. 2 e seguenti) è data dal numero
che precede ciascun paragrafo.
NOTA - La macchina può essere fornita con alcuni componenti già
montati.
ATTENZIONE - Lo sballaggio e il completamento del montaggio
devono essere eettuati su una supercie piana e solida, con spa-
zio suciente alla movimentazione della macchina e degli imballi,
avvalendosi sempre degli attrezzi appropriati.
Lo smaltimento degli imballi deve avvenire secondo le disposizioni
locali vigenti.
1.1 Montaggio del manico
Allentare i due dadi inferiori (1).
Riportare nella posizione di lavoro i due elementi (2), già premontati, che
compongono la parte inferiore del manico e bloccarli tramite i dadi (1) e le

8
manopole inferiori (3).
Fissare la parte superiore del manico (4) a quelle inferiori (2) utilizzando le
Le ghiere (6) delle maniglie (5) devono essere evvitate in modo da as-
eccessivo per bloccarle o sbloccarle.
Bloccare entrambe le maniglie (5) dopo la regolazione.
Inserire la fune di avviamento (7) nella spirale (8) di guida.
1.2 Montaggio del sacco
plastica mediante le viti (13). Introdurre il telaio (12) nel sacco (14) e ag-
scanalatura della parte in plastica (11), partendo a 5-7 mm dalle estremità.
1.3 Collegamento della batteria (se presente)
Nei modelli provvisti di avviamento elettrico, collegare il cavo della batteria
al connettore del cablaggio generale del rasaerba.
2. DESCRIZIONE DEI COMANDI
NOTA - Il signicato dei simboli riportati sui comandi è spiegato
nelle pagine precedenti.
2.1 Acceleratore
2.2 Freno della lama
contro il manico per l’avviamento e durante il funzionamento del rasaerba.
Il motore si arresta al rilascio della leva.
IMPORTANTE - L’arresto della lama deve avvenire entro pochi se-
condi dal rilascio della leva; qualora si avvertisse un prolungamento
del tempo di arresto, contattare immediatamente un Centro Spe-
cializzato.
2.3 Leva della trazione (se presente)
Nei modelli con trazione, l’avanzamento del rasaerba avviene portando la
leva (1) contro il manico.
Il rasaerba smette di avanzare al rilascio della leva.
L’avviamento del motore deve avvenire sempre con la trazione disinserita.
2.4 Regolazione dell’altezza di taglio
leva (1).
ESEGUIRE L’OPERAZIONE A COLTELLO FERMO.
3. TAGLIO DELL’ERBA
3.1 Aggancio del sacco
Sollevare il parasassi e agganciare correttamente il sacco (1), come indi-
3.2 Avviamento
Per l’avviamento, seguire le indicazioni del libretto del motore, quindi tirare
la leva del freno della lama (1) contro il manico e dare un deciso strappo
dalla manopola della fune di avviamento (2). Nei modelli provvisti di av-
viamento elettrico, tirare la leva del freno della lama (1) contro il manico e
ruotare la chiave di contatto (3).
3.3 Taglio dell’erba
stessa altezza e alternativamente nelle due direzioni.
• Nel caso di sacco di raccolta con dispositivo segnalatore del
contenuto (se previsto): durante il lavoro, con la lama in movimento,
occorre svuotarlo
3.4 Svuotamento del sacco
Quando il sacco di raccolta diventa troppo pieno, la raccolta dell’erba non
Per rimuovere e svuotare il sacco,
– arrestare il motore e attendere l’arresto della lama;
-
nendolo in posizione eretta.
3.5 Termine del lavoro
Al termine del lavoro, rilasciare la leva (1) del freno e scollegare il cappuccio
della candela (2). Nei modelli che ne sono provvisti, togliere la chiave di
contatto (3).
di intervento sul rasaerba.
3.6 Consigli per la cura del prato
Ogni tipologlia di erba presenta caratteristiche diverse e può richiedere
quindi diverse modalità per la cura del prato; leggere sempre le indicazioni
contenute nelle confezioni delle sementi riguardo l’altezza di rasatura,
rapportate alle condizioni di crescita della zona in cui si opera.
stelo e da una o puù foglie. Se le foglie vengono tagliate completamente, il
In linea generale, possono valere le seguenti indicazioni:
con un aspetto a “macchie”;
terreno;
lama per l’erba che vi si attacca e provocare strappi nel tappeto erboso;
-
tura alla massima altezza consentita dalla macchina, seguita da una
seconda rasatura a distanza di due o tre giorni.
4. MANUTENZIONE ORDINARIA
IMPORTANTE -
per mantenere nel tempo i livelli di sicurezza e le prestazioni originali della
macchina.
Ogni operazione di regolazione o manutenzione deve essere eseguita a
motore fermo, dopo aver staccato il cappuccio della candela.
Conservare il rasarba in luogo asciutto.
1) Indossare robusti guanti da lavoro prima di ogni intervento di pulizia,
manutenzione o regolazione sulla macchina.
2) Lavare accuratamente la macchina con acqua dopo ogni taglio; rimuo-
vere i detriti d’erba e il fango accumulati all’interno dello chassis per
avviamento.
3) Per il lavaggio interno dello chassis utilizzare l’apposito attacco per il
tubo dell’acqua (se previsto). Durante il lavaggio sistemare la macchina
e posizionarsi sempre dietro al manico del rasaerba.
4) La verniciatura della parte interna dello chassis può staccarsi nel tempo
per l’azione abrasiva dell’erba tagliata; in questo caso, intervenire tem-
pestivamente ritoccando la verniciatura con una pittura antiruggine, per
prevenire la formazione di ruggine che porterebbe alla corrosione del
metallo.
5) Nel caso fosse necessario accedere alla parte inferiore, inclinare la
macchina esclusivamente dal lato indicato sul libretto del motore, se-

9
In caso di qualsiasi dubbio o problema, non esitate a contattare il Servizio
Assistenza più vicino o il Vostro Rivenditore.
guendo le relative istruzioni.
6) Evitare di versare benzina sulle parti in plastica del motore o della mac-
china per evitare di danneggiarle, e ripulire immediatamente ogni traccia
di benzina eventualmente versata. La garanzia non copre i danni alle
parti in plastica causati dalla benzina.
4.1 Manutenzione della lama
-
tro specializzato, che dispone delle attrezzature più idonee.
nella tabella a pagina 2.
Data l’evoluzione del prodotto, le lame sopra citate potrebbero essere so-
stituite nel tempo da altre, con caratteristiche analoghe di intercambiabilità
e sicurezza di funzionamento.
Rimontare la lama (2) con il codice rivolto verso il terreno, seguendo la
Serrare la vite centrale (1) con una chiave dinamometrica, tarata a 35-40
Nm.
4.2 Ricarica della batteria
Per ricaricare una batteria scarica, collegarla al carica batterie (1) secondo
le istruzioni del libretto di manutenzione della batteria.
Non collegare il carica batteria direttamente al morsetto del motore.
alimentazione, poiché quest’ultimo potrebbe danneggiarsi. Se si prevede
di non utilizzare il rasaerba per un lungo periodo, scollegare la batteria dal
cablaggio del motore, assicurando comunque un buon livello di carica.
5. TUTELA AMBIENTALE
La tutela dell’ambiente deve essere un aspetto rilevante e prioritario
in cui viviamo.
– Evitare di essere un elemento di disturbo nei confronti del vicinato.
– Seguire scrupolosamente le norme locali per lo smaltimento dei materiali
di risulta dopo il taglio.
– Seguire scrupolosamente le norme locali per lo smaltimento di imballi,
parti deteriorate o qualsiasi elemento a forte impatto ambientale; que-
separati e conferiti agli appositi centri di raccolta, che provvederanno al
riciclaggio dei materiali.
– Al momento della messa fuori servizio, non abbandonare la macchina
nell’ambiente, ma rivolgersi a un centro di raccolta, secondo le norme
locali vigenti.
6. DIAGNOSTICA
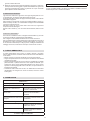
Cosa fare se ...
Origine del problema Azione correttiva
1. Il rasaerba a benzina non funziona
Manca l’olio o la benzina nel
motore
Procedere al controllo dei livelli
dell’olio e della benzina
buono stato
possono essere imbrattati o
sostituirli
stagione
Il galleggiante può essere blocca-
to; inclinate il rasaerba dal lato del
carburatore
2. L’erba tagliata non viene più raccolta nel sacco
La lama ha ricevuto un colpo
l’erba verso il sacco
Pulire l’interno dello chassis per
facilitare l’evacuazione dell’erba
verso il sacco
3. L’erba si taglia con dicoltà

6
EN
IMPORTANT - READ CAREFULLY BEFORE USING THE MACHINE. Keep for future reference
below. You are also asked to carefully read the safety regulations in the
Replace damaged or unreadable labels (see pictures on page 2).
41. Warning: Read the instruction manual before using the machine.
42. Risk of thrown objects. Keep all persons away from the work area
whilst mowing.
43. Danger of cutting yourself. Moving blades. Do not put hands or
feet near or under the opening of the blade housing. Disconnect
the spark plug cap and read the instructions before carrying out any
maintenance or repairs.
44. Only for electric lawnmowers
45. Only for electric lawnmowers
46. Danger of cutting yourself. Moving blades. Do not put hands or feet
near or under the opening of the blade housing.
Technical specications (see page 2)
[61] Nominal power
[62] Max. engine operation speed
[63] Machine weight
[64] Cutting width
[65] Sound pressure level, measured
[66] Measurement uncertainty
[67] Sound power level, measured
[68] Sound power level, guaranteed
[69] Vibration level
[70] Blade code
SAFETY REGULATIONS
to be observed scrupulously
A) TRAINING
1) Read the instructions carefully. Become familiar with the controls and
the proper use of the lawnmower. Learn how to stop the engine quickly.
2) Never allow children or persons unfamiliar with these instructions to
use the lawnmower. Local regulations can restrict the minimum age of
the operator.
3) Never use the lawnmower:
– when people, especially children or pets are nearby;
– if the operator is tired or unwell, or has taken medicine, drugs, alcohol
or any substances that may impair his ability to react and be attentive.
4) Bear in mind that the operator or user is responsible for accidents or
unexpected events occurring to other people or their property.
B) PRELIMINARY OPERATIONS
1) While mowing, always wear sturdy slip-resistant footwear and long
trousers. Do not operate the lawnmower when barefoot or wearing open
sandals.
2) Thoroughly inspect the entire work area and remove anything that could
be thrown by the machine or damage the cutting unit or engine (stones,
branches, iron wire, bones, etc.).
– store the fuel in suitable containers;
– add fuel using a funnel, only outdoors; never smoke while doing this and
whenever fuel is handled;
– add petrol before starting the engine; never add petrol or remove the
petrol tank cap while the engine is running or when it is hot;
– if you have spilt some fuel, do not attempt to start the engine but move the
lawnmower away from the area of spillage to avoid creating any source
of ignition until the fuel has evaporated and fuel vapours have dissipated.
– always put the tank and fuel container caps back on and tighten well;
4) Replace faulty silencers
5) Before use, always inspect generally the machine and in particular:
- the safety lever must move freely, it must not need forcing and should
return automatically and rapidly back to the neutral position determining
cutting means stopping;
- to see that the blade, screws and cutting unit are not worn or damaged.
Replace damaged or worn blades and screws to preserve balance. Re-
place damaged or unreadable labels.
GETTING TO KNOW THE MACHINE
DESCRIPTION OF THE MACHINE AND ITS RANGE OF USE
This machine is a garden equipment, namely a pedestrian controlled lawn-
mower.
The machine is essentially composed of a engine which drives a blade
enclosed in a casing, equipped with wheels and a handle. The operator
is able to operate the machine and use the main controls, always staying
behind the handle at a safe distance from the rotating blade. If the operator
leaves the machine, the engine and blade will stop within a few seconds.
Intended use
This machine was designed and manufactured for cutting (and collecting)
grass in gardens and grassy areas, in areas in proportion to its cutting
capacity, done by a pedestrian operator. The presence of accessories or
grass on the ground.
Improper use 
Any other usage may be hazardous and harm persons and/or damage
things. Examples of improper use may include, but are not limited to:
– transporting persons, children or animals on the machine;
– letting oneself be transported by the machine;
– using the machine to tow or push loads;
– using the machine for leaf or debris collection;
– using the machine to trim hedges, or for cutting vegetation other than
grass;
– use of the machine by more than one person;
– using the blades on surfaces other than grass.
IDENTIFICATION LABEL AND MACHINE COMPONENTS
(see pictures on page 2)
1. Acoustic power level
2. Conformity marking
3. Year of manufacture
4. Type of lawnmower
5. Serial number
6. Name and address of Manufacturer
7. Article Code
8. Engine power and speed
9. Mass in kilograms
11. Chassis
12. Engine
13. Blade (Blade)
14. Stone-guard
15. Grass-catcher
16. Handle
17. Throttle trigger
18. Engine brake lever
19. Drive engagement lever
-
bers (3 - 4 - 5) in the spaces on the last page of the manual.
The example of the declaration of conformity can be found on the penulti-
mate page of the manual.
DESCRIPTION OF SYMBOLS ON CONTROLS
(where applicable) (see pictures on page 2)
21. Slow 22. Fast 23. Choke
24. Engine Stop 25. Drive on
26. Idle 27. Engine ignition
36. Grass-catcher contents indicator: lifted (a) = empty / lowered (b) = full
SAFETY REQUIREMENTS - Your lawnmower must be used carefully.
Symbols have therefore been placed on various parts of the machine to
remind you of the main precautions to be taken. Their meaning is explained

7
C) DURING USE
monoxide fumes can develop.
-
ditions.
3) If possible, avoid mowing wet grass. Avoid working in the rain and when
there is a thunderstorm risk.
4) Make sure you have a steady foothold on slopes.
5) Never run, always walk; do not let the lawnmower pull you.
6) Always mow transversely on slopes and never up and down.
7) Be extremely carefully when changing directions on slopes.
8) Do not mow on land that slopes more than 20°.
9) Be very careful near ravines, ditches or embankments.
10) Be extremely careful when pull the lawnmower toward you.
11) Immobilise the blade if the lawnmower must be inclined for transport,
when moving over surfaces other than grass and when the lawnmower is
transported from or to an area that must be cut.
12) Never operate the lawnmower with damaged guards or without the
grass-catcher or stone-guard.
13) Do not tamper with or disable safety systems.
14) Do not change the engine settings or overspeed the engine.
15) On power-driven models, disengage wheel drive before starting up
the engine.
16) Start up the engine carefully according to the instructions, keeping feet
away from the blade.
17) Do not incline the lawnmower for start up. Start up the machine on a
18) Never place your hands and feet near or under rotating parts. Always
keep away from the discharge opening.
19) Do not start the machine when standing in front of the discharge open-
ing.
20) Do not lift or transport the lawnmower when the engine is running.
21) Stop the engine and disconnect the spark plug cable:
– before making any adjustments under the cutting deck or before unclog-
ging the chute:
– before checking, cleaning or working on the lawnmower;
– after striking a foreign object. Inspect the machine for any damage to
the lawnmower and make the necessary repairs before using it again;
– if the lawnmower begins to vibrate abnormally (Immediately look for the
cause of the vibrations and take it to a Specialised Centre for necessary
inspections).
22) Stop the engine:
– whenever you leave the lawnmower unattended. Also remove the key on
models with electric start up;
– before refuelling;
– whenever you remove or reattach the grass-catcher;
– before adjusting the cutting height.
fuel supply when mowing is done, following the instructions in the engine
manual.
24) When mowing, always keep a safe distance from the rotary blades,
given by the length of the handle.
25) WARNING - If something breaks or an accident occurs during mowing,
-
ther damage; if an accident occurs with injuries or third parties are injured,
and contact the medical authorities for any necessary health care. Carefully
remove any debris that might cause damage or harm persons or animals
should it not be seen.
26) WARNING - The level of noise and vibration found in the present
instructions are maximum values of using the machine. The use of a cut-
ting element unbalanced, the excessive speed of movement, the absence
Accordingly it is necessary to take preventive measures to avoid possible
damage due to high noise and stress from vibration; perform machine
maintenance, wear ear protection, make breaks during the work.
D) MAINTENANCE AND STORAGE
1) Keep all nuts and screws tight to be sure the equipment is in safe
working condition. Routine maintenance is essential for safety and for
maintaining a high performance level.
2) Do not store the lawnmower with fuel in the tank in an area where fuel
3) Allow the engine to cool before storing the lawnmower in any enclosure.
and petrol storage area free of grass, leaves, or excessive grease. Never
leave containers with cut grass inside a storage area.
5) Check the stone-guard and grass-catcher frequently for wear or de-
terioration.
6) If the fuel tank has to be emptied, this should be done outdoors once
the engine has cooled down.
7) Wear work gloves for disassembling and reassembling blades.
8) Keep the blade balanced during sharpening. All work on the blade
(disassembly, sharpening, balancing, reassembly and/or replacing) are
demanding jobs that require special skill as well as special tools. For safety
reasons, these jobs are best carried out at a specialized centre.
9) For safety reasons, never use the machine when it has worn or damaged
parts. Parts must be replaced and not repaired. Use original spare parts.
Parts that are not of the same quality can damage the equipment and
impair your safety
E) TRANSPORTATION AND HANDLING
1) Whenever the machine is to be handled, lifted, transported or tilted
you must:
– wear sturdy work gloves;
the weight and its distribution.
– use an appropriate number of people for the weight of the machine and
the characteristics of the vehicle or the place where it must be placed
or collected.
– make sure that machine movements do not cause petrol leaks, damage
or injuries.
2) During transport, fasten the machine securely with cables or chains.
OPERATING INSTRUCTIONS
For information on the engine and the battery (if supplied), read the
relevant manuals.
1. COMPLETE ASSEMBLY
NOTE - The number which precedes each paragraph links the refer-
ences in the text to the respective illustrations (listed on page 2 and
following pages).
NOTE - The machine can be supplied with some parts already as-
sembled.
WARNING - Unpacking and completing the assembly should be done
on a at and stable surface, with enough space for moving the ma-
chine and its packaging, always using suitable equipment.
Disposal of the packaging should be done in accordance with the
local regulations in force.
1.1 Handle assembly
Loosen the two lower nuts (1).
Return the lower part of the handle, which is made up of two pre-assembled
elements (2), to the work position and lock into place by means of the nuts
(1) and the lower knobs (3).
Fit the upper part of the handle (4) to the lower ones (2) by means of the
clamps (5), as shown.
The ring nuts (6) on the clamps (5) must be screwd so they keep the top
Block both campls (5) after adjustment.
Hook the starter cable (7) to the guide spiral (8).
Tighten the nut (9) to secure the spiral 8).
Fit the cable clamp (10) as shown and secure the control cables.
1.2 Grass-catcher assembly
With the plastic part (11) upside-down, fasten the frame (12) to the plastic
part using the screws (13). Insert the frame (12) into the sack (14) and
drawing. Fit the edge of the cloth (16) right into the groove of the plastic part

8
(11), starting 5-7 mm from the ends.
1.3 Battery connection (if present)
On models with an electric starter, connect the battery cable to the lawnmo-
wer’s general cable connection.
2. CONTROL DESCRIPTION
NOTE - The meanings of the symbols on controls are explained in
the previous pages.
2.1 Throttle
The throttle is controlled by the lever (1) and positioned as shown on the
of a throttle.
2.2 Blade brake
The blade brake is controlled by the lever (1) which must be held against
the handle for ignition and during lawnmower operations.
The engine stops when the lever is released.
IMPORTANT - The blade must stop within a few seconds of when the
lever is released; if you notice that more time is required for it to stop,
contact a Specialised Centre immediately.
2.2 Drive lever (if provided)
On power-driven models, pull the lever (1) against the handle for forward
movement.
The lawnmower stops moving forward when the lever is released.
.
2.3 Cutting height adjustment
DO THIS WHEN THE BLADE IS STOPPED.
3. GRASS CUTTING
3.1 Fastening the grass-catcher
Lift the stone-guard and fasten the grass-catcher (1) correctly as shown
in the illustration.
3.2 Start-up
For start up, follow the instructions in the engine manual, then pull the blade
cable (2). If the model has electric ignition pull the blade brake lever (1)
against the handle and turn the starter key (3)
3.3 Grass cutting
The appearance of the lawn will improve if you alternate cutting in both
directions at the same height.
• If there is a grass-catcher with contents indicator device (if appli-
cable): while working, with the blade in motion, the indicator remains
lifted as long as the grass-catcher is able to hold cut grass; when it
lowers, it means that the grass-catcher is full and it must be emptied.
3.4 Emptying the grass-catcher
the sound of the lawnmower changes and the grass-catcher is no longer
To remove and empty the grass-catcher,
– stop the engine and wait for the blade to stop;
– lift the stone-guard, grasp the handle and remove the grass-catcher
keeping it in an erect position.
3.5 When work is nished
When work has been completed, release the brake lever (1) and discon-
nect the spark plug cap (2). If the model has electric ignition, remove the
starter key (3).
WAIT UNTIL THE BLADE STOPS before making an adjustments to the
lawnmower.
3.6 Lawn care recomendation
ways to care for the lawn; always read the instructions on seed boxes for
mowing height for the growth conditions in the work area.
Keep in mind that the most grass is made up of a stem and one or more lea-
The following indications generally apply:
grass and tear the lawn;
height followed by a second mow after two or three days.
4. ROUTINE MAINTENANCE
MPORTANT - Routine and accurate maintenance is essential in maintain-
ing original machine safety and performance levels..
Each adjustment or maintenance operation must be done with the engine
stopped, after removing the spark plug cap.
Store the lawnmower in a dry place.
1) Wear sturdy work gloves before cleaning, maintaining or adjusting the
machine.
2) Accurately wash the machine with water after each mowing, remove
grass debris and mud accumulated under the chassis to prevent it from
drying and causing problems the next time the lawnmower is used.
select the lowest cutting height and always stand behind the lawnmower
handle when cleaning
abrasive action of the cut grass; in this case, intervene promptly by tou-
ching up the paintwork using a rustproof paint to prevent the formation
of the rust that would lead to corrotion of the metal .
5) If accessing the lower part is necessary, only tilt the machine on the
side indicated in the engine manual, following the relevant instructions.
6) Do not drip petrol onto the plastic parts of the engine or the machine
to prevent damaging them and remove all traces of spilt petrol imme-
diately. The warranty does not cover damage to plastic parts caused
by petrol.
4.1 Blade maintenance
Each adjustment made to the blade is best if done at a specialised Centre
that has the most appropriate tools.
On this machine must be used blades with code shown in the table on
page 2.
Given product evolution, the above mentioned blades may be replaced in
time by others, with similar interchangeable and operating safety features.
Reassemble the blade (2) with the code facing the ground, following the
steps indicated in the illustration.
Tighten the central screw (1) using a torque wrench set to 35-40 Nm.
4.2 Battery recharge
instructions in the battery maintenance handbook.
Do not connect the battery charger directly to the engine terminal.
It is not possible to start the engine using the battery charger as a power
source, as it may get damaged. if the machine is to remain inactive for a
long period, disconnect the battery leads after making sure that the battery
is fully charged.

9
5. ENVIRONMENTAL PROTECTION
Environmental protection should be a priority of considerable importance
environment in which we live.
– Try not to cause any disturbance to the surrounding area.
– Scrupulously comply with local regulations for the disposal of waste ma-
terials after mowing.
– Seguire scrupolosamente le norme locali per lo smaltimento di imballi,
Scrupulously comply with local regulations for the disposal of packaging,
deteriorated parts or any elements with a strong environmental impact;
this waste must not be disposed of as normal waste, it must be separated
recycled.
– When decommissioning, do not pollute the environment with the ma-
chine, hand it over to a disposal centre, in accordance with the local
regulations in force.
6. DIAGNOSTIC
What to do when ...
Source of problem Corrective action
1. Petrol mower does not work
There is no oil or fuel in the
engine
Check the oil and fuel levels
not in working order
Clean the spark plug and the
replace
The fuel has not been emptied
by the mower at the end of last
season
stuck. Tilt the mower over towards
the carburetor side
2. Cut grass is not blown into the grass box
The blade has received a knock Sharpen, the blade or replace it.
Check the guides which direct the
grass towards the grass box
The mower’s blade housing is
dirty underneath
Clean the blade housing so as to
give an easier path for the grass
to the grass box
3. Mower struggles to cut grass
The blade is not in good
conditions
Sharpen the blade or replace it
For any doubts or problems, please do not hesitate to contact your
nearest Customer Service Centre or Your Dealer
.

doc_base r .3- wbh-p_ 0
DICHIARAZIONE CE DI CONFORMITÁ
(Direttiva Macchine 2006/42/CE, Allegato II, parte A)
1. La Società: GGP Italy S.p.A. – Via del Lavoro, 6 – 31033 Castelfranco Veneto (TV) – Italy
Dichiara sotto la propria responsabilità, che la macchina: Rasaerba con operatore a piedi / taglio erba
2.
a) Tipo / Modello Base
b) Modello commerciale
c) Anno di costruzione
d) Matricola
e) Motore
a scoppio
3. É conforme alle specifiche delle direttive:
• MD: 2006/42/EC
f) Ente Certificatore /
g) Esame CE del tipo: /
• OND: 2000/14/EC, ANNEX VI, proc.1 -2005/88/EC
f) Ente Certificatore:
• EMCD: 2004/108/EC
4. Riferimento alle Norme armonizzate:
EN 836:1997+A4:2011
i) Livello di potenza sonora misurato
dB(A)
j) Livello di potenza sonora garantito
dB(A)
k) Ampiezza di taglio
cm
q) Persona autorizzata a costituire il FascicoloTecnico: GGP ITALY S.p.A.
Via delLavoro, 6
31033 Castelfranco Veneto (TV)- Italia
r) Castelfranco V.to, 00.00.0000 Vice Presidente R&D &Quality
Ing. Raimondo Hippoliti
doc_base r.3 - wbh-p_0
FR
Déclaration CE de Conformité
(Directive Machines 2006/42/CE, Annexe II, partie
A)
1. La Société
2. Déclare sous sa propre responsabilité que la
machine : Tondeuse à conducteur marchant/
coupe du gazon
a) Type / Modèle de Base
b) Modèle commercial
c) Année de construction
d) Série
e) Moteur: moteur essence
3. Est conforme aux prescriptions des
directives :
f) Organisme de certification
g) Examen CE du Type
4. Renvoi aux Normes harmonisées
i) Niveau de puissance sonore mesuré
j) Niveau de puissance sonore garanti
k) Largeur de coupe
q) Personne habilitée à établir le Dossier
Technique
Technique :
r) Lieu et Date
EN
EC Conformity Statement
(Machine Directive 2006/42/EC, Annex II, part A)
1. The Company
2. Herby declares under its own responsibility
that the machine: Pedestrian controlled lawn
mower / Grass cutting
a) Type / Base Model
b) Commercial model
c) Year of manufacture
d) Serial number
e) Motor: petrol
3. Conforms to directive specifications:
f) Certifying body
g) EC examination of Type
4. Reference to harmonised Standards
i) Sound power level measured
i) Sound power level guaranteed
k) Range of cut
q) Person authorised to create the Technical
Folder:
r) Place and Date
DE
EG-Konformitätserklärung
(Maschinenrichtlinie 2006/42/EG, Anhang II, Teil
A)
1. Die Gesellschaft
2. Erklärt auf eigene Verantwortung, dass die
Maschine: Handgeführter Rasenmäher /
Rasenschnitt
a) Typ / Basismodell
b) Handelsmodell
c) Baujahr
d) Seriennummer
e) Motor: Verbrennungsmotor
3. Den Anforderungen der folgenden Richtlinien
entspricht:
f) Zertifizierungsstelle
g) EG-Baumusterprüfung
4. Bezugnahme auf die harmonisierten Normen
i) Gemessener Schallleistungspegel
j) Garantierter Schallleistungspegel
k) Schnittbreite
q) Zur Verfassung der technischen Unterlagen
befugte Person:
r) Ort und Datum
NL
EG-verklaring van overeenstemming
(Richtlijn Machines 2006/42/CE, Bijlage II, deel A)
1. Het bedrijf
2. Verklaart onder zijn eigen
verantwoordelijkheid dat de machine: Lopend
bediende grasmaaier / grasmaaier
a) Type / Basismodel
b) Handelsmodel
c) Bouwjaar
d) Serienummer
e) Motor: benzinemotor
3. Voldoet aan de specificaties van de
richtlijnen:
f) Certificatie-instituut
g) EG-onderzoek van het Type
4. Verwijzing naar de Geharmoniseerde normen
i) Gemeten niveau van geluidsvermogen
j) Gegarandeerd niveau van geluidsvermogen
k) Snijbreedte
q) Bevoegd persoon voor het opstellen van het
Technisch Dossier
r) Plaats en Datum
ES
Declaración de Conformidad CE
(Directiva Máquinas 2006/42/CE, Anexo II, parte
A)
1. La Empresa
2. Declara bajo su propia responsabilidad que la
máquina: Cortadora de pasto con operador de
pie / corte hierba
a) Tipo / Modelo Base
b) Modelo comercial
c) Año de fabricación
d) Matrícula
e) Motor: motor de explosión
3. Cumple con las especificaciones de las
directivas:
f) Ente certificador
g) Examen CE del Tipo
4. Referencia a las Normas armonizadas
i) Nivel de potencia sonora medido
j) Nivel de potencia sonora garantizado
k) Amplitud de corte
q) Persona autorizada a realizar el Manual
Técnico:
r) Lugar y Fecha
PT
Declaração CE de Conformidade
(Diretiva de Máquinas 2006/42/CE, Anexo II,
parte A)
1. A Empresa
2. Declara sob a própria responsabilidade que a
máquina: Cortador de relva com operador a pé /
corte da relva
a) Tipo / Modelo Base
b) Modelo comercial
c) Ano de fabricação
d) Matrícula
e) Motor: motor a explosão
3. É conforme às especificações das diretivas:
f) Órgão certificador
g) Exame CE do Tipo
4. Referência às Normas harmonizadas
i) Nível medido de potência sonora
j) Nível garantido de potência sonora
k) Amplitude de corte
q) Pessoa autorizada a elaborar o Caderno
Técnico
r) Local e Data
EL
EK-Δήλωση συμμόρφωσης
(Οδηγία Μηχανών 2006/42/CE, Παράρτημα II,
μέρος A)
1. Η Εταιρία
2. Δηλώνει υπεύθυνα ότι η μηχανή:
Χλοοκοπτικό με όρθιο χειριστή / κοπή της χλόης
a) Τύπος / Βασικό Μοντέλο
b) Εμπορικό Μοντέλο
c) Έτος κατασκευής
d) Αριθμός μητρώου
e) Κινητήρας: κινητήρας εσωτερικής ανάφλεξης
3. Συμμορφώνεται με τις προδιαγραφές της
οδηγίας:
f) Οργανισμός πιστοποίησης
g) Εξέταση CE του Τύπου
4. Αναφορά στους Κανονισμούς εναρμόνισης
i) Στάθμη μέτρησης ακουστικής ισχύος
j) Στάθμη εγγυημένης ακουστικής ισχύος
k) Εύρος κοπής
q) Εξουσιοδοτημένο άτομο για την κατάρτιση
του Τεχνικού Φυλλαδίου:
r) Τόπος και Χρόνος
TR
AT Uygunluk Beyanı
(2006/42/CE Makine Direktifi, Ek II, bölüm A)
1. Şirket
2. Şahsi sorumluluğu altında aşağıdaki
makinenin: Ayakta operatörlü çim biçme
makinesi / çim kesimi
a) Tip / Standart model
b) Ticari model
c) İmalat yılı
d) Sicil numarası
e) Motor: patlamalı motor
3. Aşağıdaki direktiflerin özelliklerine uygun
olduğunu beyan etmektedir:
f) Sertifikalandıran kurum
g) ... Tipi CE incelemesi
4. Harmonize standartlara atıf
i) Ölçülen ses güç seviyesi
j) Garanti edilen ses güç seviyesi
k) Kesim genişliği
q) Teknik Dosyayı oluşturmaya yetkili kişi:
r) Yer ve Tarih
MK
Декларација за усогласеност со ЕУ
(Директива за машини 2006/42/CE, Анекс II,
дел A)
1. Компанијата
2. изјавува со целосна лична одговорност
дека следната машина: Тревокосачка со
оператор на нозе / косење трева
а) Тип / основен модел
б) комерцијален модел
в) година на производство
г) етикета
д) мотор: мотор со согорување
3. Усогласено со спецификациите според
директивите:
ѓ) тело за сертификација
е) тест СЕ за типот
4. Референци за усогласени нормативи
з) измерено ниво на звучна моќност
ѕ) Ниво на гарантирана звучна моќност
и) обем на сечење
н) овластено лице за составување на
Техничката брошура
њ) место и датум
doc_base r .3- wbh-p_ 0
NO
EF- Samsvarserklæring
(Maskindirektiv 2006/42/EF, Vedlegg II, del A)
1. Firmaet
2. Erklærer på eget ansvar at maskinen:
Selvgående gressklipper / gressklipping
a) Type / Modell
b) Handelsnavn
c) Produksjonsår
d) Serienummer
e) Motor: forbrenningsmotor
3. Oppfyller kravene i direktivene:
f) Sertifiseringsorgan
g) EF-typeprøving
4. Henvisning til harmoniserte standarder
i) Målt lydeffektnivå
j) Garantert lydeffektnivå
k) Klippebredde
q) Person som har fullmakt til å utferdige teknisk
dokumentasjon:
r) Sted og dato
SV
EG-försäkran om överensstämmelse
(Maskindirektiv 2006/42//EG, bilaga II, de la)
1. Företaget
2. Försäkrar på eget ansvar att maskinen:
Handjagare / gräsklippning
a) Typ / Basmodell
b) Handelsmodell
c) Tilverkningsår
d) Serienummer
e) Motor: förbränningsmotor
3. Överensstämmer med föreskrifterna i
direktivet
f) Intygsorgan
g) EG typgodkännande
4. Referens till harmoniserade standarder
i) Uppmätt ljudeffektnivå
j) Garanterad ljudeffektnivå
k) Skärbredd
q) Auktoriserad person för upprättandet av den
tekniska dokumentationen:
r) Ort och datum
DA
EF-overensstemmelseserklæring
(Maskindirektiv 2006/42/EF, bilag II, del A)
1. Firmaet
2. Erklærer på eget ansvar, at maskinen:
Plæneklipper betjent af gående personer /
klipning af græsset
a) Type / Model
b) Handelsbetegnelse
c) Fremstillingsår
d) Serienummer
e) Motor: forbrændingsmotor
3. Er i overensstemmelse med specifikationerne
ifølge direktiverne:
f) Certificeringsorgan
g) EF-typeafprøvning
4. Henvisning til harmoniserede standarder
i) Målt lydeffektniveau
j) Garanteret lydeffektniveau
k) Klippebredde
q) Person, der har bemyndigelse til at udarbejde
det tekniske dossier:
r) Sted og dato
FI
EY-VAATIMUSTENMUKAISUUSVAKUUTUS
(Konedirektiivi 2006/42/EY, Liite II, osa A)
1. Yritys
2. Vakuuttaa omalla vastuullaan, että kone:
Seisaaltaan ajettava ruohonleikkuri /
ruohonleikkuu
a) Tyyppi / Perusmalli
b) Myyntimalli
c) Valmistusvuosi
d) Sarjanumero
e) Moottori : räjähdysmoottori
3. On yhdenmukainen seuraavien direktiivien
asettamien vaatimusten kanssa:
f) Sertifiointiyritys
g) EY-tyyppitarkastus
4. Viittaus harmonisoituihin standardeihin
i) Mitattu äänitehotaso
j) Taattu äänitehotaso
k) Leikkuuleveys
q) Teknisten asiakirjojen laatimiseen valtuutettu
henkilö:
r) Paikka ja päivämäärä
CS
ES – Prohlášení o shodě
(Směrnice o Strojních zařízeních 2006/42/ES,
Příloha II, část A)
1. Společnost
2. Prohlašuje na vlastní odpovědnost, že stroj:
Sekačka se stojící obsluhou / sekačka na trávu
a) Typ / Základní model
b) Obchodní model
c) Rok výroby
d) Výrobní číslo
e) Motor: spalovací motor
3. Je ve shodě s nařízeními směrnic:
f) Certifikační orgán
g) ES zkouška Typu
4. Odkazy na Harmonizované normy
i) Naměřená úroveň akustického výkonu
i) Zaručená úroveň akustického výkonu
k) Šířka řezání
q) Osoba autorizovaná pro vytvoření
Technického spisu:
r) Místo a Datum
PL
Deklaracja zgodności WE
(Dyrektywa maszynowa 2006/42/WE, Załącznik II,
część A)
1. Spółka
2. Oświadcza na własną odpowiedzialność, że
maszyna: Kosiarka do trawy kierowana przez
operatora pieszego / cięcie trawy
a) Typ / Model podstawowy
b) Model komercyjny
c) Rok produkcji
d) Numer seryjny
e) Silnik: silnik o zapłonie iskrowym
3. Spełnia podstawowe wymogi następujących
Dyrektyw:
f) Jednostka certyfikująca
g) Badanie typu WE
4. Odniesienie do Norm zharmonizowanych
i) Zmierzony poziom mocy akustycznej
j) Gwarantowany poziom mocy akustycznej
k) Szerokość cięcia
q) Osoba upoważniona do zredagowania
Dokumentacji technicznej:
r) Miejscowość i data
HU
EK-megfelelőségi nyilatkozata
(2006/42/EK gépirányelv, II. melléklet "A" rész)
1. Alulírott Vállalat
2. Felelősségének teljes tudatában kijelenti,
hogy az alábbi gép: Gyalogvezetésű fűnyírógép /
fűnyírás
a) Típus / Alaptípus
b) Kereskedelmi típus
c) Gyártási év
d) Gyártási szám
e) Motor: robbanómotor
3. Megfelel az alábbi irányelvek előírásainak:
f) Tanúsító szerv
g) CE vizsgálat típusa
4. Hivatkozás a harmonizált szabványokra
i) Mért zajteljesítmény szint
i) Garantált zajteljesítmény szint
k) Vágási szélesség
q) Műszaki Dosszié szerkesztésére
felhatalmazott személy:
r) Helye és ideje
RU
Декларация соответствия нормам ЕС
(Директива о машинном оборудовании
2006/42/ЕС, Приложение II, часть A)
1. Предприятие
2. Заявляет под собственную
ответственность, что машина: Газонокосилка
с пешеходным управлением / стрижка газона
a) Тип / Базовая модель
b) Коммерческое наименование
c) Год изготовления
d) Паспорт
e) Двигатель: двигатель внутреннего
сгорания
3. Соответствует требованиям следующих
директив:
f) Сертифицирующий орган
g) Испытание ЕС типового образца
4. Ссылки на гармонизированные нормы
i) Измеренный уровень звуковой мощности
j) Гарантируемый уровень звуковой
мощности
k) Амплитуда кошения
q) Лицо, уполномоченное на подготовку
технической документации:
r) Место и дата
HR
EK Izjava o sukladnosti
(Direktiva 2006/42/EZ o strojevima, dodatak II,
dio A)
1. Tvrtka:
2. pod vlastitom odgovornošću izjavljuje da je
stroj: Kosilica za travu na guranje / košenje trave
a) Vrsta / Osnovni model
b) Komercijalni model
c) Godina proizvodnje
d) Matični broj
e) Motor: motor s unutarnjim izgaranjem
3. sukladan s temeljnim zahtjevima direktiva:
f) Certifikacijsko tijelo
g) Tipsko ispitivanje EZ
4. Primijenjene su slijedeće harmonizirane
norme:
i) Izmjerena razina zvučne snage
j) Zajamčena razina zvučne snage
k) Širina rezanja
q) Osoba ovlaštena za pravljenje Tehničke
datoteke:
r) Mjesto i datum
SL
ES izjava o skladnosti
(Direktiva 2006/42/ES) , priloga II, del A)
1. Družba
2. pod lastno odgovornostjo izjavlja, da je stroj:
Kosilnica / košnja trave
a) Tip / osnovni model
b) tržni model
c) Leto izdelave
d) Serijska številka
e) Motor: motor z notranjim izgorevanjem
3. Skladen je z določili direktiv :
f) Ustanova, ki izda potrdilo
g) ES pregled tipa
4. Sklicevanje na usklajene predpise
i) Izmerjen nivo zvočne moči
j) Zagotovljen nivo zvočne moči
k) Obseg košnje
q) Oseba, pooblaščena za sestavo tehnične
knjižice:
r) Kraj in datum
BS
EZ izjava o sukladnosti
(Direktiva o mašinama 2006/42/EZ, Prilog II, deo
A)
1. Firma
2. Daje izjavu pod vlastitom odgovornošću da je
mašina: Kosilica na guranje / Košenje trave
a) Tip / Osnovni model
b) Komercijalni model
c) Godina proizvodnje
d) Serijski broj
e) Motor: motor s unutrašnjim izgaranjem
3. sukladna s osnovnim zahtjevima direktive:
f) Certifikaciono tijelo
g) EZ ispitivanje tipa
4. Pozivanje na usklađene norme
i) Izmjereni nivo zvučne snage
j) Garantovani nivo zvučne snage
k) Širina košenja
q) Osoba ovlaštena za izradu tehničke brošure:
r) Mjesto i datum
SK
ES vyhlásenie o zhode
(Smernica o Strojných zariadeniach 2006/42/ES,
Príloha II, časť A)
1. Spoločnosť
2. Vyhlasuje na vlastnú zodpovednosť, že stroj:
Kosačka so stojacou obsluhou / kosačka na
trávu
a) Typ / Základný model
b) Obchodný model
c) Rok výroby
d) Výrobné číslo
e) Motor: spaľovací motor
3. Je v zhode s nariadeniami smerníc:
f) Certifikačný orgán
g) Skúška typu ES
4. Odkaz na Harmonizované normy
i) Nameraná úroveň akustického výkonu
j) Zaručená úroveň akustického výkonu
k) Šírka kosenia
q) Osoba autorizovaná na vytvorenie
Technického spisu:
r) Miesto a Dátum
RO
CE -Declaratie de Conformitate
(Directiva Maşini 2006/42/CE, Anexa II, partea A)
1. Societatea
2. Declară pe propria răspundere că maşina:
Maşină de tuns iarba cu conducător pedestru /
tăiat iarba
a) Tip / Model de bază
b) Model comercial
c) An de fabricaţie
d) Număr de serie
e) Motor: motor cu combustie
3. Este în conformitate cu specificaţiile
directivelor:
f) Organism de certificare
g) Examinare CE de Tip
4. Referinţă la Standardele armonizate
i) Nivel de putere sonoră măsurat
j) Nivel de putere sonoră garantat
k) Lăţimea de tăiere
q) Persoană autorizată să întocmească Dosarul
Tehnic
r) Locul şi Data
LT
EB atitikties deklaracija
(Mašinų direktyva 2006/42/CE, Priedas II, dalis A)
1. Bendrovė
2. Prisiima atsakomybę, kad įrenginys:
Žoliapjovė su stovinčiu operatoriumi / žolės
pjovimas
a) Tipas / Bazinis Modelis
b) Komercinis modelis
c) Pagaminimo metai
d) Serijos numeris
e) Variklis: vidaus degimo variklis
3. Atitinka direktyvose pateiktas specifikacijas:
f) Sertifikavimo įstaiga
g) CE tipo tyrimas
4. Nuoroda į suderintas Normas
i) Išmatuotas garso galios lygis
j) Užtikrinamas garso galios lygis
k) Pjovimo plotis
q) Autorizuotas asmuo sudaryti Techninę
Dokumentaciją:
r) Vieta ir Data
LV
EK atbilstības deklarācija
(Direktīva 2006/42/EK par mašīnām, pielikums II,
daļa A)
1. Uzņēmums
2. Uzņemoties par to pilnu atbildību, paziņo, ka
mašīna: Stumjama zāliena pļaujmašīna / zāles
pļaušana
a) Tips / Bāzes modelis
b) Komerciālais modelis
c) Ražošanas gads
d) Sērijas numurs
e) Motors: iekšdedzes motors
3. Atbilst šādu direktīvu prasībām:
f) Sertifikācijas iestāde
g) CE tipveida pārbaude
4. Atsauce uz harmonizētiem standartiem
i) Izmērītais skaņas intensitātes līmenis
j) Garantētais skaņas intensitātes līmenis
k) Pļaušanas platums
q) Pilnvarotais darbinieks, kas sagatavoja
tehnisko dokumentāciju:
r) Vieta un datums
SR
EC deklaracija o usaglašenosti
(Direktiva o mašinama 2006/42/EC, Prilog II, deo
A)
1. Preduzeće
2. Daje izjavu pod vlastitom odgovornošću da je
mašina: Kosačica na guranje / košenje trave
a) Tip / Osnovni model
b) Komercijalni model
c) Godina proizvodnje
d) Serijski broj
e) Motor: motor s unutrašnjim sagorevanjem
3. u skladu s osnovnim zahtevima direktiva:
f) Sertifikaciono telo
g) EC ispitivanje tipa:
4. Pozivanje na usklađene norme
i) Izmereni nivo zvučne snage
j) Garantovani nivo zvučne snage
k) Širina košenja.....................
q) Osoba ovlašćena za sastavljanje tehničke
brošure
r) Mesto i datum
BG
ЕО декларация за съответствие
(Директива Машини 2006/42/ЕО, Приложение
II, част А)
1. Дружеството
2. На собствена отговорност декларира, че
машината: Косачка с изправен водач / рязане
на трева
а) Вид / Базисен модел
б) Търговски модел
в) Година на производство
г) Сериен номер
д) Мотор: мотор с вътрешно горене
3. Е в съответствие със спецификата на
директивите:
е) Сертифициращ орган
ж) ЕО изследване на вида
4. Базирано на хармонизираните норми
и) Ниво на измерена акустична мощност
й) Гарантирано ниво на акустична мощност
к) Широчина на косене
р) Лице, упълномощено да състави
Техническата Документация:
с) Място и дата
ET
EÜ vastavusdeklaratsioon
(Masinadirektiiv 2006/42/EÜ, Lisa II, osa A)
1. Firma
2. Kinnitab omal vastutusel, et masin: Seisva
juhiga muruniitja / muruniitja
a) Tüüp / Põhimudel
b) Kaubanduslik mudel
c) Ehitusaasta
d) Matrikkel
e) Mootor: Sisepõlemismootor
3. Vastab direktiivide nõuetele:
f) Kinnitav asutus
g) EÜ tüübihindamine
4. Viide ühtlustatud standarditele
i) Mõõdetud helivõimsuse tase
j) Garanteeritud helivõimsuse tase
k) Lõikelaius
q) Tehnilise Lehe autoriseeritud koostaja:
r) Koht ja Kuupäev

Realizzazione: EDIPROM - Bergamo
© by GGP ITALY spa
-
 1
1
-
 2
2
-
 3
3
-
 4
4
-
 5
5
-
 6
6
-
 7
7
-
 8
8
-
 9
9
-
 10
10
-
 11
11
-
 12
12
-
 13
13
-
 14
14
-
 15
15
-
 16
16
-
 17
17


Mountfield NTL 434-R Instruções de operação
- Categoria
- Cortadores de grama
- Tipo
- Instruções de operação
em outras línguas
Artigos relacionados
Outros documentos
-
WOLF-Garten A 530 A V HW IS Instruções de operação
-
Efco LRi 40 P Manual do proprietário
-
Dolmar PM4810 Manual do proprietário
-
Worx WG780E Instruções de operação
-
Black & Decker CLM3825L2 Manual do usuário
-
BLACK DECKER CLM3820 T1 Manual do proprietário
-
Husqvarna 966524101 Manual do usuário
-
Husqvarna Master 46 Manual do usuário
-
-