A página está carregando...

StatClean® - Ultrasonic Cleaner
USER MANUAL
FEATURES:
Large tank capacity Tank capacity 6.0 L / 1.6 gallon.
Tank size: 34.0 x 20.5 x 9.9 cm / 13.4” x 8.1” x 3.9”
Stainless Steel Basket Fits 6” x 9” (15 x 23 cm) or smaller cassettes or
loose instruments
Control panel with capacitive
sensing technology
Solid panel top. Durable, reliable, resistant to water and harsh
chemicals.
Drainage valve Convenient to use.
Memory feature Recalls the last timer setting.
Two powerful ultrasonic
stack transducers Uniform distribution of ultrasonic waves, strong cleaning, high
durability.
3-color LED display 1 to 30-minute full range timer, degas, and thermometer.
Independent control circuit
for each ultrasonic transducer
40% higher cleaning efficiency, not susceptible to interference,
more durable.
Multiple circuit protectors When overloaded or improperly used, the protectors shut down
the power to certain areas to protect the machine.
Moisture-proofed PCB with
industrial IC
Capable for different working environments with better anti-
interference performance.
Two cooling fans One for cooling of PCB boards, one for cooling of ultrasonic
transducers. Improve heat dissipation and beneficial for
continuous operations.
Solid and advanced structural
design 4.5 mm thick wall housing made from engineering grade plastic
with tongue-in-groove design for better waterproof and drop-
proof performance.
SD-485 NA EN R4. StatClean is a registered trademark and
Your Infection Control Specialist
is a trademark of SciCan Ltd.


Principles of ultrasonic cleaning
The cleaning effect is achieved through high frequency vibrations that produce air bubbles within the liquid,
which when in contact with an object dislodges the debris.
Using tap water is sufficient; however, it is recommended to use filtered water for best results.
Read the Manual First
Before use of device, review the manual. Warnings and operations should be followed carefully.
INTRODUCTION

TABLE OF CONTENTS
Safety Precautions 1
Product Structure & Accessories 3
Control Panel & Operations 4
Operation Guidelines 5
Memory Operations 7
Common Cleaning Methods 8
Product Exploded View 10
Care and Maintenance 12
Specifications 14
Warranty 14

1
SAFETY PRECAUTIONS
Appliance and cleaner are potential life hazards to children, PLEASE KEEP
THEM AWAY AND OUT OF REACH FROM CHILDREN.
To prevent life-threatening electrical shock, please observe the following:
Danger of electrical shock! Do not use while bathing. Never immerse the device or the power cord in
water or any liquids.
› Danger of electrical shock! Never touch/insert/remove the power plug with wet hands.
› Danger of electrical shock! If the unit has fallen into water during operation, do not touch the unit.
Remove the power plug from the socket first.
› Danger of electrical shock! Do not spray any liquids over the device.
› Follow the manual to operate the device and never leave the device operating unattended.
› Do not use components unapproved by the manufacturer.
› Remove power cord by grasping its plug and not its cord.
› Keep power cord away from obstructions (cupboard doors, chairs etc.) and hot surfaces to
prevent cord damage.
› Do not use device if it has received damage to any part of the unit (plug, cord, housing etc.)
› Do not disassemble the device, except by professionals.
› If there is damage to the power plug, cord, housing, or other parts of the device, do not use the
device.
› If the unit is damaged, non-operational or has fallen into water, take it to an authorized dealer for
service.
› Remove the power plug from the socket:
- if malfunction occurs before cleaning the device
- if the device is not going to be used for prolonged period after each use (recommended)
› The installation of an earth leakage circuit breaker with a rated tripping current of no more than
30 mA provides further protection against an electrical shock. The installation should only be
carried out by a trained electrician.

2
To prevent fire hazards, please observe the following:
› Do not set unit on soft surfaces (bed, couch etc.) or block the vents on unit. Keep vents free from
any obstructions.
› Observe the other warnings in the previous section.
› If the power cord is damaged, it must be replaced by the manufacturer or its service agent or a
similarly qualified person in order to avoid a hazard.
Use filtered water for best results.
Other observations:
› Do not operate the unit without filling the tank with water. Running dry will damage the
unit.
› Do not plug in the power cord before adding water to the tank. Do not fill the tank above the Max
line to avoid overspill.
› Do not use solution containing abrasive substances or strong corrosive chemical solution not
recommended by the manufacturer or the supplier.
› Operate unit on a dry and flat surface for operation.
› When the unit encounters to severe electromagnetic interference, it may malfunction, stop
operating or lose control functions. If this happens, unplug the power cord then reinsert it to
restart the device.
IMPORTANT SAFETY INSTRUCTIONS:
When using electric appliances, basic precautions should always be followed, including the
following:
› Only use attachments recommended or sold by the manufacturer.
› Do not use outdoors.
› To disconnect, turn all controls to the off position, then remove plug from outlet. Do not unplug by
pulling on cord. To unplug, grasp the plug, not the cord. Unplug from outlet when not in use and
before servicing or cleaning.
SAFETY PRECAUTIONS

3
PRODUCT STRUCTURE & ACCESSORIES
A. Top Cover
B. Stainless steel tank
C. Housing
D. Drainage pipe fitting
E. Drainage valve handle
F. Control panel
G. Handlesa
H. Power switch
I. Power socket
J. Cover holder
1. Working time display
2. Multistage thermometer
3. Warning light
4. Degas status
5. Timer quick set key
6. Timer decreasing key
7. Normal cleaning status
8. Start/Stop key
9. Degas key
Stainless steel basket
Power cord Hose
STANDARD ACCESSORIES:
F.
G.
H. I. J.
A.
B.
C.
D.
E.

4
CONTROL PANEL & OPERATIONS
1. 10:00 – Working Time Display. It counts down after work is started.
2. – Multistage Thermometer. Solid green light indicates: water temperature is 0-30% of
60 ºC/140 ºF. Solid orange light indicates: water temperature is 30-60% of 60 ºC/140 ºF. Solid red light
indicates: water temperature is 60-90% of 60 ºC/140 ºF. Flashing red light indicates: water temperature
is close to 60 ºC/140 ºF. All lights indicates: water temperature is at 60 ºC/140 ºF (90-100%).
3. Warning Light. Normally it could be illuminated in the following two scenarios:
a. Overheat protection is triggered for one or two driving PCBs. If it is only one PCB, the other
one will continue to work. Once the PCB is cooled down, the warning light will be dimmed.
b. If the light is illuminated as soon as the unit is turned on, it indicates malfunctioning at one or
two signal cables for transducer PCBs. The unit can be operated normally.
4. – Normal Cleaning Status. Illuminated, normal cleaning is underway.
5. – Degas Status. Illuminated, the degas function is selected. Flashing degassing is underway.
6. Timer Quick Set Key. Touch Time+, it displays 10:00 or other quick timer settings. Each touch
increase it by 5 minutes.
7. – Time Decreasing Key. Touch key each time reduces the timer by 1 minute.
8. Start/Stop Key. After powering on, the LED display shows 10:00, which is the initial
default time (as shown), and the unit is ready with the normal working status. Touch
Start/Stop key twice and the cleaning starts. The cleaning stops when the timer counts
down to 00:00. If the unit needs to be stopped before the timer runs out, touch Start/
Stop key twice.
9. Degas Key. Touch Degas key, illuminates, indicating Degas function is selected. Touch Start/Stop
key twice to start degassing. will flash for 90 seconds, then the unit will return to the normal cleaning
function. Touch Degas key before it ends will stop degassing.
To prevent accidentally turning on or off the unit, the Start/Stop key needs to be touched within 6 seconds
to turn it on or off. flashes, indicating the unit is running under Normal Cleaning mode.
Degas: When cleaning heavily soiled or greasy items or silver, copper or brass items, chemical solutions
need to be added into the water. The solution may form many small droplets and take a long time to
dissolve in the water. Newly added water may generate many air bubbles on the tank walls. These will
reduce the cleaning effect in the beginning phase of ultrasonic cleaning. Turning on the degas function will
dissipate the droplets and the air bubbles, usually in 90 seconds, and improve cleaning efficiency.

1
2
3
5
OPERATION GUIDELINES
UNIT SET UP
1. Connect the power cord to the back of the unit
and to an outlet.
2. Turn the power switch found on the back of the
unit to the On position.
3. LED display shows 10:00. This is the most
common timer setting.
If the timer needs to be adjusted,touch TIME+ key for
quick timer settings and Time– key for fine adjustment
between 1 to 30 minutes.
Please consult your instrument cleaner instructions as
well as your instrument directions for use for proper
automated cleaning.
Prolonged cleaning time may result in:
1. Loosening of the screws if used.
2. If items are plated and have existing cracks, the
cracks may become more pronounced.
3. Coatings with preexisting damages may
experience more peeling.
DEGAS PROCEDURE
1. Remove the cover and put it on the cover holder
vertically. Add room temperature water to below
the MAX but higher than the MIN fill lines.
2. Add OPTIM 28 Instrument Cleaning Solution per
its Instructions for Use.
3. Touch the Degas key and allow it to operate for
90 seconds.
Please consult your Instrument cleaning Solution
Instructions for Use to determine if degassing is
required. OPTIM 28 does not require degassing.
LOADING INSTRUMENTS
1. Put items in cassettes or basket and lower into
the cleaning tank.
2. Confirm that the water level is between MIN and
MAX and above the area to be cleaned.
3. If not, add room temperature water to the tank.
If the unit is turned on without water, ultrasonic
energy will not be absorbed. Due to this
unit’s high power, if on without water for over
15 seconds damage to the unit may occur,
severely reducing the life of the unit.

4
5
6
6
CLEANING
1. Place the lid on the unit.
2. Touch the time key to set the timer to desired
time. Refer to your Instrument Cleaning
Solution’s Instructions for Use to determine the
required cleaning time. OPTIM 28 requires a 5
minute cleaning time.
3. Touch the Start/Stop key twice to activate the
cleaning cycle.
4. When cleaning cycle is completed, open the lid
and retrive the cassettes or basket.
If additional cleaning is required reset the timer and
repeat the process above.
OPERATION GUIDELINES
DRAINING TANK
At the end of the day, the tank should be drained, and
cleaned.
1. Connect the hose to the drainage pipe as
shown.
2. Turn the drainage valve handle clockwise to
open the drain and remove the dirty water
3. Clean and wipe the tank dry.
4. Close the drainage valve.
RETRIEVING INSTRUMENTS
When cleaning cycle is completed, open the lid and
retrieve the cassettes or basket.
Wipe out condensation water from the lid before
placing it on the lid holder.

7
MEMORY OPERATIONS
Equipped with advanced power off memory capability, this unit is able to memorize the latest
quick timer setting.
Last timer setting recall.
1. Once the timer hits 00:00, either touch the Start/Stop key within 5 seconds to recall/repeat latest
quick timer setting, or wait 5 seconds for the latest timer setting to appear.
2. If unit powers off during a cleaning cycle, the latest timer setting will appear once powered on.
3. If the quick timer setting is changed when the cycle is not started, it will remain until the cycle
starts. However, it will not remain if the power is off.
4. If the Start/Stop key is touched twice during a cycle, the cycle and timer will stop. It resumes when
the Start/Stop key is touched twice again.
NOTE: To prevent accidental lockups of the touch-sensing control panel, please observe the following:
1. Do not touch two or more keys simultaneously.
2. Do not leave any liquids on the control panel.
3. Light touches are sufficient, do not aggressively push the control panel.
If the control panel is locked, do the following to reset it. If the first step does not work, move on to the
second step.
1. Turn off the power switch.
2. Turn off the power switch multiple times.
3. Unplug the power cord and wait for 5-10 minutes.
4. Leave the unit unplugged for several hours.

Cleaning Method:
1. Put the items to be cleaned in the recommended container. Add your instrument cleaning solution.
We recommend OPTIM 28 Instrument Cleaner. Make sure you follow the instrument cleaning
solution instructions for use.
2. Place the container in the tank directly. Add water to a level between MIN and MAX at least half
inch or 13mm above the bottom of the container but, not over the container.
3. Turn the power switch on. Touch Time key to set the timer to 10 minutes. Consult your cleaner
and/or instrument Directions for Use for proper time. Press Start/Stop key twice to start cleaning.
Ultrasonic waves will penetrate the container and clean the items.
Selection of the container:
1. Plastic containers – Soft and will absorb 30% - 40% of ultrasound waves, reducing the cleaning effect
2. Aluminum containers – Absorbs ~20% of ultrasonic energy.
3. Glass beakers – Absorb ~5-10% of ultrasonic energy
4. Stainless steel containers – Absorbs ~8% of ultrasonic energy.
8
COMMON CLEANING METHODS
A. Regular cleaning
Use filtered water for best results. You may add an
instrument cleaning solution. We recommend
OPTIM 28 Instrument Cleaner. Please ensure you follow
its instructions for use.
Suitable Locations:
Dental and medical offices and labs.
Cleaning Method:
1. Place dirty items into basket and set basket
inside the tank.
2. Add water to the tank covering the area to be
cleaned, keeping within the lines of MIN and
MAX.
3. Turn the power switch on. Press Time key to set
the timer. Consult your cleaner and/or instrument
instructions for use for proper time.
Press Start/Stop key twice to start cleaning.
NOTE: During cleaning, dirt will come off like a cloud and the water will gradually become murky. This is
debris being removed from the instruments and indicates the instruments are being cleaned.
B. Indirect Cleaning
Put the items in a separate container.
Clean items using ultrasonic waves to penetrate the
container.
Suitable Locations: Medical and dental instrument
sterilization rooms. Different applications use different
fluids to be used inside the container.
1. Small instruments such as burs and files. Keep
them separate from main instrument cleaning.
2. Instruments that use a different solution such as
cement remover.
3. Instruments that use corrosive solution such as
a disinfectant that’s corrosive. Avoid contacting
the plastic housing with corrosive solutions.
4. Multiple patients’ dentures or impressions.
Disinfect the container after each patient.

9
COMMON CLEANING METHODS
C.Enhanced cleaning.
Debris accumulated over a long period of time, heavily
soiled.
Cleaning Method:
1. Large items can be put in the tank directly,
small items need to be placed into the basket
beforehand. Do not put items atop each other to
prevent rubbing during cleaning.
2. Add room temperature water to the max fill line.
You may add an instrument cleaning solution.
We recommend OPTIM 28 Instrument Cleaner.
Please ensure you follow its instructions for use.
3. Turn the power on.
4. Press Time key to set the timer to 15 minutes.
Press Start/Stop key twice to start cleaning.
5. When it stops, open the drainage valve
to release the dirty water. Close the valve
afterwards.
6. Clean the tank and add fresh water. Wash the
items for another 3 minutes to remove the
residual debris and detergent.
D. Special cleaning
Silver, copper or brass items that oxidize and darken
need special cleaning.
Cleaning Method:
1. Place items into basket and then into the tank,
adding water to a level within MIN and MAX,
covering the area to be cleaned. Add proper
solution that can remove metal oxidization
according to the recommended ratio.
2. Press Time key to set the timer to 15 minutes.
3. When done, remove basket and items. Rinse
the items with tap water or follow step 6 in the
Enhanced Cleaning section.
During cleaning, debris comes off like a cloud, mucking the water. This method removes silver and
copper oxidation making the items pristine again.
10
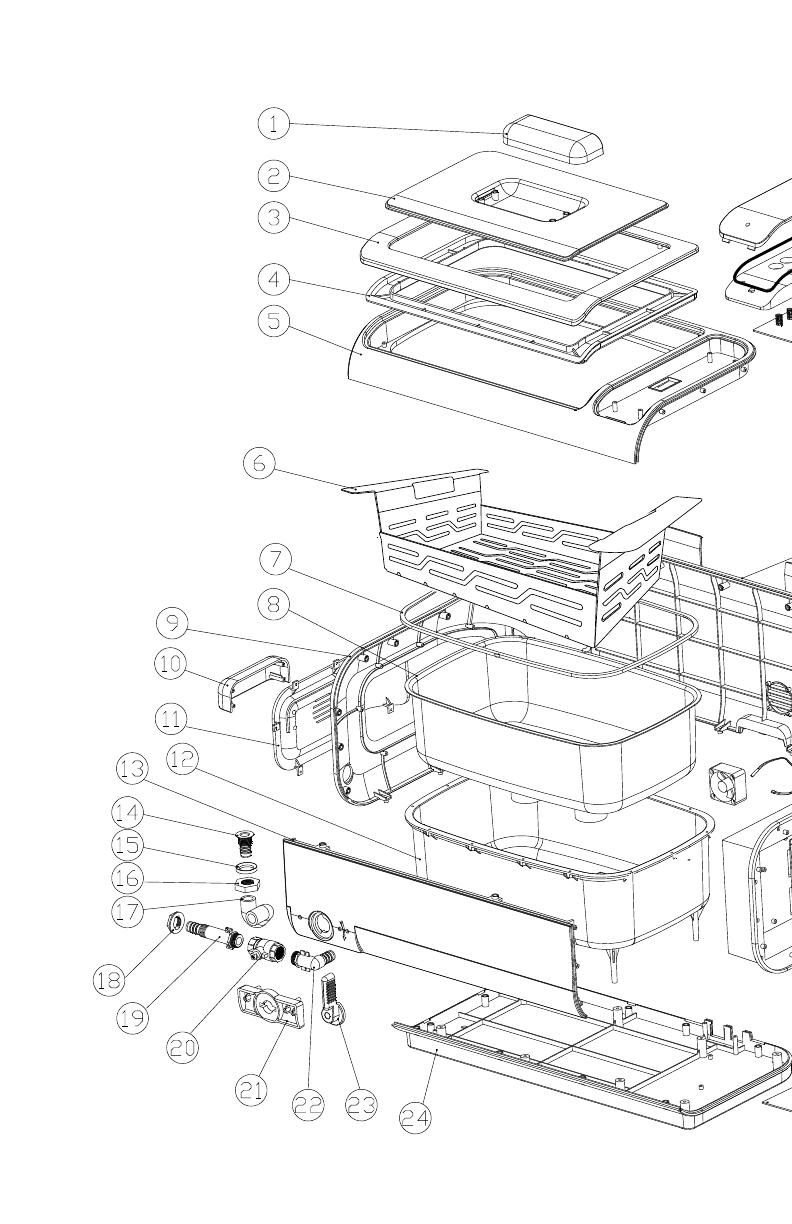
PRODUCT EXPLODED VIEW

11
No. Item Material
1 Top handle ABS
2 Lid-window AS
3 Lid-top ABS
4 Lid-bottom ABS
5 Top ring ABS
6 Stainless steel basket SUS 304
7 Silicon seal Silicone rubber
8 Stainless steel tank SUS 304
9 Left cover ABS
10 Left handle ABS
11 Left panel ABS
12 Inner tank ABS
13 Front cover ABS
14 Drain SUS 304
15 Washer AL
16 Nut AL
17 Hose Rubber
18 Nut ABS
19 Spout PP
20 Ball valve Standard part
21 Bracket ABS
22 Elbow PP
23 Valve handle PC
24 Bottom cover ABS
25 Main power PCB 94V0
26 Filter PCB 94V0
27 Cooling fan Standard part
28 Right handle ABS
29 Right panel ABS
30 Right cover ABS
31 Transducer PCB 94V0
32 PCB mounting bracket ABS
33 Power switch PCB 94V0
34 Power switch Standard part
35 Power socket Standard part
36 Thermal sensor Standard part
37 Cover holder ABS
38 Back cover ABS
39 Thermal sensor holder ABS
40 Thermal switch A 0 - 3 A- F
41 Control panel PCB 94V0
42 Light socket ABS
43 Control panel box ABS
44 Control panel silicon seal Silicone rubber
45 Control panel cover PC

1
2
3
4
5
6
12
Do not turn on the unit without water in the tank.
Although the unit is designed with multiple protections, if the unit is
turned on without water for over 15 seconds, it could severly damage
the unit and reduce the life of the unit.
Do not run the unit for extended periods of time or continuously.
Designed with overheat protection, if the unit has been running for 45
minutes, it is recommended to stop the unit for 20 minutes to prolong
the life of the unit
Do not keep chemicals in the cleaning tank overnight or when it
looks dirty.
After cleaning is completed, open the drainage valve to drain
the dirty water. Clean and wipe the tank dry.
Do not use osmosis water or highly purified water as they
corrode stainless steel.
Do not use chemicals that are corrosive to stainless steel or ABS
plastic which is the material of the housing.
Do not spray water over the housing.
Use a towel to wipe the tank and the housing dry.
Do not expose the unit under direct sunlight for extended
periods of time.
Keep the unit in a dry, cool and ventilated area.
A thermal switch is attached to the bottom of the cleaning
tank. If the unit is turned on accidentally without water in
the tank, the ultrasonic energy will not be transferred out
through the liquid and instead will be concentrated on the tank,
causing the temperature of the tank to continue to rise. This will
trigger the thermal switch to cut off power to stop the ultrasonic
transducer from running, thereby preventing damages to the unit
and fire hazard. The switch cuts off power for approximately 6-10
minutes and then reconnects the power automatically.
Keep the original packing material in case it needs to be sent in
for servicing. If it is no longer available, use enough cushioning
equivalent to a minimum 1” Styrofoam all around the unit inside the
shipping carton to avoid damages to fragile transducers. Warranty
does not cover damages during shipping.
CARE AND MAINTENANCE

StatClean Audit Procedure - Foil Test
Ultrasonic cleaners shall be tested at least weekly for cleaning performance as per the protocol
recommended in the manufacturer’s instructions for use. The test results shall be documented.
Procedure:
1. Remove the lid, basket, containers and any beakers.
2. Clean the tank thoroughly.
3. Fill the tank with water to its max fill line and add an instrument cleaning solution, we recommend
OPTIM 28 (do not replace the basket).
4. Take a piece of autoclave tape and run it from the left hand front corner to the right hand back
corner.
5. Obtain a piece of standard household aluminum foil and cut 3 pieces 2cm (3/4”) wide and 14cm (
5.5” ) long. Fold each piece to L shape along the length.
6. Stick the 3 pieces evenly spaced from left to right across the center of the tank, sticking the
end to the the underside of the tape. Keep the foil vertically into the water with the bottom edge
approximately 1cm (1/2”) above the bottom of the tank.
7. Replace the lid on the unit.
8. Turn on the ultrasonic machine and run for 1 minute.
9. Once the time has been reached, stop the unit and remove the lid.
10. Remove the foils and inspect. The foils should be perforated along the 3 edges with more damages
toward the bottom.
11. If either one on the left or the right has no obvious perforations, the transducer near that foil may
not be working properly. Call for service if this happens.
13
CARE AND MAINTENANCE

v.191022
14
SPECIFICATIONS
For all US inquiries:
701 Technology Drive
Canonsburg, PA 15317
800-572-1211 | www.scican.com
Manufactured for:
SciCan Ltd.
1440 Don Mills Rd.
Toronto, Ontario M3B 3P9 Canada
1-800-667-7733 • www.scican.com
Warranty
This unit carries a two-year warranty for parts and labor for quality defects. Damages caused by misuse
or careless uses of the unit are not covered. Repaired unit is to be shipped to continental US and Canada
addresses only. Contact us first, then send the unit with a copy of the original invoice or receipt back to:
Description StatClean Ultrasonic Cleaner
Model SC-P4862 / SC-P4862-CE
Tank Capacity 6.0 L /
1.6 gallon (US)
Max. 5.0 L / 1.3 gallon (US)
Min. 3.35 L / 0.9 gallon
(US)
Tank Size 32.3 x 20.5 x 9.9 cm / 12.8” x 8.1” x 3.9”
Longest Item Fits inside Tank 34.0 cm / 13.4”
Power Supply
120 W ( AC 100~120 V 50/60 Hz )
140 W (AC 220~240 V 50/60 Hz)
120 W (AC 100 V 50/60 Hz)
Digital Timer Settings 1 to 30 - minute full range timer
Drainage Drainage valve
Ultrasonic Frequency 35,000 Hz
Tank Material Stainless Steel SUS304
Housing Material ABS
Net Weight 7.5 kg / 16.5 lb
Gross Weight 8.6 kg / 19.0 lb
Unit Size 51.5 x 30.5 x 24.0 cm / 20.3” x 12.0” x 9.4”
Inner Carton Size 57.5 x 37.0 x 32.5 cm / 22.6” x 14.6” x 12.8”
Qty per Master Carton 1 pc /ctn
Master Carton Size 60.0 x 38.5 x 34.5 cm / 23.6” x 15.2” x 13.6”

Limpiador ultrasónico StatClean®
MANUAL DE USUARIO
CARACTERÍSTICAS:
Tanque de gran capacidad Capacidad del tanque: 6.0l / 1.6galones (EE.UU.).
Tamaño del tanque: 34.0×20.5×9.9cm / 13.4”×8.1”×3.9”
Cesta de acero inoxidable Apta para cargadores de 6”×9” (15×23cm) o de un tamaño
inferior o para instrumentos sueltos
Panel de control con
tecnología de detección
capacitiva
Tapa del panel sólida. duradera, segura y resistente al agua y a
los productos químicos agresivos.
Válvula de drenaje Uso cómodo.
Capacidad de memoria Recuerda el último ajuste del temporizador.
Dos potentes transductores
apilados ultrasónicos Distribución uniforme de las ondas ultrasónicas, limpieza potente
y alta durabilidad.
Pantalla LED de 3 colores Temporizador de 1 a 30minutos de alcance total, desgasificador
y termómetro.
Circuito de control
independiente para cada
transductor ultrasónico
Eficacia de limpieza un 40% mayor, no susceptible a
interferencias, más duradera.
Múltiples protectores de
circuito Cuando se sobrecargan o se utilizan de forma indebida, los
protectores cortan la alimentación de determinadas zonas para
proteger la máquina.
Placa de circuito impreso
resistente a la humedad con
CI industrial
Posibilidad de adaptarse a diferentes entornos de trabajo con un
mejor desempeño antiinterferencias.
Dos ventiladores de
refrigeración Uno para refrigerar los paneles de placa de circuito impreso y otro
para refrigerar los transductores ultrasónicos. Mejora la disipación
del calor y es favorable para las operaciones continuas.
Diseño estructural sólido y
avanzado Carcasa de pared de 4.5mm de grosor fabricada en plástico
de grado técnico con diseño machihembrado para un mejor
desempeño a prueba de agua y de caídas.
SD-485 NA ES R4. StatClean es una marca registrada y Your Infection Control Specialist es una marca comercial de SciCan Ltd.

1/54