Husqvarna LC 151 Manual do usuário
- Categoria
- Cortadores de grama
- Tipo
- Manual do usuário

LC 151, LC 151S, LB 256SP
EN Operator's manual 2-18
ES Manual de usuario 19-37
FR Manuel d'utilisation 38-56
PT-BR Manual do operador 57-75
PT Manual do utilizador 76-94

Contents
Introduction..................................................................... 2
Safety..............................................................................3
Assembly........................................................................ 5
Operation........................................................................ 8
Maintenance................................................................. 11
Engine troubleshooting................................................. 14
Transportation, storage and disposal........................... 15
Technical data.............................................................. 16
EC Declaration of Conformity....................................... 18
Introduction
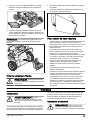
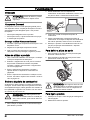
Product description
The product is a pedestrian-controlled rotary lawn
mower. For LC 151, LC 151S attach the grass catcher to
collect the grass. Attach the side discharge deflector for
side discharge of the grass. For LC 151, LC 151S attach
a mulch kit to cut the grass into fertilizer.
Intended use
Use the product to cut grass. Do not use the product for
other tasks.
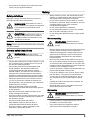
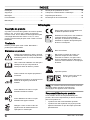
Symbols on the product
WARNING! Be careful and use the
product correctly. This product can cause
serious injury or death to the operator or
others.
Please read the operator's manual
carefully and make sure that you
understand the instructions before use.
Look out for thrown objects and ricochets.
Keep persons and animals at a safe
distance from the work area.
Warning: Keep hands and feet away from
the rotating blade.
Warning: Keep hands and feet away from
rotating parts.
Stop the engine and remove the ignition
cable before repairs or maintenance.
This product is in accordance with
applicable EC directives.
Noise emission to the environment
according to the European Community’s
Directive. The product’s emission is
specified in the Technical data chapter
and on the label.
Risk of fire.
Do not breathe in exhaust fumes. The
exhaust fumes from the engine contain
carbon monoxide, an odourless,
poisonous and very dangerous gas. Do
not start the engine indoors or in closed
spaces.
Hot surface.
Fill the engine with oil before
you start the product.
Note: Other symbols/decals on the product refer to
certification requirements for some commercial areas.
Product liability
As referred to in the product liability laws, we are not
liable for damages that our product causes if:
• the product is incorrectly repaired.
• the product is repaired with parts that are not from
the manufacturer or not approved by the
manufacturer.
• the product has an accessory that is not from the
manufacturer or not approved by the manufacturer.
21566 - 008 - 24.11.2021

• the product is not repaired at an approved service
center or by an approved authority.
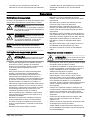
Safety
Safety definitions
Warnings, cautions and notes are used to point out
specially important parts of the manual.
WARNING: Used if there is a risk of
injury or death for the operator or bystanders
if the instructions in the manual are not
obeyed.
CAUTION: Used if there is a risk of
damage to the product, other materials or
the adjacent area if the instructions in the
manual are not obeyed.
Note: Used to give more information that is necessary
in a given situation.
General safety instructions
WARNING: Read the warning
instructions that follow before you use the
product.
• This product is dangerous if used incorrectly or if you
are not careful. Injury or death can occur if you do
not obey the safety instructions.
• This product produces an electromagnetic field
during operation. This field may under some
circumstances interfere with active or passive
medical implants. To reduce the risk of serious or
fatal injury we recommend persons with medical
implants to consult their physician and the medical
implant manufacturer before operating this product.
• Always be careful and use your common sense. If
you are not sure how to operate the product in a
special situation, stop and speak to your Husqvarna
dealer before you continue.
• Keep in mind that the operator will be held
responsible for accidents that involve other persons
or their property.
• Keep the product clean. Make sure that you can
clearly read signs and decals.
• Do not let a person use the product unless you make
sure that they read and understand the contents of
the operator's manual.
• Do not let a child operate the product.
• Keep children away from the work area. A
responsible adult must be there at all times.
• Do not let a person, without knowledge of the
instructions, operate the product.
• Always monitor a person, with decreased physical
capacity or mental capacity, that uses the product. A
responsible adult must be there at all times.
• Do not use the product if you are tired, ill, or under
the influence of alcohol, drugs or medicine. This has
a negative effect on your vision, alertness,
coordination and judgment.
• Do not use the product if it is defective.
• Do not change this product or use it if it is possible
that it has been changed by others.
• Do not change the adjustment for the engine speed
control.
Work area safety
WARNING: Read the warning
instructions that follow before you use the
product.
• Remove objects such as branches, twigs and stones
from the work area before you use the product.
• Objects that hit against the cutting equipment can
eject and cause damage to persons and objects.
Keep bystanders and animals at a safe distance
from the product.
• Never use the product in bad weather such as fog,
rain, strong winds, intense cold and risk of lightning.
To use the product in bad weather or in moist or wet
locations is tiring. Bad weather can cause dangerous
conditions, such as slippery surfaces.
• Look out for persons, objects and situations that can
prevent safe operation of the product.
• Look out for obstacles, such as roots, stones, twigs,
pits and ditches. Long grass can hide obstacles.
• To cut grass on slopes can be dangerous. Do not
use the product on ground that slopes more than
15°.
• Operate the product across the face of slopes. Do
not move up and down.
• Be careful when you go near hidden corners and
objects that prevent a clear view.
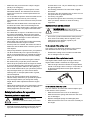
Work safety
WARNING: Read the warning
instructions that follow before you use the
product.
• Use this product to cut grass lawns only. It is not
permitted to use it for other tasks.
• Use personal protective equipment. Refer to
Personal protective equipment on page 4
.
1566 - 008 - 24.11.2021 3

• Make sure that you know how to stop the engine
quickly in an emergency.
• Never start the engine in a closed space or near
flammable material. The exhaust fumes from the
engine are hot and can contain sparks which can
start a fire.
• Do not operate the product unless the blade and all
covers are attached correctly. An incorrectly
attached blade can come loose and cause personal
injury.
• Make sure that the blade does not hit objects such
as stones and roots. This can do damage to the
blade and bend the engine shaft. A bent axle causes
heavy vibration and a very high risk that the blade
becomes loose.
• If the blade hits an object or if vibrations occur, stop
the product immediately. Disconnect the ignition
cable from the spark plug. Examine the product for
damages. Repair damages or let an authorised
service agent do the repair.
• Never attach the engine brake handle permanently
to the handle when the engine is started.
• Put the product on a stable, flat surface and start it.
Make sure that the blade does not hit the ground or
other objects.
• Always stay behind the product when you operate it.
• Let all the wheels stay on the ground and keep 2
hands on the handle when you operate the product.
Keep your hands and feet away from the rotating
blades.
• Do not tilt the product when the engine is started.
• Be careful when you pull the product rearward.
• Never lift up the product when the engine is started.
If you must lift the product, first stop the engine and
disconnect the ignition cable from the spark plug.
• Do not walk rearward when you operate the product.
• Stop the engine when you move across areas
without grass, for example paths made of gravel,
stone and asphalt.
• Do not run with the product when the engine is
started. Always walk when you operate the product.
• Stop the engine before you change the cutting
height. Never make adjustments with the engine
started.
• Never let the product stay out of view with the engine
started. Stop the engine and make sure that the
cutting equipment does not rotate.
Safety instructions for operation
Personal protective equipment
WARNING: Read the warning
instructions that follow before you use the
product.
• Personal protective equipment cannot fully prevent
injury but it decreases the degree of injury if an
accident does occur. Let your dealer help you select
the right equipment.
• Use hearing protection if the noise level is higher
than 85 dB.
• Use heavy-duty slip-resistant boots or shoes. Do not
use open shoes or go with bare feet.
• Use heavy, long pants.
• Use protective gloves when necessary, for example
when you attach, examine or clean the cutting
equipment.
Safety devices on the product
WARNING: Read the warning
instructions that follow before you use the
product.
• Do not use a product with defective safety devices.
• Do a check of the safety devices regularly. If the
safety devices are defective, speak to your
Husqvarna service agent.
To do a check of the cutting cover
The cutting cover decreases vibrations in the product
and decreases the risk of injury from the blade.
• Examine the cutting cover to make sure that there
are no damages such as cracks.
To do a check of the engine brake handle
The engine brake handle stops the engine. When the
engine brake handle is released, the engine stops.
• Start the engine and then release the engine brake
handle. If the engine does not stop in 3 seconds, let
an approved Husqvarna service agent adjust the
engine brake.
To do a check of the rear cover
The rear deflector decreases the risk that objects eject
in the direction of the operator.
• Make sure that the rear cover is not damaged.
• Make sure that the springs that close the rear cover
are not damaged.
• Replace damaged springs and damaged parts.
• Make sure that the rear cover can move smoothly on
the hinges.
41566 - 008 - 24.11.2021

Muffler
The muffler keeps the noise levels to a minimum and
sends the exhaust fumes away from the operator.
Do not use the product if the muffler is missing or
defective. A defective muffler increases the noise level
and the risk of fire.
WARNING: The muffler becomes very
hot during and after use and when the
engine operates at idle speed. Be careful
near flammable materials and/or fumes to
prevent fire.
To do a check of the muffler
• Examine the muffler regularly to make sure that it is
attached correctly and not damaged.
Fuel safety
WARNING: Read the warning
instructions that follow before you use the
product.
• Do not start the product if there is fuel or engine oil
on the product. Remove the unwanted fuel/oil and let
the product dry.
• If you spill fuel on your clothing, change clothing
immediately.
• Do not get fuel on your body, it can cause injury. If
you get fuel on your body, use soap and water to
remove the fuel.
• Do not start the product if the engine has a leak.
Examine the engine for leaks regularly.
• Be careful with fuel. Fuel is flammable and the fumes
are explosive and can cause injuries or death.
• Do not breathe in the fuel fumes, it can cause injury.
Make sure that there is a sufficient airflow.
• Do not smoke near the fuel or the engine.
• Do not put warm objects near the fuel or the engine.
• Do not add the fuel when the engine is on.
• Make sure that the engine is cool before you refuel.
• Before you refuel, open the fuel tank cap slowly and
release the pressure carefully.
• Do not add fuel to the engine in an indoor area. Not
sufficient airflow can cause injury or death because
of asphyxiation or carbon monoxide.
• Tighten the fuel tank cap fully. If the fuel tank cap is
not tightened, there is a risk of fire.
• Move the product a minimum of 3 m / 10 ft from the
position where you filled the tank before a start.
• Do not fill the fuel tank fully. Heat causes the fuel to
expand. Keep a space at the top of the fuel tank.
Safety instructions for maintenance
WARNING: Read the warning
instructions that follow before you use the
product.
• The exhaust fumes from the engine contain carbon
monoxide, an odourless, poisonous and very
dangerous gas. Do not start the engine indoors or in
closed spaces.
• Before you do the maintenance on the product, stop
the engine and remove the ignition cable from the
spark plug.
• Use protective gloves when you do maintenance on
the cutting equipment. The blade is very sharp and
cuts can easily occur.
• Accessories and changes to the product that are not
approved by the manufacturer, can cause serious
injury or death. Do not change the product. Always
use accessories that are approved by the
manufacturer.
• If the maintenance is not done correctly and
regularly, the risk of injury and damage to the
product increases.
• Only do the maintenance as given in this owner's
manual. All other servicing must be done by an
approved Husqvarna service agent.
• Let an approved Husqvarna service agent do
servicing on the product regularly.
• Replace damaged, worn or broken parts.
Assembly
Introduction
WARNING: Before you assemble the
product, you must read and understand the
safety chapter.
WARNING: Remove the spark plug
cable from the spark plug before you
assemble the product.
1566 - 008 - 24.11.2021 5

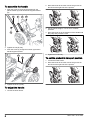
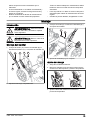
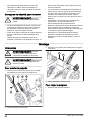
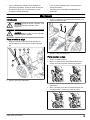
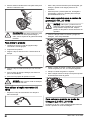
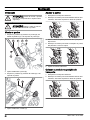
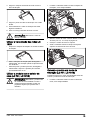
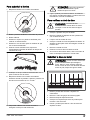
To assemble the handle
1. Push the screw (A) through the handle (B), the
plastic washer (C) and the handle support bracket
(D).
A
BCDE
2. Tighten the nut (E) fully.
3. Push the screw (F) thrugh the washer (G) and the
handle support bracket.
F
G
H
4. Tighten the knob (H) fully.
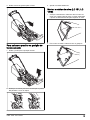
To adjust the handle
1. Loosen the lower knobs.
2. Move the knobs to the lower end of the grooves on
the left and the right side of the product.
3. Set the handle height in one of the 2 available
positions.
4. Move the knobs up in the direction of the handle until
they stop and you hear a click.
5. Tighten the knobs fully.
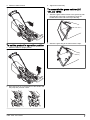
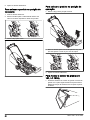
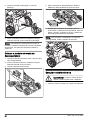
To set the product in transport position
1. Loosen the lower knobs.
2. Move the knobs to the lower end of the grooves on
the left and the right side of the product.
61566 - 008 - 24.11.2021

3. Fold the handle forward.
To set the product in operation position
1. Fold the handle to upright position.
2. Move the knobs up in the direction of the handle until
they stop and you hear a click.
3. Tighten the knobs fully.
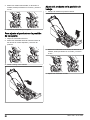
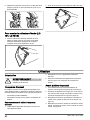
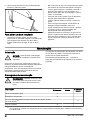
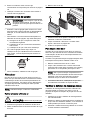
To assemble the grass catcher (LC
151, LC 151S)
1. Attach the grass catcher frame to the grass bag with
the rigid part of the bag on the bottom. Keep the
handle of the frame out of the top of the bag.
2. Attach the grass bag to the frame with the clips.
1566 - 008 - 24.11.2021 7

Operation
Introduction
WARNING: Before you operate the
product, you must read and understand the
safety chapter.
Husqvarna Connect
Husqvarna Connect is a free app for your mobile device.
The Husqvarna Connect app gives extended functions
for your Husqvarna product:
• Extended product information.
• Information about, and help with, product parts and
servicing.
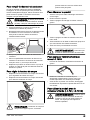
To start to use Husqvarna Connect
1. Download the Husqvarna Connect app on your
mobile device.
2. Register in the Husqvarna Connect app.
3. Do the instruction steps in the Husqvarna Connect
app to connect and register the product.
Before you operate the product
1. Read the operator's manual carefully and make sure
that you understand the instructions.
2. Examine the cutting equipment to make sure that it
is correctly attached and adjusted. See
To examine
the cutting equipment on page 12
.
3. Fill the fuel tank. See
To fill fuel on page 8
.
4. Fill the oil tank and do a check of the oil level. See
To do a check of the oil level on page 12
.
To fill fuel
If available, use low-emission/alkylate gasoline. If low-
emission/alkylate gasoline is not available, use good
quality unleaded gasoline or leaded gasoline with octane
number not less than 90.
CAUTION: Do not use gasoline with an
octane number less than 90 RON (87 AKI).
This can cause damage to the product.
1. Open the fuel tank cap slowly to release the
pressure.
2. Fill slowly with a fuel can. If you spill fuel, remove it
with a cloth and let remaining fuel dry off.
3. Clean the area around the fuel tank cap.
4. Tighten the fuel tank cap fully. If the fuel tank cap is
not tightened, there is a risk of fire.
5. Move the product a minimum of 3 m (10 ft) from the
position where you filled the tank before a start.
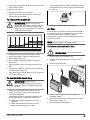
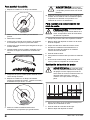
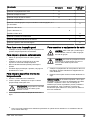
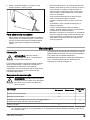
To set the cutting height
1. Move the cutting height lever rearward to increase
the cutting height.
2. Move the cutting height lever forward to decrease
the cutting height.
3
4
56
78
9
CAUTION: Do not set the cutting height
too low. The blades can hit the ground if the
surface of the lawn is not level.
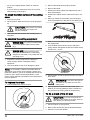
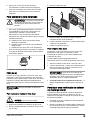
To start the product
1. Make sure that the ignition cable is connected to the
spark plug.
2. Stay behind the product.
3. Hold the engine brake handle against the handlebar.
4. Hold the starter rope handle with your right hand.
81566 - 008 - 24.11.2021

5. Slowly pull out the starter rope until you feel some
resistance.
6. Pull with force to start the engine.
WARNING: Do not twist the starter
rope around your hand.
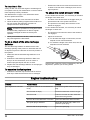
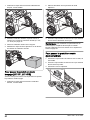
To use the drive on the wheels LC
151S
• Push the drive bail in the direction of the handlebar.
• Release the drive bail to disengage the drive, for
example when you go near an obstacle.
• Before you pull the product rearward, disengage the
drive and push the product forward approximately 10
cm.
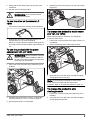
To use the product with the grass
catcher (LC 151, LC 151S)
WARNING: Do not operate the product
without a grass catcher installed or without
the rear cover closed. Objects can eject and
cause injury to the operator.
1. Lift the rear cover and remove the mulch plug if it is
installed.
2. Assemble the grass catcher, refer to
To assemble
the grass catcher (LC 151, LC 151S) on page 7
.
3. Put the grass catcher on the bracket.
4. Release the rear cover and put it on top of the grass
bag frame.
To change the product to mulch mode
(LC 151, LC 151S)
Make sure the engine is off before you change the
product to mulch mode.
1. Lift the rear cover and remove the grass catcher, if it
is installed.
2. Put the mulch plug into the discharge channel.
3. Close the rear cover and make sure that it is tightly
closed against the mulch plug.
Note: To increase the performance of the mulch
mode, replace the blade with the mulch blade
accessory. Refer to
To replace the blade on page 12
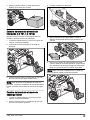
To change the product to side
discharge mode
1. Lift the rear cover and remove the grass bag, if it is
installed.
2. Close the rear cover and make sure that it is tightly
closed against the product.
1566 - 008 - 24.11.2021 9

3. Lift the discharge lock.
4. Open the side discharge cover and install the side
discharge deflector onto the support pins.
5. Let the side discharge cover close against the side
discharge deflector. Make sure that the side
discharge deflector is tightly in position before you
operate the product.
Note: To increase the performance in side discharge
mode, install the mulch plug.
To empty the grass catcher
CAUTION: Lift the grass catcher when
you move it to prevent wear.
1. Lift the grass catcher with the frame handle.
2. Use the frame handle and the bag handle when you
empty the grass catcher.
To get a good result
• Always use a sharp blade. A blunt blade gives an
irregular result and the cut surface of the grass
becomes yellow. A sharp blade also uses less
energy than a blunt blade.
• Do not cut more than ⅓ of the length of the grass.
Use the highest cutting height when you start to cut
the grass. Examine the result and lower the cutting
height to an applicable level. If the grass is very long,
operate slowly and cut 2 times if it is necessary.
• Cut in different directions each time to prevent
stripes in the lawn.
• Lift the rear cover and remove the grass catcher.
• If a mulch plug and a mulch blade are attached,
remove them.
• Close the rear cover before you operate the product.
When you operate the product, the cut grass
discharges below the rear cover.
10 1566 - 008 - 24.11.2021

• Keep the cutting cover clean. Buildup from grass and
dirt on the inner side of the cutting cover can
decrease the cutting result. Refer to
To clean the
inner surface of the cutting cover on page 12
.
Maintenance
Introduction
WARNING: Before you do
maintenance, you must read and
understand the safety chapter.
For all servicing and repair work on the product, special
training is necessary. We guarantee the availability of
professional repairs and servicing. If your dealer is not a
service agent, speak to them for information about the
nearest service agent.
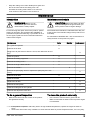
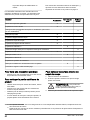
Maintenance schedule
CAUTION: Make sure that the air filter
is up and not against the ground when you
tilt the product. Risk of engine damage.
The maintenance intervals are calculated from daily use
of the product. The intervals change if the product is not
used daily.
For maintenance identified with * refer to instructions in
Safety devices on the product on page 4
.
Maintenance Daily Monthly Each season
Do a general inspection X
Examine the oil level X
Replace the oil (the first time after 5 h of use, then after each 50 h of
use) 1X
Clean the product X
Examine the cutting equipment X
Examine the cutting cover * X
Examine the engine brake handle * X
Examine the muffler * X
Examine the spark plug. Clean or replace the spark plug if it is nec-
essary X
Examine the air filter X
Clean the air filter 2X
Replace the air filter X
Examine the fuel system X
Clean the cooling fins on the cylinder X
Examine and adjust the clutch wire X
To do a general inspection
• Make sure that all nuts and screws on the product
are tightened correctly.
To clean the product externally
• Use a brush to remove leaves, grass and dirt.
• Make sure that the air intake on the top of the engine
is not blocked.
1If the product is operated with heavy load or in high ambient temperatures, replace the engine oil each 25
hours.
2Clean more often under dusty conditions or when airborne debris is present. Replace air filter, if it is very dirty.
1566 - 008 - 24.11.2021 11

• Do not use a high pressure washer to clean the
product.
• If you use water to clean the product, do not flush
water directly on the engine.
To clean the inner surface of the cutting
cover
1. Empty the fuel tank.
2. Tilt the product. Make sure that the spark plug point
up.
CAUTION: If the product is put with
the air filter down, the engine can
become damaged.
3. Hose down the inner surface of the cutting cover
with water.
To examine the cutting equipment
WARNING: To prevent accidental start
remove the ignition cable from the spark
plug.
WARNING: Use protective gloves
when you do maintenance on the cutting
equipment. The blade is very sharp and cuts
can easily occur.
1. Examine the cutting equipment for damage or
cracks. Always replace a damaged cutting
equipment.
2. Look at the blade to see if it is damaged or blunt.
Note: It is necessary to balance the blade after it is
sharpened. Let a service center sharpen, replace and
balance the blade. If you hit an obstacle that causes the
product to stop, replace the damaged blade. Let the
service center estimate if the blade can be sharpened or
must be replaced.
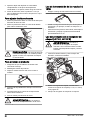
To replace the blade
1. Lock the blade with a block of wood.
2. Remove the blade bolt and spring washer.
3. Remove the blade.
4. Examine the blade support and blade bolt to see if
there are damages.
5. Examine the engine shaft to make sure that it is not
bent.
6. When you attach the new blade, point the angled
ends of the blade in the direction of the cutting cover.
7. Make sure that the blade is aligned with the center of
the engine shaft.
8. Lock the blade with a block of wood. Attach the
spring washer and tighten the bolt and washer with a
torque of 43 – 47 Nm.
9. Pull the blade around by hand and make sure that it
turns freely.
WARNING: Use heavy duty gloves.
The blade is very sharp and cuts can
easily occur.
10. Start the product to do a test of the blade. If the
blade is not correctly attached, there is vibration in
the product or the cutting result is unsatisfactory.
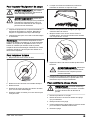
To do a check of the oil level
CAUTION: A too low oil level can do
damage to the engine. Do a check of the oil
level before you start the product.
1. Put the product on level ground.
2. Remove the oil tank cap with the attached dipstick.
3. Clean the oil from the dipstick.
12 1566 - 008 - 24.11.2021

4. Put the dipstick fully into the oil tank to give a correct
picture of the oil level.
5. Remove the dipstick.
6. Examine the oil level on the dipstick.
7. If the oil level is low, fill with engine oil and do a
check of the oil level again.
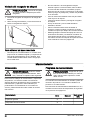
To replace the engine oil
WARNING: Engine oil is very hot
directly after the engine is stopped. Let the
engine become cool before you drain the
engine oil. If you spill engine oil on your skin,
clean with soap and water.
-20 0 30 40 80 100
-30 -20 0 20 30 40
F
C
32
-10 10
60
SAE 10W-30
SAE 5W-30
SAE 30
1. Operate the product until the fuel tank is empty.
2. Remove the ignition cable from the spark plug.
3. Remove the oil tank cap.
4. Put a container below the product to collect the
engine oil in.
5. Tilt the product to drain the engine oil from the oil
tank.
6. Fill with new engine oil of the type recommended in
Technical data on page 16
.
7. Do a check of the oil level. Refer to
To do a check of
the oil level on page 12
.
To examine the spark plug
CAUTION: Always use the
recommended spark plug type. Incorrect
spark plug type can cause damage to the
product.
• Examine the spark plug if the engine is low on
power, is not easy to start or does not operate
correctly at idle speed.
• To decrease the risk of unwanted material on the
spark plug electrodes, obey these instructions:
a) Make sure that the idle speed is correctly
adjusted.
b) Make sure that the fuel mixture is correct.
c) Make sure that the air filter is clean.
• If the spark plug is dirty, clean it and make sure that
the electrode gap is correct, refer to
Technical data
on page 16
.
• Replace the spark plug if it is necessary.
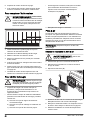
Air filter
A dirty air filter can cause the engine to be damaged or
not operate correctly. Do maintenance on the air filter
more frequently in dusty conditions. Refer to
Maintenance on page 11
for information about when to
replace the air filter.
Note: Always replace a damaged air filter.
To remove and install the air filter
WARNING: Use protective gloves.
1. Push the clips on the air filter cover.
2. Carefully remove the air filter cover (A) from the
engine.
3. Remove the air filter (B).
A
B
4. Examine the air filter for damages. Replace a
damaged air filter.
5. Clean and examine the air filter. Refer to
To clean
the air filter on page 14
.
6. Install in the opposite sequence.
1566 - 008 - 24.11.2021 13

To clean the air filter
A dirty air filter can cause the engine to be damaged or
not operate correctly. Do maintenance on the air cleaner
more frequently in dusty conditions.
See
Maintenance on page 11
for information about
when to replace the air filter.
1. Remove the air filter cover and remove the filter.
2. Clean the filter by hitting it against a flat surface. Do
not use solvent with petroleum, kerosene or
compressed air to clean the filter.
Note: Air filters in operation for a long time cannot
be cleaned fully. Replace the air filter at regular
intervals. Damaged air filters must always be
replaced.
3. When you assemble the air filter, make sure that it
fully seals against the filter holder.
To do a check of the side discharge
deflector
The side discharge deflector is attached to the side
discharge opening of the product. It decreases the risk
of objects to eject in the direction of the mow position of
the operator.
1. Make sure that the side discharge deflector is not
damaged.
2. Examine the side discharge deflector. Make sure
that you do not see defects, such as cracks or
broken springs that push the door to close.
3. Replace the side discharge deflector or the springs if
they are damaged.
To examine the fuel system
• Examine the fuel tank cap and the seal for the fuel
tank cap to make sure that there are no damages.
• Examine the fuel hose to make sure that there are
no leaks. If the fuel hose is damaged, let a service
agent replace it.
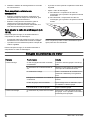
To adjust the clutch wire (LC 151S)
For the situations that follow, it is necessary to decrease
the length of the clutch wire:
• The drive of the wheels does not engage when you
pull the drive bail or the speed control lever.
• The product moves slowly when the drive of the
wheels is engaged.
For the situations that follow, it is necessary to extend
the length of clutch wire:
• The product moves when the drive of the wheels is
not engaged.
• Adjust the clutch wire.
a) To decrease the length of clutch wire, turn the
adjuster screw counterclockwise.
b) To extend the length of the clutch wire, turn the
adjustment screw clockwise.
If the product continues to drive unsatisfactory after the
adjustment, speak to you servicing dealer
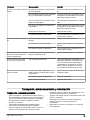
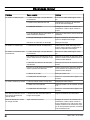
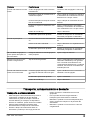
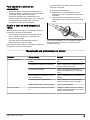
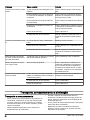
Engine troubleshooting
Problem Possible cause Solution
The engine does not start. The ignition cable is not connected cor-
rectly.
Connect the ignition cable to the spark
plug.
The fuel tank is empty. Fill the fuel tank with correct fuel type.
The fuel is old. Drain the fuel tank and the carburetor.
Refuel with new gasoline.
There is dirt in the carburetor or fuel line. Clean the carburetor and/or fuel line.
The spark plug is defective. Adjust the electrode gap, clean or re-
place the spark plug.
There is fuel on the spark plug. Clean the spark plug.
14 1566 - 008 - 24.11.2021

Problem Possible cause Solution
The engine does not stop. The stop mechanism is defective. Disconnect the ignition cable from the
spark plug. Let an approved service
agent repair the product.
The engine does not operate
smoothly.
The ignition cable is not connected cor-
rectly.
Connect the ignition cable to the spark
plug.
There is dirt in the fuel line or the fuel
has expired.
Clean the fuel line. Fill the fuel tank with
new fuel of the correct type.
There is blockage in the fuel tank cap. Clean the fuel tank cap.
There is water or dirt in the fuel system. Drain the fuel tank. Fill the fuel tank with
new fuel of the correct type.
The air filter is dirty. Clean the air filter.
The carburetor must be adjusted. Let a servicing dealer adjust the carbu-
retor.
The engine becomes too hot. The engine oil level is too low. Fill engine oil.
The air flow is not sufficient. Clean the air filter and the air filter hous-
ing.
The carburetor must be adjusted. Let a servicing dealer adjust the carbu-
retor.
There is misfire in the engine
when it operates at high
speed.
The electrode gap in the spark plug is
too small.
Adjust the electrode gap.
Unusual noises from the en-
gine during normal load.
Incorrect type of gasoline. Drain the fuel tank and the carburetor.
Refuel with new gasoline. Refer to
To fill
fuel on page 8
. If the problem continues
speak to your local service dealer.
The engine does not operate
smoothly at idle speed.
The spark plug is dirty, defective or the
electrode gap is too wide.
Adjust the electrode gap or replace the
spark plug.
The carburetor must be adjusted. Adjust the carburetor.
The air filter is dirty. Clean the air filter.
Transportation, storage and disposal
Transportation and storage
• For storage and transportation of the product and
fuel, make sure that there are no leaks or fumes.
Sparks or open flames, for example from electrical
devices or boilers, can start a fire.
• Always use approved containers for storage and
transportation of fuel.
• Empty the fuel tank before you put the product in
storage for a long period of time. Discard the fuel at
an applicable disposal location
• Safely attach the product during transportation to
prevent damage and accidents.
• Keep the product in a locked area to prevent access
for children or persons that are not approved.
• Keep the product in a dry and frost free area.
Disposal
• Obey the local recycling requirements and applicable
regulations.
• Discard all chemicals, such as engine oil or fuel, at a
service center or at an applicable disposal location.
• When the product is no longer in use, send it to a
Husqvarna dealer or discard it at a recycling
location.
1566 - 008 - 24.11.2021 15

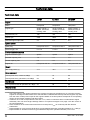
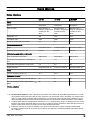
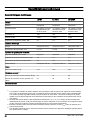
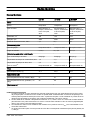
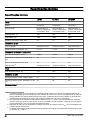
Technical data
Technical data
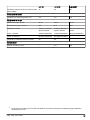
LC 151 LC 151S LB 256SP
Engine
Brand Husqvarna Husqvarna Husqvarna
Engine type Single cylinder, 4-
Stroke, Forced Air
Cooling, OHV
Single cylinder, 4-
Stroke, Forced Air
Cooling, OHV
Single cylinder, 4-
Stroke, Forced Air
Cooling, OHV
Displacement, cm3166 166 166
Speed, rpm 2800 2800 2800
Nominal engine output, kW32.7 2.7 2.7
Ignition system
Spark plug Husqvarna HQT–7 Husqvarna HQT–7 Husqvarna HQT–7
Electrode gap, mm 0.7–0.8 0.7–0.8 0.7–0.8
Fuel and lubrication system
Engine lubrication type Splash Splash Splash
Fuel tank capacity, litre 1.0 1.0 1.0
Oil tank capacity, litre 0.5 0.5 0.5
Engine oil4Husqvarna SAE 30 Husqvarna SAE 30 HusqvarnaSAE 30
Weight
With empty tanks, kg 31.1 32.6 33.1
Noise emissions5
Sound power level, measured, dB(A) 97 97 98
Sound power level, guaranteed, LWA dB(A) 98 98 98
Sound levels6
Sound pressure level at operators ear, dB(A) 85 85 88
Vibration levels7
3The power rating of the engine indicated is the average net output (at specified rpm) of a typical production
engine for the engine model measured to SAE standard J1349/ISO1585. Mass production engines may differ
from this value. Actual power output for the engine installed on the final product will depend on the operating
speed, environmental conditions and other values.
4If SAE-30 oil is used at temperatures lower than +5 °C, there is a risk that it does not lubricate the engine
sufficiently. This can cause engine damage. Refer to
To replace the engine oil on page 13
for the correct oil
for low temperatures.
5Noise emissions in the environment measured as sound power (LWA) in conformity with EC directive
2000/14/EC.
6Reported data for noise pressure level has a typical statistical dispersion (standard deviation) of 1.2 dB (A).
7Reported data for vibration level has a typical statistical dispersion (standard deviation) of 0.2 m/s2.
16 1566 - 008 - 24.11.2021

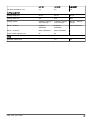
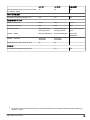
LC 151 LC 151S LB 256SP
Vibrations handlebar, m/s28.5 8.5 7.5
Cutting equipment
Cutting height, mm 25–75 25–75 25–75
Cutting width, mm 510 510 560
Cutting system Collection / BioClip® /
Side discharge
Collection / BioClip® /
Side discharge
BioClip® / Side dis-
charge
Blade - standard Collection
598562601
Collection
598562601
Mulch 598563601
Blade - Accessory Mulch 597683901 Mulch 597683901 –
Grass catcher capacity, liter 65 65 –
Drive
Self walk speed, km/h – 3.6 3.6
1566 - 008 - 24.11.2021 17

EC Declaration of Conformity
EC Declaration of Conformity
Husqvarna AB, SE-561 82 Huskvarna, Sweden, tel:
+46-36-146500, declares that the lawn mower
Husqvarna LC 151, LC 151S, LB 256SP from the year
2020 and onwards, complies with the requirements of
the COUNCIL’S DIRECTIVE:
• of June 8, 2011 on the “restriction of use of certain
hazardous substances” 2011/65/EU
• of May 17, 2006 ”relating to machinery” 2006/42/EC
• of February 26, 2014 ”relating to electromagnetic
compatibility” 2014/30/EU
• of May 8, 2000 ”relating to the noise emissions in the
environment” 2000/14/EC
Information relating to noise emissions, see Technical
data.
The following standards have been applied:
EN ISO 5395-1:2013, EN ISO 5395-1:2013/A1, EN ISO
5395-2:2013, EN ISO 5395-2:2013/A1:2016, EN ISO
5395-2:2013/A2:2017, EN ISO 14982:2009
If not otherwise stated, the above listed standards are
the latest published versions.
Notified body: 0404, RISE SMP Svensk Maskinprovning
AB, Box 7035, SE-750 07 Uppsala, Sweden has
performed conformity assessment according to Annex
VI of directive 2000/14/EC.
Huskvarna, 2021-11-30
Claes Losdal, Development Manager/Garden Products
(Authorized representative for Husqvarna AB and
responsible for technical documentation)
18 1566 - 008 - 24.11.2021

Contenido
Introducción.................................................................. 19
Seguridad..................................................................... 20
Montaje......................................................................... 23
Funcionamiento............................................................ 25
Mantenimiento.............................................................. 28
Resolución de problemas del motor............................. 32
Transporte, almacenamiento y eliminación.................. 33
Datos técnicos.............................................................. 35
Declaración de conformidad CE................................... 37
Introducción
Descripción del producto
El producto es un cortacésped giratorio conducido a pie.
Para LC 151, LC 151S, fije un recogedor de césped
para recoger la hierba. Monte el deflector de descarga
lateral para realizar una descarga lateral de la hierba.
Para LC 151, LC 151S, fije un kit de trituración para
cortar la hierba y utilizarla como abono.
Uso previsto
Utilice el producto para cortar hierba. No utilice el
producto para otras tareas.
Símbolos que aparecen en el producto
¡ADVERTENCIA! Tenga cuidado y utilice
el producto correctamente. Este producto
puede ocasionar lesiones graves o
mortales tanto al operador como a
cualquier otra persona.
Lea detenidamente el manual de usuario
y asegúrese de que entiende las
instrucciones antes de usar la máquina.
Tenga cuidado con los objetos lanzados o
rebotados.
Mantenga a las personas y animales a
una distancia de seguridad respecto a la
zona de trabajo.
Advertencia: Mantenga alejados las
manos y los pies de la cuchilla giratoria.
Advertencia: Mantenga alejados las
manos y los pies de las piezas giratorias.
Detenga el motor y quite el cable de
encendido antes de realizar tareas de
mantenimiento o reparación.
Este producto cumple con las directivas
CE vigentes.
Las emisiones sonoras en el entorno
según la directiva de la Comunidad
Europea. Las emisiones del producto se
indican en el capítulo «Datos técnicos» y
en la etiqueta.
Riesgo de incendio.
No inhale los gases de escape. Los gases
de escape del motor contienen monóxido
de carbono, que es un gas inodoro, tóxico
y muy peligroso. No arranque el motor en
interiores ni en espacios cerrados.
Superficie caliente.
Llene el motor de aceite an-
tes de arrancar el producto.
Nota: Los demás símbolos/etiquetas que aparecen en
el producto corresponden a requisitos de homologación
específicos de algunas zonas comerciales.
Responsabilidad sobre el producto
Como se estipula en las leyes de responsabilidad del
producto, no nos hacemos responsables de los daños y
perjuicios causados por nuestro producto si:
• El producto se ha reparado incorrectamente.
1566 - 008 - 24.11.2021 19

• El producto se ha reparado con piezas que no eran
del fabricante o no autorizadas por el fabricante.
• El producto tiene un accesorio que no es del
fabricante o no está autorizado por este.
• El producto no se ha reparado en un centro de
servicio autorizado o por un organismo homologado.
Seguridad
Definiciones de seguridad
Las advertencias, precauciones y notas se utilizan para
destacar información especialmente importante del
manual.
ADVERTENCIA: Indica un riesgo de
lesiones o incluso de muerte del usuario o
de las personas cercanas si no se respetan
las instrucciones del manual.
PRECAUCIÓN: Indica un riesgo de
daños en el producto, otros materiales o el
área adyacente si no se respetan las
instrucciones del manual.
Nota: Se usa para proporcionar más información
necesaria en una situación determinada.
Instrucciones generales de seguridad
ADVERTENCIA: Lea las siguientes
instrucciones de advertencia antes de
utilizar el producto.
• Este producto es una herramienta peligrosa si se
usa incorrectamente o si no se tiene cuidado. Puede
causar lesiones graves o incluso la muerte si no
siguen las instrucciones de seguridad.
• Este producto genera un campo electromagnético
durante el funcionamiento. Este campo magnético
puede, en determinadas circunstancias, interferir
con implantes médicos activos o pasivos. Para
reducir el riesgo de que se den condiciones que
provocarían lesiones graves o letales, las personas
que utilizan implantes médicos deben consultar con
su médico y con el fabricante del implante antes de
poner en marcha este producto.
• Proceda siempre con cuidado y utilice siempre el
sentido común. Si no está seguro de cómo manejar
el producto en una situación especial, pare y
consulte con su distribuidor Husqvarna antes de
continuar.
• Debe tenerse en cuenta que el operador será
responsable de los accidentes que involucren a
otras personas o a su propiedad.
• Mantenga el producto limpio. Asegúrese de que
puede leer claramente las etiquetas.
• No permita que nadie utilice el producto a menos
que se asegure de que haya leído y comprendido el
contenido del manual de usuario.
• No deje que un niño maneje el producto.
• Mantenga a los niños alejados de la zona de trabajo.
Debe haber presente en todo momento una persona
mayor de edad responsable.
• No permita que nadie maneje el producto sin
conocer las instrucciones.
• Si una persona con discapacidad física o mental usa
el producto, asegúrese de supervisarla en todo
momento. Debe haber presente en todo momento
una persona mayor de edad responsable.
• No utilice el producto si está cansado, enfermo o si
se encuentra bajo los efectos de alcohol, drogas o
medicamentos. Esto tiene un efecto negativo en su
visión, vigilancia, coordinación y capacidad de
decisión.
• No utilice el producto si está defectuoso.
• No modifique este producto ni lo utilice si puede
haber sido modificado por otras personas.
• No cambie el ajuste del régimen del motor.
Seguridad en el área de trabajo
ADVERTENCIA: Lea las siguientes
instrucciones de advertencia antes de
utilizar el producto.
• Retire objetos tales como ramas, palos y piedras de
la zona de trabajo antes de usar el producto.
• Los objetos que chocan contra el equipo de corte
pueden salir despedidos y causar daños a personas
y objetos. Mantenga a las personas y los animales a
una distancia de seguridad respecto al producto.
• No utilice el producto en condiciones climáticas
desfavorables, como niebla, lluvia, viento fuerte, frío
intenso y riesgo de relámpagos. El uso del producto
en condiciones climáticas desfavorables o en
entornos húmedos o mojados produce mucho
cansancio. El mal tiempo puede causar condiciones
peligrosas, como superficies resbaladizas.
• Preste atención a las personas, objetos y
situaciones que puedan impedir el funcionamiento
seguro del producto.
• Tenga cuidado con los posibles obstáculos, como
raíces, piedras, ramas, hoyos y zanjas. El césped
crecido puede esconder obstáculos.
• Cortar el césped en pendientes puede resultar
peligroso. No utilice el producto en pendientes de
más de 15°.
20 1566 - 008 - 24.11.2021
A página está carregando ...
A página está carregando ...
A página está carregando ...
A página está carregando ...
A página está carregando ...
A página está carregando ...
A página está carregando ...
A página está carregando ...
A página está carregando ...
A página está carregando ...
A página está carregando ...
A página está carregando ...
A página está carregando ...
A página está carregando ...
A página está carregando ...
A página está carregando ...
A página está carregando ...
A página está carregando ...
A página está carregando ...
A página está carregando ...
A página está carregando ...
A página está carregando ...
A página está carregando ...
A página está carregando ...
A página está carregando ...
A página está carregando ...
A página está carregando ...
A página está carregando ...
A página está carregando ...
A página está carregando ...
A página está carregando ...
A página está carregando ...
A página está carregando ...
A página está carregando ...
A página está carregando ...
A página está carregando ...
A página está carregando ...
A página está carregando ...
A página está carregando ...
A página está carregando ...
A página está carregando ...
A página está carregando ...
A página está carregando ...
A página está carregando ...
A página está carregando ...
A página está carregando ...
A página está carregando ...
A página está carregando ...
A página está carregando ...
A página está carregando ...
A página está carregando ...
A página está carregando ...
A página está carregando ...
A página está carregando ...
A página está carregando ...
A página está carregando ...
A página está carregando ...
A página está carregando ...
A página está carregando ...
A página está carregando ...
A página está carregando ...
A página está carregando ...
A página está carregando ...
A página está carregando ...
A página está carregando ...
A página está carregando ...
A página está carregando ...
A página está carregando ...
A página está carregando ...
A página está carregando ...
A página está carregando ...
A página está carregando ...
A página está carregando ...
A página está carregando ...
A página está carregando ...
A página está carregando ...
-
 1
1
-
 2
2
-
 3
3
-
 4
4
-
 5
5
-
 6
6
-
 7
7
-
 8
8
-
 9
9
-
 10
10
-
 11
11
-
 12
12
-
 13
13
-
 14
14
-
 15
15
-
 16
16
-
 17
17
-
 18
18
-
 19
19
-
 20
20
-
 21
21
-
 22
22
-
 23
23
-
 24
24
-
 25
25
-
 26
26
-
 27
27
-
 28
28
-
 29
29
-
 30
30
-
 31
31
-
 32
32
-
 33
33
-
 34
34
-
 35
35
-
 36
36
-
 37
37
-
 38
38
-
 39
39
-
 40
40
-
 41
41
-
 42
42
-
 43
43
-
 44
44
-
 45
45
-
 46
46
-
 47
47
-
 48
48
-
 49
49
-
 50
50
-
 51
51
-
 52
52
-
 53
53
-
 54
54
-
 55
55
-
 56
56
-
 57
57
-
 58
58
-
 59
59
-
 60
60
-
 61
61
-
 62
62
-
 63
63
-
 64
64
-
 65
65
-
 66
66
-
 67
67
-
 68
68
-
 69
69
-
 70
70
-
 71
71
-
 72
72
-
 73
73
-
 74
74
-
 75
75
-
 76
76
-
 77
77
-
 78
78
-
 79
79
-
 80
80
-
 81
81
-
 82
82
-
 83
83
-
 84
84
-
 85
85
-
 86
86
-
 87
87
-
 88
88
-
 89
89
-
 90
90
-
 91
91
-
 92
92
-
 93
93
-
 94
94
-
 95
95
-
 96
96


Husqvarna LC 151 Manual do usuário
- Categoria
- Cortadores de grama
- Tipo
- Manual do usuário
em outros idiomas
- español: Husqvarna LC 151 Manual de usuario
- français: Husqvarna LC 151 Manuel utilisateur
