
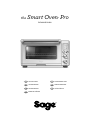
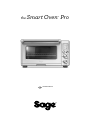
the Smart Oven® Pro
BOV820/SOV820
EN QUICK GUIDE DE KURZANLEITUNG
FR GUIDE RAPIDE NL SNELSTARTGIDS
ES GUÍA RÁPIDA
IT GUIDA RAPIDA
PT MANUAL RÁPIDO

2
IMPORTANT
SAFEGUARDS
READ ALL INSTRUCTIONS
BEFORE USE AND SAVE
FOR FUTURE REFERENCE
• The full information
book is available at
sageappliances.com
• Before using for the rst
time please ensure that your
electricity supply is the same
as shown on the rating label on
the underside of the appliance.
• Remove and safely discard
any packing materials and
promotional labels before using
the oven for the rst time.
• To avoid choking hazard for
young children, remove and
safely dispose the protective
cover tted on the power plug.
• Do not use the appliance near
the edge of a benchtop or table.
Ensure the surface is stable,
level, heat-resistant and clean.
• A re may occur if the oven is
covered or touches ammable
material, including curtains,
draperies, walls, and the like,
when in operation.
• Do not use the appliance on
(or close to) a hot gas or electric
burner, or where it could touch
a heated oven or surface.
• Do not let the power cord hang
over the edge of a table or
counter, or touch hot surfaces.
Contents
2 Sage® Recommends Safety First
6 Components
7 Quick Start Guide
8 Functions
10 Care & Cleaning
11 Troubleshooting
13 Guarantee
SAGE®
RECOMMENDS
SAFETY FIRST
At Sage® we are very safety
conscious. We design and
manufacture consumer
products with the safety of
you, our valued customer,
foremost in mind. In addition
we ask that you exercise a
degree of care when using
any electrical appliance
and adhere to the following
precautions.

3
EN
• When operating the oven, keep
a minimum distance of 10cm
of space on both sides of the
appliance and 15cm above.
• The temperature of accessible
surfaces may be high when the
appliance is operating.
• Do not touch hot surfaces.
To avoid burns, use extreme
caution when removing pans,
dishes and accessories such
as the included grilling rack and
roasting pan, that contain hot
oil or other hot liquids.
• Do not lay cooking utensils,
roasting pans or dishes on the
glass door.
• Do not leave the door standing
open for extended periods
of time.
• Do not store any item on top
of the oven when in operation
except those described on
page 8 of this book.
• Do not place cardboard, plastic,
paper, or other ammable
materials in the oven.
• Do not cover crumb tray or any
part of the oven with metal foil.
This will cause overheating
of the oven.
• Caution should be exercised
when using pans and dishes
constructed of materials other
than metal. Ensure pans and
dishes are oven safe before
using in the oven.
• Caution should be exercised
when using lids in the oven, as
pressure build up in a covered
pan or dish may cause hot
ingredients to expel or the dish
to crack. Do not place sealed
or airtight containers in the oven.
• Oversized food and metal
utensils must not be inserted
in the oven as they may create
re or risk of electric shock.
• The use of accessories and
attachments not recommended
or supplied with this oven may
cause injuries.
• This appliance is for household
use only. Do not use in any type
of moving vehicles. Do not use
the appliance outdoors, or for
anything other than its intended
use. Misuse can cause injury.
• If the appliance is to be: left
unattended, cleaned, moved,
assembled or stored, always
switch the unit o and unplug
the cord from the power outlet
and allow to cool completely.
• Do not clean with metal
scouring pads. Pieces can
break o the pad and touch
electrical parts, creating a risk
of electric shock.

4
• The appliance can be used
by children aged from 8 years
and above and persons with
reduced physical, sensory
or mental capabilities, or lack
of experience and knowledge,
if they have been given
supervision or instruction
concerning use of the appliance
in a safe way and understand
the hazards involved.
• Children shall not play with
the appliance.
• Cleaning and user maintenance
shall not be made by children
unless they are older than
8 and supervised.
• Keep the appliance and its cord
out of reach of children less
than 8 years.
• It is recommended to regularly
inspect the appliance. Do not
use the appliance if power
cord, power plug or appliance
becomes damaged in any way.
If damaged or maintenance
other than cleaning is
required, please contact Sage
Customer Service or go to
sageappliances.com
• The appliance is not intended
to be operated by means
of external timer or separate
remote control system.
SPECIFIC INSTRUCTIONS
FOR SOV820
• We recommend the oven
is operated on a dedicated
circuit separated from other
appliances. Consult a licensed
and qualied electrician if you
are unsure.
• To turn o the oven, press the
START/CANCEL button on
the control panel. The oven is
o when the button backlights
turns o.
• Regularly clean the crumb tray.
To clean the crumb tray:
−Turn OFF the oven,
−Allow the oven to cool
completely and then remove
the power cord from the power
outlet.
−Remove the crumb tray and
clean with warm soapy water.
−Dry the tray completely before
inserting it securely back
in place.

5
EN
WARNING
TO REDUCE THE RISK OF
FIRE, ELECTRIC SHOCK,
EXPOSURE TO EXCESSIVE
UV RADIATION, OR INJURY
TO PERSONS:
• Always unplug the oven and
let all parts (including the bulb
housing, glass cover and
enclosure) cool completely
before replacing bulb.
• Only use a 25 Watt, 220–240V,
G9 type oven bulb.
• Always use a soft cloth when
handling the bulb and do not
directly touch the surface as oil
from your skin can damage
the bulb.
• Do not look directly at
a glowing bulb.
• Do not remain in the light if skin
feels warm.
• Keep bulb away from materials
that may burn.
• The bulb gets hot quickly.
Only ever use the light button
to turn on the light.
• Do not operate the light if the
bulb housing, glass cover,
UV lter or enclosure are
missing or damaged.
The symbol shown
indicates that this appliance
should not be disposed
of in normal household waste.
It should be taken to a local
authority waste collection centre
designated for this purpose or
to a dealer providing this service.
For more information, please
contact your local council oce.
This symbol indicates,
temperature of accessible
surfaces may be high when
the appliance is operating
and for some time after use.
To avoid electric shock,
do not immerse the cord
or plug in water (or other liquids).
SAVE THESE INSTRUCTIONS

6
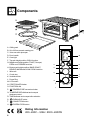
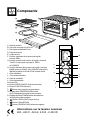
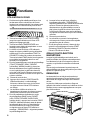
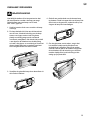
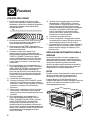
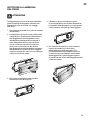
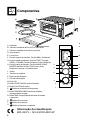
A. Grilling rack
B. 28 x 33.5cm enamel roasting pan
C. 30cm non-stick pizza pan
D. Door handle
E. Oven light
F. Top rack height position: GRILL function.
G. Middle rack height position: TOAST, Crumpet,
PIZZA and COOKIES functions.
H. Bottom rack height position: BAKE, ROAST,
REHEAT, WARM and SLOW COOK functions.
I. Wire rack
J. Crumb tray
K. Ventilation slots
L. Power Plug
M. LCD screen
N. START/CANCEL button
O. FUNCTION dial
P. TEMPERATURE conversion button
Q. TEMPERATURE dial/toast and crumpet
darkness control
R. TIME dial/toast and crumpet slice selection
S. OVEN LIGHT button
T. CONVECTION button
U. FROZEN FOOD button
M
N
S
T
U
O
P
Q
R
Rating Information
220–240V ~ 50Hz 2000–2400W
Components

7
EN
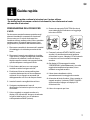
Quick Start Guide
This Quick Guide is designed for rst time use.
For safety and more information, refer to rest of the Instruction Booklet.
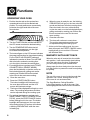
PREPARING THE OVEN
In order to remove any protective substances
on the heating elements, it is necessary to run
the oven empty for 15 minutes. Ensure the area
is well ventilated as the oven may emit vapours.
These vapours are safe and are not detrimental
to the performance of the oven.
1. Remove and safely discard any packing
material, promotional labels and tape from
the oven.
2. Remove the crumb tray, wire rack, grilling rack,
roasting pan and pizza pan from the polyfoam
packaging. Wash them with a soft sponge in
warm, soapy water then rinse and dry thoroughly.
3. Wipe the interior of the oven with a soft,
damp sponge. Dry thoroughly.
4. Place the oven on a at, dry surface. Ensure
there is a minimum distance of 10cm of space
on both sides of the appliance and 15cm above.
5. Insert the crumb tray into the oven.
6. Unwind the power cord completely and insert
the power plug in to a grounded power outlet.
7. The oven alert will sound and the LCD screen
will illuminate. The function options will appear
with an indicator on the BAKE setting.
8. Turn the FUNCTION dial to the right until the
indicator reaches the PIZZA function.
9. Press the START/CANCEL button. The button
backlight will illuminate red, the LCD screen will
illuminate orange and the oven alert will sound.
10. The LCD screen will indicate a blinking
‘PREHEATING.’ Once the oven has reached the
set temperature, the temperature alert will sound.
11. The timer will be displayed and automatically
begin to count down.
12. At the end of the cooking cycle, the oven
alert will sound, the START/ CANCEL button
backlight will go out and the LCD screen
will illuminate blue.
13. The oven is now ready to use.

8
Functions
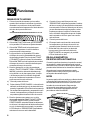
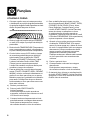
OPERATING YOUR OVEN
1. Position the wire rack so the spokes face
upward and insert it into the desired rack
position. The rack positions are conveniently
printed on the right-hand side of the oven
door window.
2. Turn the FUNCTION dial until the indicator on
the LCD screen reaches the desired setting.
3. Turn the TEMPERATURE dial to the left
to reduce the temperature or to the right
to increase the temperature.
4. The bottom gure on the LCD screen indicates
the preset cooking time for the selected setting.
For the TOAST and CRUMPET settings it
indicates the number of slices. Turn the TIME
dial to the left to reduce the cooking time
or to the right to increase the cooking time.
5. For settings without a preheat cycle (TOAST,
CRUMPET, GRILL, REHEAT, WARM),
place the food directly on the wire rack or on
the included pizza pan, grilling rack and/or
roasting pan. Ensure the food is centred
in the oven for the most even cooking.
a) Close the oven door.
b) Press the START/CANCEL button.
The button backlight will illuminate red,
the oven alert will sound, and the LCD
screen will illuminate orange.
c) The timer will be displayed and begin to count
down. The cooking temperature and time
can be adjusted during the cooking cycle.
6. For settings that feature a preheat cycle
(BAKE, ROAST, PIZZA, COOKIES, SLOW
COOK), press the START/CANCEL button
before placing food in the oven. The button
backlight will illuminate red, the oven alert
will sound and the LCD screen will indicate
a blinking ‘PREHEATING’ while the oven
is heating up.
a) When the oven is ready for use, the blinking
‘PREHEATING’ will go out, the oven alert will
sound and the timer will start counting down.
Place the food in the oven, either directly
on the wire rack or on the included pizza pan,
grilling rack and/or roasting pan. Ensure the
food is centred in the oven for the most
even cooking.
b) Close the oven door.
c) The timer will continue to count down.
The cooking temperature and time can
be adjusted during the cooking cycle.
7. At the end of the cooking cycle, the oven
alert will sound, the START/ CANCEL button
backlight will go out and the LCD screen
will illuminate blue.
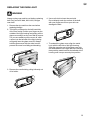
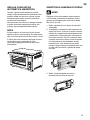
MAGNETIC AUTOEJECT RACK
When the wire rack is inserted into the middle
rack position, it will automatically eject halfway
out of the oven when the door is opened so
you can easily remove your toasted items.
Always open the door slowly when the wire rack
is in this position to prevent the rack from ejecting
too quickly.
NOTE
The top of the oven is very hot during and after
operation. As a result, storing items on top
of the oven is not recommended.
The Sage Bamboo Cutting Board ts
in the ribbed section on top of the oven. Visit
www.sageappliances.com for more information.

9
EN
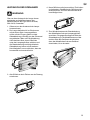
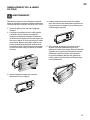
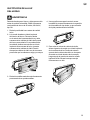
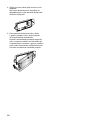
Always unplug oven and let cool before replacing
bulb. Only use a 25-Watt, 220–240V, G9 type
oven bulb.
1. Remove the wire rack from the oven before
replacing the light.
2. The light is positioned on the left-hand side
of the oven cavity. Position your ngers on the
outside of the light housing and gently pull the
glass cover away from the oven wall to remove
it. If you are unable to pull the cover o, slide
a spoon into the left side of the light housing
and gently lever the glass cover o. Always
hold the glass cover with the other hand to
prevent the cover from falling and breaking.
3. Remove the used bulb by pulling it directly out
of its holder.
4. Use a soft cloth to insert the new bulb.
Do not directly touch the surface of the bulb
with your ngers as oil from your skin can
damage the bulb.
1. To reattach the glass cover, align the metal
hook with the left side of the light housing.
Slide the opposite end of the glass cover into
the metal bracket on the right side of the housing,
then push the metal hook into the left side of the
housing until it snaps securely into position.
REPLACING THE OVEN LIGHT
WARNING

10
Before cleaning, ensure the oven is turned o by
pressing the START/CANCEL button on the control
panel. The oven is o when the button backlight is
no longer illuminated.
Remove the power plug from the power outlet.
Allow the oven and all accessories to cool
completely before disassembling and cleaning.
CLEANING THE OUTER BODY
AND DOOR
1. Wipe the outer body with a soft, damp sponge.
A non-abrasive liquid cleanser or mild spray
solution may be used to avoid build-up of stains.
Apply the cleanser to the sponge, not the oven
surface, before cleaning.
2. To clean the glass door, use a glass cleaner
or mild detergent and a soft, damp sponge or
soft plastic scouring pad. Do not use an abrasive
cleanser or metal scouring pad as these will
scratch the oven surface.
3. Wipe the LCD screen with a soft damp cloth.
Apply cleanser to the cloth and not the LCD
surface. Cleaning with dry cloth or abrasive
cleaners may scratch the surface.
4. Let all surfaces dry thoroughly prior to inserting
the power plug into a power outlet and turning
the oven on.
CLEANING THE INTERIOR
The walls on the inside of the oven feature a
non-stick coating for easy cleaning. To clean any
spattering that may occur while cooking, wipe the
walls with a soft, damp sponge. A non-abrasive
liquid cleanser or mild spray solution may be used
to avoid build-up of stains. Apply the cleanser to
the sponge, not the oven surface, before cleaning.
Avoid touching the quartz heating elements.
WARNING
Use extreme caution when cleaning the quartz
heating elements. Allow the oven to cool completely,
then gently rub a soft, damp sponge or cloth along
the length of the heating element.
Do not use any type of cleanser or cleaning agents.
Do not use any standard oven cleaner to clean the
interior of the oven as this will deteriorate the metal
surface.
Let all surfaces dry thoroughly prior to inserting
the power plug into a power outlet and turning the
oven ON.
CLEANING THE CRUMB TRAY
1. After each use, slide out the crumb tray
and discard crumbs. Wipe the tray with a soft,
damp sponge. A non-abrasive liquid cleanser
may be used to avoid build-up of stains.
Apply the cleanser to the sponge, not the tray,
before cleaning. Dry thoroughly.
2. To remove baked-on grease, soak the tray
in warm soapy water then wash with a soft
sponge or soft plastic scouring pad.
Rinse and dry thoroughly.
3. Always ensure to re-insert the crumb tray into
the oven after cleaning and prior to inserting
the power plug into a power outlet and turning
the oven on.
CLEANING THE WIRE RACK,
GRILLING RACK, ROASTING PAN
AND PIZZA PAN
1. Wash all accessories in warm soapy water
with a soft sponge or soft plastic scouring pad.
Rinse and dry thoroughly. Do not use abrasive
cleansers, metal scouring pads or metal utensils
to clean any of the accessories as they may
damage the surfaces.
2. To extend the life of your accessories,
we do not recommend that these be placed
in the dishwasher.
STORAGE
1. Ensure the oven is turned o by pressing the
START/CANCEL button on the control panel.
The oven is o when the button backlight
is no longer illuminated.
2. Remove the power plug from the power outlet.
Allow the oven and all accessories to cool
completely before disassembling and cleaning
3. Ensure the oven and all accessories are clean
and dry.
4. Ensure the crumb tray is inserted into the oven;
the grilling rack is inserted into the roasting pan
and resting on the wire rack in the middle rack
height position.
5. Ensure the door is closed.
6. Store the appliance in an upright position
standing level on its support legs. Do not
store anything on top. The only exception
is the optional Sage Bamboo Cutting Board
and Serving Tray.
Care & Cleaning

11
EN
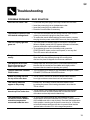
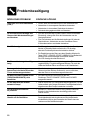
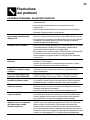
POSSIBLE PROBLEM EASY SOLUTION
Oven will not switch “ON.” • Check that the power plug is securely inserted into the outlet.
• Insert the power plug into an independent outlet.
• Insert the power plug into a dierent outlet.
• Reset the circuit breaker if necessary.
I would like to have the oven
LCD default settings back. • The oven will remember the last setting used for each function
unless you remove the plug from the power outlet.
• To restore the oven’s default settings for each function, remove
the plug from the power outlet. Wait 5 seconds, then plug back in.
The LCD display light has
gone out. • The oven goes into standby mode if not used for 10 minutes.
When in standby mode, the LCD screen will cease to illuminate,
however all function options will still be visible.
• To re-activate the oven out of standby mode, press the
START/CANCEL button on the control panel, or turn any dial.
The LCD screen will re-illuminate.
The pizza does not cook
evenly. • Some large pizzas may brown unevenly in compact ovens.
Open the oven door half way through the cooking time
and turn the pizza 90 degrees for more even darkness.
The Magnetic Auto-Rack
Eject comes out too far
when I open the door.
• Always open the door slowly and in a controlled manner when
the wire rack is inserted into the middle rack height position
to prevent the wire rack from ejecting too quickly.
I cannot select the FROZEN
FOOD button. • The FROZEN FOOD button is only selectable during the TOAST,
CRUMPET, PIZZA and COOKIES functions.
Steam is coming out from
the top of the oven door. • This is normal. The door is vented to release steam created
from high-moisture content food such as frozen breads.
The heating elements
appear to be pulsing. • Element IQ™ accurately controls the heat inside the oven
by pulsing the power in the heating elements in short bursts.
This is normal.
Water is dripping onto the
bench top from under door. • This is normal. The condensation created from high moisture
content food such as frozen breads will run down the inside
of the door and can drip onto the bench top.
The temperature reading
on the LCD screen doesn’t
match the temperature
measured inside the oven.
• To ensure the measurements are standardized, the oven
temperatures have been calibrated in the TOAST position (centre
of the middle rack with no tray in place). Re-check the temperature
in this position, ensuring not to open the oven door for 10 minutes
as heat will escape each time the door is opened. Note that the
‘preheat’ alert sounds at 75% of the target temperature.
Troubleshooting

12
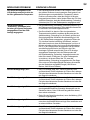
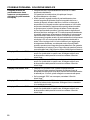
POSSIBLE PROBLEM EASY SOLUTION
The ‘preheat’ alert sounds
at a lower temperature than
what is displayed on the
LCD screen.
• The ‘preheat’ alert sounds at 75% of the target temperature.
This provides the fastest, combined preheating and cooking time.
• This is because when the ‘preheating’ alert sounds, signalling
the user to open the oven door and insert food, there is dramatic
temperature loss inside the oven. If the alert sounded at 100%
of the target temperature, opening the door would mean a lot of
this waiting time is “wasted.” We have calculated that by sounding
the alert at 75% of the target temperature, followed by the oven
door being opened to place food inside the oven, that we still
recover to the target temperature up to 2 minutes faster. This
is why the temperature on the LCD screen does not match the
target temperature at the ‘preheat’ alert. In total, it takes the oven
approximately 8–10 minutes from start-up, including opening the
oven door when the ‘preheat’ alert sounds, to reach the target
temperature. To ensure the fastest heat up time, the Sage oven uses
the maximum allowable power from the outlet (1500W for baking,
2400W for toasting).
The LCD screen displays
‘E01.’ • The LCD screen will display ‘E01’ when there is a non-resettable
issue with the appliance. Should this occur, immediately remove the
power cord from the power outlet and call Sage Customer Service.
The LCD screen displays
‘E02.’ • The LCD screen will display ‘E02’ when there is a non-resettable
issue with the appliance. Should this occur, immediately remove the
power cord from the power outlet and call Sage Customer Service.
The LCD screen displays
‘E03.’ • The LCD screen will display ‘E03’ if the oven temperature is above
the set maximum limit. Remove the plug from the power outlet,
allow the oven to cool for 15 minutes, then plug back in.
• Call Sage Customer Service if the ‘E03’ message continues.
The LCD screen displays
‘E04.’ • The LCD screen will display ‘E04’ if the room temperature is below
the set minimum. Unplug the oven and relocate to a warmer area.
The LCD screen displays
‘E05.’ • The LCD screen will display ‘E05’ when there is a non-resettable
issue with the appliance. Should this occur, immediately remove the
power cord from the power outlet and call Sage Customer Service.

13
EN
2 YEAR LIMITED GUARANTEE
Sage Appliances guarantees this product
for domestic use in specied territories for
2 years from the date of purchase against
defects caused by faulty workmanship and
materials. During this guarantee period Sage
Appliances will repair, replace, or refund any
defective product (at the sole discretion of
Sage Appliances).
All legal warranty rights under applicable
national legislation will be respected and will
not be impaired by our guarantee. For full terms
and conditions on the guarantee, as well as
instructions on how to make a claim, please visit
www.sageappliances.com.
Guarantee

14
Note

the Smart OvenTM Pro
DE KURZANLEITUNG

2
WICHTIGE
SICHERHEITS
HINWEISE
BITTE ALLE ANWEISUNGEN
VOR DEM GEBRAUCH LESEN
UND ZUR SPÄTEREN BEZUG
NAHME AUFBEWAHREN.
• Die komplette
Informationsbroschüre ist unter
sageappliances.com verfügbar.
• Vor dem ersten Gebrauch
prüfen, dass Ihre Netzspannung
mit der auf dem Etikett an
der Unterseite des Geräts
übereinstimmt.
• Vor dem ersten
Gebrauch des Ofens alle
Verpackungsmaterialien und
Werbeaufkleber abnehmen und
sicher entsorgen.
• Schutzhülle am Netzstecker
abnehmen und sicher
entsorgen, da sie für Kleinkinder
eine Erstickungsgefahr
darstellen könnte.
• Gerät nicht an der Kante Ihrer
Arbeitsplatte oder Ihres Tisches
verwenden. Nur auf stabile,
ebene, hitzebeständige und
saubere Oberächen stellen.
• Es besteht Brandgefahr,
wenn der Ofen während des
Gebrauchs mit entammbaren
Materialien abgedeckt wird oder
diese berührt, z. B. Vorhänge,
Gardinen oder Wände.
• Gerät nicht auf oder neben
eine heiße Gas- oder
Inhalt
2 Sage® Empehlt: Sicherheit Geht Vor
6 Komponenten
7 Kurzanleitung
8 Funktionen
10 Reinigung und Pege
12 Problembeseitigung
14 Garantie
SAGE® EMPFIEHLT:
SICHERHEIT
GEHT VOR
Wir bei Sage® sind sehr
sicherheitsbewusst.
Beim Design und bei der
Herstellung unserer Geräte
denken wir zu allererst
an Ihre Sicherheit. Darüber
hinaus bitten wir Sie, bei
der Verwendung jedes
Elektrogeräts angemessene
Sorgfalt anzuwenden und
sich an die folgenden
Vorsichtsmaßnahmen
zu halten.

3
DE
Elektrokochplatte oder in die
direkte Nähe eines heißen
Ofens oder einer heißen
Fläche stellen.
• Netzkabel nicht über
Arbeitsplatten oder Tischkanten
hängen lassen und von heißen
Oberächen fern halten.
• Bei der Verwendung des Ofens
mindestens 10 cm Abstand
nach beiden Seiten und 15 cm
nach oben lassen.
• Zugängliche Oberächen
werden beim Betrieb des
Geräts heiß.
• Keine heißen Oberächen
berühren. Zur Vermeidung
von Verbrennungen Pfannen,
Geschirr und Zubehörteile wie
den mitgelieferten Grillrost und
den Bräter, die heißes Fett oder
andere heiße Flüssigkeiten
enthalten könnten, mit
äußerster Vorsicht handhaben.
• Keine Kochutensilien, Bräter
oder Geschirrteile auf die
Glastür legen.
• Ofentür nicht über längere
Zeiträume hinweg oen
stehen lassen.
• Während des Betriebs des
Ofens keine Gegenstände
außer den auf Seite
8 dieser Broschüre
beschriebenen auf dem
Ofen ablegen.
• Keinen Karton oder Kunststo
und kein Papier oder sonstiges
entammbares Material in den
Ofen legen.
• Krümelschublade oder sonstige
Teile des Ofens nicht mit
Metallfolie abdecken. Dies
kann zu Überhitzung des
Ofens führen.
• Bei der Verwendung von
Back- und sonstigen Formen
aus Materialien außer Metall
Vorsicht üben. Stets prüfen,
dass Back- und sonstige
Formen ofenfest sind, ehe sie
im Ofen verwendet werden.
• Bei der Verwendung von
Deckeln im Ofen Vorsicht
üben, da in abgedeckten
Formen Druck entstehen kann,
der zum Ausspritzen heißer
Zutaten oder zu Rissen in der
Form führen kann. Keine dicht
verschlossenen oder luftdichten
Behälter in den Ofen legen.
• Niemals übergroßes Gargut
oder Utensilien aus Metall
in den Ofen legen, da dies
Brand oder Stromschlaggefahr
verursachen kann.
• Die Verwendung von für diesen
Ofen nicht empfohlenen
oder mit ihm mitgelieferten
Zubehörteilen und Accessoires
kann zu Verletzungen führen.
• Dieses Gerät ist nur für den
Haushaltsgebrauch bestimmt.
Niemals in fahrenden
Fahrzeugen verwenden. Dieses
Gerät nicht im Freien oder
anders als bestimmungsgemäß
verwenden. Missbrauch kann
zu Verletzungen führen.

4
• Wenn das Gerät unbeaufsichtigt
bleiben, gereinigt oder
transportiert, zusammengesetzt
oder gelagert werden soll, Gerät
immer ausschalten, Netzstecker
aus der Steckdose ziehen und
Gerät völlig abkühlen lassen.
• Gerät nicht mit Metall-
Scheuerlappen reinigen.
Abgebrochene Stücke solcher
Lappen können elektrische Teile
berühren und Stromschlaggefahr
verursachen.
• Dieses Gerät kann von Kindern
ab dem Alter von 8 Jahren
sowie von Personen mit
eingeschränkten körperlichen,
sensorischen oder geistigen
Fähigkeiten oder mit mangelnder
Erfahrung und fehlenden
Kenntnissen genutzt werden,
sofern sie beaufsichtigt werden
oder in den sicheren Gebrauch
des Geräts eingewiesen wurden
und sich der entsprechenden
Risiken bewusst sind.
• Kinder nicht mit dem Gerät
spielen lassen.
• Die Reinigung und Wartung
des Geräts nicht von Kindern
vornehmen lassen, sofern sie
nicht mindestens 8 Jahre alt sind
und beaufsichtigt werden.
• Gerät und Kabel für Kinder
unter 8 Jahren unzugänglich
aufbewahren.
• Regelmäßige Sichtprüfungen
des Geräts vornehmen. Gerät
nicht verwenden, wenn das
Netzkabel, der Netzstecker oder
das Gerät selbst in irgendeiner
Weise beschädigt ist.
Wenden Sie sich bei Schäden
oder zur Wartung (außer
Reinigung) bitte an den Sage-
Kundendienst oder besuchen
Sie sageappliances.com.
• Das Gerät ist nicht zur
Verwendung mit einer externen
Zeitschaltuhr oder separaten
Fernbedienung gedacht.
SPEZIELLE ANWEISUNGEN
FÜR DEN SOV820
• Wir empfehlen, den Ofen über
einen eigenen Schaltkreis
separat von anderen Geräten zu
betreiben. Bitte wenden Sie sich
an eine/n lizensierte/n Elektriker/
in, wenn Sie unsicher sind.
• Zum Ausschalten des Ofens
im Bedienfeld die Taste
START / CANCEL (START /
ABBRUCH) drücken. Der Ofen
ist ausgeschaltet, wenn die Tas-
te nicht mehr hinterleuchtet ist.
• Krümelschublade regelmäßig
reinigen. Reinigung der
Krümelschublade:
− Ofen ausschalten.
− Ofen komplett abkühlen
lassen, dann Netzstecker aus
der Steckdose ziehen.
− Krümelschublade
herausnehmen und mit
warmem Spülwasser
waschen.
− Schublade völlig trocknen
lassen, dann wieder korrekt
einschieben.

5
DE
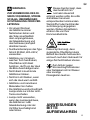
WARNUNG
ZUR VERMEIDUNG DES RI
SIKOS VON BRAND, STROM
SCHLAG, ÜBERMÄßIGER
UVSTRAHLUNG ODER VER
LETZUNG:
• Vor einem Wechsel
der Glühbirne immer
Netzstecker ziehen und
alle Teile (einschließlich
des Lampengehäuses,
der Glasabdeckung und
des Gehäuses) komplett
abkühlen lassen.
• Nur Backofenlampen des Typs
G9 mit 25 Watt, 220–240 V,
verwenden.
• Glühbirne nur mit einem
weichen Tuch handhaben;
Oberäche nicht direkt
berühren, da Öl von der Haut
die Birne beschädigen kann.
• Nicht direkt in leuchtende
Glühbirnen blicken.
• Nicht im Licht bleiben, wenn
sich die Haut warm anfühlt.
• Glühbirne von brennbaren
Materialien fern halten.
• Die Glühbirne wird schnell heiß.
Lampe stets nur mit der Licht-
Taste einschalten.
• Lampe nicht verwenden,
wenn das Lampengehäuse,
die Glühbirnen- oder
Glasabdeckung oder der
UV-Filter beschädigt sind
oder fehlen.
Dieses Symbol zeigt, dass
das Gerät nicht im
normalen Hausmüll
entsorgt werden sollte. Es sollte
stattdessen bei einem
entsprechenden kommunalen
Wertstohof oder Fachhändler
zur Entsorgung abgegeben
werden. Weitere Einzelheiten
erfahren Sie von Ihrer
Kommunalbehörde.
Dieses Symbol zeigt, dass
zugängliche Oberächen beim
Betrieb des Geräts heiß werden
und auch nach dem Gebrauch für
einige Zeit heiß bleiben können.
Zum Schutz gegen
Stromschlag Netzstecker
oder Netzkabel nicht in Wasser
oder sonstige
Flüssigkeiten tauchen.
ANWEISUNGEN
BITTE
AUFBEWAHREN

6
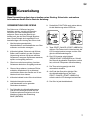
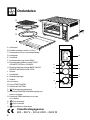
A. Grillrost
B. Emaillierter Bräter, 28 x 33,5 cm
C. Pizzablech mit Antihaftbeschichtung, 30 cm
D. Türgri
E. Ofenlampe
F. Obere Schiene: GRILL-Funktion
G. Mittlere Schiene: TOAST-, CRUMPET-, PIZZA- und
COOKIES-Funktionen
H. Untere Schiene: BAKE-, ROAST-, REHEAT-, WARM-
und SLOW COOK-Funktionen (BACKEN, BRATEN,
AUFWÄRMEN, WARMHALTEN, LANGSAMGAREN)
I. Gitterrost
J. Krümelschublade
K. Belüftungsschlitze
L. Netzstecker
M. LCD-Anzeige
N. START / CANCEL-Taste (START / ABBRUCH)
O. FUNKTIONS-Drehwähler
P. Taste TEMPERATUR-Umrechnung
Q. Drehwähler TEMPERATUR / Farbe von Toast und
Crumpets
R. Drehwähler TIME (ZEIT) / Auswahl von Toast- und
Crumpet-Scheiben
S. Taste OVEN LIGHT (OFENLAMPE)
T. Taste CONVECTION (UMLUFT)
U. Taste FROZEN FOOD (TIEFKÜHLPRODUKTE)
M
N
S
T
U
O
P
Q
R
Leistungsangaben
220–240V ~ 50Hz 2000–2400W
Komponenten
A página está carregando...
A página está carregando...
A página está carregando...
A página está carregando...
A página está carregando...
A página está carregando...
A página está carregando...
A página está carregando...
A página está carregando...
A página está carregando...
A página está carregando...
A página está carregando...
A página está carregando...
A página está carregando...
A página está carregando...
A página está carregando...
A página está carregando...
A página está carregando...
A página está carregando...
A página está carregando...
A página está carregando...
A página está carregando...
A página está carregando...
A página está carregando...
A página está carregando...
A página está carregando...
A página está carregando...
A página está carregando...
A página está carregando...
A página está carregando...
A página está carregando...
A página está carregando...
A página está carregando...
A página está carregando...
A página está carregando...
A página está carregando...
A página está carregando...
A página está carregando...
A página está carregando...
A página está carregando...
A página está carregando...
A página está carregando...
A página está carregando...
A página está carregando...
A página está carregando...
A página está carregando...
A página está carregando...
A página está carregando...
A página está carregando...
A página está carregando...
A página está carregando...
A página está carregando...
A página está carregando...
A página está carregando...
A página está carregando...
A página está carregando...
A página está carregando...
A página está carregando...
A página está carregando...
A página está carregando...
A página está carregando...
A página está carregando...
A página está carregando...
A página está carregando...
A página está carregando...
A página está carregando...
A página está carregando...
A página está carregando...
A página está carregando...
A página está carregando...
A página está carregando...
A página está carregando...
A página está carregando...
A página está carregando...
A página está carregando...
A página está carregando...
A página está carregando...
A página está carregando...
A página está carregando...
A página está carregando...
-
 1
1
-
 2
2
-
 3
3
-
 4
4
-
 5
5
-
 6
6
-
 7
7
-
 8
8
-
 9
9
-
 10
10
-
 11
11
-
 12
12
-
 13
13
-
 14
14
-
 15
15
-
 16
16
-
 17
17
-
 18
18
-
 19
19
-
 20
20
-
 21
21
-
 22
22
-
 23
23
-
 24
24
-
 25
25
-
 26
26
-
 27
27
-
 28
28
-
 29
29
-
 30
30
-
 31
31
-
 32
32
-
 33
33
-
 34
34
-
 35
35
-
 36
36
-
 37
37
-
 38
38
-
 39
39
-
 40
40
-
 41
41
-
 42
42
-
 43
43
-
 44
44
-
 45
45
-
 46
46
-
 47
47
-
 48
48
-
 49
49
-
 50
50
-
 51
51
-
 52
52
-
 53
53
-
 54
54
-
 55
55
-
 56
56
-
 57
57
-
 58
58
-
 59
59
-
 60
60
-
 61
61
-
 62
62
-
 63
63
-
 64
64
-
 65
65
-
 66
66
-
 67
67
-
 68
68
-
 69
69
-
 70
70
-
 71
71
-
 72
72
-
 73
73
-
 74
74
-
 75
75
-
 76
76
-
 77
77
-
 78
78
-
 79
79
-
 80
80
-
 81
81
-
 82
82
-
 83
83
-
 84
84
-
 85
85
-
 86
86
-
 87
87
-
 88
88
-
 89
89
-
 90
90
-
 91
91
-
 92
92
-
 93
93
-
 94
94
-
 95
95
-
 96
96
-
 97
97
-
 98
98
-
 99
99
-
 100
100


em outras línguas
- español: Sage BOV820 Guía del usuario
- français: Sage BOV820 Mode d'emploi
- italiano: Sage BOV820 Guida utente
- Nederlands: Sage BOV820 Gebruikershandleiding
- Deutsch: Sage BOV820 Benutzerhandbuch
Artigos relacionados
Outros documentos
-
Hamilton Beach 31395 Guia de usuario
-
Hamilton Beach Sure-Crisp XL Manual do usuário
-
Ninja DT200EU Instruções de operação
-
Bosch HGD43A120S/03 Manual do usuário
-
-
-
Jocel JFE014641 Manual do usuário
-
Smeg PPR9 PIZZA STEIN Manual do proprietário