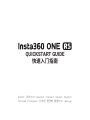
Insta360 CINRSGP One RS Twin Edition Camera Guia de usuario
- Tipo
- Guia de usuario

QUICKSTART GUIDE
快速入门指南
English · 简体中文 · Deutsch · Français · Italiano · Español
Pусский · Português · 日本語 · 한국어 · 繁體中文 ·


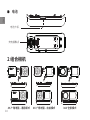
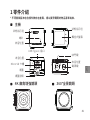
Core
4K Boost Lens 360 Lens
* The number of parts vary in different ONE RS Editions. Please refer to the
packing list of your purchased Edition.
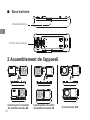
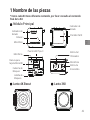
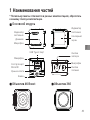
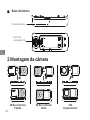
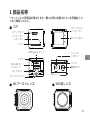
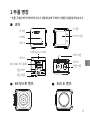
1 Names of Parts
Status Indicator Status
Indicator
USB Type-C Port
Touch
Screen
Lock Buckle
Shutter
Button
Microphone
Microphone
Speaker
MicroSD Card Slot
Lock Cover
Power
Button
1
EN
Microphone

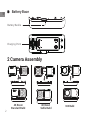
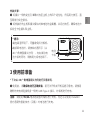
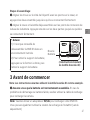
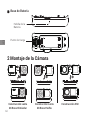
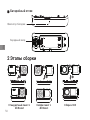
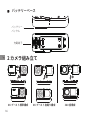
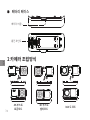
2 Camera Assembly
4K Boost
Standard Build
4K Boost
Selfie Build 360 Build
Battery Base
Battery Buckle
Charging Point
❶
❷
❶
❷
❶
❷
2
EN

(4K Boost
Standard Build)
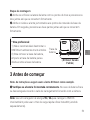
Assembly Steps:
❶ Align the holes on the side of the lens to the points on the Core, and press
the two together until they firmly connect.
❷ Align the already assembled Core and lens to the connecting points of the
Battery Base. Then press the two parts together until they firmly connect.
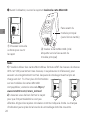
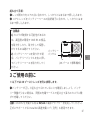
* Pro Tip:
1) Avoid disassembling or storing
a disassembled ONE RS in high
humidity environments, as camera
could be damaged.
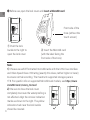
2) To remove the Battery Base, push
the battery buckle to the right, then
pull the Battery Base off.
Battery
Buckle
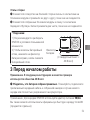
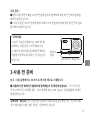
Note: The following instructions use the 4K Boost Lens as an example.
❶ Ensure the battery has been assembled properly. Please connect the
included charge cable to ONE RS in case of low or depleted battery.
Note: Please use a 5V/2A power adapter to charge your ONE RS. You can also
use the official Insta360 Fast Charge Hub (sold separately).
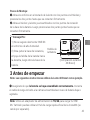
3 Before You Start
EN
3

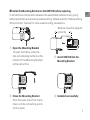
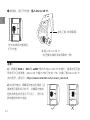
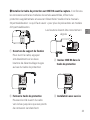
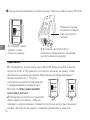
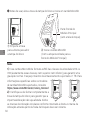
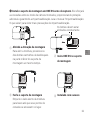
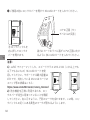
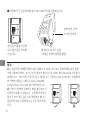
① Push the lock
buckle to the right to
open the lock cover
② Insert the MicroSD card
(with the label facing the
front side of the Core)
Front side of the
Core (without the
touch screen)
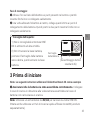
❷ Before use, open the lock cover and insert a MicroSD card.
insta360.com/r/oners_microsd
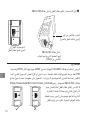
2)Be sure to close the lock cover
completely to ensure the waterproofing is
not affected. Align the circular indication
marks as shown to the right. The yellow
indication mark near the lock buckle
should be covered.
Note:
1)Please use exFAT formatted microSD cards with the UHS-I bus interface
and Video Speed Class V30 rating (exactly this class, neither higher or lower)
to ensure normal recording. The maximum supported storage space is
1TB. For specific info on supported MicroSD card models, see https://www.
EN
4

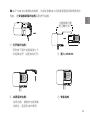
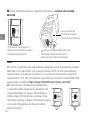
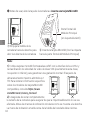
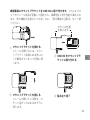
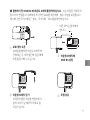
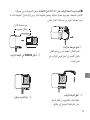
❸ Install the Mounting Bracket on the ONE RS before capturing.
It will reinforce connections between the assembled camera mods, giving
added protection and ensuring waterproofing. Please read the "Waterproofing:
What to Know" manual for more waterproofing precautions.
EN
5
①
②
③④
Open the Mounting Bracket
To open the frame, press the
two red unlocking buttons at the
bottom of the Mounting Bracket
at the same time.
Close the Mounting Bracket
Push the open side of the frame
down until its connecting points
click in place.
Insert ONE RS into the
Mounting Bracket
Installed successfully
Buttons should be aligned
correctly

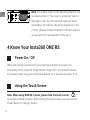
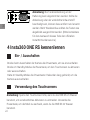
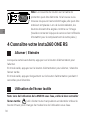
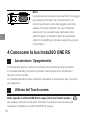
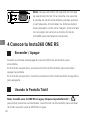
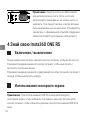
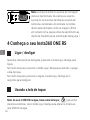
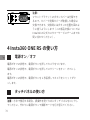
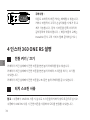
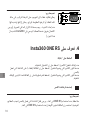
4 Know Your Insta360 ONE RS
Power On / Off
When the camera is turned off, press the Power Button to power it on.
In standby mode, press the Power Button to light off / on the touch screen.
In standby mode, long press the Power Button for 2 seconds to power it off.
Using the Touch Screen
Note: When using ONE RS in water, please lock the touch screen ( )
to avoid accidental presses. After locking the touch screen, you can use the
Power Button to change modes.
EN
6
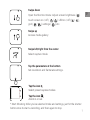
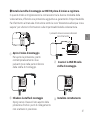
Note: The button cover on the Mounting Bracket can
be disassembled. If the cover or windproof foam is
damaged, it can be removed and replaced. When
reinstalling, the buttons should be aligned as in the
picture. (Please contact Insta360's official customer
service team for replacement of this part.)

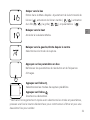
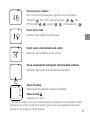
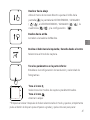
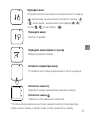
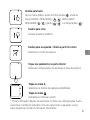
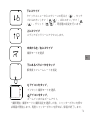
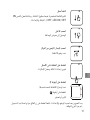
Swipe down
Open the Shortcut menu: Adjust screen brightness ( ),
touch screen on / off ( / ), LED on / off ( / ),
grid ( / ), settings ( ), etc.
* Start Shooting: After you've selected mode and settings, just hit the shutter
button once to start a recording, and then again to stop.
EN
7
Tap the icon Q,
Select preset capture modes.
Tap the icon ,
Zoom in or out.
Swipe up
Access media gallery.
Swipe left/right from the center
Select capture mode.
Tap the parameters at the bottom
Set resolution and framerate settings.

* For more product information, visit https://www.insta360.com/r/onersdetail
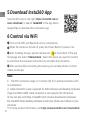
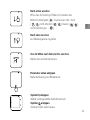
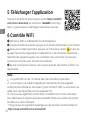
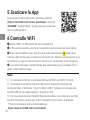
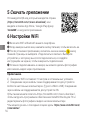
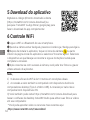
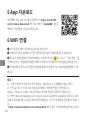
❶ Turn on the WiFi and Bluetooth of your smartphone.
❷ When the camera is turned off, press the Power Button to power it on.
❸ After installing the app, tap the camera icon at the bottom of the app
homepage and select "Connect now". Select the device you want to connect
to and follow the onscreen instructions to complete the connection.
❹ After successfully connecting the camera, you can take photos or shoot
videos via the app.
Note:
1)The WiFi connection range is 10 meters (33 ft) in optimal conditions with
no interference.
2)Cable connection is also supported for Android devices and desktop computers
(Type-C and Micro USB). Cable connection is not supported for iOS devices.
3) You can also visit https://Insta360.com/r/oners-download to download
the Insta360 Studio desktop software to edit your photos and videos on your
computer.
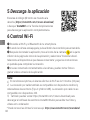
6 Control via WiFi
EN
8
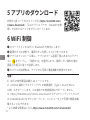
5
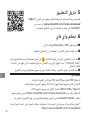
Download Insta360 App
Scan the QR code on the right (https://insta360.com/r/
oners-download) or search "Insta360" in the App Store /
Google Play to download the companion app.

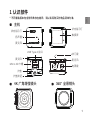
1 认识部件
主机
4K 广角增强镜头 360° 全景镜头
护盖拨钮
* 不同套装版本包含部件数存在差异,请以实际购买的物品清单为准。
CHS
9
状态指示灯 状态指示灯
USB Type-C 接口
触摸屏
快门键
扬声器
麦克风
麦克风
麦克风
Micro SD 卡槽
护盖
电源键

2 组合相机
4K 广角增强 - 通用模式 360°全景模式4K 广角增强 - 自拍模式
❶
❷
❶
❷
❶
❷
电池
电池卡扣
充电接触点
CHS
10

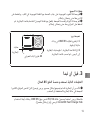
安装步骤:
❶ 将镜头一侧的定位孔准确对应至主机上的四个定位柱,然后用力按压,直
至两部分完全锁合。
❷ 将安装好的主机和镜头模块对准电池的金属槽,并用力按压,确保电池卡
扣完全卡住镜头和主机。
* 提示:
1) 在高湿环境下,尽量避免拆分相机。
2) 拆卸电池时,请按如右图所示(以
4K 广角增强镜头为例),向右拨动电
池卡扣的同时,稍微用力将电池取下。
电池
卡 扣
❶ 使用前,请确保电池已正确安装。若无法开机或开机后提示低电,请使用
随附的充电线连接机身一侧的 USB Type-C 接口,对相机进行充电。
注意:请使用 5V/2A 电源适配器对相机进行充电。您还可以使用 Insta360
官方适配的智能快充(另售)对电池进行充电。
3 使用前准备
* 下文以 4K 广角增强镜头为例进行示意说明。
CHS
11

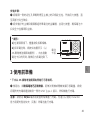
① 向右拨动护盖拨钮,
打开护盖 ② 插入 Micro SD 卡
(标签朝向相机没有屏幕的一侧)
主机正面(非屏幕面)
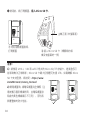
❷ 使用前,请打开护盖,插入 Micro SD 卡。
2)关闭护盖时,请确保护盖完全锁紧(注
意按图示圆形标识对齐,并确保护盖拨
钮处的黄色标识显示不可见),否则将
影响整机的防水性能。
注意:
1)请使用 UHS-I、V30 和exFAT 格式的 Micro SD/TF 存储卡,速度过低可能
导致无法正常录像;Micro SD 卡最大内存可支持 1TB。如需了解 Micro SD 卡
支持型号,请访问:https://www.insta360.com/r/oners_microsd
CHS
12

❸ 由于 ONE RS 是模块化相机,为保证各模块之间的紧密固定和相机的防水
性能,请安装相机保护边框后再进行拍摄。
CHS
13
①
②
③④
打开保护边框:
同时按下保护边框底部 2 个
红色锁定杆,边框自动打开。
关闭保护边框:
关闭边框,使锁扣与挂钩锁
合到位,直至发出咔嗒声。
置入 ONE RS
安装完成
注意按键位置
的正确对应

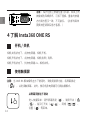
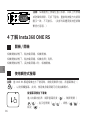
4 了解 Insta360 ONE RS
开机 / 关机
相机关机状态下,点按电源键,相机开机。
相机开机状态下,点按电源键,相机熄屏 / 亮屏。
相机开机状态下,长按电源键 2s,相机关机。
从屏幕顶部往下滑动
进入快捷菜单:调节屏幕亮度( )、锁屏开关(
/ )、指示灯开关( / )、网格( / )、
设置( )等菜单。
使用触摸屏
注意:当 ONE RS 模块相机在水下使用时,请使用锁屏功能,将屏幕锁定
( ),以防误触屏幕。此时,使用机身电源键可切换拍摄模式。
CHS
14
注意: 保护边框上按键位置可拆装,如其上的
按键或防风棉损坏,可拆下替换。重装时按键
方向请与图示一致,不可装反。(此部件具体
更换流程请联系官方客服。)

* 开始录像:完成模式和相关参数设置后,单击相机快门键,即可开始录像。
再次单击快门键,结束录像。
CHS
15
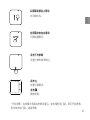
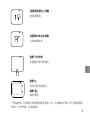
点击下方参数
设置分辨率帧率档位。
从屏幕底部往上滑动
访问媒体库。
在屏幕中央左右滑动
切换拍摄模式。
点击 Q,
快速切换模式。
点击 ,
缩放视角。

* 更多相关产品信息,请访问 https://www.insta360.com/r/onersdetail
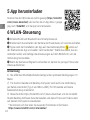
❶ 打开手机蓝牙和 WiFi 功能。
❷ 相机关机状态下,点按电源键,相机开机。
❸ 打开 app,点击 app 页面下方的相机图标 ,在“使用 WiFi 连接”一
项点击“立即连接”。当 app 页面跳转至提示【搜寻相机中 ......】,选择你
需要连接的相机,然后按照 app 页面提示完成操作。
❹ 连接成功后,可在 app 页面进行拍照、录像、设置等操作。
注意:
1)WiFi 连接有效距离为 10 米(无干扰无遮挡)。
2)相机支持安卓设备(Micro-USB 或 Type-C 接口)有线连接,但此版本不
支持 iOS 系统设备有线连接,详细信息请咨询 Insta360。
3)可在电脑上下载 Insta360 Studio,对拍摄的视频和图片进行编辑。下载地址:
https://insta360.com/r/oners-download
6 WiFi 连接
CHS
16
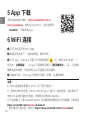
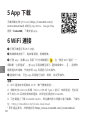
5 App 下载
手机扫描右侧二维码(https://insta360.com/r/
oners-download)或前往 App Store、应用宝搜索
“Insta360”下载安装 App。

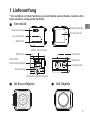
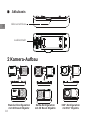
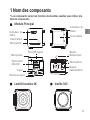
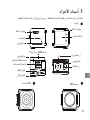
Kernstück
4K Boost Objektiv 360 Objektiv
* Da nachdem sich die Packlisten je nach Bundle unterscheiden, beziehe dich
bitte auf deine vorliegende Packliste.
1 Lieferumfang
USB-C-Anschluss
Touchscreen
Abdeckungsverschluss
Auslöser
Powertaste
Mikrofon
Mikrofon
Mikrofon
Lautsprecher
Statusanzeige Statusanzeige
MicroSD-
Kartensteckplatz
Abdeckung
DE
17

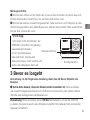
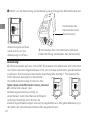
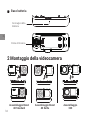
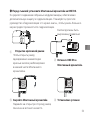
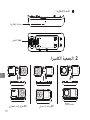
2 Kamera-Aufbau
Standard konfiguration
mit 4K Boost Objektiv
Selfie-Konfiguration
mit 4K Boost Objektiv
360°-Konfiguration
mit 360° Objektiv
Akkubasis
Akkuverschluss
Ladekontakt
❶
❷
❶
❷
❶
❷
DE
18
A página está carregando...
A página está carregando...
A página está carregando...
A página está carregando...
A página está carregando...
A página está carregando...
A página está carregando...
A página está carregando...
A página está carregando...
A página está carregando...
A página está carregando...
A página está carregando...
A página está carregando...
A página está carregando...
A página está carregando...
A página está carregando...
A página está carregando...
A página está carregando...
A página está carregando...
A página está carregando...
A página está carregando...
A página está carregando...
A página está carregando...
A página está carregando...
A página está carregando...
A página está carregando...
A página está carregando...
A página está carregando...
A página está carregando...
A página está carregando...
A página está carregando...
A página está carregando...
A página está carregando...
A página está carregando...
A página está carregando...
A página está carregando...
A página está carregando...
A página está carregando...
A página está carregando...
A página está carregando...
A página está carregando...
A página está carregando...
A página está carregando...
A página está carregando...
A página está carregando...
A página está carregando...
A página está carregando...
A página está carregando...
A página está carregando...
A página está carregando...
A página está carregando...
A página está carregando...
A página está carregando...
A página está carregando...
A página está carregando...
A página está carregando...
A página está carregando...
A página está carregando...
A página está carregando...
A página está carregando...
A página está carregando...
A página está carregando...
A página está carregando...
A página está carregando...
A página está carregando...
A página está carregando...
A página está carregando...
A página está carregando...
A página está carregando...
A página está carregando...
A página está carregando...
A página está carregando...
A página está carregando...
A página está carregando...
A página está carregando...
A página está carregando...
A página está carregando...
A página está carregando...
A página está carregando...
A página está carregando...
-
 1
1
-
 2
2
-
 3
3
-
 4
4
-
 5
5
-
 6
6
-
 7
7
-
 8
8
-
 9
9
-
 10
10
-
 11
11
-
 12
12
-
 13
13
-
 14
14
-
 15
15
-
 16
16
-
 17
17
-
 18
18
-
 19
19
-
 20
20
-
 21
21
-
 22
22
-
 23
23
-
 24
24
-
 25
25
-
 26
26
-
 27
27
-
 28
28
-
 29
29
-
 30
30
-
 31
31
-
 32
32
-
 33
33
-
 34
34
-
 35
35
-
 36
36
-
 37
37
-
 38
38
-
 39
39
-
 40
40
-
 41
41
-
 42
42
-
 43
43
-
 44
44
-
 45
45
-
 46
46
-
 47
47
-
 48
48
-
 49
49
-
 50
50
-
 51
51
-
 52
52
-
 53
53
-
 54
54
-
 55
55
-
 56
56
-
 57
57
-
 58
58
-
 59
59
-
 60
60
-
 61
61
-
 62
62
-
 63
63
-
 64
64
-
 65
65
-
 66
66
-
 67
67
-
 68
68
-
 69
69
-
 70
70
-
 71
71
-
 72
72
-
 73
73
-
 74
74
-
 75
75
-
 76
76
-
 77
77
-
 78
78
-
 79
79
-
 80
80
-
 81
81
-
 82
82
-
 83
83
-
 84
84
-
 85
85
-
 86
86
-
 87
87
-
 88
88
-
 89
89
-
 90
90
-
 91
91
-
 92
92
-
 93
93
-
 94
94
-
 95
95
-
 96
96
-
 97
97
-
 98
98
-
 99
99
-
 100
100


