AEG VX7-2-IW-S Manual do usuário
- Categoria
- Aspirador de pó
- Tipo
- Manual do usuário

DE
GB
ES
PT
FR
NL
IT
FA
BENUTZERHANDBUCH
INSTRUCTION BOOK

DE
GB
ES
PT
FR
NL
IT
FA
DE
GB
ES
PT
FR
NL
IT
FA
Vielen Dank, dass Sie sich für den AEG-Staubsauger
VX7 entschieden haben. Verwenden Sie immer Origi-
nalzubehör und Originalersatzteile, um bestmögliche
Ergebnisse zu erzielen. Dieses Produkt wurde mit
Rücksicht auf die Umwelt hergestellt. Alle Plastikteile
sind für Recyclingzwecke markiert.
Inhalt
BESCHREIBUNG DES STAUBSAUGERS . . . . . . . . . . . . . . . . . . . . . . 5
SICHERHEITSANFORDERUNG . . . . . . . . . . . . . . . . . . . . . . . . . . . . . .6
ERLÄUTERUNGEN ZU DEN VORSCHRIFTEN DER
ENERGIEEFFIZIENZKLASSE . . . . . . . . . . . . . . . . . . . . . . . . . . . . . . . . 7
WIE MAN DEN STAUBSAUGER BENUTZT . . . . . . . . . . . . . . . . . . .8
STARTENSTOPPEN SIE DEN STAUBSAUGER . . . . . . . . . . . . . . . 8
STELLEN SIEDIE SAUGLEISTUNG EIN. . . . . . . . . . . . . . . . . . . . . . .8
PARKPOSITIONEN . . . . . . . . . . . . . . . . . . . . . . . . . . . . . . . . . . . . . . . . . .8
AUSTAUSCHEN DES STAUBBEUTELS SBAG® . . . . . . . . . . . . .9
ERSETZEN DER FILTER . . . . . . . . . . . . . . . . . . . . . . . . . . . . . . . . . . . . .9
STAUBSAUGEN MIT DER UNIVERSALDÜSE . . . . . . . . . . . . . . . .10
REINIGEN DER UNIVERSALDÜSE . . . . . . . . . . . . . . . . . . . . . . . . . .10
REINIGEN DER TURBODÜSE* . . . . . . . . . . . . . . . . . . . . . . . . . . . . . .10
TIPPS, WIE SIE DIE BESTEN ERGEBNISSE ERZIELEN
KÖNNEN . . . . . . . . . . . . . . . . . . . . . . . . . . . . . . . . . . . . . . . . . . . . . . . . . . 11
FEHLERSUCHE . . . . . . . . . . . . . . . . . . . . . . . . . . . . . . . . . . . . . . . . . . . . 11
* NUR AUSGEWÄHLTE MODELLE
Gracias por elegir la aspiradora AEG VX7. Use siempre
accesorios y piezas de repuesto originales para
lograr los mejores resultados. Este producto ha sido
diseñado teniendo en cuenta el medio ambiente. Las
piezas de plástico están marcadas para su reciclaje.
Contenido
DESCRIPCIÓN DE LA ASPIRADORA . . . . . . . . . . . . . . . . . . . . . . . . 21
REQUISITO DE SEGURIDAD . . . . . . . . . . . . . . . . . . . . . . . . . . . . . . . .22
NOTAS SOBRE LA NORMATIVA
DE ETIQUETA ENERGÉTICA . . . . . . . . . . . . . . . . . . . . . . . . . . . . . . .23
CÓMO USAR LA ASPIRADORA . . . . . . . . . . . . . . . . . . . . . . . . . . . . .24
PONGA EN MARCHAPARE LA ASPIRADORA . . . . . . . . . . . . . .24
AJUSTE LA POTENCIA DE ASPIRACIÓN . . . . . . . . . . . . . . . . . . .24
POSICIONES DE ESTACIONAMIENTO . . . . . . . . . . . . . . . . . . . . . .24
CAMBIO DE LA BOLSA DE POLVO SBAG® . . . . . . . . . . . . . . . . .25
SUSTITUCIÓN DE LOS FILTROS . . . . . . . . . . . . . . . . . . . . . . . . . . . .25
ASPIRACIÓN CON LA BOQUILLA UNIVERSAL . . . . . . . . . . . . .26
LIMPIEZA DE LA BOQUILLA UNIVERSAL . . . . . . . . . . . . . . . . . .26
LIMPIEZA DE LA BOQUILLA 6TURBO* . . . . . . . . . . . . . . . . . . . . .26
CONSEJOS PARA OBTENER EL MEJOR RESULTADO . . . . . . .27
SOLUCIÓN DE PROBLEMAS . . . . . . . . . . . . . . . . . . . . . . . . . . . . . . .27
* SOLO ALGUNOS MODELOS
Thank you for choosing AEG VX7 vacuum cleaner.
Always use original accessories and spare parts to
get the best results. This product is designed with the
environment in mind. All plastic parts are marked for
recycling purposes.
Content
DESCRIPTION OF THE VACUUM CLEANER . . . . . . . . . . . . . . . . 13
SAFETY REQUIREMENTS . . . . . . . . . . . . . . . . . . . . . . . . . . . . . . . . . . 14
ENERGY LABELLING INSTRUCTIONS . . . . . . . . . . . . . . . . . . . . . . 15
HOW TO USE THE VACUUM CLEANER. . . . . . . . . . . . . . . . . . . . . 16
START AND STOP THE VACUUM CLEANER . . . . . . . . . . . . . . . . 16
REGULATING SUCTION POWER . . . . . . . . . . . . . . . . . . . . . . . . . . . 16
PARKING POSITIONS . . . . . . . . . . . . . . . . . . . . . . . . . . . . . . . . . . . . . . 16
REPLACING THE DUST BAG SBAG® . . . . . . . . . . . . . . . . . . . . . 17
REPLACING THE FILTERS . . . . . . . . . . . . . . . . . . . . . . . . . . . . . . . . . 17
VACUUMING WITH THE UNIVERSAL NOZZLE . . . . . . . . . . . . . 18
CLEANING THE UNIVERSAL NOZZLE . . . . . . . . . . . . . . . . . . . . . . 18
CLEANING THE TURBO NOZZLE* . . . . . . . . . . . . . . . . . . . . . . . . . 18
TIPS ON HOW TO GET THE BEST RESULTS . . . . . . . . . . . . . . . . 19
TROUBLESHOOTING . . . . . . . . . . . . . . . . . . . . . . . . . . . . . . . . . . . . . . 19
* SELECTED MODELS ONLY
Obrigado por ter escolhido um aspirador AEG VX7.
Para obter os melhores resultados, utilize sempre
acessórios e peças de substituição originais. Este
produto foi concebido a pensar no meio ambiente.
Todas as peças de plástico estão marcadas para
efeitos de reciclagem.
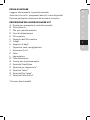
Conteúdo
DESCRIÇÃO DO ASPIRADOR . . . . . . . . . . . . . . . . . . . . . . . . . . . . . . .29
REQUISITOS DE SEGURANÇA . . . . . . . . . . . . . . . . . . . . . . . . . . . . .30
NOTAS SOBRE OS REGULAMENTOS DE ETIQUETA
DE ENERGIA . . . . . . . . . . . . . . . . . . . . . . . . . . . . . . . . . . . . . . . . . . . . . . . 31
COMO UTILIZAR O ASPIRADOR . . . . . . . . . . . . . . . . . . . . . . . . . . .32
LIGARDESLIGAR O ASPIRADOR . . . . . . . . . . . . . . . . . . . . . . . . . .32
AJUSTAR A POTÊNCIA DE SUCÇÃO . . . . . . . . . . . . . . . . . . . . . . .32
POSIÇÕES DE ESTACIONAMENTO . . . . . . . . . . . . . . . . . . . . . . . . .32
SUBSTITUIR O SACO DO ASPIRADOR SBAG® . . . . . . . . . . . . .33
SUBSTITUIR OS FILTROSS . . . . . . . . . . . . . . . . . . . . . . . . . . . . . . . . .33
ASPIRAR COM A ESCOVA UNIVERSALL . . . . . . . . . . . . . . . . . . . .34
LIMPAR A ESCOVA UNIVERSAL . . . . . . . . . . . . . . . . . . . . . . . . . . . .34
LIMPAR A ESCOVA TURBO* . . . . . . . . . . . . . . . . . . . . . . . . . . . . . . .34
SUGESTÕES PARA OBTER OS MELHORES RESULTADOS . .35
RESOLUÇÃO DE PROBLEMAS . . . . . . . . . . . . . . . . . . . . . . . . . . . . .35
* APENAS ALGUNS MODELOS

DE
GB
ES
PT
FR
NL
IT
FA
DE
GB
ES
PT
FR
NL
IT
FA
AEG VX7
61 ....................................................
62 ...........................................
63 .................................
64 ...................................
64 ........................................
64 ..........................................................
64 .....................................
65 ......................... S-BAG
65 ......................................................
66 ...........................
66 ........................................
66 ..........................................
67 ..........................
67 .............................................................
Merci d’avoir choisi l’aspirateur AEG VX7. Utilisez
toujours les accessoires et les pièces de rechange AEG
pour obtenir les performances optimales. Ce produit
est conçu dans le respect de l’environnement. Tous les
éléments en plastique sont marqués d’un symbole de
recyclage.
Contenu
DESCRIPTION DE L’ASPIRATEUR . . . . . . . . . . . . . . . . . . . . . . . . . .37
PRÉCAUTIONS DE SÉCURITÉ . . . . . . . . . . . . . . . . . . . . . . . . . . . . . .38
NOTES CONCERNANT LA RÈGLEMENTATION
RELATIVE À L'ÉTIQUETTE ÉNERGIE . . . . . . . . . . . . . . . . . . . . . . .39
COMMENT UTILISER CET ASPIRATEUR . . . . . . . . . . . . . . . . . . 40
MISE EN MARCHEARRÊT DE L’ASPIRATEUR . . . . . . . . . . . . . 40
RÉGLAGE DE LA PUISSANCE . . . . . . . . . . . . . . . . . . . . . . . . . . . . . 40
POSITIONS DE RANGEMENT . . . . . . . . . . . . . . . . . . . . . . . . . . . . . 40
REMPLACEMENT DU SAC À POUSSIÈRE, SBAG® . . . . . . . . . . 41
REMPLACEMENT DES FILTRES . . . . . . . . . . . . . . . . . . . . . . . . . . . . 41
UTILISATION DE L’ASPIRATEUR AVEC LA BROSSE . . . . . . . . .42
NETTOYAGE DE LA BROSSE . . . . . . . . . . . . . . . . . . . . . . . . . . . . . . .42
NETTOYAGE DE LA TURBOBROSSE* . . . . . . . . . . . . . . . . . . . . . .42
ASTUCES POUR UN RESULTAT IMPECCABLE . . . . . . . . . . . . . .43
EN CAS D’ANOMALIE DE FONCTIONNEMENT . . . . . . . . . . . . .43
* MODÈLES SÉLECTIONNÉS UNIQUEMENT
Grazie per aver scelto l’aspirapolvere AEG VX7. Per
ottenere i migliori risultati, utilizzare sempre gli
accessori e i ricambi originali. Questo prodotto è stato
progettato nel rispetto dell’ambiente. Tutte le parti
in plastica sono contrassegnate per consentirne il
riciclaggio.
Contenuto
DESCRIZIONE DELL'ASPIRAPOLVERE . . . . . . . . . . . . . . . . . . . . . .53
REQUISITI PER LA SICUREZZA . . . . . . . . . . . . . . . . . . . . . . . . . . . .54
NOTE SULLE NORME INERENTI ALLE
ETICHETTE ENERGETICHE . . . . . . . . . . . . . . . . . . . . . . . . . . . . . . . .55
COME UTILIZZARE L’ASPIRAPOLVERE . . . . . . . . . . . . . . . . . . . . .56
AVVIOARRESTO DELL’ASPIRAPOLVERE . . . . . . . . . . . . . . . . . .56
REGOLAZIONE DELLA POTENZA ASPIRANTE . . . . . . . . . . . . .56
POSIZIONI DI STAZIONAMENTO . . . . . . . . . . . . . . . . . . . . . . . . . . .56
SOSTITUZIONE DEL SACCHETTO, SBAG® . . . . . . . . . . . . . . . . .57
SOSTITUZIONE DEI FILTRI . . . . . . . . . . . . . . . . . . . . . . . . . . . . . . . . .57
ASPIRAZIONE CON LA SPAZZOLA COMBINATA . . . . . . . . . . .58
PULIZIA DELLA SPAZZOLA COMBINATA . . . . . . . . . . . . . . . . . .58
PULIZIA DELLA SPAZZOLA TURBO* . . . . . . . . . . . . . . . . . . . . . . .58
SUGGERIMENTI PER OTTENERE I MIGLIORI RISULTATIS . . .59
RISOLUZIONE DEI PROBLEMI . . . . . . . . . . . . . . . . . . . . . . . . . . . . . .59
* SOLO PER ALCUNI MODELLI
Gefeliciteerd met uw keuze van een AEG VX7-
stofzuiger. Gebruik altijd originele accessoires en
reserveonderdelen voor de beste resultaten. Dit
product is ontworpen om het milieu te sparen.
Alle plastic onderdelen zijn gemarkeerd voor
recyclingdoeleinden.
Inhoud
BESCHRIJVING VAN DER STOFZUIGER . . . . . . . . . . . . . . . . . . . .45
VEILIGHEIDSVEREISTE . . . . . . . . . . . . . . . . . . . . . . . . . . . . . . . . . . . 46
OPMERKINGEN OVER DE VOORSCHRIFTEN VOOR
ENERGIELABELS . . . . . . . . . . . . . . . . . . . . . . . . . . . . . . . . . . . . . . . . . .47
GEBRUIK VAN DE STOFZUIGER . . . . . . . . . . . . . . . . . . . . . . . . . . . 48
DE STOFZUIGER STARTENSTOPPEN . . . . . . . . . . . . . . . . . . . . 48
HET ZUIGVERMOGEN REGELEN . . . . . . . . . . . . . . . . . . . . . . . . . . 48
PARKEERPOSITIES . . . . . . . . . . . . . . . . . . . . . . . . . . . . . . . . . . . . . . . 48
DE STOFZUIGERZAK, SBAG®, VERVANGEN . . . . . . . . . . . . . . .49
DE FILTERS VERVANGEN . . . . . . . . . . . . . . . . . . . . . . . . . . . . . . . . . .49
STOFZUIGEN MET HET UNIVERSELE MONDSTUK . . . . . . . . .50
HET UNIVERSELE MONDSTUK REINIGEN. . . . . . . . . . . . . . . . . .50
HET TURBOMONDSTUK REINIGEN* . . . . . . . . . . . . . . . . . . . . . .50
TIPS OM DE BESTE RESULTATEN TE VERKRIJGEN . . . . . . . . 51
PROBLEEMOPLOSSING . . . . . . . . . . . . . . . . . . . . . . . . . . . . . . . . . . . . 51
* ALLEEN BEPAALDE MODELLEN

DE
GB
ES
PT
FR
NL
IT
FA
C.
Q. S.P. R.
B.
L.
E.
H.
N.
G.
D.
F.
A.
K.
M.
I.
J.
O.

DE
GB
ES
PT
FR
NL
IT
FA
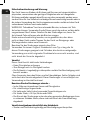
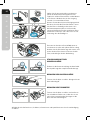
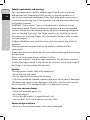
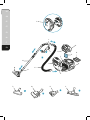
VOR DER INBETRIEBNAHME
Lesen Sie dieses Handbuch sorgfältig durch.
Überprüfen Sie, ob alle beschriebenen Teile enthalten sind.
Beachten Sie insbesondere die Sicherheitshinweise
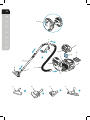
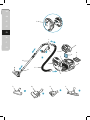
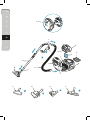
BESCHREIBUNG DES STAUBSAUGERS VOM TYP VX7
A. Display mit manueller Bedienung des Drehschalters
B. Abluftfilter
C. Parkschlitze
D. Netzkabel
E. Motorfilter
F. Motorfilterhalterung
G. s-Bag®
H. s-Bag®-Halterung
I. Abdeckung für Staubbeutelfach
J. 3in1 Multifunktionsdüse
K. Schlauch
L. Handgriff
M. Teleskoprohr
N. Parkfunktion
O. FlowMotion Düse
P. Mini-Turbodüse für Polster*
Q. Turbodüse*
R. Mini turbodüse*
S. ParkettoPro Hartbodendüse*
* Nur ausgewählte Modelle.

DE
GB
ES
PT
FR
NL
IT
FA
Sicherheitsanforderung und Warnung
Das Gerät kann von Kindern ab 8 Jahren und Personen mit eingeschränkten
physischen, sensorischen oder geistigen Fähigkeiten oder mit mangelnder
Erfahrung und/oder mangeln dem Wissen nur dann verwendet werden, wenn
sie durch eine für ihre Sicherheit zuständige Person beaufsichtigt werden oder in
die sichere Verwendung des Geräts eingewiesen wurden und die mit dem Gerät
verbundenen Gefahren verstanden haben.
WARNUNG: Turbodüsen* besitzen rotierende Bürsten, in denen sich Teile
festsetzen können. Verwenden Sie die Düsen vorsichtig und nur auf den dafür
vorgesehenen Oberfl ächen. Schalten Sie den Staubsauger aus, bevor Sie
festsitzende Teile entfernen oder die Bürsten reinigen.
Kinder müssen beaufsichtigt werden, um zu gewährleisten, dass diese
nicht mit dem Gerät spielen.Trennen Sie das Gerät vor Reinigungs- oder
Wartungsarbeiten immer vom Stromnetz.
Benutzen Sie den Staubsauger niemals ohne Filter.
Verwenden Sie immer Original-Staubbeutel vom Typ s-bag, die für
diesen Staubsauger geeignet sind. Schäden, die durch unsachgemäße
Verwendung von nicht-originalen Staubbeuteln verursacht wurden, sind
nicht durch die Garantie abgedeckt.
Vorsicht
Dieses Gerät besitzt elektrische Verbindungen:
• Keine Flüssigkeiten aufsaugen
• Zum Reinigen nicht in Flüssigkeit tauchen
• Der Schlauch ist regelmäßig zu überprüfen und darf bei Beschädigung nicht
benutzt werden.
Oben Genanntes kann den Motor ernsthaft beschädigen. Solche Schäden sind
nicht durch die Garantie abgedeckt. Dieser Staubsauger ist ausschließlich zur
Verwendung im Haushalt bestimmt.
Benutzen Sie den Staubsauger niemals ...
• In der Nähe von brennbaren Gasen und Flüssigkeiten.
• Für scharfkantige Gegenstände
• Für heiße oder kalte Asche, brennende Zigarettenkippen etc.
• Für feinen Staub, z. B. Gips, Beton oder Mehl.
• Der Einsatz des Staubsauger unter den oben genannten Bedingungen kann
zu schweren Schäden führen, diese sind nicht durch die Garantieleistung
abgedeckt.
Vorsichtsmaßnahmen hinsichtlich des Netzkabels
• Stecker und Netzkabel regelmäßig auf Beschädigungen überprüfen.

DE
GB
ES
PT
FR
NL
IT
FA
Staubsauger niemals benutzen, wenn das Netzkabel beschädigt ist.
• Wenn das Netzkabel beschädigt ist, muss es zur Vermeidung von Gefahren
von einem autorisierten AEGServicezentrum ausgetauscht werden. Schäden
am Kabel des Staubsaugers werden von der Garantie nicht abgedeckt.
• Den Staubsauger niemals am Netzkabel ziehen oder hochheben.
• Alle Wartungs- und Reparaturarbeiten müssen vom autorisierten AEG-
Kundendienst durchgeführt werden.
Staubsauger an einem trockenen Ort aufbewahren.
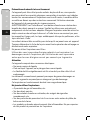
Verbraucherinformationen und Nachhaltigkeitsgrundsätze
AEG übernimmt keine Verantwortung für Schäden, die durch den
unsachgemäßen Einsatz des Geräts oder unbefugten Eingriff in
den Staubsauger entstehen. Nähere Einzelheiten zur Garantie sowie
Ansprechstellen für Verbraucherfragen fi nden Sie im beigelegten
Garantieheft.
Wenn Sie Fragen oder Hinweise zum Staubsauger oder zur Bedienungsanleitung
haben oder aber wenn Sie praktisches Zubehör benötigen, senden Sie uns bitte
eine E-Mail an floorcare@aeg-home.com oder rufen Sie uns an.
Nachhaltigkeitsgrundsätze
Dieses Produkt wurde mit Rücksicht auf die Umwelt hergestellt. Alle
Plastikteile sind für Recyclingzwecke markiert. Einzelheiten darüber fi nden Sie
auf unserer Website: www.aeg-home.com.
Das Verpackungsmaterial wurde mit Blick auf Umweltfreundlichkeit
ausgewählt und kann wiederverwertet werden. Recyceln Sie Materialien
mit dem Symbol . Entsorgen Sie die Verpackung in den entsprechenden
Recyclingbehältern. Recyceln Sie zum Umwelt- und Gesundheitsschutz
elektrische und elektronische Geräte.
Entsorgen Sie Geräte mit diesem Symbol nicht mit dem Hausmüll. Bringen
Sie das Gerät zu Ihrer örtlichen Sammelstelle oder wenden Sie sich an Ihr
Gemeindeamt.

DE
GB
ES
PT
FR
NL
IT
FA
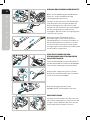
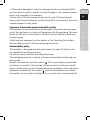
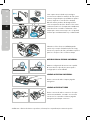
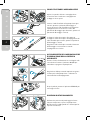
WIE MAN DEN STAUBSAUGER BENUTZT
PARKPOSITIONEN
STARTEN/STOPPEN SIE DEN
STAUBSAUGER UND STELLEN SIEDIE
SAUGLEISTUNG EIN
Önen Sie die Abdeckung des Staubbehälters.
Prüfen Sie, ob der Staubbeutel (s-bag)
ordnungsgemäß eingesetzt ist.
Verwenden Sie die Parkposition der Unterseite
(A), um den Staubsauger zu transportieren und
zu lagern. An der Rückseite (B), wenn Sie eine
Pause machen (Ihren Rücken schonen).
Schieben Sie den Schlauch in den Staubsauger
(zum Entnehmen des Schlauchs drücken Sie
die Entriegelungstasten und ziehen ihn ab).
Schieben Sie den Schlauch in den Schlauchgri,
bis die Verriegelungstaste klickt (um ihn
freizugeben, drücken Sie die Verriegelungstaste
und ziehen ihn heraus).
Befestigen Sie das Teleskoprohr an der
Düse. Befestigen Sie das Teleskoprohr am
Schlauchgri (um es zu entfernen, drücken Sie
die Verriegelungstaste und ziehen es heraus).
Justieren Sie das Teleskoprohr, indem Sie die
Verriegelung mit einer Hand halten und den Gri
mit der anderen Hand ziehen.
Ziehen Sie das Netzkabel heraus und stecken Sie
es in die Netzsteckdose. Drücken Sie die EIN/AUS-
Taste, um den Staubsauger ein-/auszuschalten.
Anpassen der Saugleistung. Drehen Sie den
Drehschalter am Staubsauger oder verwenden
Sie das Luftventil am Handgri.*
Nach der Reinigung drücken Sie die
AUFROLLTASTE, um das Kabel einzurollen.

DE
GB
ES
PT
FR
NL
IT
FA
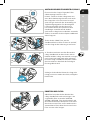
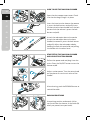
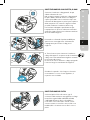
AUSTAUSCHEN DES STAUBBEUTELS (S-BAG®)
Ersetzen Sie den s-bag in folgenden Fällen:
S-BAG-Anzeige leuchtet rot auf.
Hinweis: Tauschen Sie den s-bag immer aus,
wenn die S-BAG-Anzeige leuchtet, auch wenn
der s-bag nicht voll ist (er könnte verstopft
sein). Dies gilt auch nach der Verwendung von
Teppichreinigungspulver. Für bestmögliche
Leistung verwenden Sie den Ultra Long
Performance-Beutel, der speziell für Ihren
Staubsauger entwickelt wurde. Andere
synthetische s-bags können ebenfalls verwendet
werden. Verwenden Sie keine Papierstaubbeutel!
www.s-bag.com
Ziehen Sie die S-BAG-Taste, um das
Staubbeutelfach zu önen. Ziehen Sie am Gri,
um den s-bag mit der Halterung zu entfernen.
A. Zum Herausnehmen aus dem Einsatz den
s-bag®-Staubbeutel am Kartonhalter ziehen.
Dadurch wird der s-bag® automatisch versiegelt,
und es kann kein Staub nach außen gelangen.
B. Neuen s-bag®-Staubbeutel einsetzen, indem
der Kartonhalter in das Ende der Führung im
Einsatz gedrückt wird.
Schließen Sie den Deckel. Wenn der s-bag nicht
richtig positioniert wurde oder fehlt, schließt der
Deckel nicht.
Abluftfilter bei jedem fünften Wechsel des
s-bag®-Staubbeutels wechseln/reinigen. Nur
original AEG-Filter verwenden: (AEF12W,
AFS1W) / AEFG12W. Filter herausnehmen und
die Farbe des Rahmens überprüfen: Grün: Muss
durch einen neuen Filter ersetzt werden (nicht
auswaschbarer Filter). Blau: Durch einen neuen
Filter ersetzen oder reinigen.
ERSETZEN DER FILTER
A.
B.

DE
GB
ES
PT
FR
NL
IT
FA
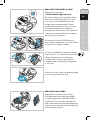
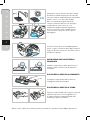
Spülen Sie die Innenseite (die verschmutzte
Seite) mit lauwarmem Leitungswasser aus.
Tippen Sie auf den Filterrahmen, um das Wasser
zu entfernen. Wiederholen Sie den Vorgang
viermal. (**nur waschbare Filter)
Hinweis: Verwenden Sie keine Reinigungsmittel.
Berühren Sie nicht die Filteroberfläche. Lassen
Sie den Filter vollständig trocken (min. 24 h
bei Raumtemperatur), bevor Sie ihn wieder
einsetzen! Wechseln Sie den waschbaren Filter
mindestens einmal pro Jahr oder wenn er sehr
schmutzig oder beschädigt ist.
Ersetzen Sie den Motorfilter (AF08), wenn er
verschmutzt ist oder nach jedem fünften s-bag.
Drücken Sie die Filterhalterung nach unten, und
ziehen Sie den Filter heraus. Ersetzen Sie den
Filter, und schließen Sie die Abdeckung.
STAUBSAUGEN MIT DER
UNIVERSALDÜSE
REINIGEN DER UNIVERSALDÜSE
REINIGEN DER TURBODÜSE
Ändern Sie die Düseneinstellung mit dem Pedal.
Das Symbol zeigt den empfohlenen Bodentyp.
Trennen Sie die Düse vom Rohr. Reinigen Sie mit
dem Schlauchgri.
Trennen Sie die Düse vom Rohr und entfernen
Sie verhedderte Fäden usw., indem Sie sie mit
einer Schere wegschneiden. Reinigen Sie die
Düse mit dem Schlauchgri. *
AEG behält sich das Recht vor, Produkte, Informationen und Spezifikationen ohne Vorankündigung
zu ändern.

DE
GB
ES
PT
FR
NL
IT
FA
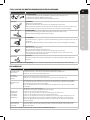
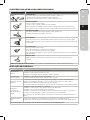
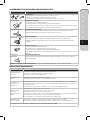
TIPPS, WIE SIE DIE BESTEN ERGEBNISSE ERZIELEN KÖNNEN
DÜSE/ZUBEHÖR VERWENDUNG FÜR:
3-in-1-Zubehörwerkzeug* Drei Tools in einem:
1. Tool zum Staubsaugen auf harten Oberflächen (Bücherregalen, Fußleisten usw.).
2. Polsterdüse für Textilien (Gardinen, Polster usw.).
3. Fugendüse für Spalten und Nischen (hinter Heizkörpern usw.).
Turbodüse* Teppichdüse:
• Bürstet und saugt gleichzeitig
• Die Bürstenrolle wird durch den Luftstrom des Staubsaugers angetrieben.
• Nicht geeignet für Teppiche mit sehr hohem Flor und langen Fransen, rutschfeste Teppiche wie
Türmatten oder wasserfeste Teppiche. Verwenden Sie stattdessen die Universaldüse.
ParkettoPro-Düse* Hartbodendüse::
• Zur schonende Reinigung von Hartböden (Parkett, Holzböden, Fliesen usw.).
• Optimale Staubentfernung auf Hartböden mit Fugen.
PrecisionFlow-Düse*
Universaldüse:
• Für alle Bodentypen, sorgt für eine optimale Staubentfernung sowohl auf Teppichen als auch auf
Hartböden.
• Ändern Sie die Düseneinstellung mit dem Pedal. Das Symbol zeigt den empfohlenen Bodentyp.
Miniturbodüase*
Miniturbodüse:
• Bürstet und saugt gleichzeitig
• Für Polstermöbel, PKW-Sitze, Matratzen usw.
• Die Bürstenrolle wird durch den Luftstrom des Staubsaugers angetrieben.
• Nicht geeignet für Teppiche mit sehr hohem Flor und langen Fransen, da diese sich in der
rotierenden Bürstenrolle verfangen können.
Polsterdüse*
Polsterdüse:
Für Sofas, Vorhänge, leichte Stoe usw. Polsterdüse* (35) verwenden. Gegebenenfalls Saugleistung
reduzieren.
Modelle mit manueller Leistungsregelung - Für eine optimale Leistung befolgen Sie die Abbildung auf dem Staubsauger.
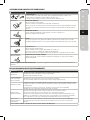
FEHLERSUCHE
PROBLEM SOLUTION
Der Staubsauger
startet nicht
• Stellen Sie sicher, dass das Kabel an das Stromnetz angeschlossen ist.
• Vergewissern Sie sich, dass der Stecker und das Kabel nicht beschädigt sind.
• Prüfen Sie, ob eine Sicherung durchgebrannt ist.
Die s-bag®-
Kontrolllampe
leuchtet
• Prüfen Sie, ob der s-bag® voll oder verstopft ist.
• Wenn Sie den s-bag® bereits gewechselt haben, tauschen Sie den Motorfilter aus.
Der Staubsauger
stoppt
Der Staubsauger könnte überhitzt sein: Trennen Sie ihn vom Netzstrom, und prüfen Sie, ob Düse,
Rohr, Schlauch oder Filter verstopft sind. Lassen Sie den Staubsauger 30 Minuten lang abkühlen,
bevor Sie ihn wieder am Stromnetz anschließen.
Wenn der Staubsauger immer noch nicht funktioniert, kontaktieren Sie einen autorisierten AEG-
Kundendienst.
Rückgang der
Saugleistung
im Vergleich
zur normalen
Saugleistung
• Check if the s-bag is full or blocked.
• Check if the motor filter is clogged and needs changing.
• Prüfen Sie, ob der s-bag voll oder verstopft ist.
• Prüfen Sie, ob der Motorfilter verstopft ist und ausgetauscht werden muss.
• Prüfen Sie, ob die Düse verstopft ist und gereinigt werden muss.
• Prüfen Sie, ob der Schlauch verstopft ist, indem Sie ihn vorsichtig zusammendrücken. Seien Sie
jedoch vorsichtig, falls die Verstopfung im Schlauch durch Glas oder Nadeln verursacht wurde.
Hinweis: Die Gewährleistung deckt keine Schäden am Schlauch ab, die durch dessen Reinigung
verursacht wurden.
Wasser wurde in
den Staubsauger
eingesaugt
Es ist erforderlich, den Motor von einem autorisierten AEG-Kundendienst auswechseln zu lassen.
Schäden am Motor, die durch eingedrungenes Wasser verursacht wurden, sind nicht durch die
Garantie abgedeckt.
Bei weiteren Problemen wenden Sie sich an den autorisierten AEG-Kundendienst.

DE
GB
ES
PT
FR
NL
IT
FA
DE
GB
ES
PT
FR
NL
IT
FA
DE
GB
ES
PT
FR
NL
IT
FA
C.
Q. S.P. R.
B.
L.
E.
H.
N.
G.
D.
F.
A.
K.
M.
I.
J.
O.

DE
GB
ES
PT
FR
NL
IT
FA
DE
GB
ES
PT
FR
NL
IT
FA
DE
GB
ES
PT
FR
NL
IT
FA
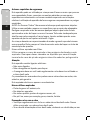
BEFORE STARTING
Read this manual carefully.
Check that all parts described are included.
Pay special attention to the safety precautions.
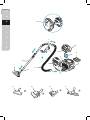
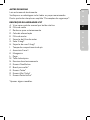
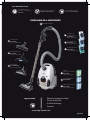
DESCRIPTION OF VX7 VACUUM CLEANER
A. Display with rotary knob manual control
B. Exhaust filter
C. Parking slots
D. Power cord
E. Motor filter
F. Motor filter holder
G. S-bag
H. S-bag holder
I. Dust compartment cover
J. 3in1 tool
K. Hose
L. Handle
M. Telescopic tube
N. Parking clip
O. FlowMotion nozzle
P. Upholstery nozzle*
Q. Turbo nozzle*
R. Mini turbo nozzle*
S. ParkettoPro nozzle*
* Certain models only.

DE
GB
ES
PT
FR
NL
IT
FA
DE
GB
ES
PT
FR
NL
IT
FA
DE
GB
ES
PT
FR
NL
IT
FA
Safety requirement and warning
This appliance can be used by children aged from 8 years and above
and persons with reduced physical, sensory or mental capabilities or
lack of experience and knowledge if they have been given supervision or
instruction concerning use of the appliance in a safe way and understand
the hazards involved.
WARNING: Turbo nozzles* have a rotating brush in which parts may
become entrapped. Please use them with caution and only on intended
surfaces. Please turn the vacuum cleaner off before removing entrapped
parts or cleaning the brush. The Turbo nozzle is not suitable for carpets
with deep piles and long fringes, anti-slip carpets like door mats or water
resistant carpets.
Children should be supervised to ensure that they do not play with the
appliance.
Cleaning and maintenance shall not be made by children without
supervision.
Always disconnect the plug from the mains before cleaning or maintaining
the appliance.
Never use the vacuum cleaner without its filters.
Always use original s-bag dust bags suitable for this particular vacuum
cleaner. Damages caused to the cleaner by incorrect use of none-original
dust bags is not covered by the warranty.
Caution
This appliance contains electrical connections:
• Never vacuum any liquid
• Do not immerse in any liquid for cleaning
• The hose should be checked regularly and must not be used if damaged.
The above can cause serious damage to the motor, which is not covered
by the warranty. This vacuum cleaner is for domestic use only.
Never use vacuum cleaner
• Close to fl ammable gases, etc.
• On sharp objects
• On hot or cold cinders, lit cigarette butts, etc.
• On fi ne dust, for instance plaster, concrete, flour.
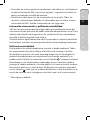
Power cord precautions
• Never use the vacuum cleaner if the cord is damaged.

DE
GB
ES
PT
FR
NL
IT
FA
DE
GB
ES
PT
FR
NL
IT
FA
DE
GB
ES
PT
FR
NL
IT
FA
• If the cord is damaged, it must be replaced only by an authorized AEG
service centre in order to avoid a hazard. Damage to the vacuum cleaner’s
cord is not covered by the warranty.
• Never pull or lift the vacuum cleaner by the cord. All servicing and
repairs must be performed by an authorized AEG service centre. Store the
vacuum cleaner in a dry place.
Consumer information and sustainability policy
AEG declines all responsibility for all damages arising from any improper
use of the appliance or in cases of tampering with the appliance. For more
details of warranty and consumers’ contacts see the Warranty Booklet in
the packaging.
If you have any comments on the cleaner or the Operating Instructions
manual please e-mail us at [email protected].
Sustainability policy
This product is designed with the environment in mind. All plastic parts
are marked for recycling purposes.
For details see our website: www.aeg-home.com.
The packaging material is chosen to be environmentally friendly and can
be recycled.
Recycle the materials with the symbol . Put the packaging in applicable
containers to recycle it. Help protect the environment and human health
and to recycle waste of electrical and electronic appliances. Do not dispose
appliances marked with the symbol with the household waste. Return
the product to your local recycling facility or contact your municipal office.

DE
GB
ES
PT
FR
NL
IT
FA
DE
GB
ES
PT
FR
NL
IT
FA
DE
GB
ES
PT
FR
NL
IT
FA
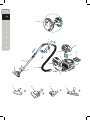
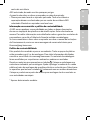
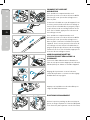
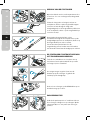
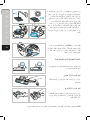
HOW TO USE THE VACUUM CLEANER
PARKING POSITIONS
START/STOP THE VACUUM CLEANER
AND ADJUST SUCTION POWER
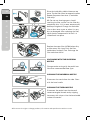
Open the dust compartment cover. Check
that the dust bag (s-bag) is in place.
Use parking position underneath (A) to
carry and store the cleaner. At the back (B)
when you pause (save your back).
Insert the hose into the cleaner (to remove
it, press the lock buttons and pull). Insert
the hose into the hose handle until the lock
button clicks (to release it, press the lock
button
and pull).
Attach the telescopic tube to the nozzle.
Attach the telescopic tube to the hose
handle (to remove it, press the lock button
and pull). Adjust the telescopic tube by
holding the lock with one hand and pulling
the handle with the other hand.
Pull out the power cord and plug it into the
mains. Press the ON/OFF button to turn the
cleaner on/o.
Adjust suction power. Turn the rotary knob
on the cleaner or use the air valve on the
handle.*
After cleaning, push the REWIND button to
rewind the cable.

DE
GB
ES
PT
FR
NL
IT
FA
DE
GB
ES
PT
FR
NL
IT
FA
DE
GB
ES
PT
FR
NL
IT
FA
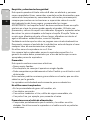
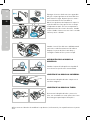
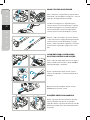
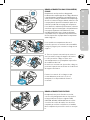
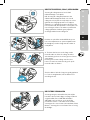
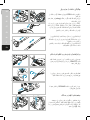
REPLACING THE DUSTBAG, S-BAG®
Replace the s-bag when
- S-BAG indicator lights up in red
NB
: Always change the s-bag when S-BAG
indicator is illuminated even if the s-bag
is not full (it may be blocked) and after
using carpet cleaning powder. For best
possible performance, use the Ultra Long
Performance bag which is especially
developed for your cleaner. Other synthetic
s-bags can also be used. Do not use paper
dust bags! www.s-bag.com
Pushing and lifting the OPEN button to
open the dust compartment. Lift the handle
to remove the s-bag with holder.
A. Pull the cardboard to remove the s-bag®
from the insert. This automatically seals the
s-bag® and prevents dust leaking out.
B. Insert a new s-bag® by pushing the
cardboard right into the end of the groove
in the insert.
Close the lid. If the s-bag is not properly placed
or is missing, the lid will not close.
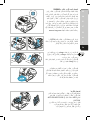
Replace/clean the exhaust filter at every
fifth replacement of the dust bag (s-bag®).
Use AEG original filters: (AEF12W, AFS1W)
/ AEFG12W. Lift out the filter and check the
color of the frame: Green: Must be replaced by
a new filter (non-washable filter). Blue: Replace
with a new filter or clean it.
REPLACING THE FILTERS
A.
B.

DE
GB
ES
PT
FR
NL
IT
FA
DE
GB
ES
PT
FR
NL
IT
FA
DE
GB
ES
PT
FR
NL
IT
FA
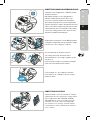
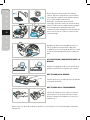
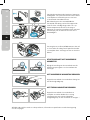
Rinse the inside (dirty side) in lukewarm tap
water. Tap the filter frame to remove the water.
Repeat the process four times. (*
*washable
filter only)
NB: Do not use cleaning agents. Avoid
touching the filter surface. Let the filter dry
completely (min. 24 h in room temperature)
before putting back! Change the washable
filter at least once a year or when it is very
dirty or damaged. After replacing the filter,
close the dust compartment lid until it is
clicked back into place.
Replace the motor filter (AF08) when dirty
or after every 5th s-bag. Push the filter
holder down and pull it out. Exchange the
filter and close the lid.
VACUUMING WITH THE UNIVERSAL
NOZZLE
CLEANING THE UNIVERSAL NOZZLE
CLEANING THE TURBO NOZZLE
Change nozzle setting with the pedal. Icon
illustrates recommended floor type.
Disconnect the nozzle from the tube. Clean
with the hose handle.
Disconnect the nozzle from the tube and
remove entangled threads etc by snipping
them away with scissors. Use the hose handle
to clean the nozzle.*
AEG reserves the right to change products, information and specifications without notice.

DE
GB
ES
PT
FR
NL
IT
FA
DE
GB
ES
PT
FR
NL
IT
FA
DE
GB
ES
PT
FR
NL
IT
FA
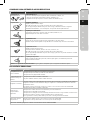
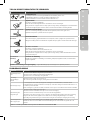
TIPS ON HOW TO GET THE BEST RESULTS
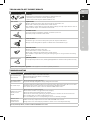
NOZZLE/ACCESSORY USE FOR:
3in1 accessory tool* 3 tools in 1:
1. Dusting tool for hard surfaces (bookshelves, skirting boards etc).
2. Upholstery tool for textiles (curtains, upholstery etc).
3. Crevice tool for narrow spaces (behind radiators etc).
Turbo nozzle* Carpet nozzle:
• Brushes and vacuums at the same time (best pick up of hair, fibres etc).
• Brush roller is driven by the airflow of the vacuum cleaner.
• Not suitable for carpets with very deep piles and long fringes, anti-slip carpets like door mats or
water resistant carpets. Use universal nozzle instead.
ParkettoPro nozzle* Hard oor nozzle:
• For gentle cleaning of hard floor (parquet, wooden floor, tiles etc).
• Best dust pick up on hard floor with crevice.
PrecisionFlow nozzle*
Universal nozzle:
• For all floor types, secures best dust pick up on both carpets and hard floors.
• Change nozzle setting with the pedal. Icon will show recommended floor type.
Mini Turbo nozzle*
Mini turbo nozzle:
• Brushes and vacuums at the same time.
• For textile furniture, car seats, mattresses etc.
• Brush roller is driven by the airflow of the vacuum cleaner.
• Not suitable for carpets with very deep pile and long fringes as it can get stuck in the rotating
brush roll.
Upholstery nozzle*
Upholstery nozzle:
Use the upholstery nozzle for sofas, curtains, lightweight fabrics etc. Reduce suction power if necessary.
Models with manual power regulation – follow graphics on cleaner for optimal performance.
TROUBLESHOOTING
PROBLEM SOLUTION
The vacuum cleaner
does not start
• Check that the cable is connected to the mains.
• Check that the plug and cable are not damaged.
• Check for a blown fuse.
The s-bag® indicator
light is illuminated
• Check if the s-bag® is full or blocked.
• If you have already changed the s-bag®, change the motor filter.
The cleaner stops
The cleaner might be overheated: disconnect it from the mains; check if the nozzle, tube, hose or filters
are blocked. Let the cleaner cool down for 30 minutes before plugging it in again.
If the cleaner still does not work, contact an authorized AEG service centre.
Reduction of suction
capacity versus
normal
• Check if the s-bag is full or blocked.
• Check if the motor filter is clogged and needs changing.
• Check if nozzle is blocked and needs to be cleared.
• Check if hose is blocked by squeezing it gently. However, be careful in case the obstruction has
been caused by glass or needles caught inside the hose.
Note: The warranty does not cover any damage to the hose caused by cleaning it.
Water has been
sucked into the
vacuum cleaner
It will be necessary to replace the motor at an authorized AEG service centre.
Damage to the motor caused by the penetration of water is not covered by the warranty.
For any further problems, contact an authorized AEG service centre.

DE
GB
ES
PT
FR
NL
IT
FA
DE
GB
ES
PT
FR
NL
IT
FA
DE
GB
ES
PT
FR
NL
IT
FA
C.
Q. S.P. R.
B.
L.
E.
H.
N.
G.
D.
F.
A.
K.
M.
I.
J.
O.
A página está carregando ...
A página está carregando ...
A página está carregando ...
A página está carregando ...
A página está carregando ...
A página está carregando ...
A página está carregando ...
A página está carregando ...
A página está carregando ...
A página está carregando ...
A página está carregando ...
A página está carregando ...
A página está carregando ...
A página está carregando ...
A página está carregando ...
A página está carregando ...
A página está carregando ...
A página está carregando ...
A página está carregando ...
A página está carregando ...
A página está carregando ...
A página está carregando ...
A página está carregando ...
A página está carregando ...
A página está carregando ...
A página está carregando ...
A página está carregando ...
A página está carregando ...
A página está carregando ...
A página está carregando ...
A página está carregando ...
A página está carregando ...
A página está carregando ...
A página está carregando ...
A página está carregando ...
A página está carregando ...
A página está carregando ...
A página está carregando ...
A página está carregando ...
A página está carregando ...
A página está carregando ...
A página está carregando ...
A página está carregando ...
A página está carregando ...
A página está carregando ...
A página está carregando ...
A página está carregando ...
A página está carregando ...
-
 1
1
-
 2
2
-
 3
3
-
 4
4
-
 5
5
-
 6
6
-
 7
7
-
 8
8
-
 9
9
-
 10
10
-
 11
11
-
 12
12
-
 13
13
-
 14
14
-
 15
15
-
 16
16
-
 17
17
-
 18
18
-
 19
19
-
 20
20
-
 21
21
-
 22
22
-
 23
23
-
 24
24
-
 25
25
-
 26
26
-
 27
27
-
 28
28
-
 29
29
-
 30
30
-
 31
31
-
 32
32
-
 33
33
-
 34
34
-
 35
35
-
 36
36
-
 37
37
-
 38
38
-
 39
39
-
 40
40
-
 41
41
-
 42
42
-
 43
43
-
 44
44
-
 45
45
-
 46
46
-
 47
47
-
 48
48
-
 49
49
-
 50
50
-
 51
51
-
 52
52
-
 53
53
-
 54
54
-
 55
55
-
 56
56
-
 57
57
-
 58
58
-
 59
59
-
 60
60
-
 61
61
-
 62
62
-
 63
63
-
 64
64
-
 65
65
-
 66
66
-
 67
67
-
 68
68


AEG VX7-2-IW-S Manual do usuário
- Categoria
- Aspirador de pó
- Tipo
- Manual do usuário
em outros idiomas
- español: AEG VX7-2-IW-S Manual de usuario
- français: AEG VX7-2-IW-S Manuel utilisateur
- italiano: AEG VX7-2-IW-S Manuale utente
- English: AEG VX7-2-IW-S User manual
- Nederlands: AEG VX7-2-IW-S Handleiding
- Deutsch: AEG VX7-2-IW-S Benutzerhandbuch
Artigos relacionados
-
AEG VX7 Instruções de operação
-
AEG VX7-2-IW-S Manual do usuário
-
-
-
AEG VX9-4-4DB Manual do usuário
-
AEG LX9-3-CR Manual do proprietário
-
AEG AVQ2131 Manual do usuário
-
-
-
Outros documentos
-
Electrolux Z3323 Manual do usuário
-
-
-
-
-
-
-
-
-
VOLTA 2815 Manual do proprietário