Samsung PS51E530A3W Guia rápido
- Categoria
- TVs de plasma
- Tipo
- Guia rápido

Plasma TV
user manual
Thank you for purchasing this Samsung product.
To receive more complete service, please register
your product at
www.samsung.com/register
Model _____________Serial No. _____________
E-MANUAL
© 2012 Samsung Electronics Co., Ltd. All rights reserved.
BN68-04068L
BN68-04068L-04
Contact SAMSUNG WORLDWIDE
If you have any questions or comments relating to Samsung products, please contact the SAMSUNG customer care centre.
Country
Customer Care Centre
Web Site
NIGERIA 0800-726-7864 www.samsung.com
Ghana 0800-10077
0302-200077
www.samsung.com
Cote D’ Ivoire 8000 0077 www.samsung.com
Senegal 800-00-0077 www.samsung.com
Cameroon 7095-0077 www.samsung.com
KENYA 0800 724 000 www.samsung.com
UGANDA 0800 300 300 www.samsung.com
TANZANIA 0685 88 99 00 www.samsung.com
SOUTH AFRICA 0860-SAMSUNG (726-7864) www.samsung.com
Botswana 0800-726-000 www.samsung.com
Namibia 8197267864 www.samsung.com
Angola 91-726-7864 www.samsung.com
Zambia 211350370 www.samsung.com
[PE530-SH]BN68-04068L.indb 1 2012-07-26 3:41:33

English - 2
For more information on how to use e-Manual (p. 9)
Figures and illustrations in this User Manual are provided for reference only and may differ from actual product appearance. Product
design and specifications may be changed without notice.
Digital TV notice
1. Functionalities related to Digital TV (DVB) are only available in countries/areas where DVB-T (MPEG2 and MPEG4 AVC) digital terrestrial
signals are broadcasted or where you are able to access to a compatible DVB-C (MPEG2 and MPEG4 AAC) cable-TV service. Please
check with your local dealer the possibility to receive DVB-T or DVB-C signal.
2. DVB-T is the DVB European consortium standard for the broadcast transmission of digital terrestrial television and DVB-C is that for the
broadcast transmission of digital TV over cable. However, some differentiated features like EPG (Electric Programme Guide), VOD (Video On
Demand) and so on, are not included in this specification. So, they cannot be workable at this moment.
3. Although this TV set meets the latest DVB-T and DVB-C standards, as of [August, 2008], the compatibility with future DVB-T digital
terrestrial and DVB-C digital cable broadcasts cannot be guaranteed.
4. Depending on the countries/areas where this TV set is used some cable-TV providers may charge an additional fee for such a service and
you may be required to agree to terms and conditions of their business.
5. Some Digital TV functions might be unavailable in some countries or regions and DVB-C might not work correctly with some cable service
providers.
6. For more information, please contact your local Samsung customer care centre.
✎
The reception quality of TV may be affected due to differences in broadcasting method between the countries. Please check the TV
performance in the local SAMSUNG Authorized Dealer, or the Samsung Call Centre whether it can be improved by reconfiguring TV
setting or not.
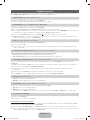
User Instructions
• Screen Image retention
Do not display a still image (such as on a video game) on the plasma display panel for more than several minutes as it can cause screen
image retention. This image retention is also known as “screen burn”. To avoid such image retention, reduce the degree of brightness and
contrast of the screen when displaying a still image.
• Heat on the top of the Plasma TV
The top side of the product may be hot after long periods of use as heat dissipates from the panel through the vent hole in the upper part of
the product.
This is normal and does not indicate any defect or operation failure of the product.
However, children should be prevented from touching the upper part of the product.
• The product is making a “cracking” noise.
A “cracking” noise may occur when the product contracts or expands due to a change in the surrounding environment such as
temperature or humidity. This is normal and not a defect of the unit.
• Cell Defects
The PDP uses a panel consisting of 2,360,000(HD-level) to 6,221,000(FHD-level) pixels which require sophisticated technology to produce.
However, there may be a few bright or dark pixels on the screen. These pixels will have no impact on the performance of the product.
• Avoid operating the TV at temperatures below 41°F (5°C)
• A still image displayed too long may cause permanent damage to the PDP Panel.
Watching the Plasma TV in 4:3 format for a long period of time may leave traces of borders displayed on the left, right
and centre of the screen caused by the difference of light emission on the screen. Playing a DVD or a game console may
cause similar effects to the screen.
Damages caused by the above effect are not covered by the Warranty.
• After-images on the Screen.
Displaying still images from Video games and PC for longer than a certain period of time may produce partial after-images.
To prevent this effect, reduce the “brightness” and “contrast” when displaying still images for a long time.
• Warranty
Warranty does not cover any damage caused by image retention.
Burn-in is not covered by the warranty.
[PE530-SH]BN68-04068L.indb 2 2012-07-26 3:41:34

English - 3
Accessories
✎
Please make sure the following items are included with your TV. If any items are missing, contact your dealer.
✎
The items’ colours and shapes may vary depending on the models.
✎
Cables not included in the package contents can be purchased separately.
• Remote Control & Batteries (AAA x 2) • Power Cord
• Owner’s Instructions • Cleaning Cloth
• Warranty Card / Safety Guide (Not available in some locations)
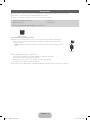
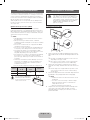
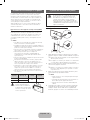
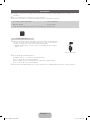
Ferrite Core (1EA)
✎
Ferrite Core for Power Cord: The ferrite cores are used to shield the cables from interference.
When connecting a cable, open the ferrite core and clip it around the cable near the plug as
shown in the figure.
x
A Maximum distance between the ferrite core and the end of the cord inserted in the TV: 3/4
inches
B
A
B
A
Power Cord
✎
An administration fee may be charged if either
(a) an engineer is called out at your request and there is no defect in the product
(i.e. where you have failed to read this user manual)
(b) you bring the unit to a repair centre and there is no defect in the product
(i.e. where you have failed to read this user manual)
✎
The amount of such administration charge will be advised to you before any work or home visit is carried out.
[PE530-SH]BN68-04068L.indb 3 2012-07-26 3:41:34

English - 4
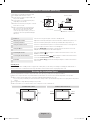
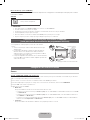
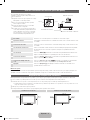
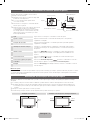
Using the TV’s Controller (Panel Key)
TV Controller is a multi directional button that
helps navigate without remote control.
✎
Some functions which require a PIN code
may not be available.
✎
The product colour and shape may vary
depending on the model.
✎
Exits the menu when pressing the controller
more than 1 second.
✎
When selecting the function by moving
the controller to the up/down/left/right
directions, be sure not to press the
controller. If you press it first, you cannot
operate it to move the up/down/left/right
directions.
Function menu
Return
Remote control sensor
TV Controller
Down (Front)
Up (Rear)
Right
Left
Power on Turns the TV on by pressing the controller in standby mode.
Adjusting the volume Adjusts the volume by moving the controller from side to side when the power is on.
Selecting a channel Selects a channel by moving the controller up and down when the power is on.
Using the function menu Press the controller when the power is on, then the function menu screen appears. If
you press it again, the function menu screen disappears.
Using the Menu
Selects the MENU(
m
) by moving the controller in the function menu screen. The
OSD(On Screen Display) of your TV’s feature appears.
Selecting the Source Selects the Source( ) by moving the controller in the function menu screen. The
Source list screen appears.
Selecting the Contents Home Selects the Contents Home( ) by moving the controller in the function menu
screen. The Contents Home main screen appears.
Power Off
Selects the Power Off(
P
) to turn the TV off by moving the controller in the function
menu screen.
Standby mode
Do not leave your TV in standby mode for long periods of time (when you are away on a holiday, for example). A small amount of
electric power is still consumed even when the power button is turned off. It is best to unplug the power cord.
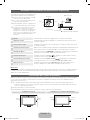
Securing the Installation Space
Keep the required distances between the product and other objects (e.g. walls) to ensure proper ventilation.
Failing to do so may result in fire or a problem with the product due to an increase in the internal temperature of the product.
✎
When using a stand or wall-mount, use parts provided by Samsung Electronics only.
x
If you use parts provided by another manufacturer, it may result in a problem with the product or an injury due to the product
falling.
✎
The appearance may differ depending on the product.
✎
Be careful when you contact the TV because some parts can be somewhat hot.
Installation with a stand. Installation with a wall-mount.
10 cm10 cm
10 cm
10 cm
10 cm
10 cm
10 cm
[PE530-SH]BN68-04068L.indb 4 2012-07-26 3:41:35

English - 5
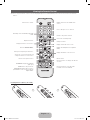
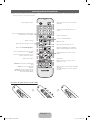
Viewing the Remote Control
✎
This is a special remote control for the visually impaired persons and has Braille points on the Power, Channel, and Volume
buttons.
A B C D
E-MANUAL
P.SIZE
AD/SUBT.
CONTENT
Installing batteries (Battery size: AAA)
Turns the TV on and off.
Displays and selects the available video
sources.
Returns to the previous channel.
Cuts off the sound temporarily.
Changes channels.
Displays channel lists on the screen.
Displays the EPG (Electronic Programme
Guide).
Displays information on the TV screen.
Exits the menu.
Press to directly access to channels.
Adjusts the volume.
Alternately select Teletext ON, Double, Mix
or OFF.
Displays the main on-screen menu.
Quickly select frequently used functions.
Views the Contents Home.
Returns to the previous menu.
Selects the on-screen menu items and
changes the values seen on the menu.
Use these buttons according to the direction
on screen.
Use these buttons in a specific feature.
For details, refer to the e-Manual.
E-MANUAL: Displays the e-Manual
guide. (p. 9)
P.SIZE: Selects the picture size.
AD/SUBT.: Audio Description selection.
(Not available in some locations) / Displays
digital subtitles.
[PE530-SH]BN68-04068L.indb 5 2012-07-26 3:41:36

English - 6
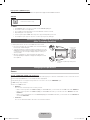
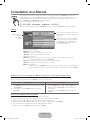
Initial Setup
When the TV is initially powered on, a sequence of on-screen prompts will assist in configuring basic settings. Press the POWER
P
button. Setup is available only when the source is set to TV.
1. Menu Language: Selecting a menu language
Press the ▲ or ▼ button, then press the ENTER
E
button.
Select the desired OSD (On Screen Display) language.
2. Use Mode: Selecting Store Demo or Home Use
Press the ▲ or ▼ button, then press the ENTER
E
button.
Select the Home Use mode. Store Demo mode is for retail environments.
✎
When pressing TV controller, the function menu screen appears. Select the MENU(
m
) and press it more than 5 seconds
using the controller. The Store Demo mode is set.
✎
Cancel the Store Demo by selecting Source( ) and pressing it more than 5 seconds.
✎
Store Demo is only for shop display. If you select it, several functions are not able to use. Please select Home Use when you
watch at home.
3. Country (Depending on the country): Selecting a country
Press the ▲ or ▼ button, then press the ENTER
E
button.
Select the appropriate country.
✎
After selecting the country in the country menu, some models may proceed with an additional option to setup the pin number.
4. Auto Tuning (Step 1): Selecting how you watch your TV
Let’s find and store channels on your TV. Do you need to search for channels?
• Yes, I need to.: Memorises all of the available channels using RF cable.
• No, I don’t need to.: You don’t need to use Auto Tuning to find channels.
5. Auto Tuning (Step 2): Selecting a search options
Select the desired broadcasting signal and antenna source. Press the ▲/▼/◄/► button, then press the ENTER
E
button.
When setting the antenna source to Cable, a step appears allowing you to assign numerical values (channel frequencies) to the
channels. For more information, refer to Channel → Auto Tuning.
✎
Some channel may not be transmitted to this television. It depends on Broadcasting signal gain or specification.
✎
Press the ENTER
E
button at any time to interrupt the memorisation process.
✎
See e-Manual chapter “Retuning Channels > Auto Tuning”
6. Clock: Setting the Clock Mode
• Auto: Set the current time automatically.
• Manual: Allows you to manually set the current date and time.
7. Time Zone (Depending on the country): Setting your Time Zone
This step is only available when the clock mode is set to Auto.
• Auto: Set the time zone automatically.
• Manual: Set the time zone manually.
✎
If you selected Manual, you can select whether to turn DST (Daylight Savings Time) On or Off. (Depending on the
country)
8. Setup Complete
Press the ENTER
E
button.
✎
The completed settings are displayed.
If You Want to Reset This Feature...
Select System - Setup (Initial Setup). Enter your 4 digit PIN number. The default PIN number is “0-0-0-0”. If you want to change the
PIN number, use the Change PIN function.
You should do Setup (MENU → System) again at home although you did in shop.
✎
If you forget the PIN code, press the remote control buttons in the following sequence in Standby mode, which resets the PIN to
“0-0-0-0”: MUTE → 8 → 2 → 4 → POWER (on)
[PE530-SH]BN68-04068L.indb 6 2012-07-26 3:41:37

English - 7
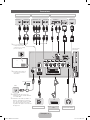
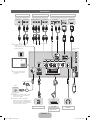
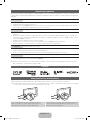
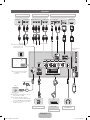
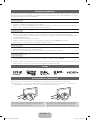
Connections
HDMI IN 2
HDMI IN 1
(DVI)
COMPONENT / AV IN
AUDIO
VIDEO
SERVICE
ANT IN
EXT (RGB)
DIGITAL
AUDIO OUT
(OPTICAL)
(5V 0.5A)
OPTICAL
EXT
AUDIO OUT
R-AUDIO-L
P
R
P
B
Y
COMPONENT OUT
AUDIO OUT
R-AUDIO-L
VIDEO OUT
R B
R B RG
WR
R
Y
Y
W
WR
R
W
R
G
DVI OUT
HDMI OUT
AUDIO OUT
R-AUDIO-L
PC
R
W
VHF/UHF Antenna
Cable
USB
or
TV Rear Panel
TV Side Panel
BD Player / PC
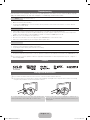
HDMI, HDMI/DVI connection
Audio connection
SCART connection
Headphone
connection
BD Player
Component connection
BD Player
AV connection
✎
The position of port may
differ depending on the
model.
✎
It supports both
Component and AV
connection in one port.
VCR or DVD
✎
The PDP device may interfere with
an amateur radio or AM radio.
✎
When using two-way radio mobile
and portable units or amateur radio
or AM radio near by your TV, this
may cause the TV to malfunction.
[PE530-SH]BN68-04068L.indb 7 2012-07-26 3:41:37

English - 8
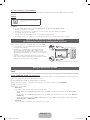
SERVICE
SERVICE
Connector for service only.
✎✎
NOTE
• For HDMI/DVI cable connection, you must use the HDMI IN 1(DVI) port.
• The interlace mode is not supported.
• The set might operate abnormally if a non-standard video format is selected.
• PC(D-Sub) input is not supported.
• Connecting through the HDMI cable may not be supported depending on the PC.
• The headphone jack supports only the 3 conductor tip-ring-sleeve (TRS) type.
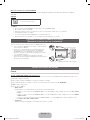
Connecting to a COMMON INTERFACE slot
(Your TV viewing Card Slot)
To watch paid channels, the “CI or CI+ CARD” must be inserted.
• If you do not insert the “CI or CI+ CARD”, some channels will display
the message “Scrambled Signal”.
• The pairing information containing a telephone number, the “CI or CI+
CARD” ID the Host ID and other information will be displayed in about
2~3 minutes. If an error message is displayed, please contact your
service provider.
• When the configuration of channel information has finished, the
message “Updating Completed” is displayed, indicating the channel
list is updated.
TV Side Panel
y The image may differ depending on the
model.
Changing the Input Source
Source
TV / Ext. / HDMI1/DVI / HDMI2 / AV / Component
Use to select TV or other external input sources such as DVD / Blu-ray players / cable box / STB satellite receiver connected to the TV.
✎
In the displaying Source list, connected inputs will be highlighted.
✎
PC(D-Sub) input is not supported. If you want to connect PC to the TV, use HDMI1/DVI input.
✎
Ext. always stays activated.
✎
Press the TOOLS button.
• Edit Name
You can set an external input sources name you want.
– When connecting a PC to the HDMI IN 1(DVI) port with HDMI cable, you should set the TV to PC mode under Edit Name.
– When connecting a PC to the HDMI IN 1(DVI) port with HDMI to DVI cable, you should set the TV to DVI PC mode under
Edit Name.
– When connecting an AV devices to the HDMI IN 1(DVI) port with HDMI to DVI cable, you should set the TV to DVI Devices
mode under Edit Name.
• Information
You can see detailed information about the connected external device.
Display Modes (HDMI/DVI Input)
Optimal resolution is 1920 x 1080@60Hz. See specification page for full available resolution.
[PE530-SH]BN68-04068L.indb 8 2012-07-26 3:41:38

English - 9
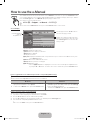
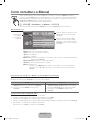
How to use the e-Manual
E-MANUAL
You can find instructions about your TV’s features in the e-Manual in your TV. To use, press the E-MANUAL button
on your remote. Move the cursor using the up/down/right/left buttons to highlight a category, then a topic, and then
press the ENTER
E
button. The e-Manual displays the page you want to see.
You can also access it through the menu:
O
MENUm → Support → e-Manual → ENTERE
✎
To return to the e-Manual main menu, press the E-MANUAL button on the remote.
Screen Display
Operation Buttons
}
Index: Displays the index screen.
E
Enter: Selects a category or sub-menu.
e
Exit: Exit the e-Manual.
<Viewing the Contents>
a
Try now: Displays the OSD menu that corresponds to the topic. To return to the e-Manual screen, press
the E-MANUAL button.
b
Home: Moves to the e-Manual home screen.
L
Page: Moves to previous or next page.
{ Zoom: Magnifies a screen.
– Press the { (Zoom) button to magnify the screen. You can scroll through the magnified screen
by using the ▲ or ▼ buttons. To return to the screen to normal size, press the RETURN button.
Basic Features
Changing the Preset Picture Mode
Adjusting Picture Settings
Changing the Picture Options
Changing the Preset Sound Mode
Adjusting Sound Settings
}
Index
E
Enter
e
Exit
Currently displayed
video, TV
Programme, etc.
The category list. Press ◄ or ► button to
select the category you want.
Displays the sub-menu list. Use the arrow
buttons on your remote to move the cursor.
Press ENTER
E
button to select the sub-
menu you want.
How to toggle between an e-Manual topic and the corresponding OSD menu(s).
✎
This function is not enabled in some menus.
✎
You cannot use the Try now function if the menu is not activated.
Method 1 Method 2
1. If you want to use the menu that corresponds to an e-Manual
topic, press the red button to select Try now.
2. To return to the e-Manual screen, press the E-MANUAL button.
1. Press the ENTER
E
button when a topic is displayed. “Are
you sure?” appears. Select Yes, and then press the ENTER
E
button. The OSD window appears.
2. To return to the e-Manual screen, press the E-MANUAL button.
How to search for a topic on the index page
✎
This function may not be supported depending on the language.
1. If you want to search a keyword, press the blue button to select Index.
2. Press the ◄ or ► button to select a character order you want.
3. Press the ▲ or ▼ button to select a keyword you want to see, and then press the ENTER
E
button.
4. You can view the corresponding e-Manual instruction screen.
✎
To close the Index screen, press the RETURN button.
[PE530-SH]BN68-04068L.indb 9 2012-07-26 3:41:40

English - 10
Installing the Wall Mount
The wall mount kit (sold separately) allows you to mount the TV
on the wall. For detailed information on installing the wall mount,
see the instructions provided with the wall mount. Contact a
technician for assistance when installing the wall mount bracket.
We do not advice you to do it yourself.
Samsung Electronics is not responsible for any damage to the
product or injury to yourself or others if you select to install the
TV on your own.
Wall Mount Kit Specifications (VESA)
✎
Wall mount kit is not supplied but sold separately.
Install your wall mount on a solid wall perpendicular to the floor.
When attaching to other building materials, please contact your
nearest dealer. If installed on a ceiling or slanted wall, it may fall
and result in severe personal injury.
✎
NOTE
x
Standard dimensions for wall mount kits are shown in
the table below.
x
When purchasing our wall mount kit, a detailed
installation manual and all parts necessary for assembly
are provided.
x
Do not use screws that do not comply with the VESA
standard screw specifications.
x
Do not use screws longer than the standard dimension,
as they may cause damage to the inside of the TV set.
x
For wall mounts that do not comply with the VESA
standard screw specifications, the length of the screws
may differ depending on their specifications.
x
Do not fasten the screws too strongly, this may damage
the product or cause the product to fall, leading to
personal injury. Samsung is not liable for these kinds of
accidents.
x
Samsung is not liable for product damage or personal
injury when a non-VESA or non-specified wall mount
is used or the consumer fails to follow the product
installation instructions.
x
Do not exceed 15 degrees tilt when mounting this TV.
inches
VESA Spec.
(A * B)
Standard
Screw
Quantity
43~51 400 X 400
M8 4
60~64 600 X 400
Do not install your Wall Mount
Kit while your TV is turned on.
It may result in personal injury
due to electric shock.
Securing the TV to the Wall
Caution: Pulling, pushing, or climbing onto the TV
may cause the TV to fall. In particular, ensure that
your children do not hang over or destabilize the TV;
doing so may cause the TV to tip over, resulting in
serious injuries or death. Follow all safety precautions
provided on the included Safety Flyer. For added
stability, install the anti-fall device for safety
purposes, as follows.
To avoid the TV from falling
Wall
1. Put the screws into the clamps and firmly fasten them onto the
wall. Confirm that the screws have been firmly installed onto the
wall.
✎
You may need additional material such as an anchor
depending on the type of wall.
✎
Since the necessary clamps, screws, and string are
not supplied, please purchase these additionally.
2. Remove the screws from the centre back of the TV, put the
screws into the clamps, and then fasten the screws onto the TV
again.
✎
Screws may not be supplied with the product. In this
case, please purchase the screws of the following
specifications.
3. Connect the clamps fixed onto the TV and the clamps fixed onto
the wall with a strong string and then tie the string tightly.
✎
NOTE
• Install the TV near to the wall so that it does not fall
backwards.
• It is safe to connect the string so that the clamps
fixed on the wall are equal to or lower than the
clamps fixed on the TV.
• Untie the string before moving the TV.
4. Verify all connections are properly secured. Periodically check
connections for any sign of fatigue for failure. If you have
any doubt about the security of your connections, contact a
professional installer.
[PE530-SH]BN68-04068L.indb 10 2012-07-26 3:41:40

English - 11
Troubleshooting
If the TV seems to have a problem, first try this list of possible problems and solutions. If none of these troubleshooting tips
apply, visit “www.samsung.com”, then click on Support, or call Samsung customer service centre.
Issues
The TV will not turn on.
• Make sure the AC power cord is securely plugged in to the wall outlet and the TV.
• Make sure the wall outlet is working.
• Try pressing the POWER button on the TV to make sure the problem is not the remote. If the TV turns on, refer to “Remote
control does not work” below.
Issues
There is no picture/video.
• Check cable connections (remove and reconnect all cables connected to the TV and external devices).
• Set your external device’s (Cable/Set top Box, DVD, Blu-ray etc) video outputs to match the connections to the TV input. For
example, if an external device’s output is HDMI, it should be connected to an HDMI input on the TV.
• Make sure your connected devices are powered on.
• Be sure to select the TV’s correct source by pressing the SOURCE button on the remote control.
• Reboot the connected device by reconnecting the device’s power cable.
Issues
The remote control does not work.
• Replace the remote control batteries with the poles (+/–) in the right direction.
• Clean the sensor’s transmission window on the remote.
• Try pointing the remote directly at the TV from 5~6 feet away.
Issues
The cable/set top box remote control doesn’t turn the TV on or off, or adjust the volume.
• Program the Cable/Set top box remote control to operate the TV. Refer to the Cable/Set user manual for the SAMSUNG TV code.
✎
You can keep your TV as optimum condition to upgrade the latest firmware on web site (www.samsung.com → Support →
Downloads) by USB.
Licence
Storage and Maintenance
✎
If you remove the attached sticker on the TV screen, clean the residues and then watch TV.
✎
The exterior and screen of the product can get scratched during cleaning. Be sure to wipe the exterior and screen carefully
using the cloth provided or a soft cloth to prevent scratches.
Do not spray water directly onto the product. Any liquid that goes
into the product may cause a failure, fire, or electric shock.
Clean the product with a soft cloth dapped in a small amount of
water. Do not use a flammable liquid (e.g. benzene, thinners) or a
cleaning agent.
[PE530-SH]BN68-04068L.indb 11 2012-07-26 3:41:41

English - 12
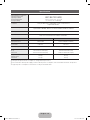
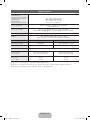
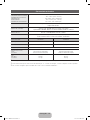
Specifications
Environmental Considerations
Operating Temperature
Operating Humidity
Storage Temperature
Storage Humidity
10°C 40°C 50°F 104°F
-20°C 45°C -4°F 113°F
to
10°C 40°C 50°F 104°F
-20°C 45°C -4°F 113°F
(
10°C 40°C 50°F 104°F
-20°C 45°C -4°F 113°F
to
10°C 40°C 50°F 104°F
-20°C 45°C -4°F 113°F
)
10% to 80%, non-condensing
10°C 40°C 50°F 104°F
-20°C 45°C -4°F 113°F
to
10°C 40°C 50°F 104°F
-20°C 45°C -4°F 113°F
(
10°C 40°C 50°F 104°F
-20°C 45°C -4°F 113°F
to
10°C 40°C 50°F 104°F
-20°C 45°C -4°F 113°F
)
5% to 95%, non-condensing
TV System Analogue: B/G, D/K, L, I (Depending on your country selection)
Digital: DVB-T/DVB-C
Colour/Video System Analogue: PAL, SECAM, NTSC-4.43, NTSC-3.58, PAL60
Digital: MPEG-2 MP@ML, MPEG-4, H.264/AVC MP@L3, [email protected], [email protected]
Sound System BG, DK, L, NICAM, MPEG1, DD, DD+, HEAAC
HDMI IN Video: 1080 24p, 1080p, 1080i, 720p, 576p, 480p
Audio: 2Ch Linear PCM 32/44.1/48kHz, 16/20/24bits.
Model Name PS51E530 PS60E530
Display Resolution 1920 X 1080 1920 X 1080 (Black & White)
Screen Size
19 22 26 32 40 43 46 51 60
inches
19 22 26 32 40 43 46 51 60
inches
Sound (Output) 10W X 2
Dimensions (WxDxH)
Body
With stand
1187.8 X 56.0 X 706.6 (mm)
1187.8 X 252.0 X 781.9 (mm)
1389.3 X 56.0 X 828.2 (mm)
1389.3 X 330.0 X 907.9 (mm)
Weight
Without Stand
With Stand
19.6 kg
22.1 kg
28.3 kg
32.6 kg
✎
Design and specifications are subject to change without prior notice.
✎
For information about power supply, and more about power consumption, refer to the label attached to the product.
✎
Typical power consumption is measured according to IEC 62087 Ed.2
[PE530-SH]BN68-04068L.indb 12 2012-07-26 3:41:42

English - 13
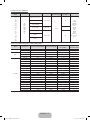
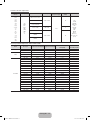
Supported Video Formats
File Extention Container Video Codec Resolution Frame rate (fps) Bit rate (Mbps) Audio Codec
*.avi
*.mkv
*.asf
*.wmv
*.mp4
*.3gp
*.vro
*.mpg
*.mpeg
*.ts
*.tp
*.trp
*.mov
*.flv
*.vob
*.svi
*.m2ts
*.mts
*.divx
AVI
MKV
ASF
MP4
3GP
VRO
VOB
PS
TS
DivX 3.11/4.x/5.x/6.x
1920 x 1080
6~30
30
AC3
LPCM
ADPCM
(IMA, MS)
AAC
HE-AAC
WMA
DD+
MPEG
(MP3)
DTS Core
G.711(A-Law,
μ-Law)
MPEG4 SP/ASP
H.264 BP/MP/HP
Motion JPEG 640 x 480 8
Window Media Video v9
1920 x 1080 30
MPEG2
MPEG1
Full available resolution: 1920 X 1080 @ 60 Hz
Mode Resolution Horizontal Frequency (KHz) Vertical Frequency (Hz)
Pixel Clock Frequency
(MHz)
Sync Polarity (H / V)
IBM
640 x 350 31.469 70.086 25.175 +/-
720 x 400 31.469 70.087 28.322 -/+
MAC
640 x 480 35.000 66.667 30.240 -/-
832 x 624 49.726 74.551 57.284 -/-
1152 x 870 68.681 75.062 100.000 -/-
VESA DMT
640 x 480 31.469 59.940 25.175 -/-
640 x 480 37.861 72.809 31.500 -/-
640 x 480 37.500 75.000 31.500 -/-
800 x 600 37.879 60.317 40.000 +/+
800 x 600 48.077 72.188 50.000 +/+
800 x 600 46.875 75.000 49.500 +/+
1024 x 768 48.363 60.004 65.000 -/-
1024 x 768 56.476 70.069 75.000 -/-
1024 x 768 60.023 75.029 78.750 +/+
1152 x 864 67.500 75.000 108.000 +/+
1280 x 720 45.000 60.000 74.250 +/+
1280 x 800 49.702 59.810 83.500 -/+
1280 x 1024 63.981 60.020 108.000 +/+
1280 x 1024 79.976 75.025 135.000 +/+
1366 x 768 47.712 59.790 85.500 +/+
1440 x 900 55.935 59.887 106.500 -/+
1600 x 900RB 60.000 60.000 108.000 +/+
1680 x 1050 65.290 59.954 146.250 -/+
1920 x 1080 67.500 60.000 148.500 +/+
[PE530-SH]BN68-04068L.indb 13 2012-07-26 3:41:43

Français - 2
Pour plus d'informations sur l'utilisation du manuel électronique (P. 9)
Les figures et illustrations contenues dans ce mode d’emploi sont fournies pour référence uniquement. Elles peuvent différer de
l’aspect réel du produit. La conception et les spécifications du produit sont susceptibles d’être modifiées sans préavis.
Avis concernant le téléviseur numérique
1. Les fonctions relatives à la télévision numérique (DVB) ne sont disponibles que dans les pays ou régions où des signaux terrestres
numériques de type DVB-T (MPEG2 et MPEG4 AVC) sont diffusés ou dans lesquels vous avez accès à un service de télévision par câble
compatible DVB-C (MPEG2 et MPEG4 AAC). Consultez votre distributeur local pour connaître les possibilités en matière de réception des
signaux DVB-T ou DVB-C.
2. DVB-T est la norme du consortium européen DVB pour la diffusion des signaux terrestres de télévision numérique. La norme DVB-C
est, quant à elle, prévue pour la diffusion des signaux de télévision numérique par câble. Certaines fonctions particulières, telles que le
guide électronique des programmes (Electric Program Guide - EPG) ou encore la vidéo à la demande (Video On Demand - VOD), ne sont
toutefois pas incluses dans cette spécification. Dès lors, elles ne seront pas traitées pour l’instant.
3. Bien que ce téléviseur soit conforme aux dernières normes DVB-T et DVB-C (août 2008), il n’est pas garanti qu’il soit compatible avec les
futures diffusions de signaux numériques terrestres DVB-T et par câble DVB-C.
4. En fonction du pays ou de la région où vous vous trouvez, certains opérateurs de télévision par câble peuvent facturer des frais
supplémentaires pour un tel service. Il se peut également que vous deviez accepter les termes et conditions de ces sociétés.
5. Il se peut que certaines fonctions de TV numérique ne soient pas disponibles dans certains pays ou certaines régions et que la réception
des signaux DVB-C ne soit pas correcte avec tous les opérateurs.
6. Pour plus d’informations, contactez votre service client Samsung.
✎
Les différentes méthodes de diffusion adoptées en fonction des pays peuvent affecter la qualité de réception du téléviseur. Vérifiez le
fonctionnement du téléviseur chez votre revendeur agréé SAMSUNG ou contactez le centre d’appel de Samsung pour savoir s’il est
possible d’en améliorer les performances en reconfigurant les réglages.
Instructions d'utilisation
• Rémanence à l'écran
N’affichez pas une image figée (telle qu’elle apparaît sur un jeu vidéo) sur l’écran plasma au-delà de quelques minutes, sinon cela risquerait
de provoquer une rémanence à l’écran. Cette rémanence de l'image est également appelée "brûlure de l'écran". Pour éviter la rémanence,
réduisez le niveau de contraste ou de luminosité de l'écran lorsque vous affichez une image figée.
• Chaleur diffusée sur la partie supérieure du téléviseur à écran plasma
Le dessus de l'appareil peut chauffer en cas d'utilisation prolongée, car la chaleur s'échappe du panneau par le trou d'aération situé dans
la partie supérieure du produit.
Ce phénomène est normal et n'indique aucunement la présence d'un défaut ou d'un dysfonctionnement.
Il convient cependant d'empêcher les enfants de toucher la partie supérieure de l'écran.
• Le produit fait un bruit de "claquement".
Ce bruit de "claquement" risque d'être perceptible lorsque le produit se contracte ou s'étend suite à un changement du milieu ambiant, tel
que la température ou l'humidité. Ce phénomène est normal et ne constitue pas un défaut.
• Défauts de cellule
L'écran plasma utilise un panneau constitué de 2360000 (niveau HD) à 6221000 (niveau FHD) pixels dont la fabrication fait appel à une
technologie avancée. Il se peut toutefois que quelques points clairs ou sombres apparaissent à l'écran. Ils n'ont aucune incidence sur la
performance du produit.
• Évitez d'utiliser le téléviseur à des températures inférieures à 5°C (41°F).
• Une image figée affichée pendant une période prolongée peut endommager définitivement l'écran plasma.
Visionner pendant longtemps le téléviseur à écran plasma au format 4/3 risque de laisser apparaître des traces de
bordures sur la gauche, sur la droite et au centre de l’écran. Ces traces sont dues à la différence de luminosité sur l’écran.
Lire un DVD ou un jeu vidéo sur console risque de provoquer des effets similaires sur l'écran.
Les dommages provoqués par l'effet susmentionné ne sont pas couverts par la garantie.
• Images rémanentes à l’écran.
L'affichage d'images fixes de jeux vidéo et d'ordinateurs pendant une période excessive peut produire des rémanences.
Pour empêcher ce phénomène, réduisez la luminosité et le contraste en cas d'affichage prolongé d'images figées.
• Garantie
La garantie ne couvre pas les dommages causés par la rémanence.
Les brûlures ne sont pas couvertes par la garantie.
[PE530-SH]BN68-04068L.indb 2 2012-07-26 3:41:44

Français - 3
Accessoires
✎
Vérifiez que les éléments suivants sont inclus avec votre téléviseur. S’il manque des éléments, contactez votre revendeur.
✎
La couleur et la forme des éléments peuvent varier en fonction du modèle.
✎
Les câbles qui ne se trouvent pas dans le contenu de l'emballage peuvent être achetés séparément.
• Télécommande et piles (AAA x 2) • Câble d'alimentation
• Instructions d’utilisation • Chiffon de nettoyage
• Carte de garantie / Manuel de sécurité (non disponible dans certains pays)
Tore magnétique (1EA)
✎
Blindage magnétique pour cordon d'alimentation: le blindage magnétique sert à protéger les
câbles des interférences. Lors de la connexion d'un câble, ouvrez le blindage magnétique et
rabattez-le autour du câble près de la prise, comme illustré.
x
A Distance maximale entre le blindage magnétique et l'extrémité du cordon insérée dans le
téléviseur: 3/4pouces
B
A
B
A
Câble d'alimentation
✎
Des frais d’administration peuvent vous être facturés si :
(a) un technicien intervient à votre demande et que le produit ne comporte aucun défaut
(c.-à-d; si vous n’avez pas pris la peine de lire le présent manuel d’utilisation)
(b) vous amenez le produit dans un centre de réparation alors qu’il ne comporte aucun défaut
(c.-à-d; si vous n’avez pas pris la peine de lire le présent manuel d’utilisation)
✎
Le montant de ces frais d’administration vous sera signifié avant la réalisation de toute prestation ou visite à domicile.
[PE530-SH]BN68-04068L.indb 3 2012-07-26 3:41:44

Français - 4
Utilisation du contrôleur du téléviseur (touche de panneau)
Le Contrôleur TV est un bouton multi-directionnel
qui permet la navigation sans télécommande.
✎
Certaines fonctions exigeant un code PIN
peuvent ne pas être disponibles.
✎
La couleur et la forme du produit peuvent
varier en fonction du modèle.
✎
Permet de quitter le menu en appuyant sur
le contrôleur pendant plus d'une seconde.
✎
Lorsque vous sélectionnez la fonction en
déplaçant le contrôleur vers le haut, le
bas, la gauche ou la droite, veillez à ne pas
appuyer sur ce dernier. Si vous appuyez
dessus, vous ne pouvez plus vous en servir
pour effectuer un déplacement dans ces
directions.
Menu Fonction
Retour
Capteur de la télécommande
Contrôleur TV
Bas (avant)
Haut (arrière)
Droite
Gauche
Marche Permet d'allumer le téléviseur en appuyant sur le contrôleur en mode Veille.
Réglage du volume Permet de régler le volume en déplaçant le contrôleur d'un côté à l'autre lorsque le
téléviseur est allumé.
Sélection d'une chaîne Permet de sélectionner une chaîne en déplaçant le contrôleur de haut en bas lorsque
le téléviseur est allumé.
Utilisation du menu Fonction Appuyez sur le contrôleur lorsque le téléviseur est allumé afin de faire apparaître l'écran
du menu des fonctions. Pour faire disparaître cet écran, appuyez une nouvelle fois.
Utilisation du Menu
Permet de sélectionner le MENU(
m
) en déplaçant le contrôleur dans l'écran du menu
des fonctions. Le menu OSD s'affiche sur l'écran du téléviseur.
Sélection de la source Permet de sélectionner la Source ( ) en déplaçant le contrôleur dans l'écran du
menu des fonctions. La liste Source s'affiche.
Sélection de l'Accueil contenu Permet de sélectionner Accueil contenu( ) en déplaçant le contrôleur dans
l'écran du menu des fonctions. L'écran principal Accueil contenu s'affiche.
Mise hors tension
Permet de sélectionner la fonction Eteindre(
P
) afin de mettre le téléviseur hors
tension en déplaçant le contrôleur dans l'écran du menu des fonctions.
Mode Veille
Ne laissez pas le téléviseur en mode Veille pendant de longues périodes (lorsque vous partez en vacances, par exemple). L’appareil
consomme toujours une petite quantité d’énergie, même lorsque le bouton marche/arrêt est en position Off. Il est préférable de
débrancher le cordon d’alimentation.
Sécurisation de l’espace d’installation
Maintenez les distances requises entre le produit et les autres objets (par exemple, les murs) afin de garantir une ventilation adaptée.
Le non-respect de ces distances peut provoquer un incendie ou un problème au produit en raison d’une augmentation de la
température interne de celui-ci.
✎
Lors de l’utilisation d’un pied ou d’un support mural, utilisez uniquement les pièces fournies par Samsung Electronics.
x
L’utilisation de pièces fournies par un autre fabricant peut occasionner un problème au niveau du produit ou la chute de
celui-ci, ce qui pourrait vous blesser.
✎
L’aspect peut varier en fonction du produit.
✎
Soyez prudent lorsque vous touchez le téléviseur, car certaines parties peuvent être brûlantes.
Installation avec un pied. Installation avec un support de montage mural.
10 cm10 cm
10 cm
10 cm
10 cm
10 cm
10 cm
[PE530-SH]BN68-04068L.indb 4 2012-07-26 3:41:45

Français - 5
Présentation de la télécommande
✎
Ceci est une télécommande spéciale destinée aux malvoyants. Elle dispose de points Braille sur les boutons Power, Channel et
Volume.
A B C D
E-MANUAL
P.SIZE
AD/SUBT.
CONTENT
Installation des piles (type de pile : AAA)
Permet d’allumer et éteindre la télévision.
Permet d’afficher et de sélectionner les
sources vidéo disponibles.
Permet de revenir à la chaîne précédente.
Permet de couper temporairement le son.
Permet de changer de chaîne.
Affiche la liste des chaînes à l’écran.
Permet d’afficher le Guide électronique des
programmes (EPG).
Permet d’afficher des informations sur l’écran
du téléviseur.
Permet de quitter le menu.
Appuyez pour atteindre les chaînes
directement.
Permet de régler le volume.
Choisissez Teletext Activé, Double, Mix ou
ARRET.
Permet d’afficher le menu principal à l’écran.
Permet de sélectionner rapidement les
fonctions fréquemment utilisées.
Affiche l'Accueil contenu.
Permet de revenir au menu précédent.
Permettent de sélectionner des éléments de
menu à l’écran et de modifier les valeurs des
menus.
Utilisez ces boutons conformément aux
instructions affichées à l'écran.
Ces boutons ont des fonctions spécifiques.
Pour plus d’informations, reportez-vous au
manuel électronique.
E-MANUAL: affiche le Guide e-Manual.
(p. 9)
P.SIZE: permet de sélectionner le format
de l'image.
AD/SUBT.: Sélection de la description
audio. (Non disponible dans tous les
pays) / permet d'afficher les sous-titres
numériques.
[PE530-SH]BN68-04068L.indb 5 2012-07-26 3:41:45

Français - 6
Configuration initiale
Lorsque le téléviseur est allumé pour la première fois, plusieurs invites s'affichent pour vous aider à configurer les réglages de base.
Appuyez sur le bouton POWER
P
. Configuration n'est disponible que lorsque la source est définie sur TV.
1. Langue des menus: Sélection de la langue des menus
Appuyez sur le bouton ▲ ou ▼, puis sur ENTER
E
.
Sélectionnez la langue de votre choix pour l'affichage à l'écran.
2. Mode Utilisation: Sélection du mode Util.magasin ou Util. domicile
Appuyez sur le bouton ▲ ou ▼, puis sur ENTER
E
.
Sélectionnez le mode Util. domicile. Le mode Util.magasin est prévu pour un usage en magasin.
✎
L'écran du menu des fonctions s'affiche lorsque vous appuyez sur le contrôleur TV. Sélectionnez le bouton MENU(
m
) et
maintenez-le enfoncé pendant plus de 5secondes à l'aide du contrôleur. Le mode Util.magasin est défini.
✎
Pour annuler le mode Util.magasin, sélectionnez le bouton Source( ) et maintenez-le enfoncé pendant plus de
5secondes.
✎
Util.magasin est disponible uniquement pour une exposition en magasin. Si vous sélectionnez cette option, plusieurs
fonctions ne sont pas disponibles. Sélectionnez Util. domicile lorsque vous regardez le téléviseur à la maison.
3. Pays (en fonction du pays): Sélection d'un pays
Appuyez sur le bouton ▲ ou ▼, puis sur ENTER
E
.
Sélectionnez le pays de votre choix.
✎
Après la sélection du pays dans le menu Pays, certains modèles peuvent demander, en plus, le code PIN.
4. Recherche automatique (Etape1): sélection du mode de visionnage du téléviseur
Trouvons et mémorisons les chaînes sur votre TV. Avez-vous besoin de rechercher les chaînes ?
• Oui, j’en ai besoin.: mémorise toutes les chaînes disponibles à l’aide d’un câbleRF.
• Non, je n’en ai pas besoin.: Il est inutile d’utiliser la fonction de recherche automatique pour trouver des chaînes.
5. Recherche automatique (Etape2): sélection d'une option de recherche
Sélectionnez le signal de diffusion et la source d'antenne de votre choix. Appuyez sur le bouton ▲/▼/◄/► et appuyez ensuite sur
ENTER
E
.
Lors du réglage de la source d'antenne sur Câble, une fenêtre s'affiche pour vous permettre d'attribuer des valeurs numériques
(fréquences) aux chaînes. Pour plus d'informations, reportez-vous à Canal → Recherche automatique.
✎
Certaines chaines peuvent ne pas être transmise à ce téléviseur. Cela dépend du signal de radiodiffusion ou de specification.
✎
Appuyez sur le bouton ENTER
E
à tout moment pour interrompre la mémorisation.
✎
Reportez-vous à l’e-Manual, sous “Nouvelle recherche des chaînes > Recherche automatique”
6. Horloge: réglage du mode Horloge
• Auto: permet de régler l'heure actuelle automatiquement.
• Manuel: permet de définir manuellement la date et l'heure actuelles.
7. Fuseau Horaire (en fonction du pays): définition de votre fuseau horaire
Cette étape n'est disponible que lorsque le mode Horloge est défini sur Auto.
• Auto: définit le fuseau horaire automatiquement.
• Manuel: définit le fuseau horaire manuellement.
✎
Si vous avez sélectionné Manuel, vous pouvez choisir de définir la fonction Heure d'été sur Activé ou sur Arrêt. (en
fonction du pays)
8. Configuration terminée
Appuyez sur le bouton ENTER
E
.
✎
Les paramètres terminés s'affichent.
Si vous souhaitez réinitialiser cette fonction...
Sélectionnez Système - Configuration (Configuration initiale). Entrez votre code PIN à quatre chiffres. Le code PIN par défaut est "0-0-
0-0". Si vous souhaitez modifier le code PIN, utilisez la fonction Modifier PIN.
Vous devez de nouveau sélectionner Configuration (MENU → Système) chez vous, bien que vous l'ayez déjà fait en magasin.
✎
Si vous avez oublié le code PIN, appuyez sur les boutons de la télécommande dans l'ordre suivant en mode veille, ce qui
redéfinit le code sur "0-0-0-0": MUTE → 8 → 2 → 4 → POWER (activé)
[PE530-SH]BN68-04068L.indb 6 2012-07-26 3:41:45

Français - 7
Connexions
HDMI IN 2
HDMI IN 1
(DVI)
COMPONENT / AV IN
AUDIO
VIDEO
SERVICE
ANT IN
EXT (RGB)
DIGITAL
AUDIO OUT
(OPTICAL)
(5V 0.5A)
OPTICAL
EXT
AUDIO OUT
R-AUDIO-L
P
R
P
B
Y
COMPONENT OUT
AUDIO OUT
R-AUDIO-L
VIDEO OUT
R B
R B RG
WR
R
Y
Y
W
WR
R
W
R
G
DVI OUT
HDMI OUT
AUDIO OUT
R-AUDIO-L
PC
R
W
Antenne VHF/UHF
Câble
USB
ou
Panneau arrière du téléviseur
Panneau latéral
du téléviseur
Lecteur BD / PC
Connexion HDMI, HDMI/DVI
Connexion audio
Connexion SCART
Connexion de Casque
Lecteur BD
Connexion à composantes
Lecteur BD
Connexion AV
✎
L'emplacement du port
peut varier en fonction
du modèle.
✎
Les connexions
Composante et AV
sont prises en charge
par un seul port.
Magnétoscope ou lecteur
DVD
✎
L'appareil PDP peut créer des
interférences avec la radio amateur
ou la radio AM.
✎
L'utilisation de radios portables ou
mobiles, d'émetteurs-récepteurs,
ainsi que de radios amateur ou AM
près de votre téléviseur pourrait
engendrer des dysfonctionnements
de l'appareil.
[PE530-SH]BN68-04068L.indb 7 2012-07-26 3:41:46

Français - 8
SERVICE
SERVICE
Prise pour tests uniquement.
✎✎
REMARQUE
• Vous devez utiliser le port HDMI IN 1(DVI) pour connecter un câble HDMI/DVI.
• Le mode entrelacé n’est pas pris en charge.
• Le téléviseur peut fonctionner de façon anormale si le format vidéo sélectionné n’est pas standard.
• L’entrée PC(D-Sub) n’est pas prise en charge.
• En fonction du PC, la connexion à l'aide du câble HDMI peut ne pas être prise en charge.
• La prise casque ne prend en charge que le type TRS (tip-ring-sleeve) à 3 conducteurs.
Connexion à une fente pour INTERFACE COMMUNE
(fente pour carte de visualisation de programmes télévisés)
Pour regarder les chaînes payantes, la carte CI ou CI+ doit être
insérée.
• Si vous ne l'insérez pas, certaines chaînes afficheront le message
"Signal brouillé".
• Les informations de pairage contenant un numéro de téléphone,
l'ID de la carte CI ou CI+, l'ID de l'hôte et d'autres informations
s'afficheront après 2 ou 3 minutes. Si un message d'erreur s'affiche,
contactez votre fournisseur de service.
• Lorsque la configuration des informations sur les canaux est terminée,
le message "Mise à jour terminée" s'affiche, indiquant que la liste des
chaînes est mise à jour.
Panneau latéral du
téléviseur
y L'image peut varier en fonction du modèle.
Changement de la source d'entrée
Source
TV / Ext. / HDMI1/DVI / HDMI2 / AV / Composant
Permet de sélectionner le téléviseur ou d’autres sources d’entrée externes (telles qu’un lecteur DVD, un lecteur Blu-ray, un décodeur
câble ou un récepteur décodeur) connectées au téléviseur.
✎
Les entrées connectées sont mises en surbrillance dans la liste Source qui s'affiche.
✎
L’entrée PC(D-Sub) n’est pas prise en charge. Pour connecter un PC au téléviseur, utilisez l’entrée HDMI1/DVI.
✎
L’option Ext. reste activée en permanence.
✎
Appuyez sur le bouton TOOLS.
• Modif. Nom
Vous pouvez définir le nom de la source d'entrée externe de votre choix.
– Lorsque vous connectez un PC au port HDMI IN 1(DVI) avec un câble HDMI, vous devez définir le téléviseur en mode PC
sous Modif. Nom.
– Lorsque vous connectez un PC au port HDMI IN 1(DVI) avec un câble HDMI vers DVI, vous devez définir le téléviseur en
mode DVI PC sous Modif. Nom.
– Lorsque vous connectez un périphérique AV au port HDMI IN 1(DVI) avec un câble HDMI vers DVI, vous devez définir le
téléviseur en mode Périph. DVI sous Modif. Nom.
• Information
Vous pouvez afficher des informations détaillées sur le périphérique externe connecté.
Modes d'affichage (entrée HDMI/DVI)
La résolution optimale est de 1920 x 1080 à 60 Hz. Reportez-vous à la page des caractéristiques techniques pour accéder à
la résolution complète.
[PE530-SH]BN68-04068L.indb 8 2012-07-26 3:41:47
A página está carregando...
A página está carregando...
A página está carregando...
A página está carregando...
A página está carregando...
A página está carregando...
A página está carregando...
A página está carregando...
A página está carregando...
A página está carregando...
A página está carregando...
A página está carregando...
A página está carregando...
A página está carregando...
A página está carregando...
A página está carregando...
A página está carregando...
A página está carregando...
A página está carregando...
A página está carregando...
A página está carregando...
A página está carregando...
A página está carregando...
A página está carregando...
A página está carregando...
A página está carregando...
A página está carregando...
A página está carregando...
A página está carregando...
-
 1
1
-
 2
2
-
 3
3
-
 4
4
-
 5
5
-
 6
6
-
 7
7
-
 8
8
-
 9
9
-
 10
10
-
 11
11
-
 12
12
-
 13
13
-
 14
14
-
 15
15
-
 16
16
-
 17
17
-
 18
18
-
 19
19
-
 20
20
-
 21
21
-
 22
22
-
 23
23
-
 24
24
-
 25
25
-
 26
26
-
 27
27
-
 28
28
-
 29
29
-
 30
30
-
 31
31
-
 32
32
-
 33
33
-
 34
34
-
 35
35
-
 36
36
-
 37
37
-
 38
38
-
 39
39
-
 40
40
-
 41
41
-
 42
42
-
 43
43
-
 44
44
-
 45
45
-
 46
46
-
 47
47
-
 48
48
-
 49
49


Samsung PS51E530A3W Guia rápido
- Categoria
- TVs de plasma
- Tipo
- Guia rápido