CP Electronics EBDSPIR Ceiling Mounted PIR Presence Detectors Guia de instalação
- Categoria
- Detectores de movimento
- Tipo
- Guia de instalação

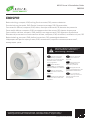
EBDSPIR
Basic switching, compact, IP40, ceiling, ush mounted, PIR, presence detector
Grundschaltung, kompakt, IP40, Decke, Unterputzmontage, PIR, Präsenzmelder
Conmutación básica, compacto, IP40, techo, montaje encastrado, PIR, detector de presencia
Permutação básica, compacto, IP40, montagem embutida no teto, PIR, detetor de presença
Commutation de base, compact, IP40, plafond, montage encastré, PIR, détecteur de présence
Rilevatore di presenza con commutazione di base, compatto, IP40, da sotto, installazione in pari, PIR
Basisschakeling, compact, IP40, plafond, verzonken, PIR, aanwezigheidsdetector
Инфракрасный датчик присутствия, IP40, потолочный, скрытого монтажа,компактный,
коммутация - реле
WD101 Issue 10 Installation Guide
EBDSPIR
cpelectronics.co.uk/cp/101
Downloads and Videos | Downloads und Videos | Descargas y Videos | Descargas e Videos |
Téléchargements & Vidéos | Downloads e Video | Downloads en Video’s | Загрузки и Видео
Warning | Warnung | Advertencia |
Aviso | Attention | Attenzione |
Waarschuwing | Внимание
EN This device should
be installed by a qualied
electrician in accordance with
the latest edition of the IEE
wiring regulations.
DE Dieses Gerät ist
ausschließlich von qualizierten
Elektrofachkräen zu installieren.
ES Sólo un electricista
cualicado debe instalar este
dispositivo.
PT Somente um eletricista
qualicado deve instalar este
dispositivo.
FR Seul un électricien
qualié peut installer ce
dispositif.
IT Il dispositivo deve
essere installato da un
elettricista qualicato.
NL Dit apparaat moet
worden geïnstalleerd door een
gekwaliceerde elektricien.
RU Это устройство
должно быть установлено
квалифицированным
электриком.

2
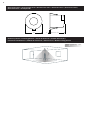
Detection pattern | Erfassungsbereich | Patrón de detección | Padrão de detecção |
Performance de détection | Modello di rilevazione | Detectie zone | Шаблон обнаружения
high sensitivity low
2.8m
7m
Dimensions (mm) | Abmessungen (mm) | Dimensiones (mm) | Dimensões (mm) | Dimensioni (mm) |
Dimensies (mm) | Размеры (мм)
76 465

3
EN Key
1. Neutral
2. Live
3. 10A circuit protection if
required
4. Load
DE Zeichenerklärung
1. Neutral
2. Netzspannungsführend
3. 10A Kurzschlusssicherung,
falls nötig
4. Last
ES Leyenda
1. Neutro
2. Fase
3. 10A protección de circuito,
en caso necesario
4. Carga
PT Legenda
1. Neutro
2. Fase
3. 10A proteção do circuito,
caso necessário
4. Carga
FR Légende
1. Neutre
2. Phase
3. 10A protection du circuit si
nécessaire
4. Charge
IT Legenda
1. Neutro
2. Fase
3. 10A protezione del circuito,
se necessario
4. Carico
NL Legenda
1. Nul
2. Fase
3. 10A beveiliging indien nodig
4. Belasting
RU Условные обозначения
1. Нейтральный
2. Фаза
3. 10А защита цепи при
необходимости
4. Загрузить
L/Out
N
L
4
3
2
1
Wiring | Verkabelung | Cableado | Ligações | Câblage | Cablaggio | Bedrading | Кабель

4
EN This device is designed to be ush
ceiling-mounted. See page 12 for
additional mounting options.
• Do not site the unit where direct sunlight
might enter the sensor.
• Do not site the sensor within 1m of any
lighting, forced air heating or ventilation.
• Do not x the sensor to an unstable or
vibrating surface.
DE Das Modell ist für den Deckeneinbau
vorgesehen. Siehe Seite 12 für weitere
Mntagemöglichkeiten.
• Einheit so anbringen, dass der Sensor vor
direkter Sonneneinstrahlung geschützt ist.
• Sensor mit Mindestabstand von 1m
zu Lichtquellen, Luheizung oder
Ventilation anbringen.
• Sensor nicht an einer instabilen oder
vibrierenden Oberäche montieren.
ES Este producto está diseñado para
montarse empotrado en techo. Ver pag.
12 para otras opciones de montaje.
• Evite que la luz del sol incida directamente
sobre el sensor.
• No coloque el sensor a menos de 1m
de fuentes de iluminación, salidas de
calefacción por aire forzado o ventilación.
• No je el sensor a supercies que vibren o
no sean estables.
PT Este dispositivo foi projetado para
ser montado no teto. Veja a página 12
para opções adicionais de montagem.
• Não instale a unidade num local onde a
luz solar direta possa incidir no sensor.
• Não coloque o sensor a menos de 1m de
qualquer iluminação, aquecimento ou
ventilação de ar forçado.
• Não xe o sensor em uma superfície
instável ou sujeito a vibrações.
FR Le produit est conçu pour être monté
au plafond en encastré. Voir page 12 pour
les options additionnelles de montage.
• Ne pas placer l’unité dans une position
où la lumière directe du soleil pourrait
pénétrer dans le capteur.
• Ne pas placer le capteur à moins
d’unmètre de tout dispositif d’éclairage,
de chauage ou de ventilation à air forcé.
• Ne pas xer le capteur sur une surface
instable ou vibrante.
IT Questo dispositivo è progettato per
essere a lo sotto. Vedi pagina 12 per
opzioni di montaggio aggiuntive.
• Non collocare l’unità in una posizione in
cui la luce diretta del sole possa entrare
nel sensore.
• Non posizionare il sensore a meno
di un metro da un qualsiasi tipo di
illuminazione, sistema di riscaldamento
o ventilazione.
• Non installare il sensore su superci
instabili o soggette a vibrazioni.
NL Dit apparaat is ontworpen voor
inbouwmontage in het plafond. Zie
pagina 12 voor optionele montage opties.
• Plaats het apparaat niet op een locatie
waar direct zonlicht de sensor kan
binnendringen.
• Plaats de sensor niet op minder dan 1
meter afstand van verlichting, geforceerde
luchtverwarming of ventilatie.
• Bevestig de sensor niet op een onstabiel
of trillend oppervlak.
RU Это устройство предназначено
для скрытого монтажа на потолке.
Смотрите стр. 12 для дополнительных
опций монтажа.
• Не размещайте устройство в местах,
где прямой солнечный свет может
попасть в датчик.
• Не размещайте датчик в пределах 1
м от освещения, принудительного
воздушного отопления или
вентиляции.
• Не закрепляйте датчик на
неустойчивой или вибрирующей
поверхности.
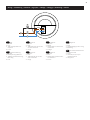
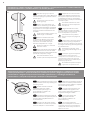
Installation | Instalación | instalação | Installazione | Installatie | Установка
Ø 64mm
1
35mm
6mm
2
Create cut out | Erstellen Sie einen Ausschnitt | Oricio de corte | Fixação no teto | Percer |
Creare il foro | Sparing maken | Выполните вырез в панели
EN Cut a 64mm diameter
hole in the ceiling.
DE Deckenausschnitt
64mm.
ES Cortar un oricio de 64
mm de diámetro en el techo
PT Efectuar um corte de
diâmetro de 64mm no teto.
FR Percer un trou de
64mm de diamètre dans le
plafond
IT Realizzare un foro di
64mm di diametro a sotto.
NL Maak een 64mm
diameter sparing in het
plafond.
RU Выполните
отверстие диаметром 64 мм
в потолочной панели.
Wire stripping | Abisolieren | Pelado de cables | Descascamento do o | Dénudage des câbles |
Spelatura del lo | Kabelstrippen | Зачистка проводов
EN Strip the wires as shown opposite.
Presence detector does not require
earth conductor.
DE Abisolieren Sie die Kabel wie dargestellt.
Der Melder benötigt keinen Erdanschluß.
ES Pele los cables como se muestra en el
dibujo. El detector no requiere cable de tierra.
PT Descarne os cabos como mostrado
ao lado. Este detector não requer conductor
de terra.
FR Dénudez les câbles comme indiqué ci-
contre. Le détecteur de présence ne nécessite
pas de conducteur de terre.
IT Spelare i li come mostrato. Il rilevatore
di presenza non richiede il cavo di terra.
NL Strip de aders zoals weergegeven op
de aeelding hiernaast. Aardingsdraad is niet
vereist.
RU Выполните зачистку проводов, как
показано на рисунке. Датчик присутствия
не требует провода заземления.

5
3
4
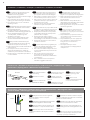
Clamp cable | Zugentlastung | Abrazadera para el cable | Fixação do cabo | Serrer les câbles |
Morsetto per il cavo | Trekontlasting | Фиксация кабеля
EN Continue tightening the screws
until the clamp bar snaps out and is tightly
engaged against the cable/s. The cable
clamp must clamp the outer sheath only.
DE Ziehen Sie die Schrauben weiterhin
an, bis die Klemme einrastet und fest am
Kabel sitzt. Die Kabelklemme darf nur die
äußere Ummantellung einklemmen.
ES Continuar apretando los tornillos
hasta que la barra abrazadera salga y se
ajuste bien con el cable. La abrazadera para
cables solo debe sujetar la funda.
PT Apertar os parafusos até que a
barra de xação se encaixe totalmente e
prenda bem o cabo. O grampo do cabo
deve xar apenas o revestimento externo.
FR Continuez de serrer les vis jusqu’à
ce que la barre de xation sorte et se serre
fortement sur le câble. Le serre-câbles doit
uniquement serrer la gaine extérieure.
IT Continuare a stringere le viti no
a quando la barra del morsetto non scatti
e si ssi leggermente sul cavo. Applica il
morsetto alla sola guaina esterna del cavo.
NL Blijf de schroeven aandraaien
totdat de beugel los komt en de kabel
stevig vastklemt. De beugel moet alleen de
buitenmantel vastklemmen.
RU Завинчивайте шурупы до
тех пор, пока зажимная планка не
защелкнется и не будет плотно
прилегать к кабелю. Кабельный хомут
должен обжимать только внешнюю
оболочку.
Wire in plugs & connect to detector | Verdrahtugn & Anschluß des Melders | Cableado y conexión del sensor |
Cablagem e ligação do sensor | Câbler le bornier et connecter au détecteur | Cablaggio e connessione al
rilevatore | Bedrading & aansluiten op detector | Соединение проводов и подключение к датчику
EN Wire in plug/s, using wiring
diagram on page 3 as a guide. Connect the
plug/s to the detector.
DE Zum Anschluß des Melders
verwenden Sie das Schaltbild. Verwenden
Sie dazu den /die beiliegenden Stecker.
ES Cablear siguiendo el esquema de
la página 3 como guía. Conectar las bornas
al sensor.
PT Efectuar as ligações seguindo o
esquema na pág.3 como indicação. Ligar
os bornes ao sensor.
FR Raccorder les câbles au bornier
débrochable en respectant le schéma
de câblage page 3. Connecter le bornier
au détecteur.
IT Collegare il morsetto usando il
cablaggio indicato a pagina 3 come guida.
Connetti il morsetto al rilevatore.
NL Aders aansluiten in de
aansluitklem(men), gebruik het
bedradingsschema op pagina 3 als
richtlijn. Steek de aansluitklem(men) in
de detector.
RU Подключите провода в
контактный разъем, используя схему
соединений на стр. 3 в качестве
руководства. Подключите контактный
разъем к датчику.

6
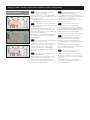
5EN Bend the springs up and push
detector through hole in ceiling. When fully
inserted the springs snap back to hold the
device in place.
To avoid injury, take care when
bending springs.
DE Federn nach oben biegen und
Detektor durch die Önung in der Decke
schieben. Sobald der Detektor vollständig
eingeschoben ist, schnappen die Federn
zurück und halten das Gerät fest an Ort
und Stelle.
Achten Sie auf die Spannfedern um
Verletzungen zu vermeiden
ES Doble los muelles hacia arriba
e introduzca el detector por el oricio
del techo. Cuando esté totalmente
introducido, los muelles saltan para
mantener el dispositivo en su lugar.
Doble los muelles con cuidado al
montar la unidad.
PT Dobre as molas para cima e empurre
detector através do furo no teto. Ao serem
totalmente inseridas as molas saltam de volta
para manter o dispositivo no lugar.
Para evitar ferimentos, tenha
cuidado quando manipule as molas.
FR Replier les ressorts vers le haut
et pousser le détecteur à travers le trou
dans le plafond. Quand les ressorts sont
complètement insérés, ils se remettent
dans leur position initiale pour maintenir le
dispositif en place.
Pour éviter toute blessure, faire
attention lors de la compression
des ressorts.
IT Piegare le molle verso l’alto e
inserire il rilevatore nel foro sul sotto.
Una volta inserito, le molle si riassestano
ssando il dispositivo in posizione.
per evitare infortuni, prestare
attenzione quando si piegano le
molle.
NL Buig de veren omhoog en duw het
apparaat door de sparing in het plafond.
Wanneer de veren volledig door de sparing
zijn klappen deze terug om het apparaat op
zijn plek te houden.
Om letsel te voorkomen, wees
voorzichtig met het buigen van de
veren.
RU Отведите пружины в верхнее
положение и вставьте датчик в
отверстие в потолке. После полного
погружения в отверстие пружины
вернутся в обратное положение для
фиксации устройства.
Во избежание травм, отводите
пружины с осторожностью.
Install detector | Melder installieren | Instalación del detector | Instalaçao do detector | Installer le détecteur |
Installazione del sensore | Installeer detector | Установка датчика
6EN Set up Lux & time out settings using
pot adjustments, before fully installing into
the ceiling cut out.
DE Richten Sie die Lichtstärke-
und Zeiteinstellungen mittels
Potentiometeranpassungen vor
der endgültigen Installation im
Deckenausschnitt ein.
ES Congure los ajustes Lux y Time out
(desconexión) usando los ajustes de potencia
antes de instalar completamente en el
encastre de techo.
PT Congure as denições de LUX e
Intervalo utilizando recetáculos ajustados,
antes da instalação no recorte do teto.
FR Dénissez les paramètres Lux et de
temporisation à l’aide des potentiomètres
d’ajustement, avant l’installation complète
dans la découpe du plafond.
IT Congurare le impostazioni Lux
e timeout utilizzando regolazioni del
potenziometro prima dell’installazione
completa nell’intaglio a sotto.
NL Lux en tijd instellen met
afstellingen potentiometers,
vóór complete installatie in de
plafonduitsparing.
RU Настройте параметры
Освещенности & Время отключения с
помощью настроек потенциометров,
прежде чем полностью установить в
вырез на потолке.
Adjust settings using pots | Anpassen der Einstellungen mittels Potentiometern | Congure los ajustes
usando potenciómetros | Ajuste das denições utilizando recipientes | Régler les paramètres à l’aide de
potentiomètres | Regolare le impostazioni utilizzando i potenziometri | Instellingen afstellen met
potentiometers | Настройте параметры с помощью потенциометров

7
Presence Detection
1
2
3
Testing | Prüfen | Pruebas | Teste | Test | Veriche | Testen | Тестирование
EN 1. Power up the sensor. The load
should come on immediately.
2. Vacate the room or remain very still and
wait for the load to switch o (this should take
less than 20 minutes).
3. Enter the room or make some movement
and check that the load switches on.
DE 1. Schließen Sie den Sensor an die
Stromversorgung an - das System sollte sich
sofort einschalten.
2. Verlassen Sie den Raum oder stehen Sie
ganz still, um zu prüfen, ob das System sich
ausschaltet (Dies erfolgt nach ca. 20Minuten
nach der letzten Erfassung).
3. Betreten Sie den Raum oder bewegen Sie
sich, um sicherzustellen, dass das System
sich einschaltet.
ES 1. Encienda el sensor: la carga debería
encenderse inmediatamente.
2. Salga de la habitación o permanezca muy
quieto y espere a que la carga se apague
(deberían requerirse menos de 20 min).
3. Entre en la habitación o realice algún
movimiento y compruebe que la carga se
enciende.
PT 1. Ligue o sensor - a carga deve ser
ativada imediatamente.
2. Desocupe a sala ou permaneça imóvel e
aguarde até a carga ser desativada
(isto deve levar menos de 20 minutos).
3. Entre na sala ou faça algum movimento e
verique se a carga é ativada.
FR 1. Alimenter le capteur: la charge
devrait s’allumer immédiatement.
2. Quitter la pièce ou rester immobile et
attendre que la charge s’éteigne (ceci devrait
prendre moins de 20 minutes).
3. Entrer dans la pièce ou bouger et vérier
que la charge s’allume.
IT 1. Accendi il sensore: il carico
dovrebbe attivarsi immediatamente.
2. Abbandona la stanza o cerca di restare il più
fermo possibile e attendi lo spegnimento del
carico (dovrebbe richiedere meno di 20 minuti).
3. Entra nella stanza o esegui qualche
movimento per vericare che il carico si attivi.
NL 1. Zet spanning op de sensor. De
ballast moet onmiddellijk inschakelen.
2. Verlaat de ruimte of zorg dat er geen
beweging is binnen de detectiezone en
wacht tot de ballast uitschakelt (dit duurt 20
minuten).
3. Ga de ruimte in of maak bewegingen
binnen de detectiezone en controleer of de
ballast wordt ingeschakeld.
RU 1. Включите датчик. Нагрузка
должна включиться немедленно.
2. Выйдите из комнаты или оставайтесь
на месте и подождите, пока нагрузка не
отключится (это должно занять не более
20 минут).
3. Войдите в комнату или сделайте
какое-нибудь движение и убедитесь, что
нагрузка включена.

8
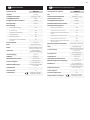
Compliance
IP rating
Insulation class
Material (casing)
Humidity
Working temperature range
Soware
Pollution
Type of action
Construction
Purpose
Time out range
Fans and ventilation equipment
Resistive heaters
LED lighting
Compact uorescent lighting
Fluorescent lighting
Incandescent lighting
Max load:
Terminal capacity
Power consumption parasitic
Supply frequency
Supply voltage AC
Weight
Part code
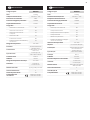
EN Technical Data
EMC-2014/30/EU,
LVD-2014/35/EU
40
2
Flame retardant ABS
and PC/ABS
5 to 95% non-
condensing
-10 to 35ºC
Class A
Degree 2
Type 1.B action
(micro disconnection)
Independent flush
mounted, electronic
control.
Sensing control
10s–30m
3A
8A
3A
3A
6A
8A
2.5mm²
260mW
50Hz
230 VAC +/- 10%
0.150kg
EBDSPIR
Eingehaltene normen
IP-schutzklasse
Isolationsklasse
Material (gehäuse)
Feuchtigkeit
Arbeitstemperaturbereich
Soware
Verschmutzung
Aktionsart
Bauweise
Zweck
Zeitüberschreitungsbereich
Induktiv/ventilatoren und
lüungssysteme
Widerstandsfähige heizungen
LED-beleuchtung
Kompakte neonbeleuchtung
Neonbeleuchtung
Glühlampen
Max. Last:
Leiterkapazität
Parasitäre stromverbrauch
Versorgungsfrequenz
Versorgungsspannung AC
Gewicht
Teile-code
DE Technische Daten
EMC-2014/30/EU,
LVD-2014/35/EU
40
2
Flammenhemmendes
ABS und PC/ABS
5 bis 95 % Luftfeuchtigkeit,
nicht kondensierend
-10 bis 35ºC
Klasse A
Abschluss 2
Aktion Typ 1.B
(Mikrotrennung)
Unabhängige
Unterputz-Elektronik
Sensorsteuerung
10s–30m
3A
8A
3A
3A
6A
8A
2.5mm²
260mW
50Hz
230 VAC +/- 10%
0.150kg
EBDSPIR

9
Conformidad con
normativas
Grado de protección IP
Clase de aislamiento
Material (carcasa)
Humedad
Rango de temperatura de trabajo
Soware
Contaminación
Tipo de acción
Construcción
Finalidad
Rango de tiempo fuera
Inductivo/equipo de ventilación y
ventiladores
Calentadores resistiva
Iluminación LED
Iluminación uorescente
compacta
Iluminación uorescente
Iluminación incandescente
Carga máx.:
Capacidad del terminal
Consumo energético parasitaria
Frecuencia de suministro
Voltaje de entrada de CA
Peso
Código de pieza
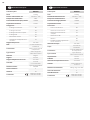
ES Datos Técnicos PT Dados Técnicos
Compatibilidade
Classicação IP
Classe de isolamento
Material (caixa)
Umidade
Faixa de temperatura de trabalho
Soware
Poluição
Tipo de ação
Construção
Objetivo
Intervalo de tempo limite
Iindutivo/ventiladores e equipa-
mentos de ventilação
Resistivas aquecedores
Lâmpada de LED
Lâmpada uorescente compacta
Lâmpada uorescente
Iluminação incandescente
Carga max.:
Capacidade do terminal
Consumo de energia parasitária
Freqüência de fornecimento
Tensão de alimentação CA
Peso
Código da peça
EMC-2014/30/EU,
LVD-2014/35/EU
40
2
Ignífugo ABS y PC/ABS
5 a 95 % sin
condensación
-10 a 35ºC
Clase A
Grado 2
Acción tipo 1.B
(micro desconexión)
Montado al ras
independiente, control
electrónico
Control de detección
10s–30m
3A
8A
3A
3A
6A
8A
2.5mm²
260mW
50Hz
230 VAC +/- 10%
0.150kg
EBDSPIR
EMC-2014/30/EU,
LVD-2014/35/EU
40
2
Retardante de chamas
ABS e PC/ABS
5 a 95% sem
condensação
-10 a 35ºC
Classe A
Grau 2
Ação do tipo 1.B
(micro desconexão)
Independente montado,
controle eletrônico
Controle de detecção
10s–30m
3A
8A
3A
3A
6A
8A
2.5mm²
260mW
50Hz
230 VAC +/- 10%
0.150kg
EBDSPIR

10
FR Données Techniques
Conformité
Indice IP
Classe d’isolation
Matériau (boîtier)
Humidité
Plage de température de travail
Logiciel
Pollution
Type d’action
Construction
Rôle
Plage de temps mort
Ventilateurs et équipements de
ventilation
Réchaueurs résistif
Éclairage LED
Éclairage uorescent compact
Éclairage uorescent
Éclairage incandescent
Charge max.:
Capacité des terminaux
Consommation électrique parasite
Fréquence d’alimentation
Tension d’alimentation CA
Poids
Code de la pièce
IT Speciche Tecnichev
Conformità
Classicazione IP
Classe di isolamento
Materiale (rivestimento)
Umidità
Intervallo di temperatura di lavoro
Soware
Inquinamento
Tipo di azione
Costruzione
Scopo
Intervallo di tempo
Induttivo/ventole e apparecchia-
ture di ventilazione
Resistivo
Illuminazione LED
Illuminazione uorescente
compatta
Illuminazione uorescente
Luce a incandescenza
Carico max:
Capacità del morsetto
Consumo di energia parassita
Frequenza di alimentazione
Tensione di alimentazione CA
Peso
Codice parte
EMC-2014/30/EU,
LVD-2014/35/EU
40
2
Agent Ignifuge ABS et
PC/ABS
5 à 95 %
noncondensable
-10 à 35ºC
Classe A
Degré 2
Action de type 1.B
(micro déconnexion)
Commande
électronique encastrée
indépendante
Contrôle de détection
10s–30m
3A
8A
3A
3A
6A
8A
2.5mm²
260mW
50Hz
230 VAC +/- 10%
0.150kg
EBDSPIR
EMC-2014/30/EU,
LVD-2014/35/EU
40
2
ABS ignifugo e PC/ABS
Dal 5 al 95% senza
condensa
-10 al 35ºC
Classe A
Grado 2
Tipo 1.B azione
(micro disconnessione)
Controllo elettronico a
filo indipendente
Controllo del
rilevamento
10s–30m
3A
8A
3A
3A
6A
8A
2.5mm²
260mW
50Hz
230 VAC +/- 10%
0.150kg
EBDSPIR

11
Conformiteit
IP classicatie
Isolatieklasse
Materiaal (behuizing)
Luchtvochtigheid
Werktemperatuurbereik
Soware
Verontreiniging
Type actie
Bouw
Doel
Time-outbereik
Ventilatoren en ventilatieap-
paratuur
Resistent kachels
LED verlichting
Compacte tl-verlichting
Tl-verlichting
Gloeilampverlichting
Max belasting
Eindcapaciteit
Energieverbruik in ruststand
Voedingsfrequentie
Voedingsspanning AC
Gewicht
Onderdeelcode
NL Technische data
Нормативные стандарты
Степень защиты (IP)
Класс защиты
Материал (корпус)
Влажность
Диапазон рабочих температур
Программное обеспечение
загрязнение
Тип действия
строительство
Цель
Диапазон времени ожидания
Вентиляторы и вентиляционное
оборудование
Резистивные нагреватели
Светодиодные светильники
Компактные люминесцентные
лампы
Люминесцентные лампы
Лампы накаливания
Максимальная нагрузка:
Клеммы подключения кабеля
Потребляемая мощность
Номинальная частота
Номинальное напряжение
Вес
Наименование изделия
RU Технические характеристики
EMC-2014/30/EU,
LVD-2014/35/EU
40
2
Brandvertragend ABS
en PC/ABS
5 tot 95%, niet
condenserend
-10 tot 35ºC
Klasse A
Graad 2
Type 1.B-actie
(micro-ontkoppeling)
Onafhankelijke inbouw,
elektronische besturing
Detectiecontrole
10s–30m
3A
8A
3A
3A
6A
8A
2.5mm²
260mW
50Hz
230 VAC +/- 10%
0.150kg
EBDSPIR
EMC-2014/30/EU,
LVD-2014/35/EU
40
2
Огнестойкие пластик
АБС и ПК/АБС
от 5 до 95% без
конденсации влаги
от -10 до 35ºC
Класс A
Степень 2
Тип 1.B действие
(микроразрыв)
Независимый скрытый
монтаж, электронное
управление
Зондирование
10 секунд до 30 минут
3A
8A
3A
3A
6A
8A
2.5mm²
260mW
50 Гц
230 В AC +/- 10%
0.150кг
EBDSPIR

12
WD101 Issue 10 Installation Guide, EBDSPIR
CP Electronics
Brent Crescent, London NW10 7XR
t. +44 (0)333 900 0671
enquir[email protected]
www.cpelectronics.co.uk connect with us
Due to our policy of continual product improvement CP Electronics reserves the right to alter the specication of this product without prior notice.
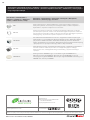
Part Number | Artikelnummer |
Referencia | Referéncia | Référence |
Codice | Artikelnummer | Номер
Description | Beschreibung | Descripción | Descripção | Description |
Descrizione | Omschrijving | Описание
DBB Surface mounting box | Deckenauaudose | Caja para montaje en supercie |
Caixa para supercie | Accessoire pour montage en saillie | Scatola a supercie |
Opbouwdoos | Коробка поверхностного монтажа
DBB-EXT
Surface mount back box extender | Erweiterung für Deckenauaudose | Extensión
para montaje en supercie | Extensor de caixa de montagem em superfície | Extension
d’accessoire pour montage en saillie | Estensore per scatola per montaggio a supercie |
Verhogingsring | Удлинитель коробки поверхностного монтажа
EBD-ENCIP1
Pre-drilled 64mm hole IP65 detector enclosure | Vorgebohrtes 64mm-Aussparung für
den IP 65 Sensor | Carcasa IP65 para detectores diámetro 64 mm | Boîtier étanche IP65
pré-percé d’un diamètre de 64mm | Boîtier étanche IP65 pré-percé d’un diamètre de
64mm | Scatola IP65 con foro di 64mm | IP65 behuizing met voorgeboorde 64mm sparing
| Предварительно просверленный корпус IP65 с отверстием 64 мм
EXD-HSC
Extended wiring housing | Erweiterter Verdrahtungsraum | Ampliación de alojamiento
de cables | Extensor adicional para cabos | Enveloppe allongée pour câblage |
Estensore per i cavi | Verlengde behuizing voor bedrading | Удлиненный корпус
проводки
EBDSPIR-MS
Masking shields for EBDSPIR range | Linsenabdeckung für die EBDSPIR Serie |
Obturadores para la gama EBDSPIR | Máscaras para a gama EBDSPIR | Ecrans de
masquage pour la gamme EBDSPIR | Maschere per la gamma EBDSPIR | Maskering voor
EBDSPIR serie | Маски для EBDSPIR
Accessories & associated products | Zubehör | Accesorios y productos asociados | Acessórios e productos
associados | Accessoires et produits associés | Accessori e prodotti associati | Toebehoren | Аксессуары и
сопутствующие товары
-
 1
1
-
 2
2
-
 3
3
-
 4
4
-
 5
5
-
 6
6
-
 7
7
-
 8
8
-
 9
9
-
 10
10
-
 11
11
-
 12
12


CP Electronics EBDSPIR Ceiling Mounted PIR Presence Detectors Guia de instalação
- Categoria
- Detectores de movimento
- Tipo
- Guia de instalação
em outras línguas
- español: CP Electronics EBDSPIR Ceiling Mounted PIR Presence Detectors Guía de instalación
- français: CP Electronics EBDSPIR Ceiling Mounted PIR Presence Detectors Guide d'installation
- italiano: CP Electronics EBDSPIR Ceiling Mounted PIR Presence Detectors Guida d'installazione
- English: CP Electronics EBDSPIR Ceiling Mounted PIR Presence Detectors Installation guide
- русский: CP Electronics EBDSPIR Ceiling Mounted PIR Presence Detectors Инструкция по установке
- Nederlands: CP Electronics EBDSPIR Ceiling Mounted PIR Presence Detectors Installatie gids
- Deutsch: CP Electronics EBDSPIR Ceiling Mounted PIR Presence Detectors Installationsanleitung